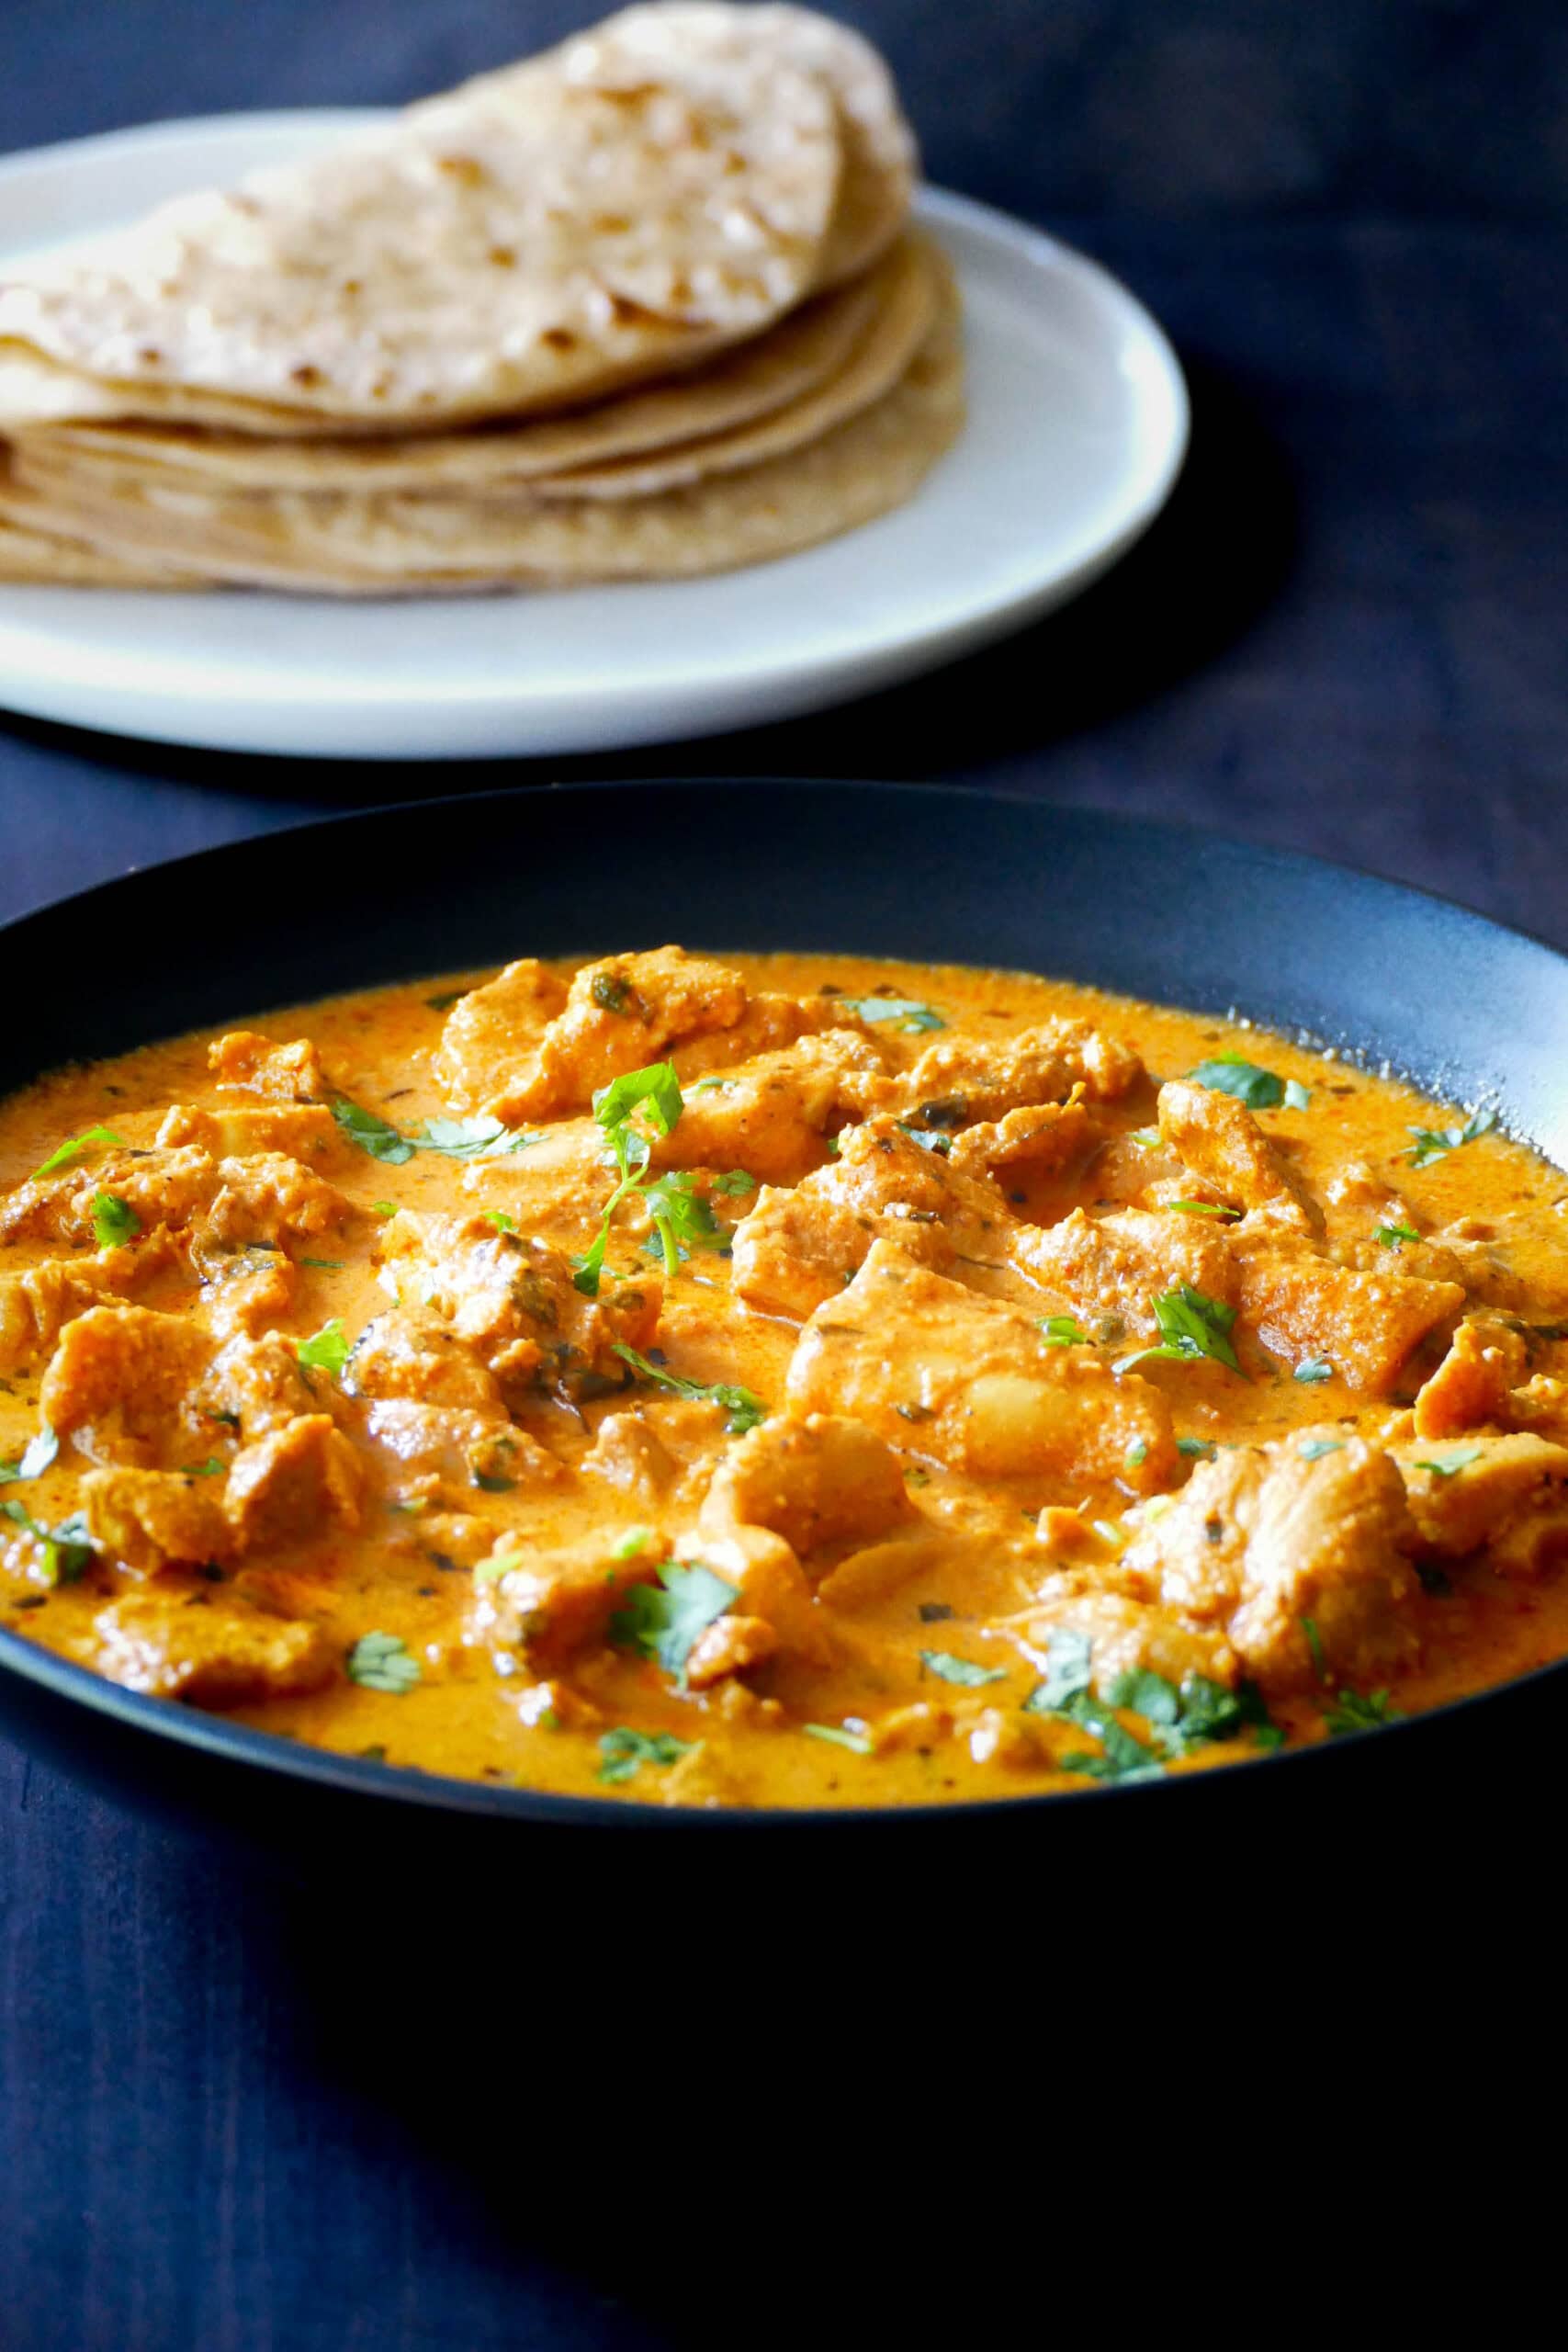
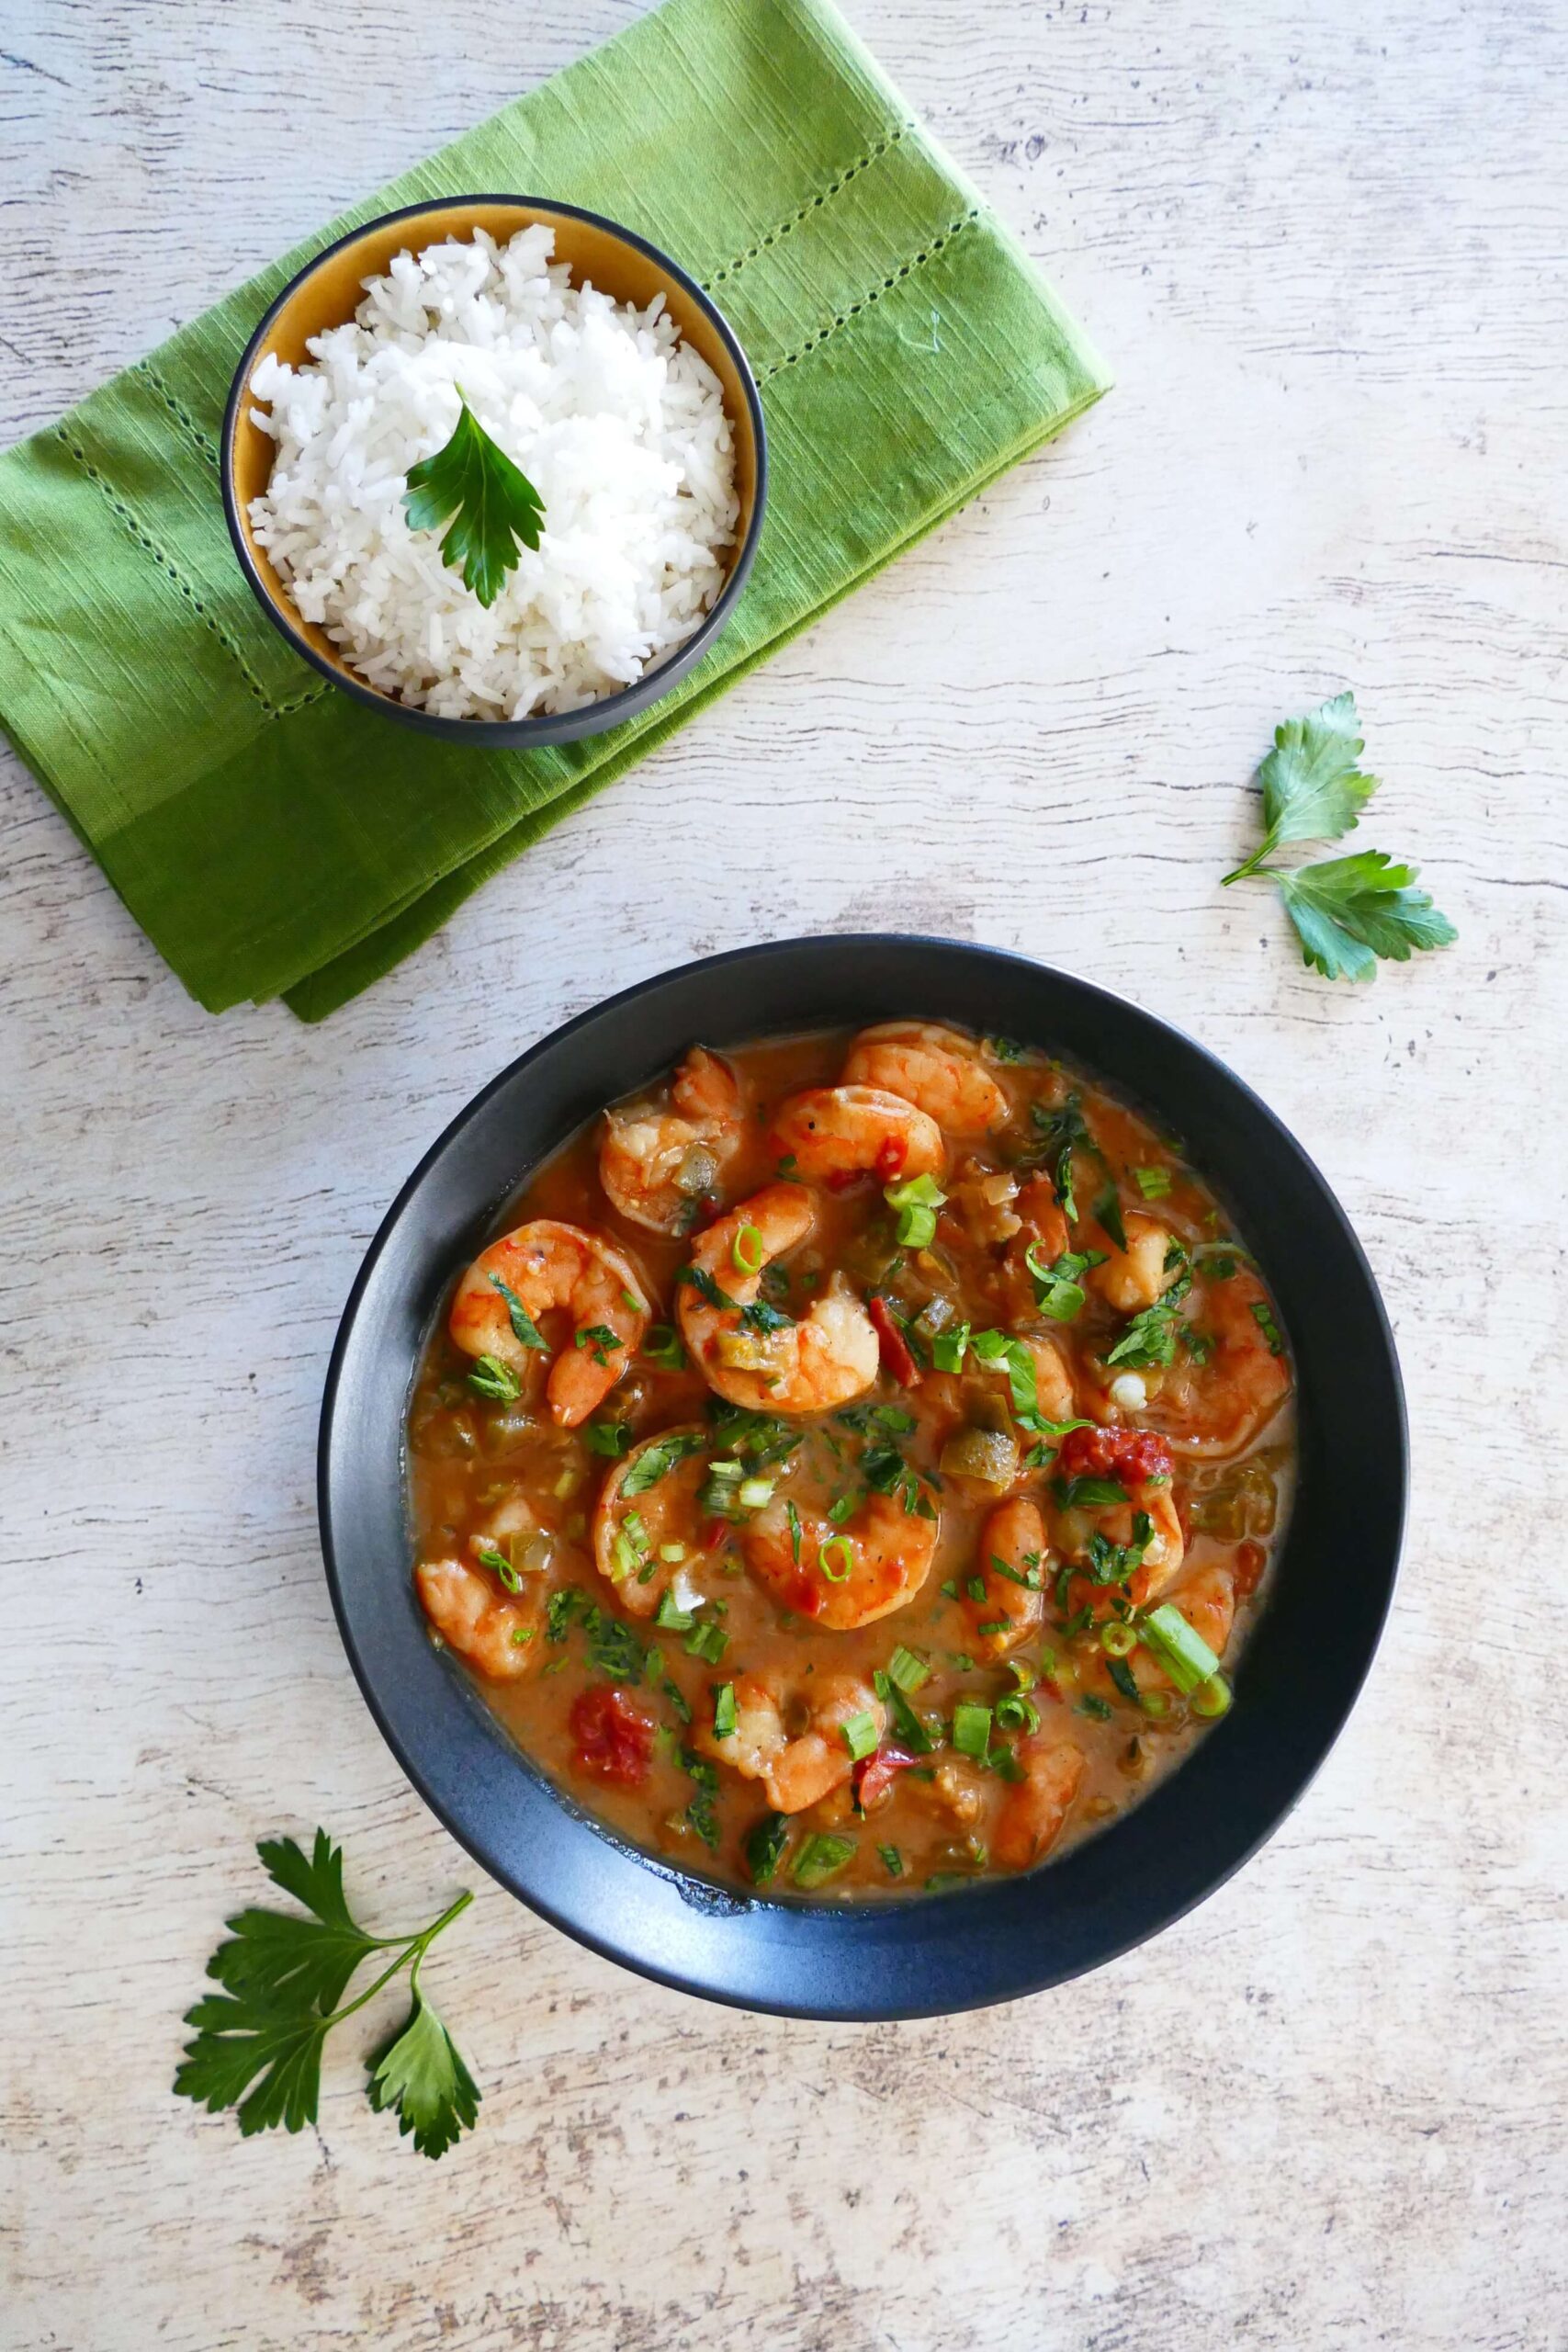
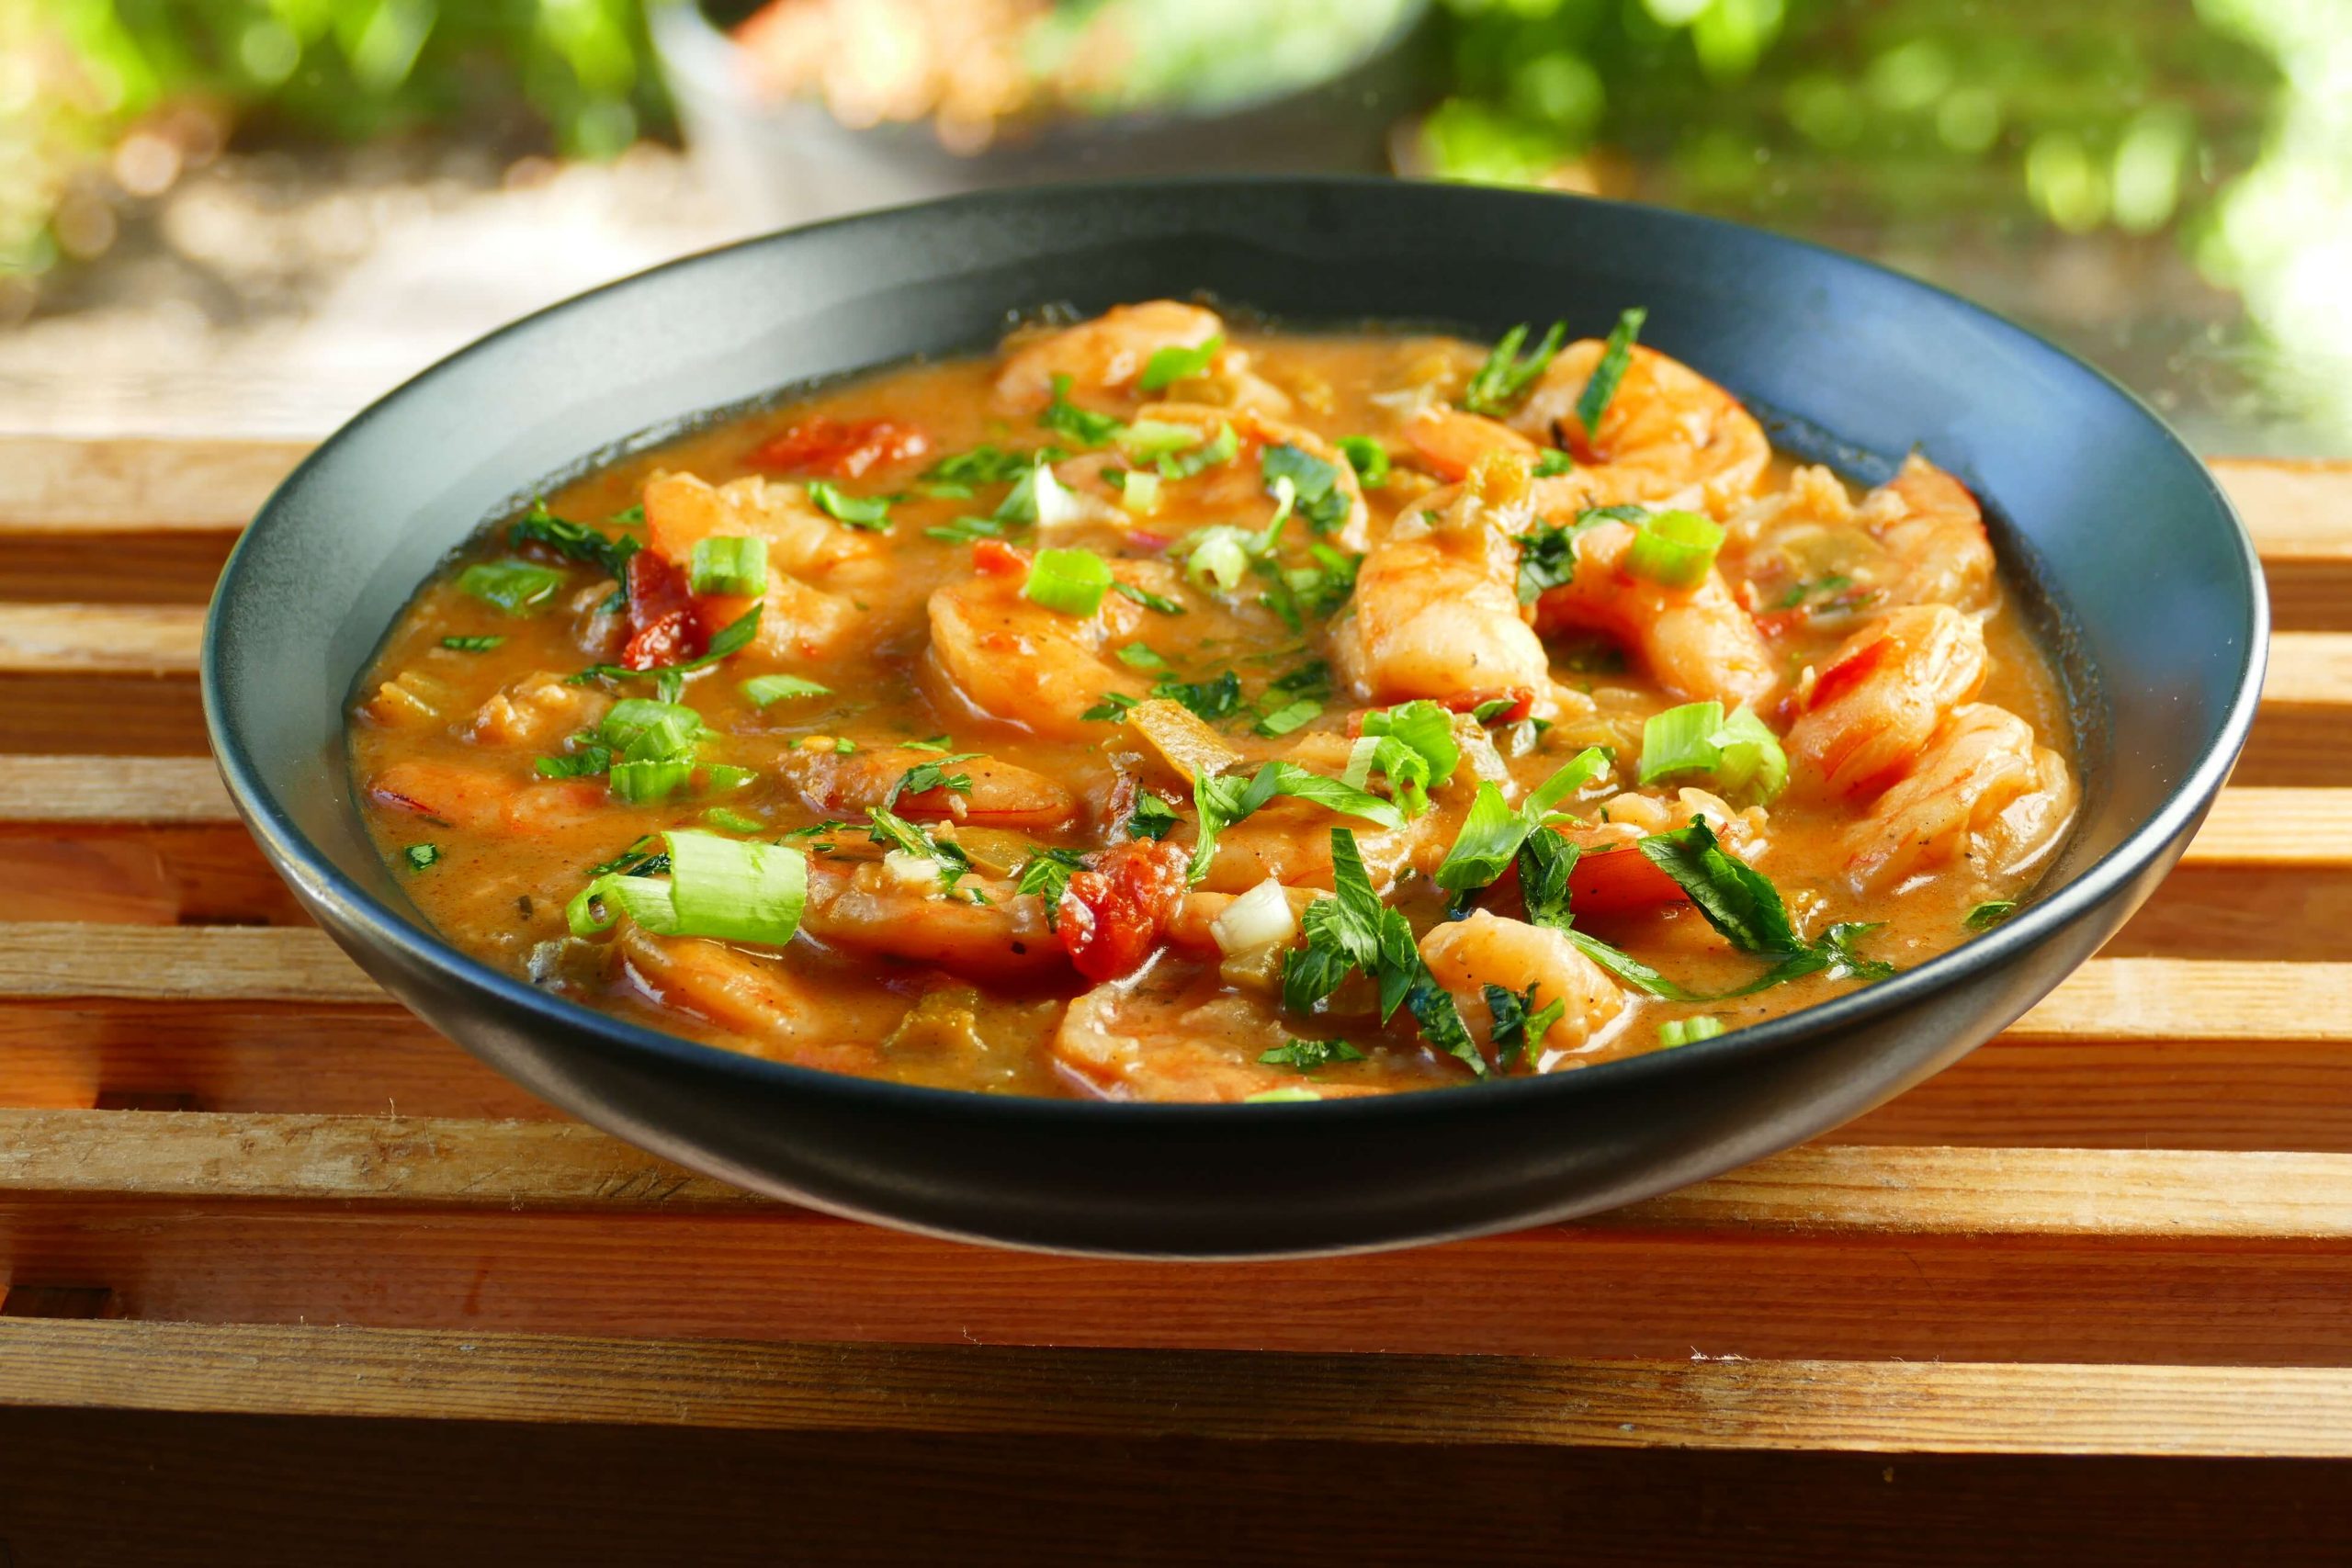
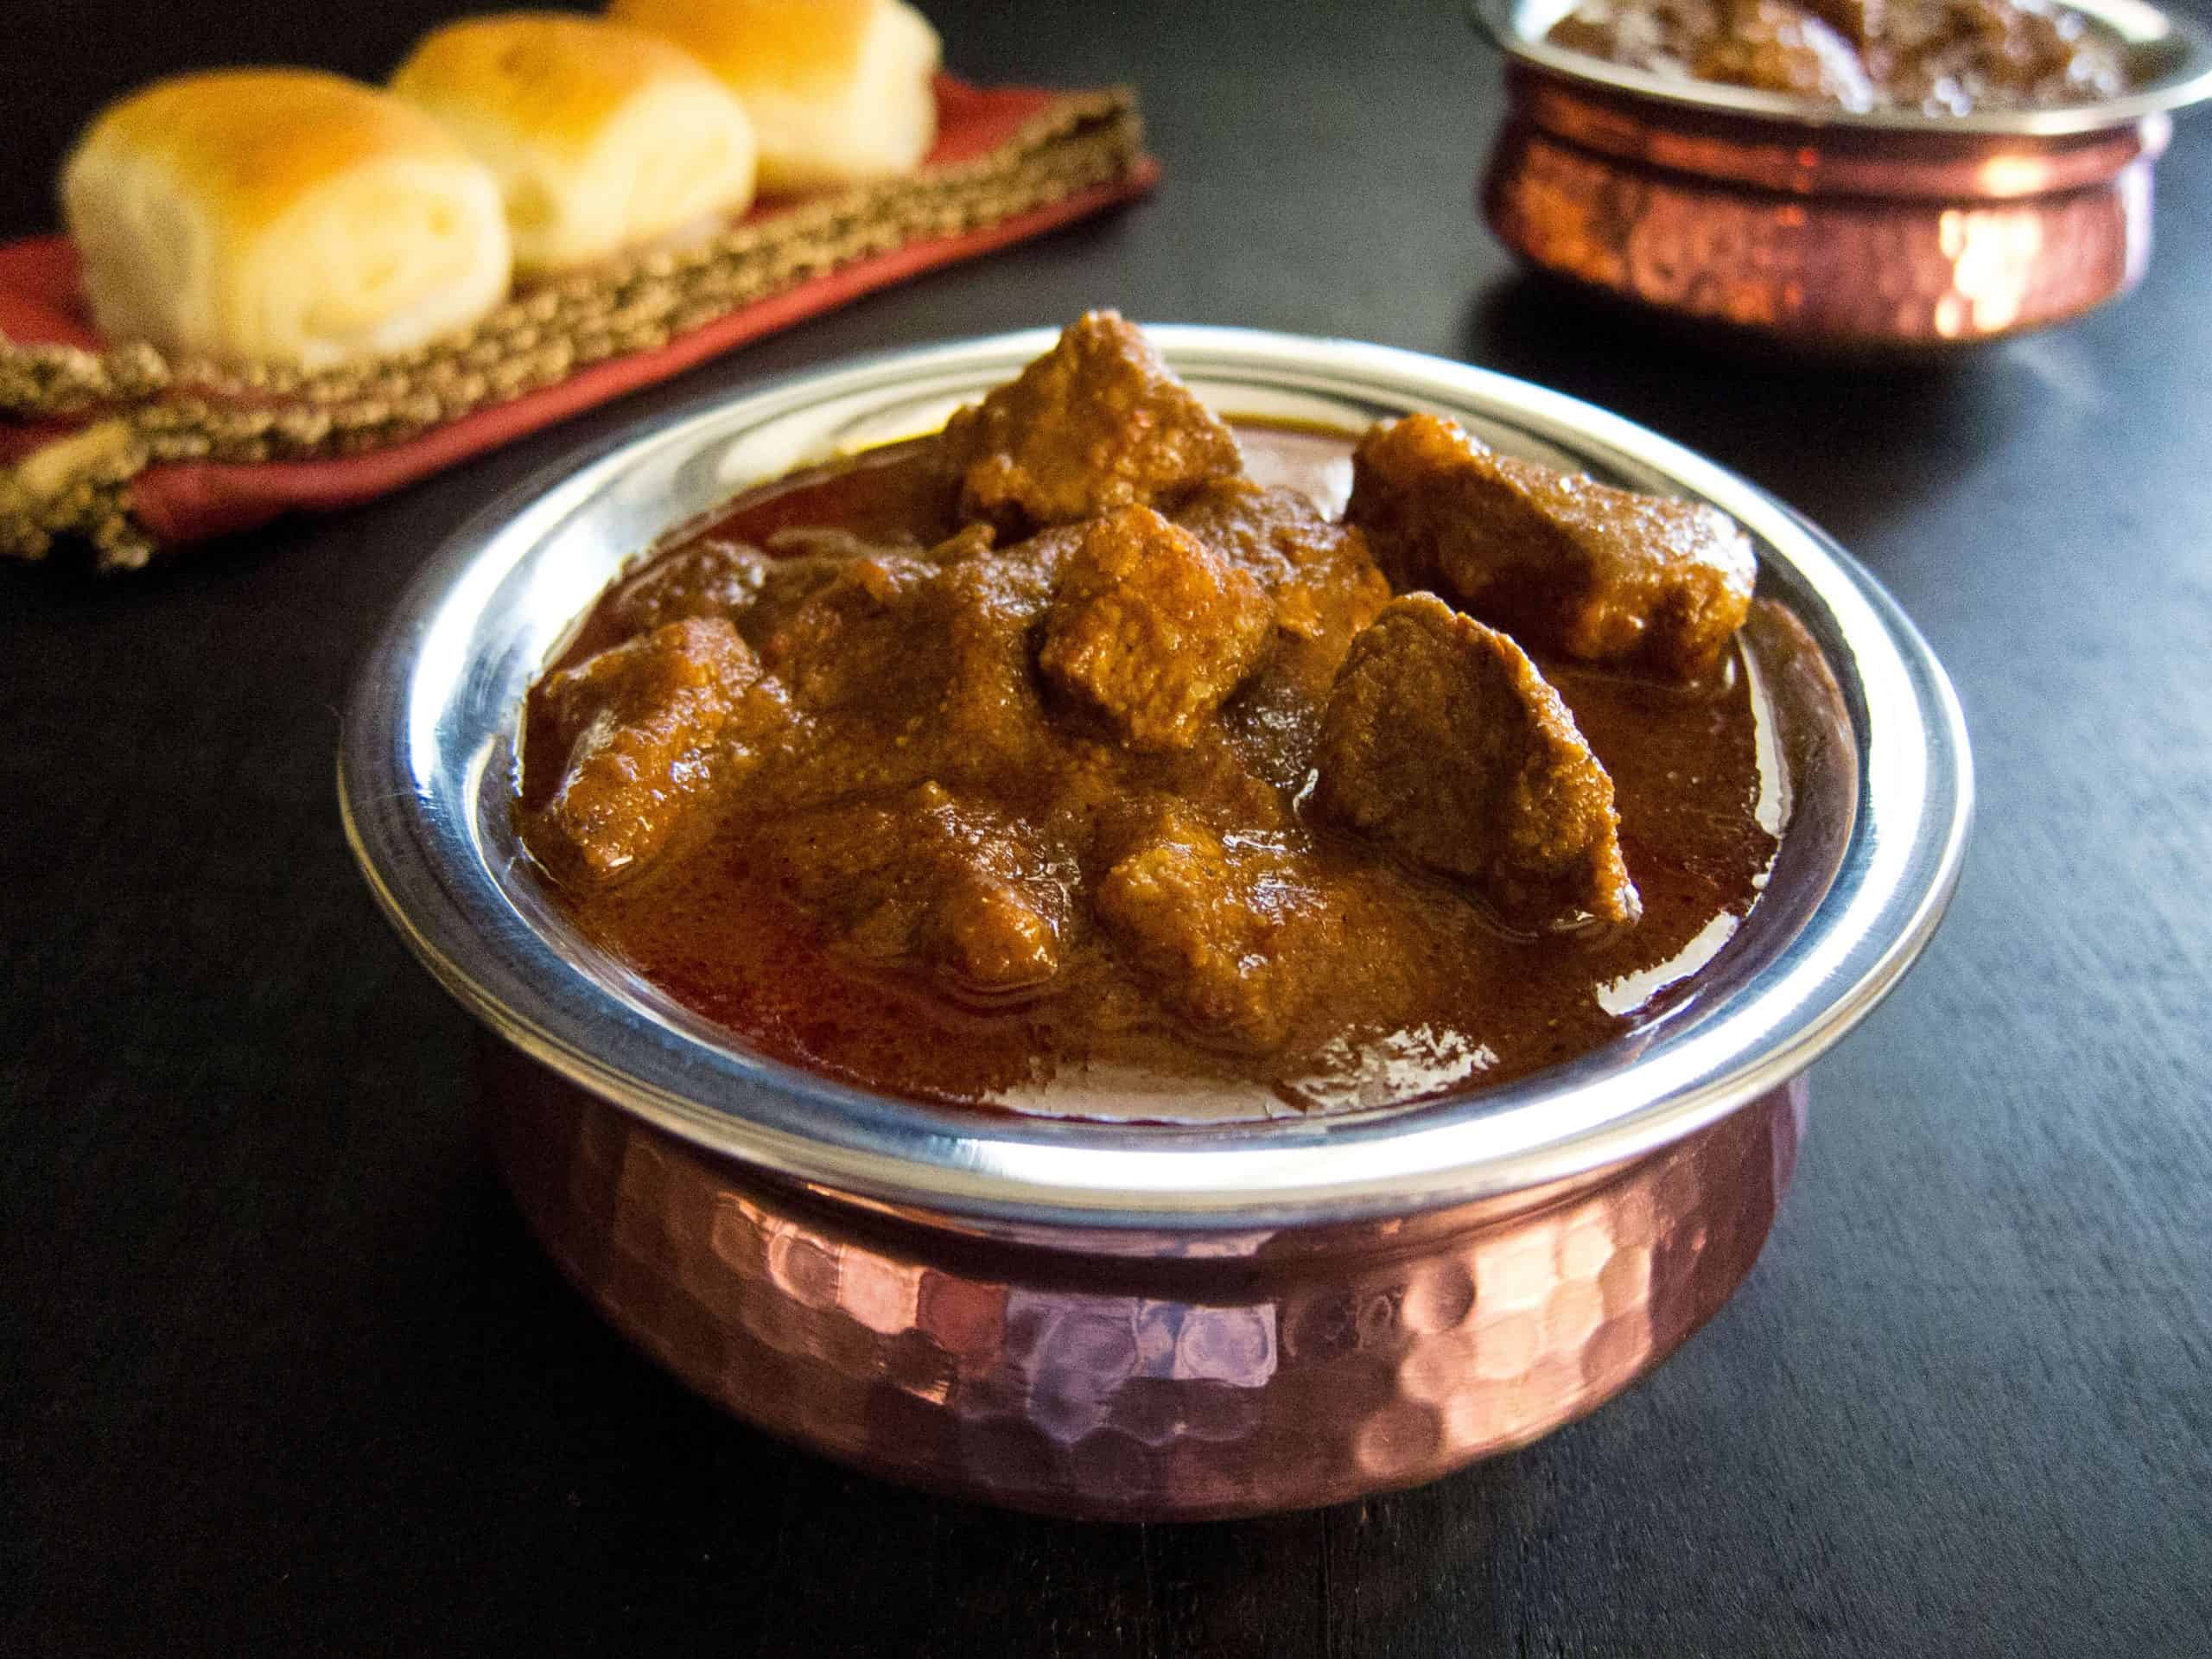
This Instant Pot Shrimp Étouffée is a classic New Orleans recipe made with Creole spices and plenty of shrimp in a spicy tomato-based sauce. The rich and delicious stew tastes great over rice. Although this easy shrimp étoufféé recipe is perfect for a special occasion like Mardi Gras, it also makes regular weeknight meals extra special. [Stovetop instructions also included.]
[This recipe was modified in January 2020 to provide stovetop instructions.]
This post contains affiliate links. As an Amazon Associate, I earn from qualifying purchases. Please read the disclosure.
Table of Contents
Introduction
Shrimp Étouffée (pronounced ‘eh-too-fay’) is one of the more popular dishes from Louisiana, along with gumbo, jambalaya, red beans and rice, and shrimp creole.
What is étouffée? The meaning of étouffée as translated from French is “smothered”. Smothering is a cooking technique used in both Cajun and Creole cuisines of Louisiana where food is cooked in a covered pan over low heat without a lot of liquid.
Étouffée is a traditional Louisiana recipe made with shellfish and is served over rice. Étouffée is most commonly made with crawfish or shrimp.
Since shrimp is more easily available, that’s what I’ve used for this recipe. I always keep a bag of frozen shrimp in my freezer so I don’t have to run out to the store at the last minute when I want to make a quick dinner entree!
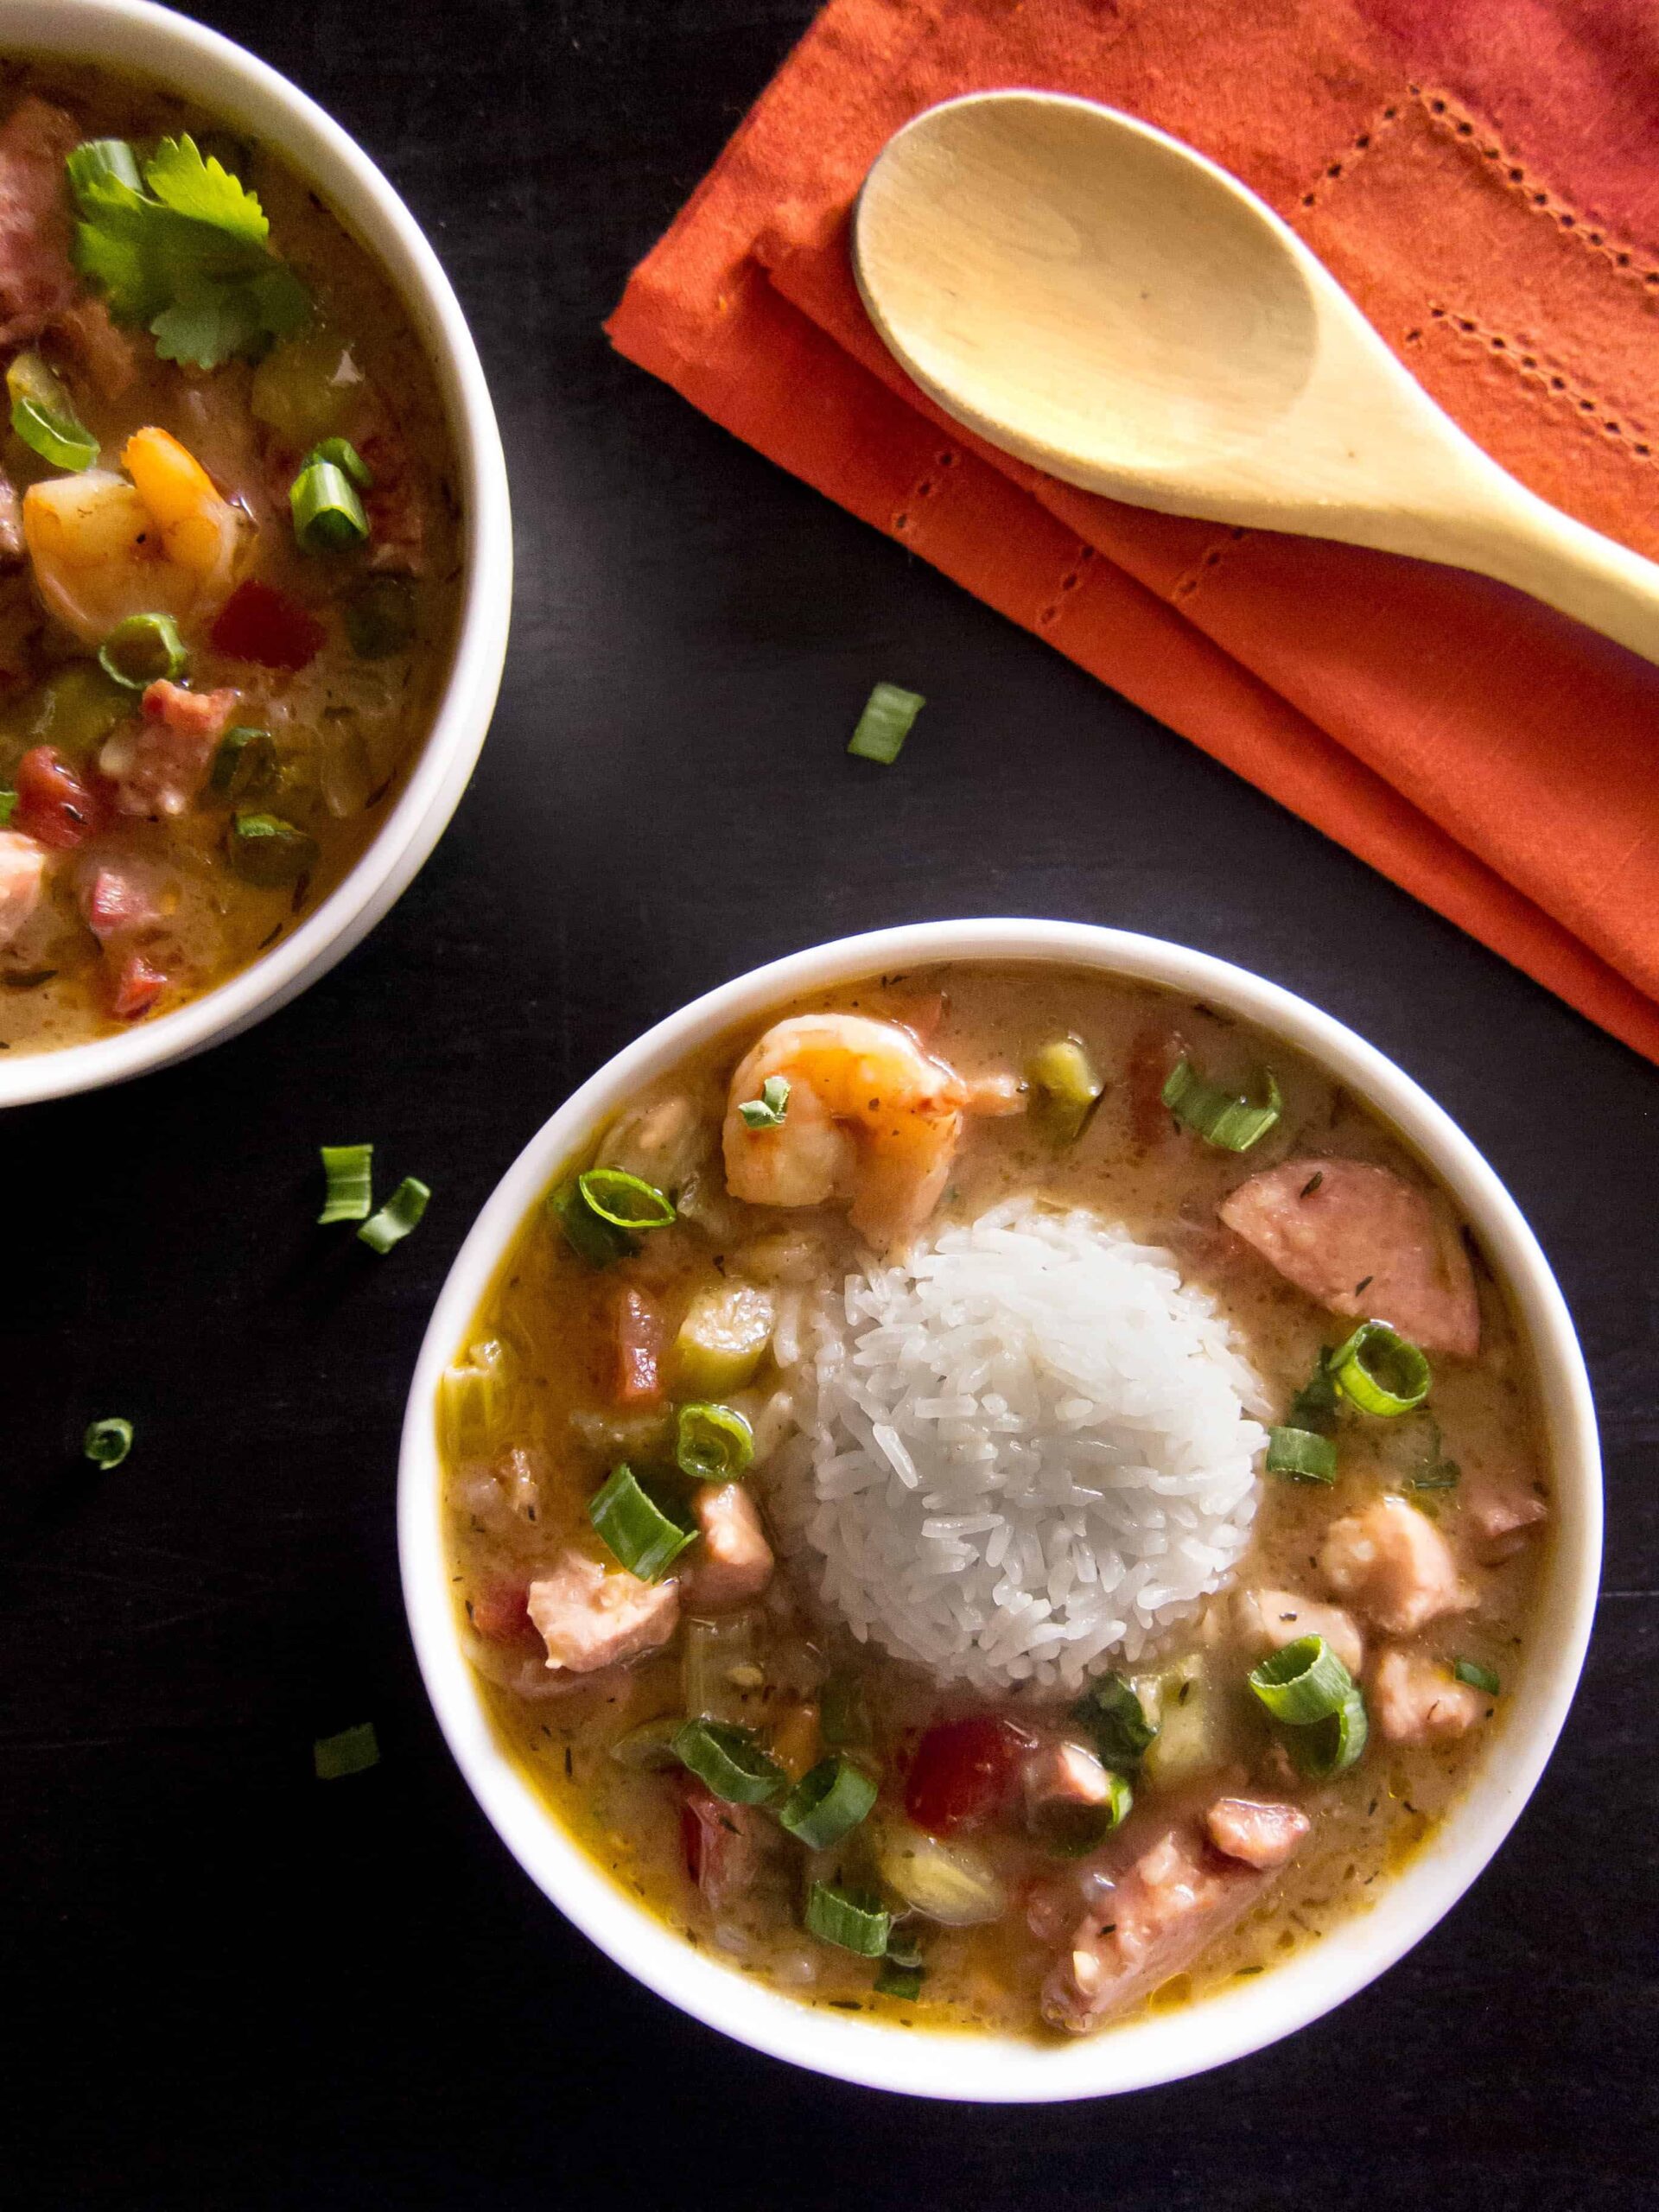
Instant Pot Shrimp Étouffée is quite similar to Instant Pot Gumbo, but there are a few differences.
- This étouffée is made with shrimp whereas the Instant Pot Gumbo has shrimp, sausage and chicken.
- This Louisiana Étouffée is made with a blonde roux (pronounced roo and is flour and oil/butter cooked together) compared to the dark roux in the gumbo. This changes the taste of the sauce and reduces the cooking time!
- I use olive oil and flour for the gumbo roux but for the étouffée roux, I use butter and flour. The gumbo recipe also has okra for thickening.
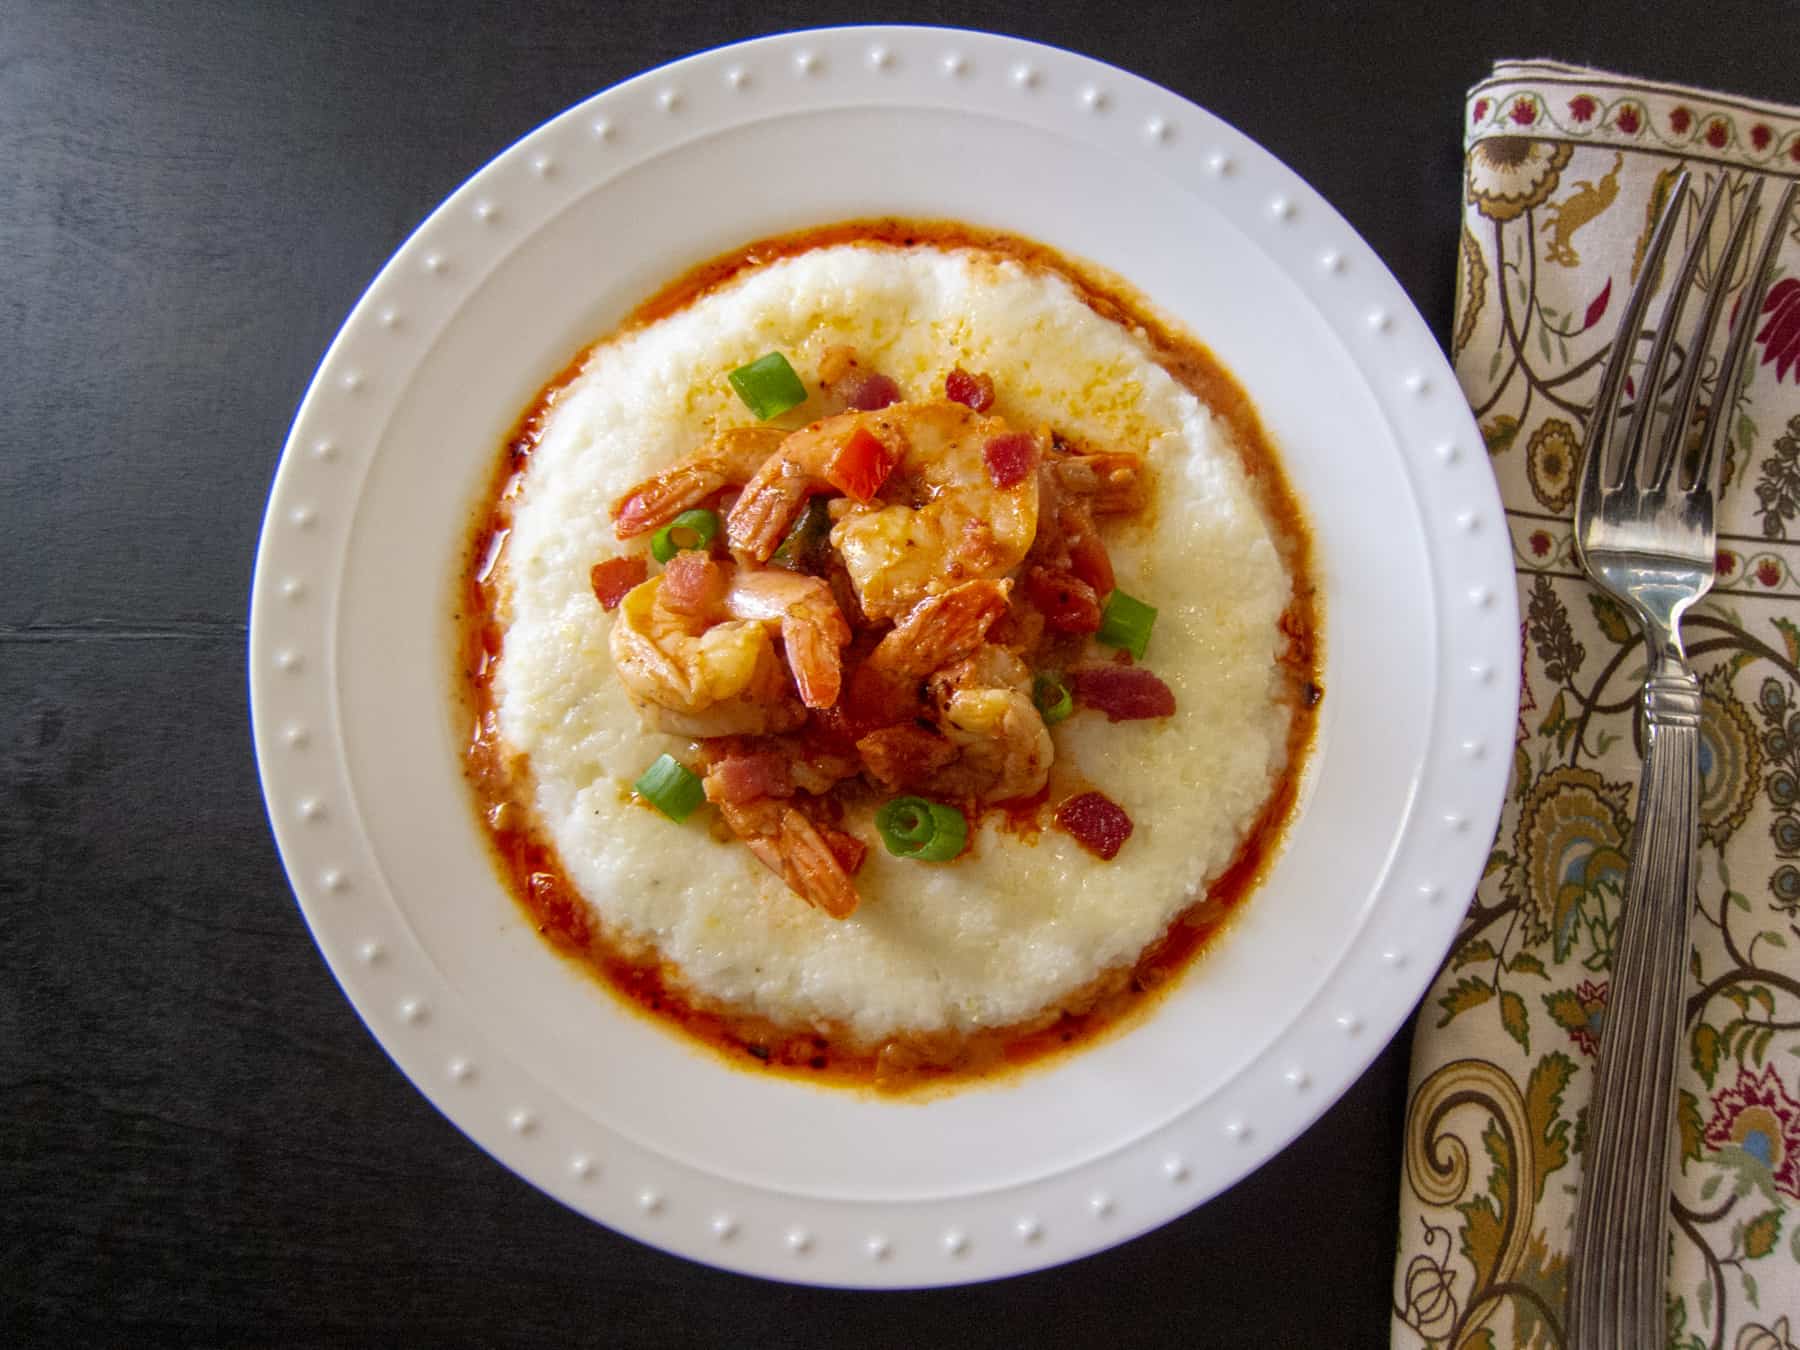
➡ Looking for more shrimp recipes? Try my Instant Pot shrimp and grits or garlic shrimp pasta. And don’t use chicken broth for seafood recipes. Put those shrimp shells to use and make this seafood stock!
Tips and Substitutions
Tomatoes
Some people prefer shrimp étouffée without tomatoes. I have made this same étouffée recipe without tomatoes but my family likes the version with tomatoes and that’s what I’m sharing with you here. You can omit the tomatoes if you wish. The result is a paler and milder dish.
I use fresh tomatoes, but you can substitute canned diced tomatoes.
Occasionally, I add in a tablespoon of tomato puree with the tomatoes to give the dish more of a tomato flavor. Don’t stir the puree in, just add it on top of the étouffée sauce before pressure cooking.
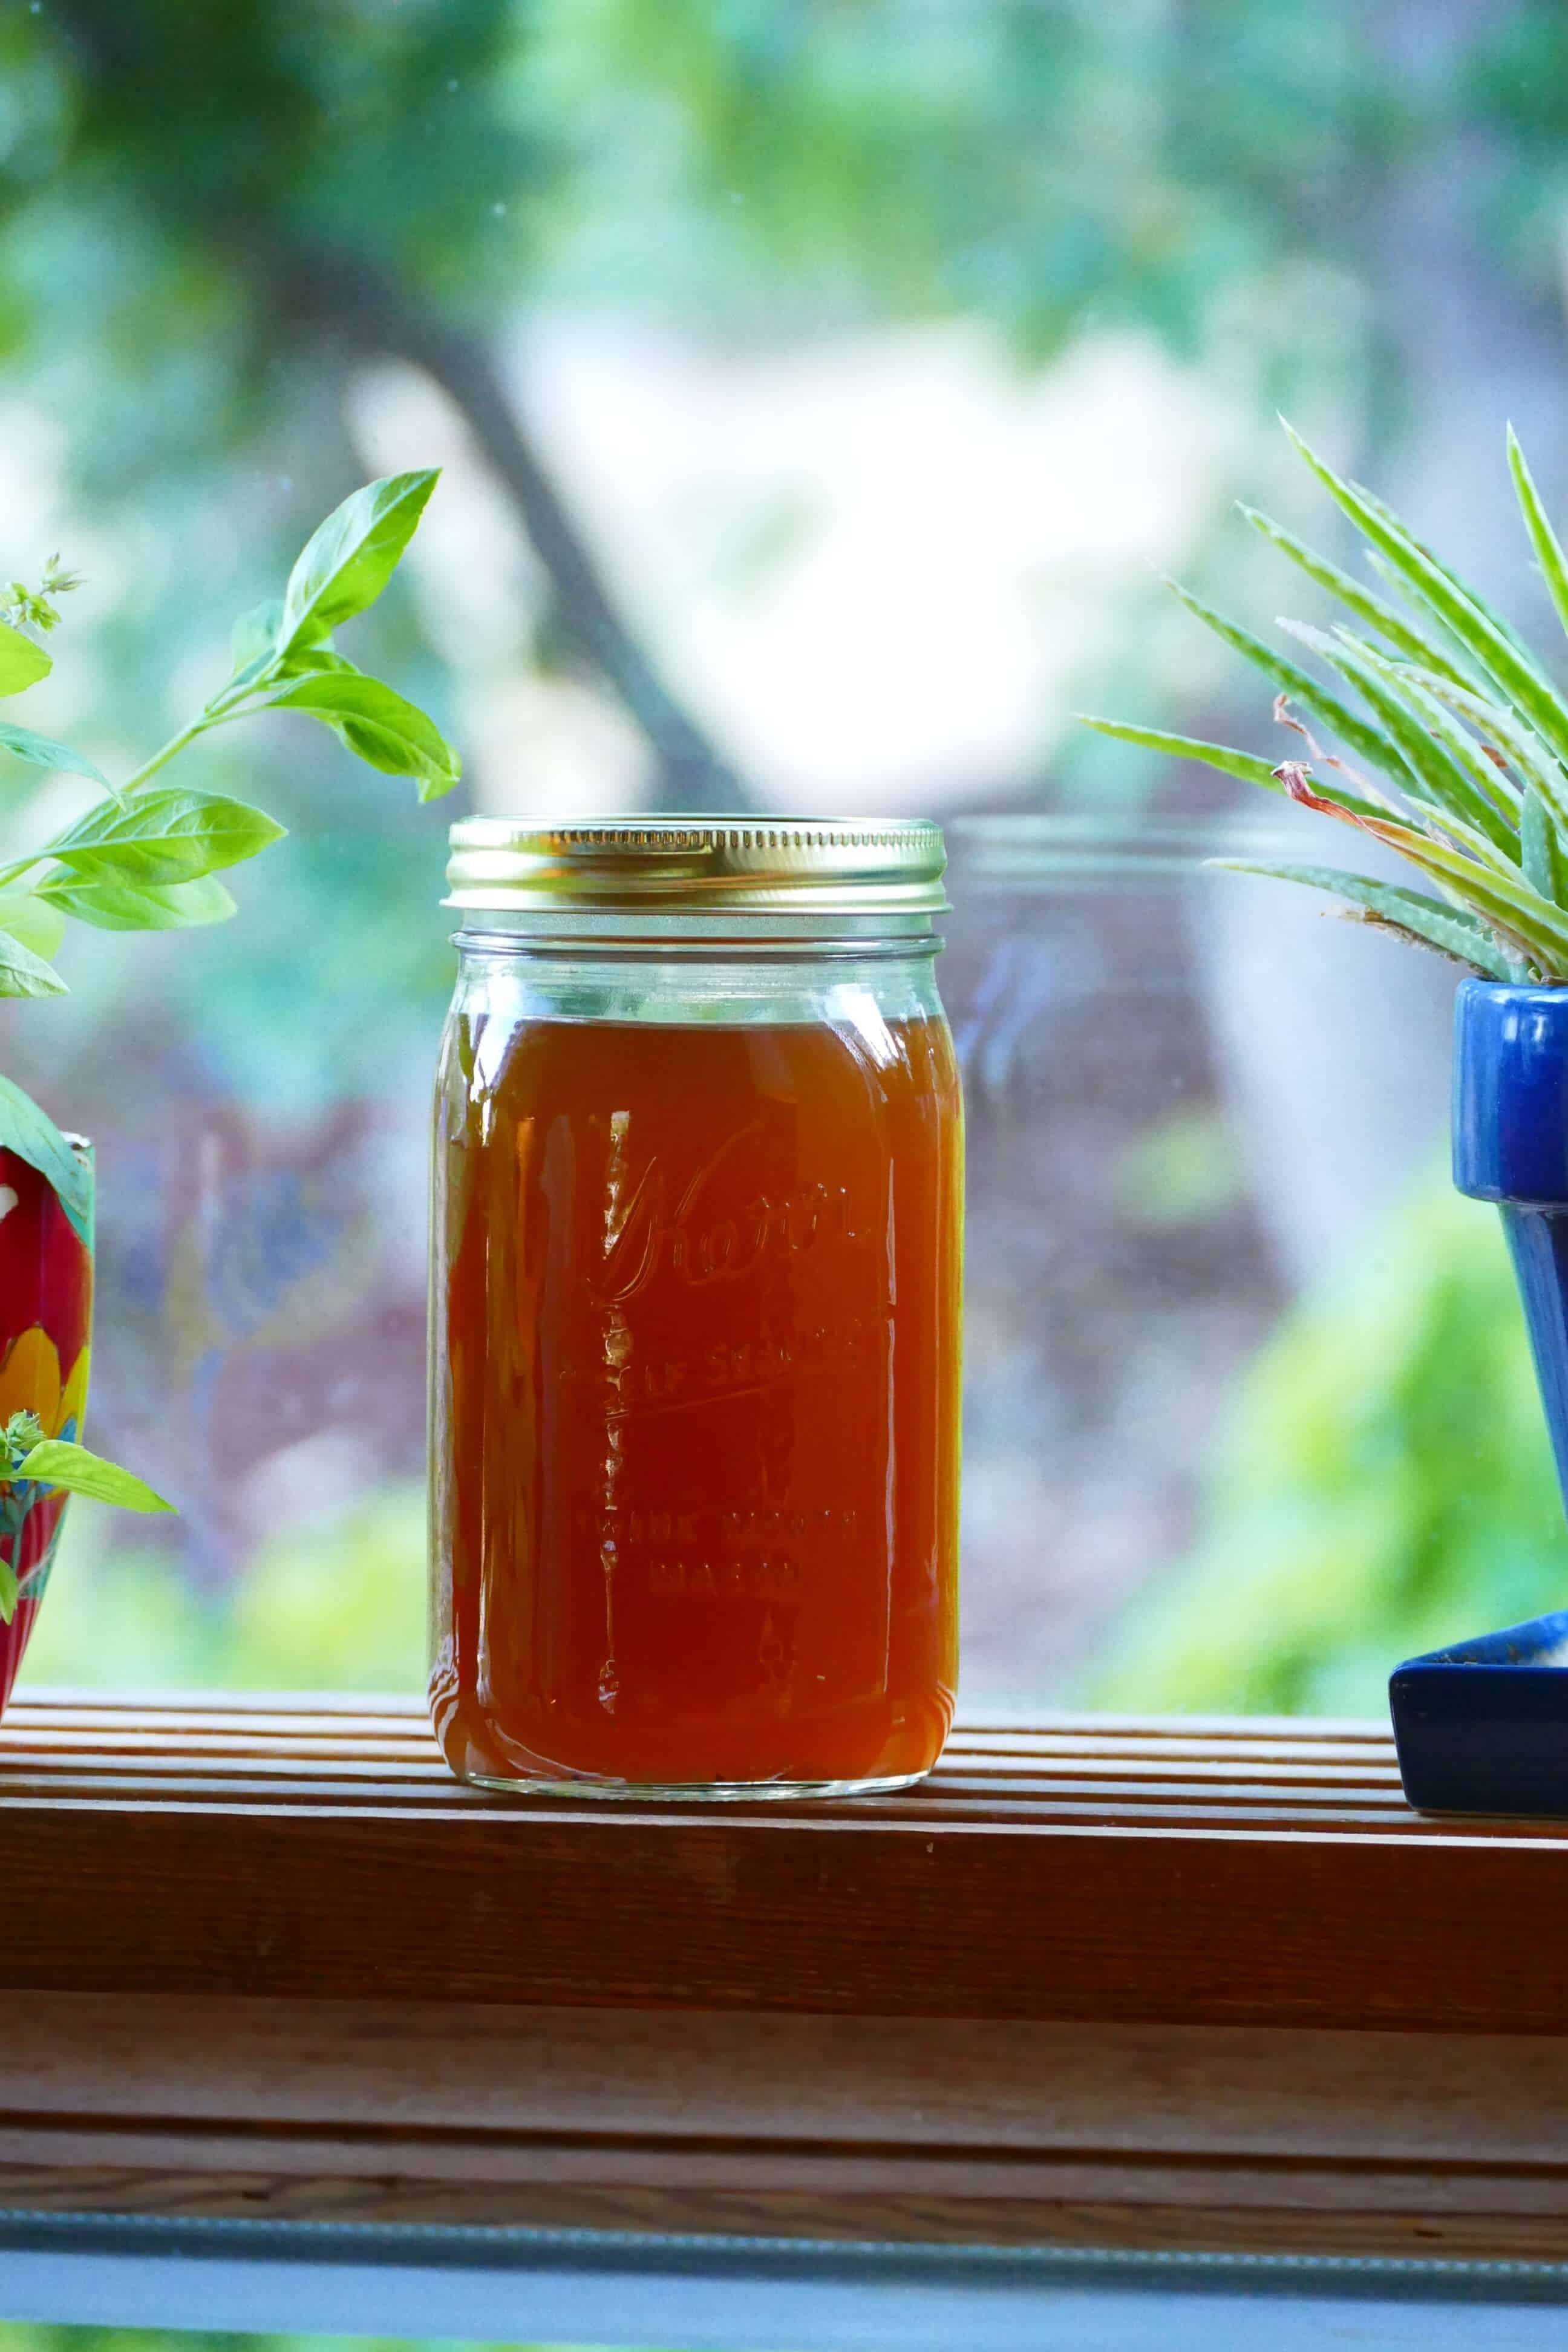
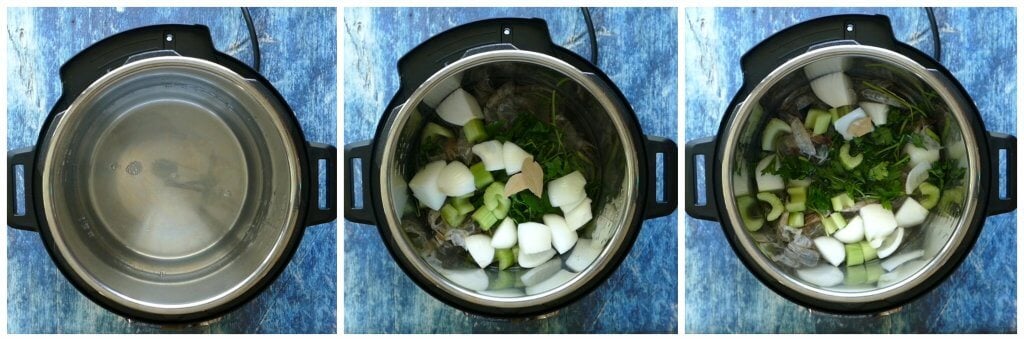
Seafood Stock
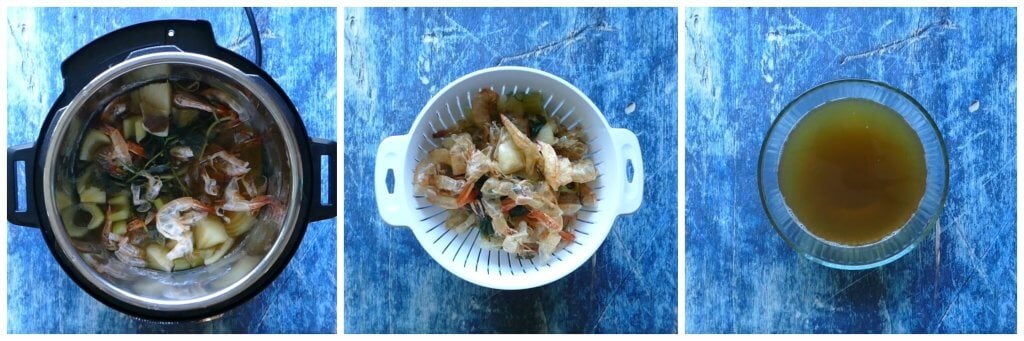
I prefer to use seafood stock because I’ve noticed a taste difference if I use chicken broth. It’s really easy to make homemade seafood stock; you can even make it ahead of time. Just peel the shrimp and toss the shrimp peels and some aromatics in the Instant Pot and go about your business! Some of my reader use the shrimp heads too, so feel free to do that. Strain and store in the fridge (up to a couple of days) until ready to use.
Étouffée Roux
So, what is roux? Roux is a thickener made with oil/butter and flour. The fat and flour are cooked together till the flour loses its raw taste and the mixture turns color.
The color of roux for étouffée is lighter than the roux you would make for gumbo – a blonde roux rather than a dark roux. That means that the roux takes much less time to make for this étouffée. If you prefer the stronger flavor of dark roux, you can cook it for longer. Just make sure it doesn’t burn!
Creole Seasoning
Tony Chacheres Creole seasoning is terrific and I use it in all my Cajun and Creole dishes. If you have another favorite, feel free to substitute.
Spiciness
Finish with a dash of tabasco sauce if you want to add more spice to the dish.
How to Serve
You can serve the shrimp étouffée over rice, pasta or even grits.
Crawfish Étouffée or Chicken Etouffee
You can substitute crawfish for the shrimp, but you’ll have to cook it for longer, and in Saute mode. To make chicken étouffée, add diced chicken thighs to the sauce before pressure cooking and pressure cook for 5 minutes instead of 10 minutes.
Burn Message
This étouffée recipe was made in a 6 quart Instant Pot Ultra and I have had no sealing issues or burn errors. If your Instant Pot is prone to getting the Burn Message, you can try the following:
- Deglaze really well.
- After sauteing onions, celery, etc. turn off the Instant Pot and let it cool down.
- Add an extra ¼ to ½ cup of broth.
[Read More: Instant Pot Burn Message]
If you’re new to the Instant Pot and aren’t familiar with how to use it, you might find it helpful to first read one of the following guides and then come back here to learn how to make this recipe.
- General Instant Pot Instructions for Beginners
- Instant Pot ULTRA Beginner’s Manual
- Instant Pot DUO EVO PLUS Beginner’s Manual
- Instant Pot DUO NOVA Beginner’s Manual
- Instant Pot DUO GOURMET Beginner’s Manual
- Instant Pot DUO CRISP Beginner’s Manual
- Instant Pot PRO Beginner’s Manual
- Instant Pot PRO CRISP Beginner’s Manual
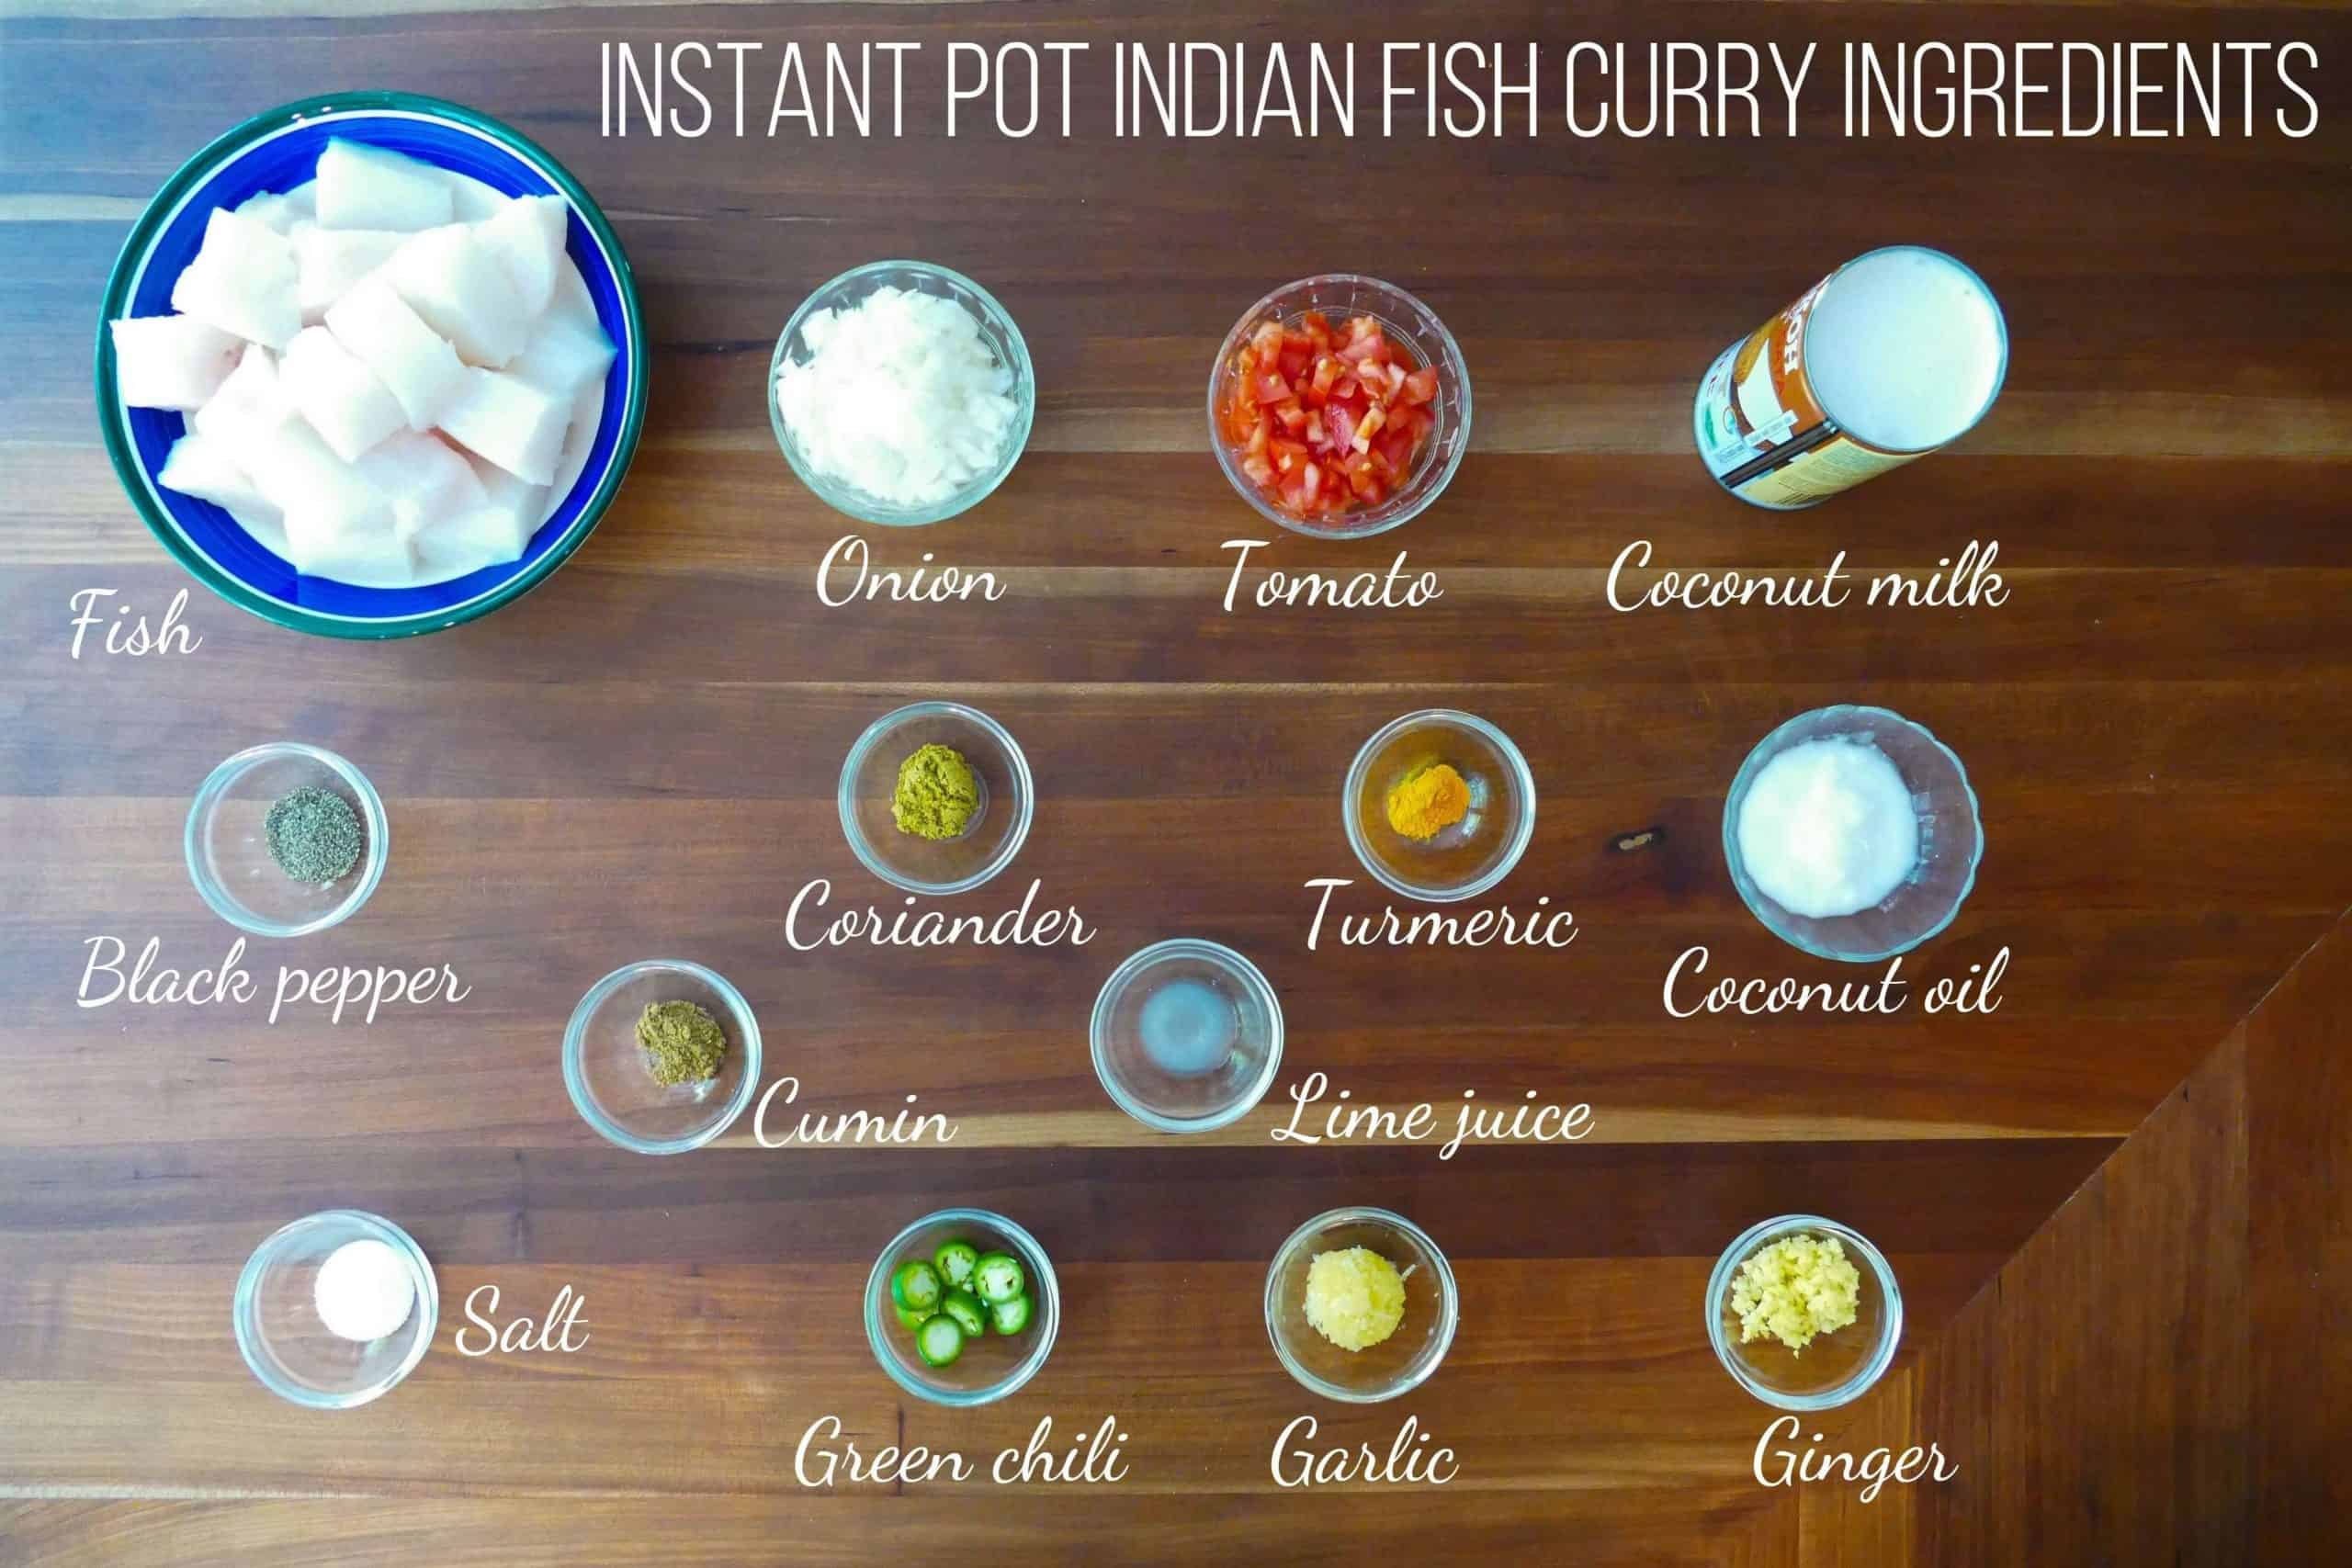
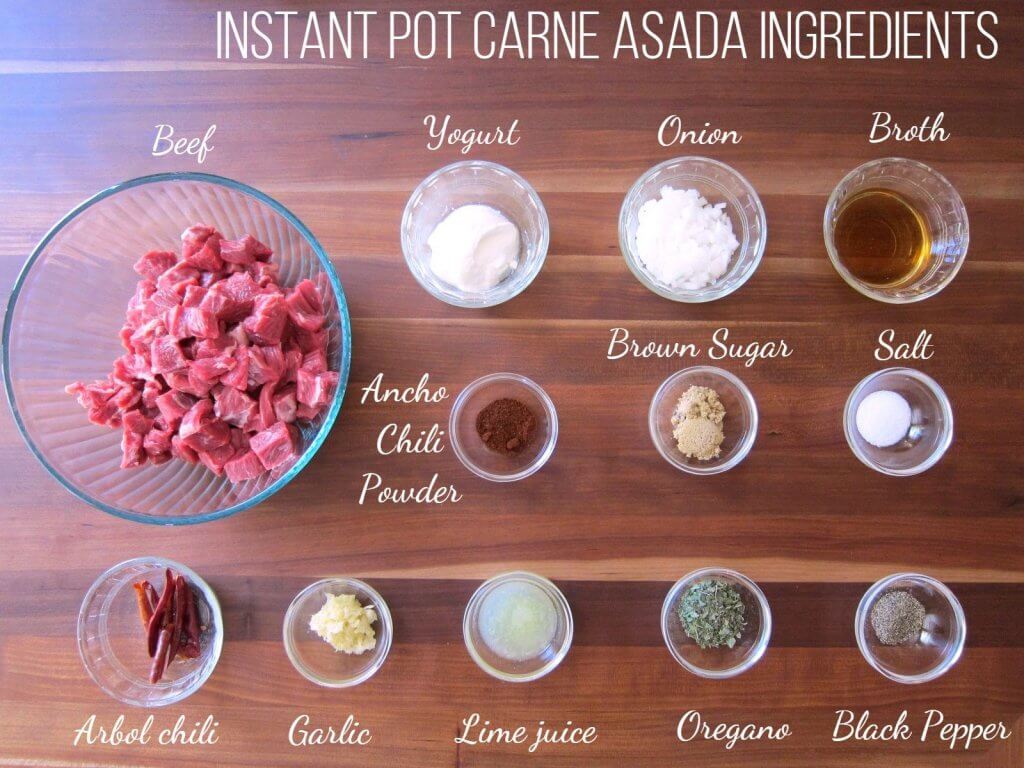
Instant Pot Shrimp Étouffée – Ingredients
- Bell pepper
- Onion
- Celery
- Stock
- Lemon juice
- Worcestershire sauce
- Creole seasoning
- Garlic
- Parsley
- Black pepper
- White pepper
- Salt
- Thyme
- Green onion
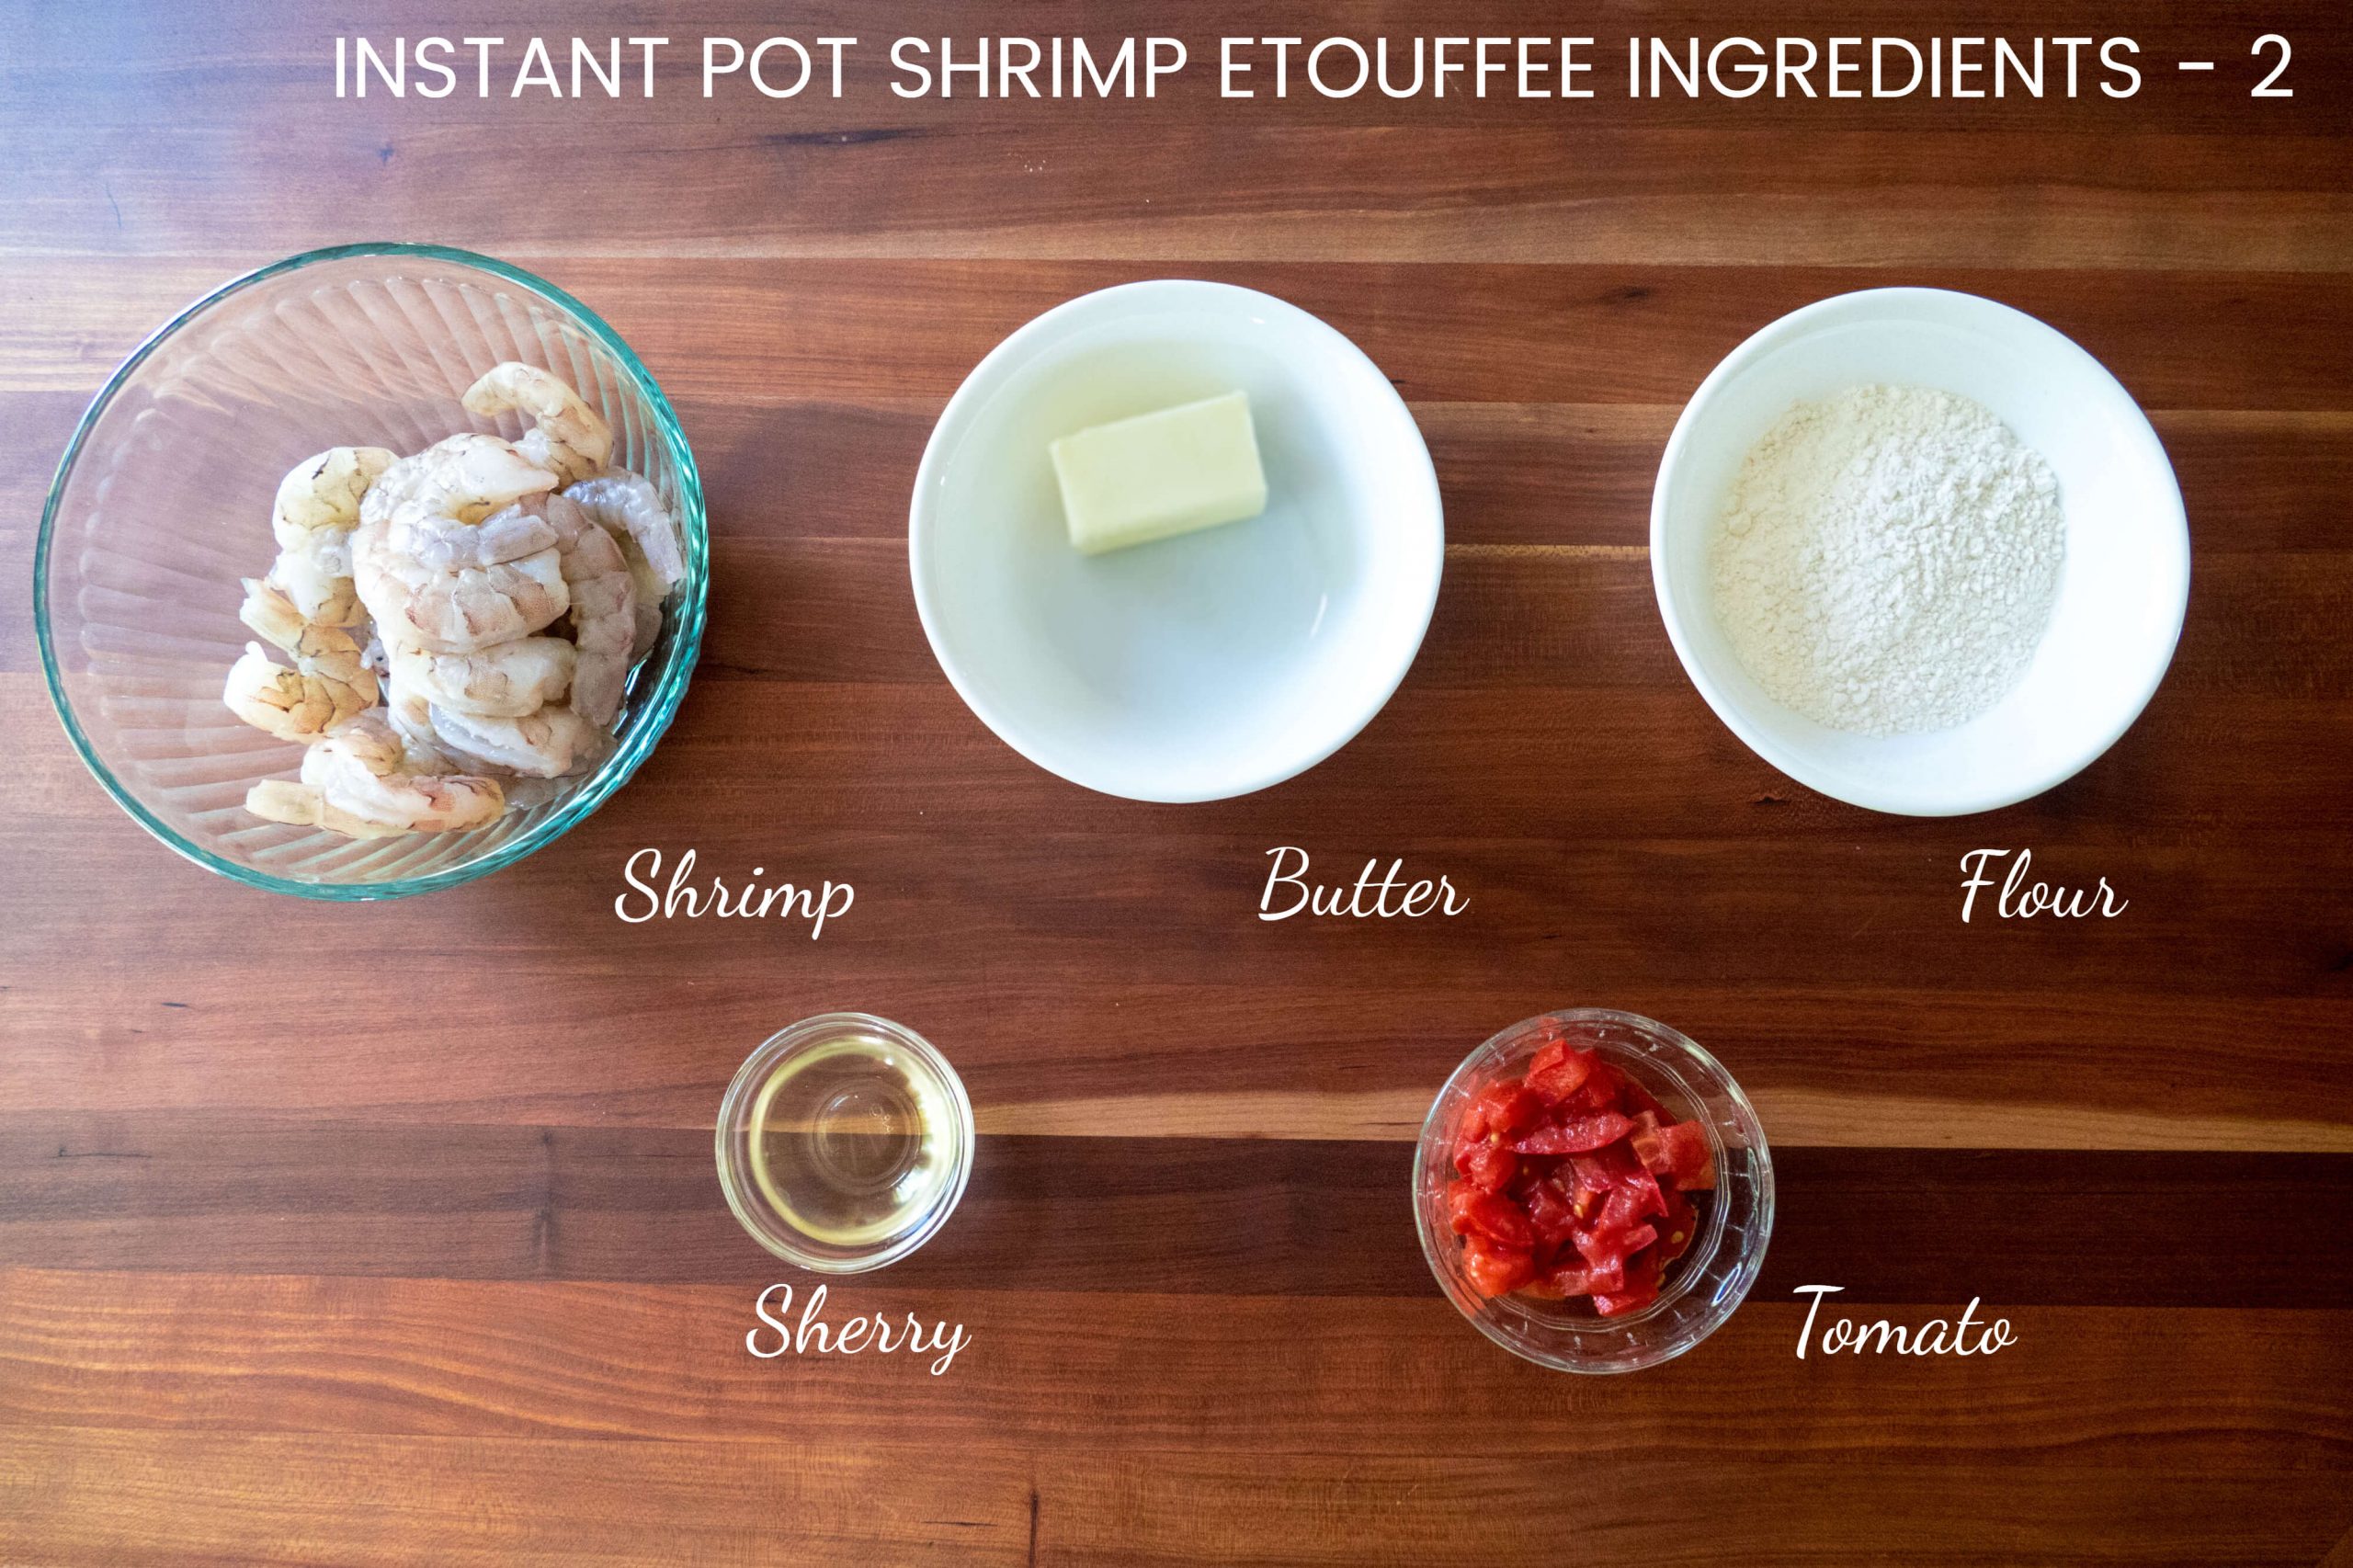
- Shrimp
- Butter
- Flour
- Sherry
- Tomato
More details in the recipe card at the bottom of this post
How to Make Shrimp Étouffée in the Instant Pot (Step by Step Instructions)
- Season shrimp.
- Turn on Saute Mode.
- Make the roux.
- Stir in vegetables and seasonings.
- Add liquids and tomato.
- Pressure cook.
- Release pressure.
- Stir in shrimp.
- Garnish.
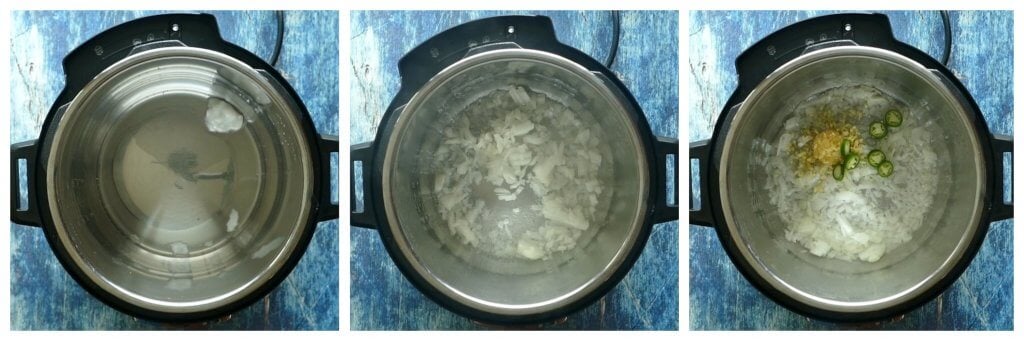
Season Shrimp
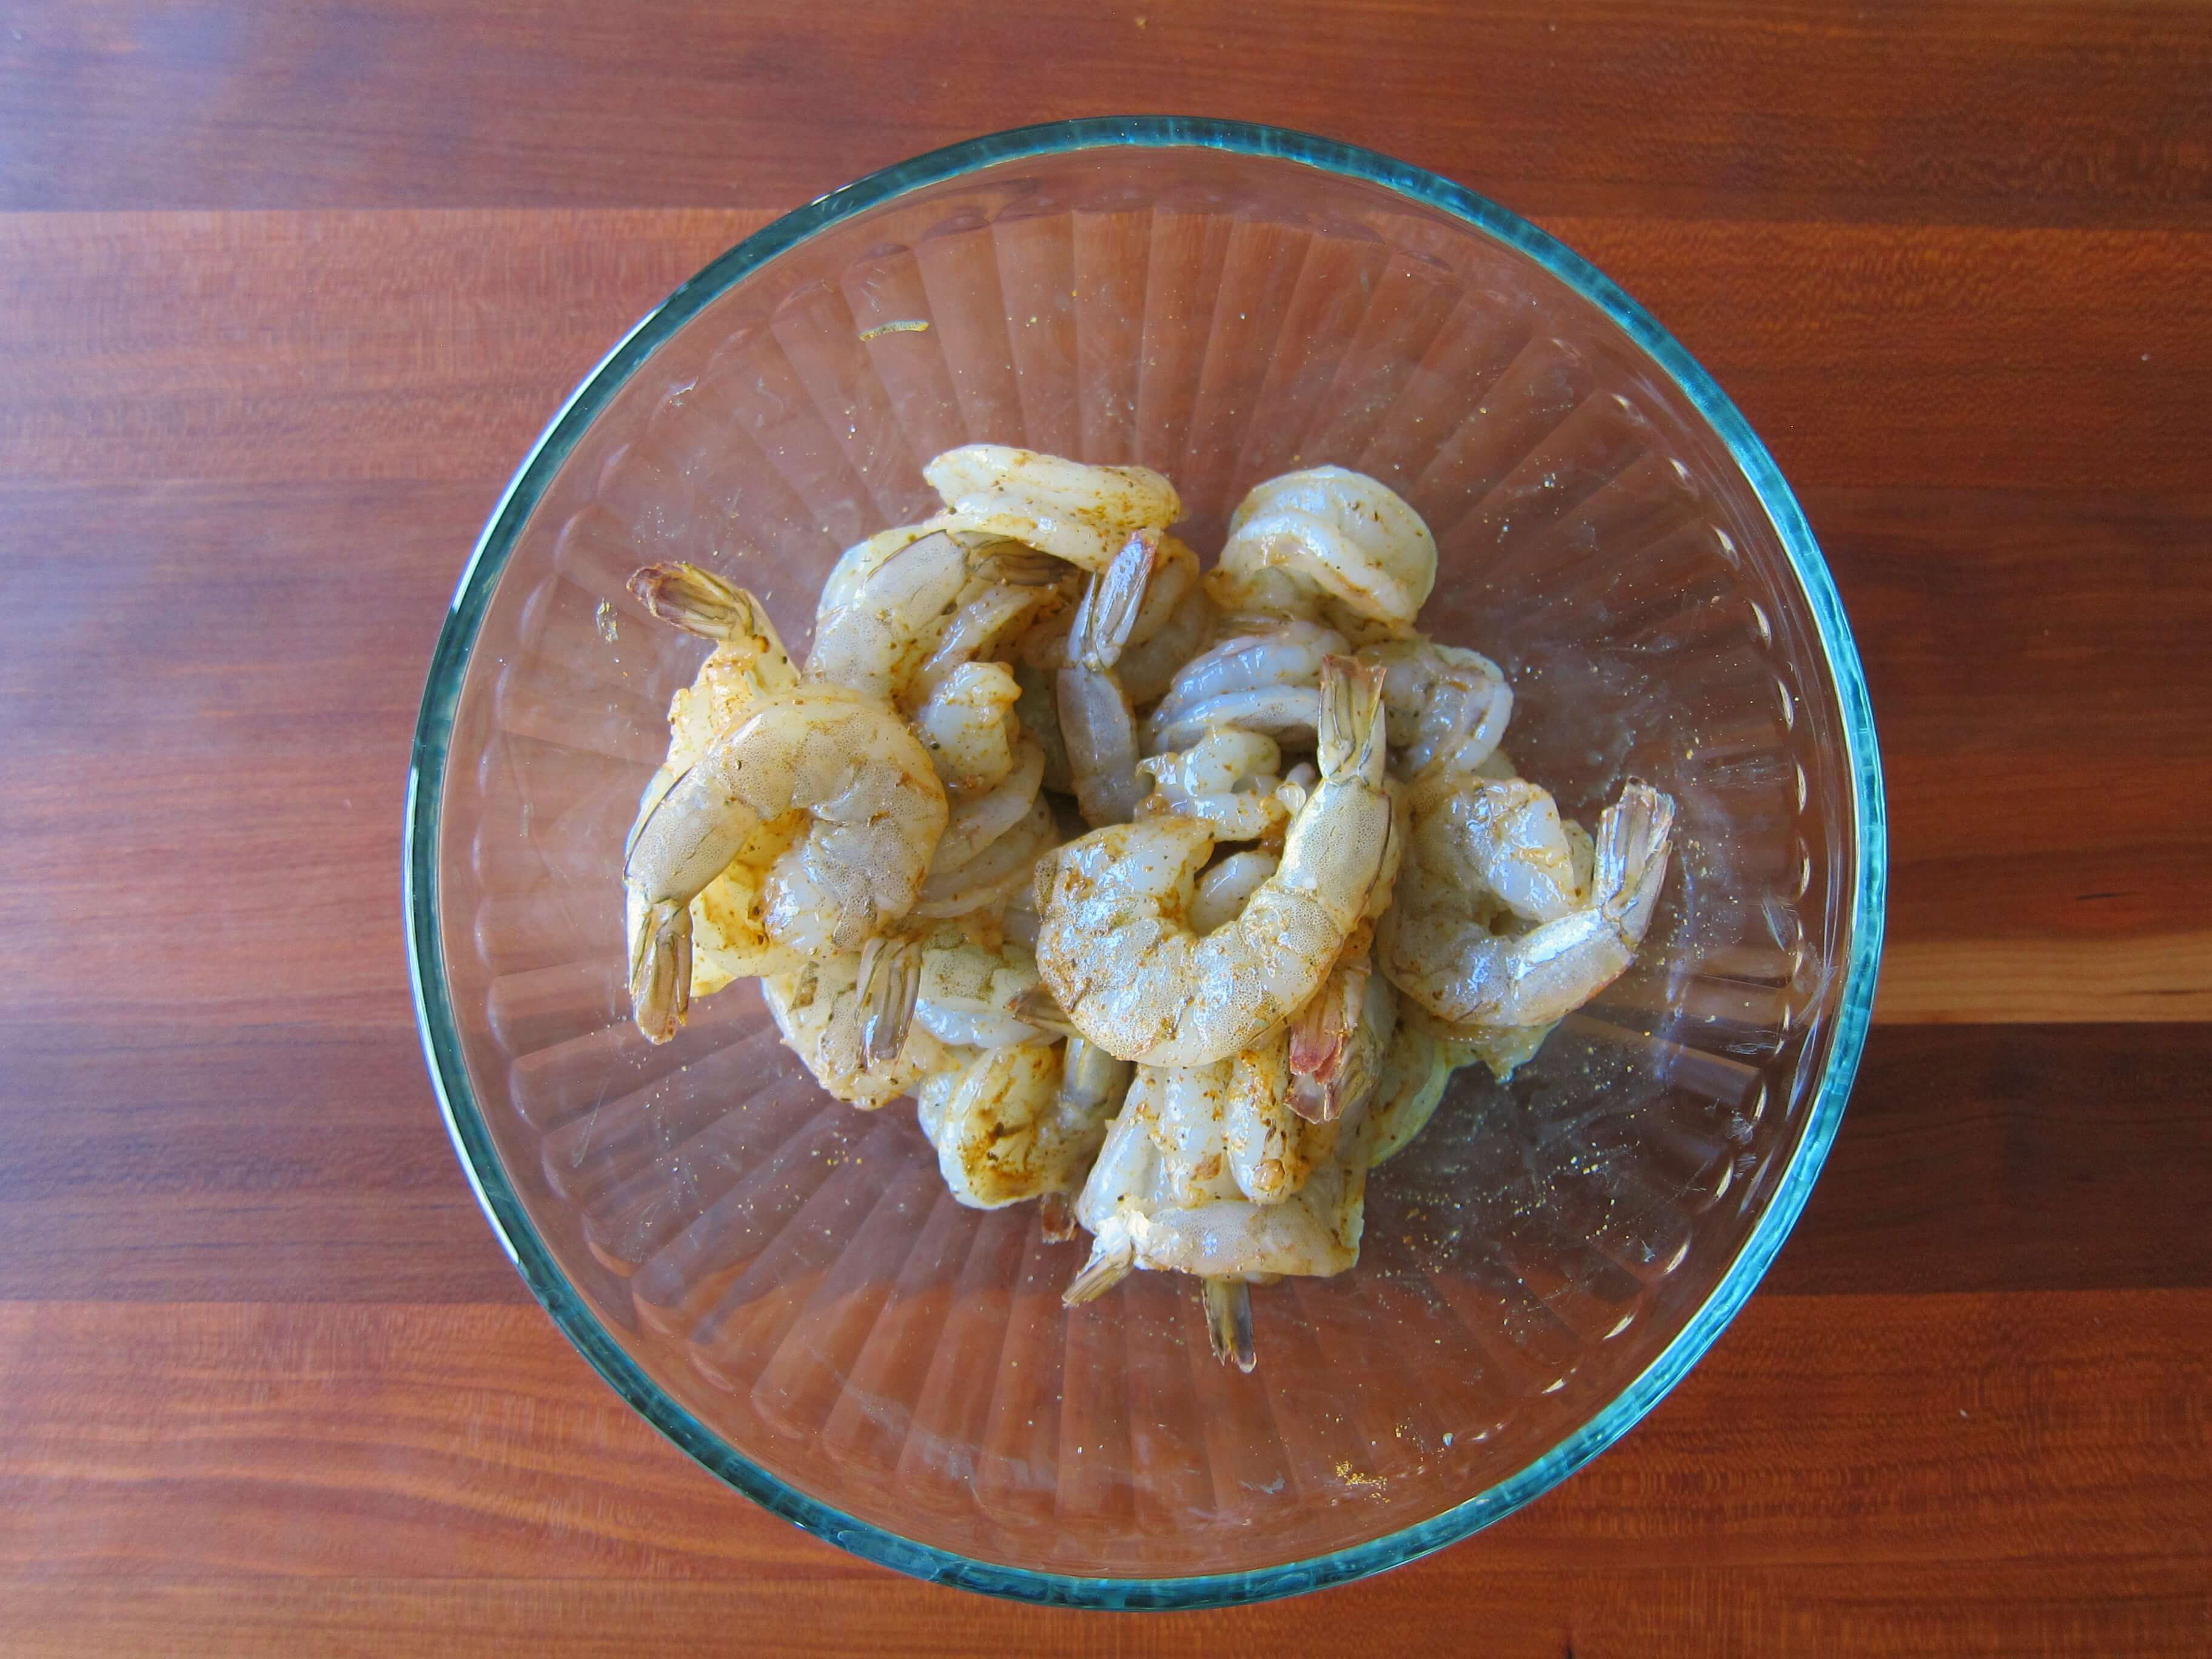
- Rub shrimp with 1 teaspoon of Creole seasoning and set aside.
How to Turn on Saute Mode
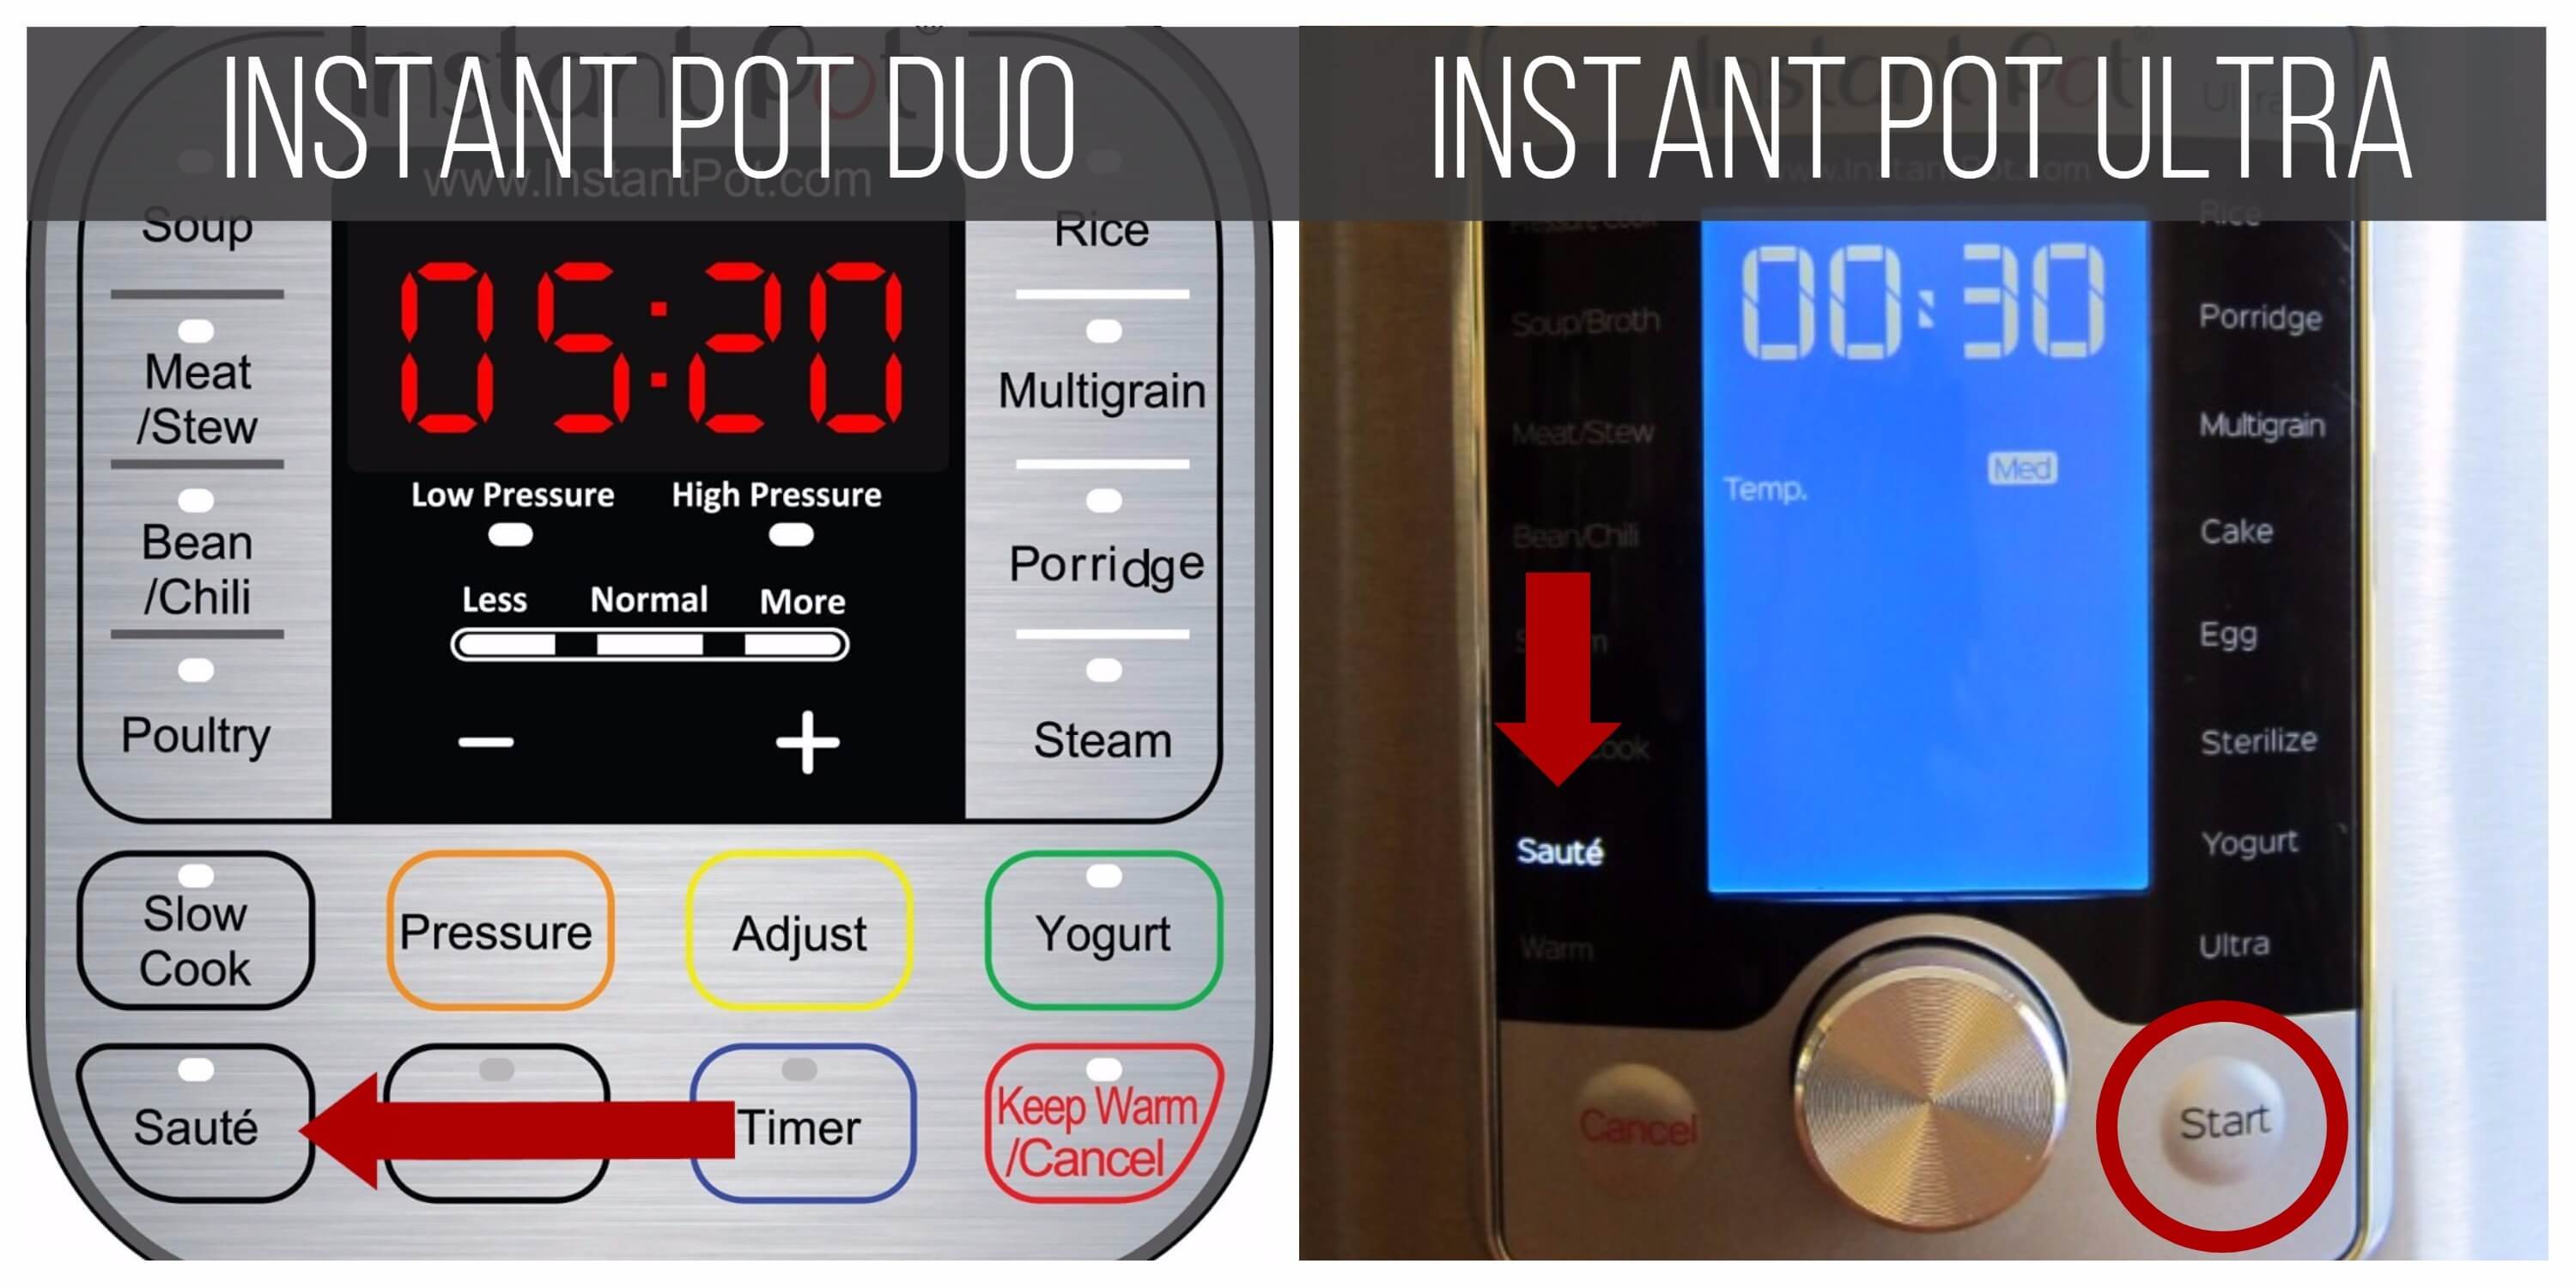
- Instant Pot DUO: Select the Saute function.
- Instant Pot ULTRA: Select the Saute function and press Start.
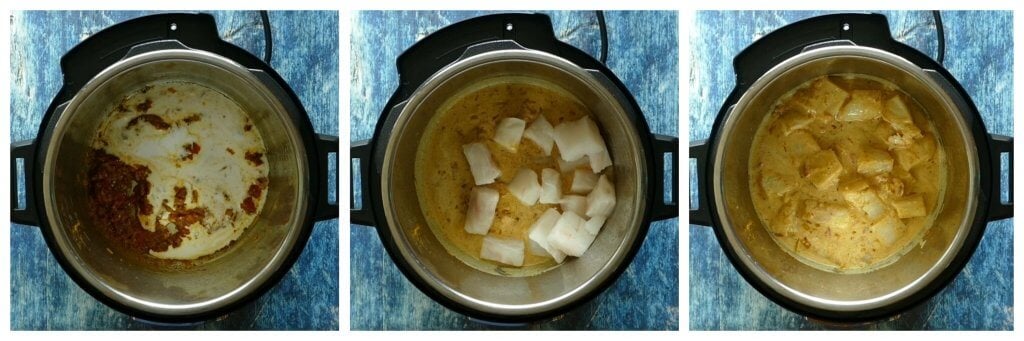
Make the Roux
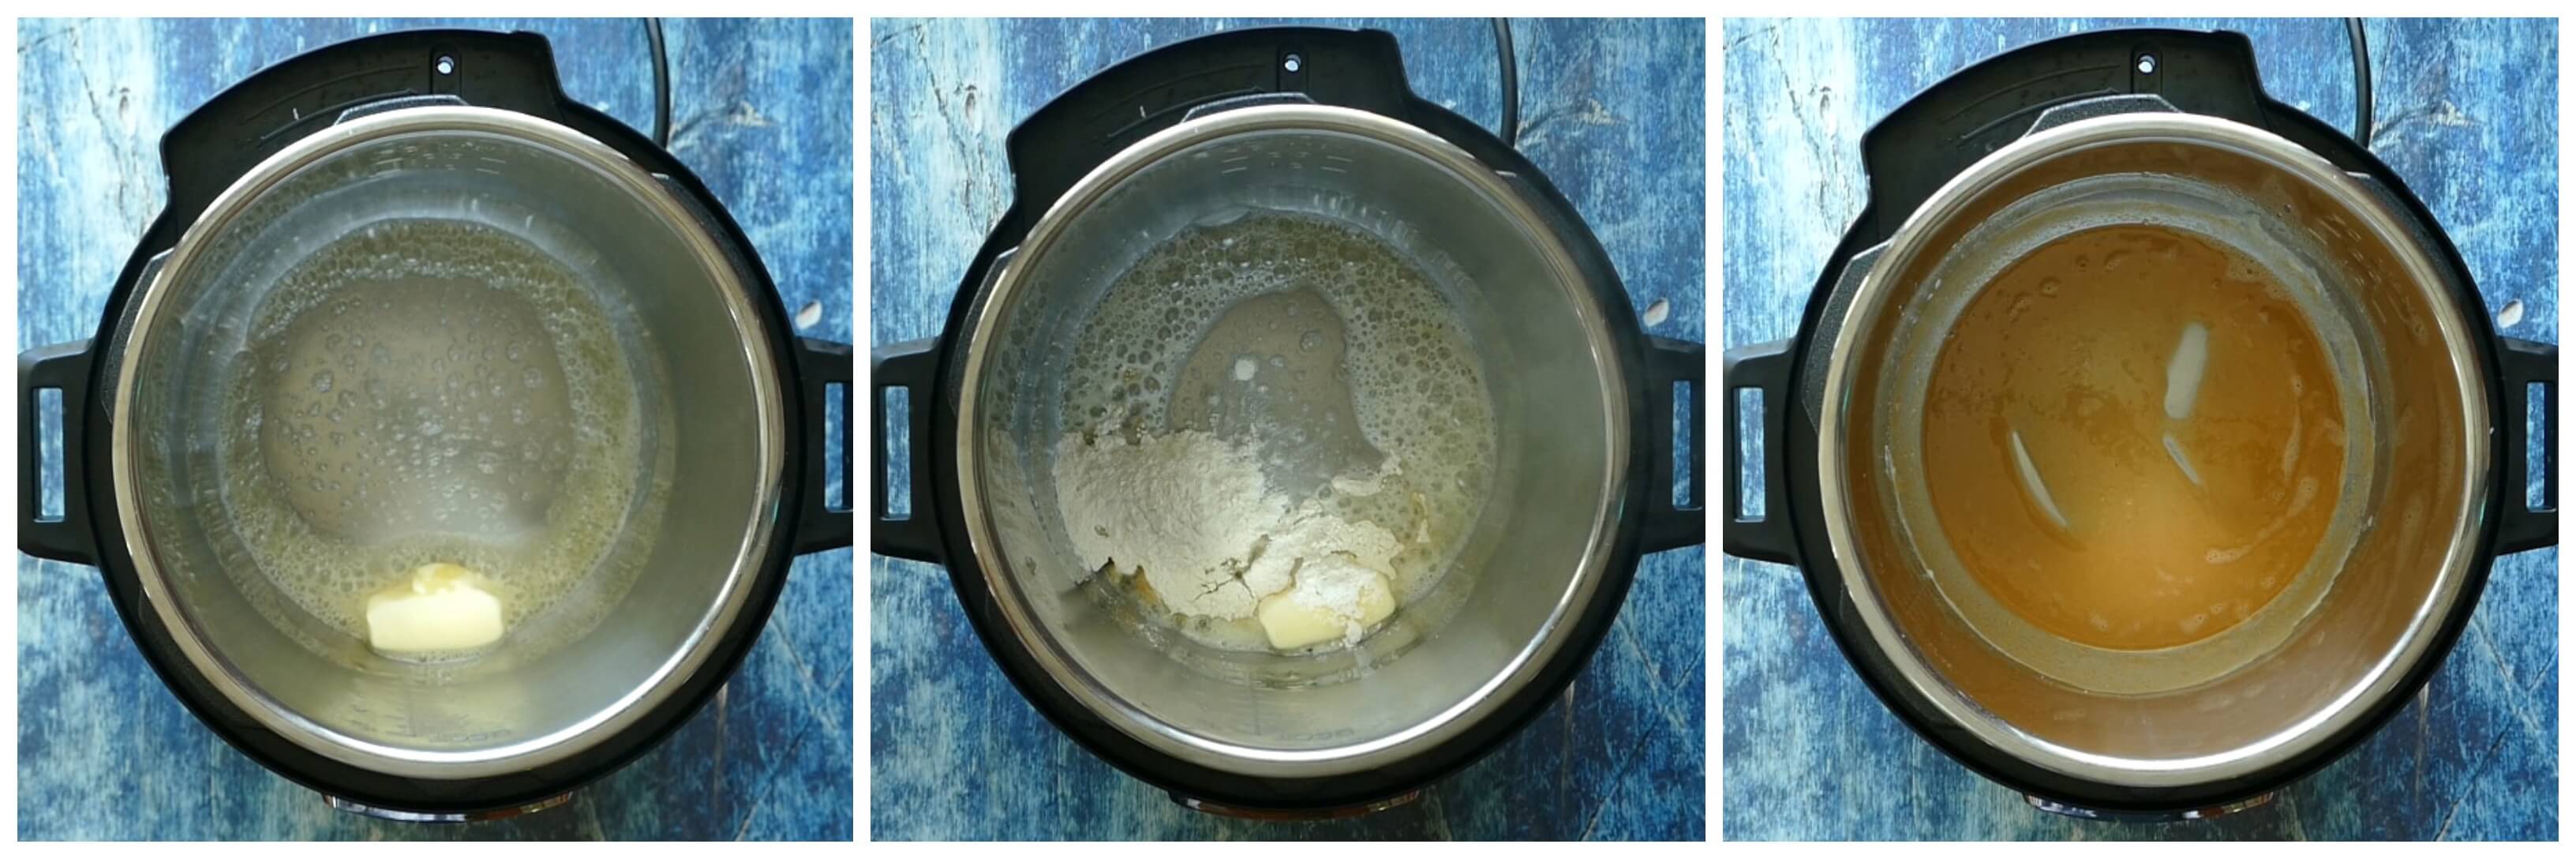
- When Instant Pot has heated, melt the butter in the inner pot of Instant Pot.
- To make the roux, add flour to the inner pot and stir flour and butter until the mixture becomes a light caramel color. Make sure you stir the roux constantly, otherwise it will burn. This will take about 5 minutes.
- If you need to, press Cancel to turn of the Instant Pot to cool it down and then select Saute again.
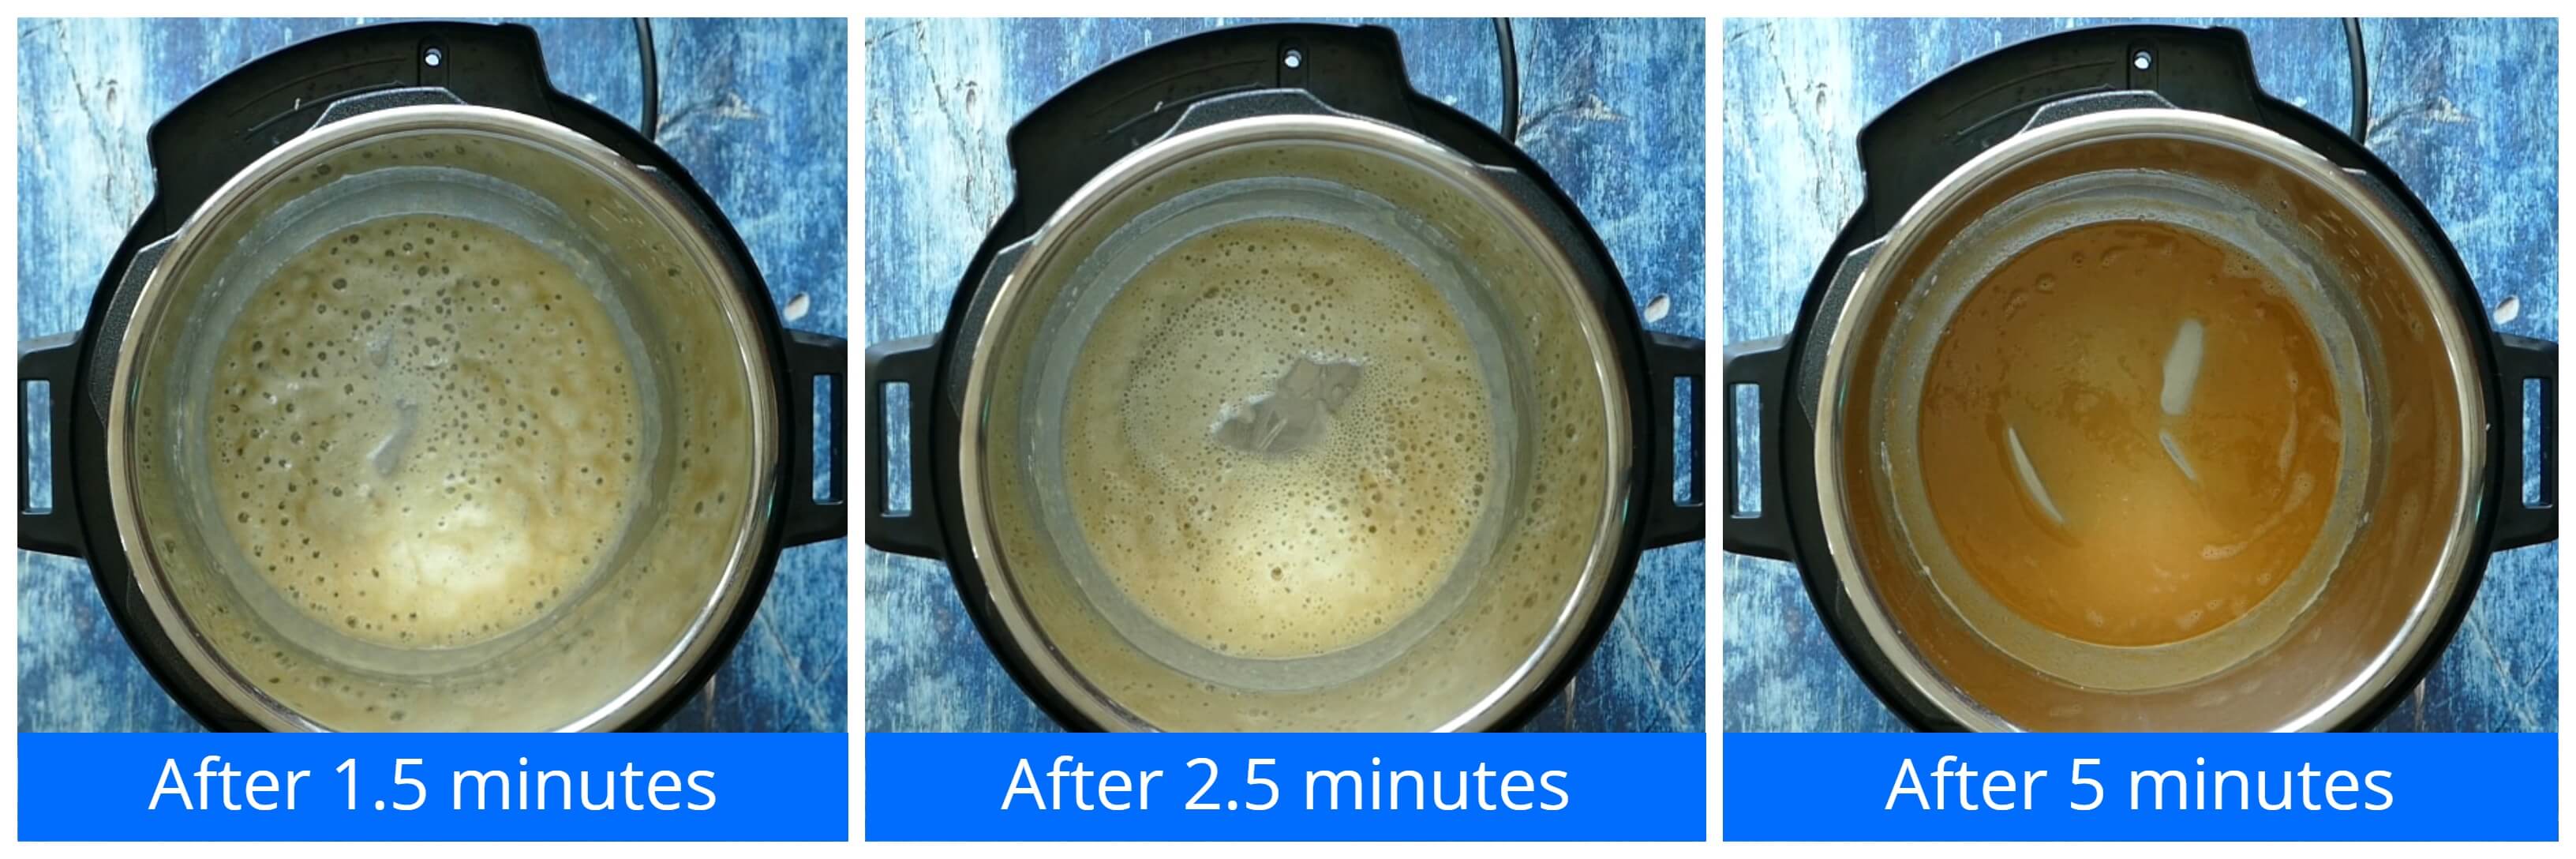
- This is what the roux looks like when it is the correct blonde (caramel) color. It starts out slow but gets dark quickly toward the end!
- This roux was sauteed on medium/normal heat level.
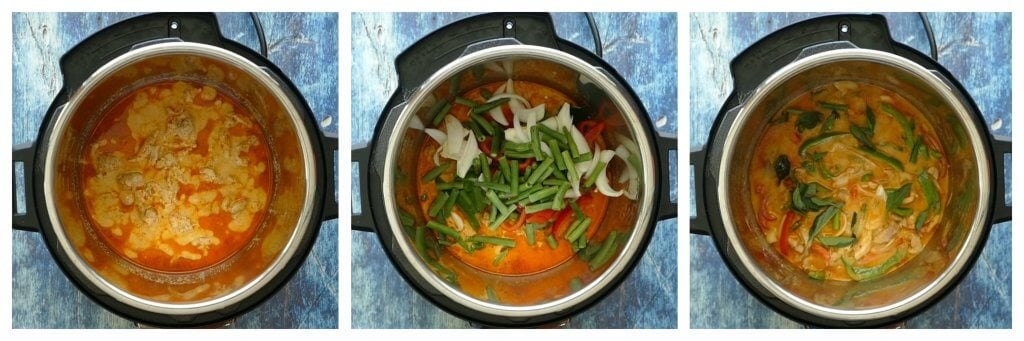
Stir in vegetables and seasonings
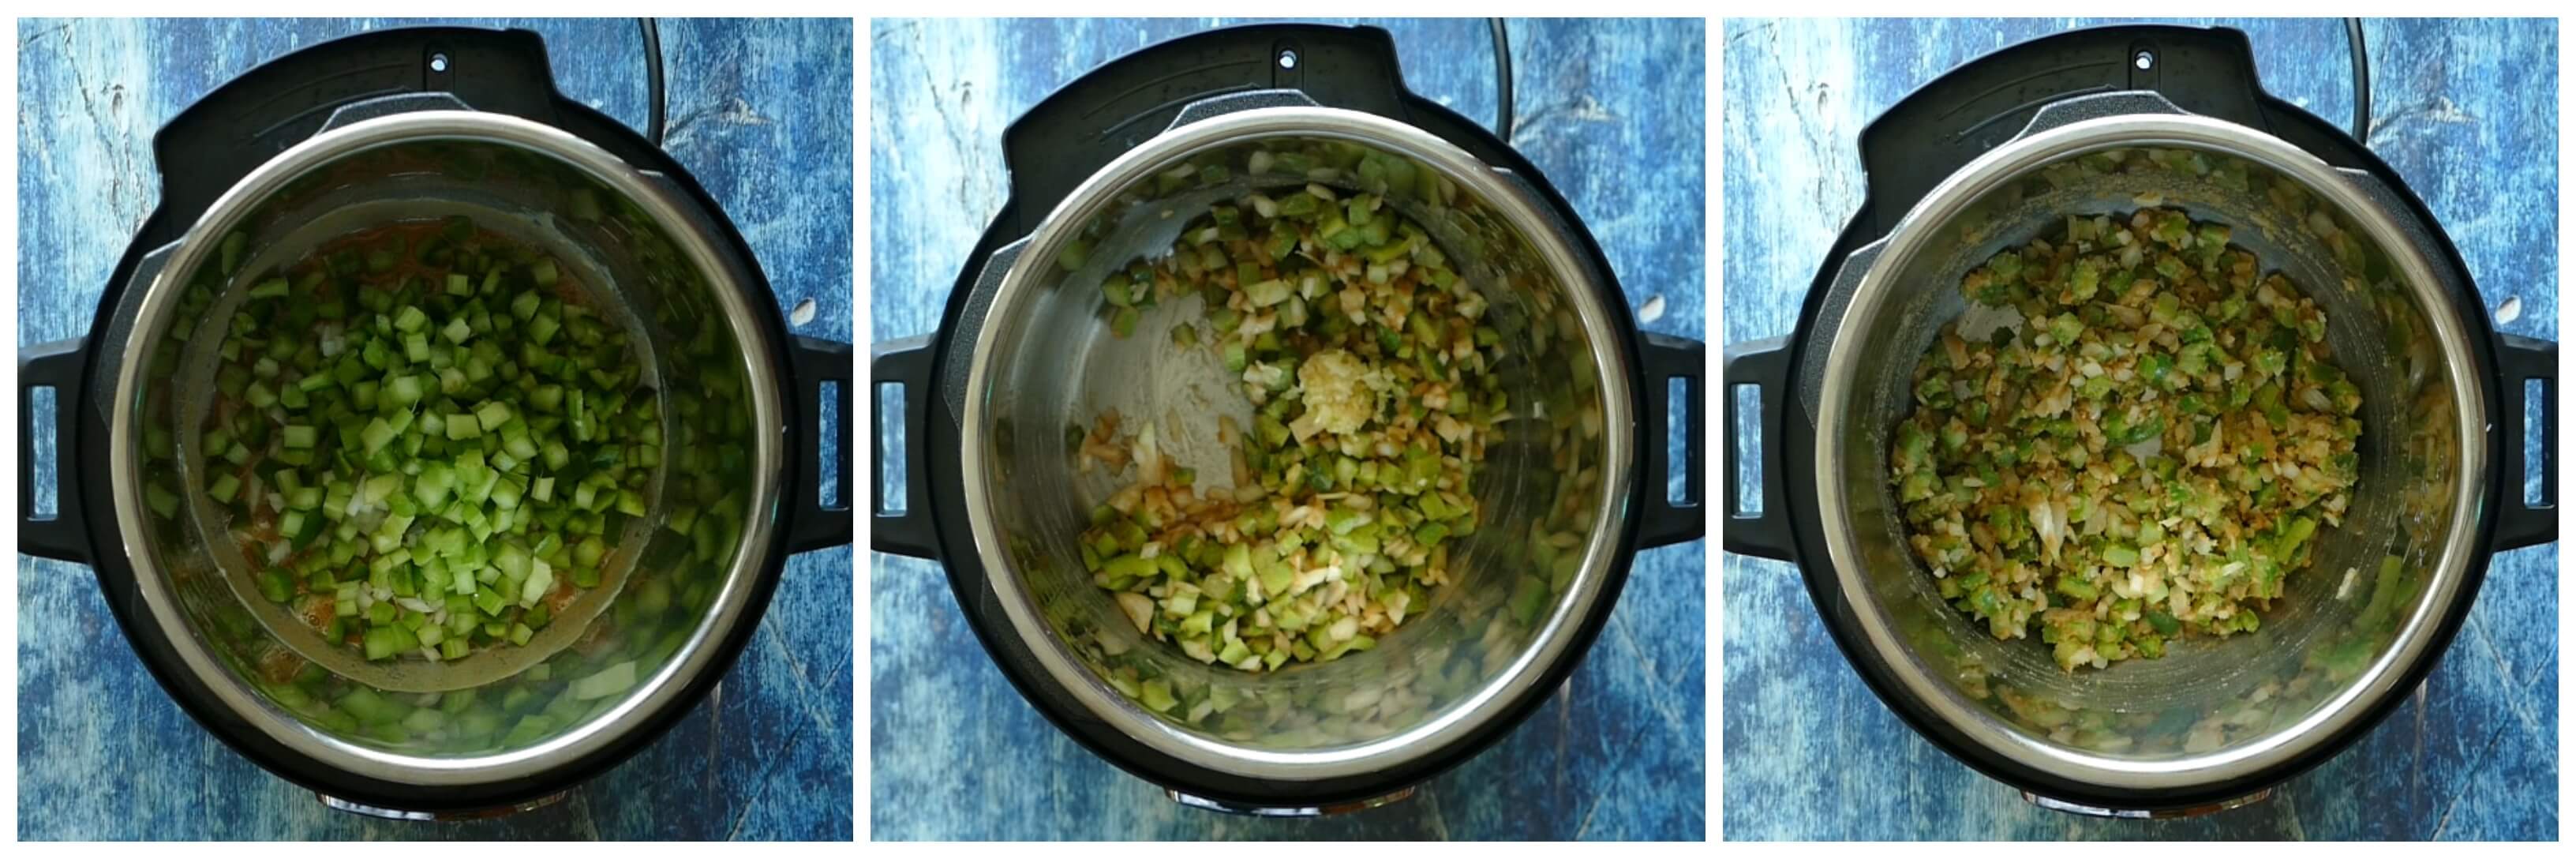
- Add onions, bell pepper, celery, and garlic. Stir until vegetables are slightly soft, about 5 minutes.
- Stir in remaining Creole seasoning, white pepper, black pepper, thyme, salt.
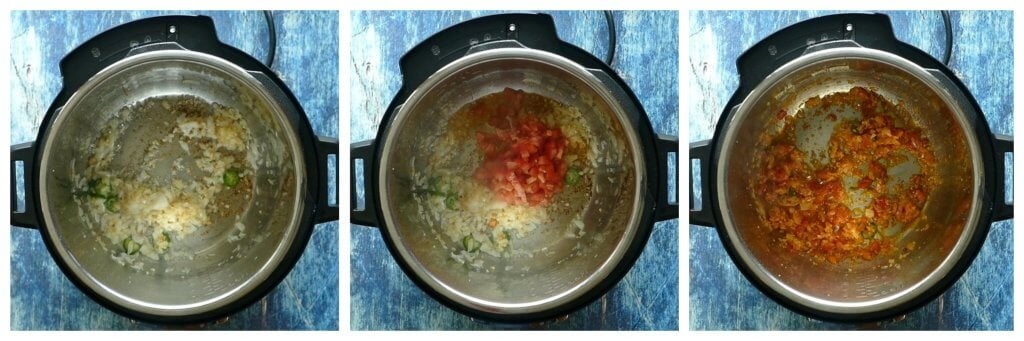
Add liquids and tomato
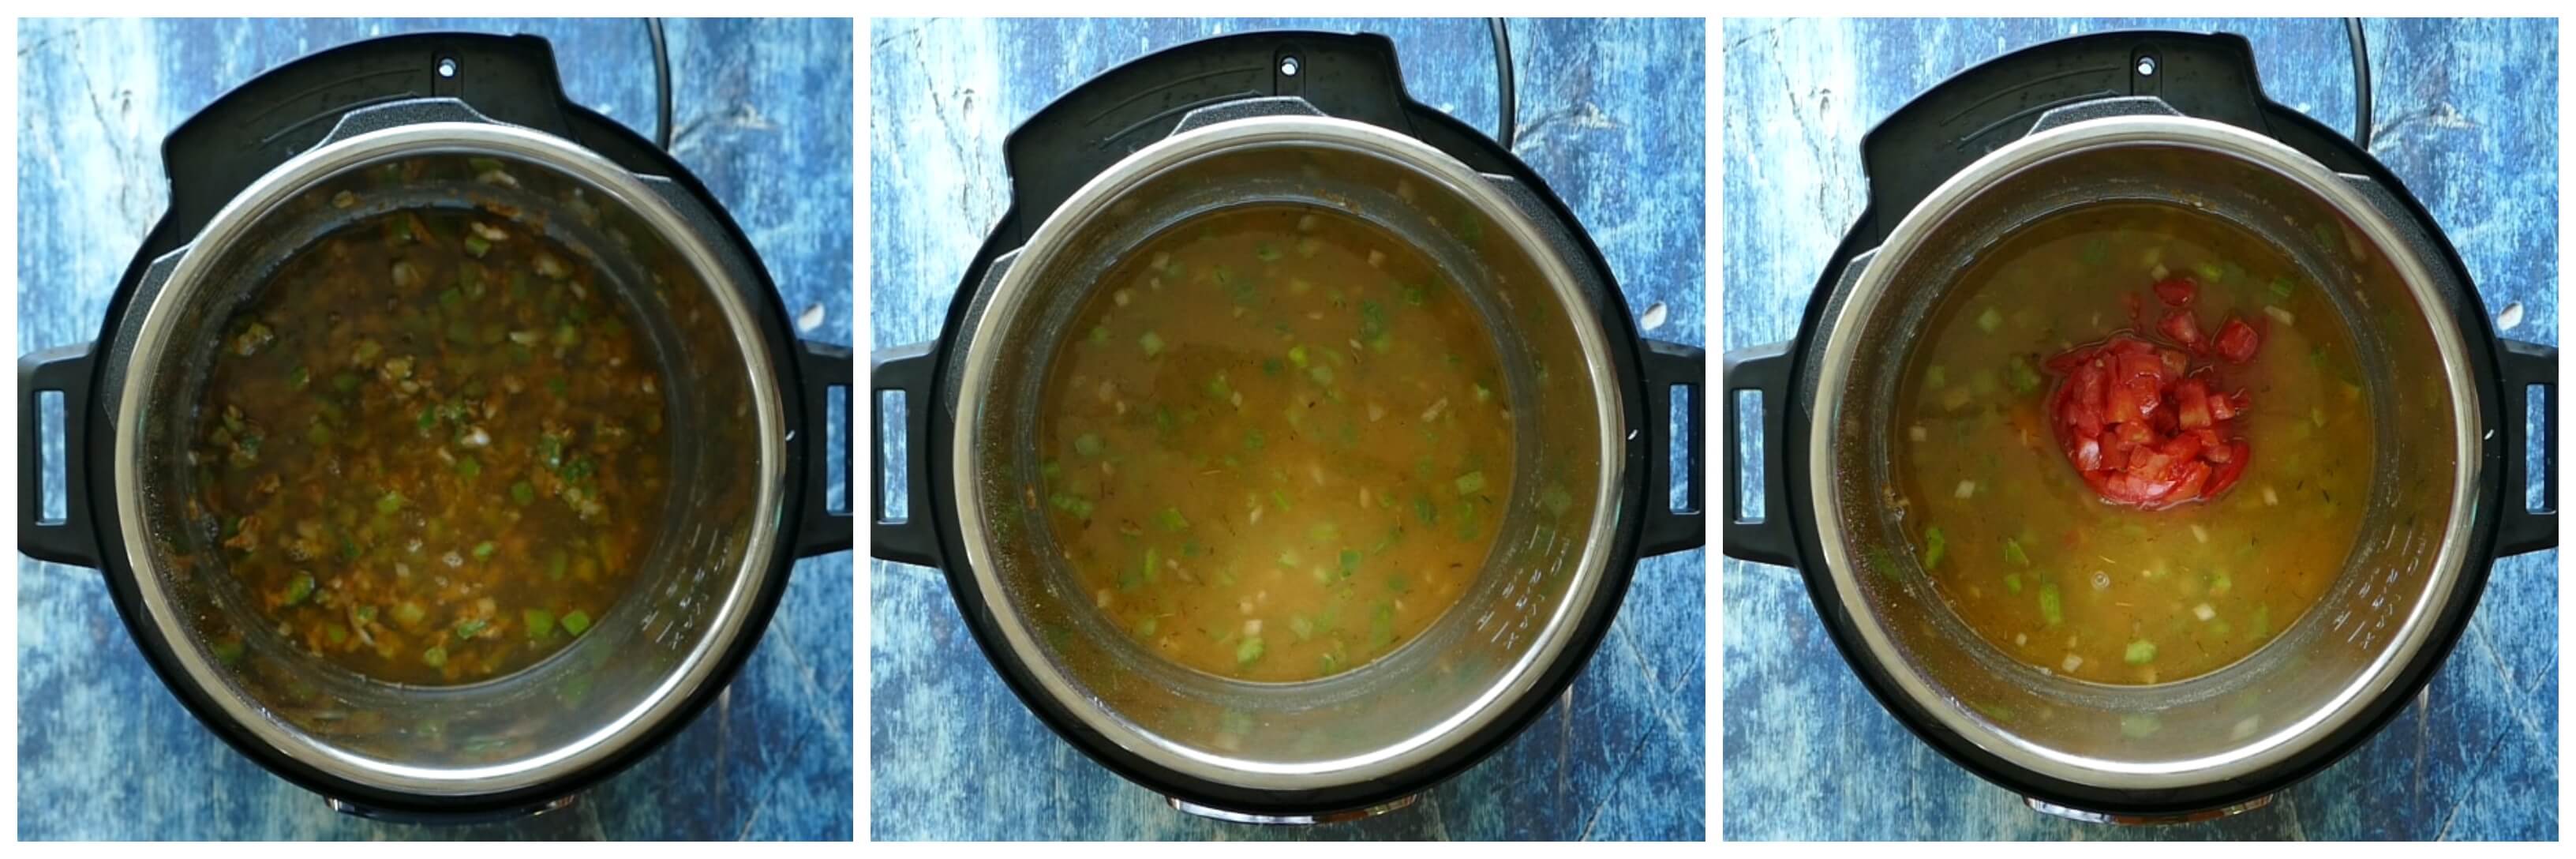
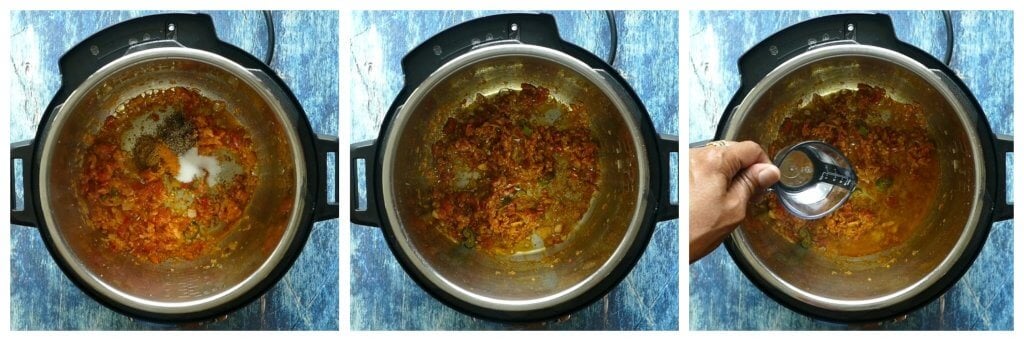
- Using a spatula, scrape the bottom of the inner pot to make sure there are no burnt bits stuck to the bottom. Deglaze with a tablespoon or two of stock if needed.
- Add shrimp stock, Worcestershire sauce, lemon juice, and stir.
- Add tomato and tomato puree (if using) and gently push down with a spatula, no need to stir.
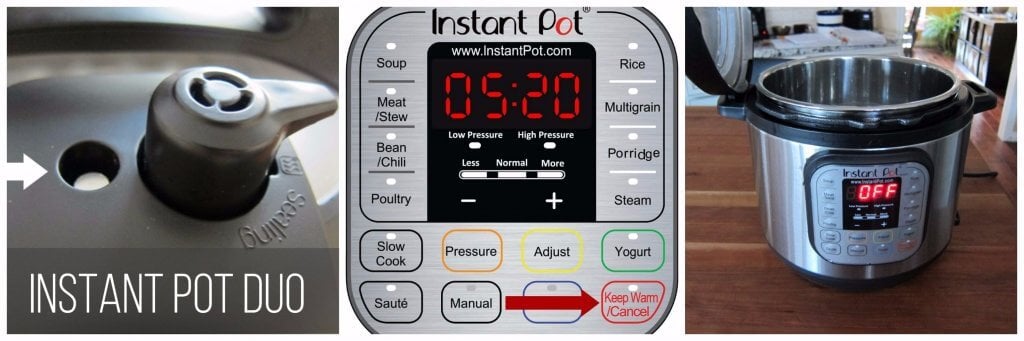
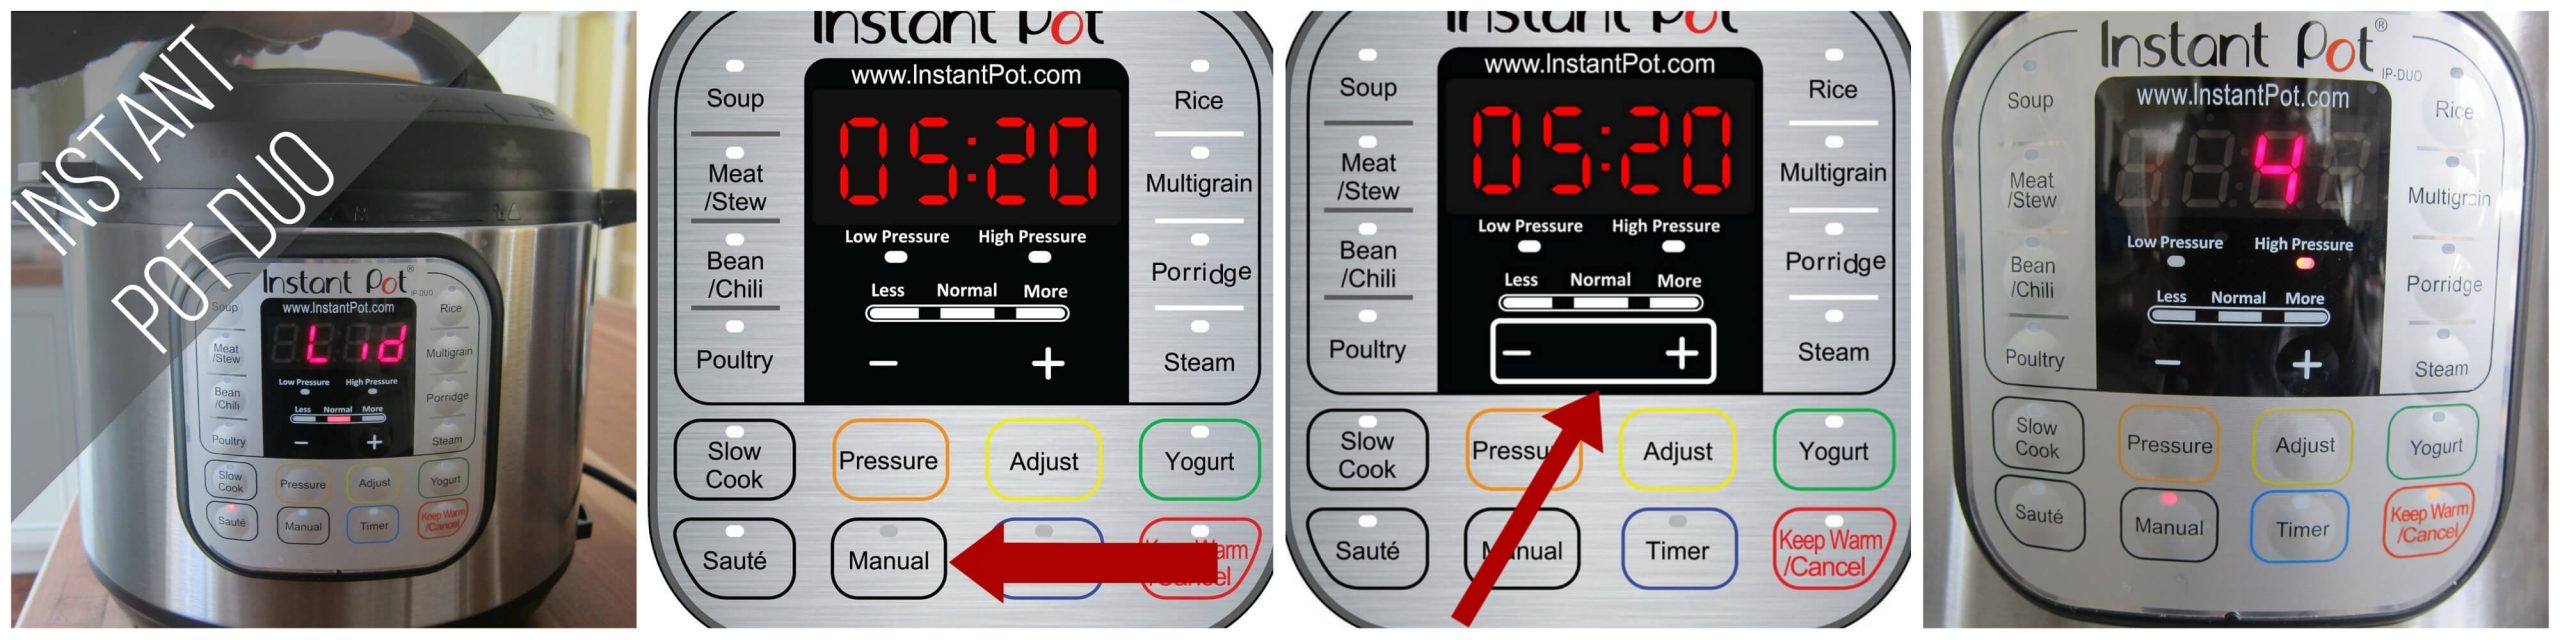
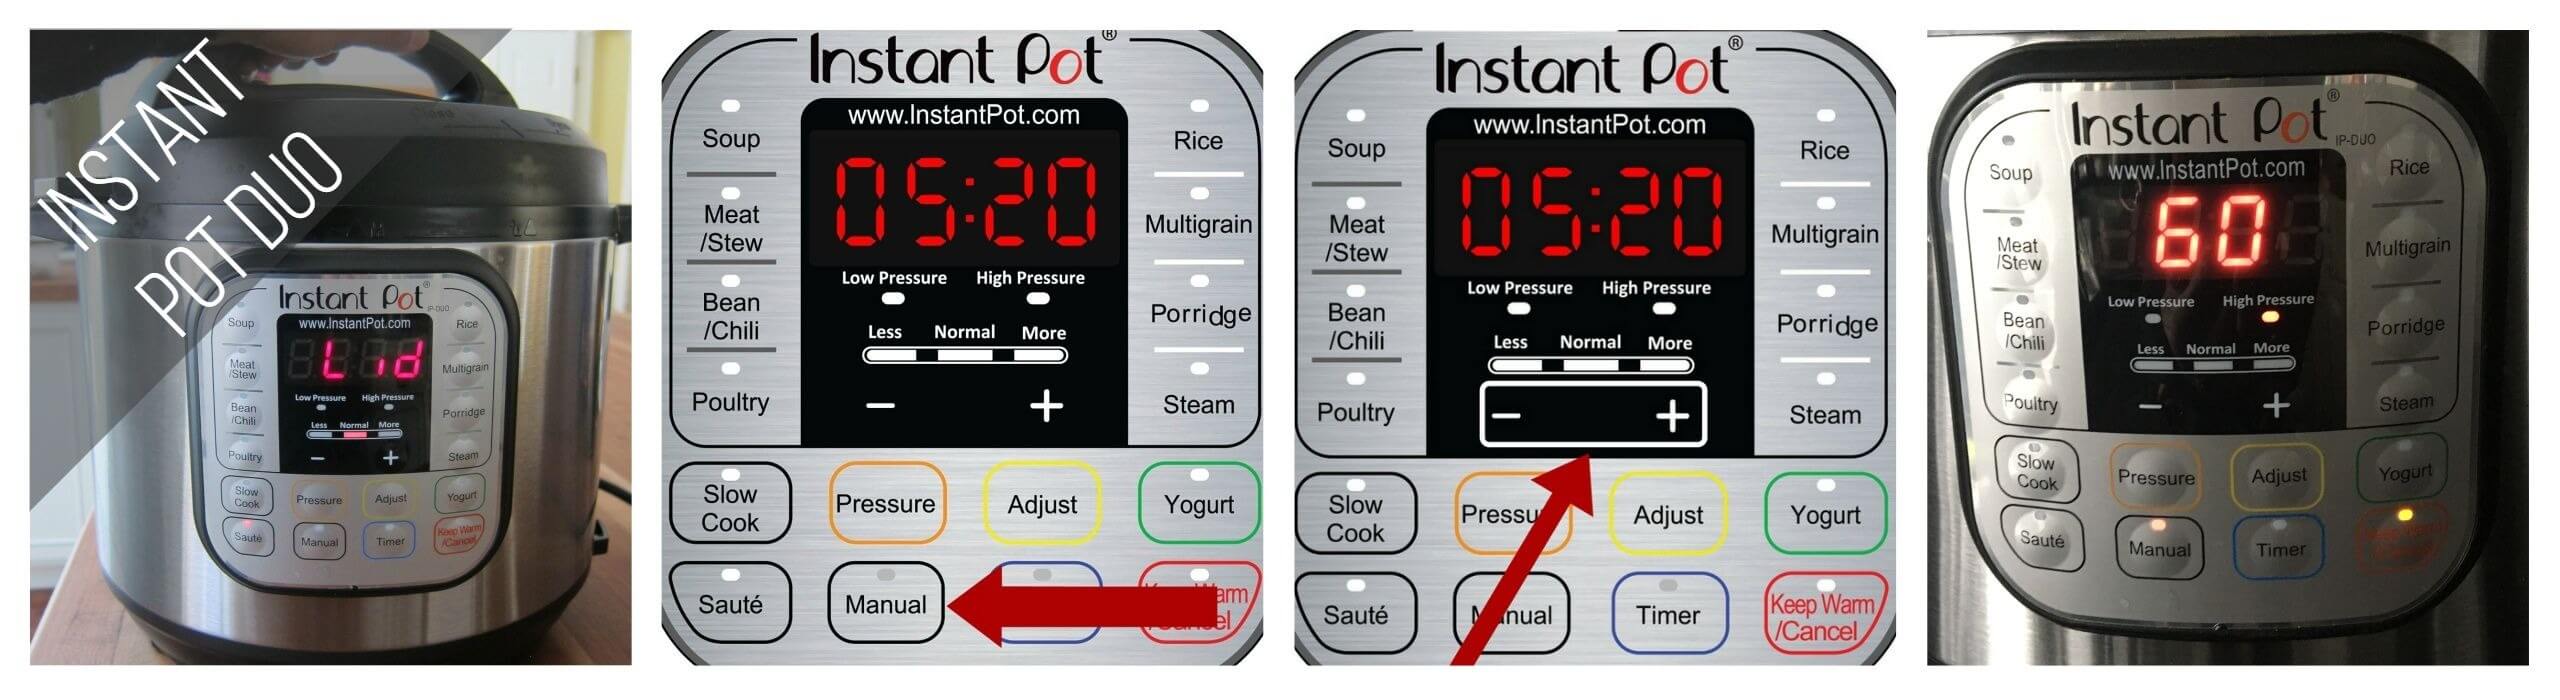
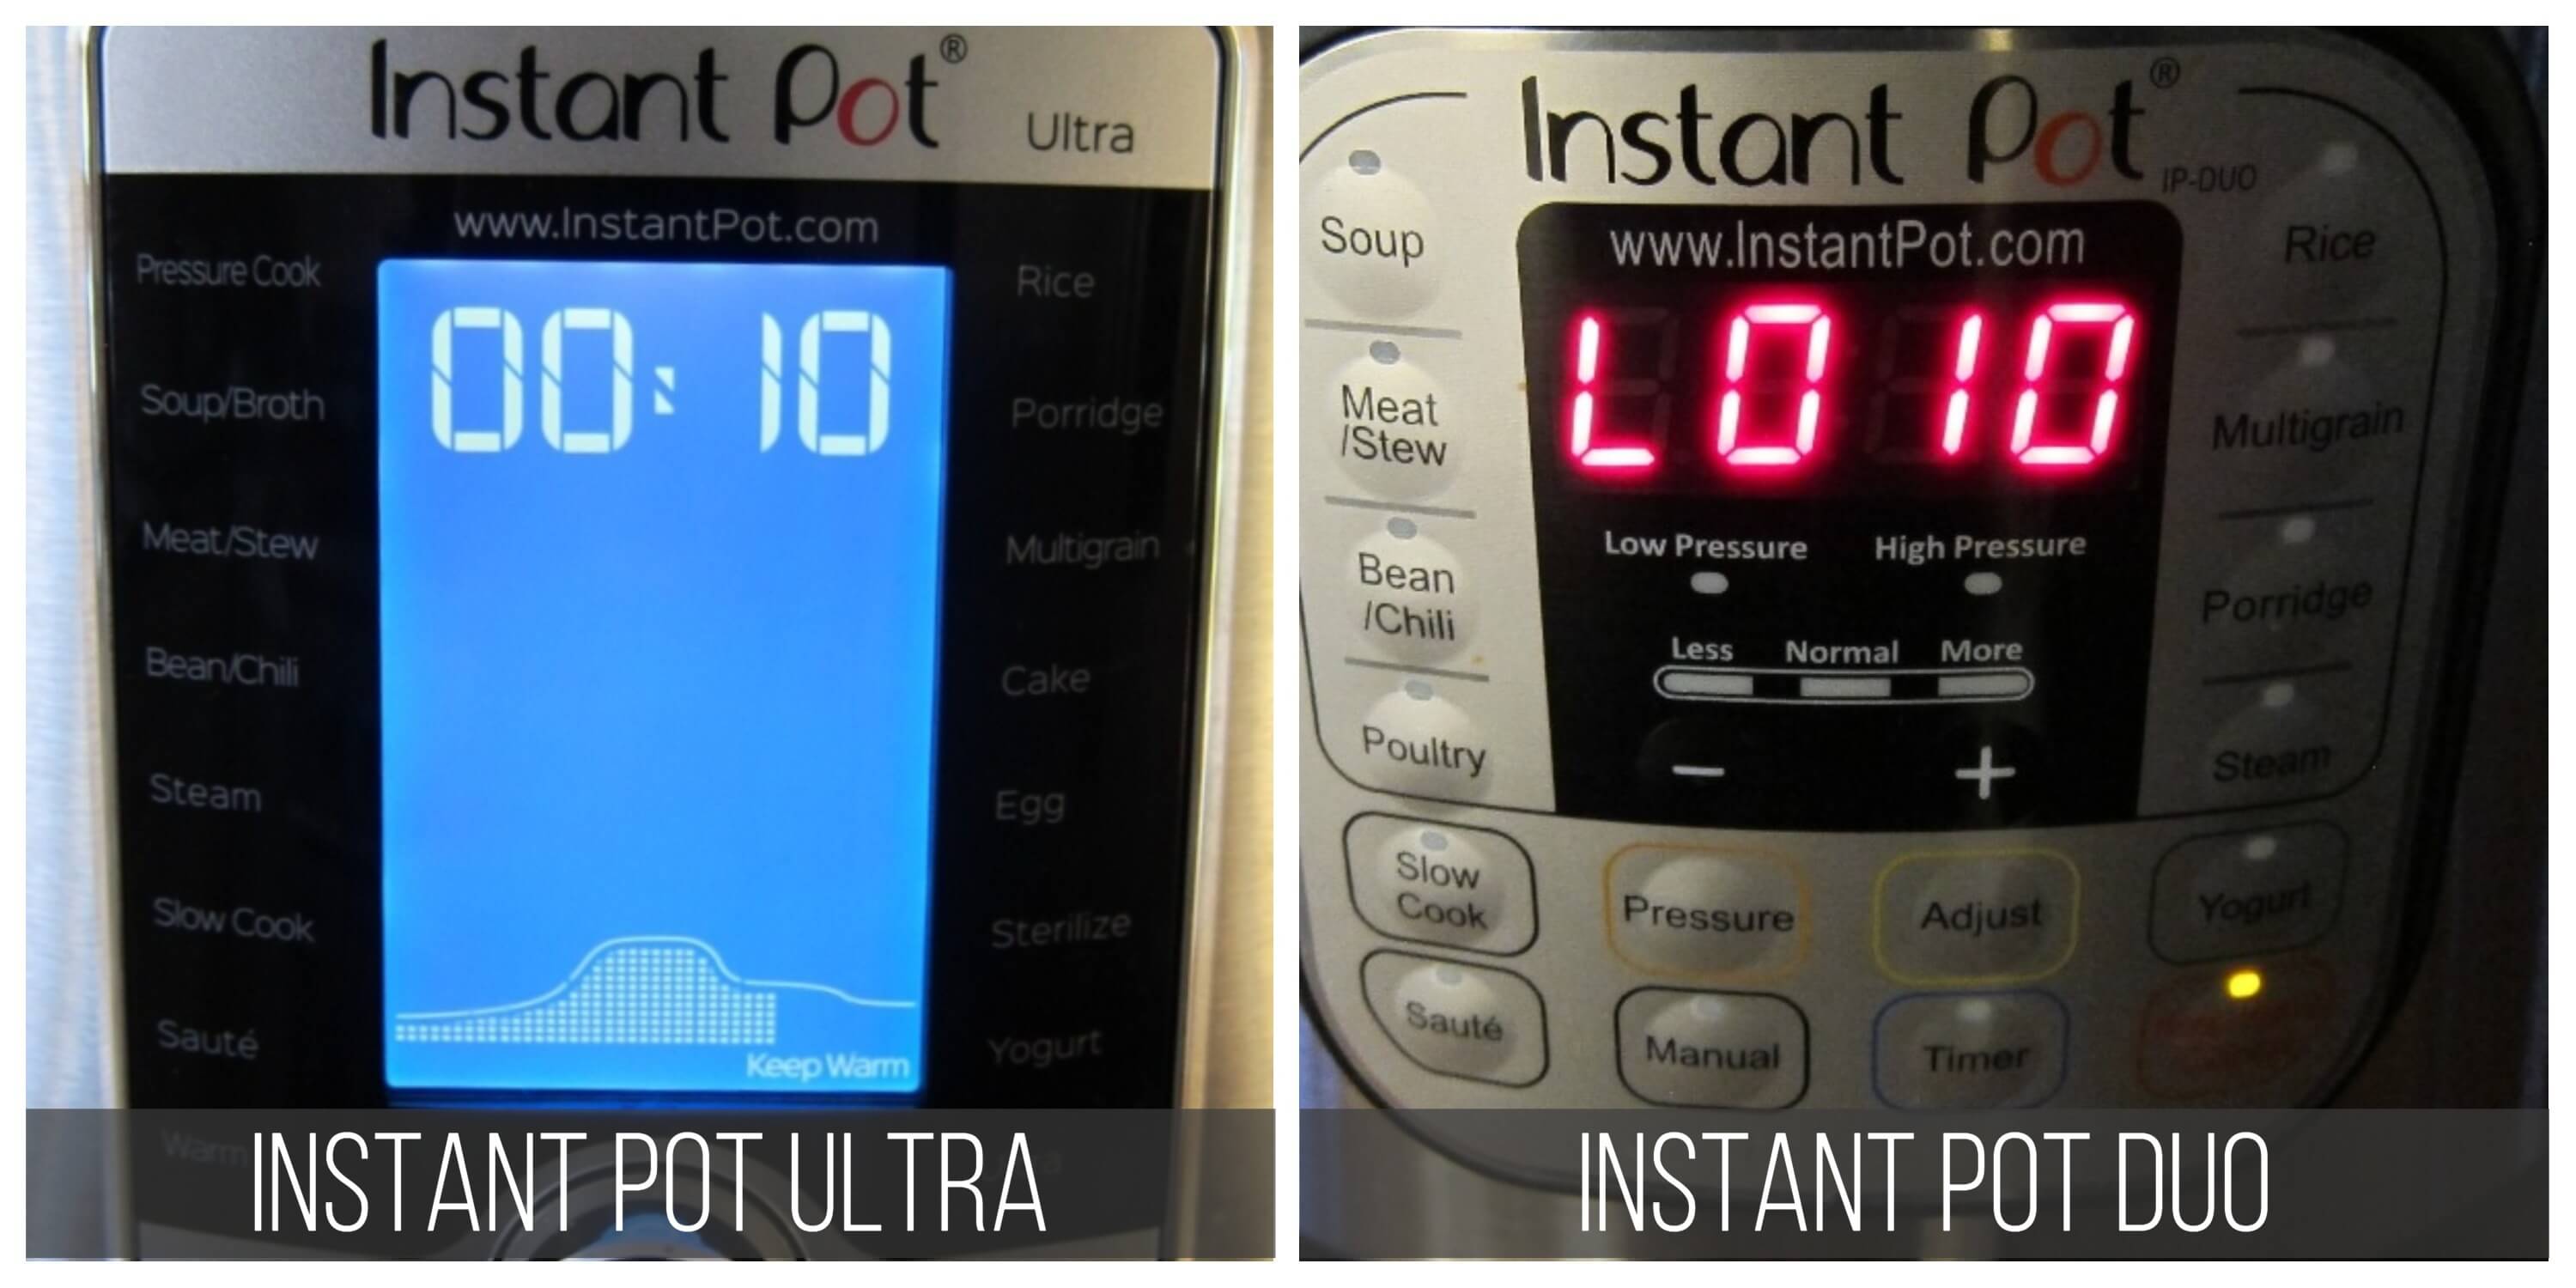
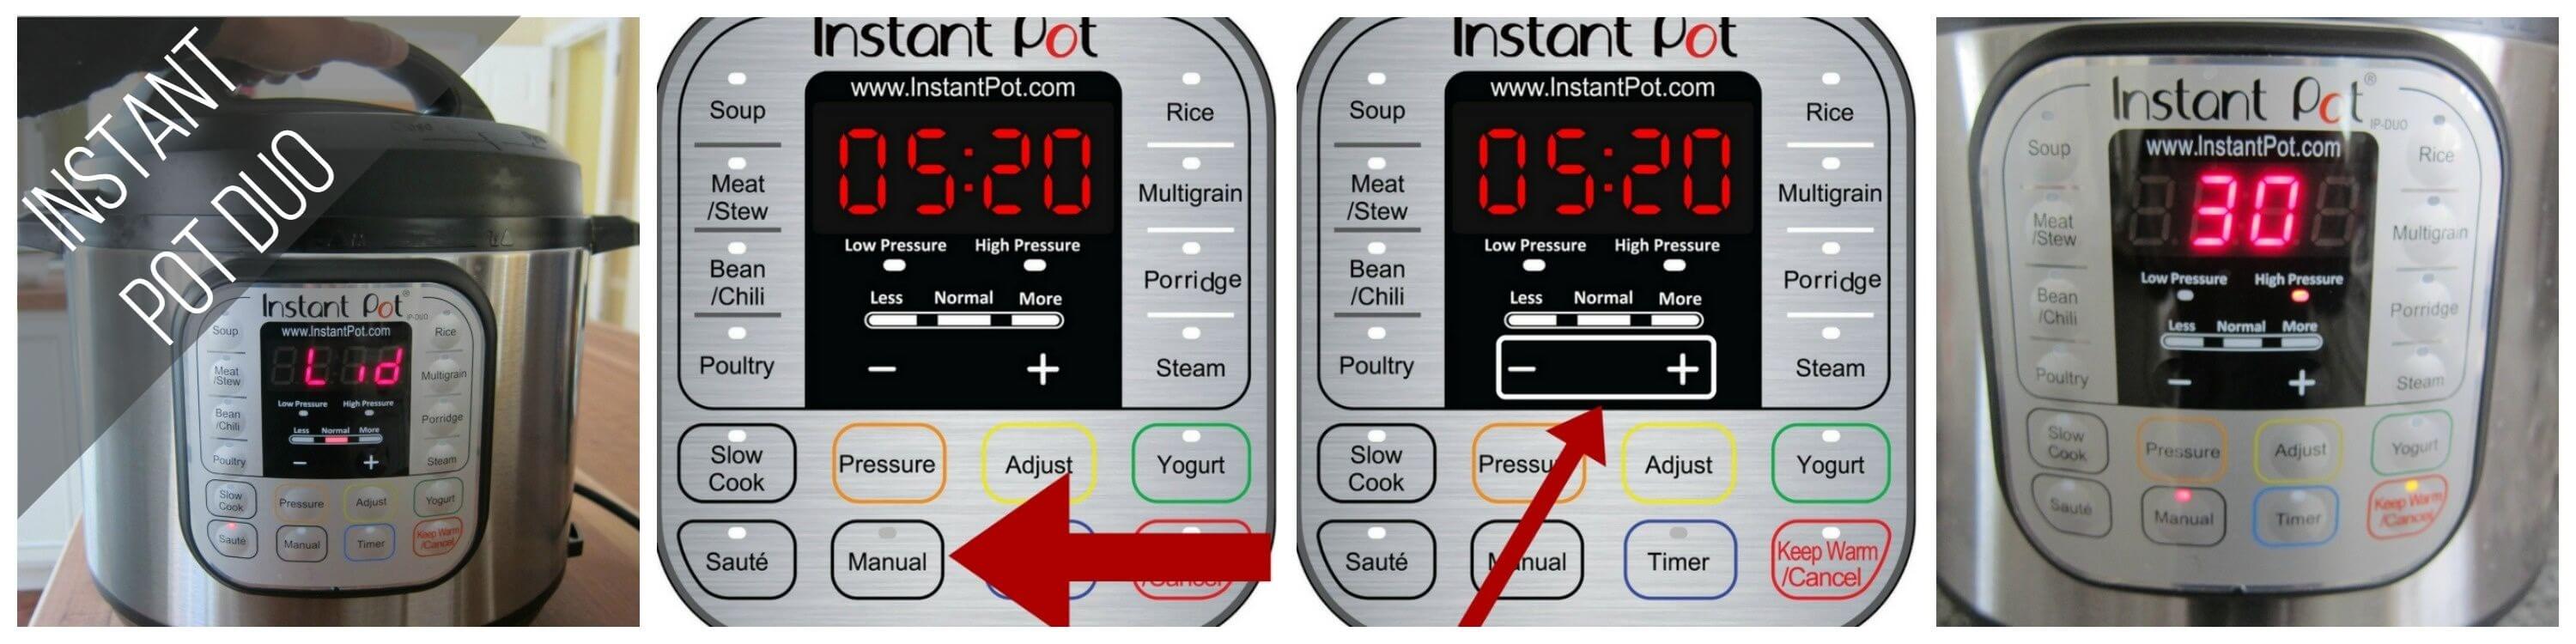
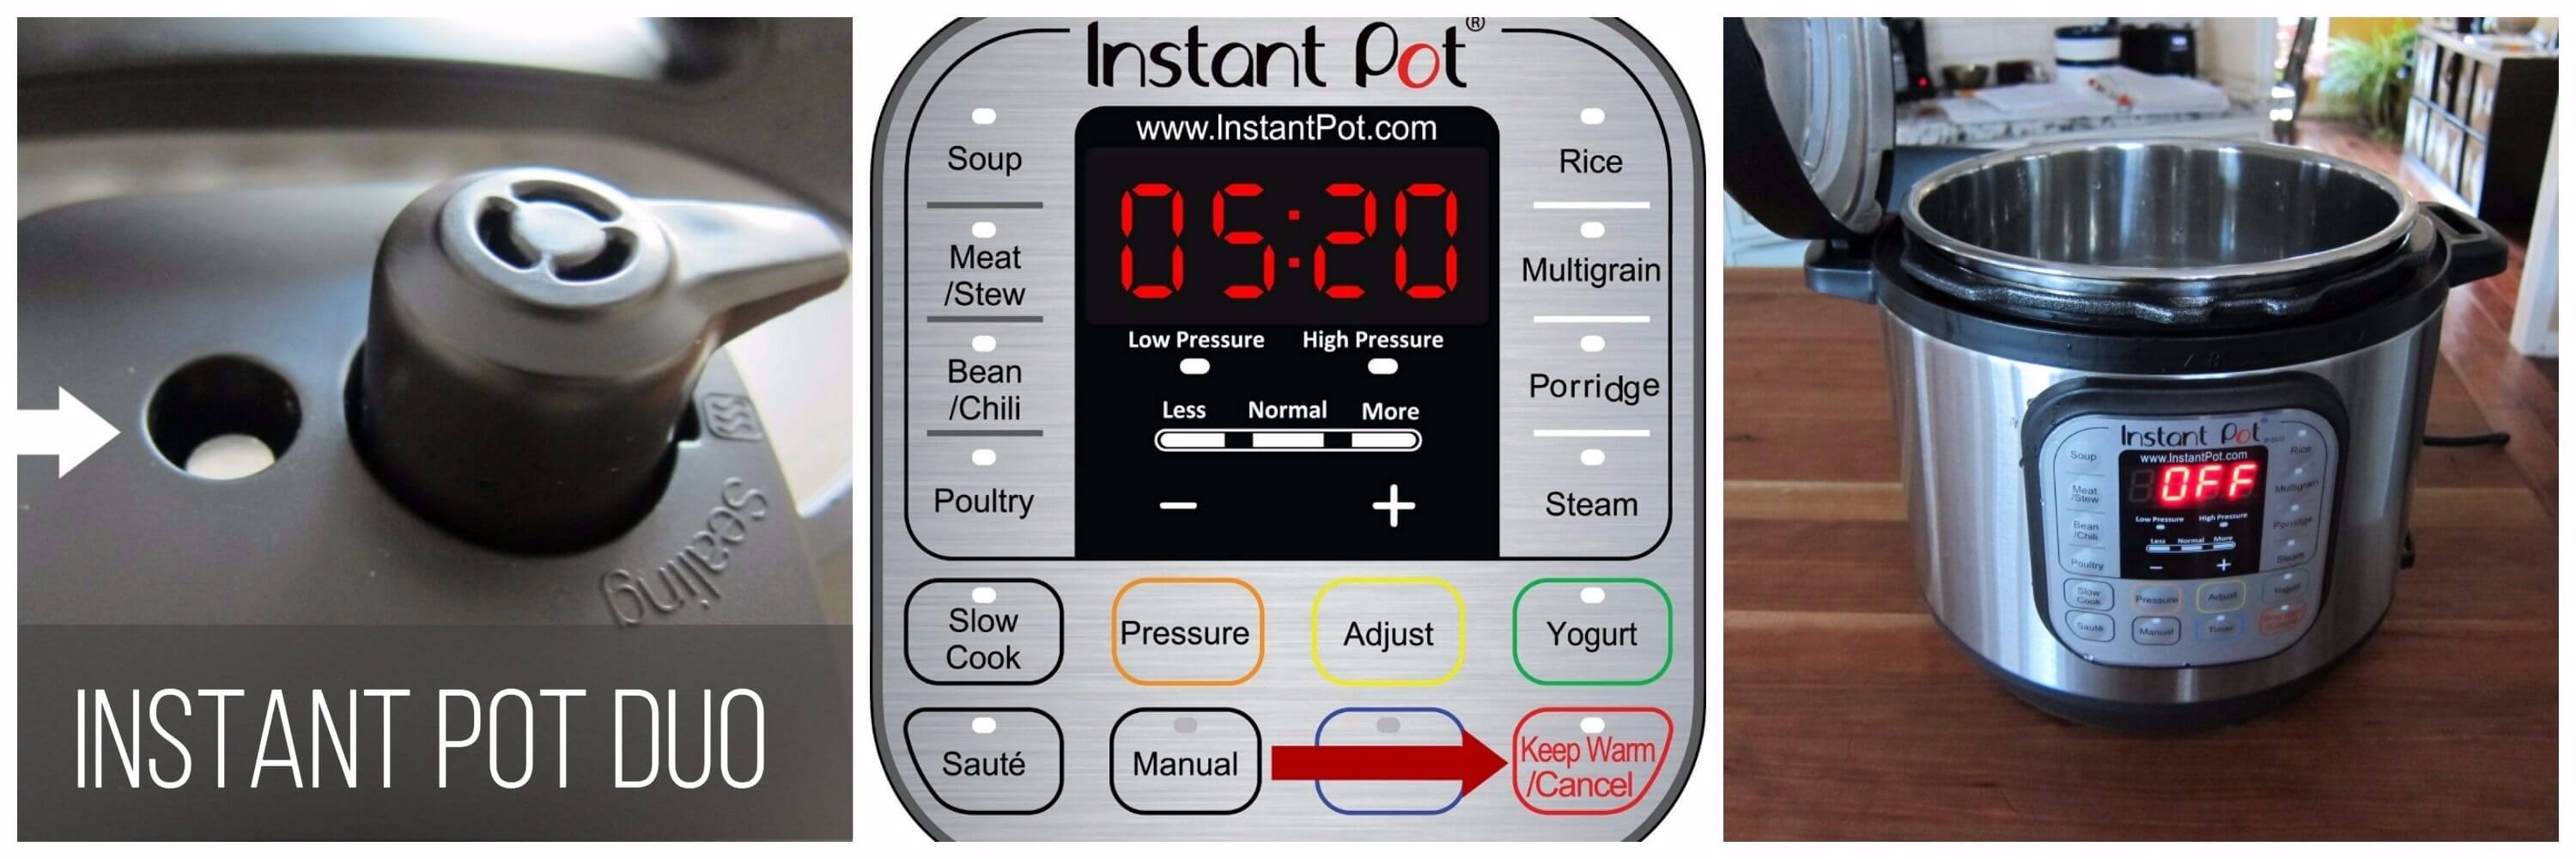
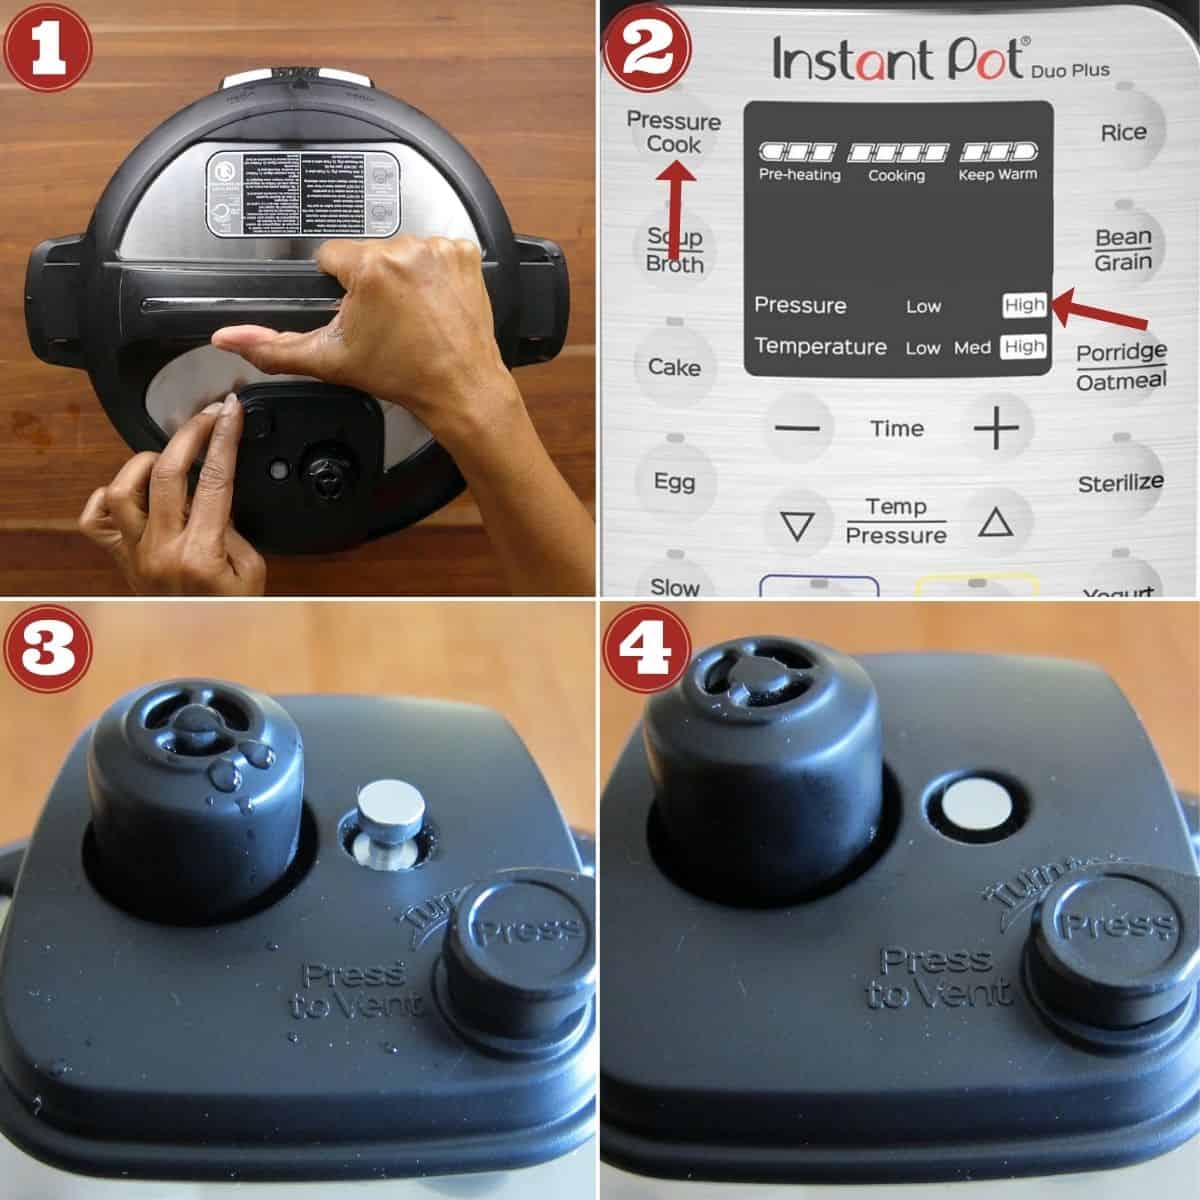
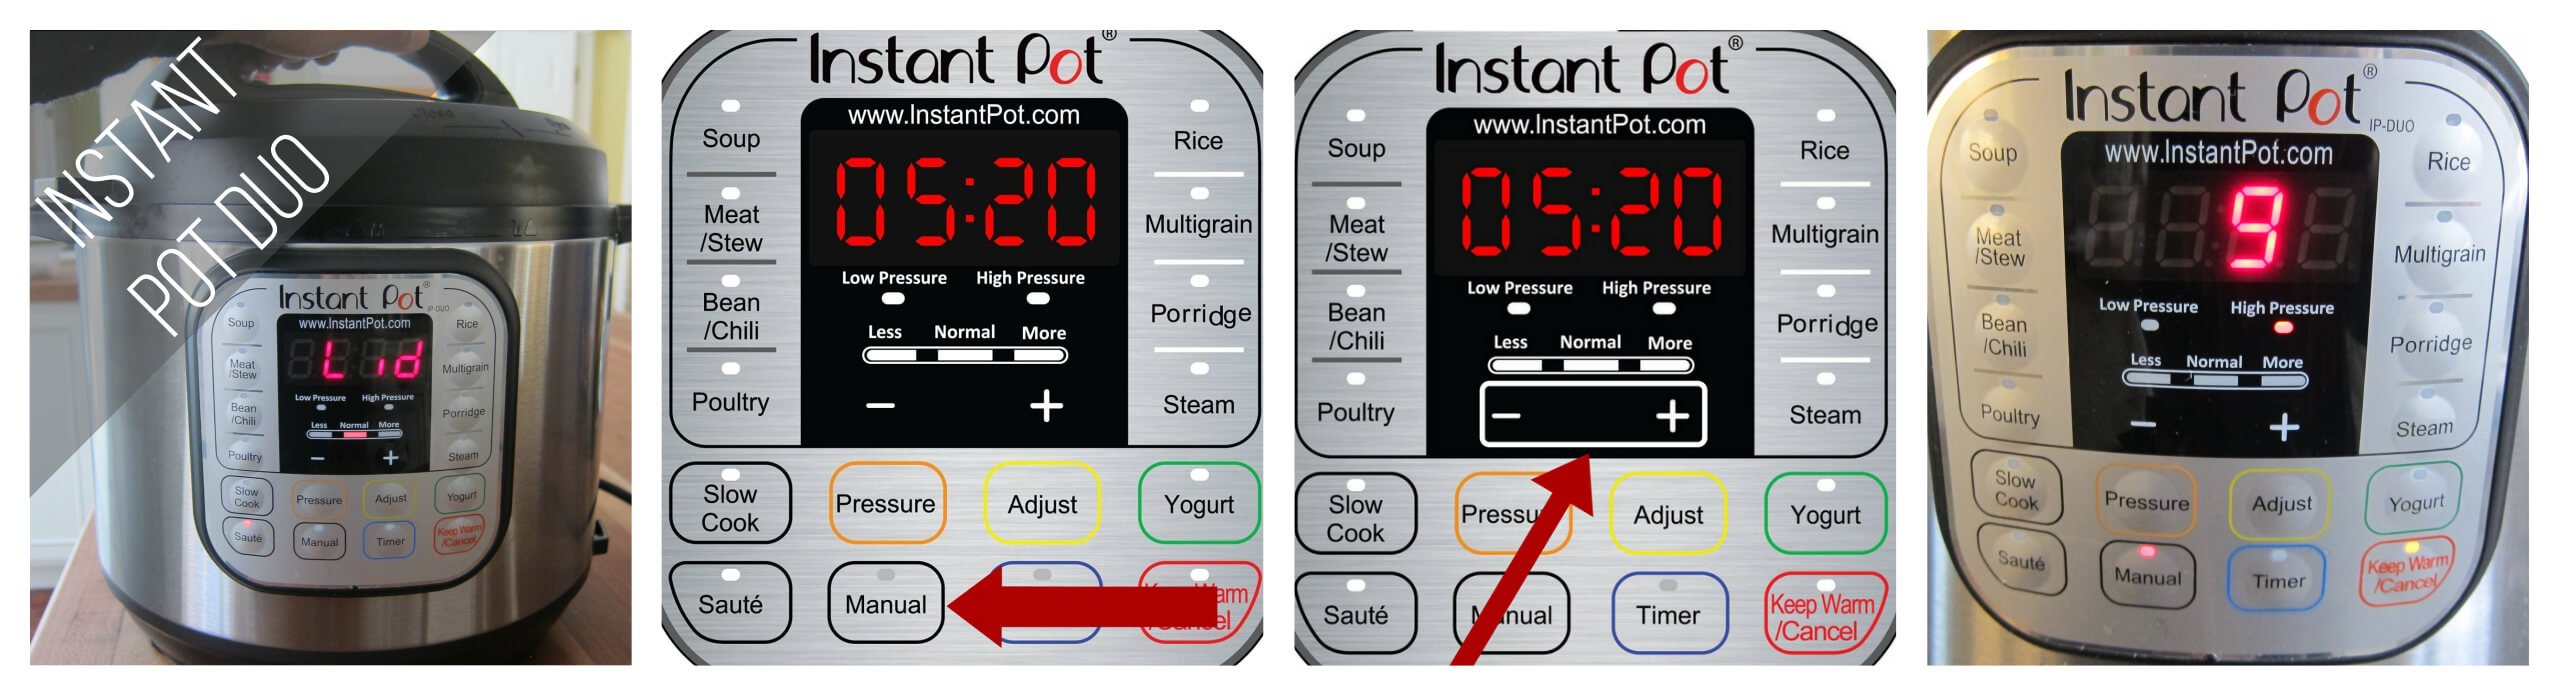
Instant Pot Duo Pressure Cook 10 minutes

- Close the lid and make sure the steam release handle is in the Sealing position.
- Press Manual (or Pressure Cook) and + or – until the display reads 10 (10 minutes).
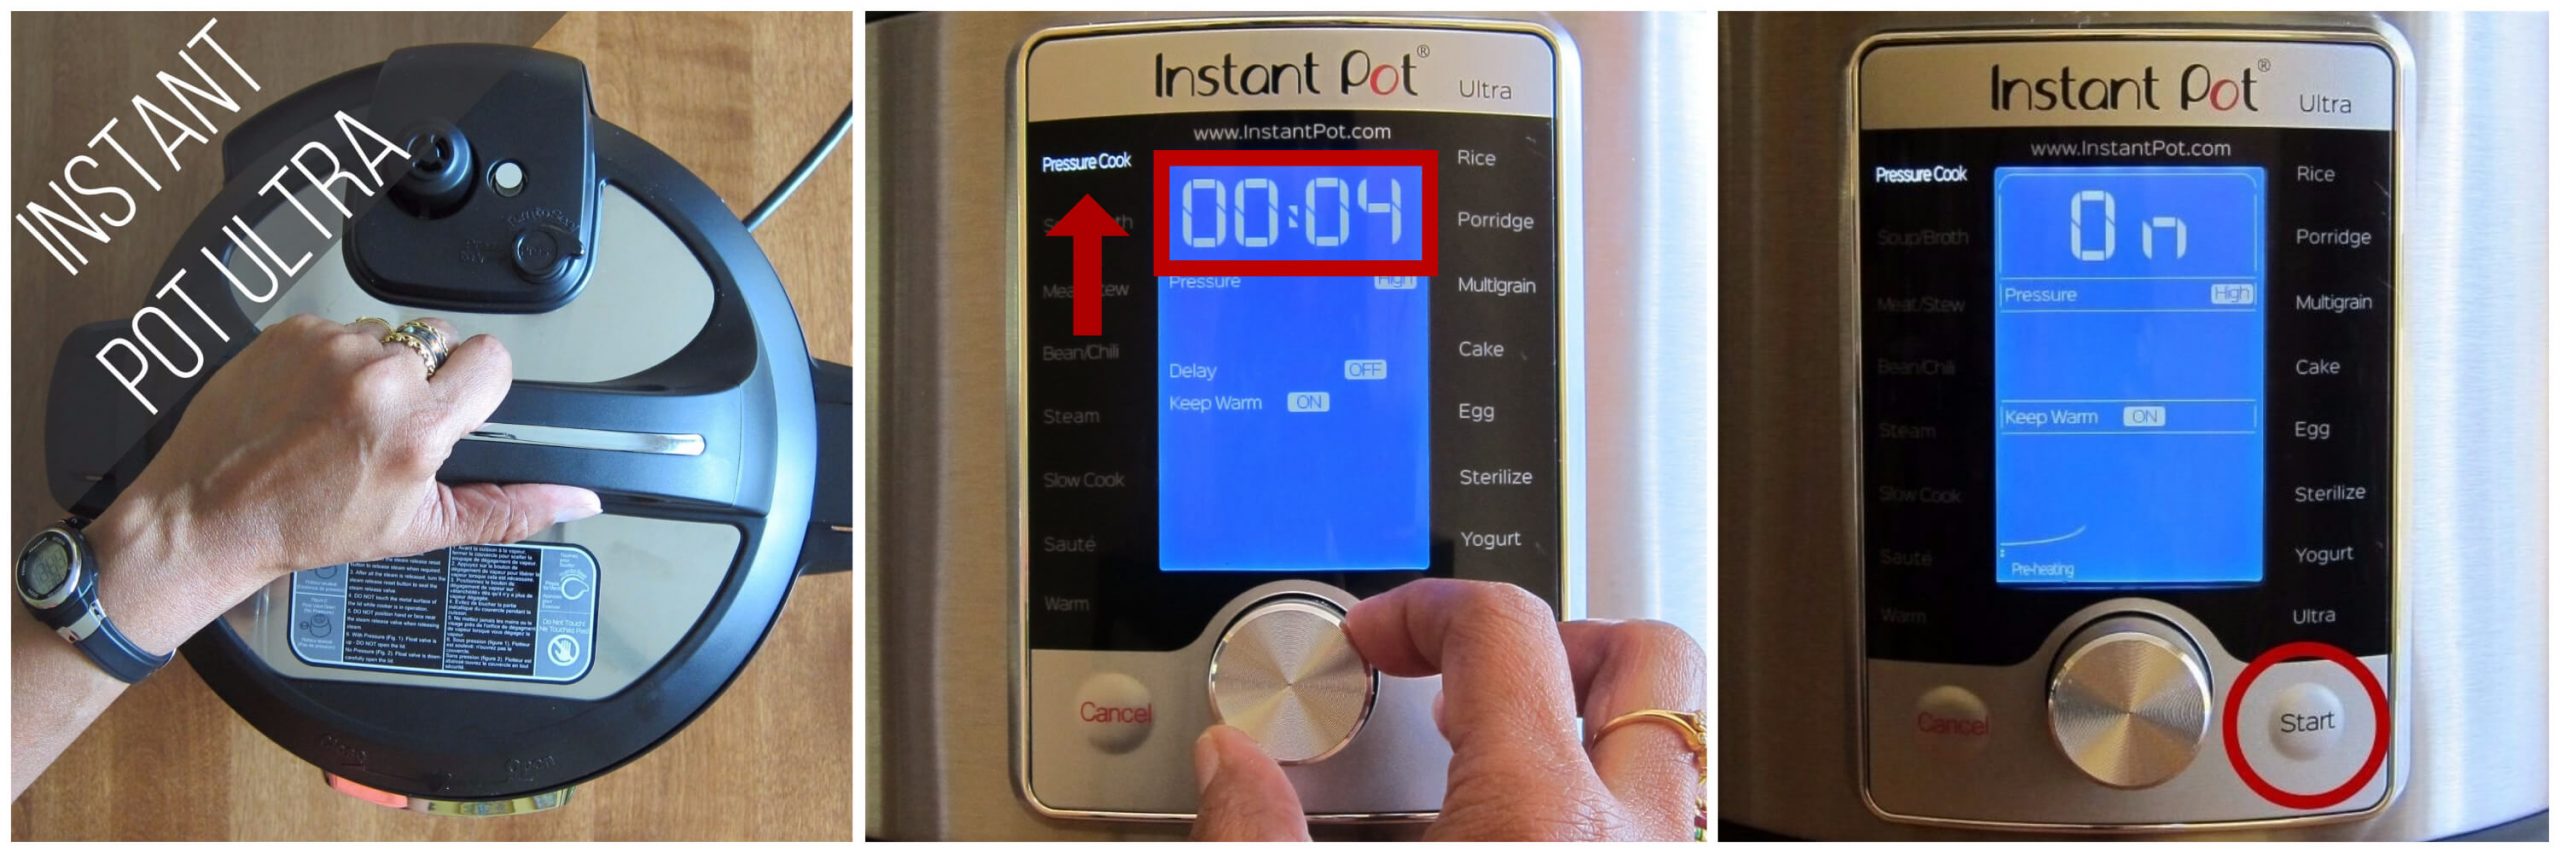
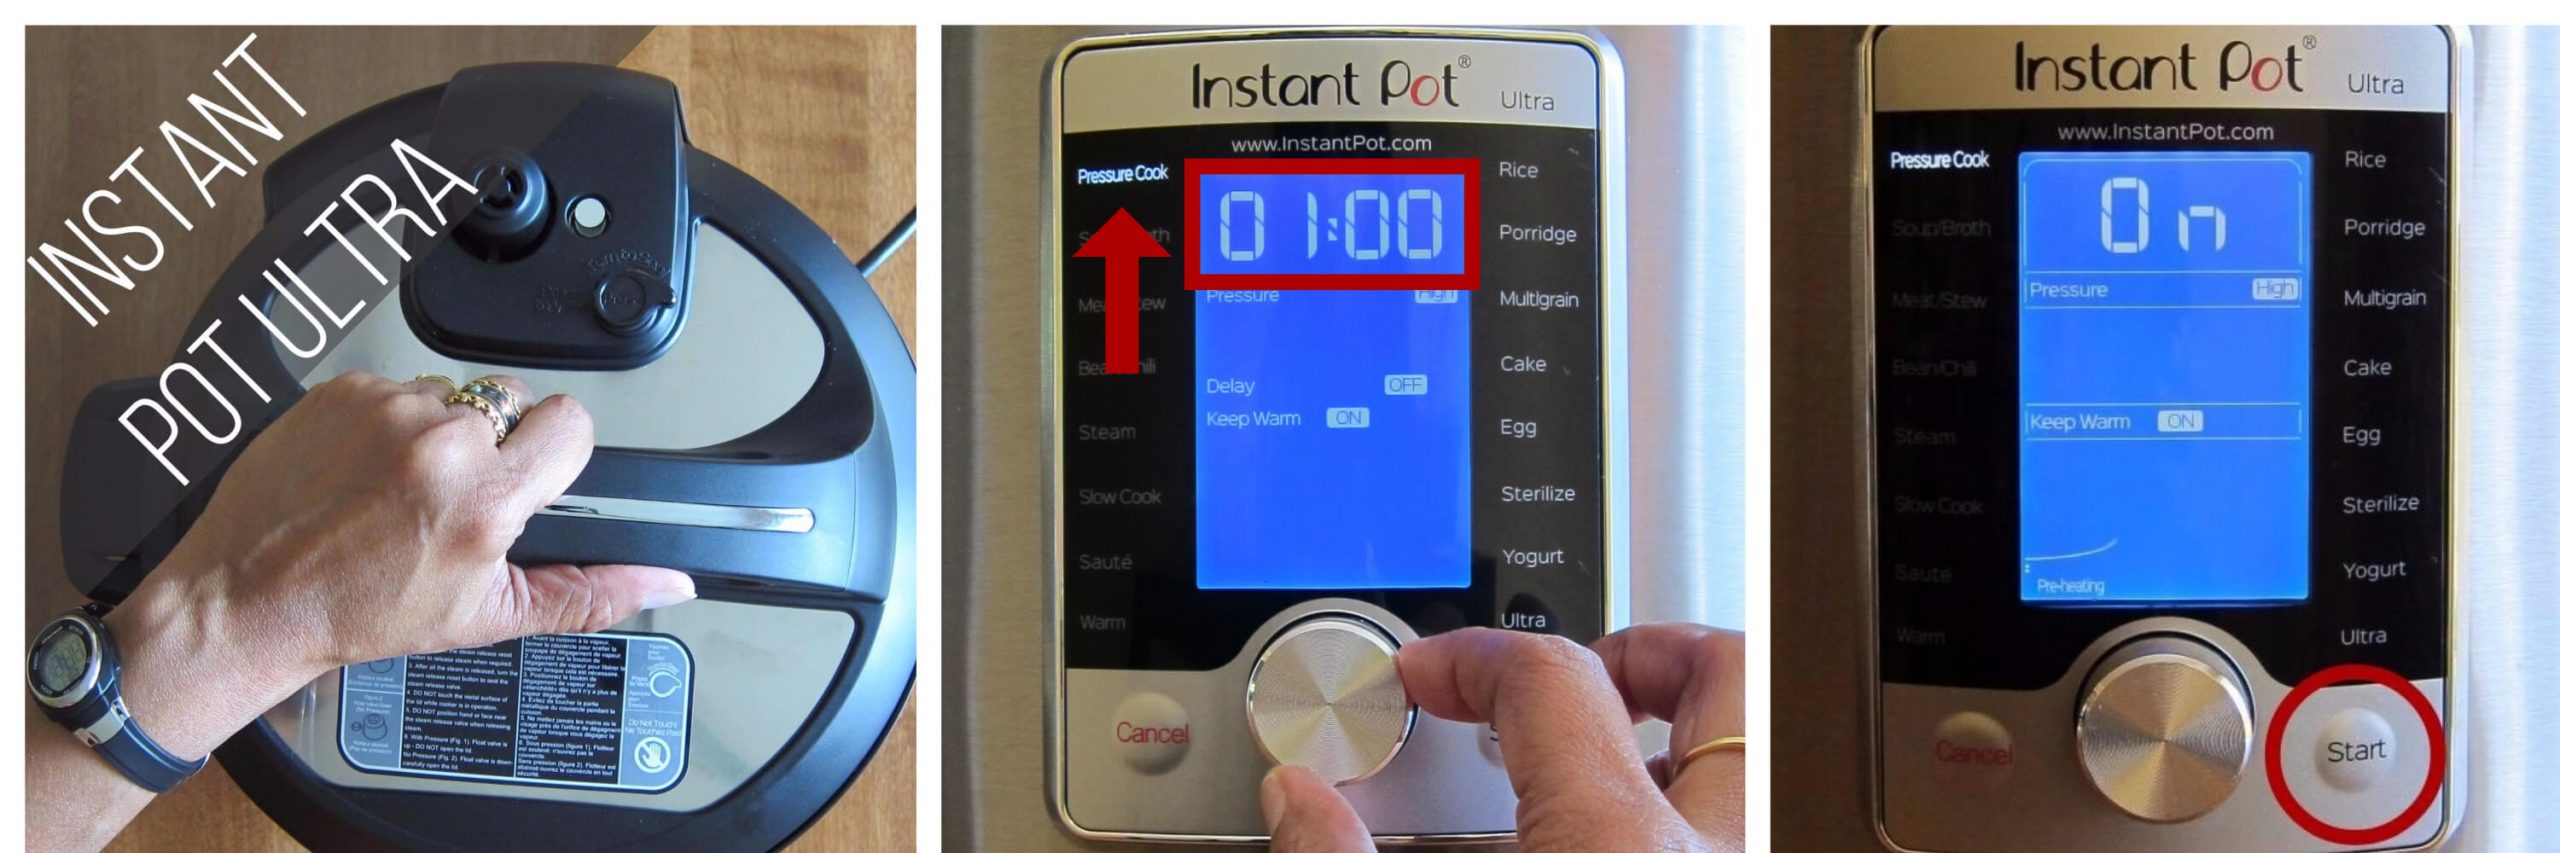
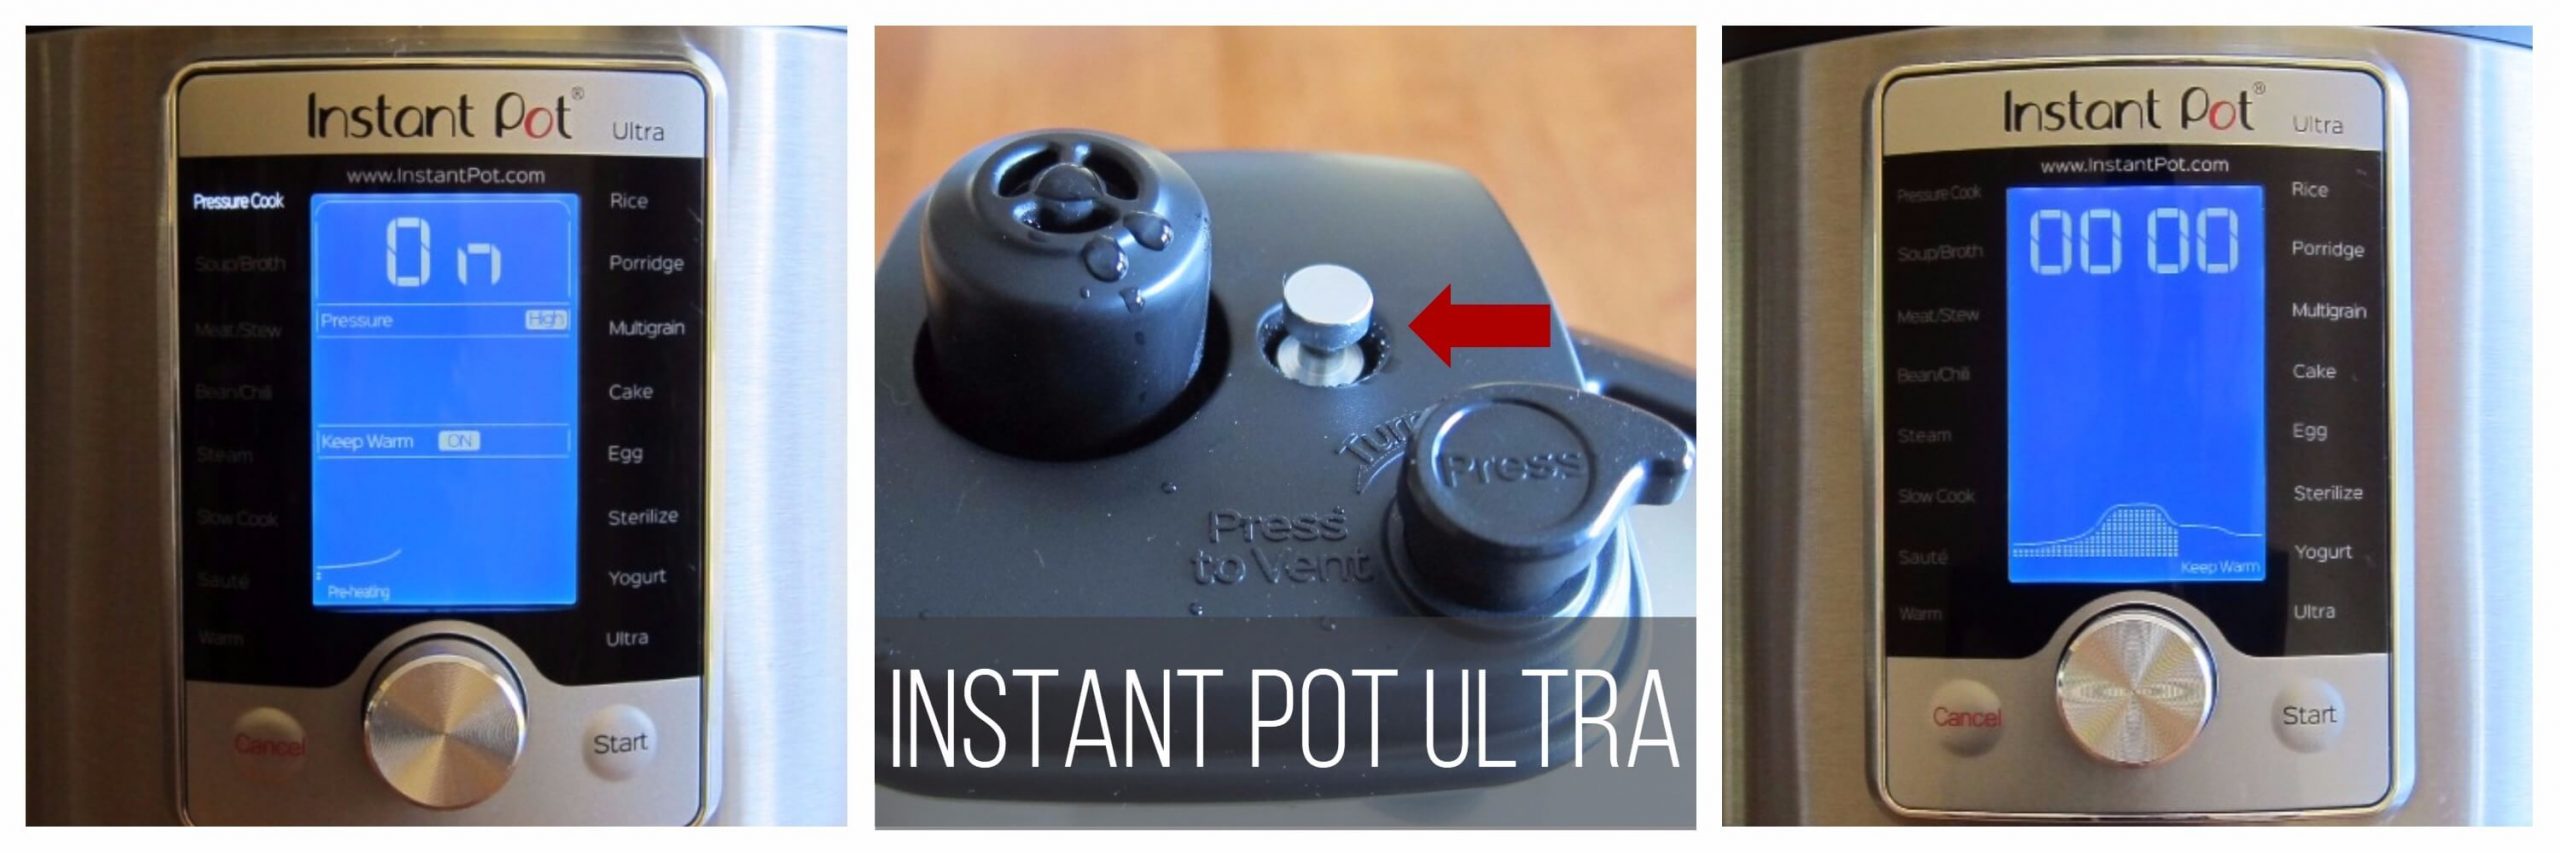
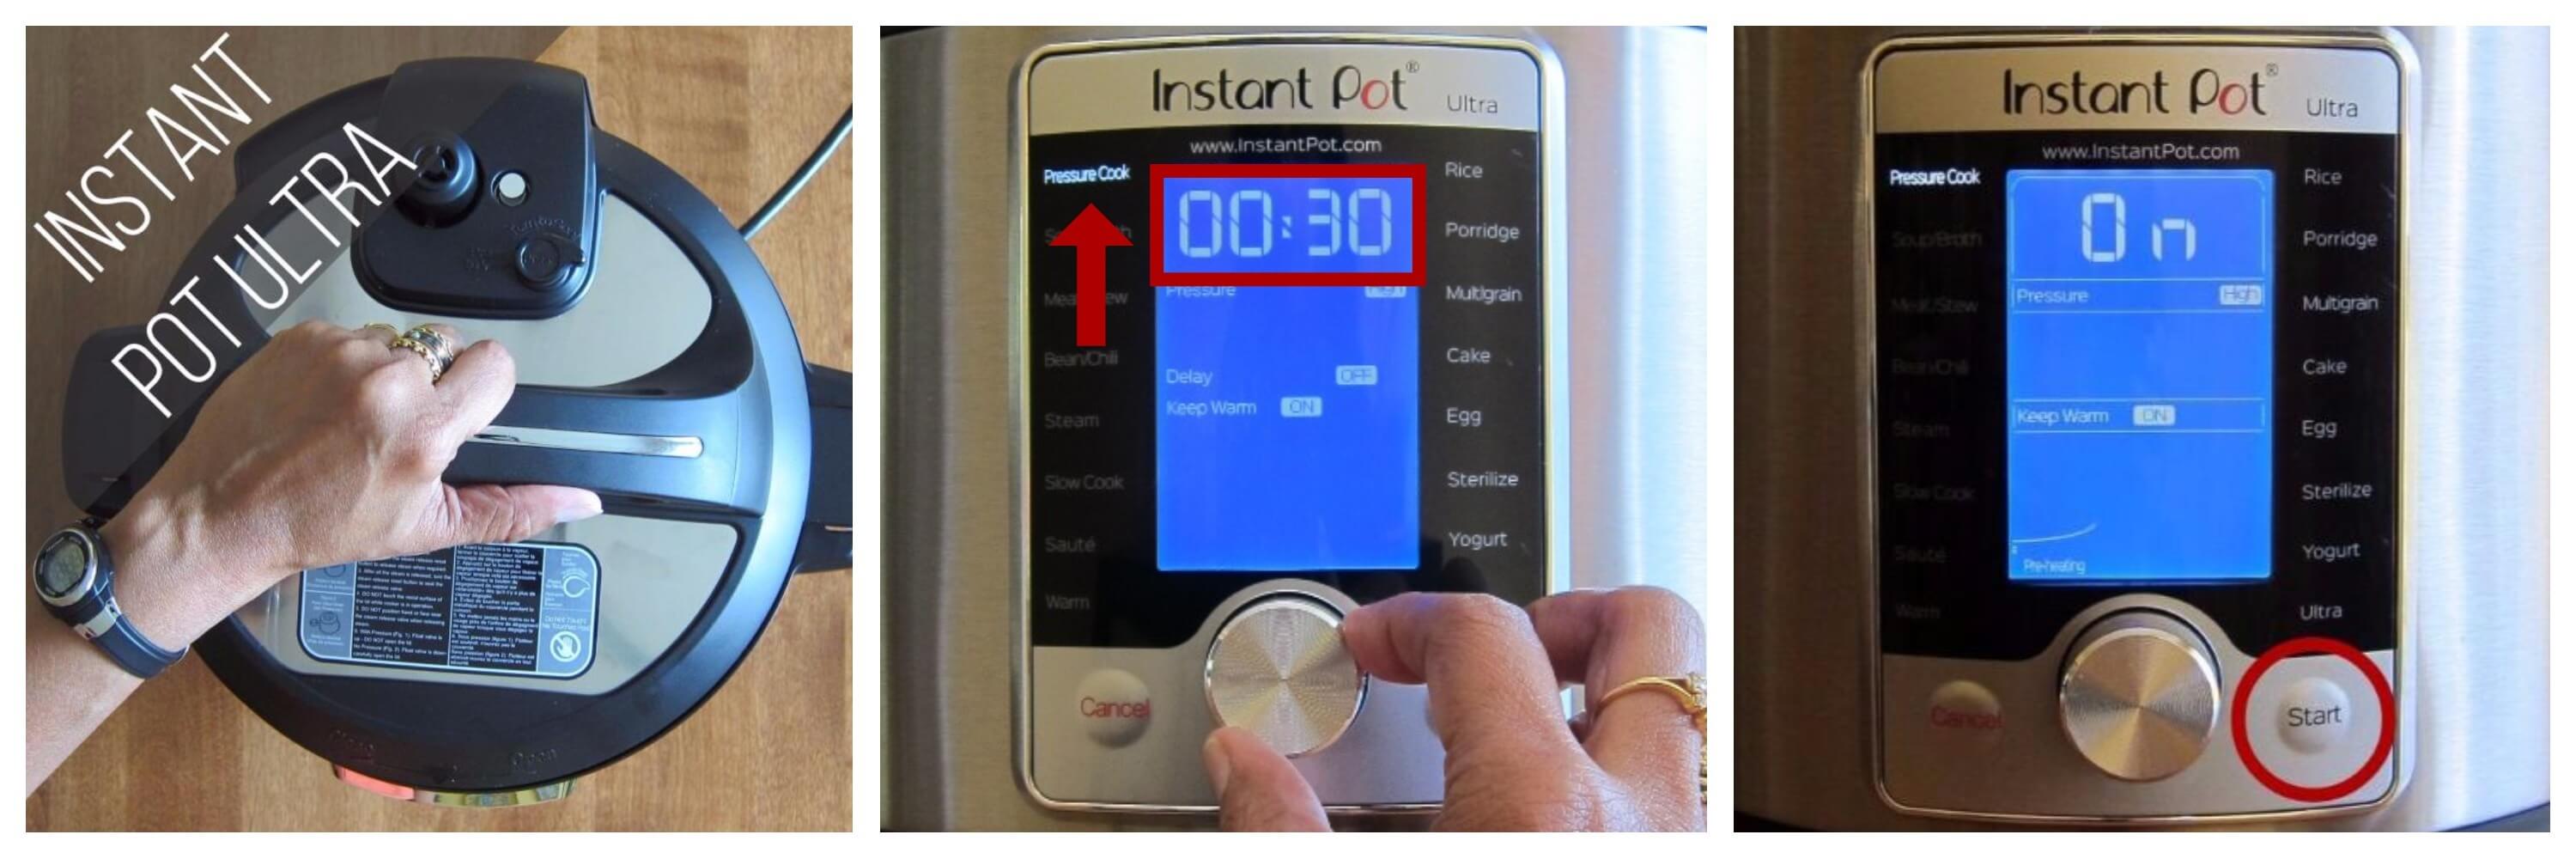
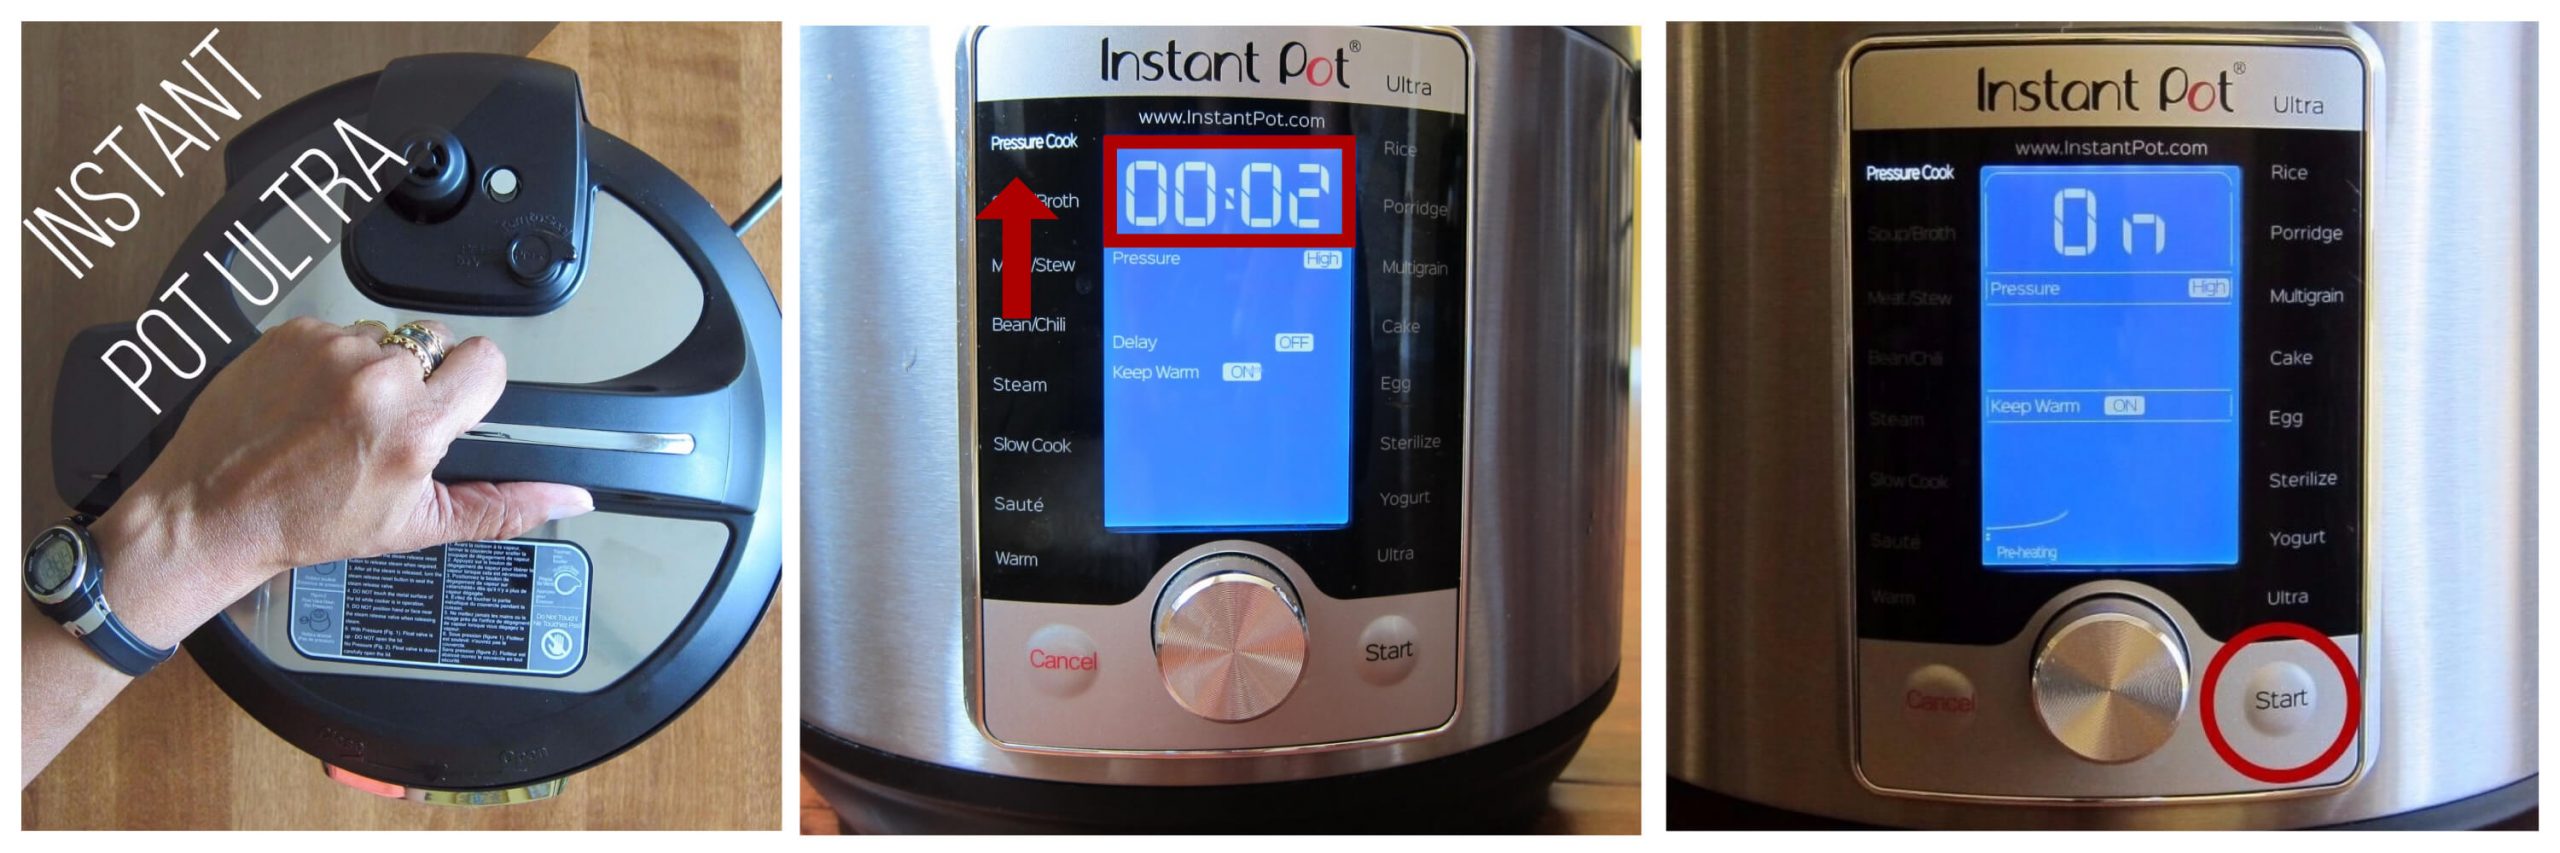
Instant Pot Ultra Pressure Cook 10 minutes
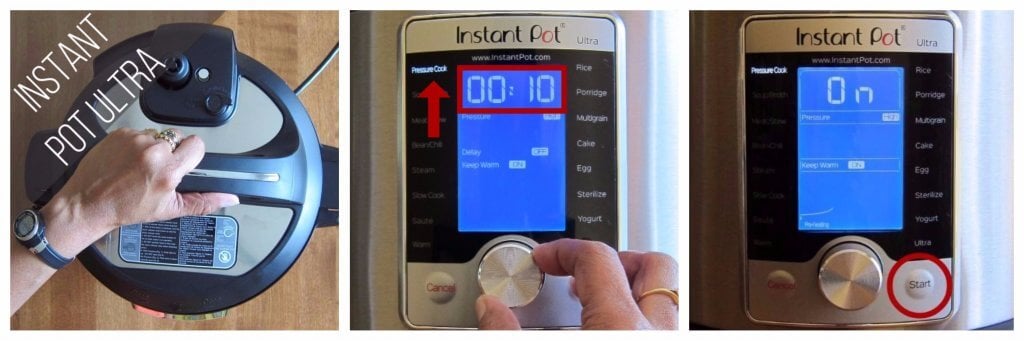
- Close the lid.
- Select Pressure Cook mode and adjust the time to 10 minutes (00:10).
- Press Start.
Pressure Cooking Process (Duo and Ultra)
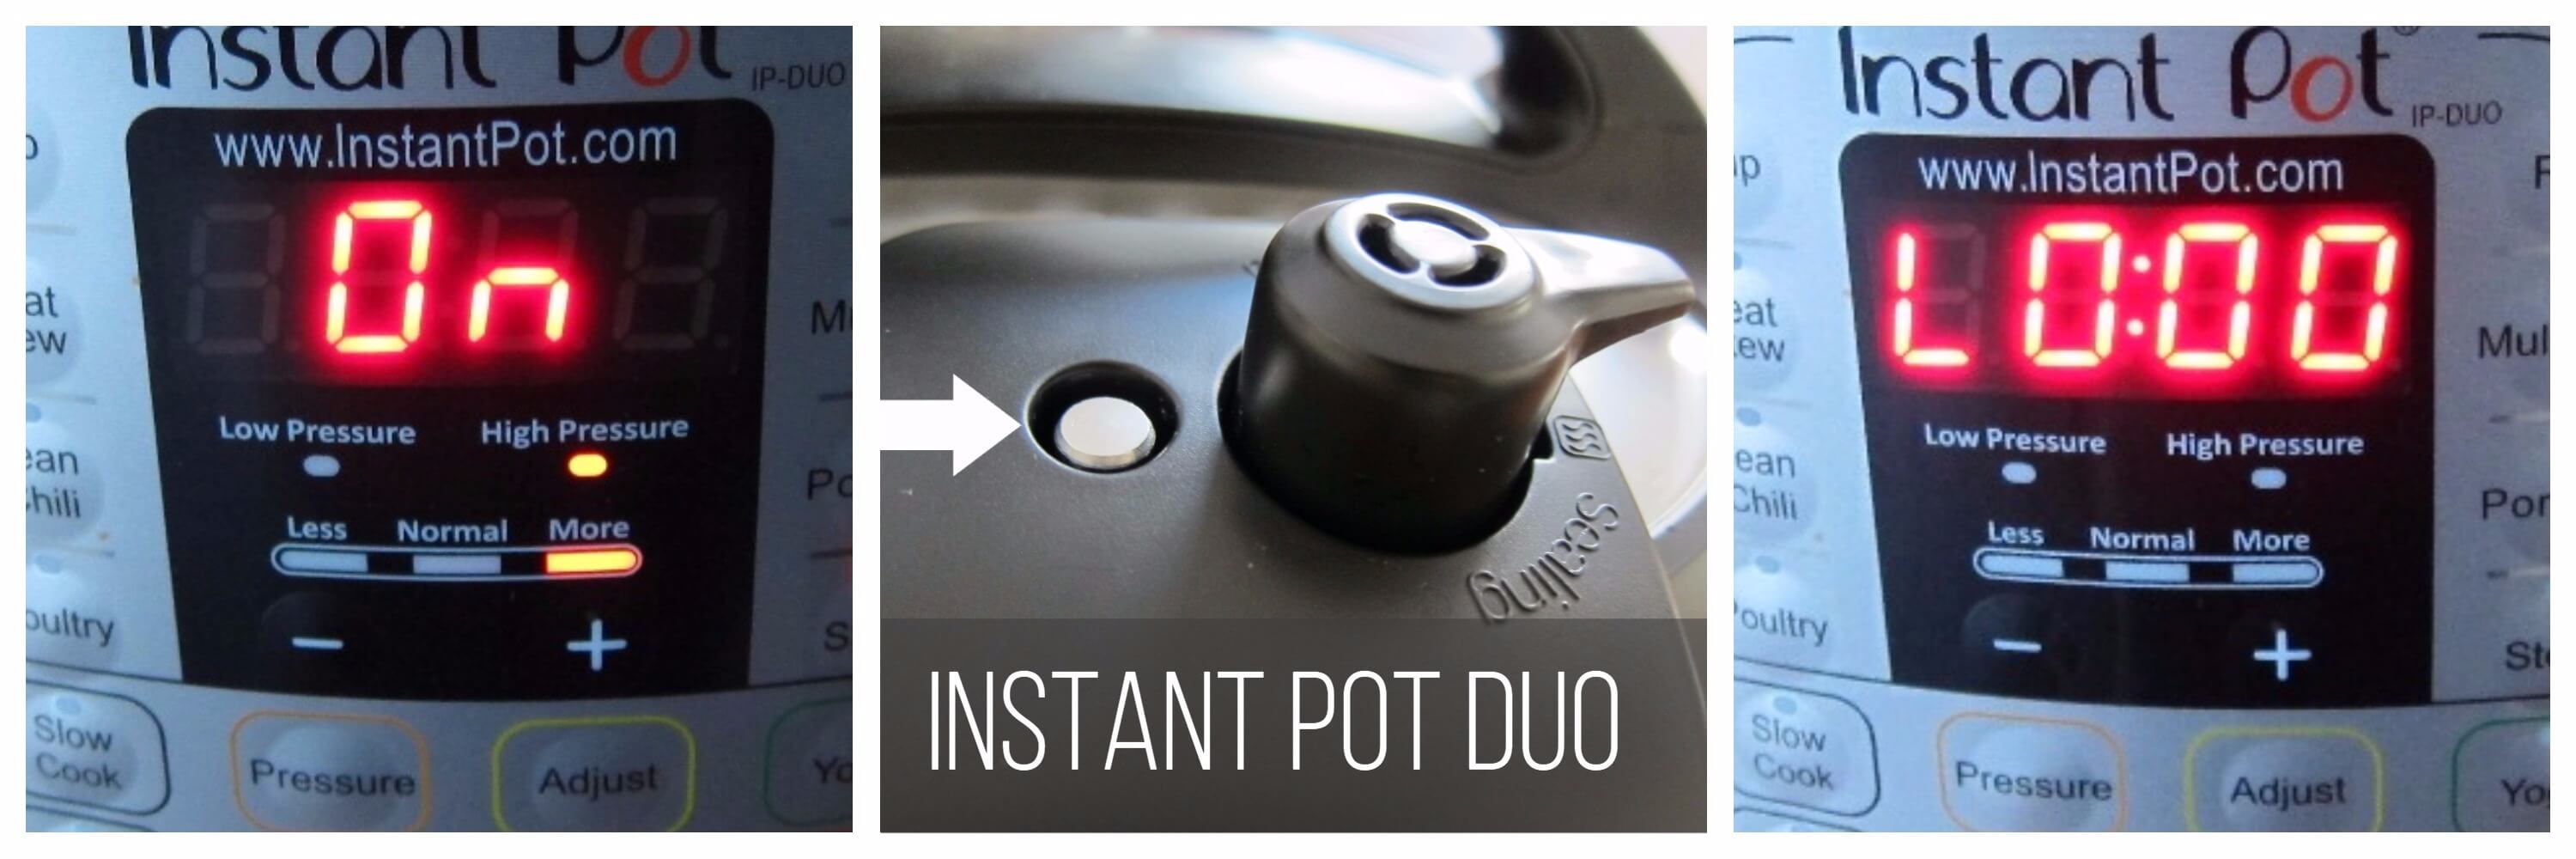
- Instant Pot display will change to On.
- Once the Instant Pot is pressurized, the float valve will go up.
- The display will count down to 0; it will then switch to Keep Warm mode and display L0:00 or 00 00 and begin to count up the number of minutes since pressure cooking completed.
How to do a 10-minute Natural Release of Pressure
- Allow the Instant Pot to stay in Keep Warm mode for 10 minutes.
How to Release any Remaining Pressure on the DUO

- Move the steam release handle to Venting. Any remaining steam will come out of the steam release handle.
- When your Instant Pot is depressurized, the float valve will be in the down position.
- Press Cancel and open the Instant Pot.
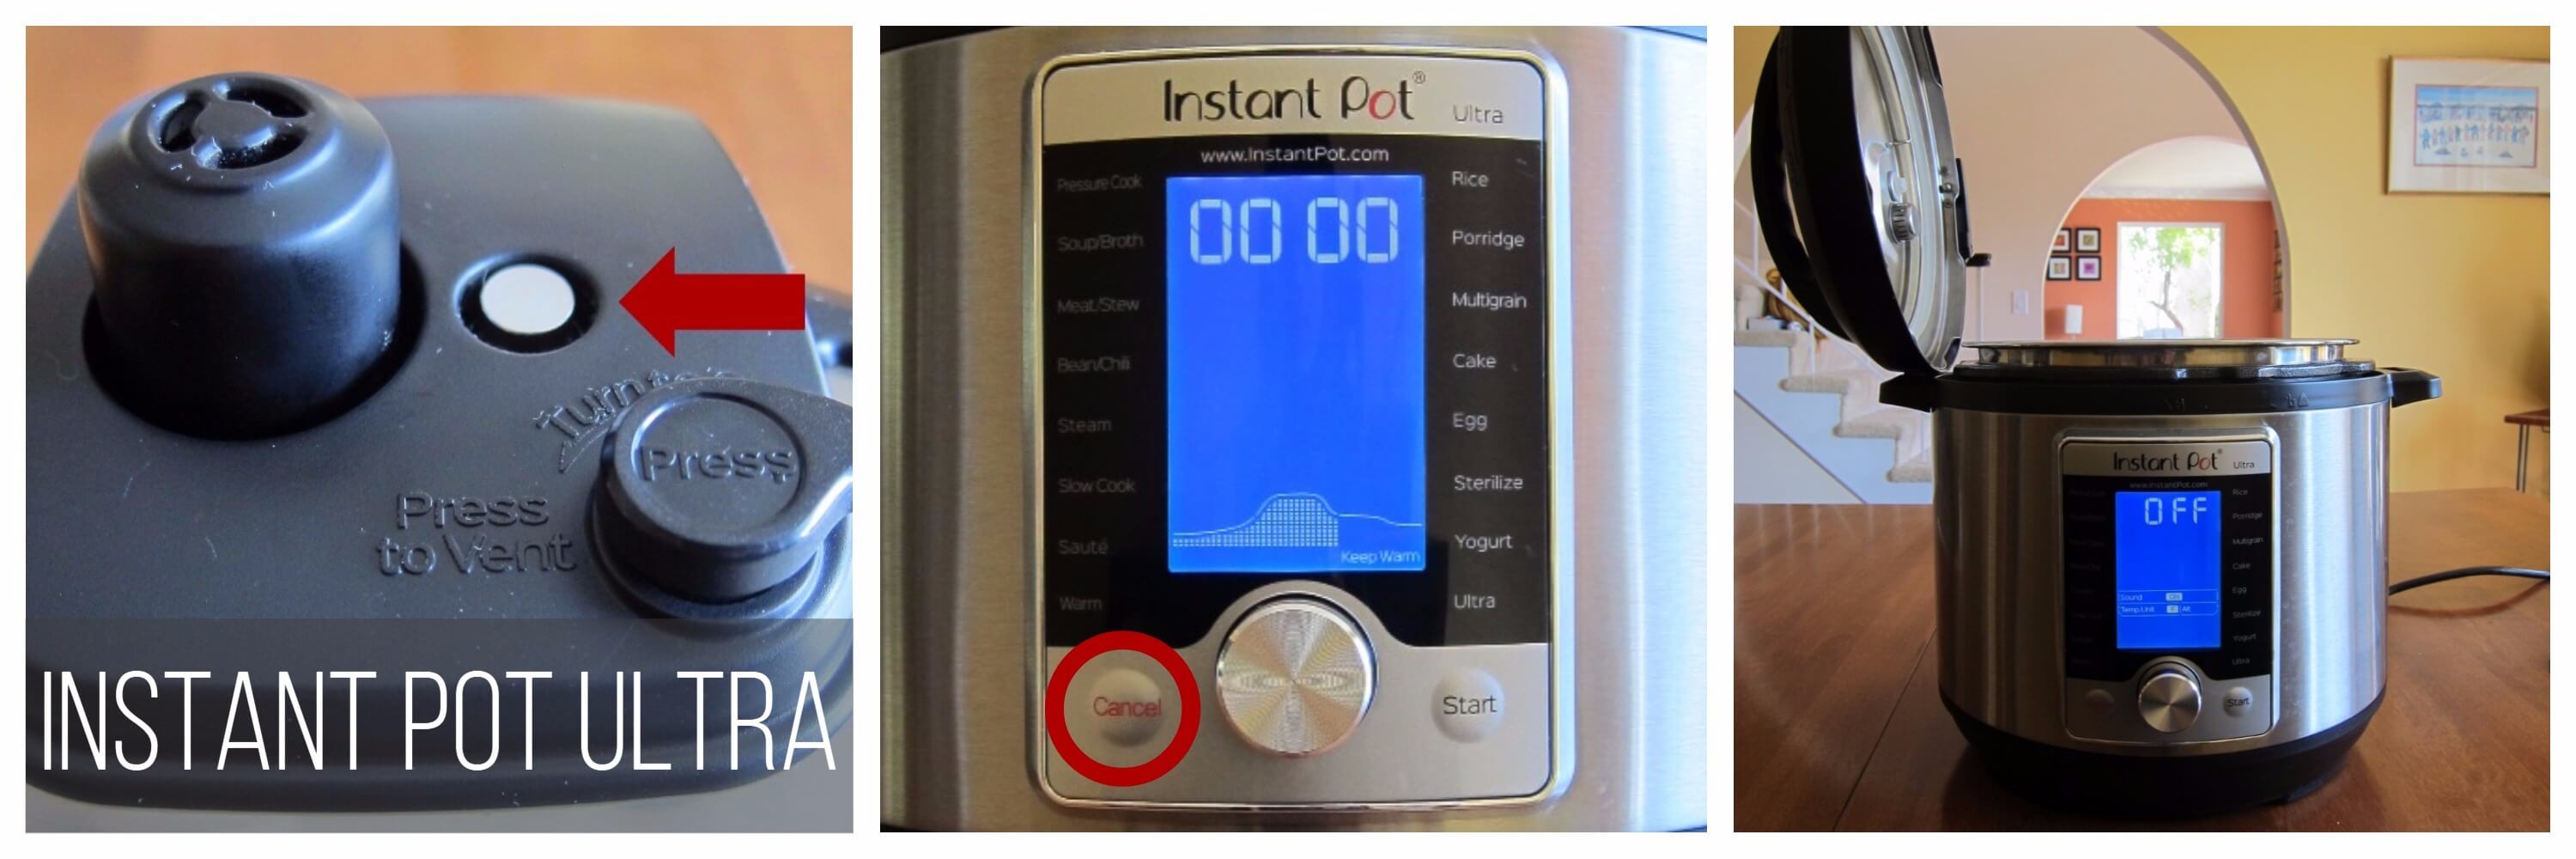
How to Release any Remaining Pressure on the ULTRA
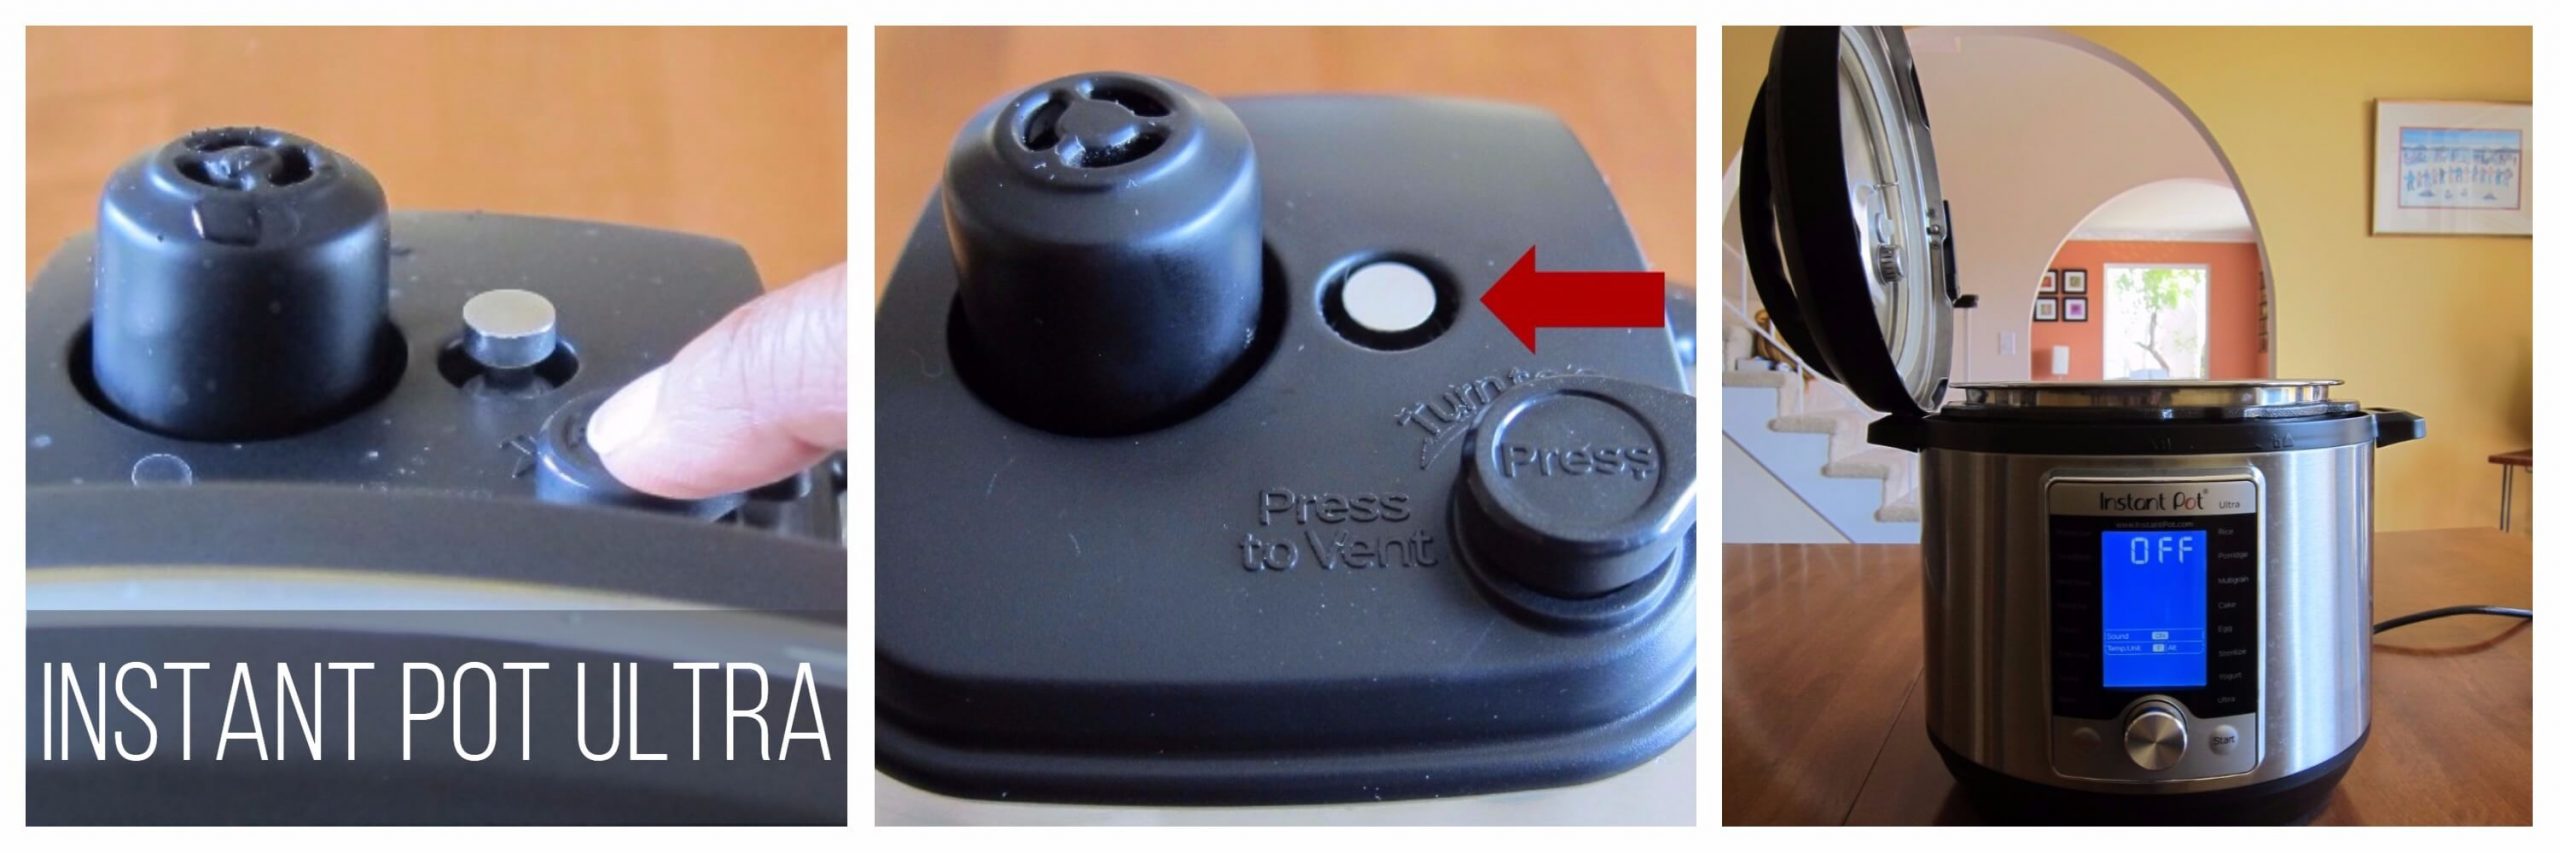
- Press down on the Steam Release Button until it locks into place, and any remaining steam will come out of the Steam Release Valve.
- When your Instant Pot is depressurized, the float valve will be in the down position.
- Press Cancel and open the Instant Pot.
[Find out more about the pressure release methods and how and when to use them. ]
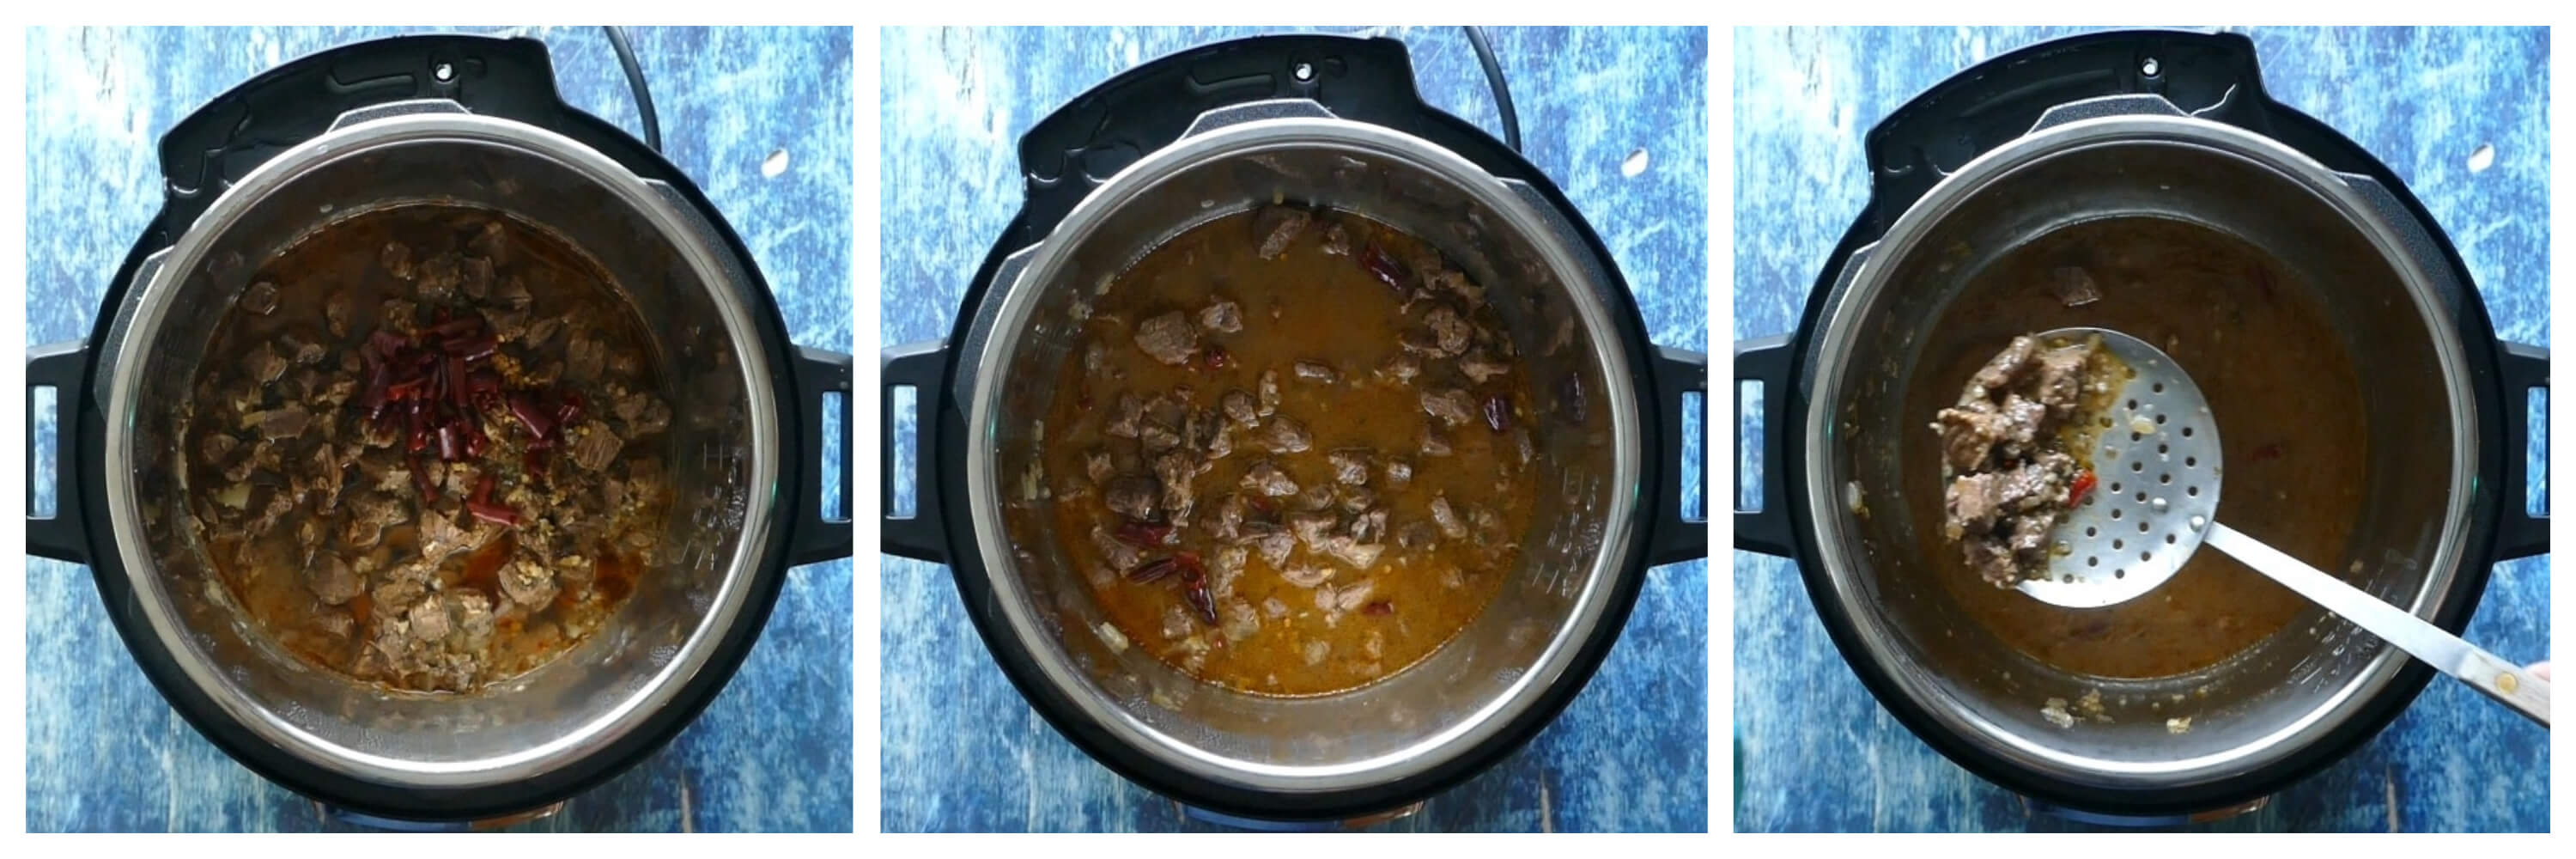
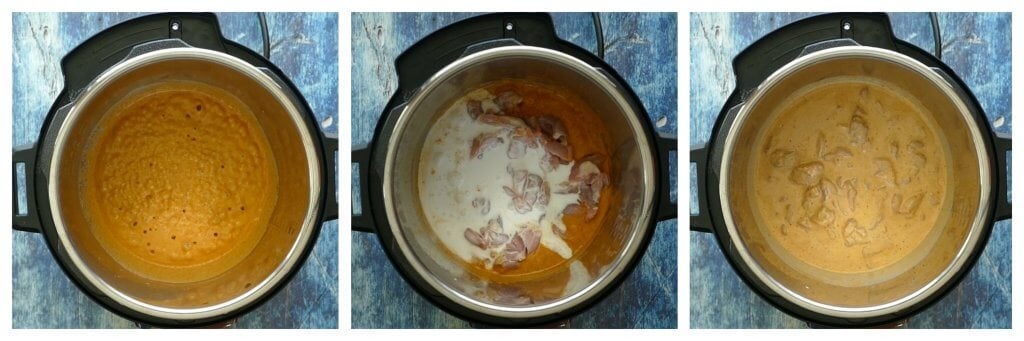
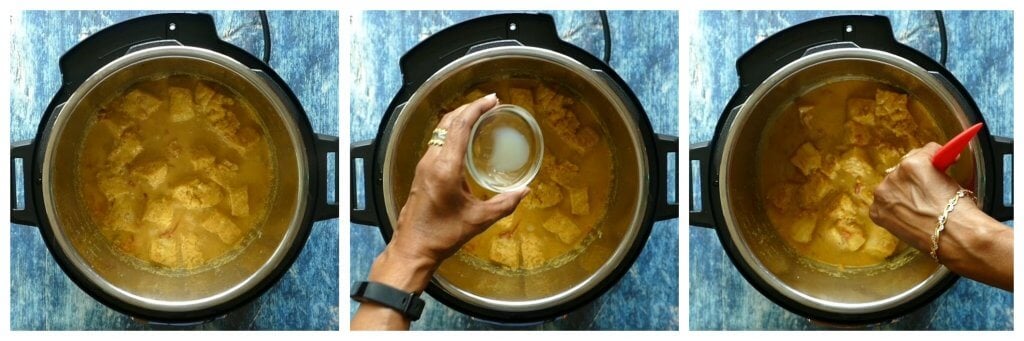
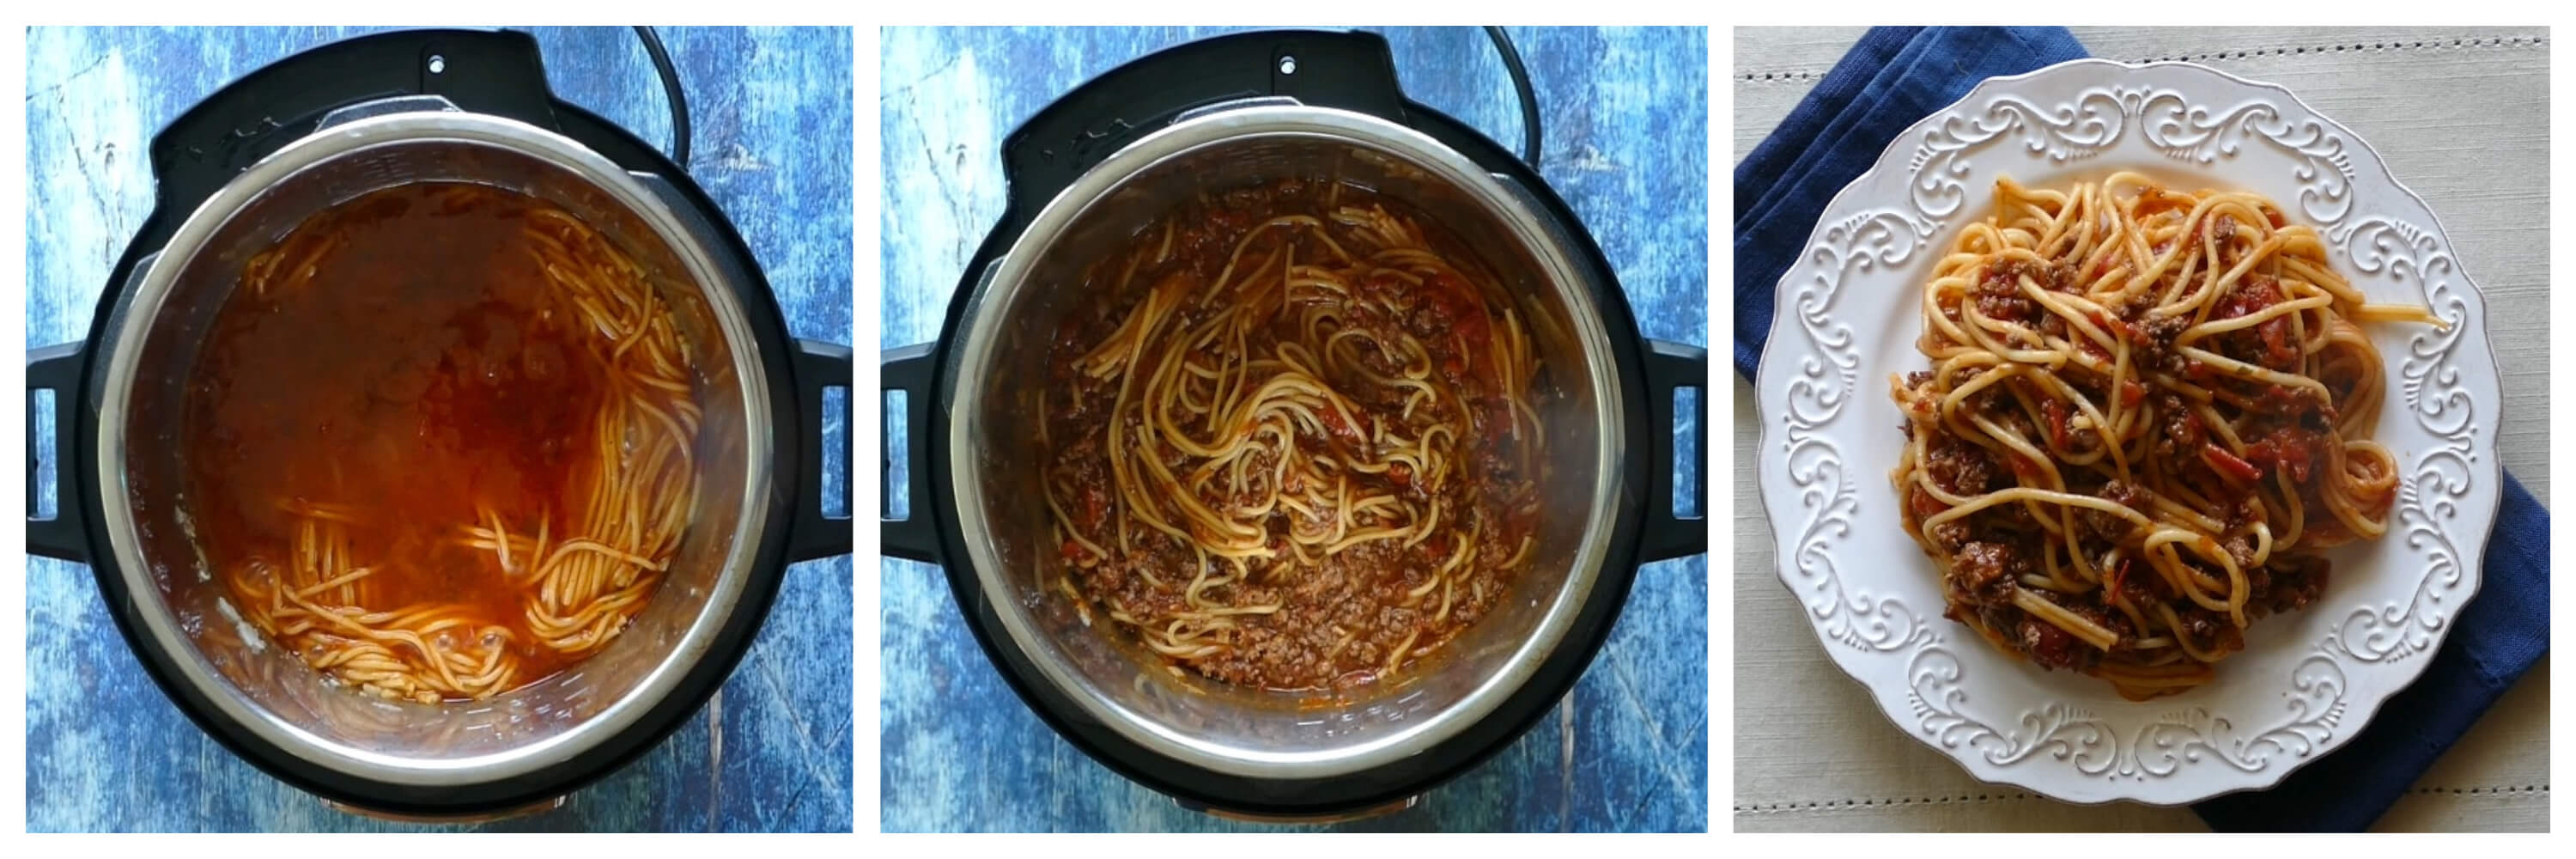
Stir in Shrimp
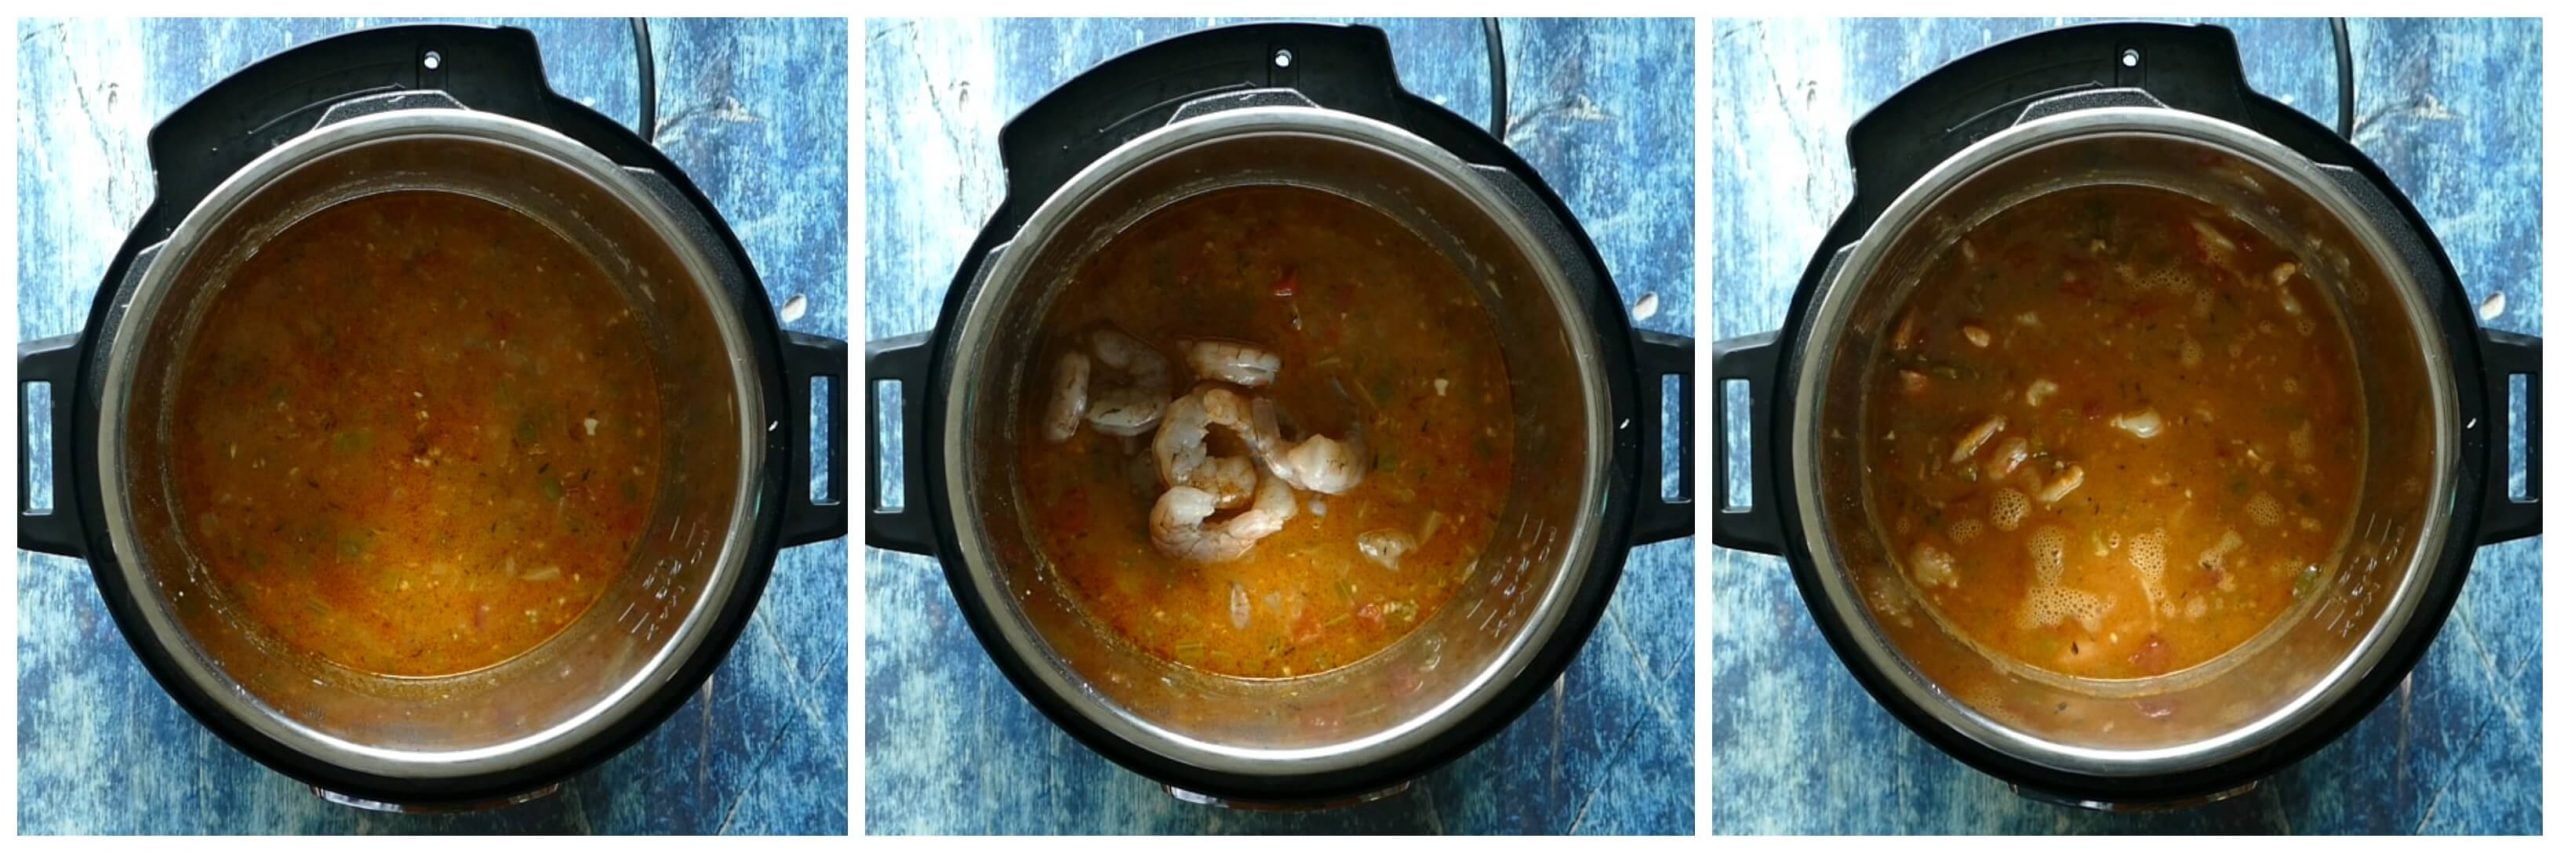
- Immediately stir in the shrimp and dry sherry (if using) and close the Instant Pot for 10 minutes. *
- The shrimp will cook in the residual heat. If you have trouble shutting the lid, keep the steam release valve in the venting position (or push down on the steam release button on the Ultra) while closing.
Pro Tip
* Be sure not to let too much heat and steam escape before adding the shrimp. The shrimp will be cooking in the residual heat.
Garnish
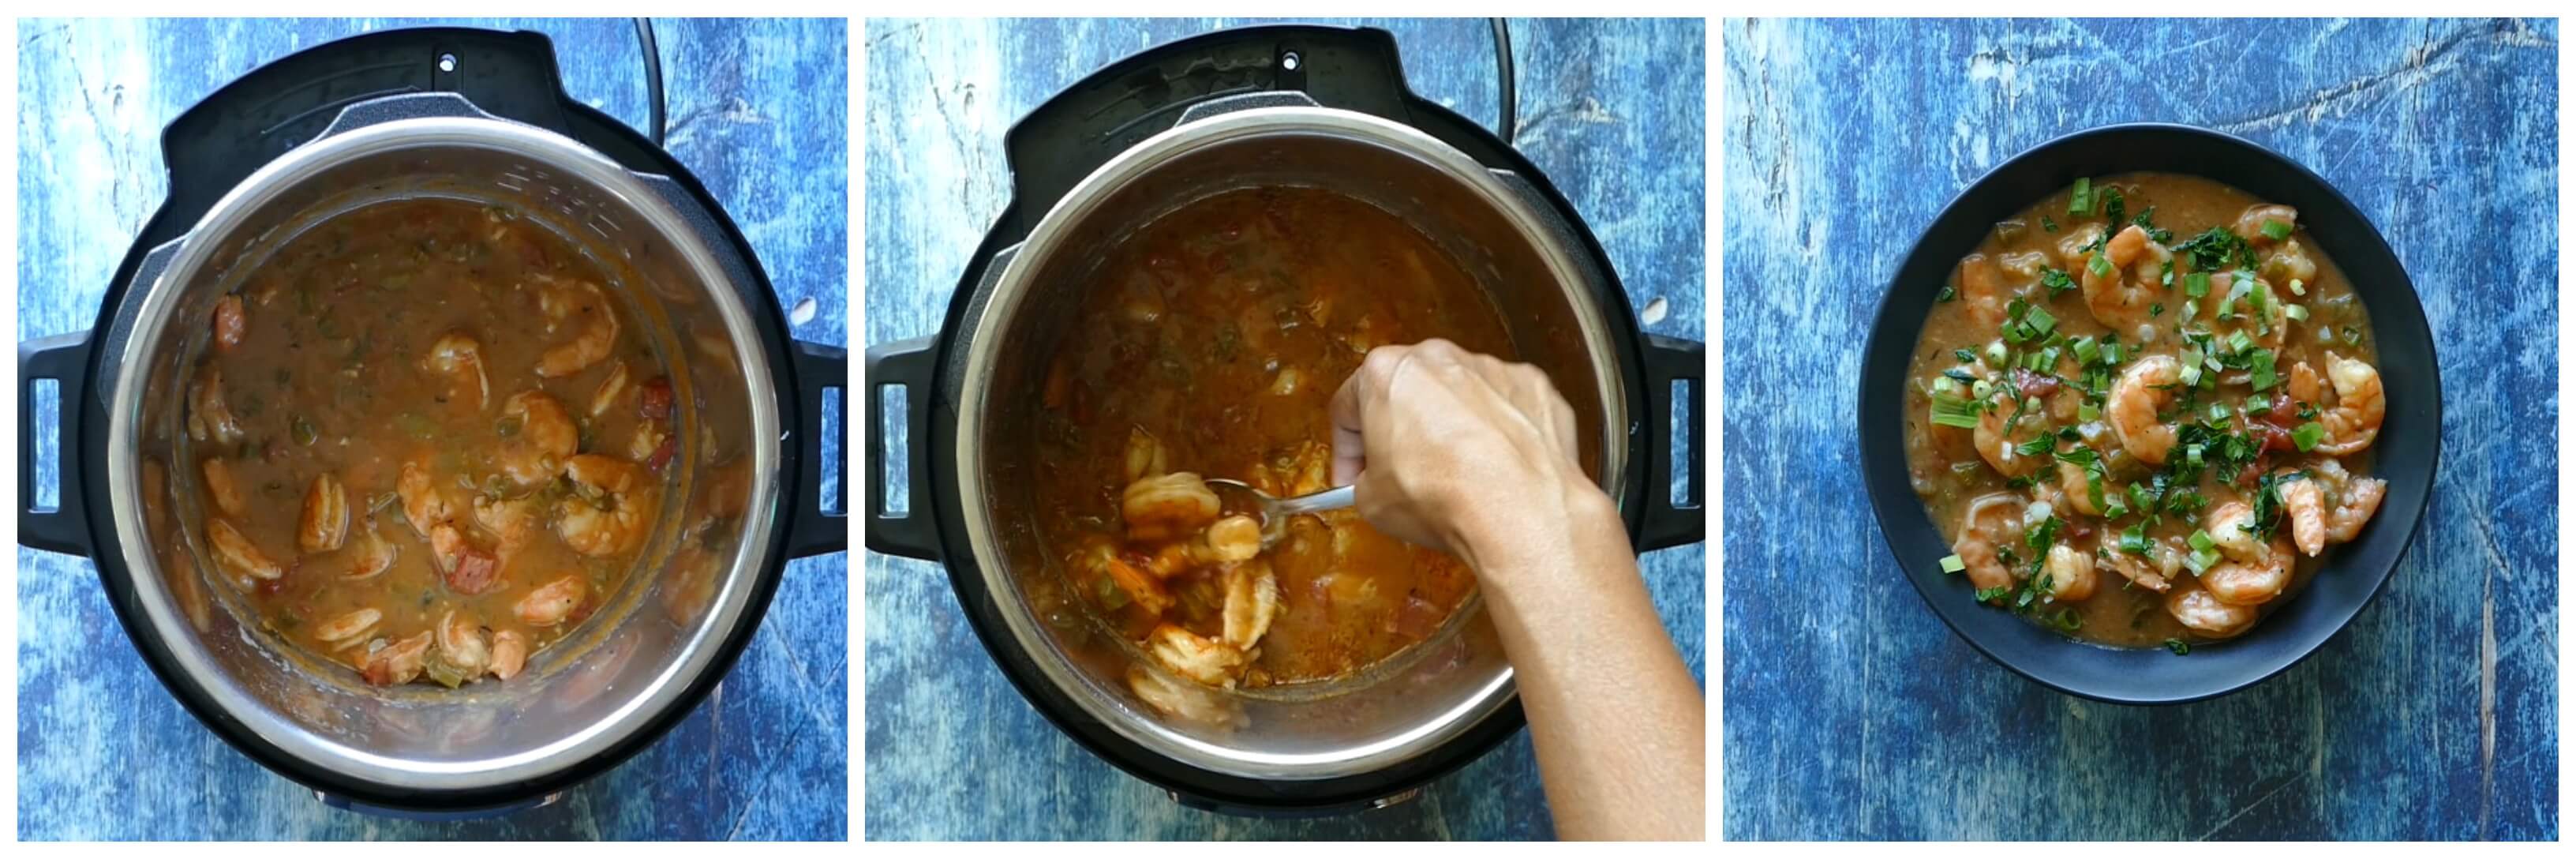
- Open the Instant Pot again (release pressure if needed) and gently stir the shrimp.
- Stir and sprinkle the Instant Pot shrimp étouffée with green onions and parsley.
- Serve over Instant Pot Jasmine Rice or a rice of your choice.
If you enjoy Creole and Cajun recipes, you may also like Instant Pot Jambalaya, Instant Pot Red Beans and Rice, or Instant Pot Gumbo.
Stovetop Directions for Shrimp Étouffée
To make this recipe on the stovetop:
- Rub shrimp with Creole seasoning.
- Make the roux.
- Add vegetables and saute till soft.
- Whisk in the seafood stock.
- Bring to a boil, reduce heat to a simmer and stir in spices and tomato.
- Simmer for 10 minutes.
- Stir in the shrimp and cook for an additional 10 minutes.
- Stir in sherry and sprinkle with green onions and parsley.
See the recipe card below for detailed instructions.

New Orleans Instant Pot Shrimp Etouffee
Equipment
Ingredients
- 2 lbs shrimp peeled and deveined
- 1 tablespoon Creole seasoning divided
- 4 tablespoon butter
- ¼ cup all-purpose flour
- 1 cup onions diced
- 1 cup bell peppers green, diced
- 1 cup celery diced
- 1 tablespoon garlic minced
- ¼ teaspoon white pepper
- ½ tsp black pepper powder
- ½ tsp dried thyme
- ¼ tsp salt optional
- 2 cups seafood stock
- 1 teaspoon worcestershire sauce
- 1 tsp lemon juice
- 1 cup tomatoes chopped
- 1 tablespoon tomato puree optional
- 1 tablespoon sherry optional, to finish
- 2 tablespoon green onions green parts only, sliced thinly
- ¼ cup parsley chopped – to garnish
Instructions
Instant Pot Instructions
- Rub shrimp with 1 teaspoon of Creole seasoning and set aside.
- Select Saute and when Instant Pot has heated, melt butter in the inner pot of Instant Pot.
- Add all-purpose flour to inner pot and cook butter and flour until the mixture resembles a light caramel color, stirring frequently, and being careful not to burn. This will take about 5 minutes. *
- Add onions, bell pepper, celery, and garlic. Stir until vegetables are slightly soft, about 5 minutes.
- Stir in remaining Creole seasoning, white pepper, black pepper, thyme, salt.
- Using a spatula, scrape the bottom of the inner pot to make sure there are no burnt bits stuck to the bottom. Deglaze with a tablespoon or two of stock if needed.
- Add seafood stock, worcestershire sauce, lemon juice, and stir.
- Add tomatoes and tomato puree (if using) and gently push down with a spatula; don't stir.
- Close Instant Pot and pressure cook on High Pressure for 10 minutes.
- Do a 10-minute natural release and open the Instant Pot. [Read More: The Different Pressure Release Methods].
- Immediately stir in the shrimp and sherry (if using) and close the Instant Pot for 10 minutes. The shrimp will cook in the residual heat.
- Open the Instant Pot again and gently stir the shrimp.
- Serve Instant Pot Shrimp Étouffée over Instant Pot Jasmine Rice or a rice of your choice.
- Sprinkle the shrimp étouffée with green onions and parsley.
Stovetop Instructions
- Rub shrimp with 1 teaspoon of Creole seasoning and set aside.
- To make the roux, melt the butter in a heavy medium-sized saucepan over medium heat and add in the flour.
- Stir flour and butter until the mixture becomes a light caramel color. This will take about 5 minutes for a blonde roux or 10 minutes for a darker roux. Make sure you stir the roux constantly, otherwise it will burn.
- Add onions, bell pepper, celery, and garlic. Stir until vegetables are slightly soft, about 5 minutes.
- Slowly whisk in the shrimp stock, stirring it constantly until the sauce is smooth and no longer clumpy.
- When the étouffée begins to boil, reduce heat to a simmer and stir in remaining Creole seasoning, white pepper, black pepper, thyme, salt, Worcestershire sauce, lemon juice, tomato, and tomato puree (if using).
- Simmer on low heat until the sauce begins to thicken, about 10 minutes. Stir in the shrimp, cover, and cook for an additional 10 minutes. If the mixture appears too thick, add more seafood stock.
- Stir in sherry and sprinkle with green onions and parsley before serving the étouffée.
Video
Notes
- Prep time does not include steps that are already accounted for in the ingredient list, e.g. peeled shrimp, minced garlic, cut vegetables, etc.
- If you prefer a thicker étouffée, reduce the sauce by cooking in Saute mode before adding the shrimp or discard half the sauce before serving.
- * étouffée is made with blonde (light) roux while gumbo’s roux is a darker color. If you wanted a darker étouffée, cook the roux for another 5 to 10 minutes.
- This recipe was made in a 6 quart Instant Pot Ultra, and I have not had any burn message or sealing issues.
Nutrition
I am not a certified nutritionist. I provide my best estimate of nutritional information merely as a courtesy to my readers. If you depend on nutritional information for dietary or health reasons, I suggest using your favorite online nutrition calculator to confirm the nutritional value of this recipe based on the actual ingredients that you use.
Did you know that the best way to support your favorite bloggers is to comment and rate recipes, and share on social media? If you loved this recipe, please comment and give it a five ⭐ rating in the comment section below. If you’re a pinner, pin this post using the Pin buttons at the top and bottom of this post and in the recipe card above. Thank you for your support!


 Instant Pot DUO Pressure Cook: