
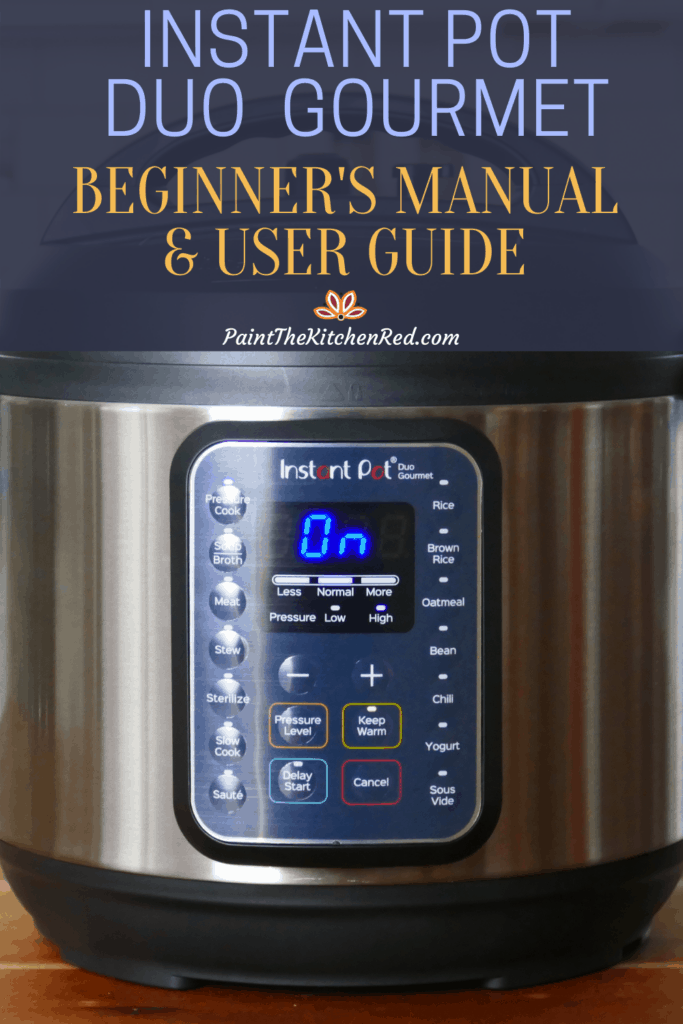
If you’ve just purchased the Costco Instant Pot (Instant Pot Duo Gourmet model), this beginner’s quick start guide will help you get started. This user manual tells you about all the parts, the most important buttons and functions, and gives you instructions on how to use the Instant Pot Gourmet model for the first time by doing the water test or initial test run. [Instructional video included]

This post contains affiliate links. As an Amazon Associate, I earn from qualifying purchases. Please read the disclosure.
Table of Contents
- Introduction with video
- What is an Instant Pot?
- How does Pressure Cooking Work?
- Is the Instant Pot Safe to Use?
- Safety Precautions
- First Thing You Need to Do: Open the Box!
- Parts
- Accessories
- Lid
- Sealing Ring
- Float Valve
- Anti-Block Shield
- Assembly
- Open and Close the Lid
- Release Pressure
- Commonly Used Buttons
- Initial Test Run/Water Test
- Compare Duo Gourmet vs. Duo
- Compare Duo Gourmet vs. Duo Plus
- Compare Duo Gourmet vs. Duo SV
- Recipes to Try
Introduction
If you have trouble seeing the instructional video below, disable your ad blocker temporarily and refresh the browser.
This Instant Pot Duo Gourmet from Costco is my seventh Instant Pot! I have an Instant Pot Duo, Instant Pot Ultra 6 quart and 8 quart, Instant Pot Smart Wifi, Instant Pot Duo Evo Plus, and Instant Pot Duo Nova. I purchased my first Instant Pot 4 years ago and I was hooked from the get-go! Is it time for an intervention?!
The Instant Pot Gourmet is a mix between the Instant Pot Duo and Instant Pot Ultra. It has a similar display panel to the Duo and the lid of the Ultra. In other words, the best of both worlds. I love the auto-seal feature of the lid.
This guide will tell you how to use this Costco Instant Pot right out of the box.
What is an Instant Pot?
The Instant Pot has become so popular in recent years that Instant Pot is being used by some as a generic name for pressure cookers of any brand.
In reality, Instant Pot is the brand name of a multicooker that serves as a pressure cooker, slow cooker, rice cooker, yogurt maker, sauté/searing pan, steamer, and warming pot all in one convenient appliance.
Some people use the name Instapot, but the correct name is Instant Pot.
The Instant Pot Company (Instant Brands) started out with one product – the Instant Pot – and now makes a wide range of kitchen appliances including air fryers, blenders, and toaster ovens.
Although the Instant Pot pressure multicooker has many different functions or smart programs, the most commonly used is the Pressure Cook function. Pressure cooking allows you to cook foods at a fraction of the time it would take on the stovetop.
How Does Pressure Cooking Work?
The Instant Pot Duo Gourmet pressure cooker creates a closed environment where steam builds up in a tightly sealed pot. This, in turn, causes the internal temperature to rise and pressure to increase.
Under high pressure, the fiber in the food is tenderized and flavors develop in a very short time. Nutrient-rich steam condenses in the pot instead of evaporating and nutritional value is retained because of the speed of cooking.
Is the Duo Gourmet Instant Pot Safe to Use?
The Duo Gourmet ain’t your grandma’s pressure cooker! If you’ve had experiences, like I, with stovetop pressure cooker mishaps in the past, fear no more. The Instant Pot eliminates most of those pressure cooker issues.
According to the Instant Pot Company’s safety information, in the past, most pressure cooker disasters could usually be attributed to user error. Instant Pot pressure multicookers are carefully designed to eliminate and avoid most of the potential problems.
Numerous safety features help reduce common errors. Safety features include pressure sensor technology, lid close detection, lid lock technology, overheat protection and automatic temperature and pressure controls.
Safety Precautions
Although there are many built-in safety features as explained above, as a user you need to follow common-sense precautions:
- Don’t touch the hot surfaces, particularly the stainless steel parts. Use the handles to move the Instant Pot or the inner pot.
- Don’t place the Instant Pot on or close to an electric or gas burner.
- Don’t move the Instant Pot when it’s under pressure.
- Don’t fill over ⅔ full.
- When cooking foods that expand e.g. rice, beans, pasta don’t fill over ½ full.
- Ensure anti-block shield, float valve, and steam release pipe are clean and not clogged.
- Don’t open the lid until the float valve is down i.e. the Instant Pot is depressurized.
- Keep hands and face away from the steam release mechanism.
- Don’t obstruct the steam release valve when pressure is being released.
- When quick-releasing frothy foods such as applesauce, oatmeal, pasta, etc. take extra care. It’s best to release pressure is short bursts for these types of foods.
- Don’t use another Instant Pot model’s lid on the Duo Gourmet Instant Pot.
For more information about safety precautions, please read the Instant Pot Duo Gourmet user manual.
First Thing You Need to Do is Open the Box!
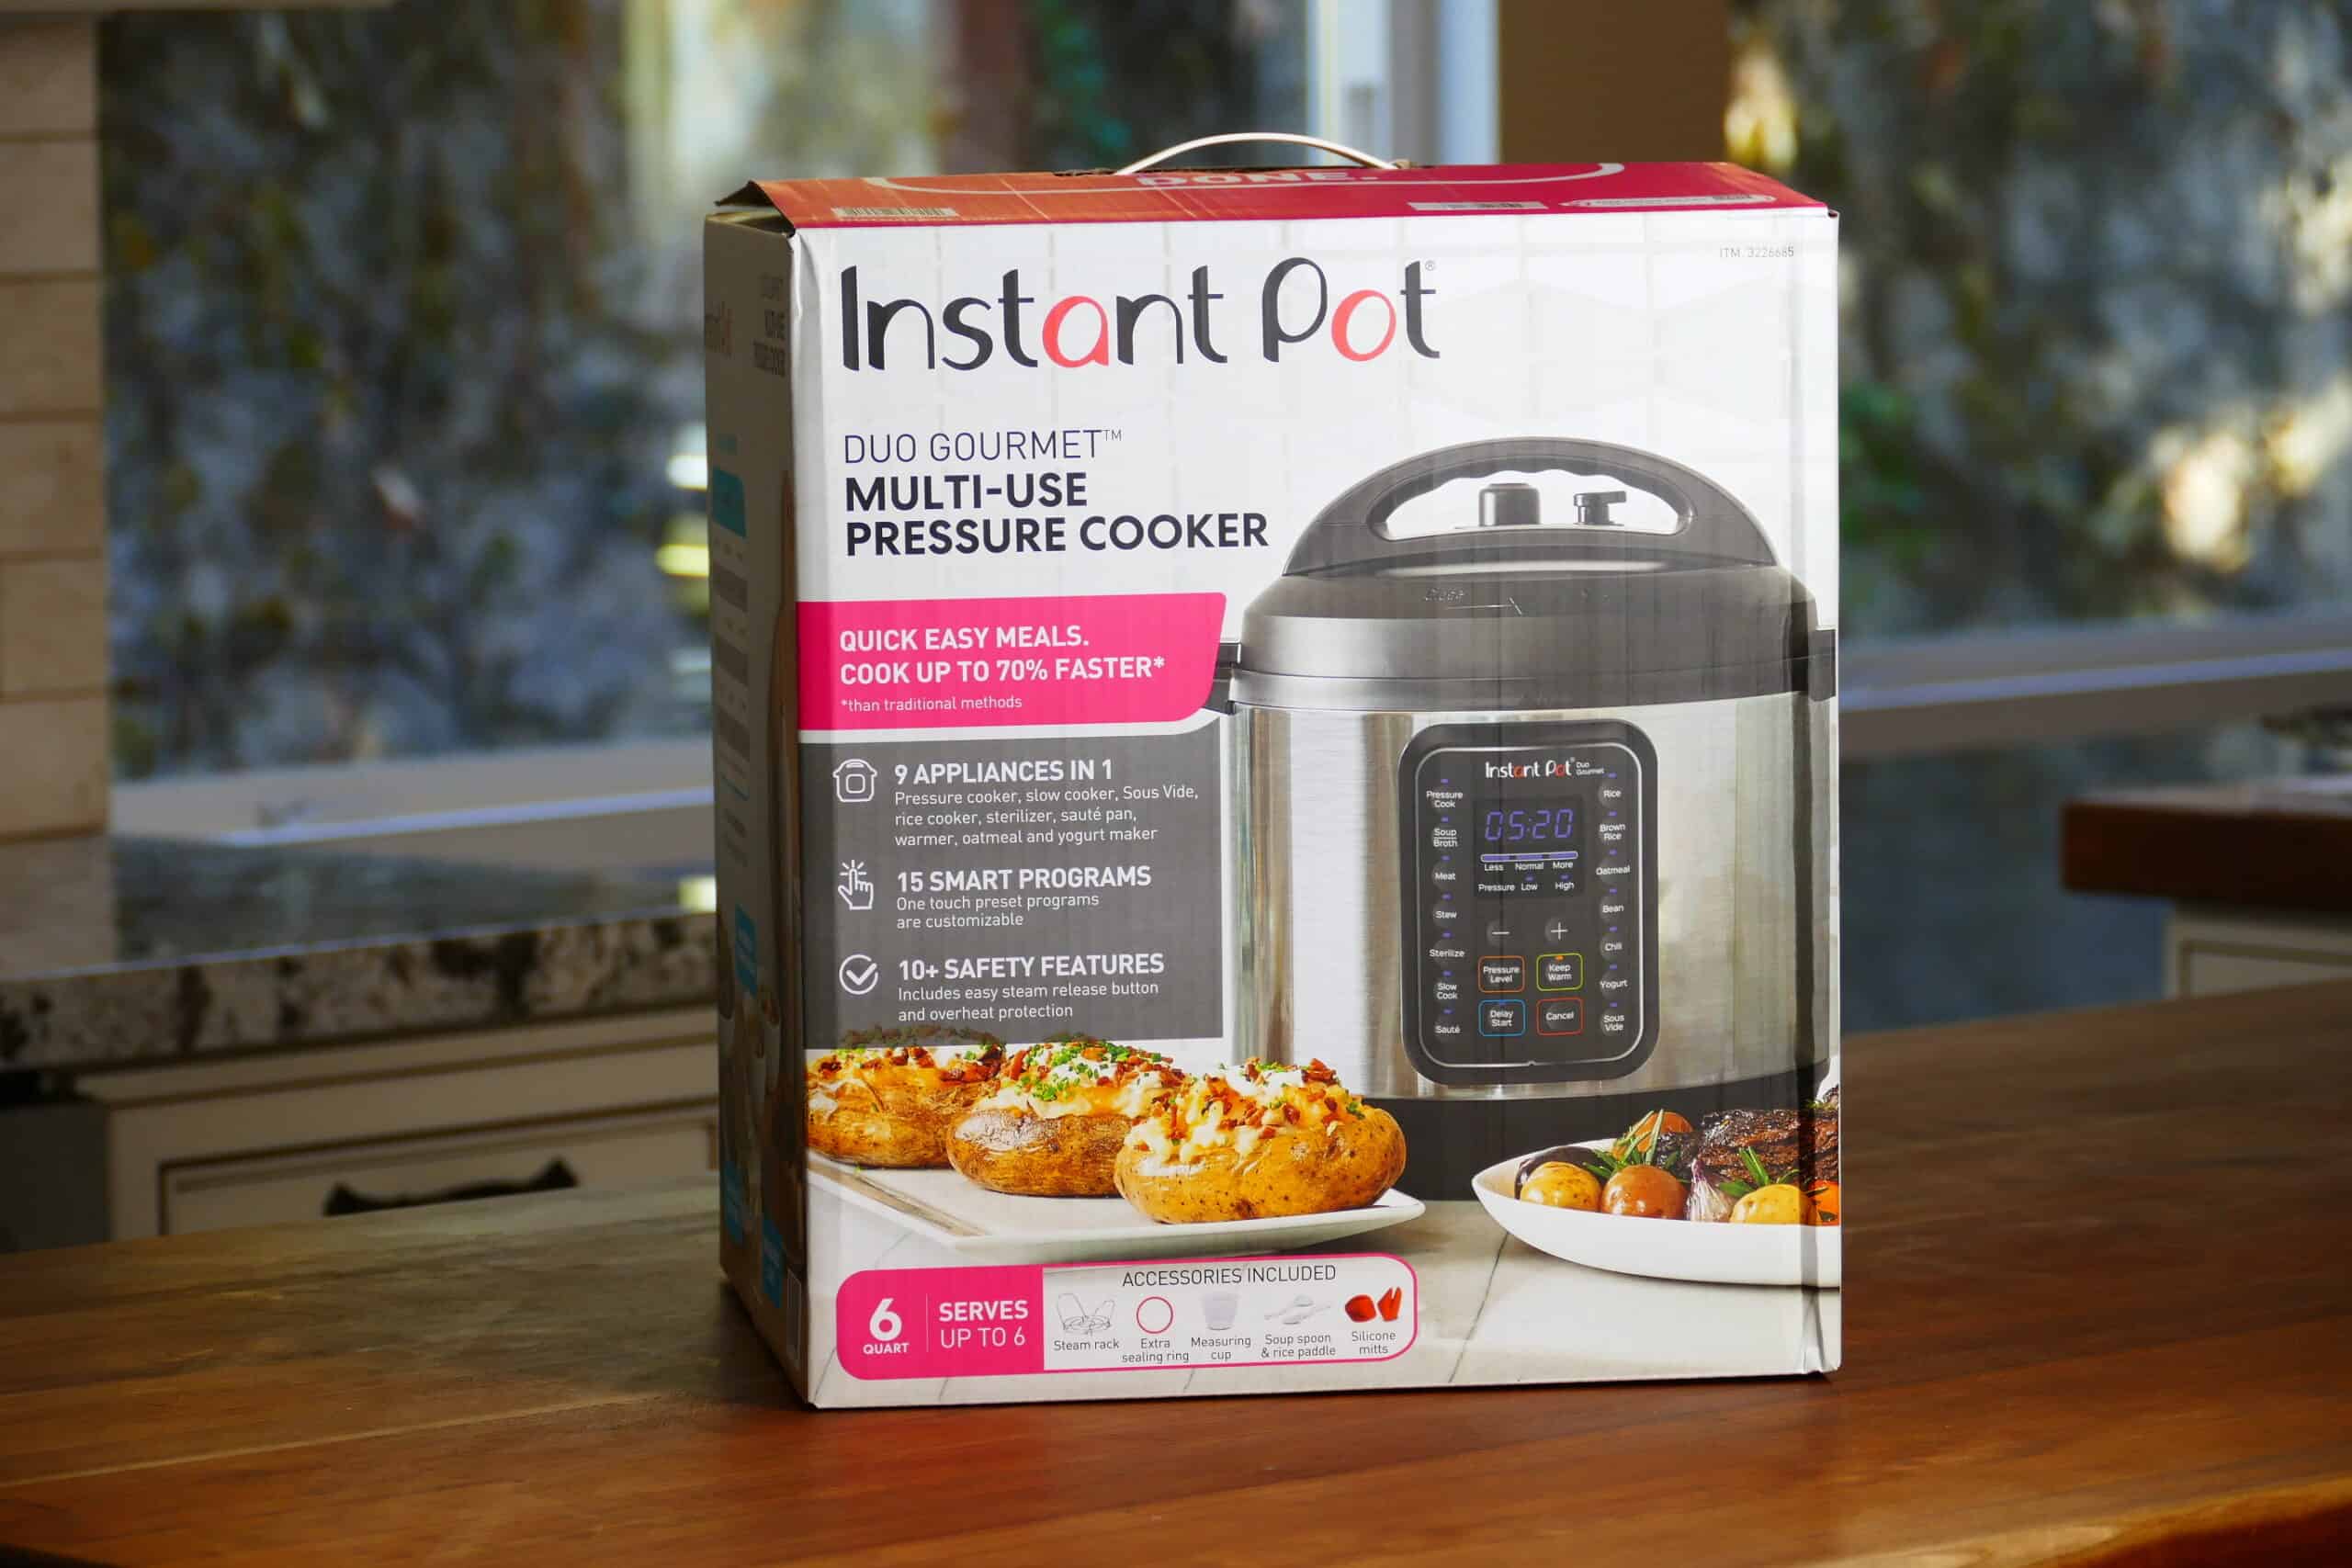
I frequently hear from people who either got the Instant Pot as a gift, or they bought it and are too scared to use it. So let me just say there’s nothing to worry about. The Instant Pot has many layers of built-in safety features!
Besides, if you don’t get it out of the box and try it out, in the event you have a defective unit you might miss the warranty period and be stuck with another useless appliance!
In this guide, I’m going to (virtually) hold your hand and help you get going to the point where you’ll pressure cook your first recipe: water. You’ve got this!
Parts
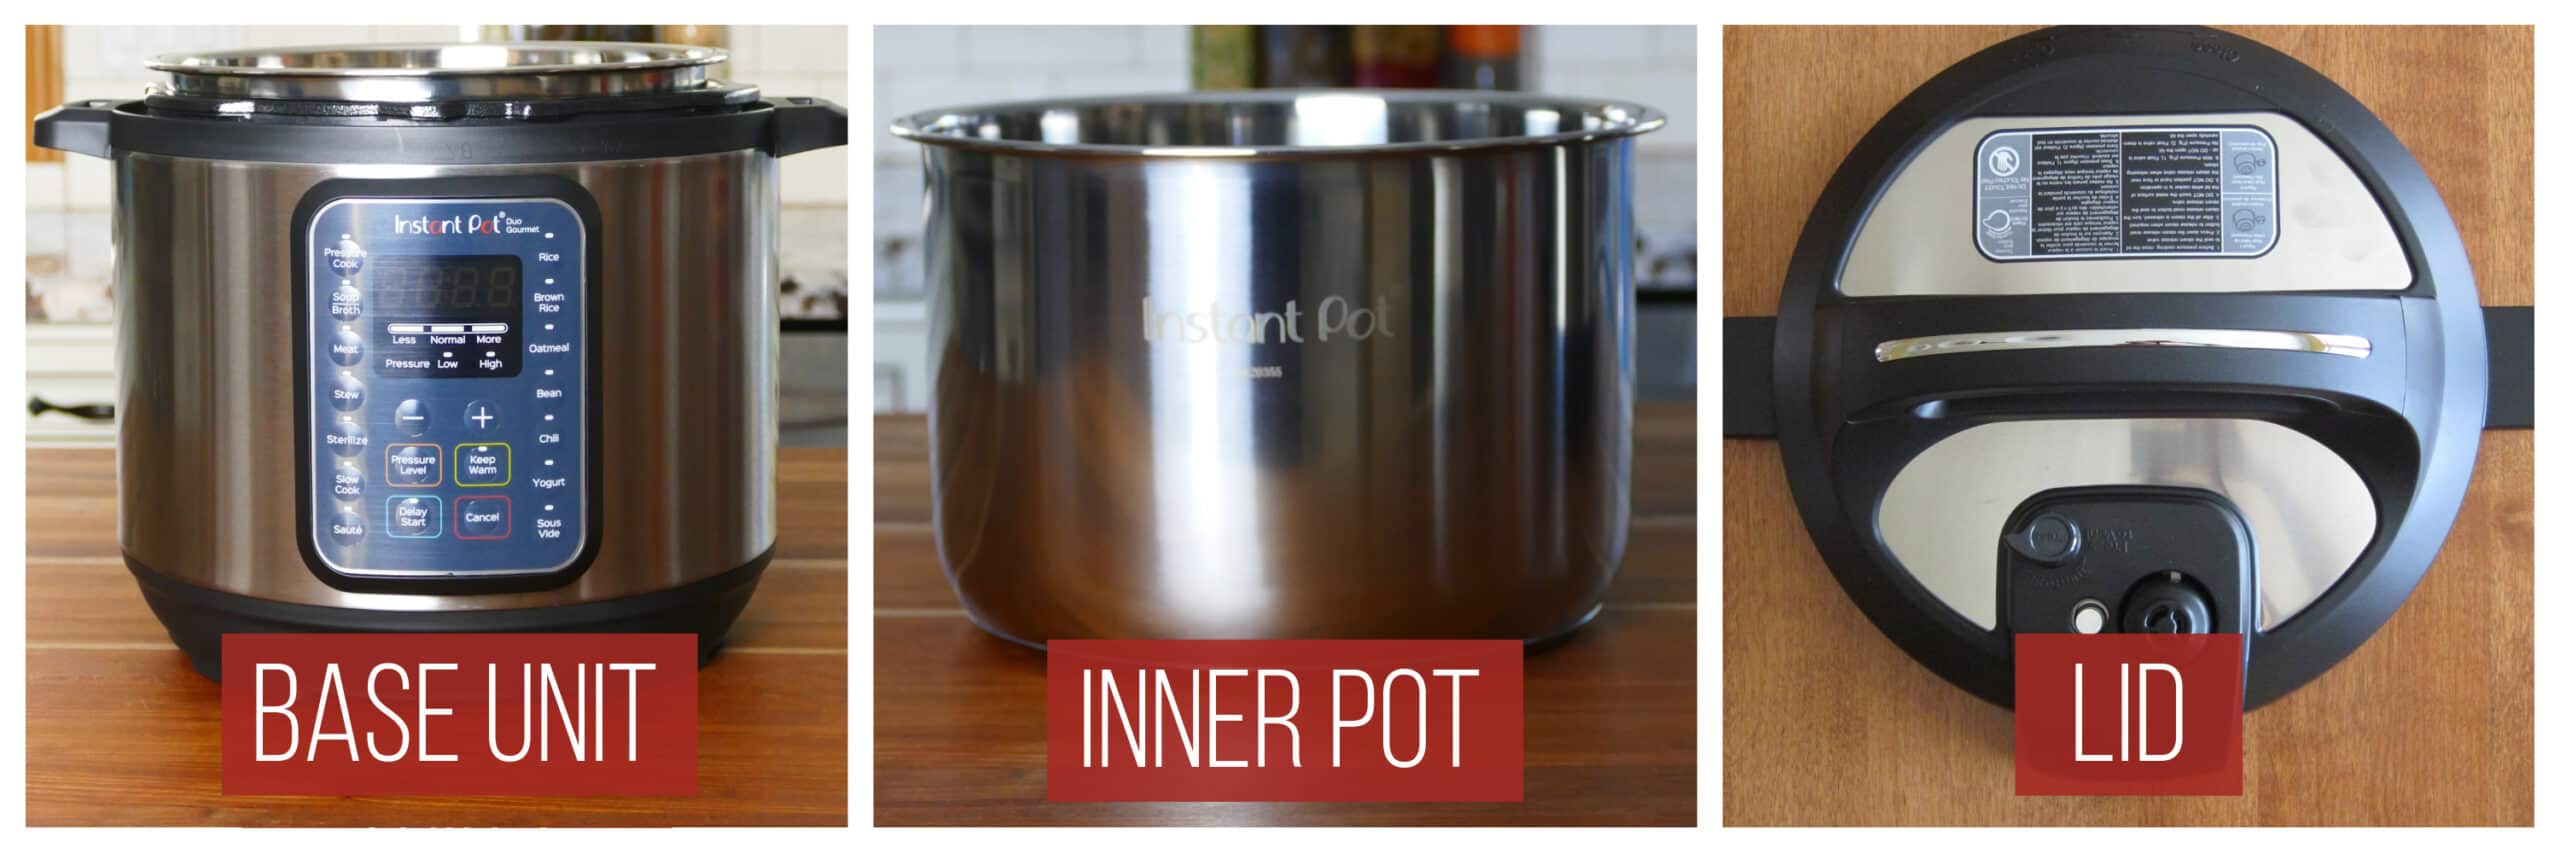
The Instant Pot Duo Gourmet comes with the following main parts:
- Base Unit/Outer Pot – stainless steel exterior that houses the heating element, control panel, and attached power cord.
- Inner Pot – removable stainless steel pot. The inner pot is stove-friendly, so you can use it on your stovetop as you would a regular pot. It can be washed in the dishwasher or by hand.
- Lid – closes the Instant Pot and seals it under pressure. The lid can be washed in the dishwasher or by hand.
Accessories
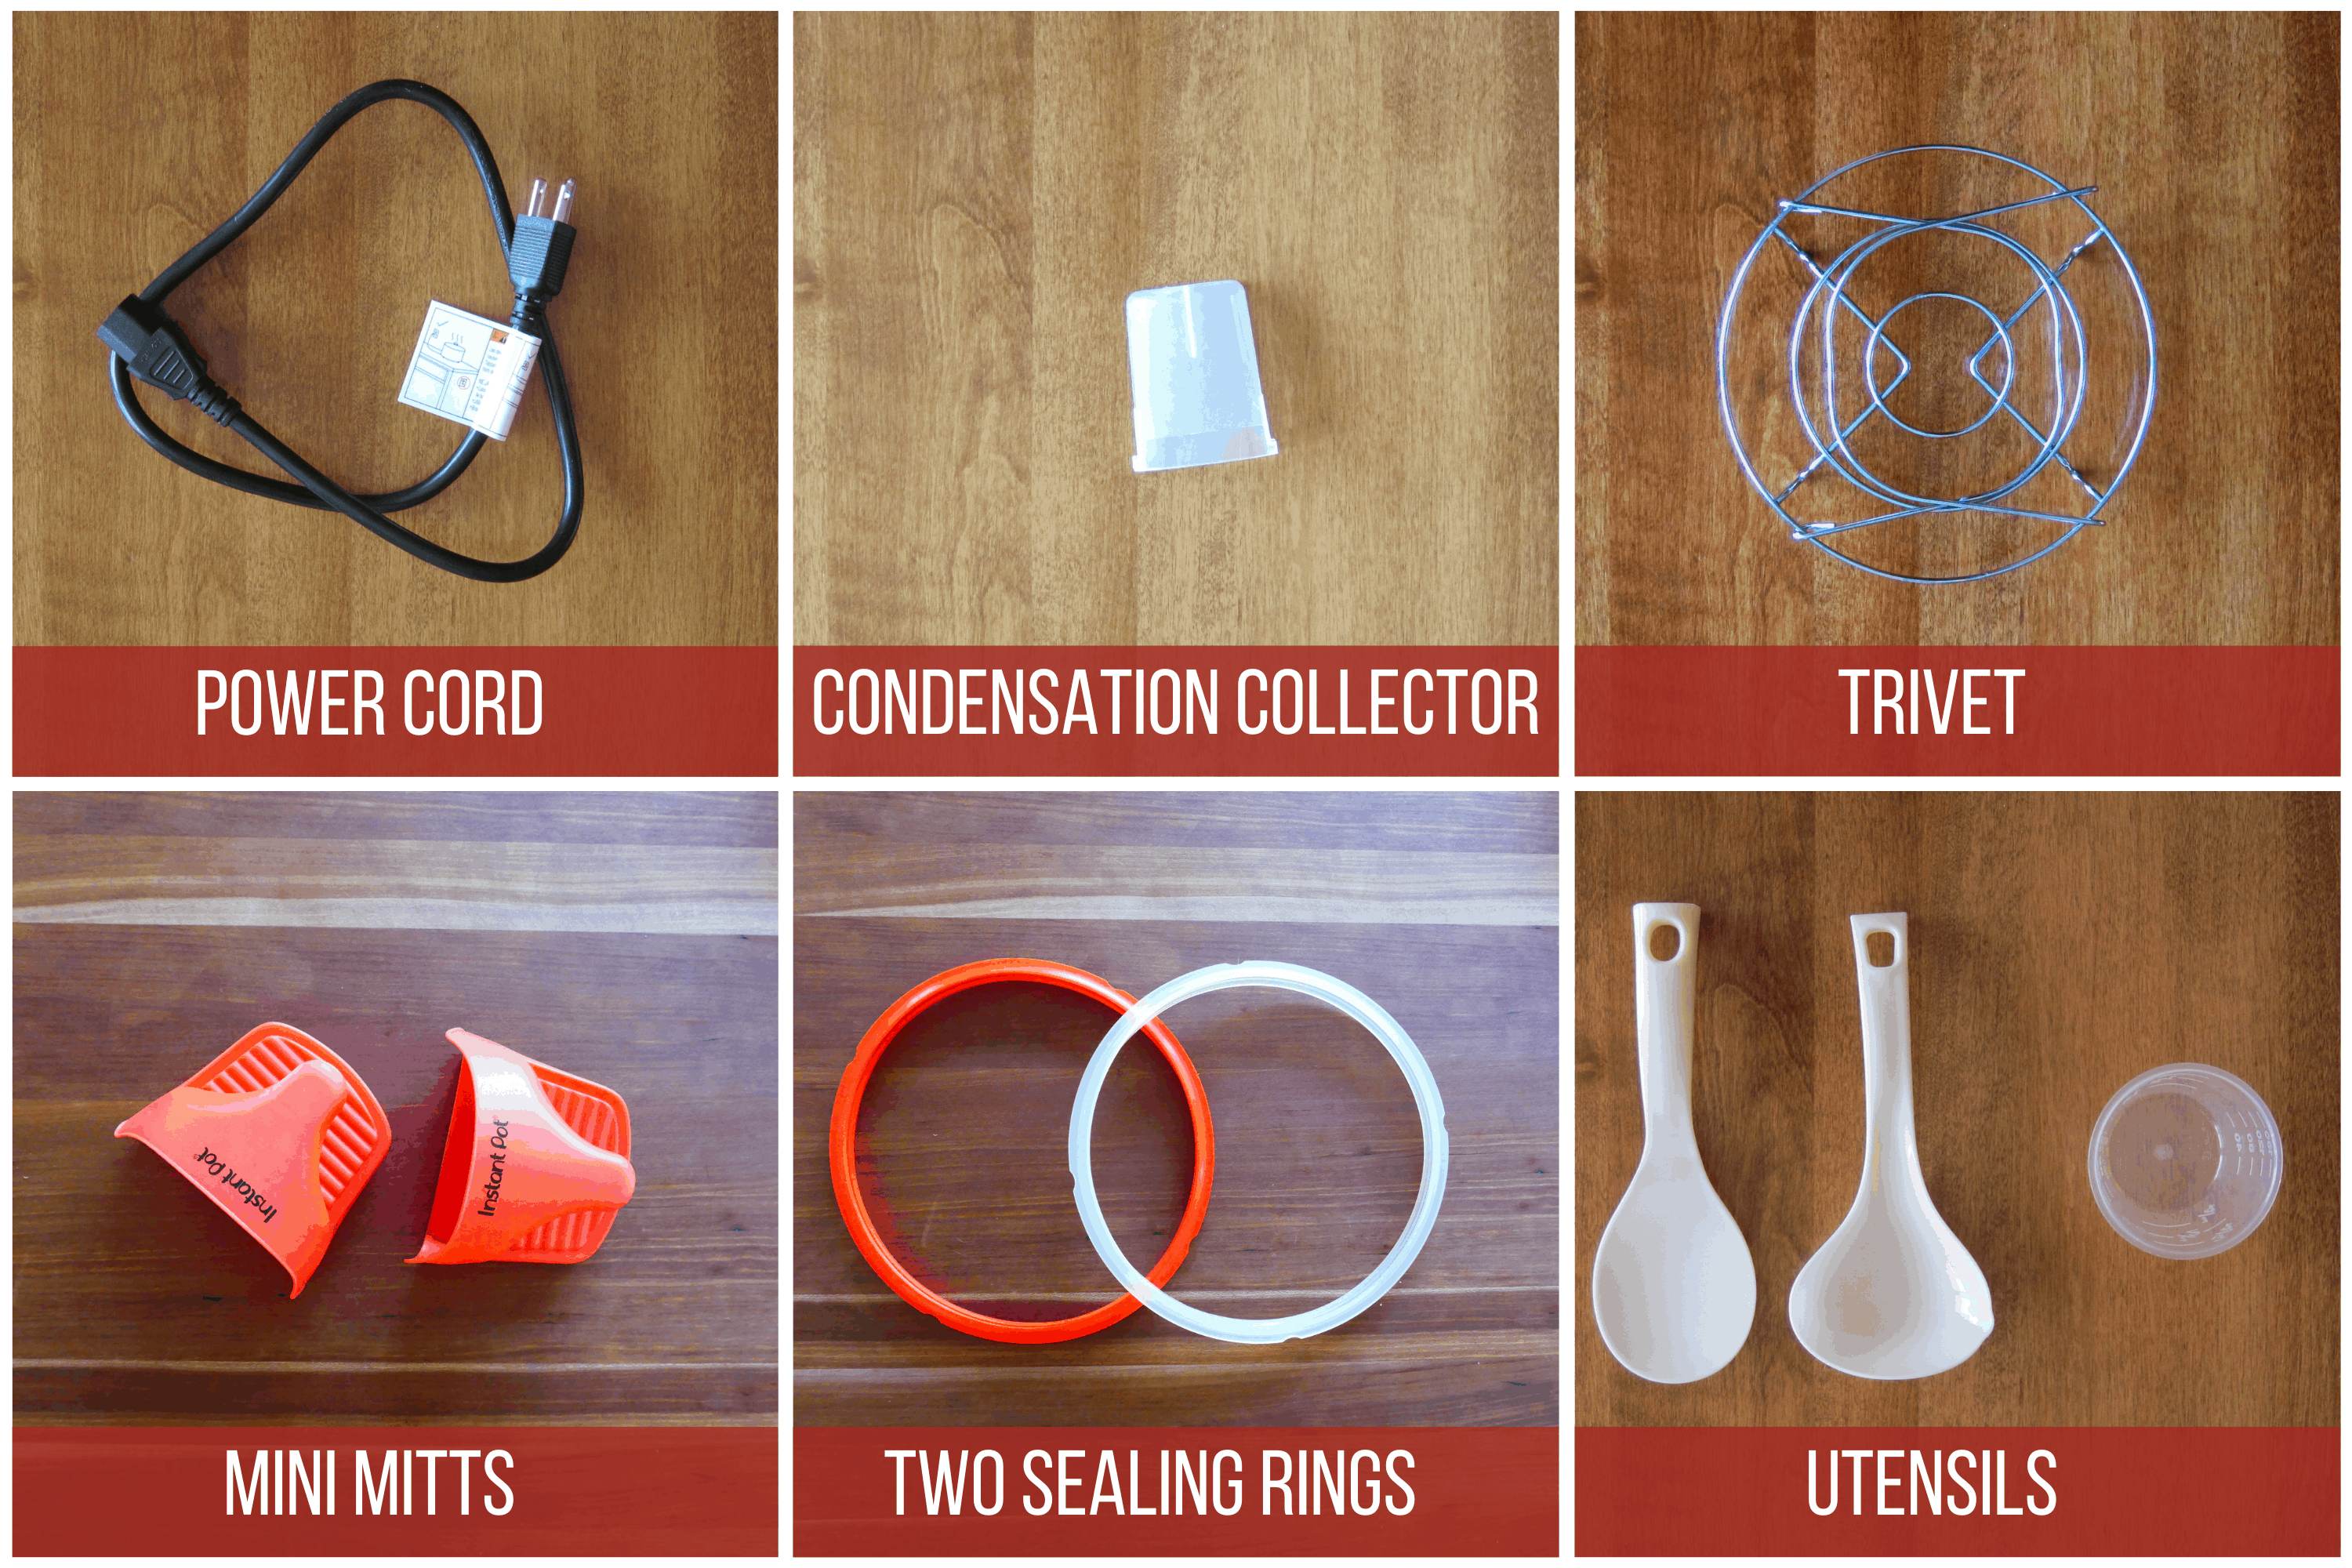
The Instant Pot Gourmet comes with the following accessories:
- Power cord – the 3-prong detachable power cord is plugged into the back of the Instant Pot Gourmet. (Note: some models have attached power cords.)
- Condensation Collector – catches drips from condensation on the lid; attaches onto the back of the base unit. The condensation collector can be washed in the top rack of the dishwasher or by hand.
- Trivet / Steam Rack – useful for elevating food above the liquid and for Pot in Pot cooking. (Note: some models don’t come with the spoons and measuring cup.) The trivet can be washed in the dishwasher or by hand.
- Mini Mitts – used to remove the inner pot from the base unit or to remove dishes from the inner pot during Pot in Pot cooking.
- Sealing Ring – allows the Instant Pot to build pressure by creating a tight seal when the contents are heated to a high temperature. It can be washed in the top rack of the dishwasher or by hand.
- Spoons and measuring cup – plastic paddle is used to stir rice and ladle can be used to serve soup. The measuring cup can be used for measuring rice.
Instant Pot Duo Gourmet Lid
Instant Pot Duo Gourmet Lid Exterior Parts
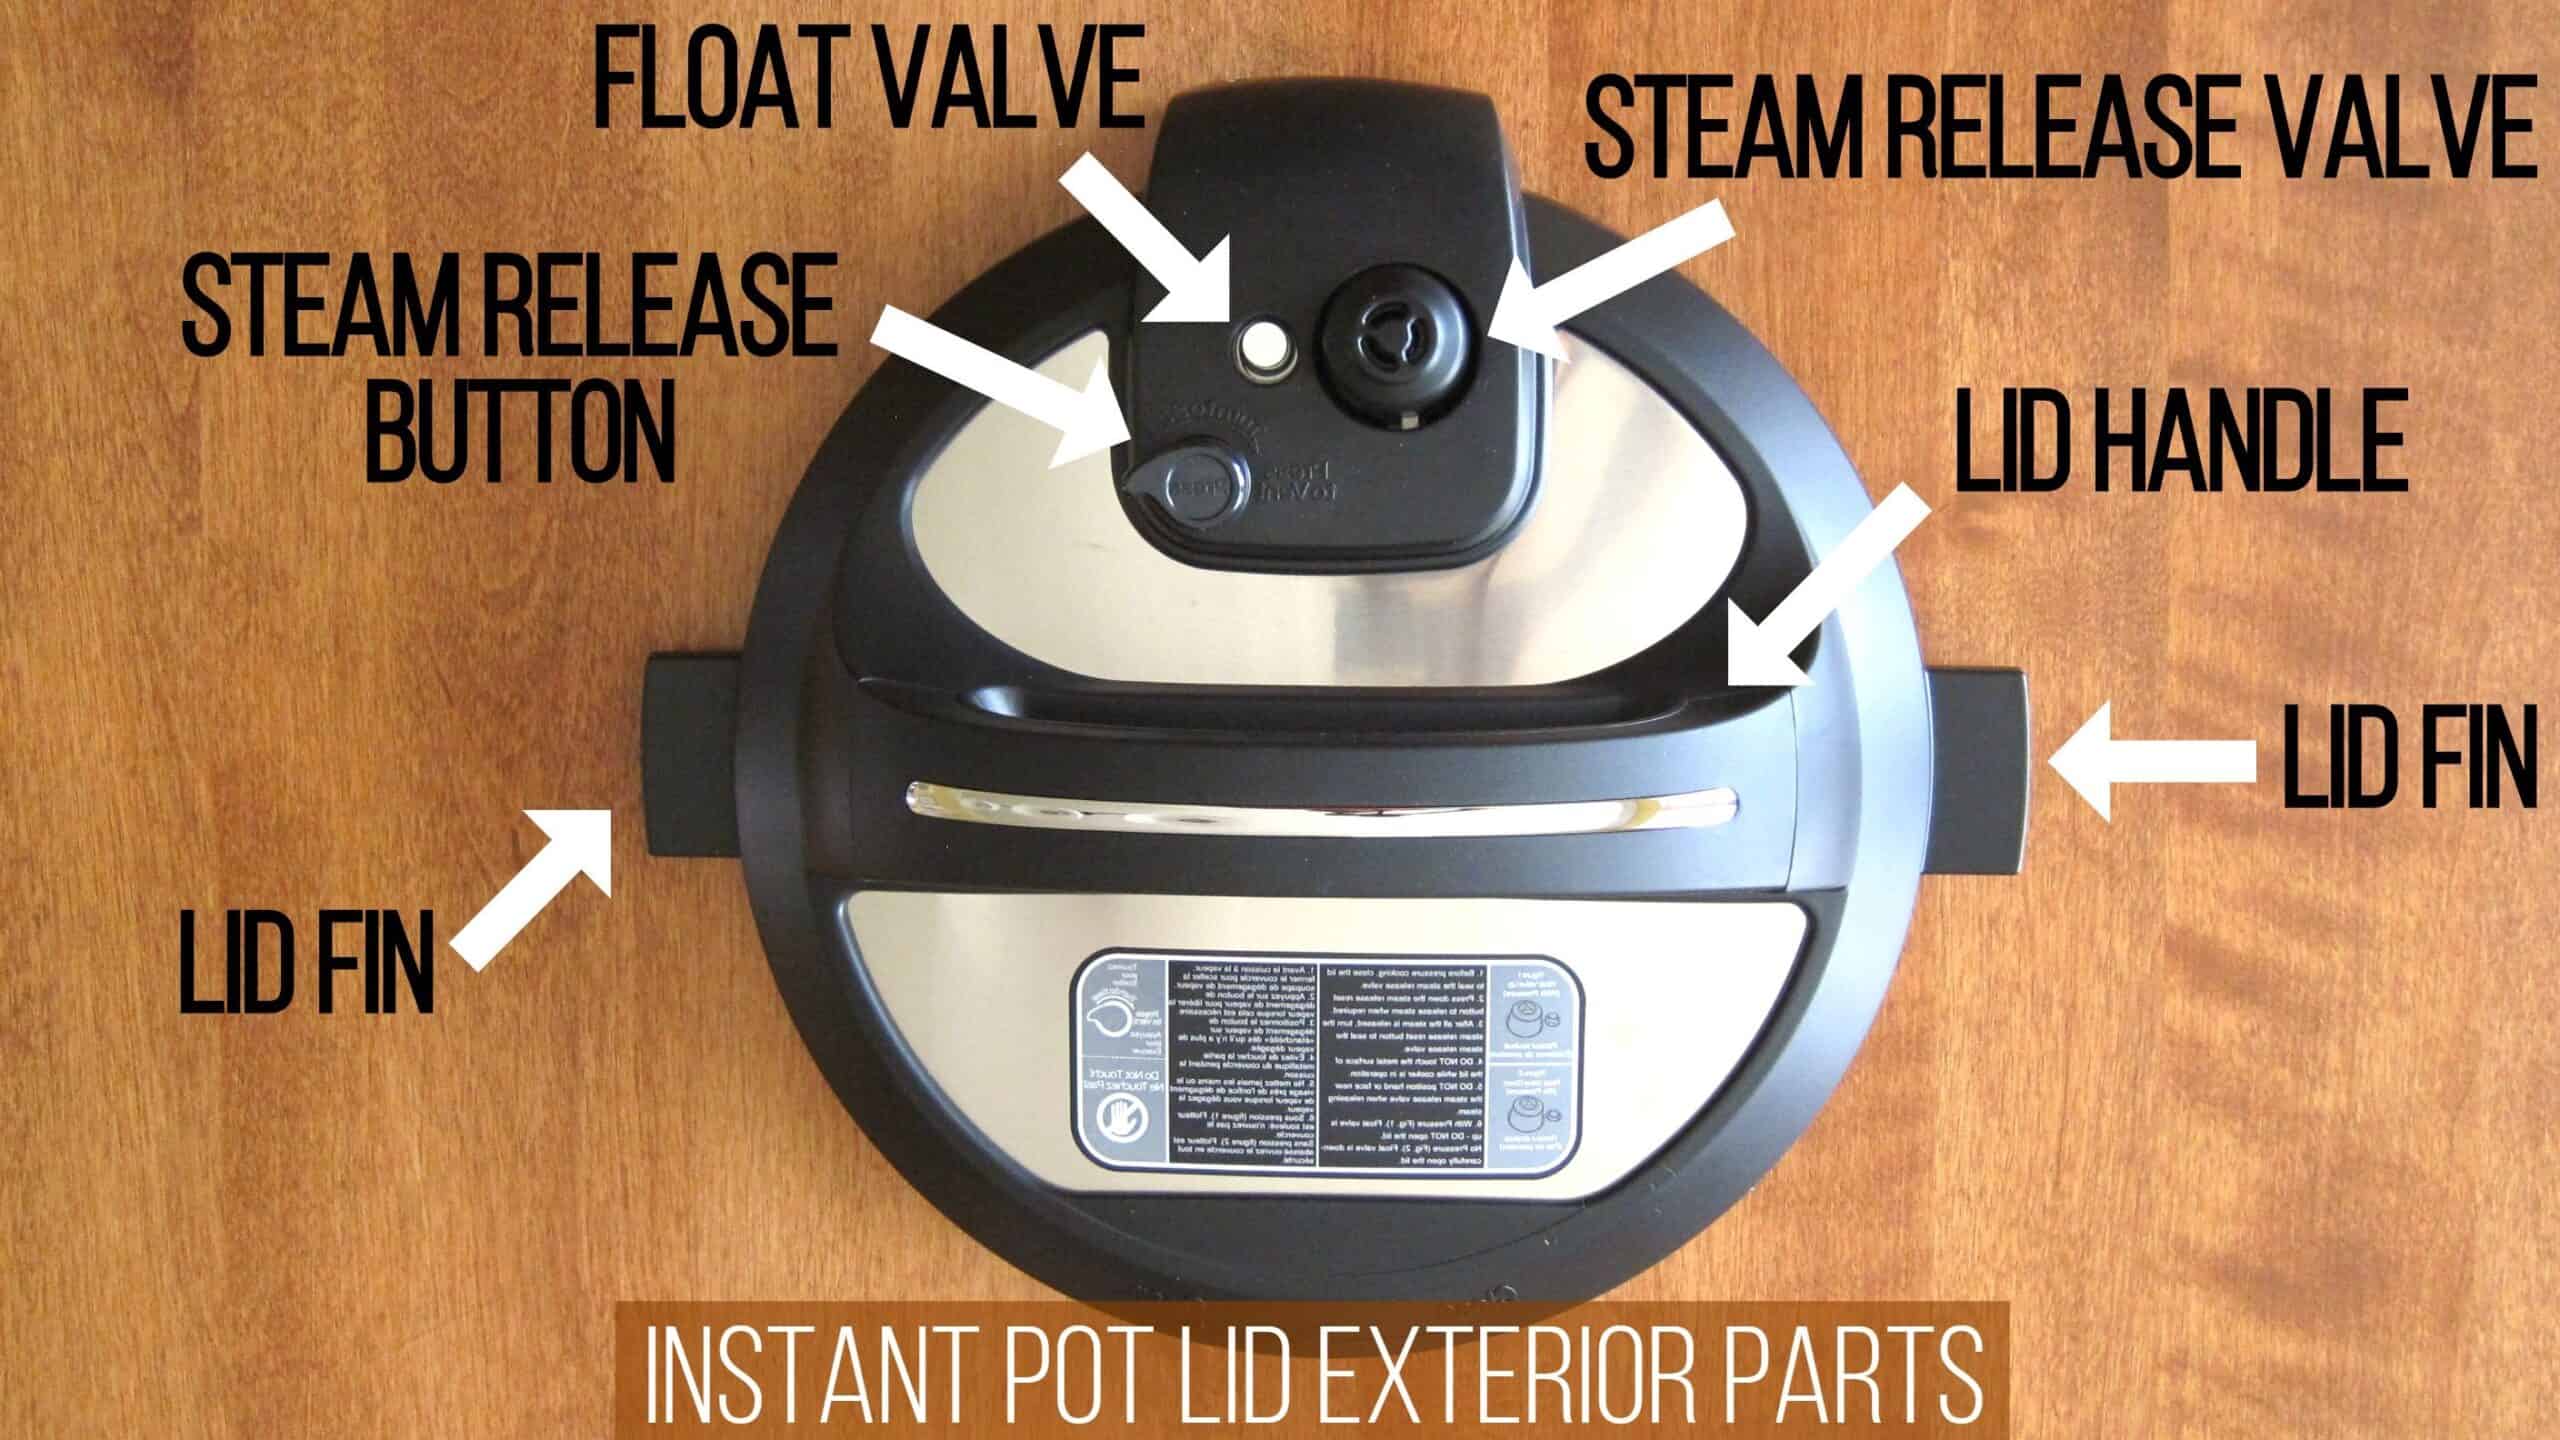
- Lid Fins – placed in the lid fin slot of the base unit to prop the lid open
- Steam Release Button (also referred to as Pressure Release Button or Steam Release Reset Button) – allows a manual release of pressure from the Instant Pot Gourmet. The Steam Release Button automatically pops up when the Instant Pot Gourmet lid is opened or closed.
- Float Valve – seals in the steam, allowing the Instant Pot to be pressurized
- The Steam Release Valve – a safety mechanism that allows steam to escape and maintains the correct pressure level. It sits loosely on the lid and can be removed to be cleaned.
- Lid Handle – used to put on and take off the lid
Steam Release Parts
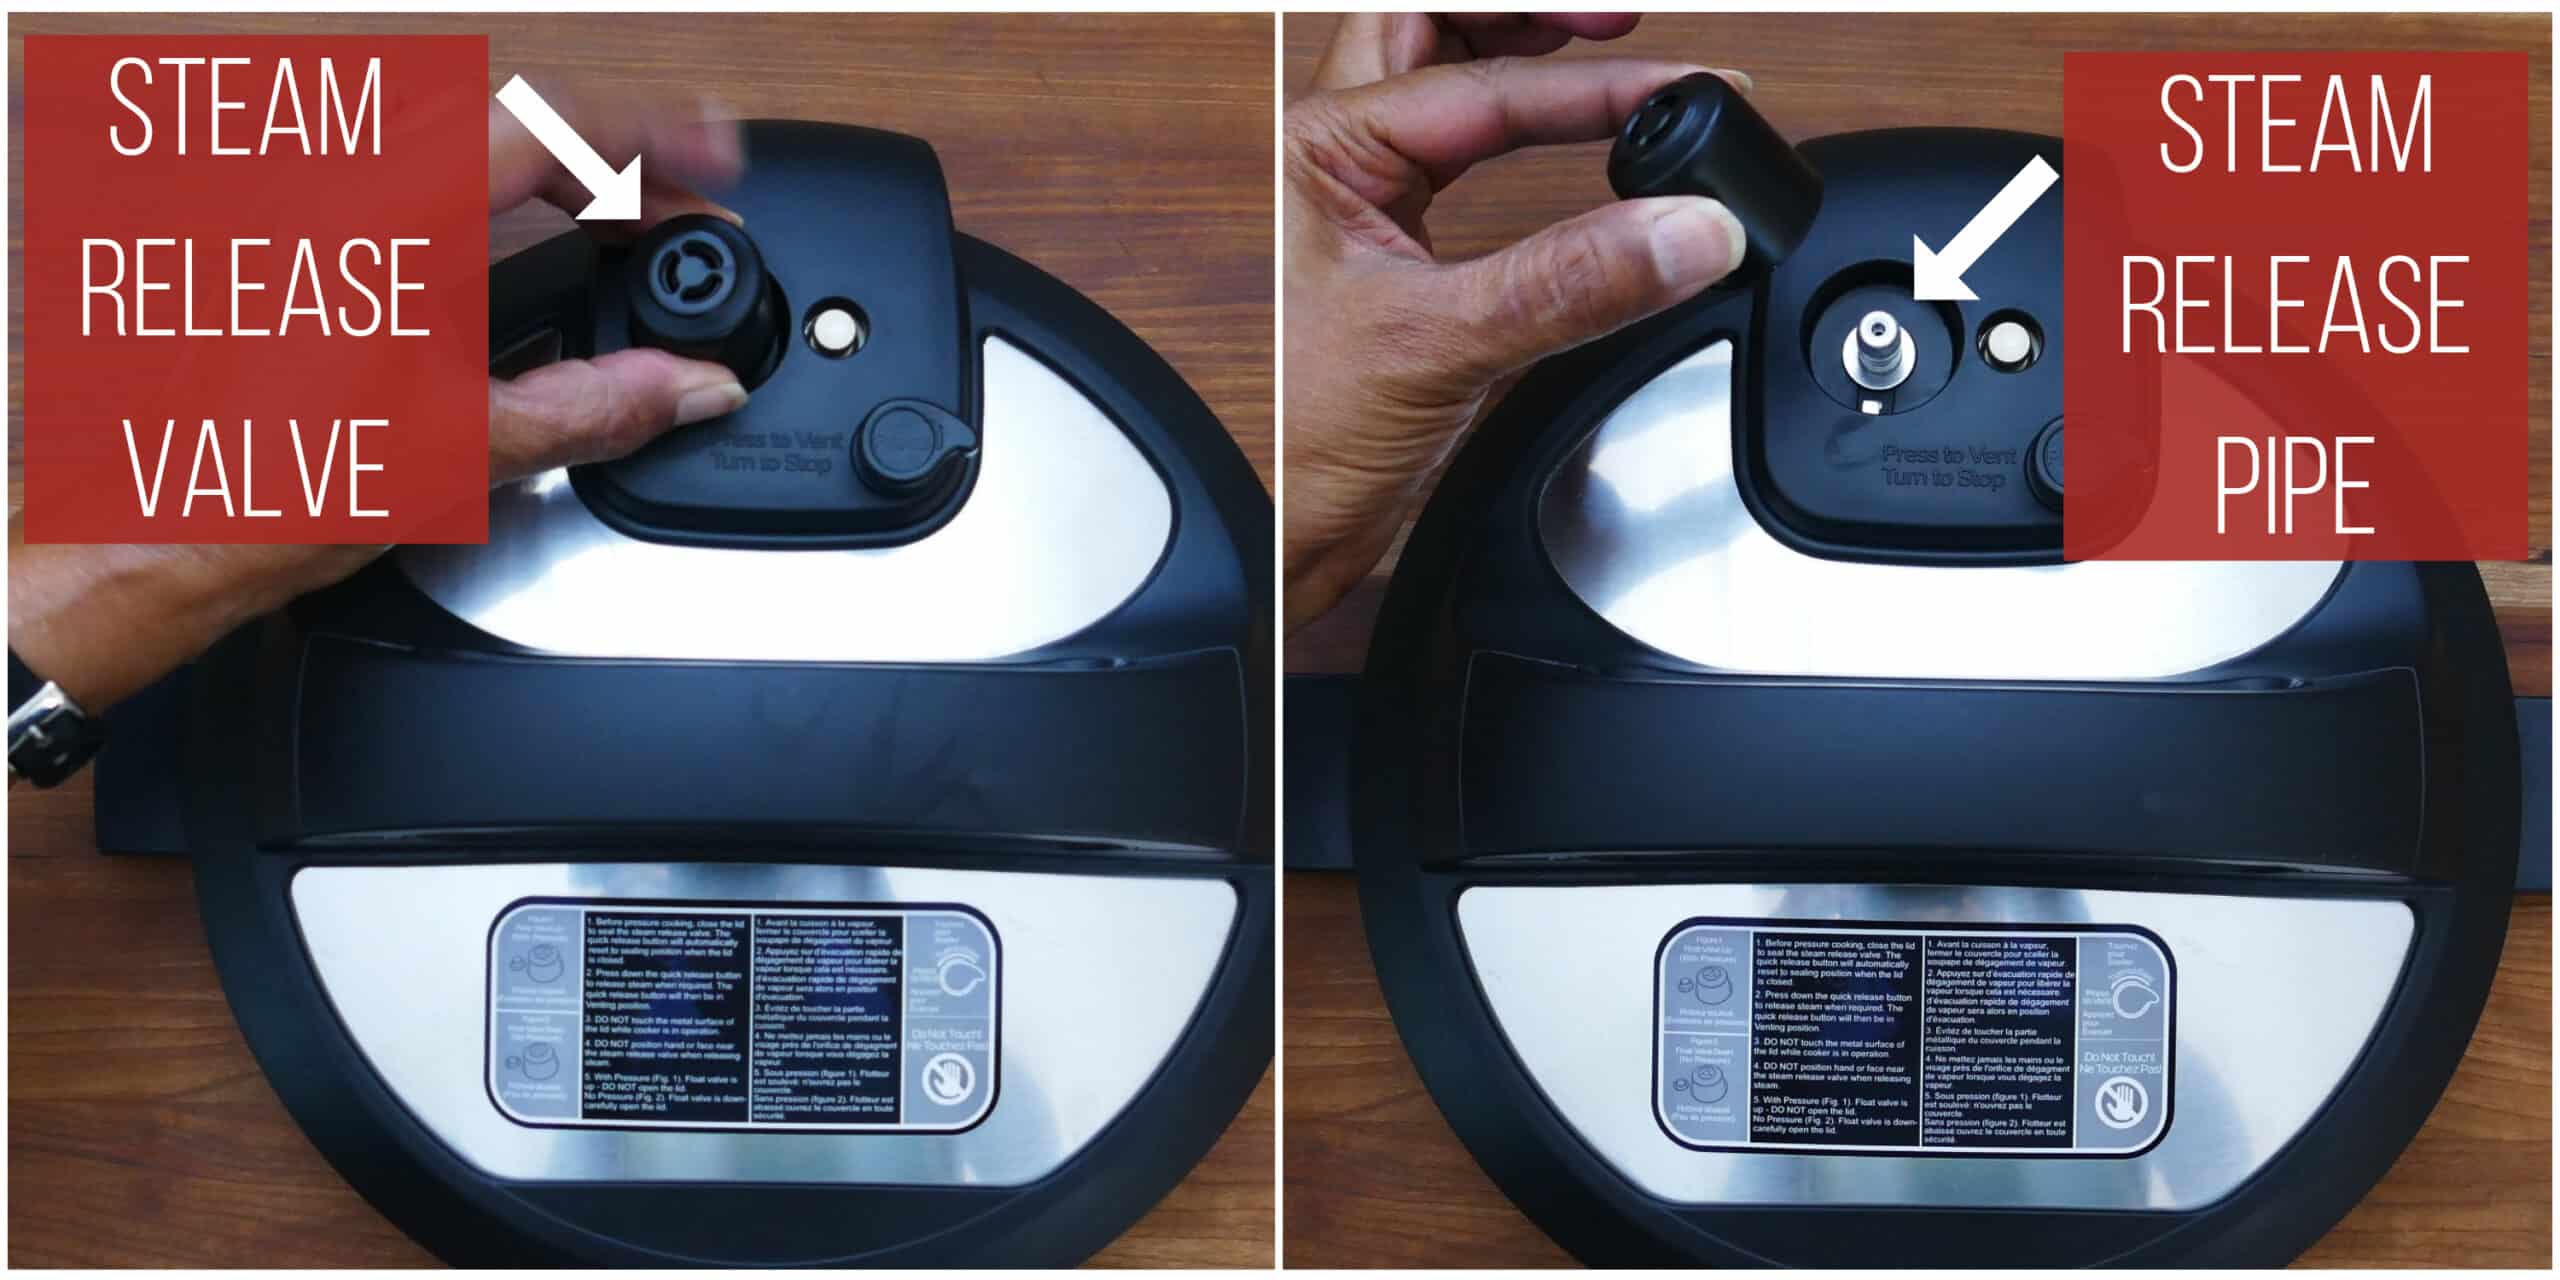
The steam release consists of:
- Steam release valve – regulates the internal temperature. It is supposed to be wobbly but must be pushed in all the way.
- Steam release pipe – steam travels from the inner pot through the pipe during steam release.
Instant Pot Duo Gourmet Lid Interior Parts
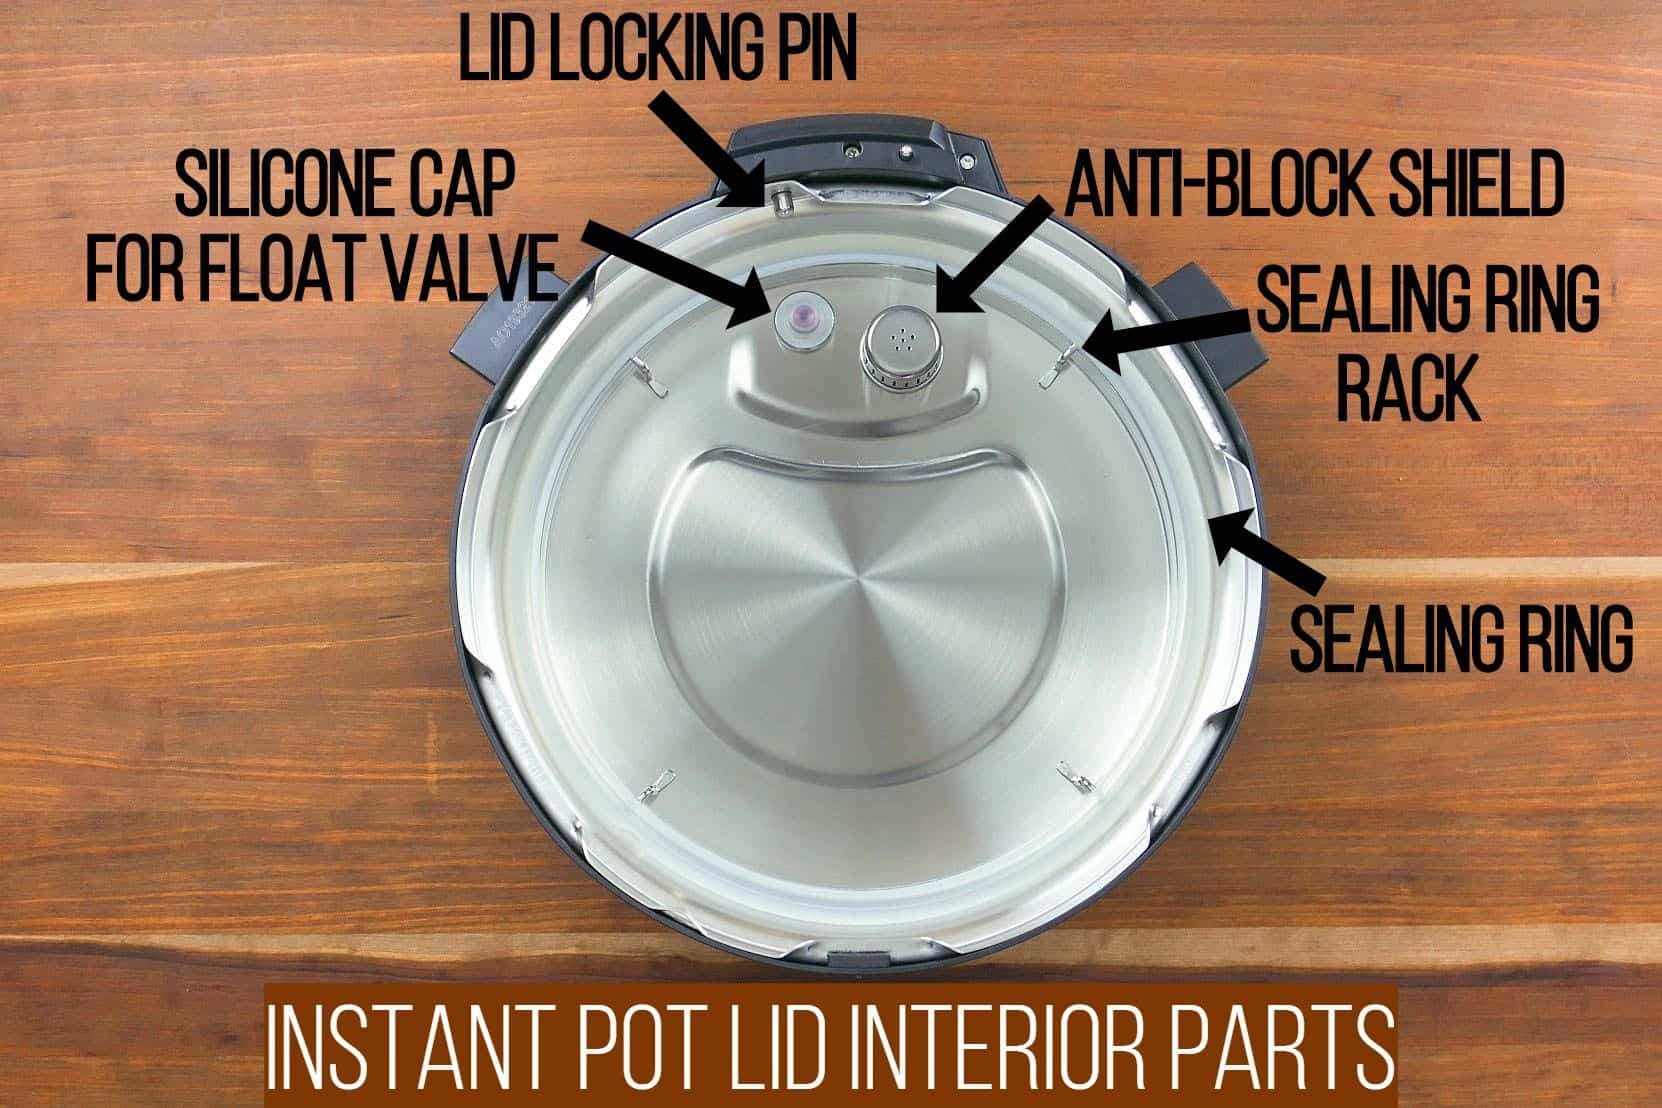
The inside of the Instant Pot lid consists of the following parts:
- Silicone Cap for Float Valve – covers the float valve and keeps it in place
- Lid Locking Pin – safety mechanism that prevents the lid from opening under pressure
- Anti-Block Shield – prevents food from coming out of the inner pot through the steam release pipe
- Sealing Ring Rack – holds the sealing ring in place
- Sealing Ring – silicone sealing ring allows the Instant Pot to seal
Sealing Ring
How to Remove the Sealing Ring
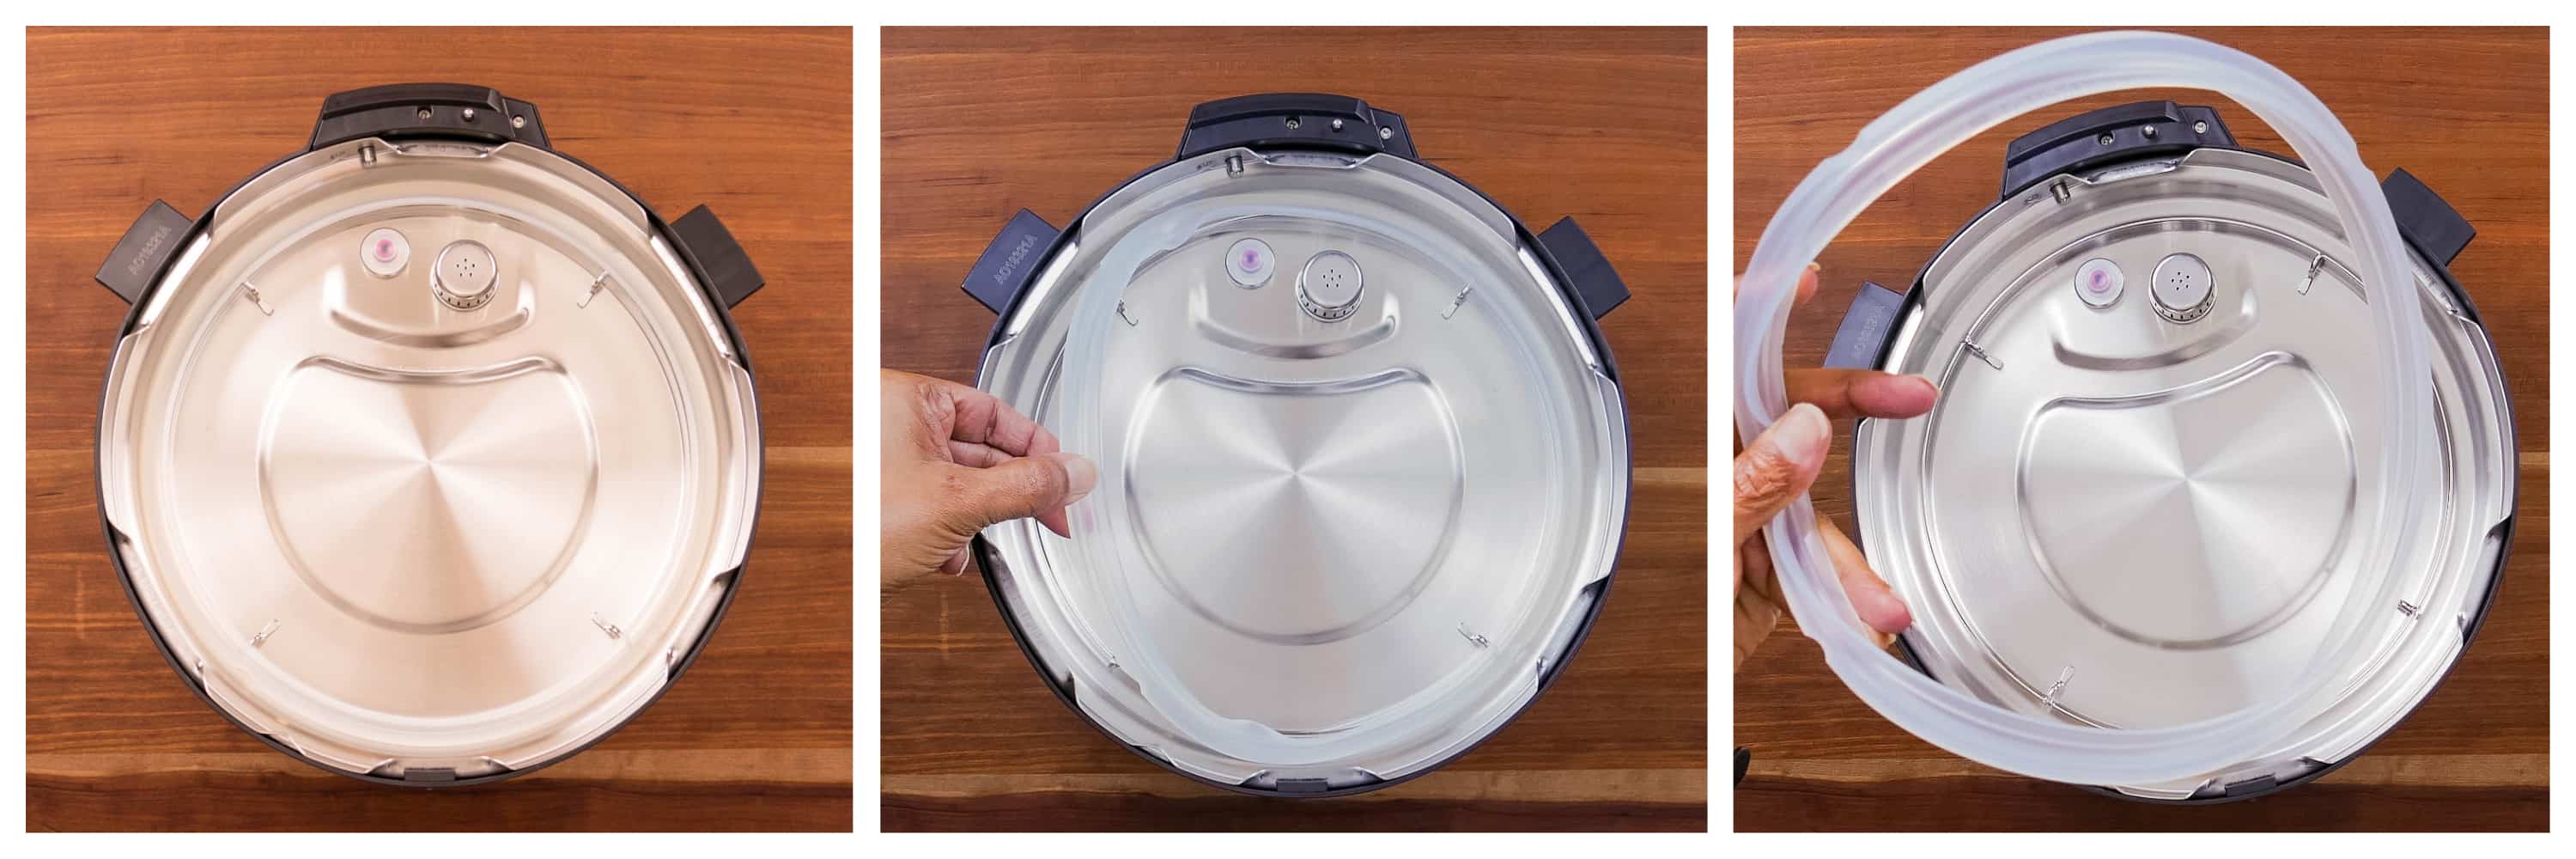
- Pull gently on the silicone ring until it detaches from the sealing ring rack.
- Continue to pull the silicone sealing ring out until it is completely separated.
How to Replace the Sealing Ring
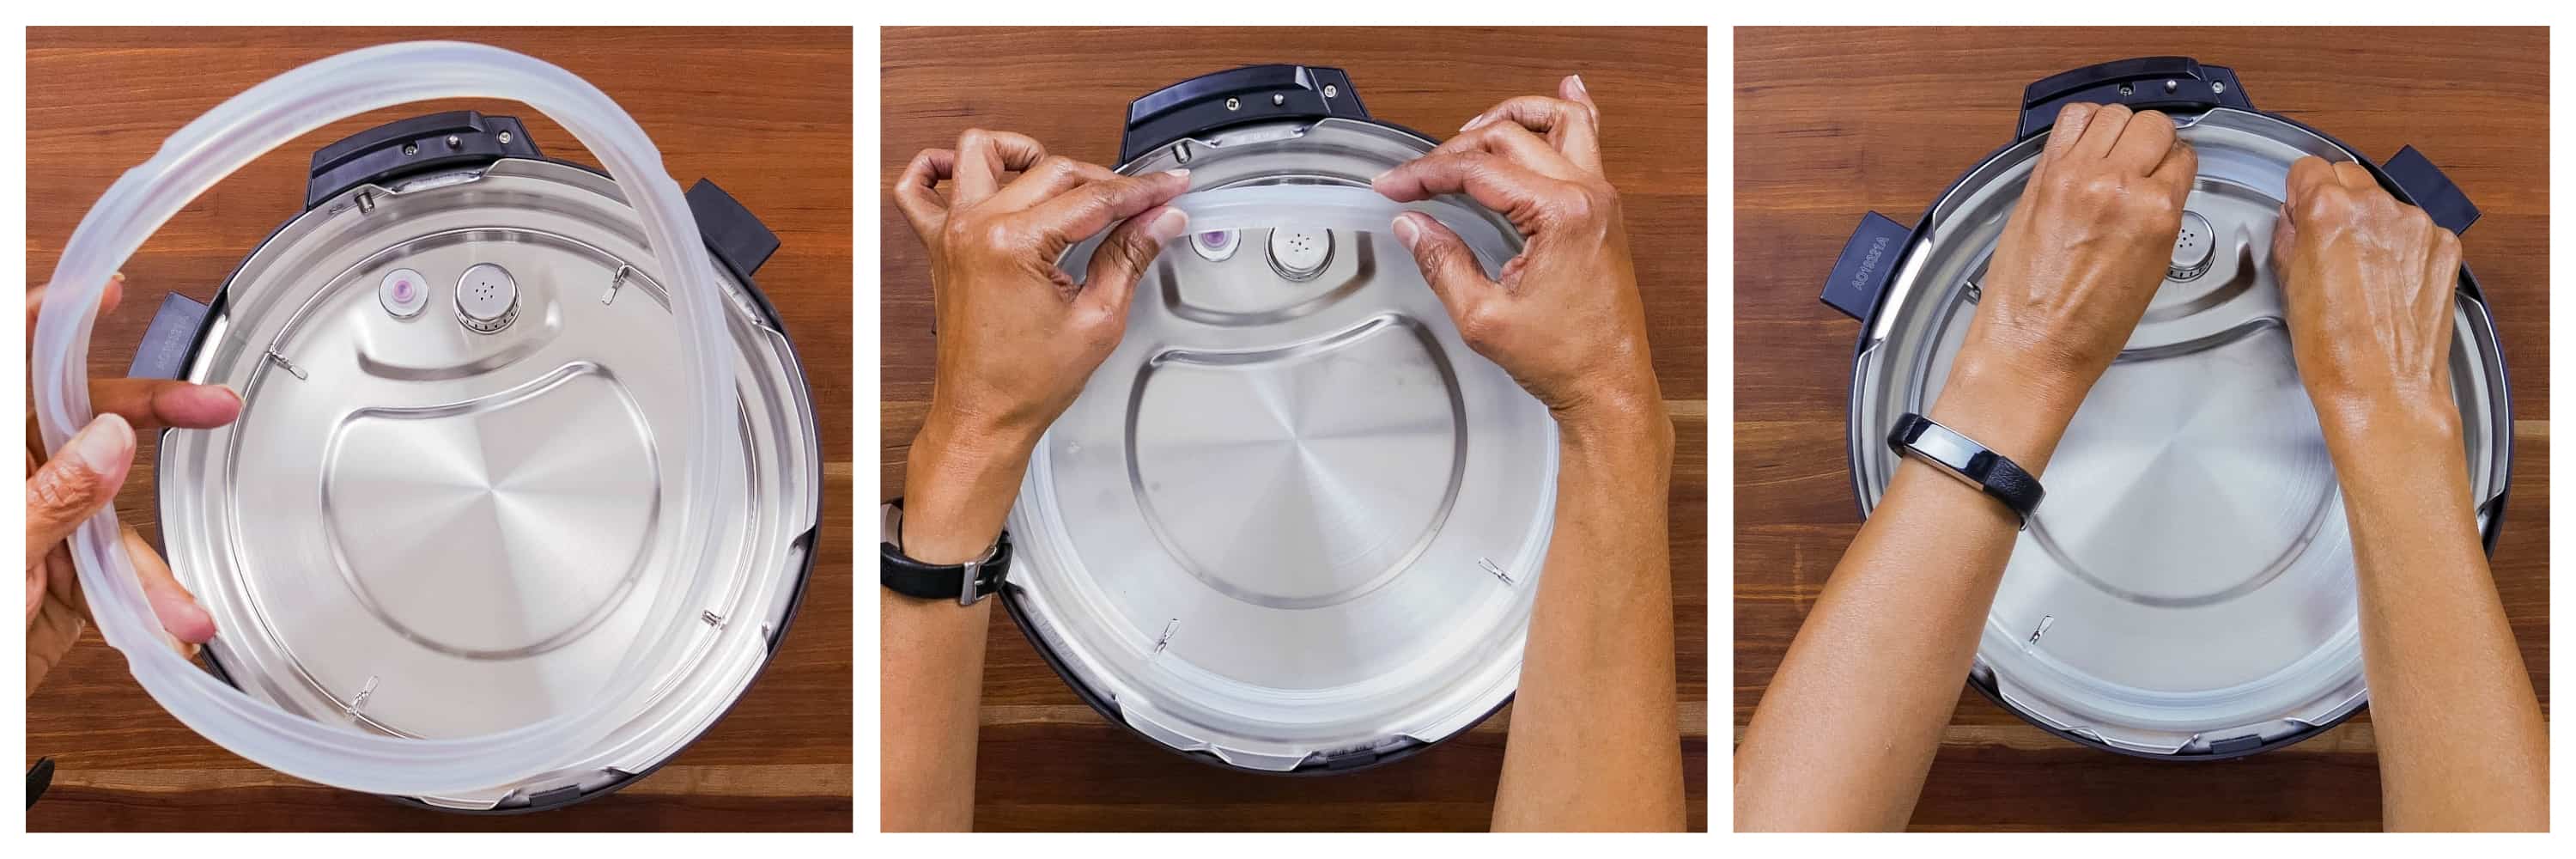
- Place the silicone sealing ring on the sealing ring rack.
- Working your way all around, push the sealing ring until it’s firmly seated in the sealing ring rack.
- Make sure no part of the sealing ring is sticking out, or you may have sealing issues and get the Burn Message.
- The first few times, you may find it difficult to remove the sealing ring but after a few uses, it should stretch out a bit.
Float Valve
You should clean the float valve periodically, especially after cooking frothy or starchy foods.
How to Remove the Float Valve
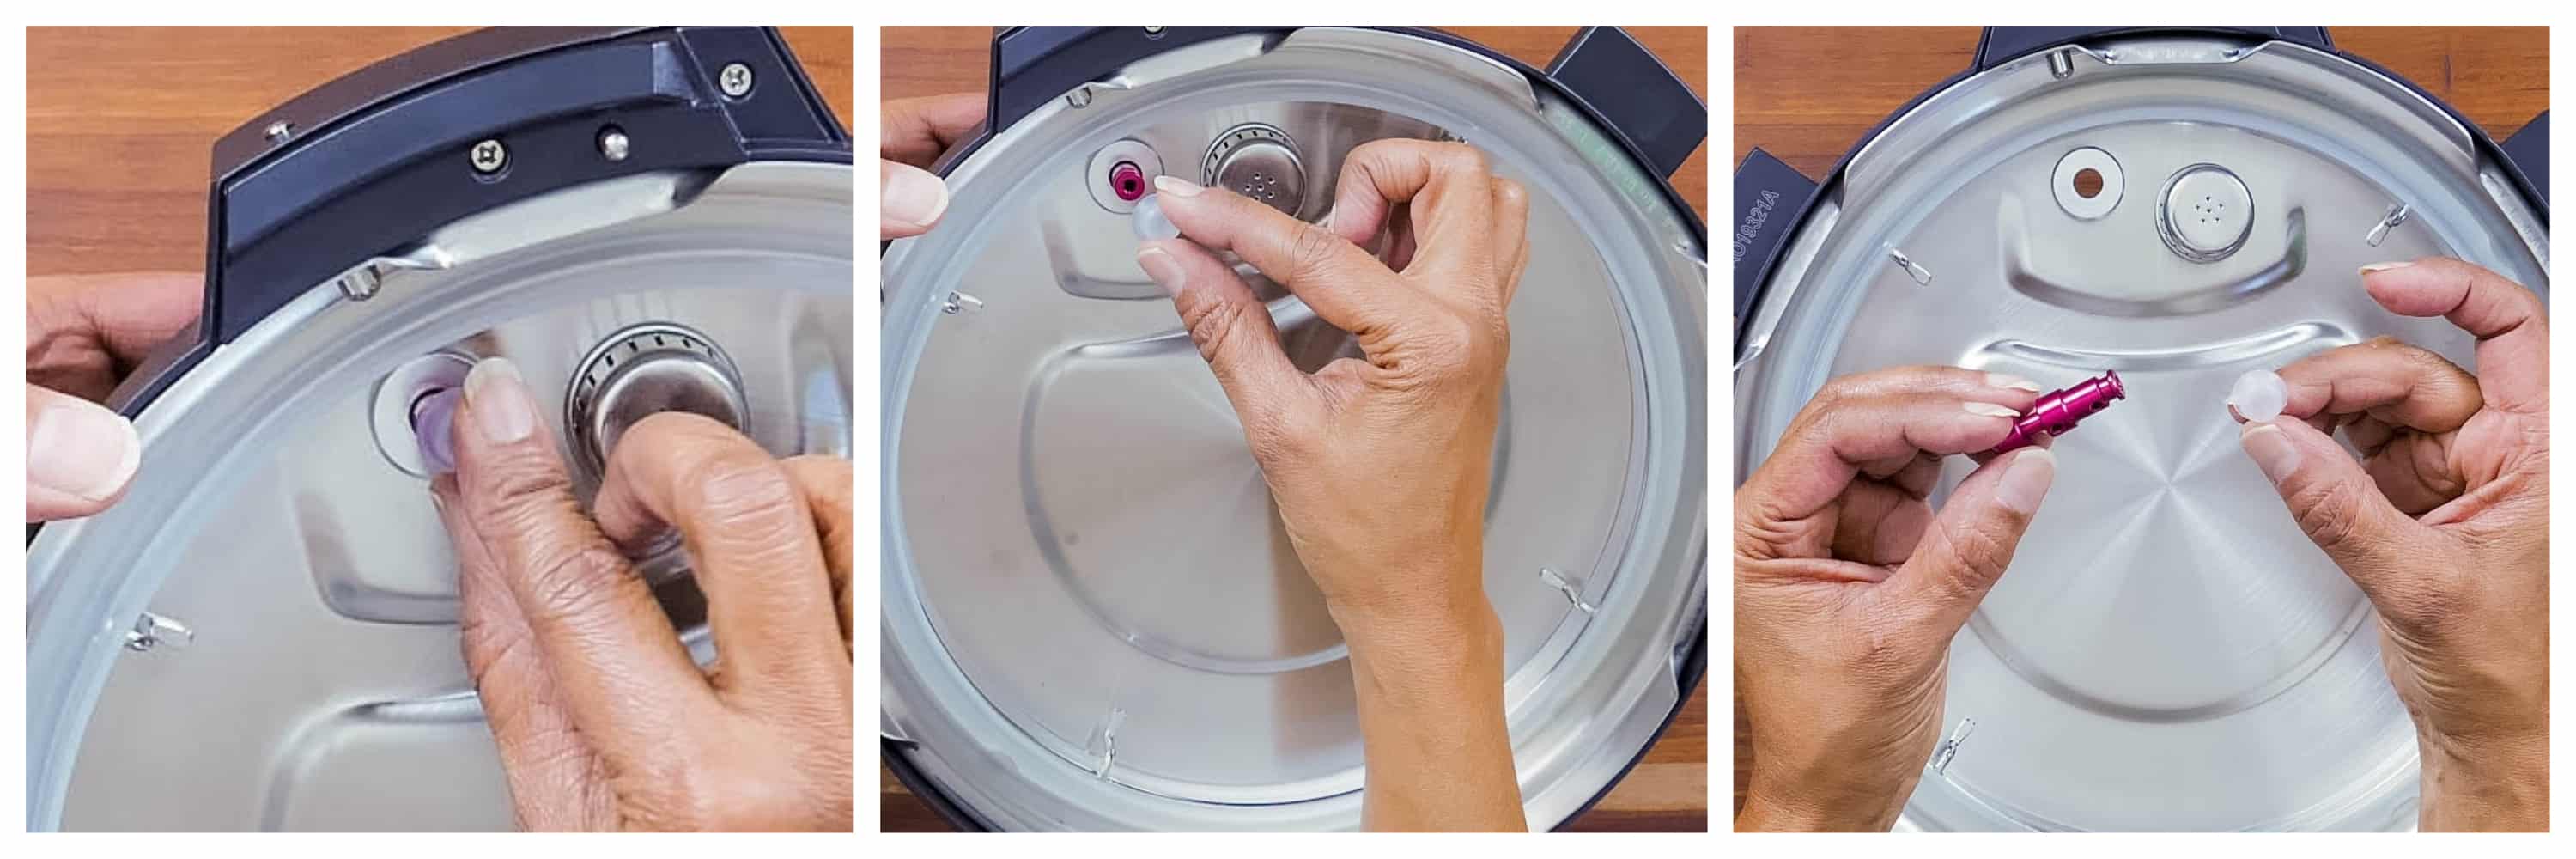
- While holding the float valve in place on the outside of the lid, remove the float valve’s silicone cap.
- Allow the float valve to fall out from the bottom.
- Be careful not to misplace the silicone cap.
How to Replace the Float Valve
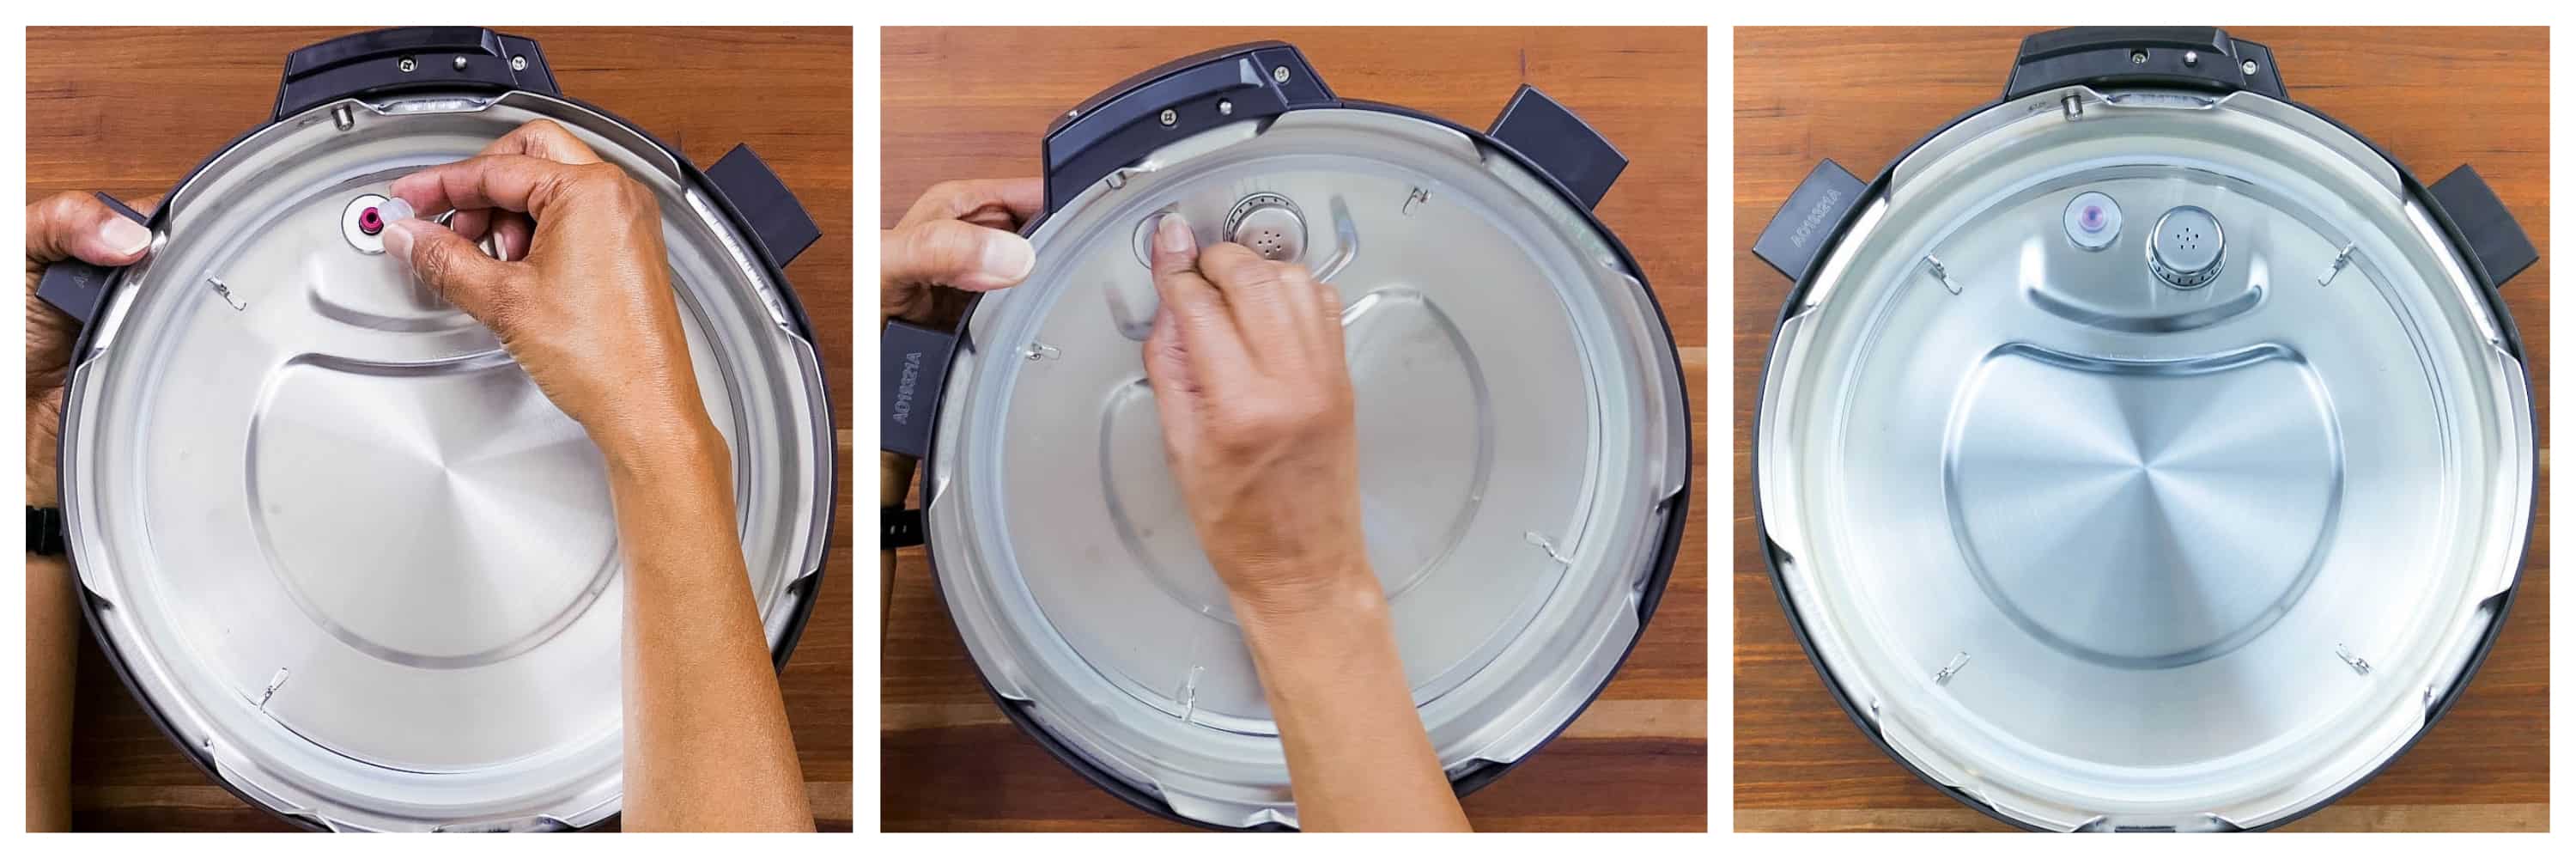
- Thread the float valve through the float valve hole.
- While holding it in place on the exterior of the lid, replace the silicone cover by pushing it onto the float valve on the interior of the lid.
Anti-Block Shield
You need to clean the anti-block shield periodically, especially after you’ve cooked frothy or starchy foods.
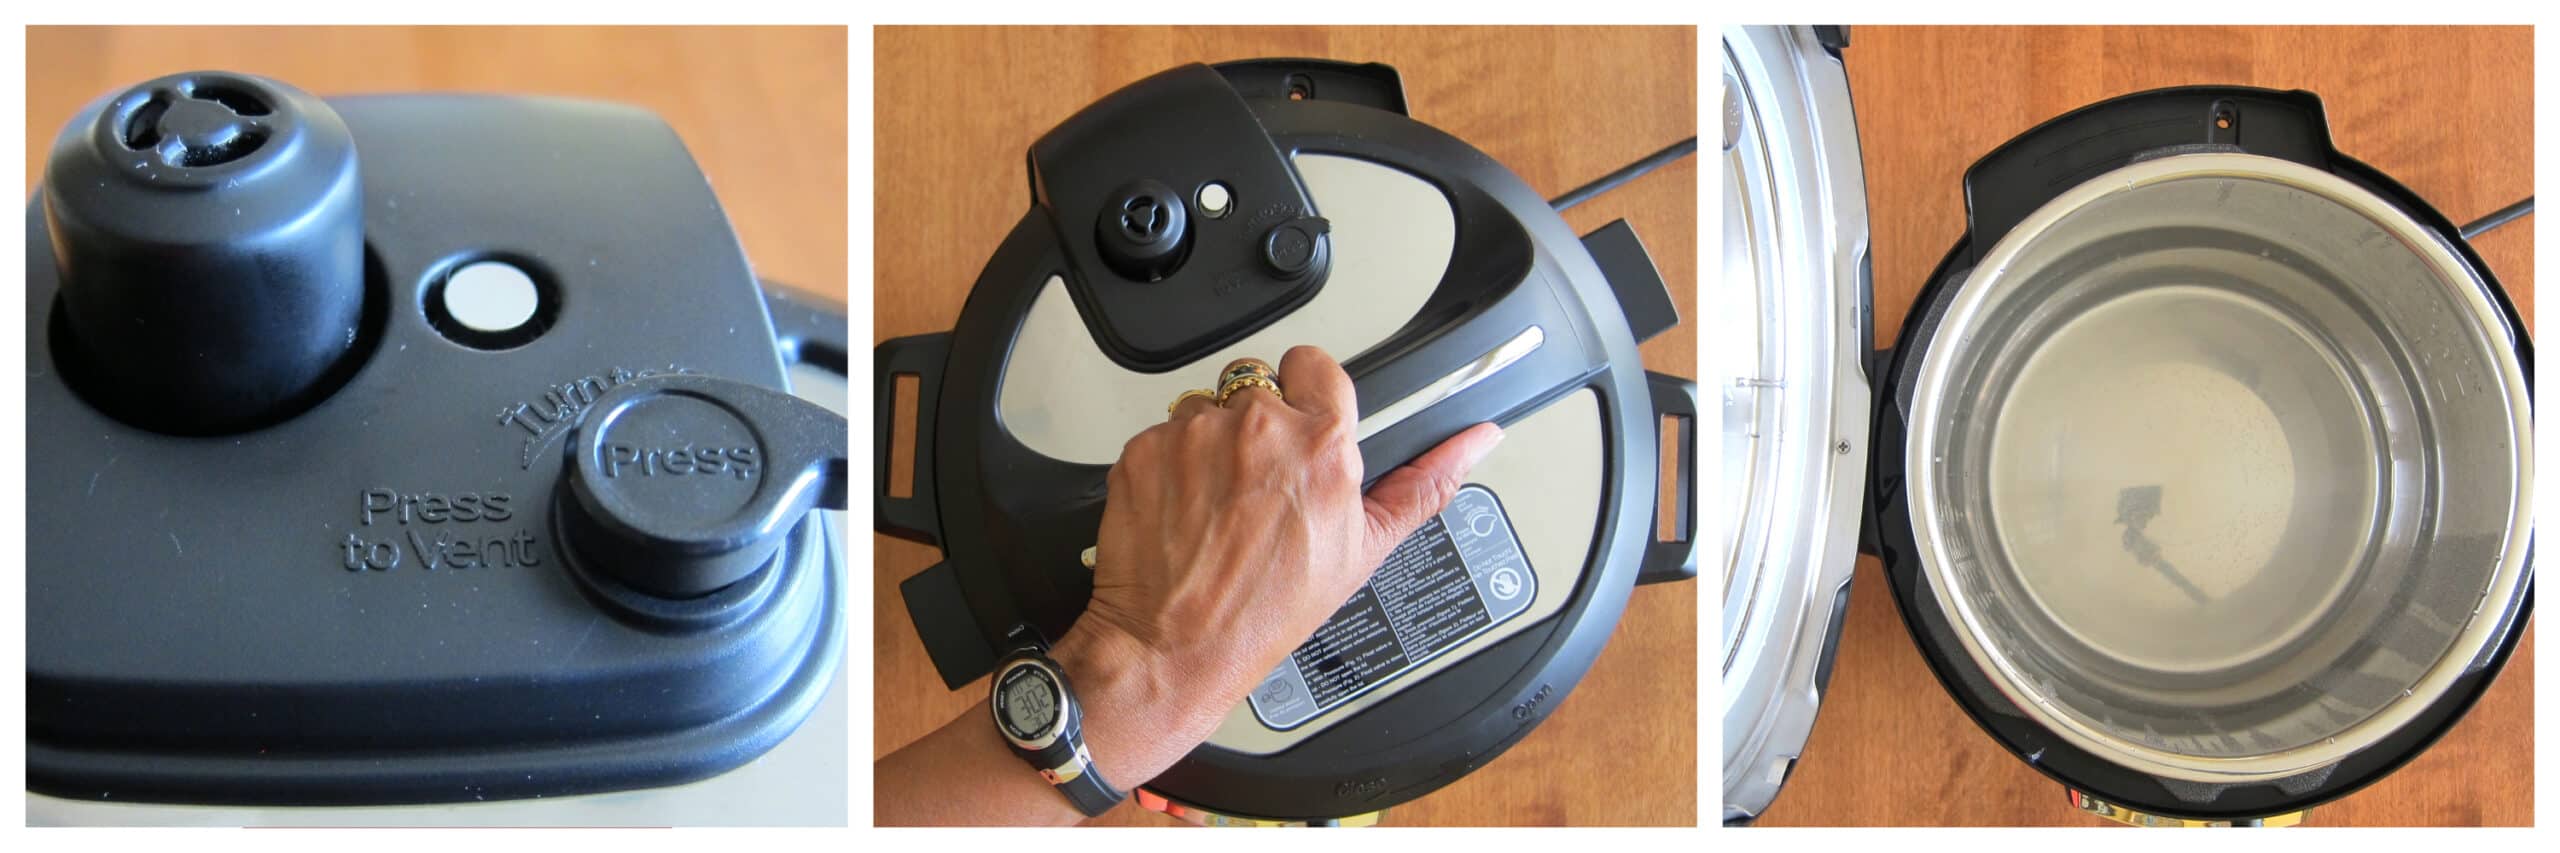
How to Remove and Replace the Anti-block Shield
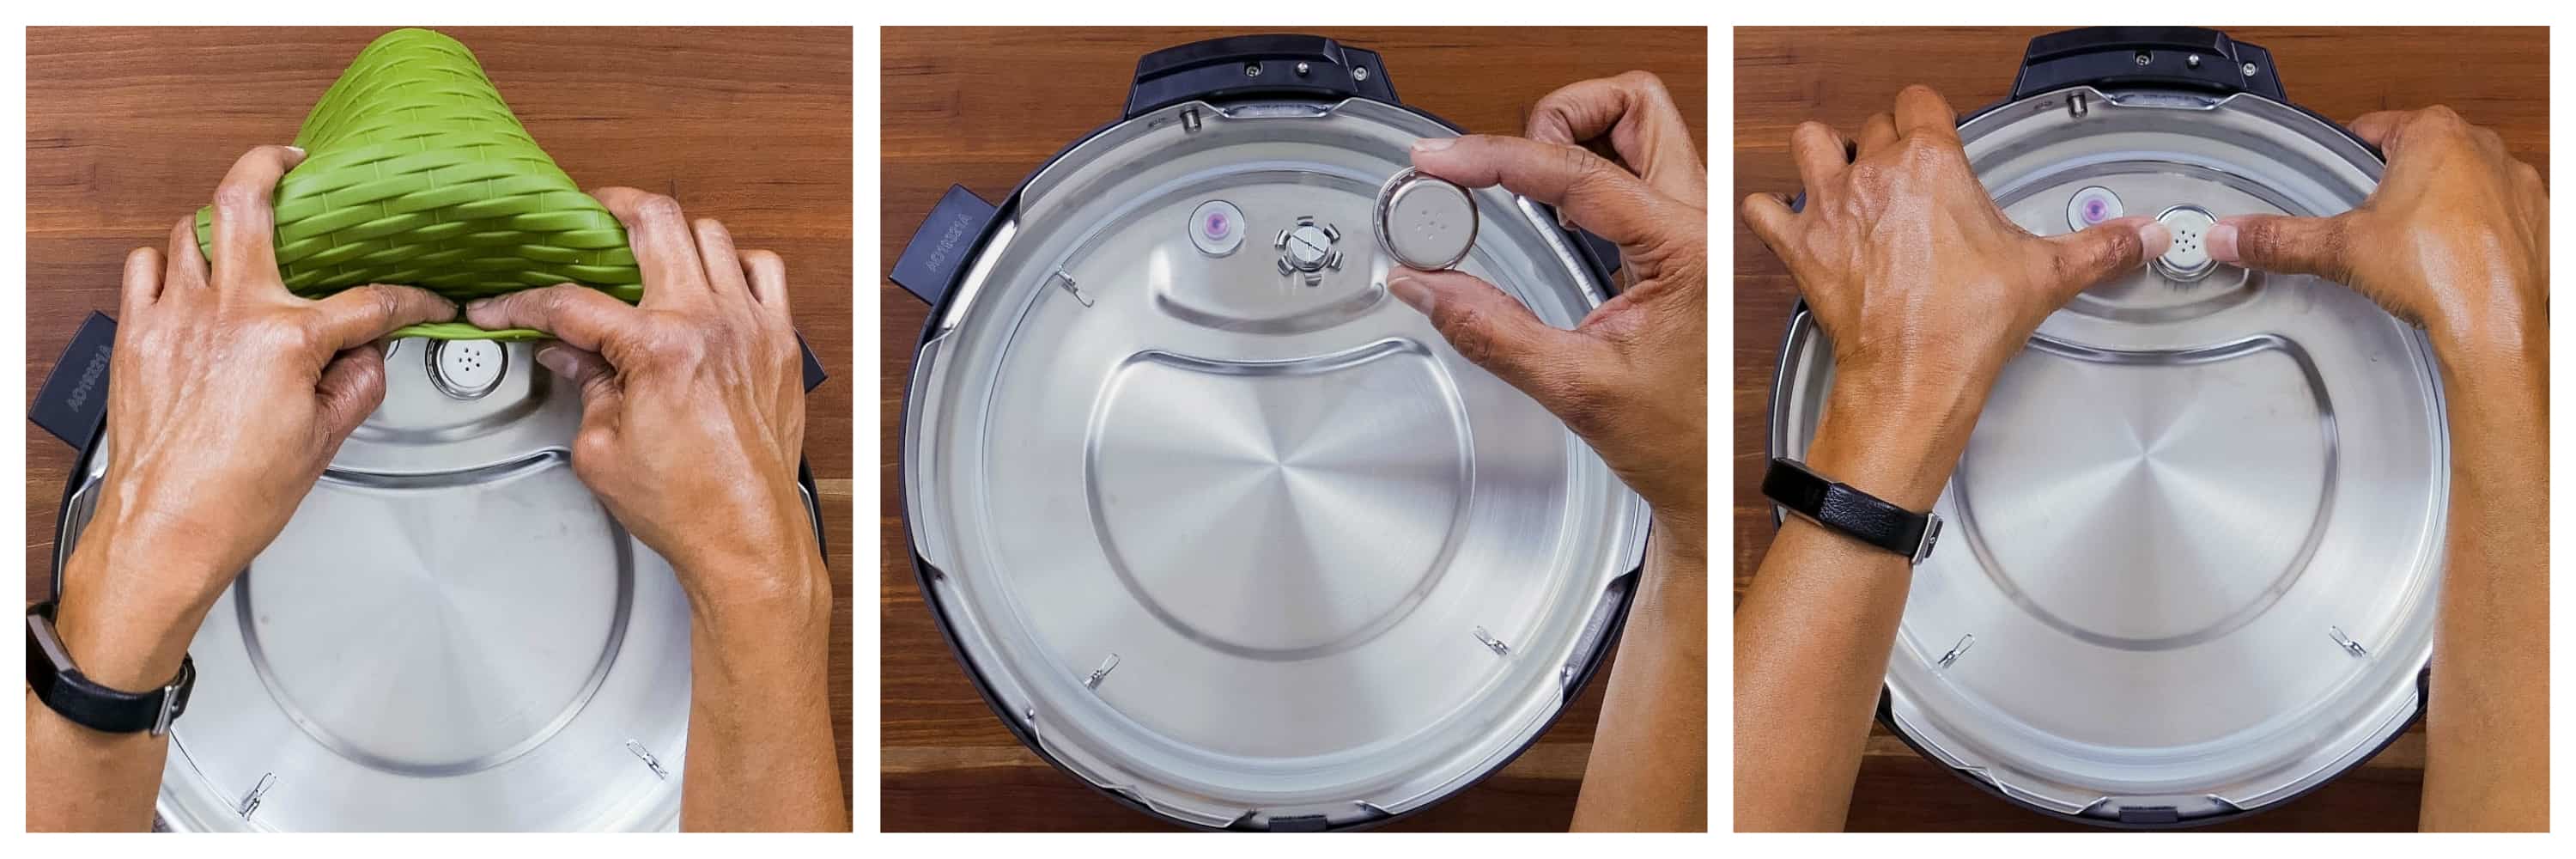
- The anti-block shield can be hard to remove with your bare hands.
- Use a silicone trivet or a dish towel to push the anti-block shield in an upwards motion.
- Try it from the front or from behind (as shown above in the first image)
- To replace the anti-block shield, push it in until it clicks into place.
Instant Pot Assembly
Here’s how to set up the Instant Pot Duo Gourmet base unit, inner pot, condensation collector, and power cord:
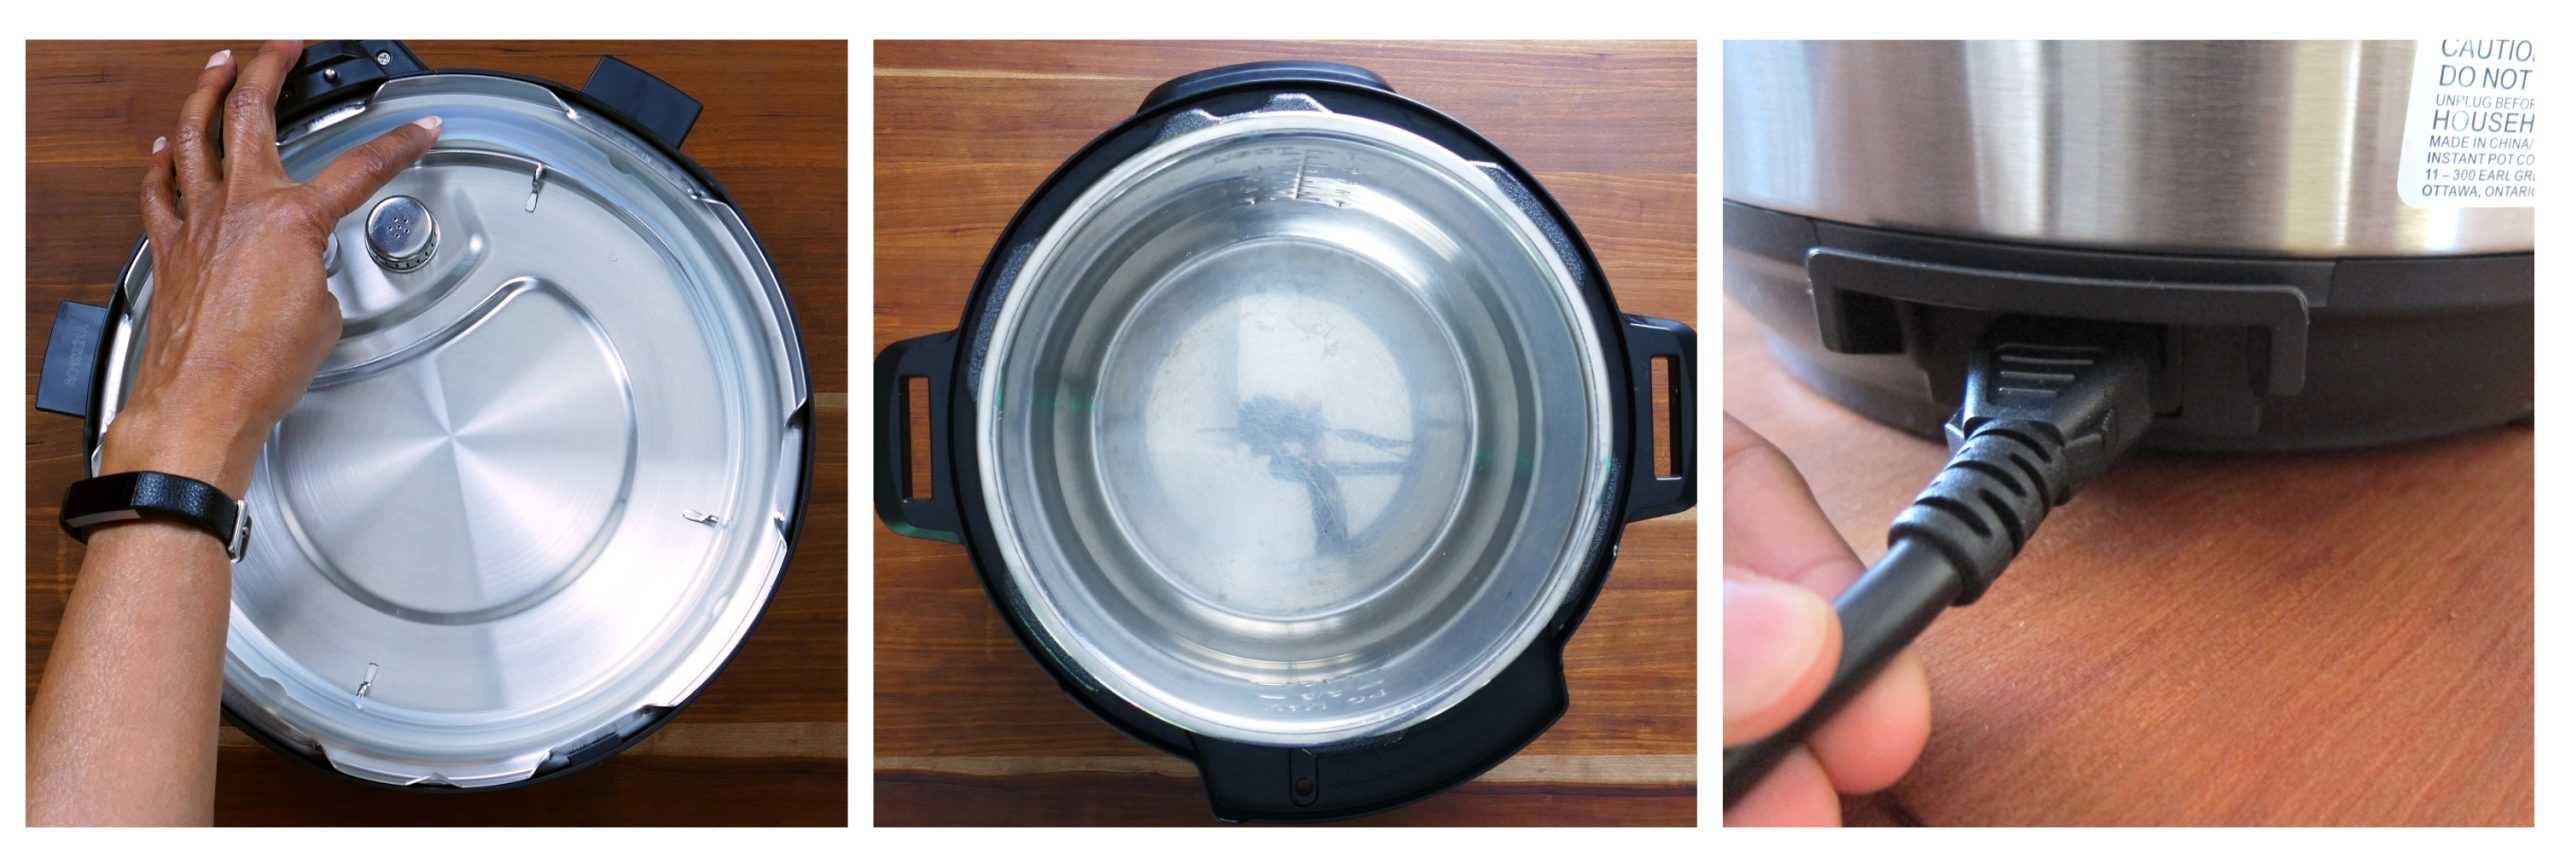
Base Unit and Inner Pot
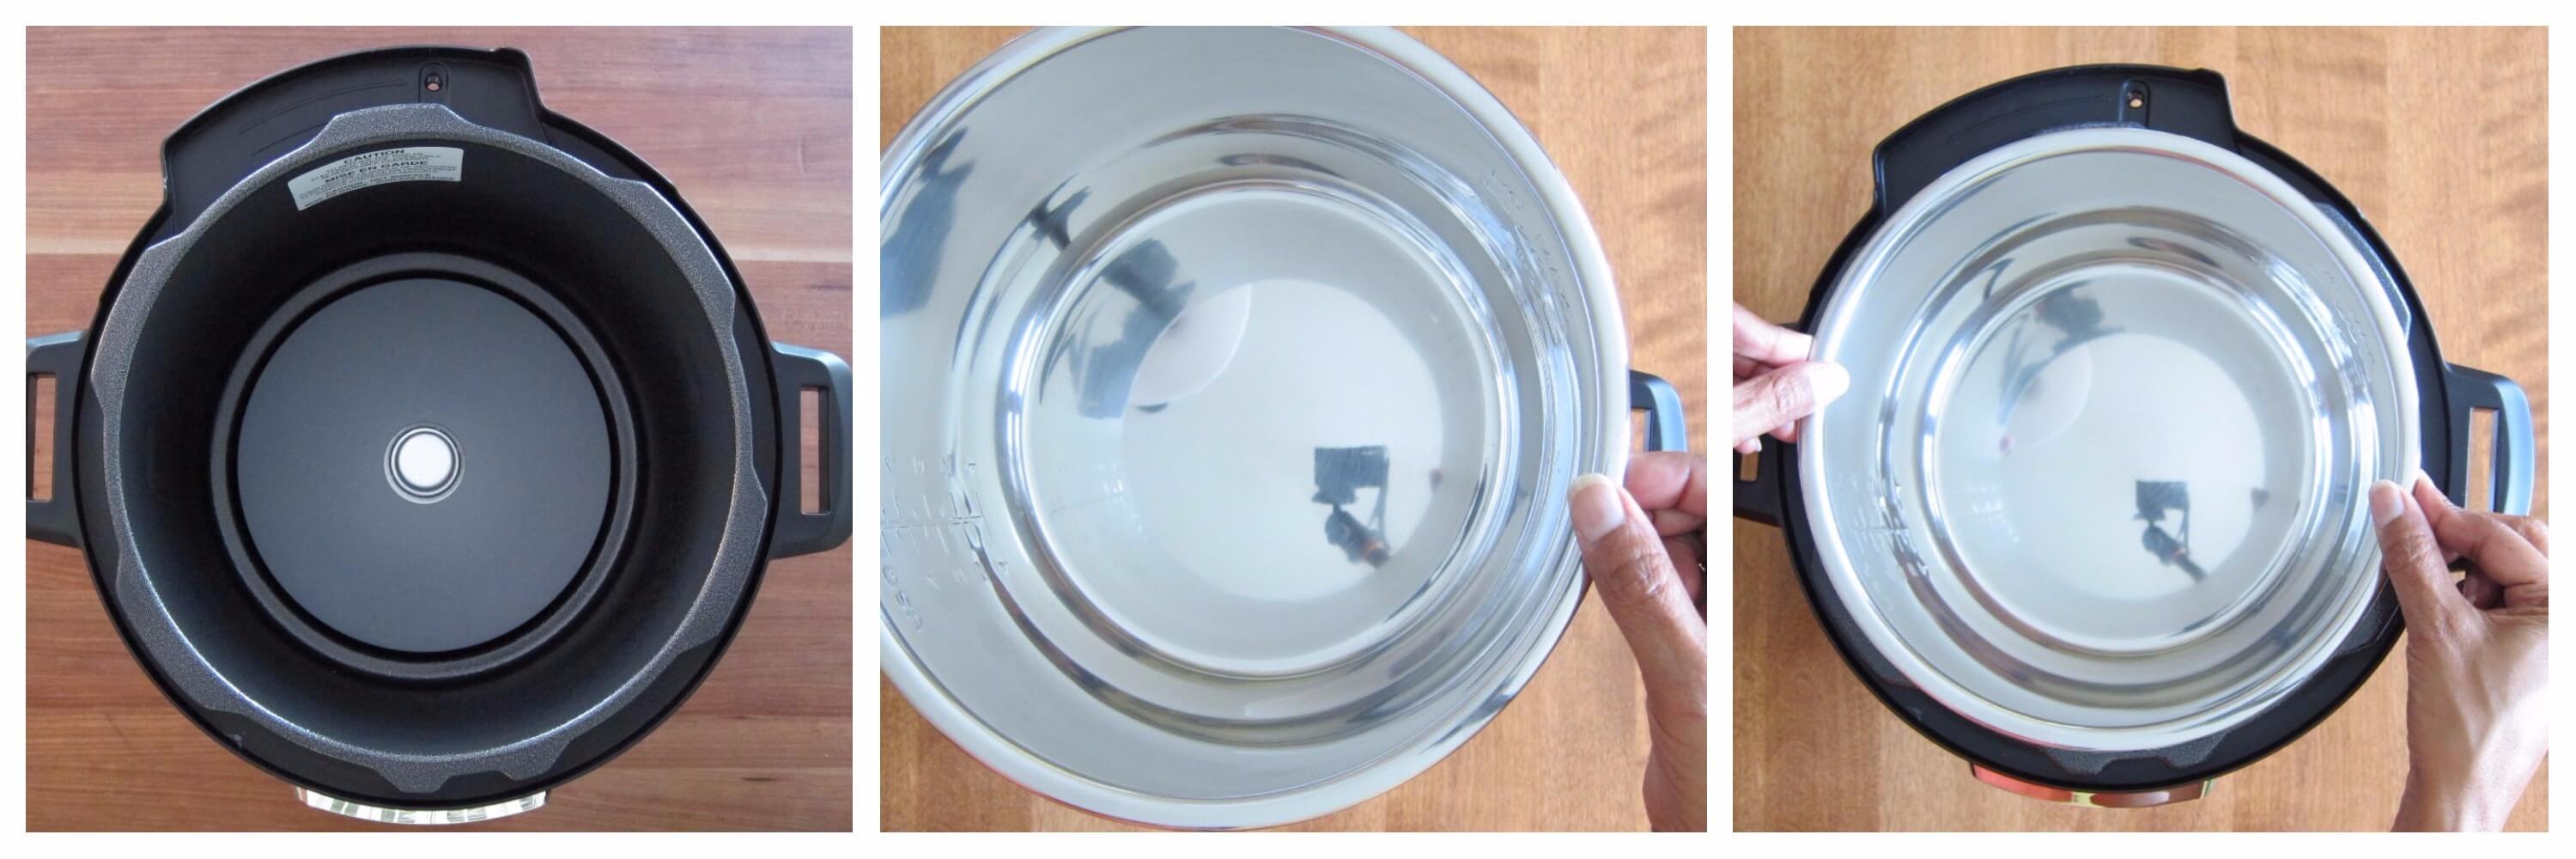
- Make sure the base unit is empty and clean.
- Place the stainless steel inner pot into the base unit.
Condensation Collector
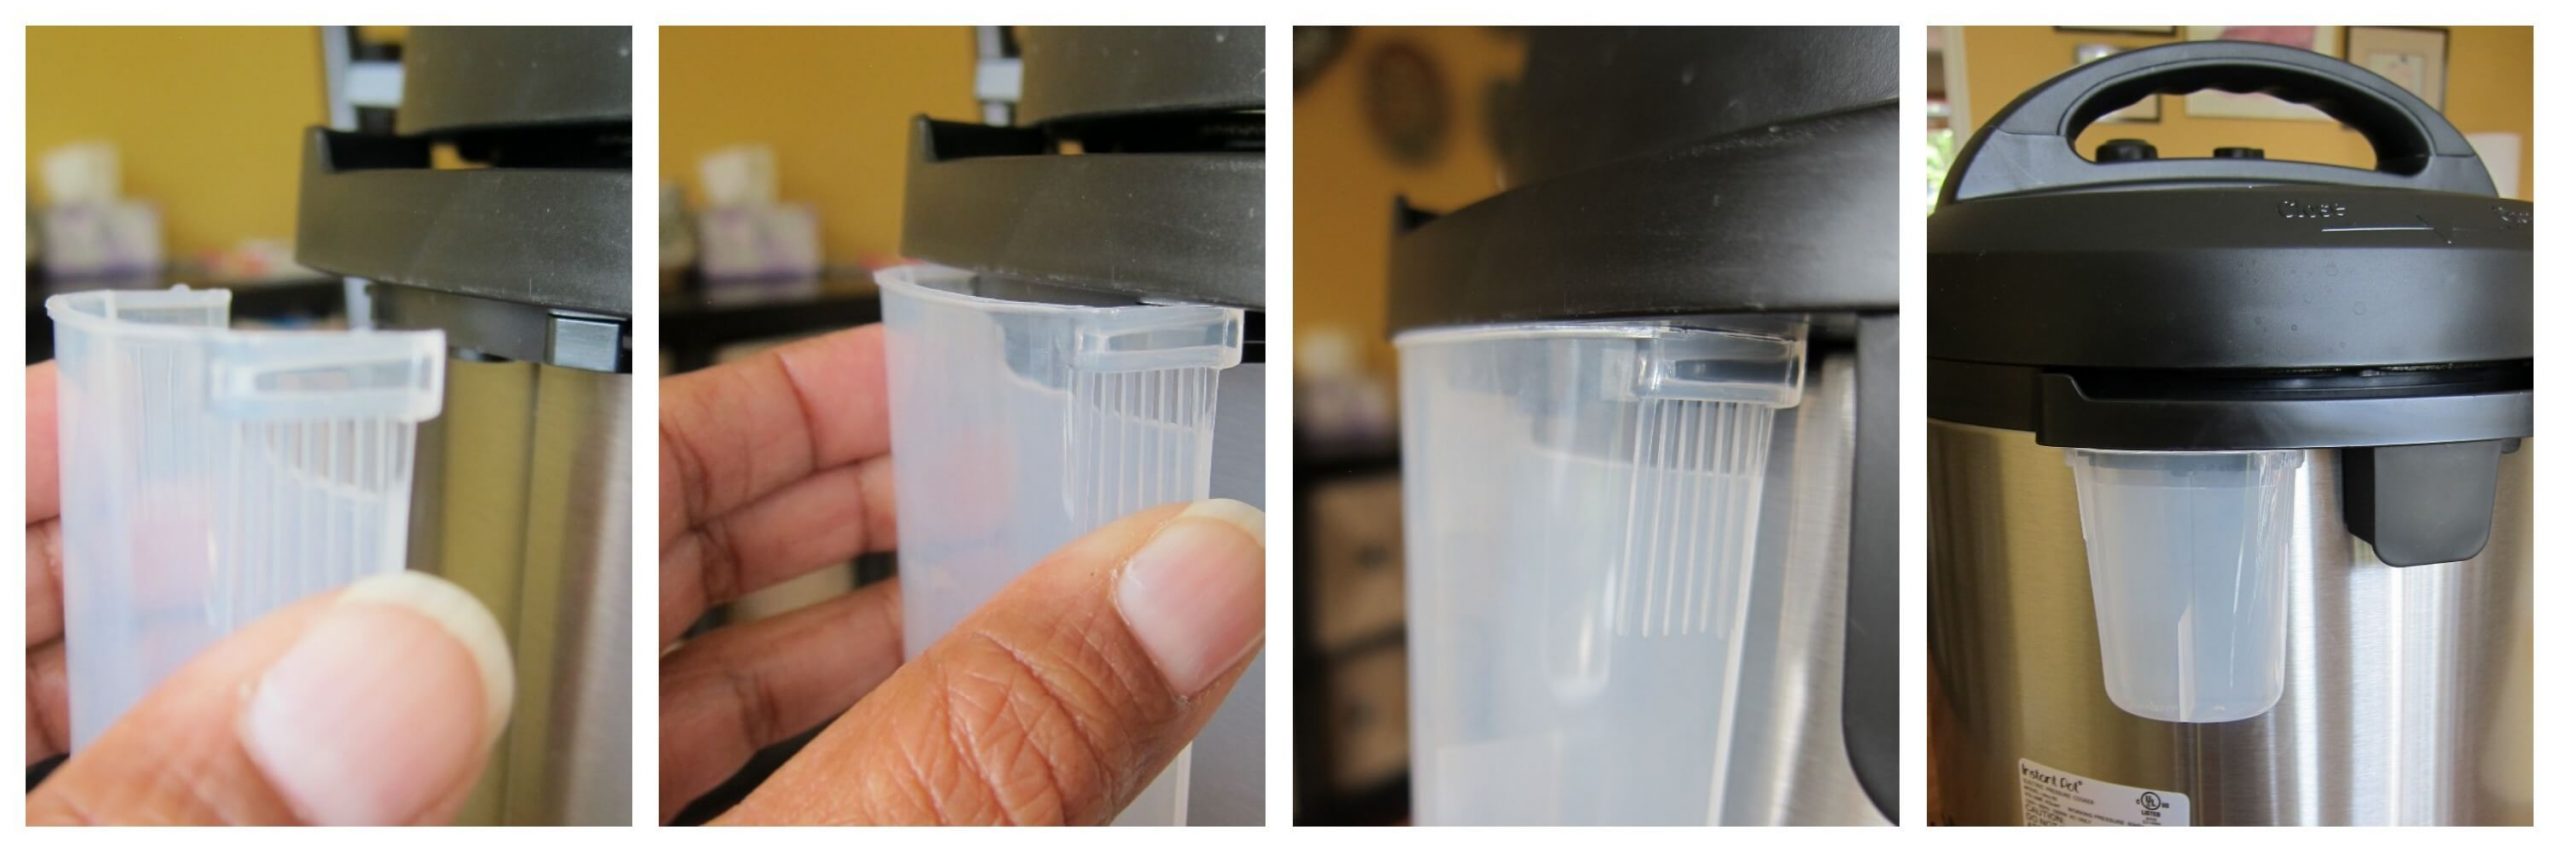
The condensation collector catches any moisture that builds up on the rim. This usually comes from moisture dripping from inside the lid into the rim of the Instant Pot base, when the lid is propped open.
In my experience, the condensation collector rarely fills up but I have found that when I cook pasta, in particular, liquid tends to collect and it can get messy! Get into the habit of checking for liquid in the condensation collector after every use.
To attach the condensation collector:
- Slide the condensation collector onto the back of the Instant Pot.
- It will sit snugly against the base unit.
- To clean it, slide it out, empty it out, rinse and slide back in place. It can also be washed in the top rack of the dishwasher.
Power Cord
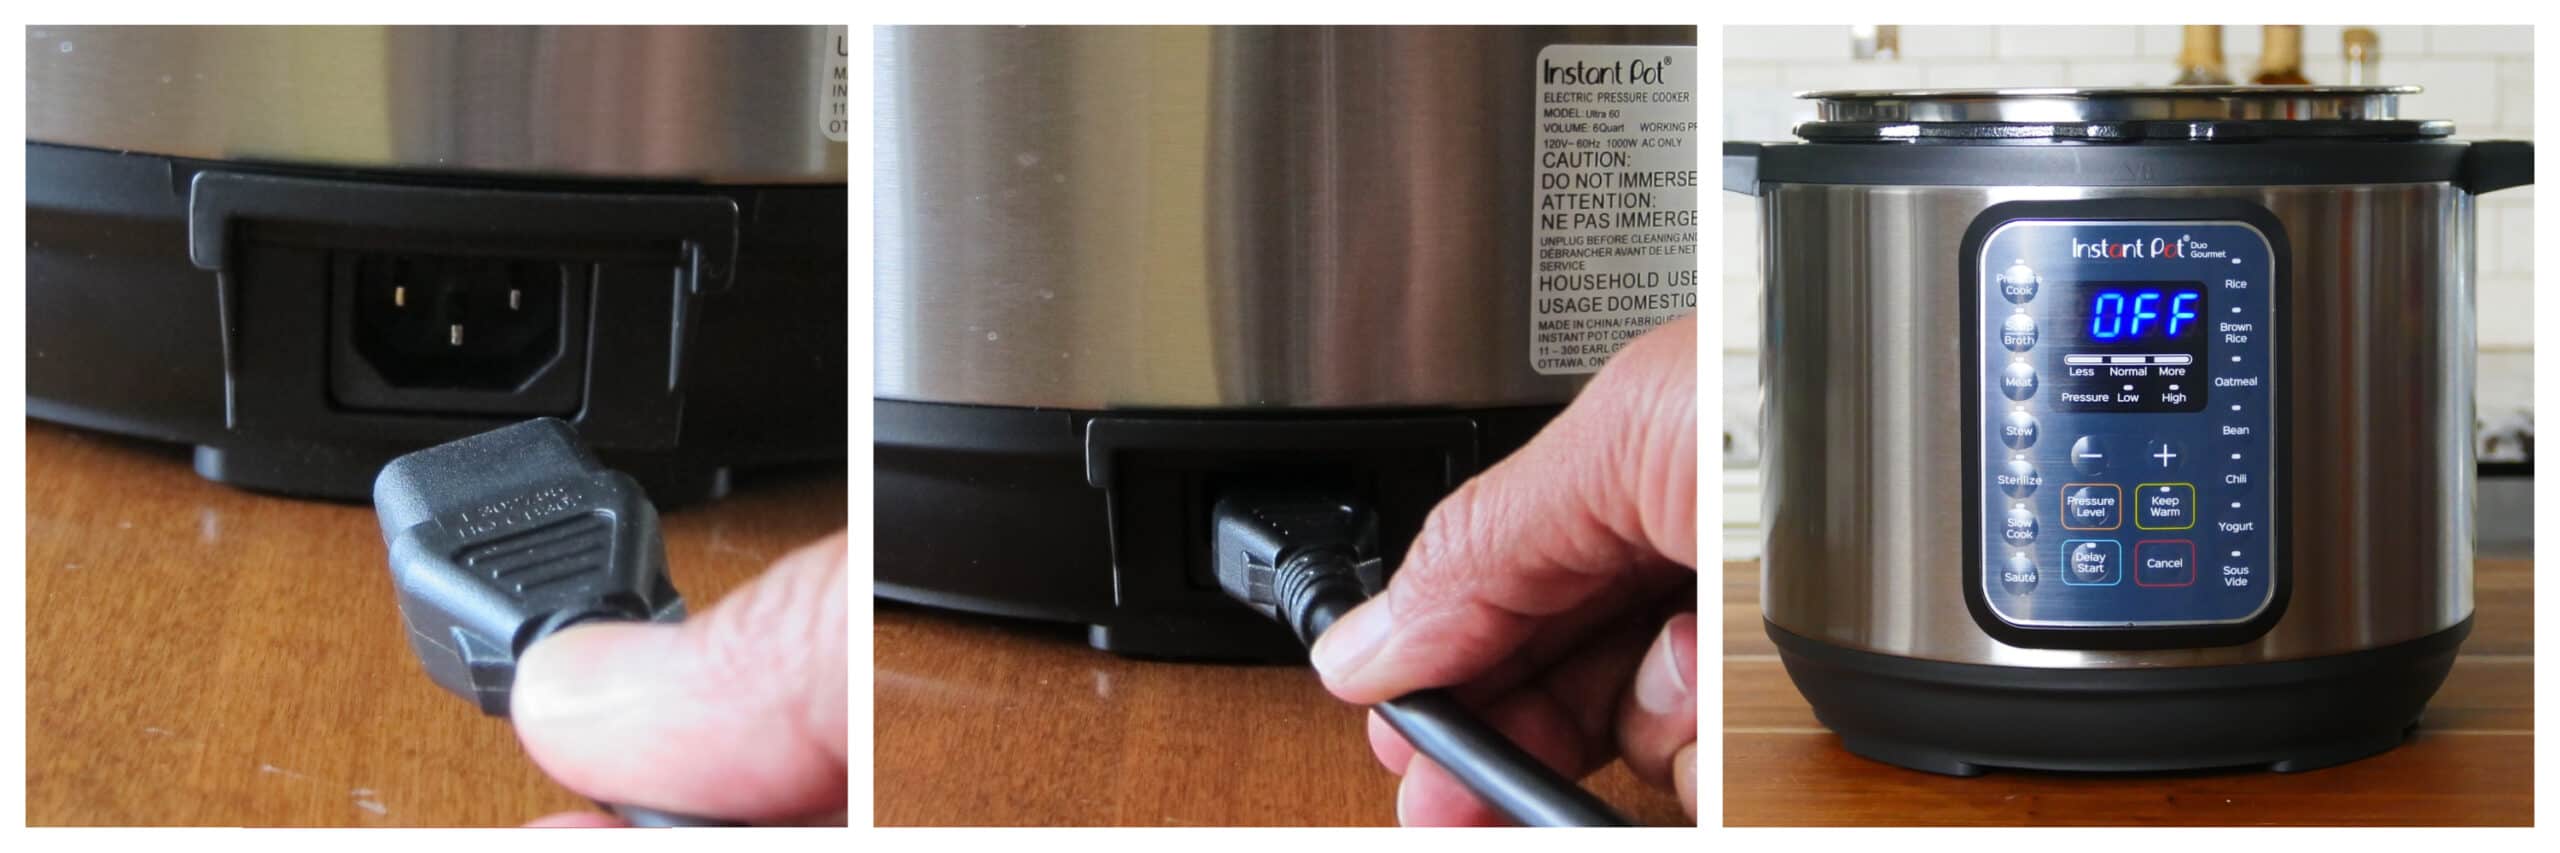
- Insert the power cord into the back of the Instant Pot and plug the power cord into an electrical outlet.
- The display will light up.
Open and Close the Lid
How to Close the Lid
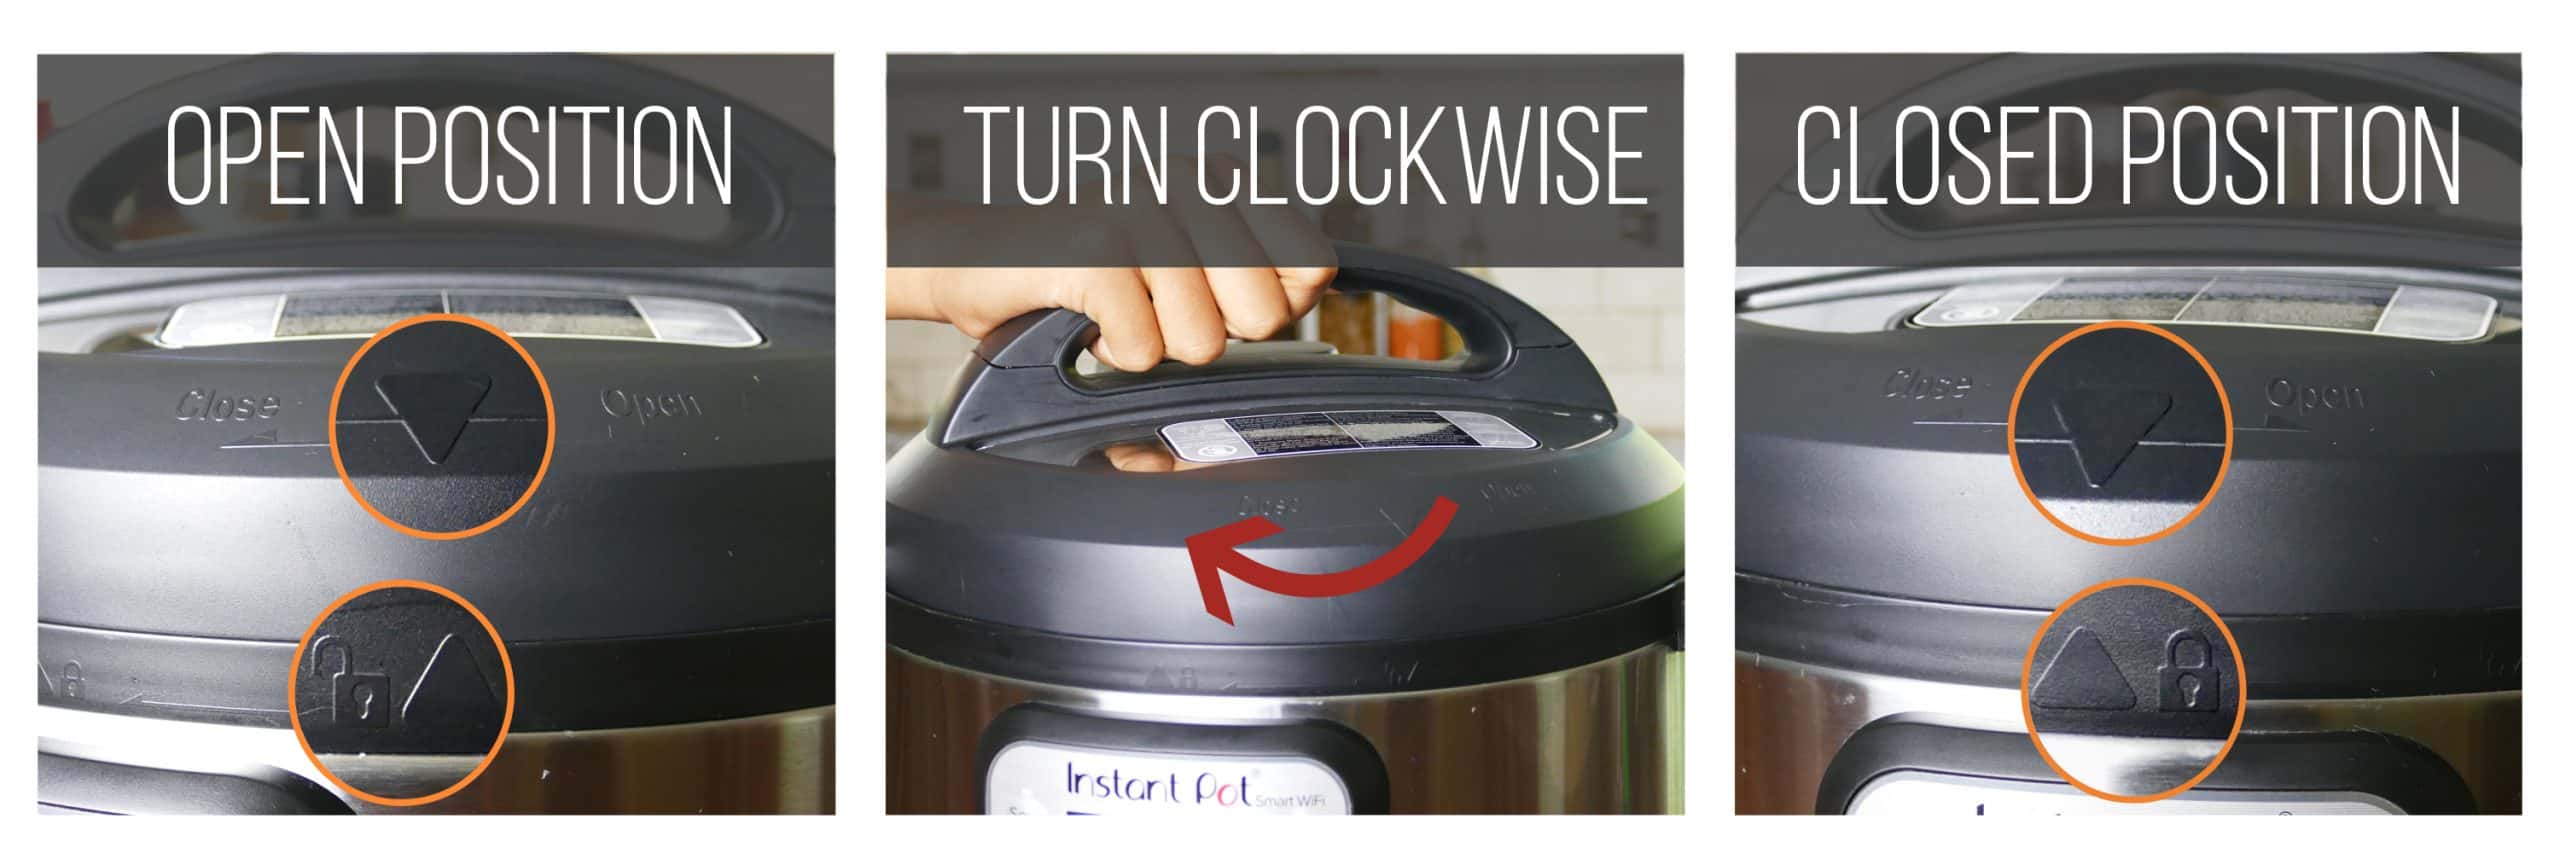
- Place the lid onto the Instant Pot base unit with the arrow mark on the lid lined up with the open lock icon that is above the right corner of the control panel.
- You’ll hear a chime (if the volume is turned on).
- Turn the lid clockwise until the arrow mark on the lid is lined up with the closed lock icon and you hear another chime.
- The lid will be closed.
How to Open the Lid
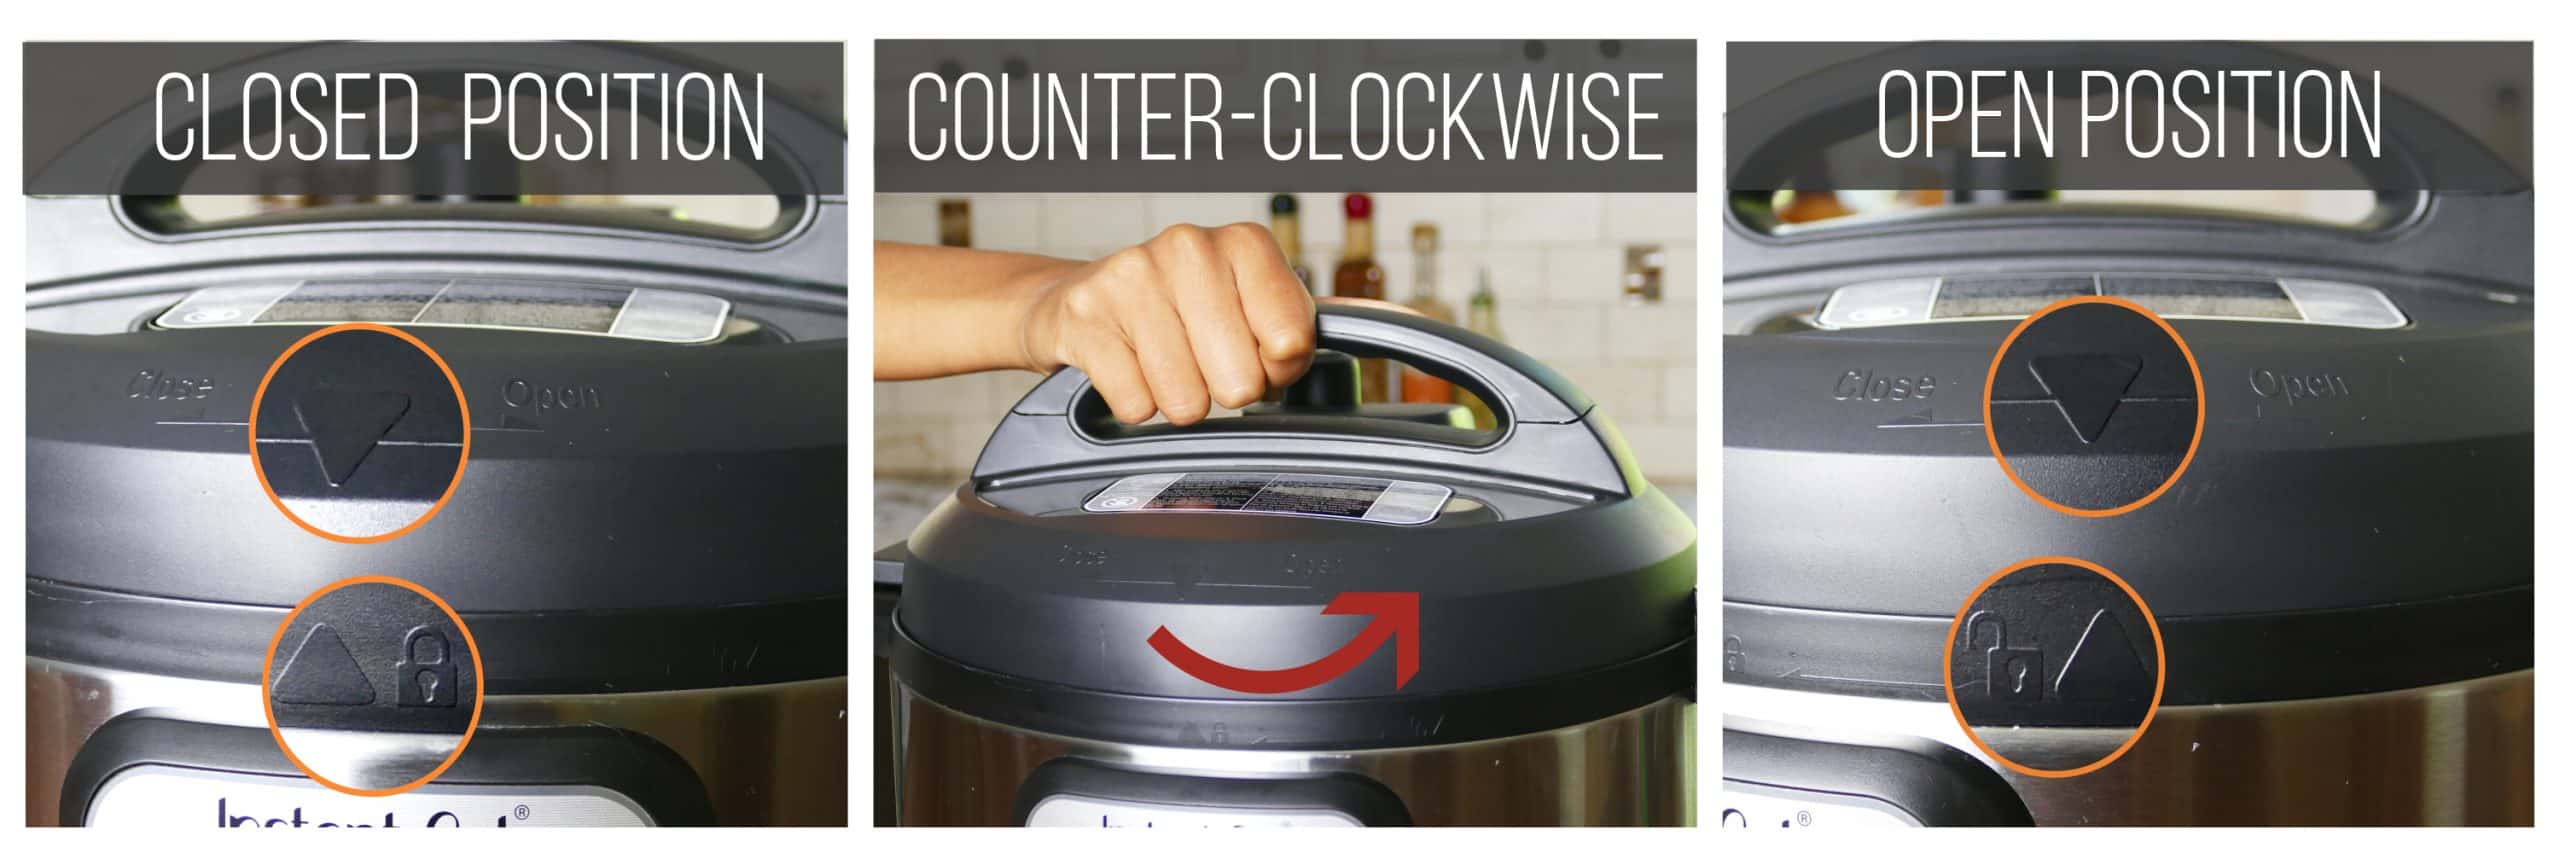
- The lid will not open until all pressure has been released.
- Once the float valve is down, turn the lid counter-clockwise until you hear a chime.
- The arrow on the lid will be lined up with the open lock icon on the base unit.
- Lift the lid to remove it.
- If you feel a slight resistance, wiggle the lid back and forth and the suction should release.
How to Prop Open the Lid
Propping open the lid keeps it out of the way and allows you to use the Instant Pot hands-free.

- Locate the two lid fins on the lid.
- Locate the lid fin slots on the base unit.
- Insert either lid fin into either slot to prop the lid open.
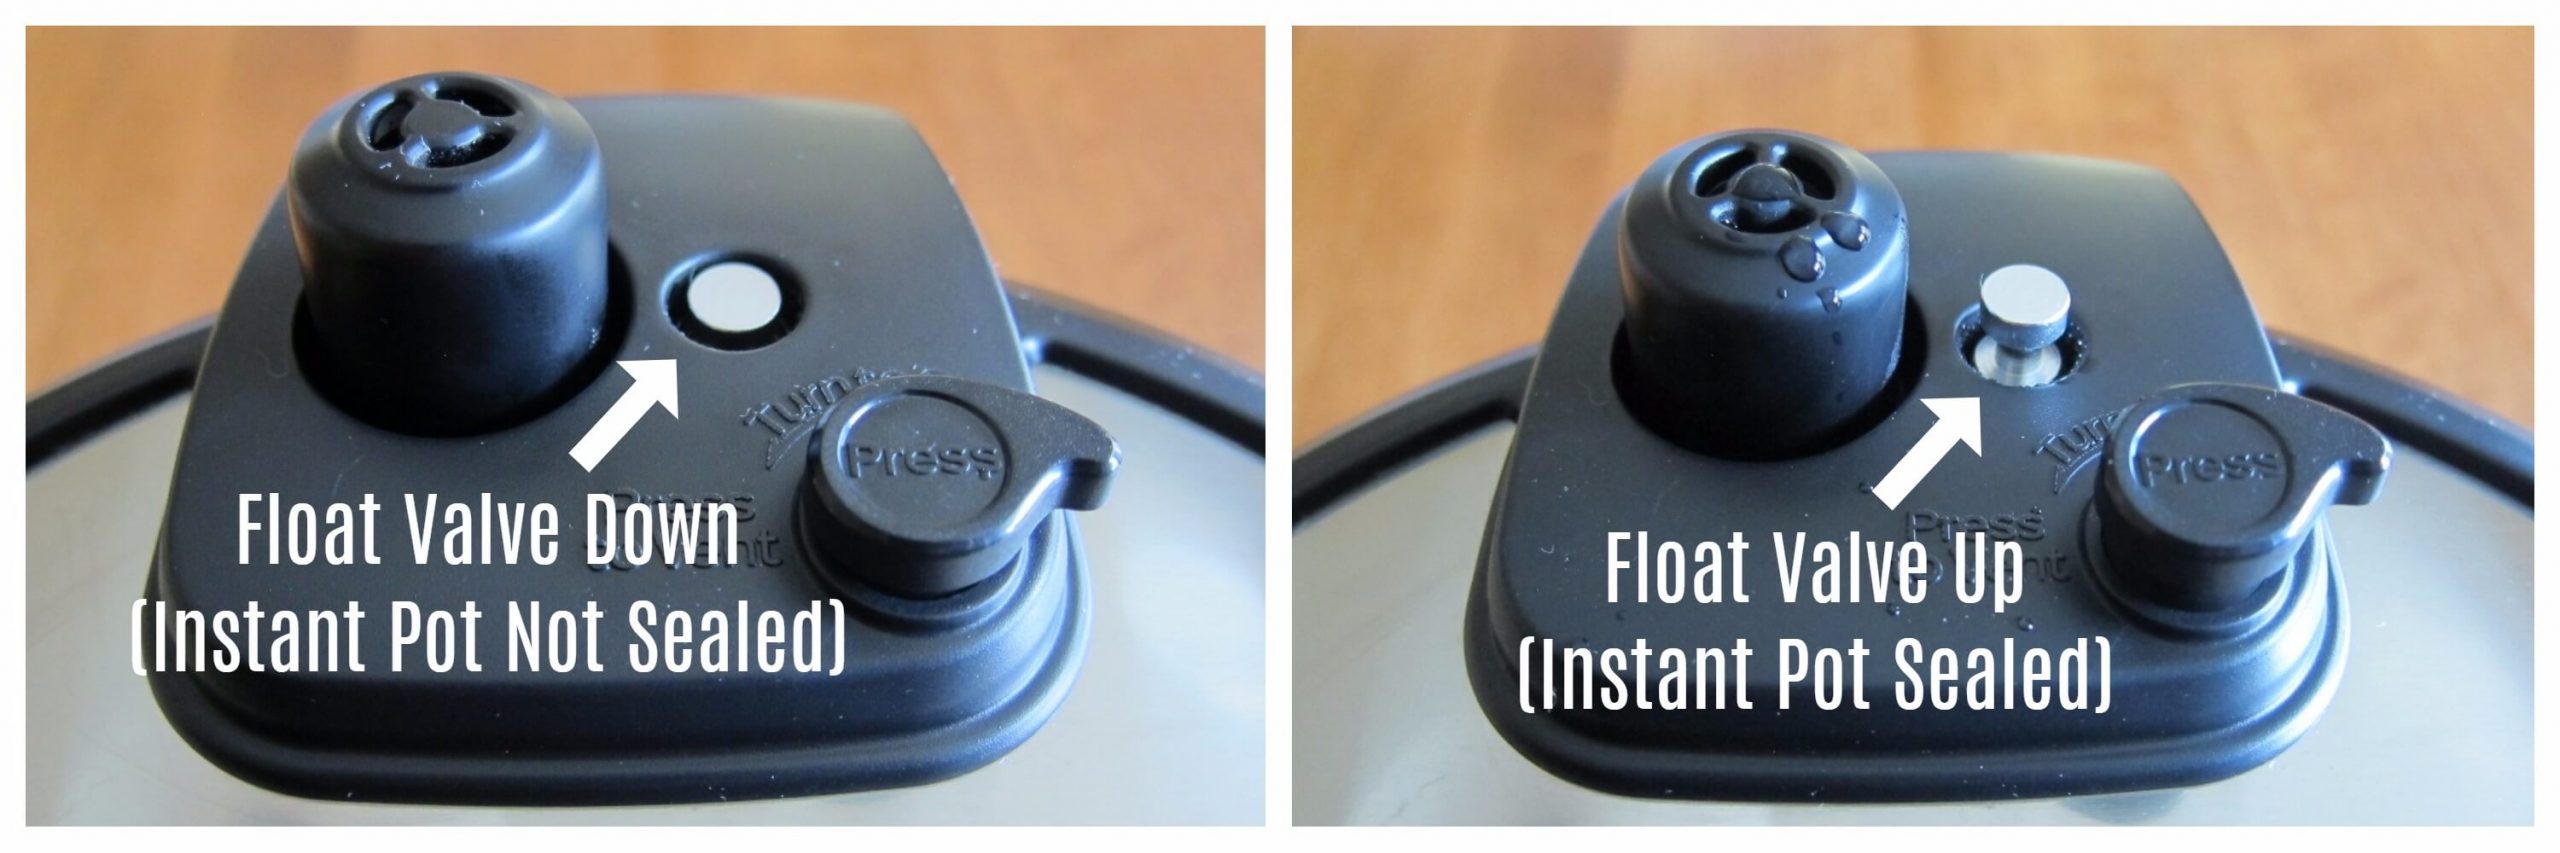
How to Release Pressure
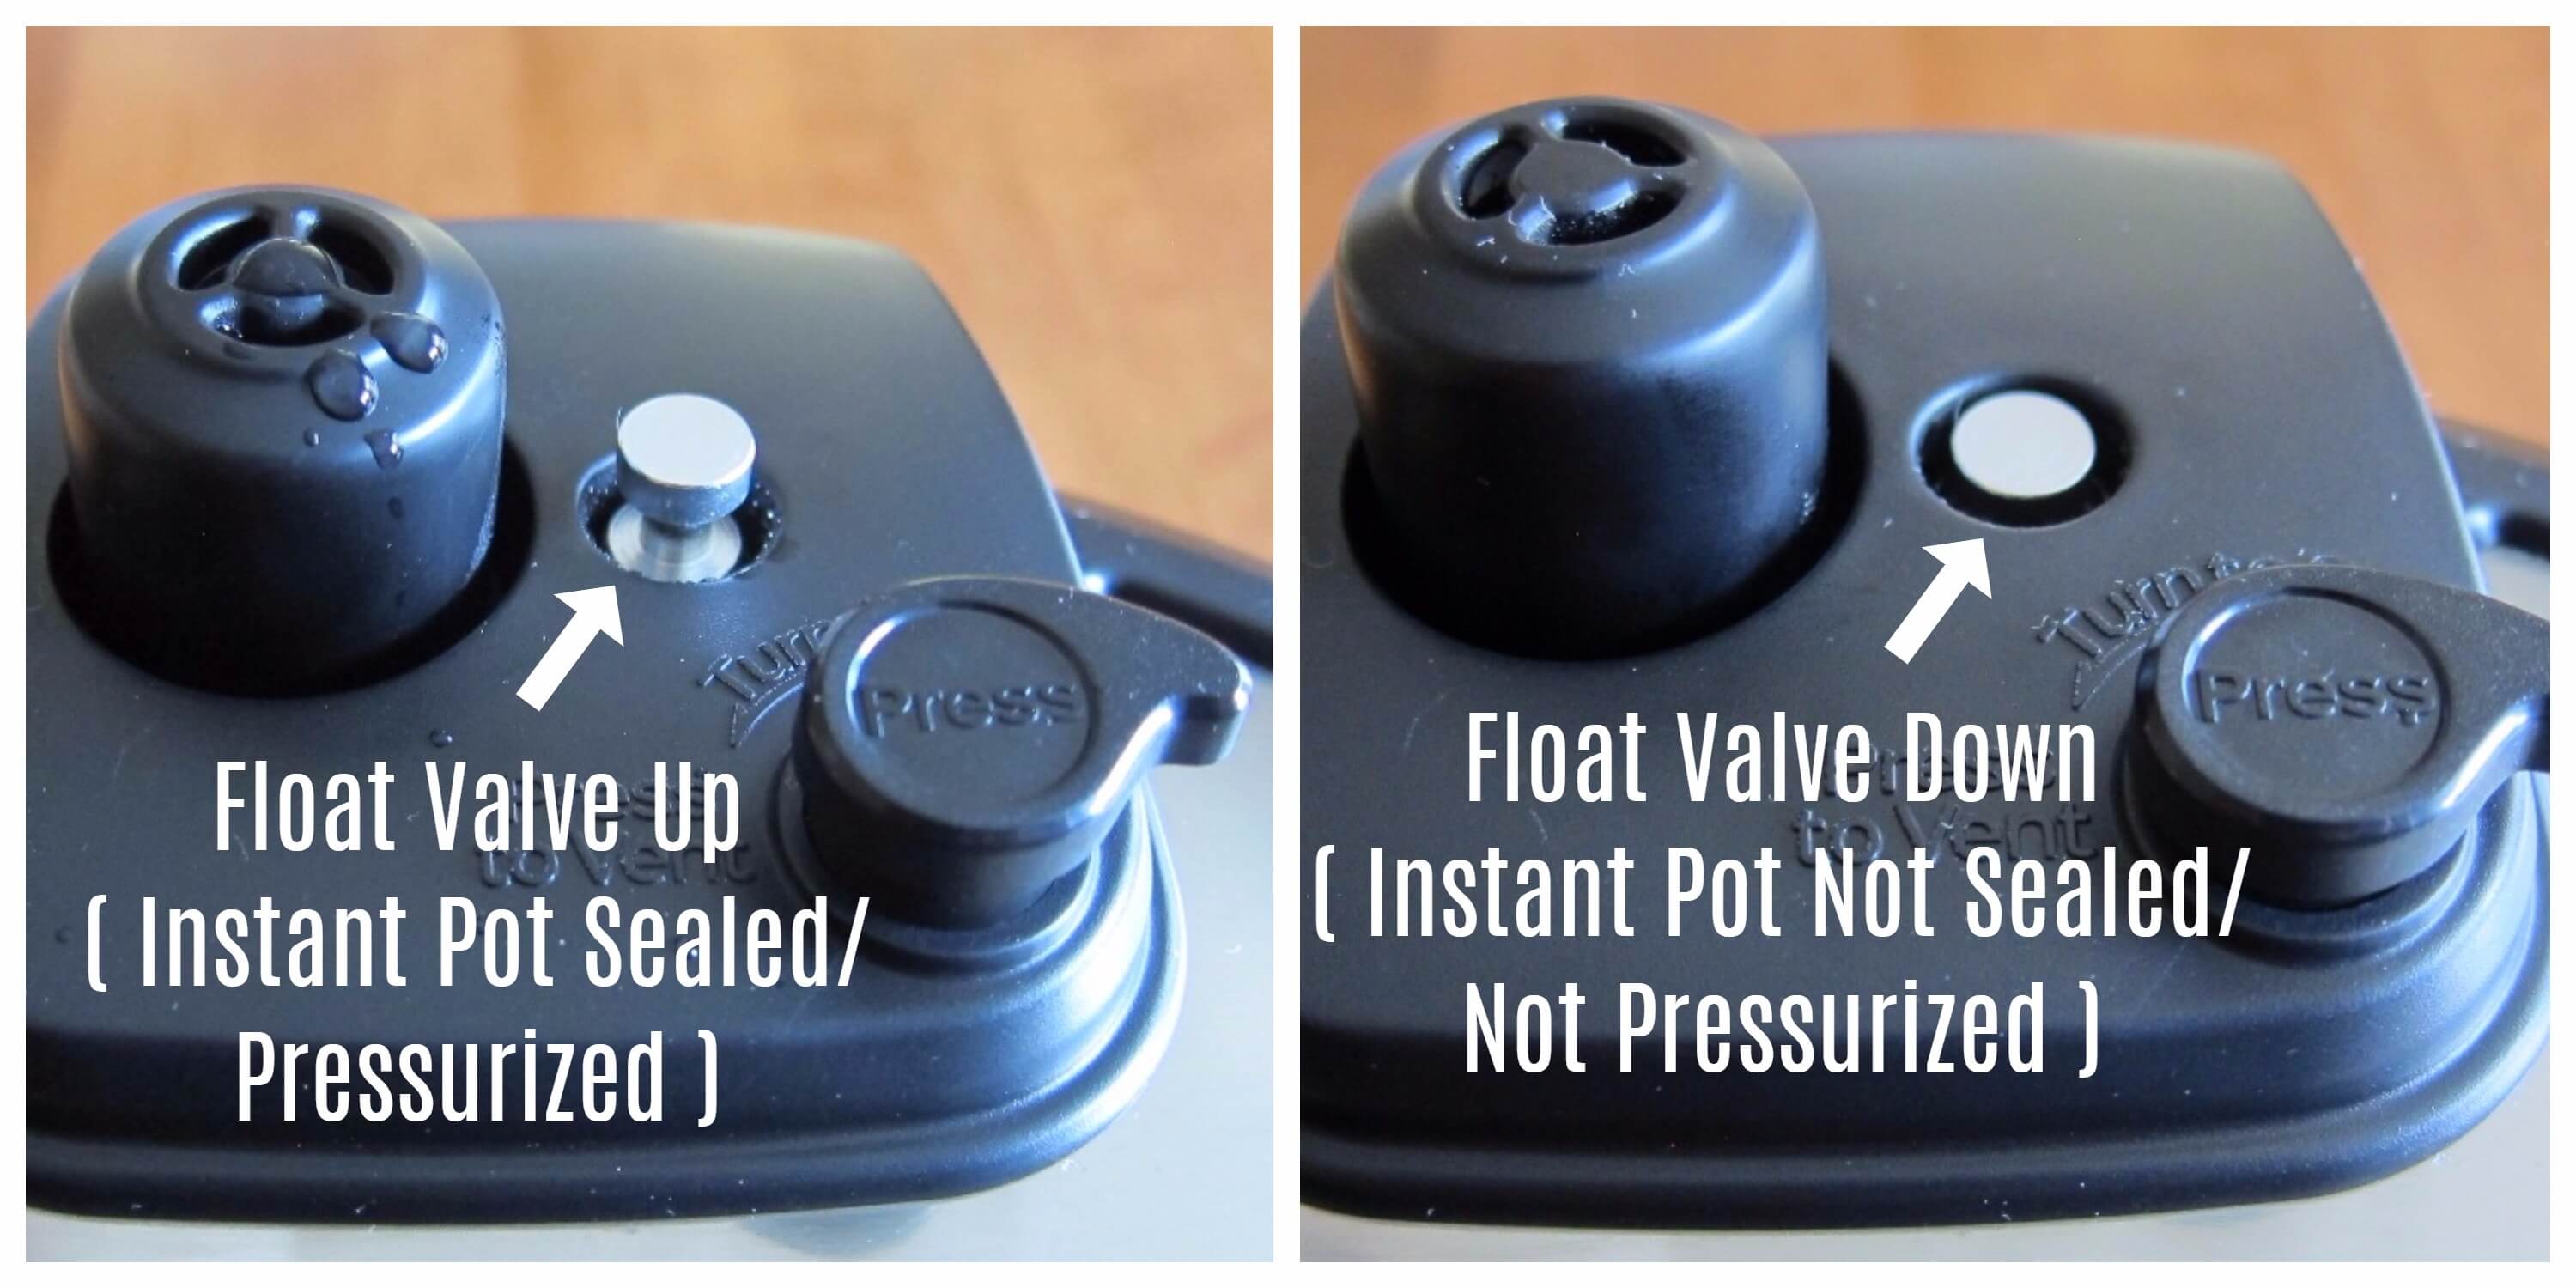
- When the Instant Pot Gourmet is under pressure, the float valve goes up and the Instant Pot is sealed. It cannot be opened. Don’t try to force it open!
- When the Instant Pot Gourmet isn’t under pressure, the float valve goes back down and is level with the lid.
There are a few ways you can release pressure once the Instant Pot Duo Gourmet has finished pressure cooking. The recipe you’re following will tell you what method to use.
In this article, I discuss the two most common pressure release methods:
- Quick Release (QR)
- Natural Pressure Release or Natural Release (NPR or NR).
[Find out more details about all the different pressure release methods.]
How to Quick Release (QR) Instant Pot Duo Gourmet
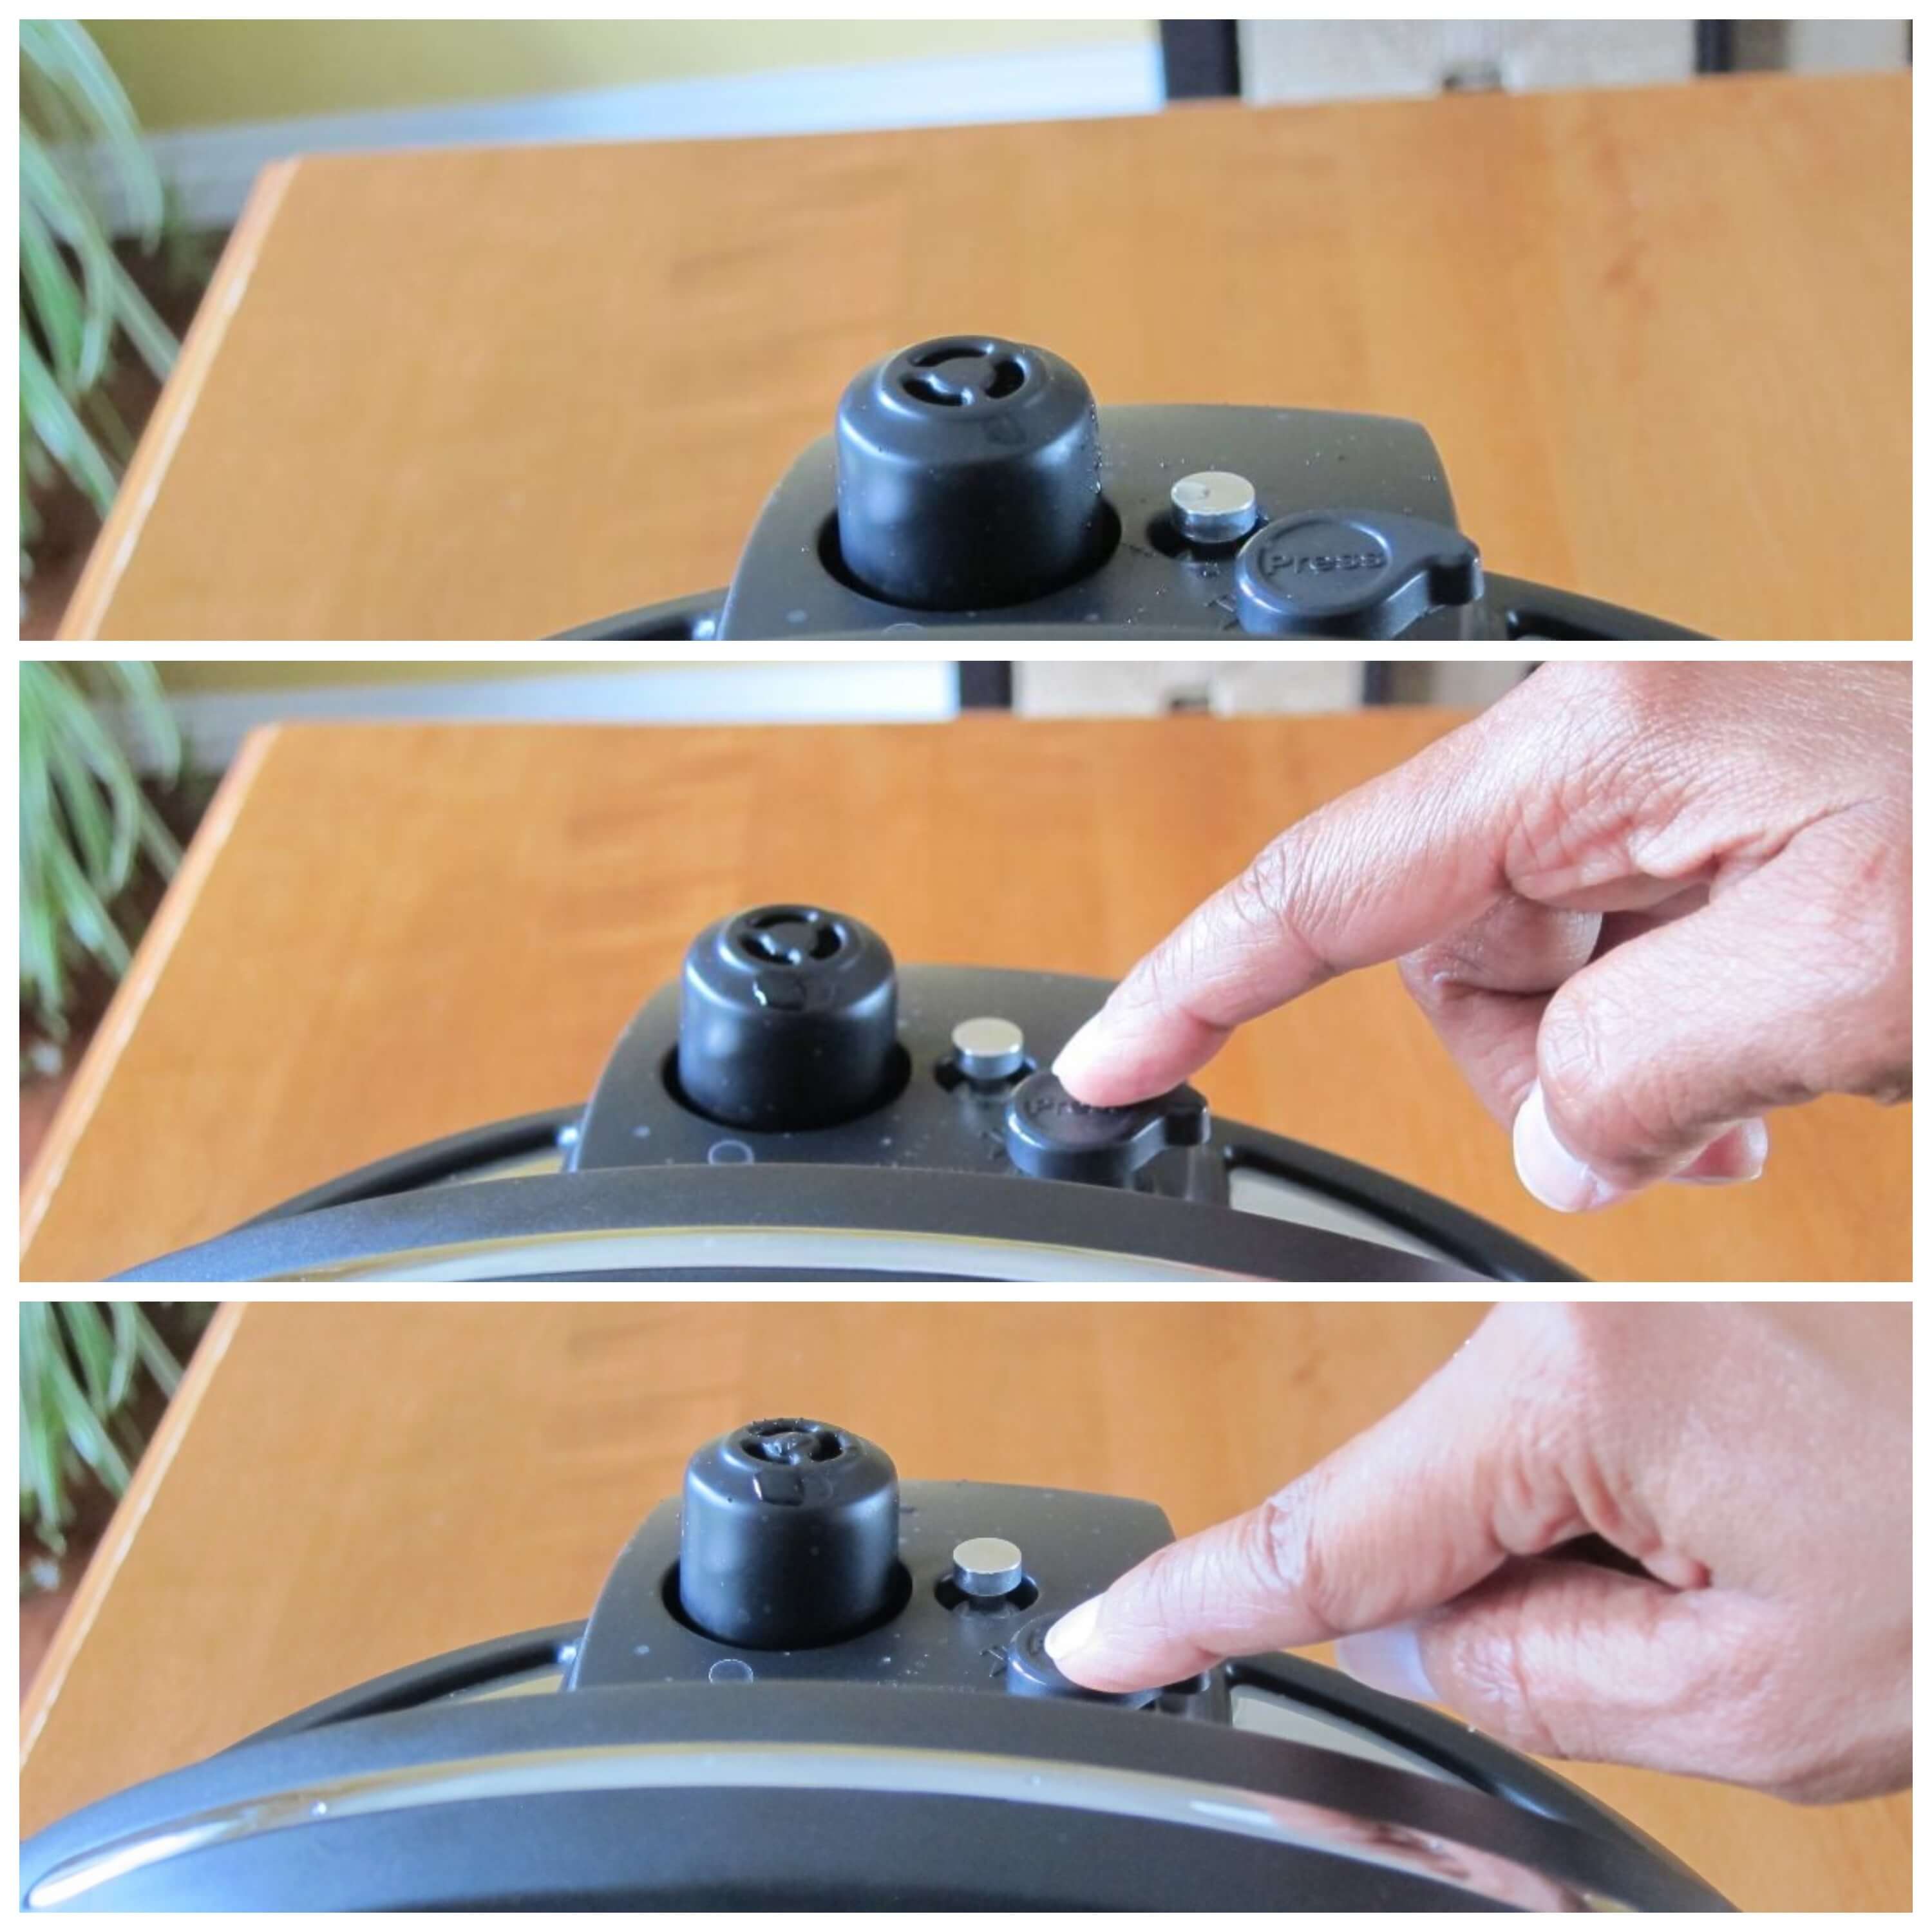
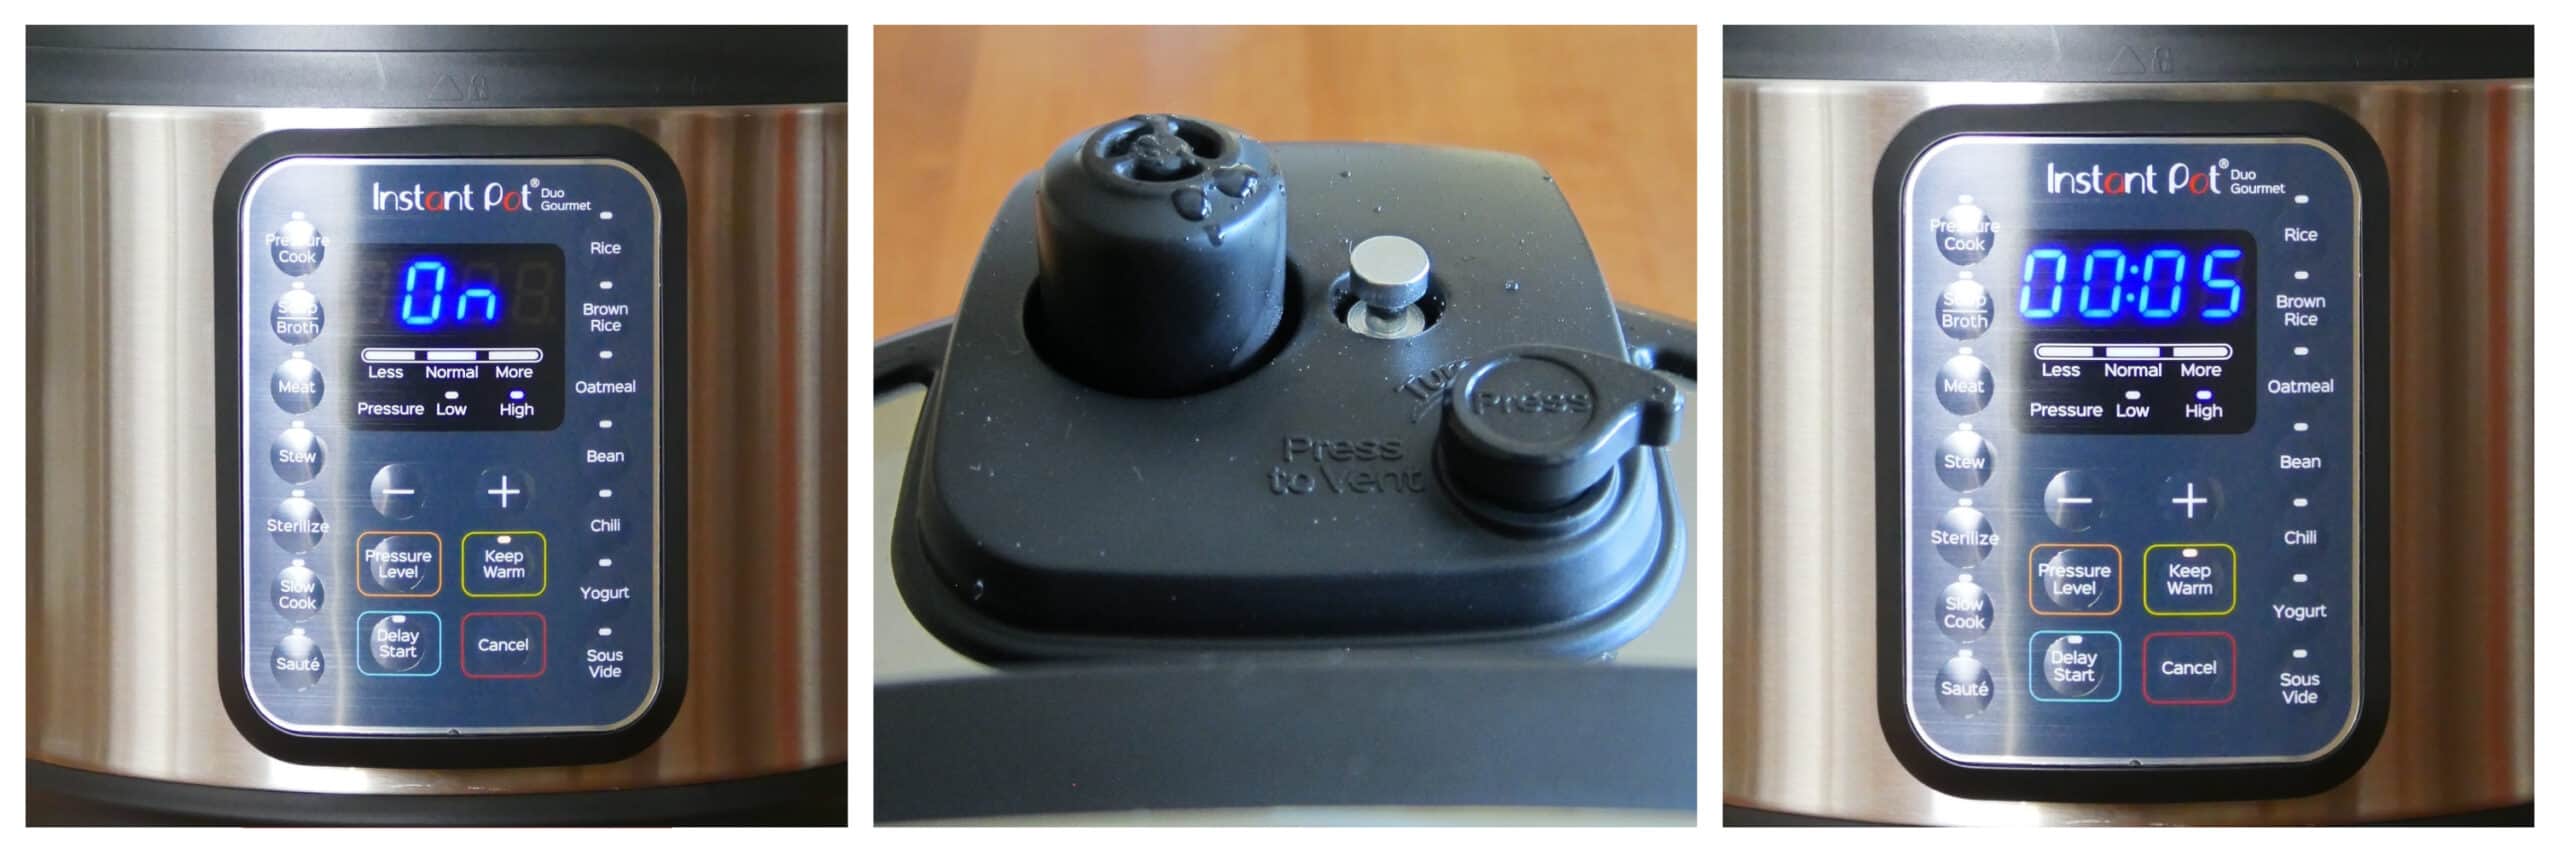
- To do a Quick Release of pressure (QR), press down on the Steam Release Button until it locks into place, and steam begins to come out of the Steam Release Valve.
- Be sure your hand is not above the Steam Release Valve while the pressure is being released.
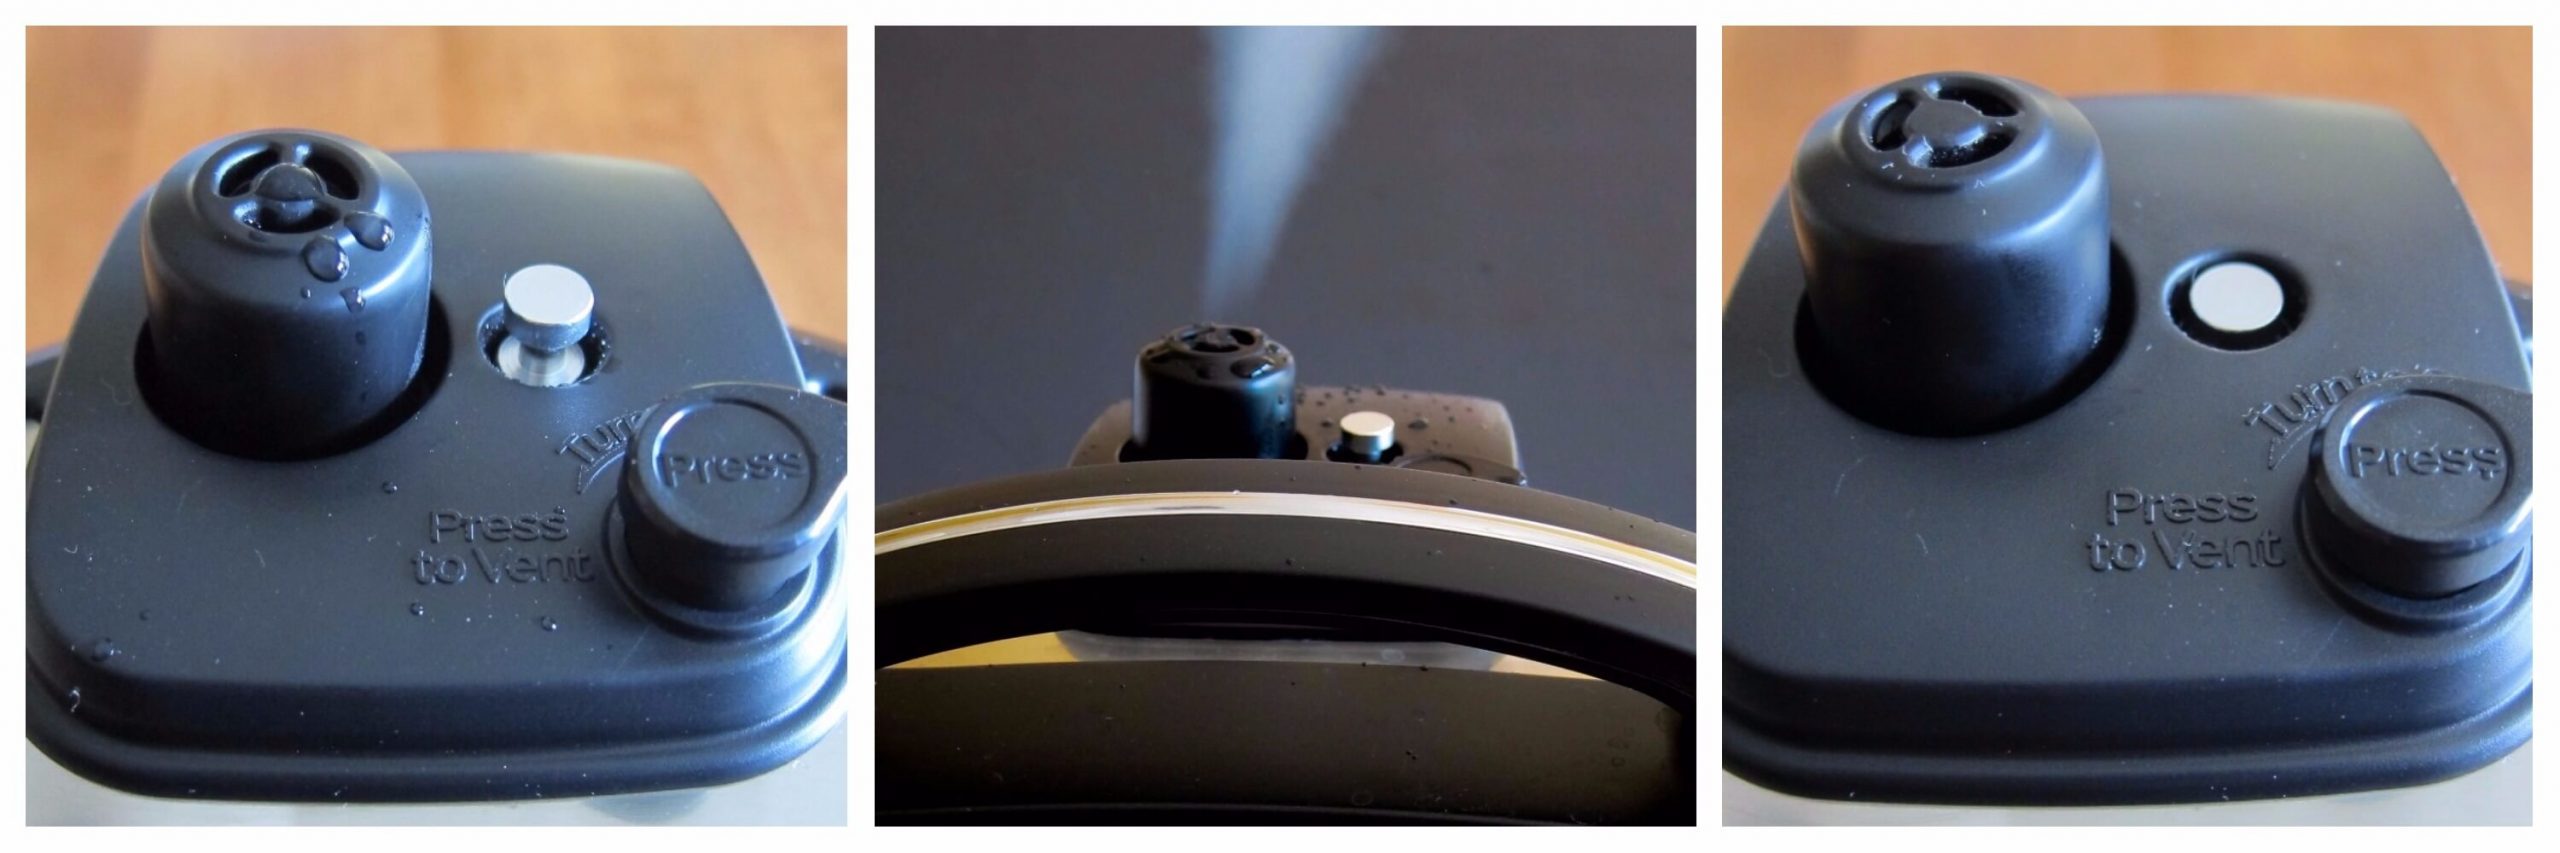
- The Float Valve will go from the up position to the down position once the Instant Pot Gourmet has de-pressurized and all the steam has been released.
- It is now safe to open the Instant Pot Gourmet.
How to Natural Release (NR) / Natural Pressure Release (NPR) Instant Pot Duo Gourmet
- To do an Instant Pot Natural Release of Pressure (NPR), wait for the Float Valve to go down on its own.
- This can take anywhere from 5 minutes to 30 minutes, depending on how much liquid is in the Instant Pot. The more liquid there is, the longer it takes for the Instant Pot to release pressure on its own.
- If you’re in a hurry, you can wait for 15 minutes for the Instant Pot natural release, and then release the remaining pressure using the quick-release method.
Commonly Used Buttons of the Instant Pot Gourmet
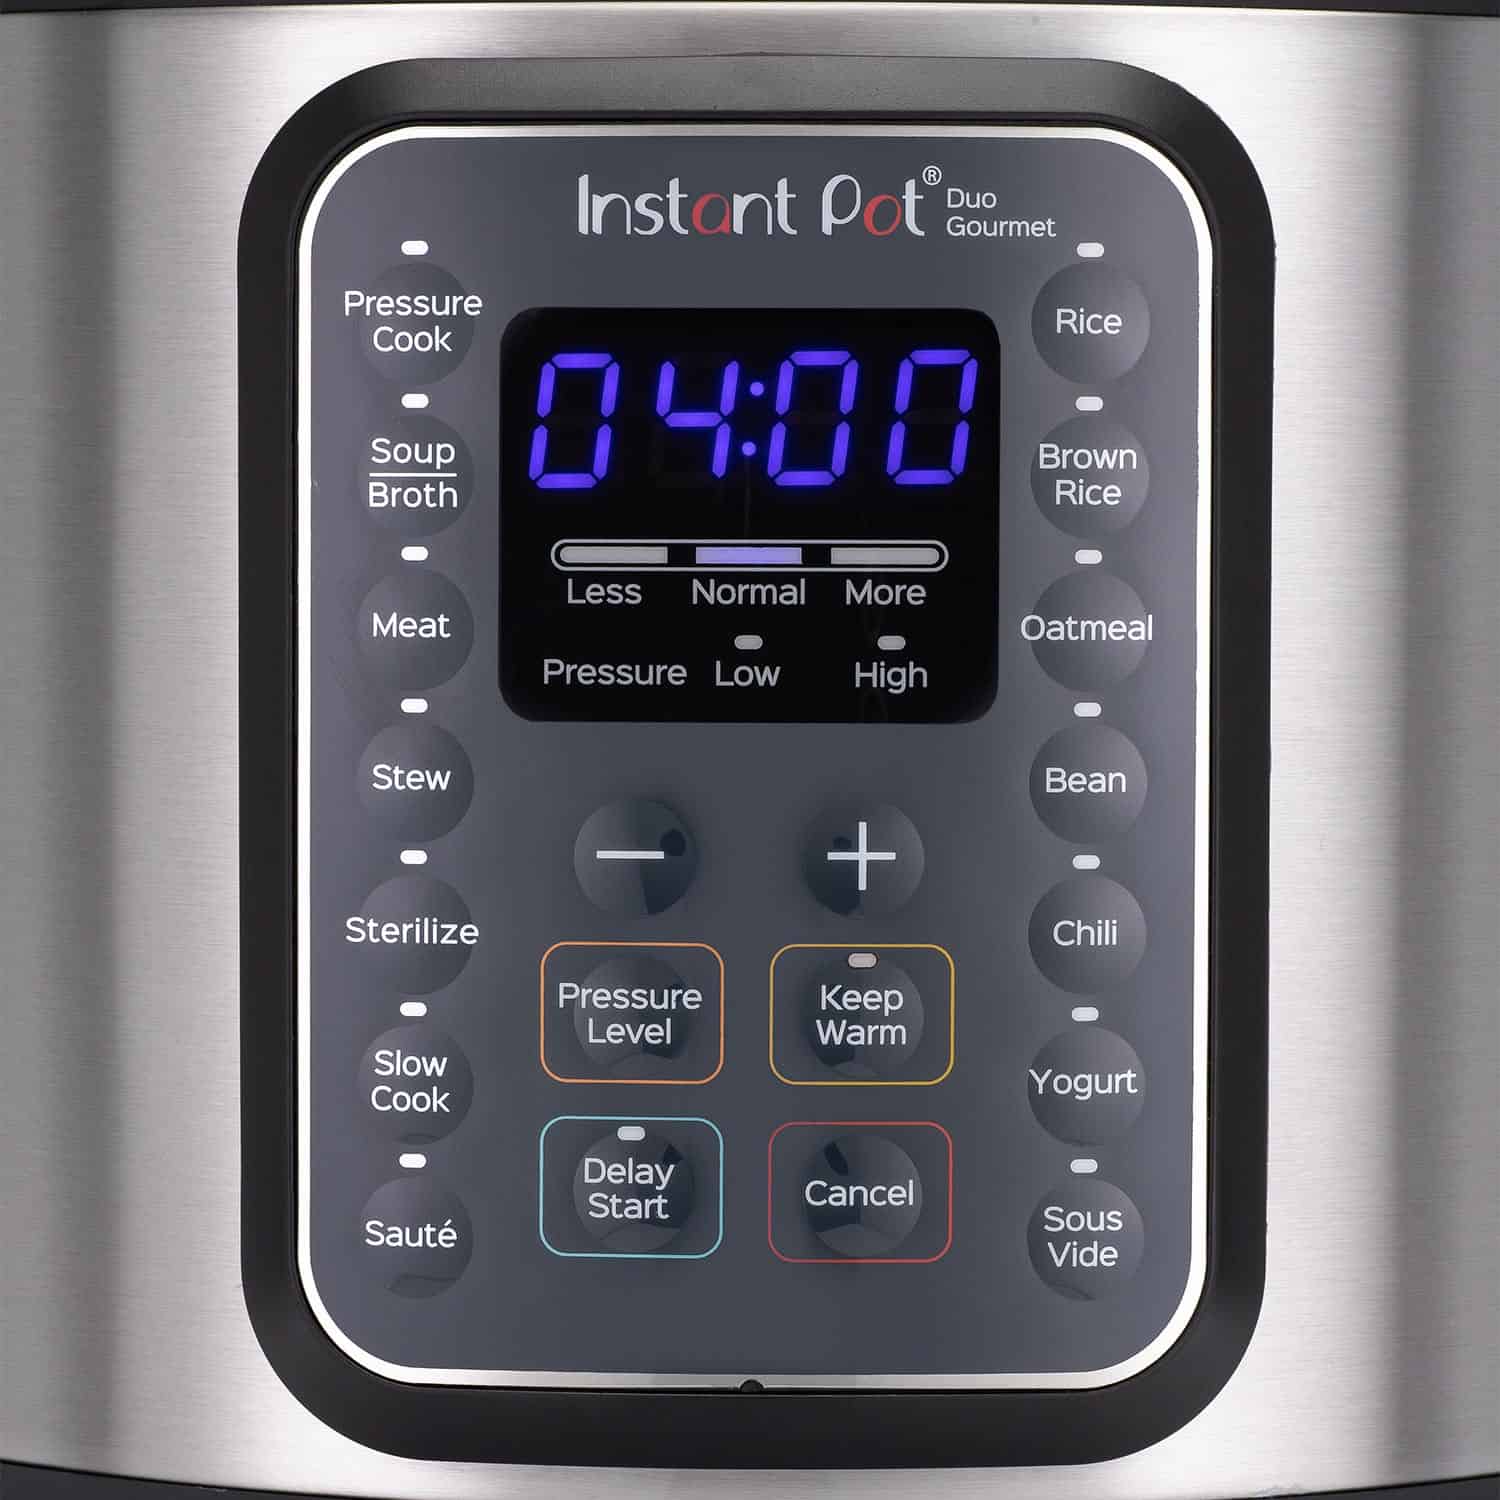
The Instant Pot Duo Gourmet has many buttons that may appear confusing and complicated. But they really aren’t. Just think of them as presets or shortcuts.
For the purposes of just getting you going, in this guide I’ll show you the most commonly used Instant Pot buttons and functions (smart programs):
- Saute
- Pressure Cook
- Pressure Level
- Keep Warm
- Cancel
[Read More: Detailed instructions on the Instant Pot Sous Vide smart program.]
Pro Tip
You may encounter Instant Pot recipes that tell you to press Start. Some models such as the Duo, Lux, Nova, Gourmet, Viva, Smart Wifi do not have a Start button. Instead, once you program the Instant Pot, it automatically starts after a few seconds. Some other models such as Ultra, Duo Evo Plus, Duo Crisp and Max require you to press Start after programming the Instant Pot.
Saute
The Saute function allows you to saute food in the Instant Pot before pressure cooking, and to reduce the liquid after pressure cooking. I love this function because I don’t need to get out another pan and that helps keep cleanup to a minimum.
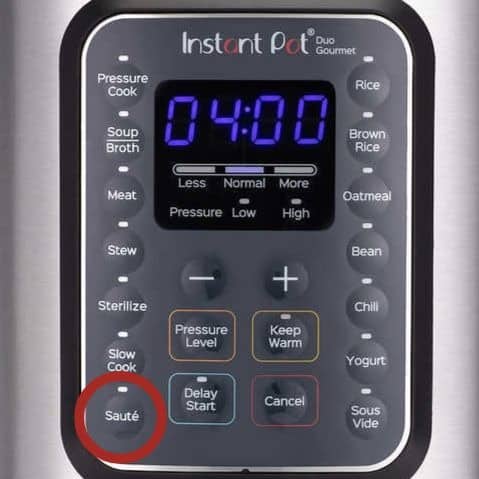
- Press the Saute button.
- The display says On.
- Once the desired saute temperature has been reached, the display says Hot.
- Add your food to the inner pot and saute.
To change the Saute temperature:
- Press the Saute button repeatedly to toggle between Less (lowest temperature), Normal (medium temperature), and More (high temperature).
Safety Tip
Don’t use the Instant Pot lid while sauteing. A glass lid with a venting hole (purchased separately) may be used. As a safety precaution, the cooker automatically enters standby mode (display says Off) after 30 minutes if you have not pressed Cancel.
Pressure Cook
Pressure Cook is the most useful feature of the Instant Pot.
Pro Tip
* You might see some recipes tell you to press Manual. Manual and Pressure Cook are the same thing. Manual was replaced with Pressure Cook in newer versions of the Instant Pot.
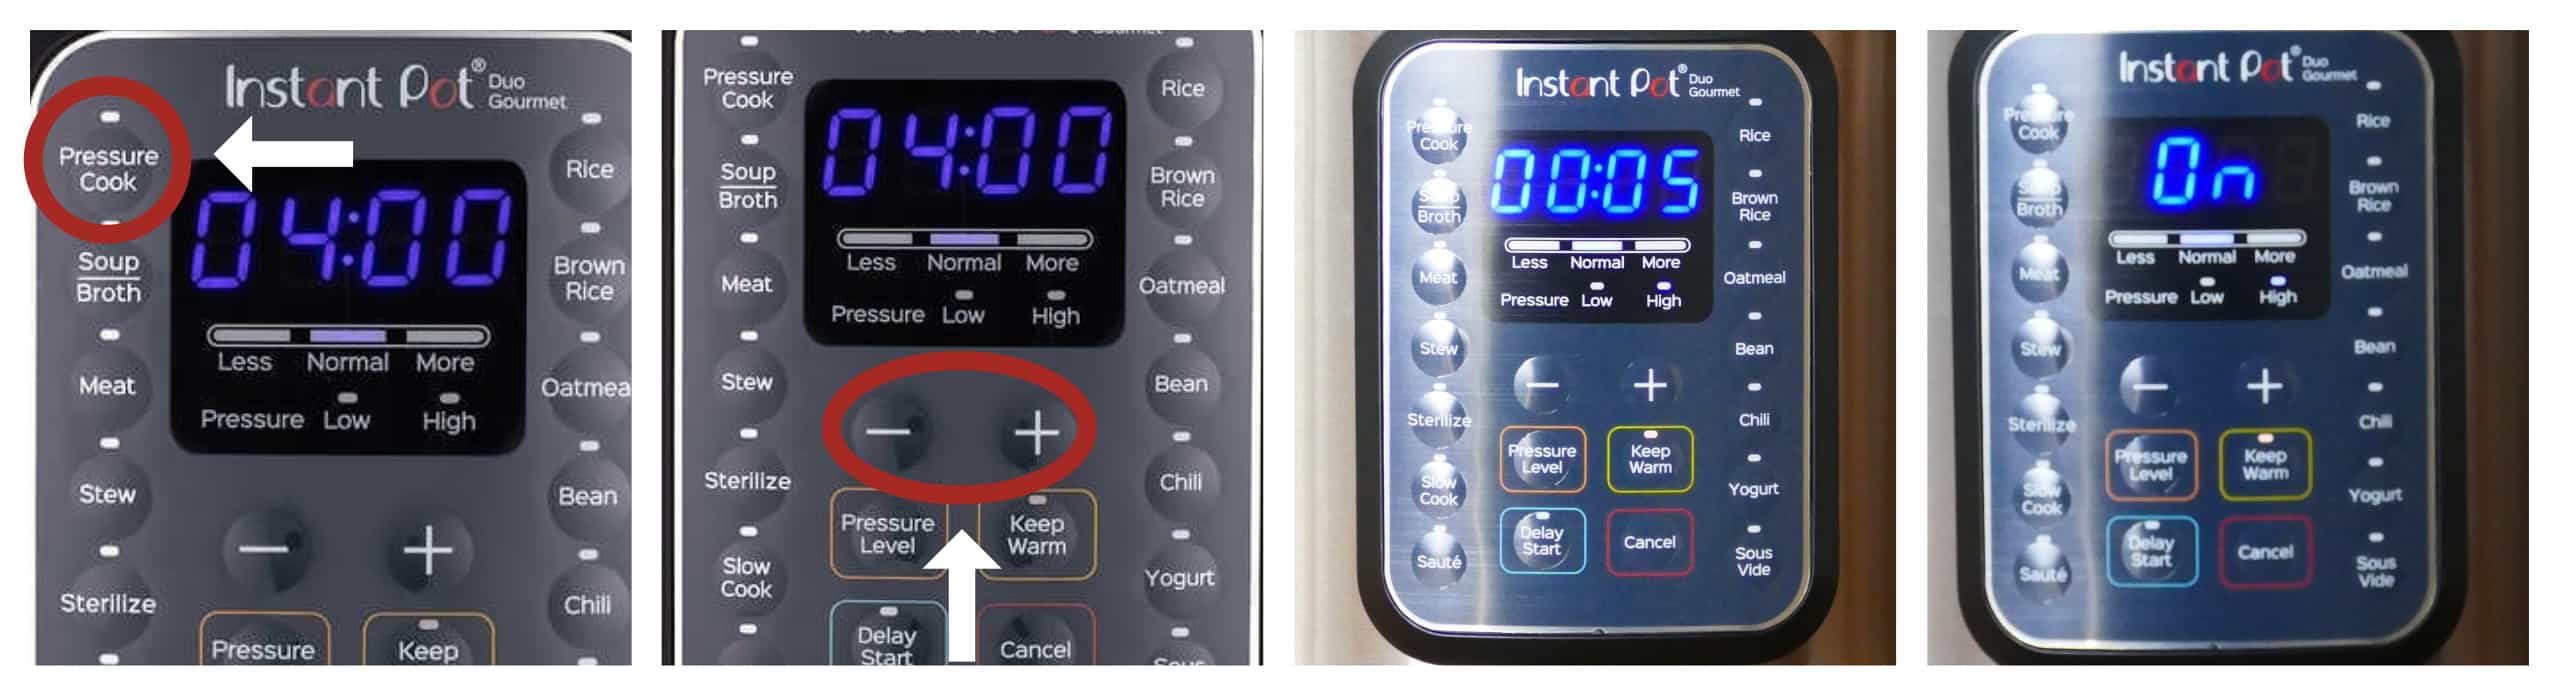
- Press the Pressure Cook button.
- Press the + or – buttons to set the pressure cooking time.
- Once the pressure cooking time has been set (e.g. 00:05 for 5 minutes), wait a couple of seconds and the display will change to On.
Pressing the Pressure Cook button repeatedly allows you to toggle between several preset cooking times programmed as Less, Normal, and More. I don’t normally use this functionality. I prefer to manually program the pressure cooking time using the + and – buttons.
- The float valve will go from the Down position to the Up position.
- This can take anywhere from 5 to 30 minutes, depending on the amount of food you’re cooking and the temperature of the ingredients.
- The display will change from On to counting down the number of minutes you’ve programmed for (e.g. 00:05 for 5 minutes).
Pressure Level
The Instant Pot Pressure Cook program can use high or low pressure. A majority of the recipes that you encounter will use High pressure. If a recipe doesn’t state whether to use high or low pressure, you can probably assume it’s high pressure.
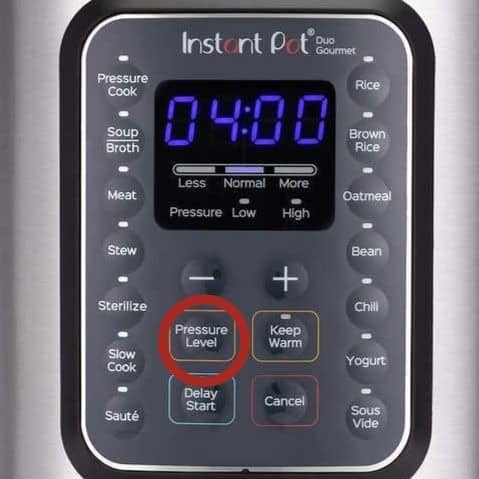
- Press the Pressure Level button to toggle between low and high pressure when using pressure cooking functions.
Keep Warm
The Keep Warm function is useful when you want your food to stay warm after being pressure cooked. Having the Keep Warm function on allows you keep track of the amount of time since pressure cooking completed. This is useful when you’re doing a natural release.
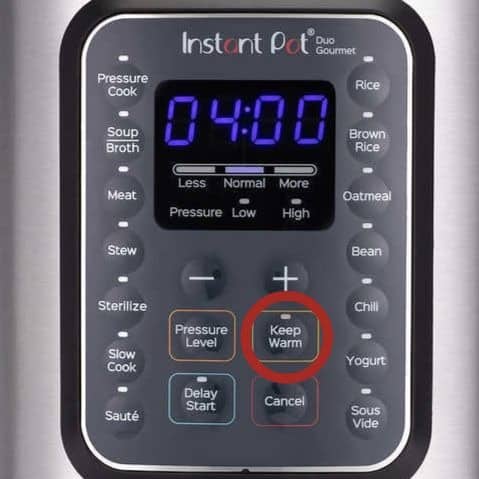
- Press the Keep Warm button to turn the Keep Warm function on and off.
- After pressing the Keep Warm button, press the + and – buttons to change the time you want the Instant Pot to be in Keep Warm mode.
- After pressure cooking is complete, the Keep Warm function starts and the time counts UP by minutes. The display panel shows the elapsed time (e.g. 00:02 for 2 minutes or 00:15 for 15 minutes.) If the Cancel button is not pressed, the Instant Pot will turn OFF after 10 hours.
- The Keep Warm function can be used with or without the lid closed. You can also use an optional glass lid for this function. When the Keep Warm function finishes, the cooker beeps and goes into standby mode.
Cancel
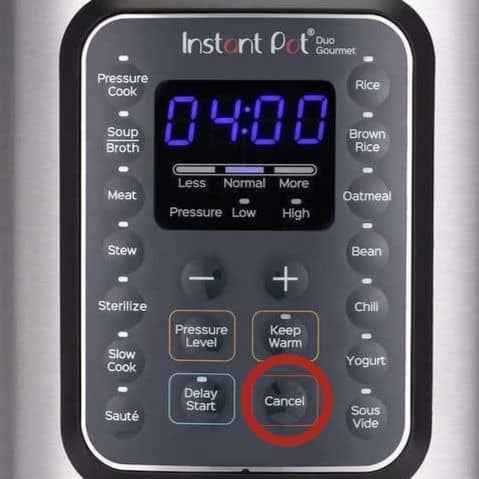
- Press the Cancel button to end any selected function. The Instant Pot display will say OFF.
Instant Pot Gourmet Water Test / Initial Test Run
What is the Water Test?
A water test is done by pressure cooking water for a few minutes. According to the Instant Pot manual you need to use 3 cups of water but I’ve found that using 2 cups of water is adequate. The advantage of using 2 cups is that it takes less time for the Instant Pot to come to pressure.
Why You Should do the Water Test
The initial test run or water test serves two purposes: it familiarizes you with using your new Instant Pot Duo Gourmet and it allows you to establish that your Instant Pot is working properly. If you have a defective unit, the water test will identify that and you can get a replacement unit.
You should do a water test before the first use but you can also do it when you’re having problems with the Instant Pot pressurizing. Doing the water test will pinpoint whether there’s something about the recipe that’s causing your sealing issues.
How to do the Initial Test Run / Water Test
- Make sure the sealing ring is properly seated.
- Place the inner pot into the base unit.
- Attach the power cord to the base unit and plug it into an outlet.
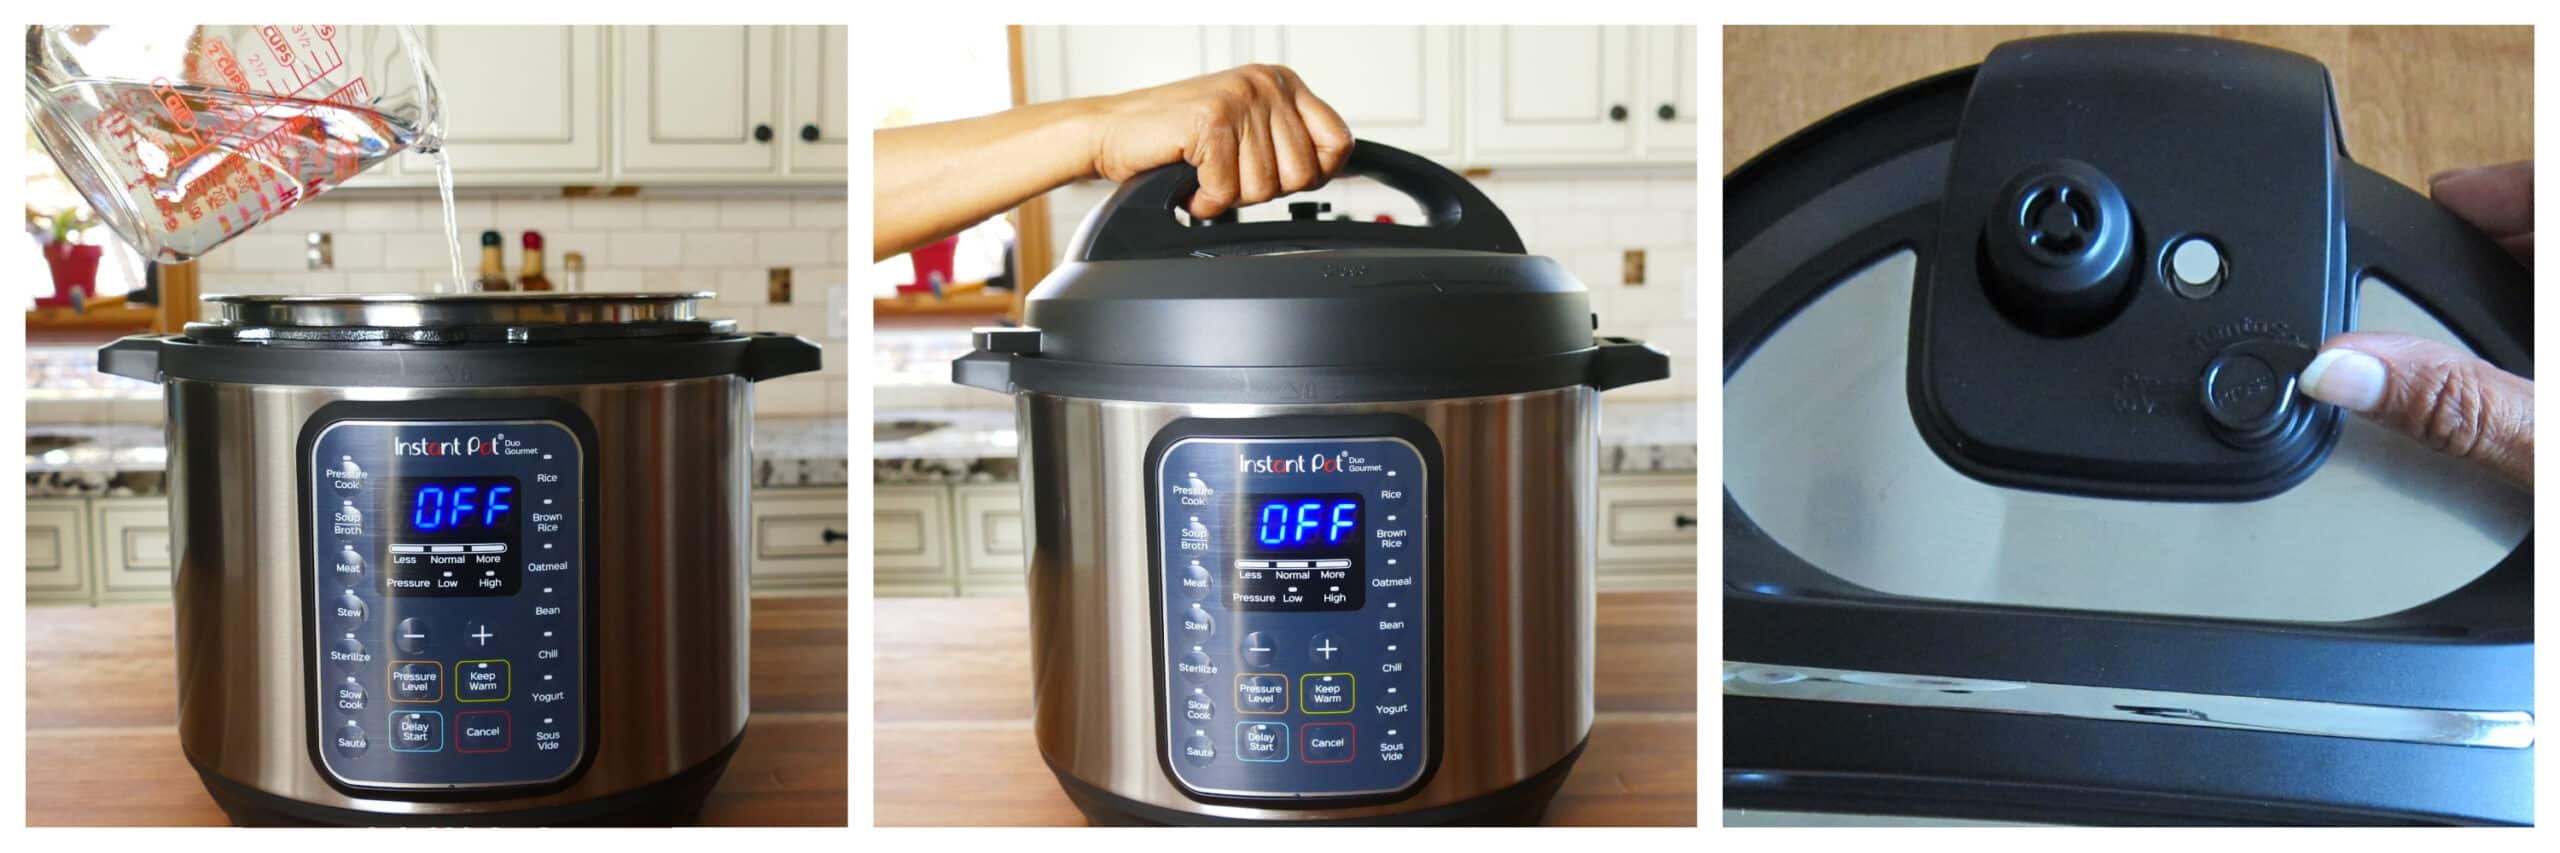
- Pour 2 cups of water into the inner pot.
- Close the lid.
- Make sure the steam release button is up. If it isn’t, turn it counter-clockwise to snap it back up.
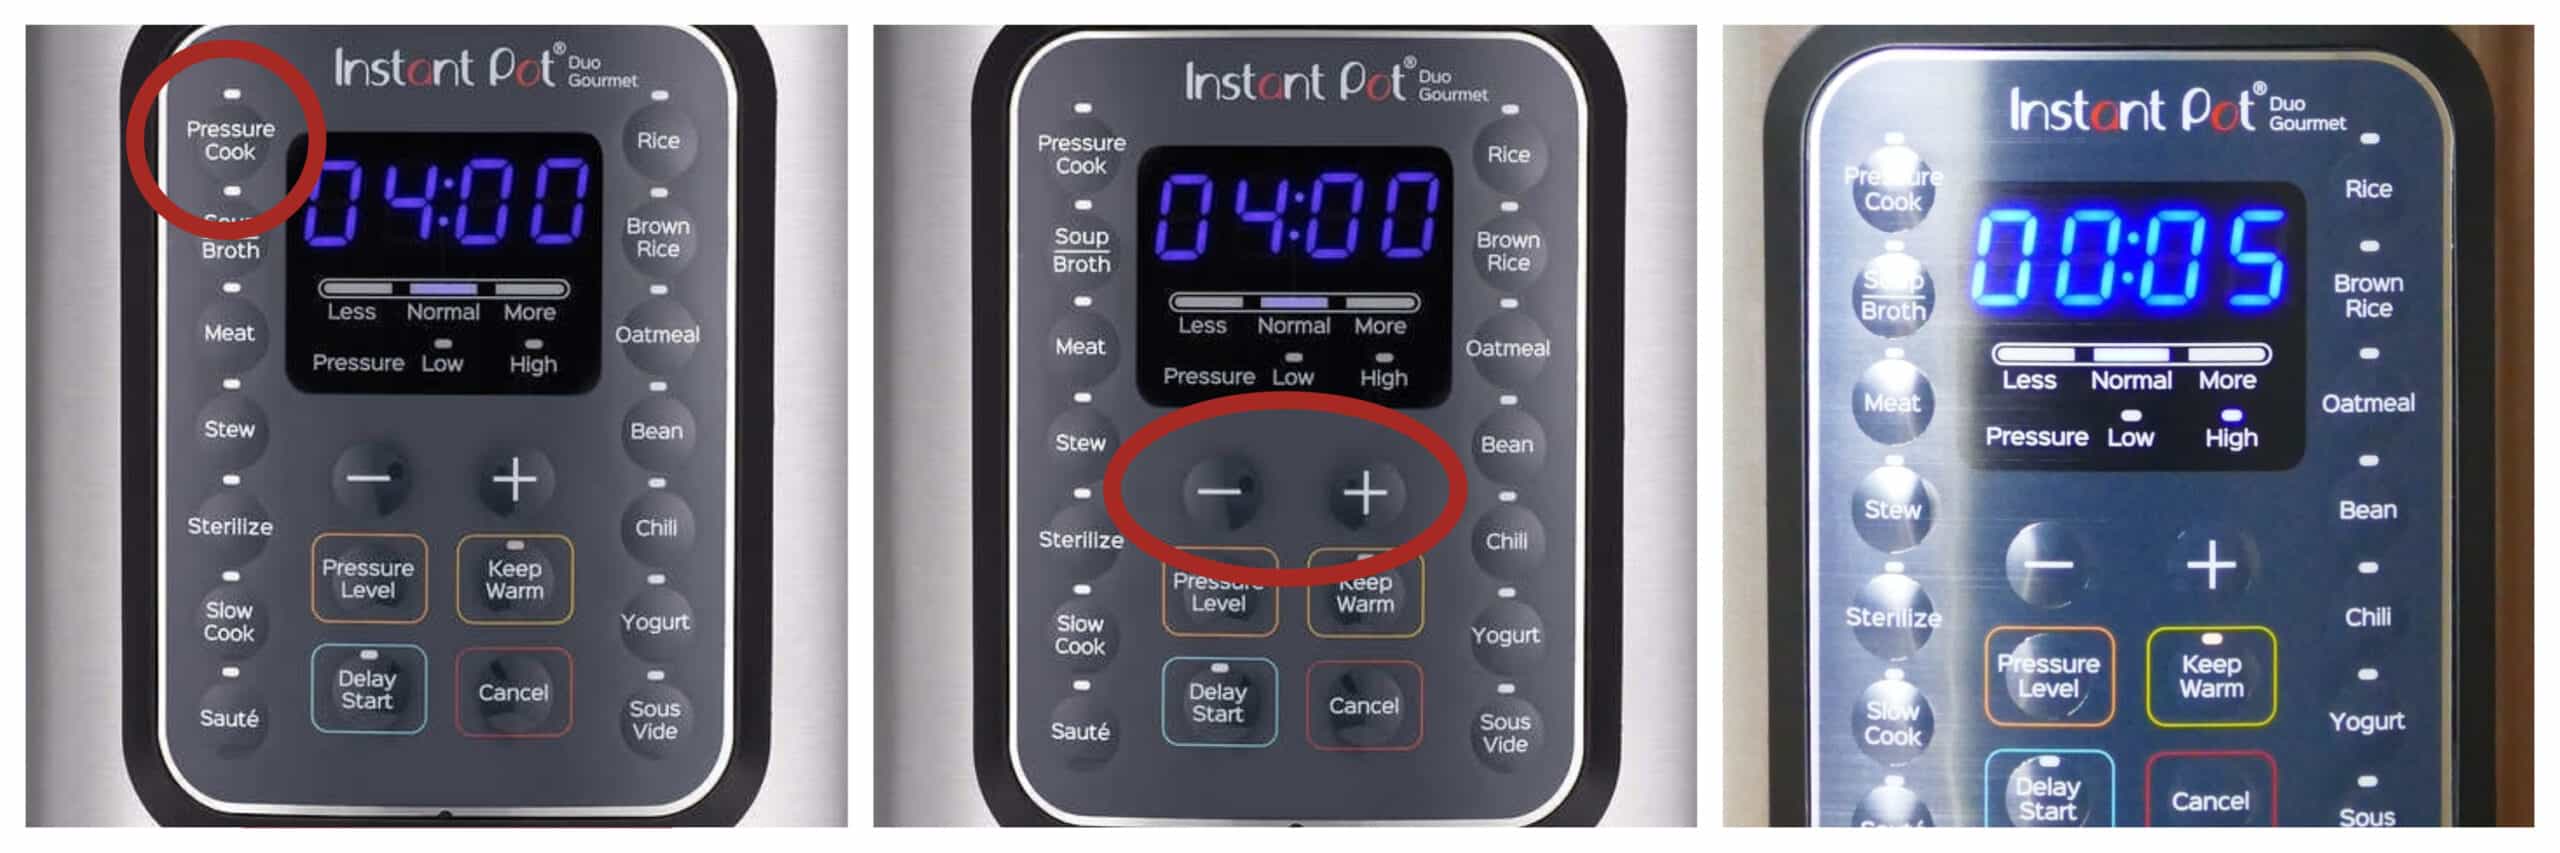
- Press the Pressure Cook button.
- Press the + or – buttons until the time goes to 00:05 (5 minutes).
- After a couple of seconds, the display will change to On.
- Soon, you’ll hear and see small amounts of steam coming from the top of the lid. This is normal and safe! Just keep your hands and face away from the steam. You might also notice a funny, plastic smell. Don’t worry – it should go away and it shouldn’t happen again after the first use.
- Once pressure has built up, the float valve will come up.
- After the float valve comes up, the display will change from On to 00:05. This can take a few minutes.
- The display will count down from 00:05 to 00:00.
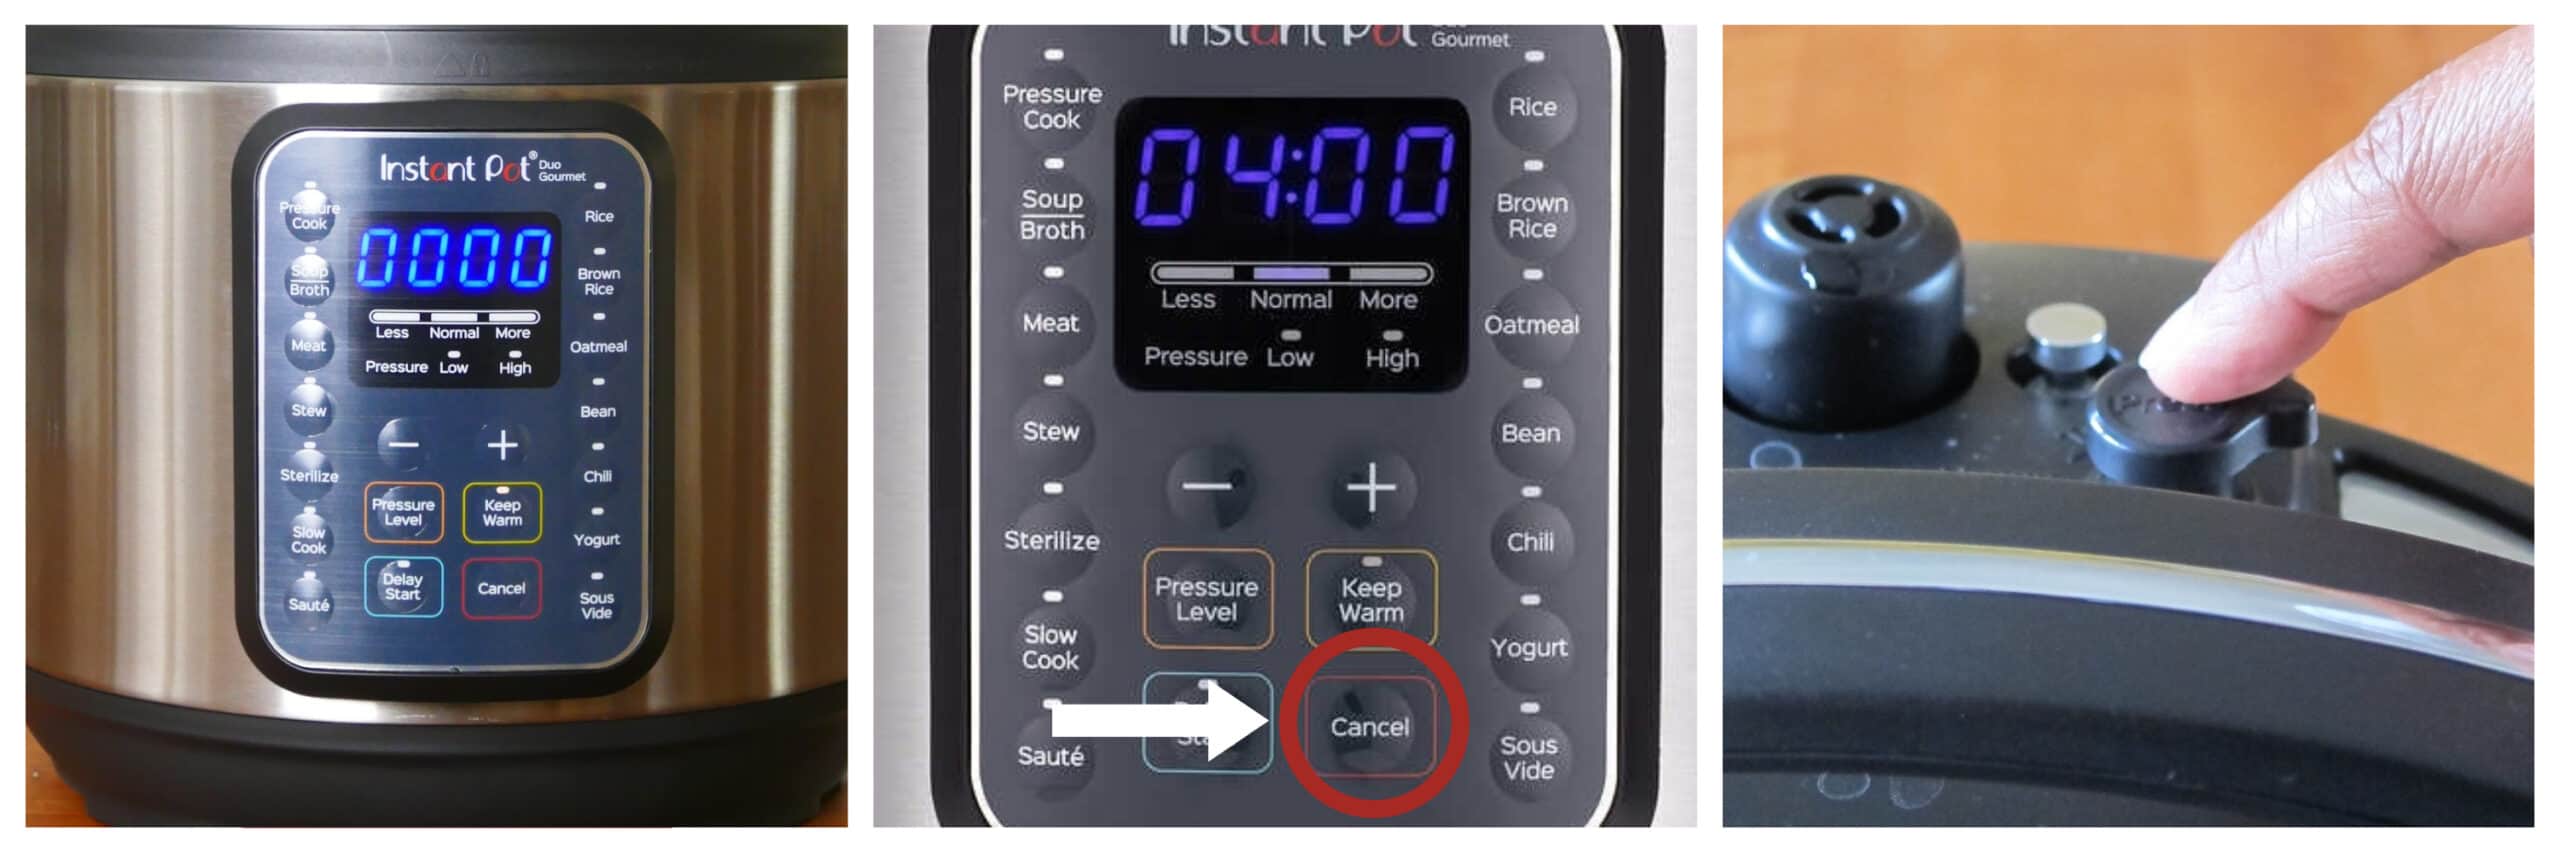
- When pressure cooking is complete, you’ll hear a series of beeps and the display will show 00:00, which means it’s in Keep Warm mode (if the Auto Keep Warm function is turned on.)
- You can either do a quick release or a natural release. To do a natural release, wait for the float valve to fall on its own. This can take 10 to 30 minutes. [Learn more about all the pressure release methods.]
- In this case, you’ll do a quick release.
- Press the Cancel button. The display will say Off.
- Press the steam release button until it locks into place. Steam will gush out of the steam release cover. Keep your hands and face away from the steam.
- Once all the steam has been released, the float valve goes down and the Instant Pot is de-pressurized.
- This can take a few minutes.
- Open the lid and prop the lid open.
What to do if the water test fails
If the water test fails and you’re not able to get the Instant Pot to come to pressure, use the following articles to troubleshoot the issue:
- Reasons why your Instant Pot is not Sealing
- Instant Pot Burn Message
- Common Instant Pot Problems
- Instant Pot Tips and FAQs
If you can’t solve your problem, open a support ticket with the Instant Pot company.
Instant Pot Duo Gourmet vs Duo
Here are the important differences between the Duo Gourmet and Duo:
| Feature | Instant Pot DUO | Instant Pot GOURMET |
|---|---|---|
| Pressurizing and Steam Release | Has a steam release handle that has to be manually moved from Sealing to Venting. | Has a steam release button that automatically resets to the Sealing position when the lid is opened or closed. |
| Float Valve | On some Duo models, the float valve is at the level of lid when the Instant Pot Duo is sealed and below the level of the lid when it’s not sealed. | The float valve is above the level of lid when the Instant Pot Gourmet is sealed and at the level of the lid when it’s not sealed. |
| Accessories | Comes with basic accessories, no extras | Comes with mini mitts and extra sealing ring. |
| Size | The Duo comes in 3 qt, 6 qt and 8 qt. | Comes in 6 quart size only. |
| Smart Programs | Does not have the Sous Vide smart program. | Has Sous Vide smart program. |
| Colors | Available in different colors, at select retailers. | Only available in one color. |
Instant Pot Duo Gourmet vs Duo Plus
Here are the important differences between Duo Gourmet and Duo Plus:
| Feature | Instant Pot DUO PLUS | Instant Pot GOURMET |
|---|---|---|
| Pressurizing and Steam Release | The Steam Release Handle has to be manually moved to the Sealing position when the Instant Pot is closed. It’s easy to forget to move it to Sealing. [There are multiple versions of this model. Older versions have the Steam Release Handle but newer versions have a Steam Release Switch (like Duo Evo Plus model) which is really easy to use.] | The Steam Release Button is pushed down to lock into venting mode and turned counter-clockwise to seal again. The Steam Release Button automatically resets to the Sealing position when the lid is opened or closed, so it’s easier to use than the steam release handle of the Duo Plus. |
| Accessories | Comes with basic accessories, no extras. | Comes with mini mitts and extra sealing ring. |
| Size | The Duo Plus comes in 3 qt, 6 qt and 8 qt. | Comes in 6 quart size only. |
| Smart Programs | Has Sous Vide smart program | Has Sous Vide smart program. |
Instant Pot Duo Gourmet vs Duo SV
Here are the important differences between Duo Gourmet and Duo SV:
| Feature | Instant Pot DUO SV | Instant Pot GOURMET |
|---|---|---|
| Pressurizing and Steam Release | Has a steam release handle that has to be manually moved from Sealing to Venting. | Has a steam release button that automatically resets to the Sealing position when the lid is opened or closed. |
| Float Valve | On some Duo SV models, the float valve is at the level of lid when the Instant Pot Duo SV is sealed and below the level of the lid when it’s not sealed. | The float valve is above the level of lid when the Instant Pot Gourmet is sealed and at the level of the lid when it’s not sealed. |
| Accessories | Comes with mini mitts and extra sealing ring. | Comes with mini mitts and extra sealing ring. |
| Size | The Duo SV comes in 6 quart size only | Instant Pot Duo Gourmet also comes in 6 quart size only. |
| Smart Programs | Has the Sous Vide smart program. | Has the Sous Vide smart program. |
First Recipes to Try
You should be all set to try out your first recipe! Here are some of my favorite easy recipes:
- Instant Pot African Peanut Stew
- Instant Pot Arroz Con Pollo
- Instant Pot Pork Tacos/Carnitas
- Instant Pot Thai Red Curry
- Instant Pot Chicken Curry Soup
- Instant Pot Vegetarian Moroccan Stew
If you found this article to be helpful, please share it on social media using the social media share buttons at the top and bottom of this post. Thank you so much!


Patriece Fennell says
I need help on how to use my Instant Pot Duo Gourmet. Please Help Me I keep reading the instructions, but I don’t get it.
Paint the Kitchen Red says
Hi Patriece, I’m sorry to hear you’re having trouble. Please watch this video, I hope it helps you figure it out.
Raúl Mendoza says
I have a question to use the Instant Pop Gourmet as low cooking to do bone broth.
How many time?
How much water?
Paint the Kitchen Red says
Hi Raul, I add enough water to go to the max fill line and I usually pressure cook on high pressure for 2 hours. But you can also pressure cook on low pressure for the same amount of time.
Angelique Cejka says
Hi, can you describe how to set the time with the sous vide function on the Instant Pot Duo Gourmet please?
Paint the Kitchen Red says
Hi Angelique, I have a whole post dedicated to how to do sous vide. If you click on “Instant Pot models with sous vide” in the table of contents at the top, you’ll see how to do it.
Greta Farina says
Thank you so much for these instructions. The booklets that came with the Duo Gourmet are useless. I am almost ready to return the darn thing as I had no idea how to use it. I will try one more recipe. Too bad they do not have step by step instructions enclosed with it.
Again, thank you.
Do you have any more info on recipes?
Paint the Kitchen Red says
Greta, any Instant Pot recipe on my site can be made with your Duo Gourmet. No special instructions. The same goes for most recipes you’ll find on the web. Hope that helps!
Manjari Chaturvedi says
I have recently purchased Instant Pot Gourmet Duo. Wondering how to use steam function on it as there is no pre programme for steaming in this one.
Paint the Kitchen Red says
Manjari, you can use the pressure cook button. It’s the same as steam except steam heats up slightly faster. If you want to steam with no pressure, just keep the steam release in venting position.
Marilyn Bell says
When I plugged my Instant pot duo gourmet it started beeping and all lights were flashing. The display says C6L. What does this mean and how do I fix it?
Paint the Kitchen Red says
Marilyn, it’s a faulty sensor issue “Faulty low pressure sensor”. You probably need to contact the company. If you are a handy person, you could follow the advice by this reddit user, but do so at your own risk because I have not tried it 🙂 https://www.reddit.com/r/instantpot/comments/ml3lwc/how_i_fixed_a_c6l_low_pressure_sensor_issue/