
Whether it’s your Instant Pot not working, not sealing, having error codes or the food burn message, or leaking steam, this Instant Pot troubleshooting guide tells you how to fix the most common Instant Pot problems encountered by beginners and experienced users.
This post contains affiliate links. As an Amazon Associate, I earn from qualifying purchases. Please read the disclosure.
➡ Are you getting an error code like C7 or PrSe? Head over to my post about Instant Pot error codes and how to solve them!
I’ve owned a few Instant Pot electric pressure cookers over the years, and I’ve learned a thing or two about them. Through my blog and on social media, I hear from owners who ask for help with various problems with their Instant Pot.
In this article, I share a list of common pressure cooker problems and solutions.
Instant Pot Terminology
Here are some of the parts that I refer to throughout this article. The steam release mechanism varies according to the Instant Pot model; some newer models may look slightly different.
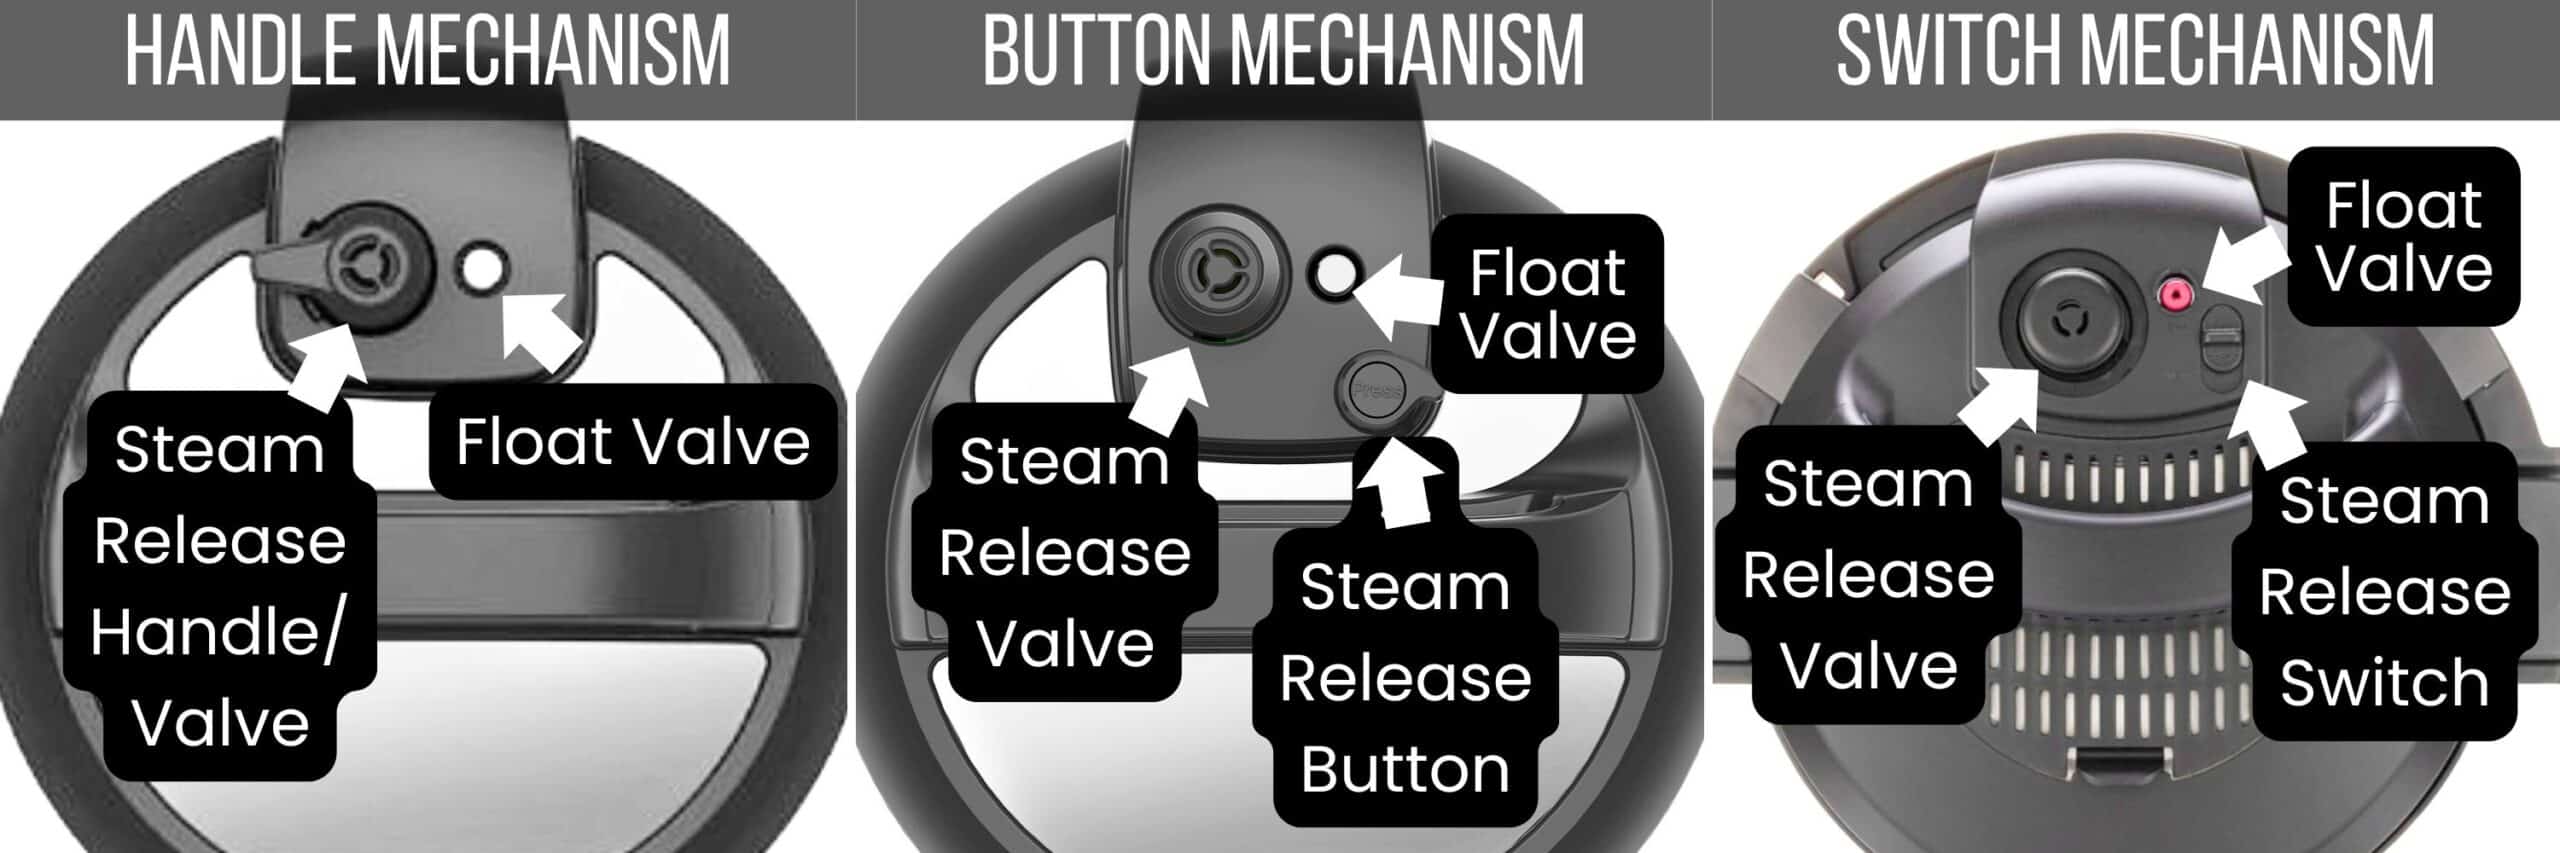
- Float Valve: a metal pin that pops up once the Instant Pot has pressurized.
- Steam Release Valve: Steam is released through the vents in the steam release valve. It’s also referred to as the Instant Pot pressure valve, pressure release valve, or venting knob.
- Steam Release Handle: Steam is released through the vents in the steam release handle. To seal the Instant Pot pressure cooker, turn this pressure knob to the Sealing position, and to release pressure, move it to the Venting position. The steam release handle is sometimes referred to as the Instant Pot venting knob or pressure valve.
- Steam Release Button: Click it counterclockwise to spring it up into the Sealing position. To release pressure, push the button until it clicks down into place in the Venting position.
- Steam Release Switch: To put it in Sealing mode, slide it into the Seal position. To release pressure, slide it into the Vent position.
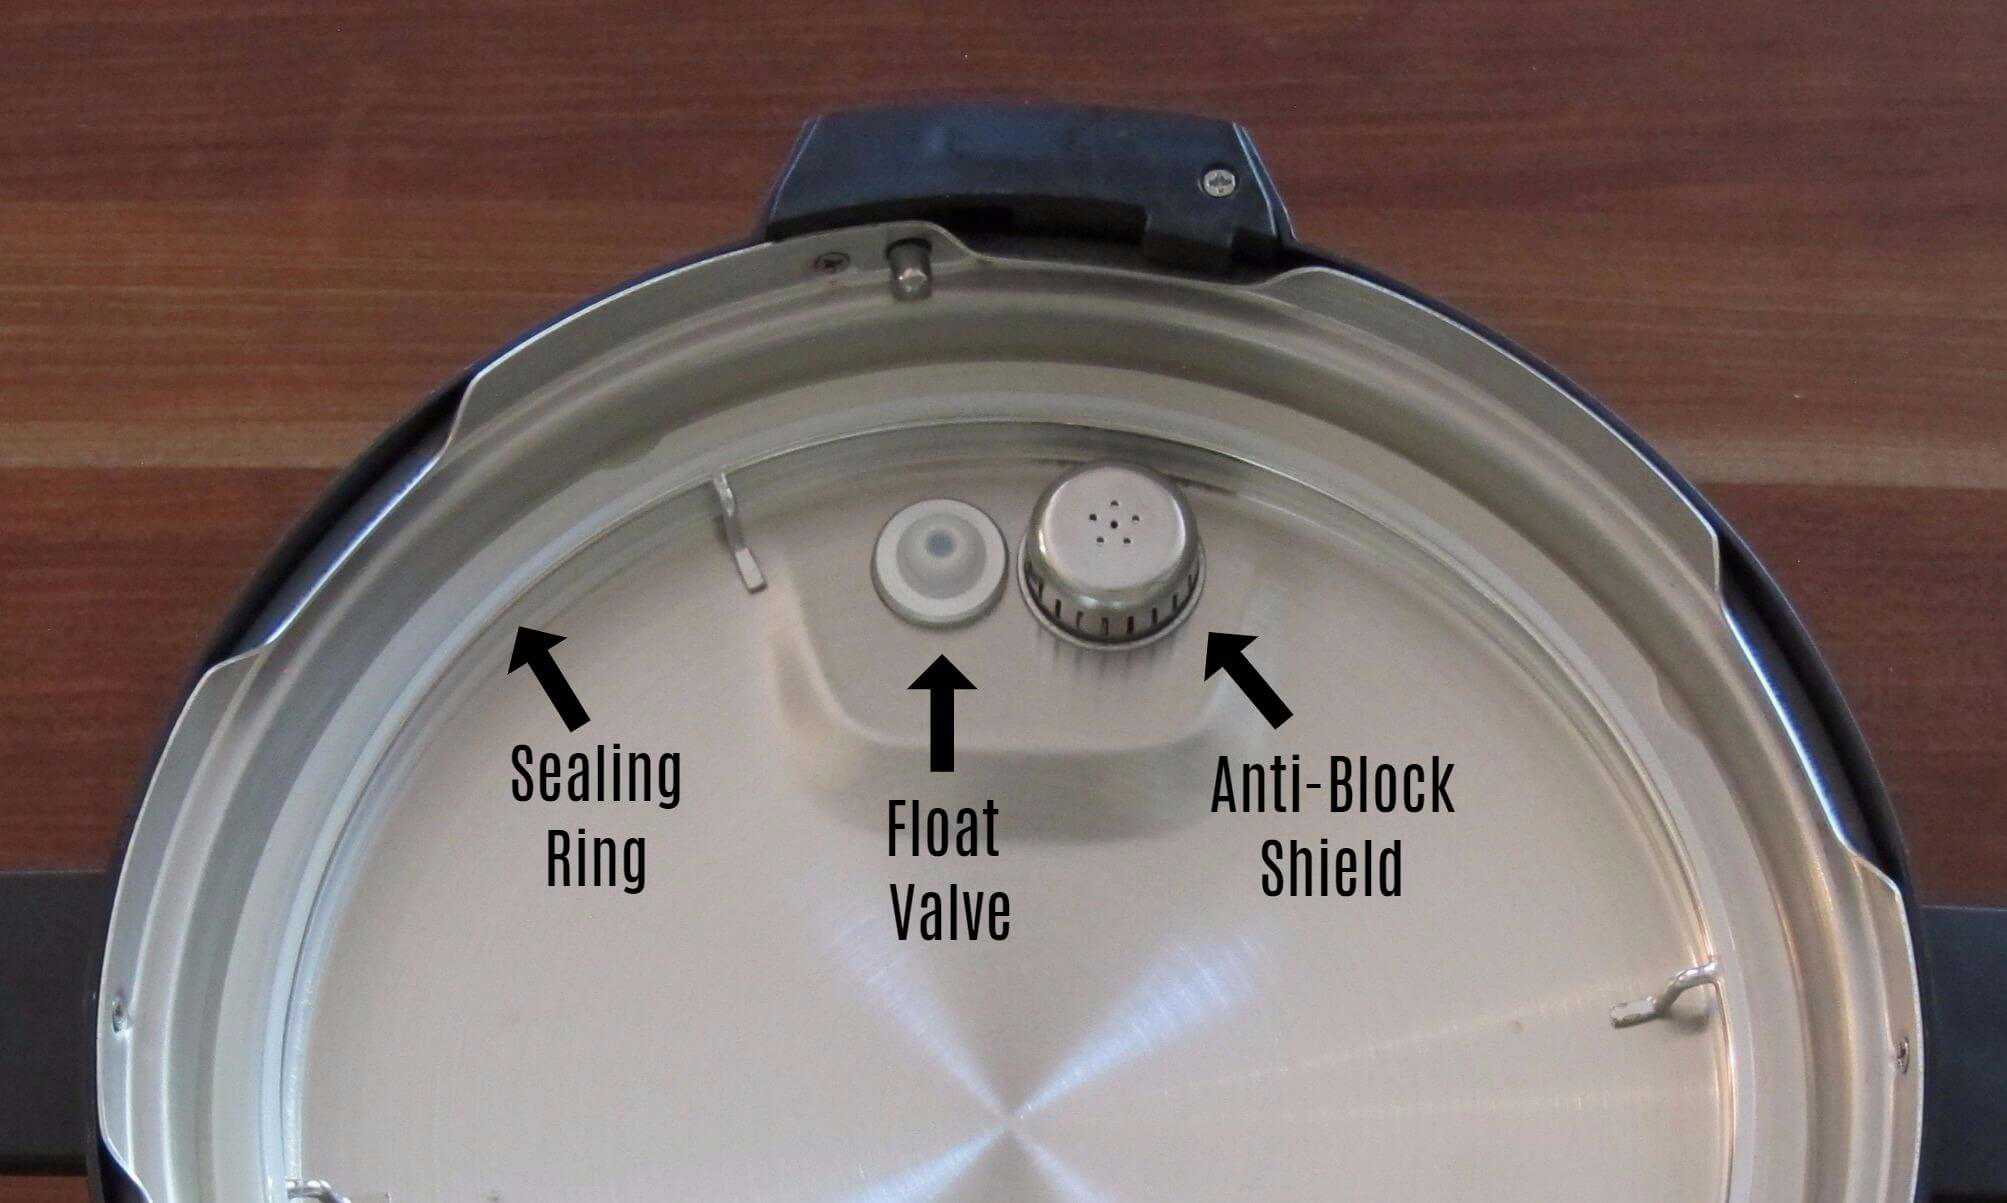
- Silicone Sealing Ring: a flexible ring that creates a seal between the Instant Pot’s base unit and the lid, allowing it to build up to the correct pressure and pressurize it. It’s also referred to as a gasket.
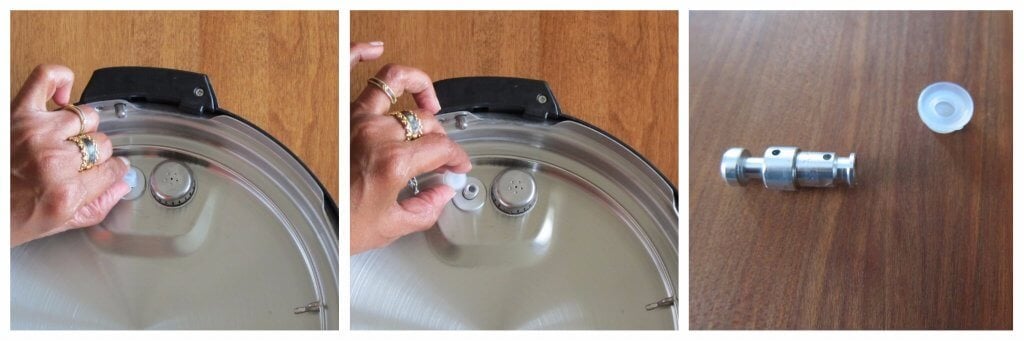
- Float Valve: a metal pin covered with a silicone cover on the inside of the lid, which keeps it in place. It can be removed and cleaned.
- Anti-block Shield: metal cover that prevents food particles from entering and blocking the steam release pipe. The anti-block shield covers the exhaust valve and can be removed and cleaned.
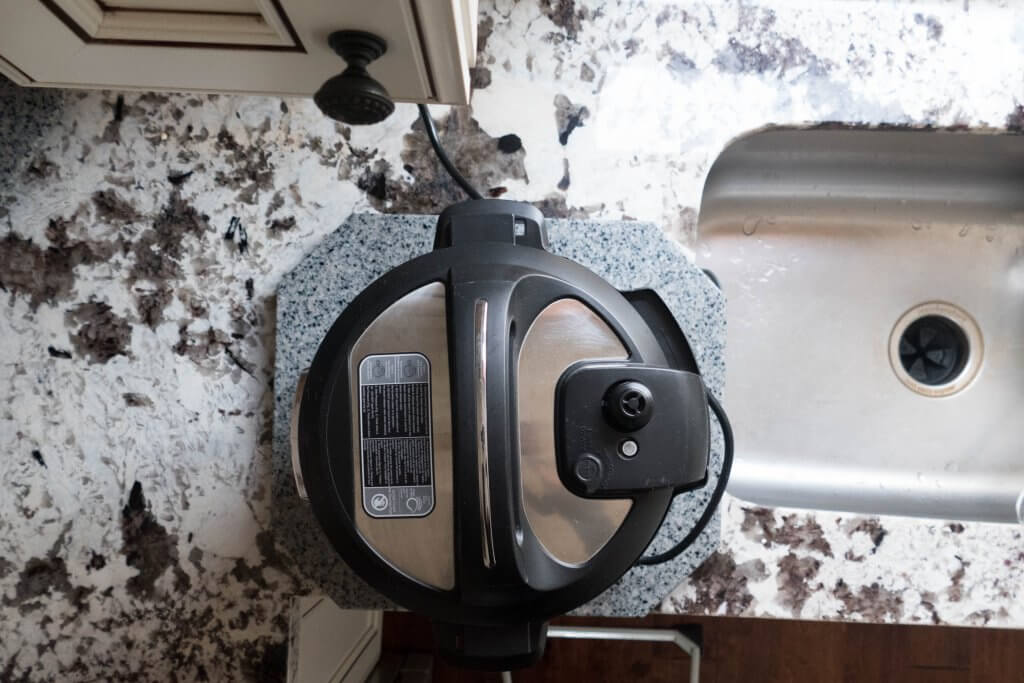
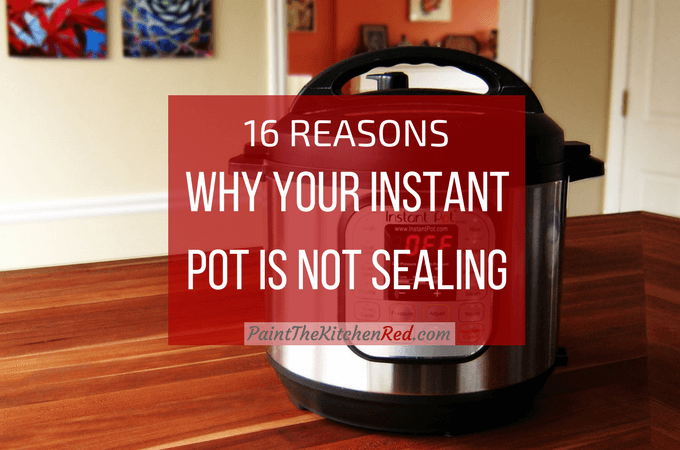
1. Instant Pot is Not Sealing | Instant Pot Leaking Steam and Not Building Pressure
This is one of the most common Instant Pot issues new owners encounter, and it’s easy to fix in most cases.
If you find your Instant Pot float valve not sealing, it’s probably because there isn’t enough steam to build pressure. Here are the more common issues for your Instant Pot not coming to pressure:
| Problem | Solution |
|---|---|
| The sealing ring is not pushed in all the way | Install sealing ring properly |
| Steam release is in the Venting position | Move the steam release handle, button, or switch to the Sealing position |
| Food is stuck on the bottom of the inner pot (This usually happens after using the Saute function) | Clean the inner pot (insert) thoroughly. Thoroughly deglaze after using the Saute function |
| There isn’t enough liquid in the pot to create steam and make the Instant Pot come up to pressure | Add more liquid |
| The lid is not closed properly | Open the lid and close again, turning clockwise all the way |
| The Food Burn message has appeared on the display panel | – Use the recommended quantity of liquid. If you’re using thick sauces like tomato sauce or pasta sauce, it must be thinned with a clear liquid such as water or broth. – Layer foods by adding clear liquids first, meat and vegetables next, and rice, pasta, and dense ingredients on top. |
But that’s not all – there are many more reasons. Find out more reasons why your Instant Pot is not sealing and what you can do to fix this problem.
2. Instant Pot is Leaking Steam
Should steam come out of the Instant Pot while pressurizing? Yes, it’s normal to have steam escape from the steam release handle/valve and float valve while pressure is building.
Small amounts of steam will come out of the float valve and steam release valve until the Instant Pot is pressurized and the float valve is up. There’s no need for concern; it’s not a problem.
Once it’s pressurized, it’s normal for tiny wisps of steam to escape, especially if you’re cooking foods with a lot of liquid.
If you’re making a recipe with a lot of liquid, such as soup or stew, your Instant Pot will also take a longer time to come to pressure.
If steam is coming out of the Instant Pot in Sealing position and continues to come out, this will keep the pot from reaching pressure, and you may need to check a few things.

Why is your Instant Pot leaking steam from the sides?
| Problem | Solution |
|---|---|
| The sealing ring is missing | Install sealing ring |
| The sealing ring is stretched out | Put the sealing ring in the freezer for a few minutes |
| The sealing ring has food debris | Remove the sealing ring and thoroughly clean it |
| The sealing ring is damaged | Purchase a new sealing ring |
Why is your Instant Pot leaking steam from the float valve?
If the Instant Pot valve is leaking continuously for over 2 minutes, and you find the float valve not rising, here are some reasons:
| Problem | Solution |
|---|---|
| There’s food debris on the float valve or its silicone cover | Clean the float valve silicone seal |
| The float valve silicone cover has worn out | Replace the float valve silicone cover |

Why is your Instant Pot leaking steam from the steam release valve?
If the steam release valve is not working correctly and steam is leaking continuously, here are some reasons:
| Problem | Solution |
|---|---|
| Steam release is in the Venting position | Move the steam release handle to the Sealing position |
| Steam release valve is not seated properly | Make sure the steam release valve is pushed in all the way down (it will be wobbly – that’s normal) |
| Pressure control failure | Create a support ticket with customer service. |
[Read More: Reasons your Instant Pot is Not Sealing]
3. Instant Pot Not Turning On – Instant Pot Stopped Working – Instant Pot is Dead
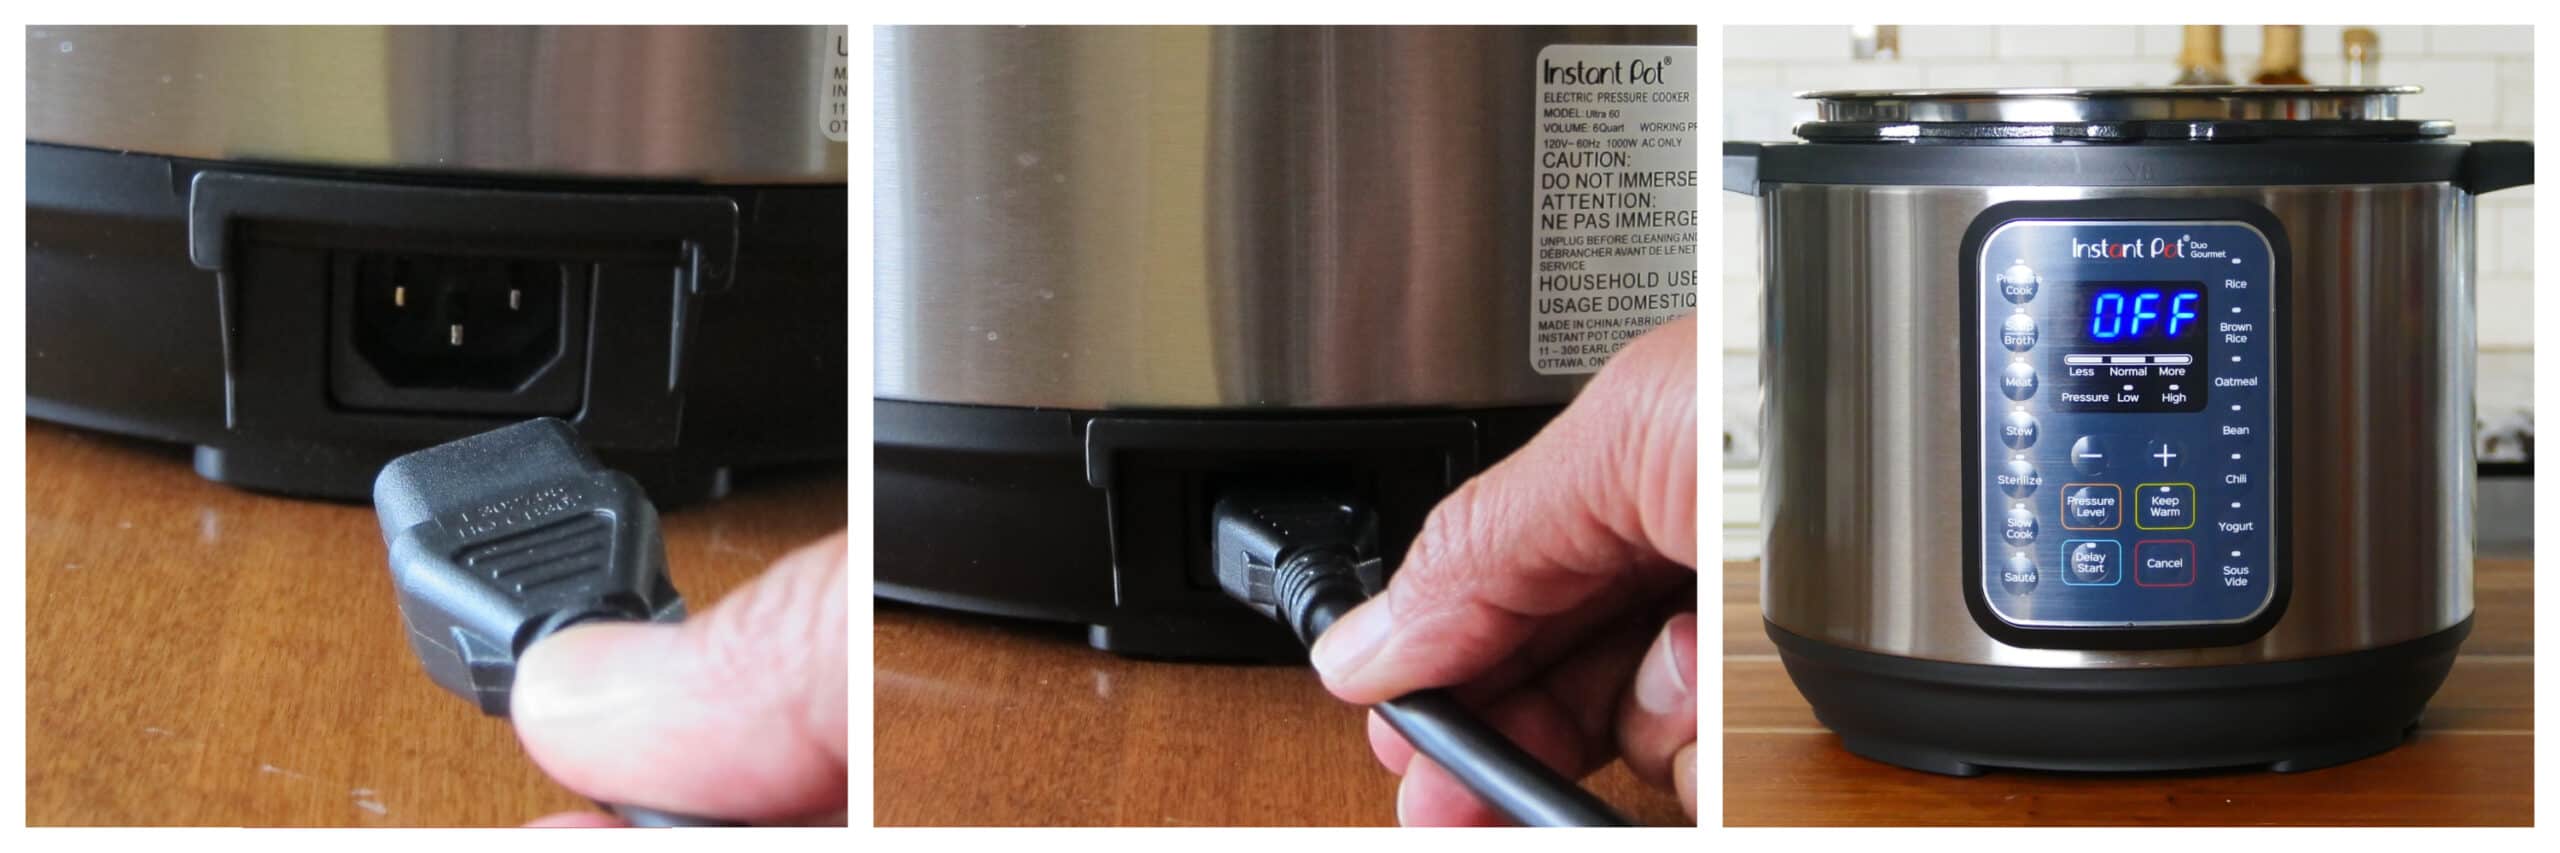
- If your Instant Pot won’t turn on, it could be because it hasn’t been plugged in correctly. Test the outlet to make sure it is working with another appliance or an electrical outlet tester. Or use a different outlet.
- If your Instant Pot has a detachable cord, it might be loose. Check the cord and make sure it’s pushed in all the way. It can come loose if you move the Instant Pot or accidentally bump it.
- If your Instant Pot display is dead, it’s possible that an Instant Pot fuse needs to be replaced. It could be faulty due to a power surge or other electrical issue. Create a support ticket with customer service to get help.
- Also, if you find your Instant Pot not heating, try out the hack mentioned in Instant Pot Problem #19.
4. Float Valve Won’t Go Up | Float Valve is Stuck
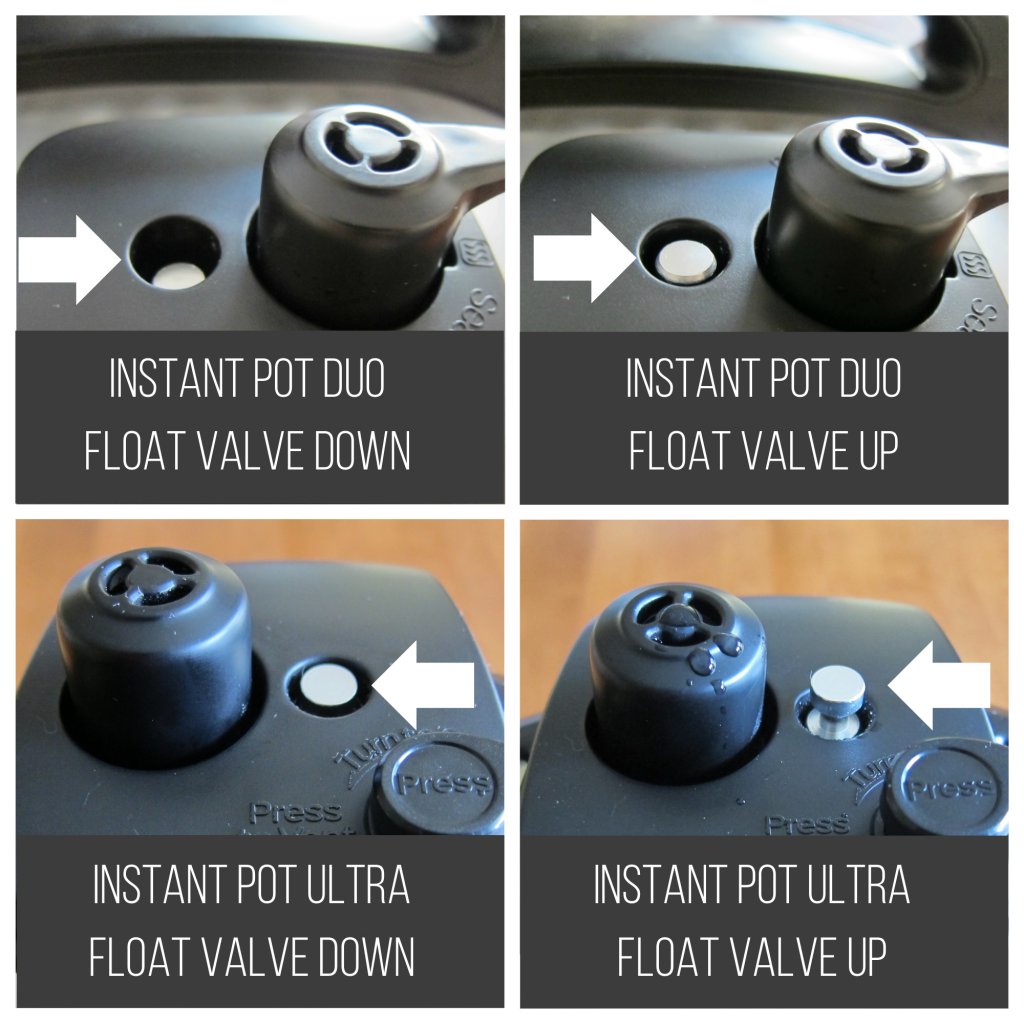
- Different models of the Instant Pot have different positions that the float valve can be in when sealed, so it might be in the Up position, and you don’t realize it (See above image). Note: Some models have a red-colored float valve.
- If your float valve is stuck in the Up position, it could be due to debris or stickiness from food. Use a long spoon or chopstick to gently push down on the float valve.
- If your float valve is stuck in the Down position, it’s probably because your Instant Pot is having trouble sealing. See Problem #1.
5. Instant Pot is Taking Too Long to Cook Food
Total Cook Time = Time to Come to Pressure + Pressure Cooking Time + Time for Natural Release of Pressure (NPR)
For example, if your Instant Pot recipe says to pressure cook for 10 minutes, the Instant Pot may take 15 minutes to come to pressure. Pressure cooking takes 10 minutes, and naturally releasing of pressure can take another 5 to 20 minutes.
The quantity, density, and temperature of liquid and food in the pot determine how long it takes for the Instant Pot to come to pressure. The quantity of food also determines how long it takes to release pressure.
If you’re wondering why your Instant Pot is taking so long to come to pressure, it could be because you’re cooking frozen food or a large quantity of food.
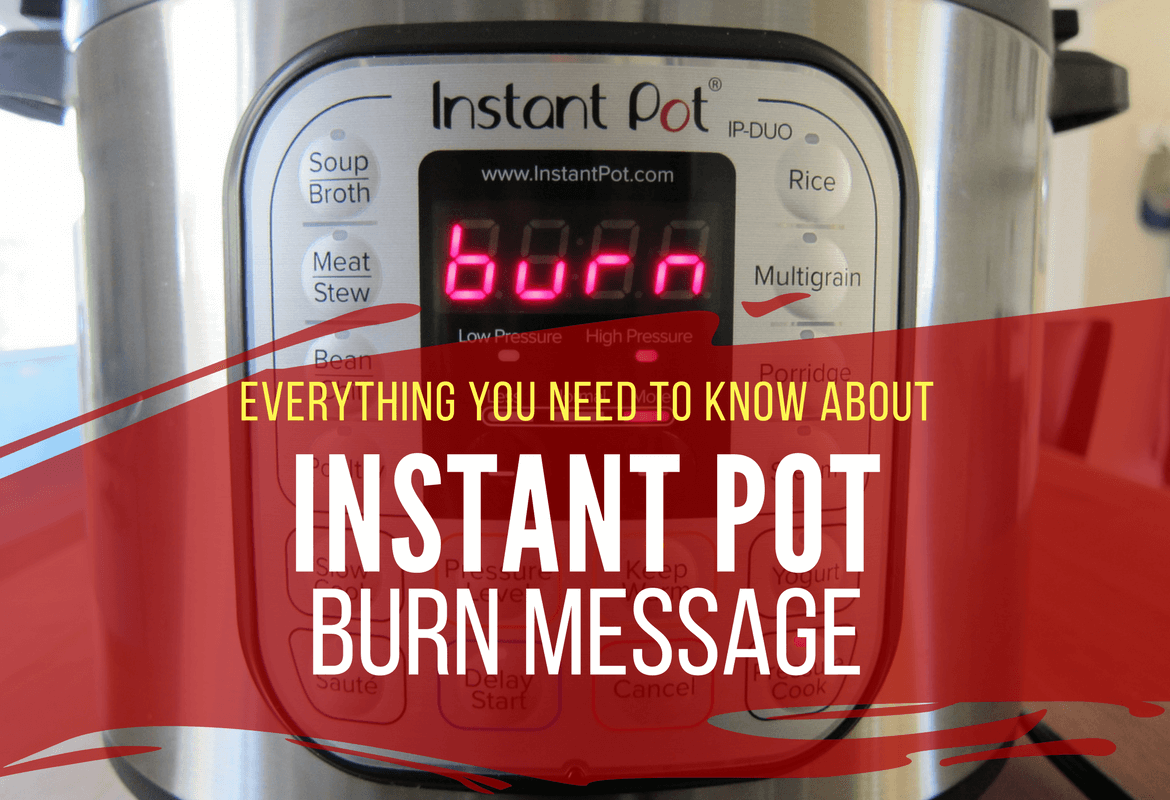
6. Instant Pot Display Says Burn or Food Burn
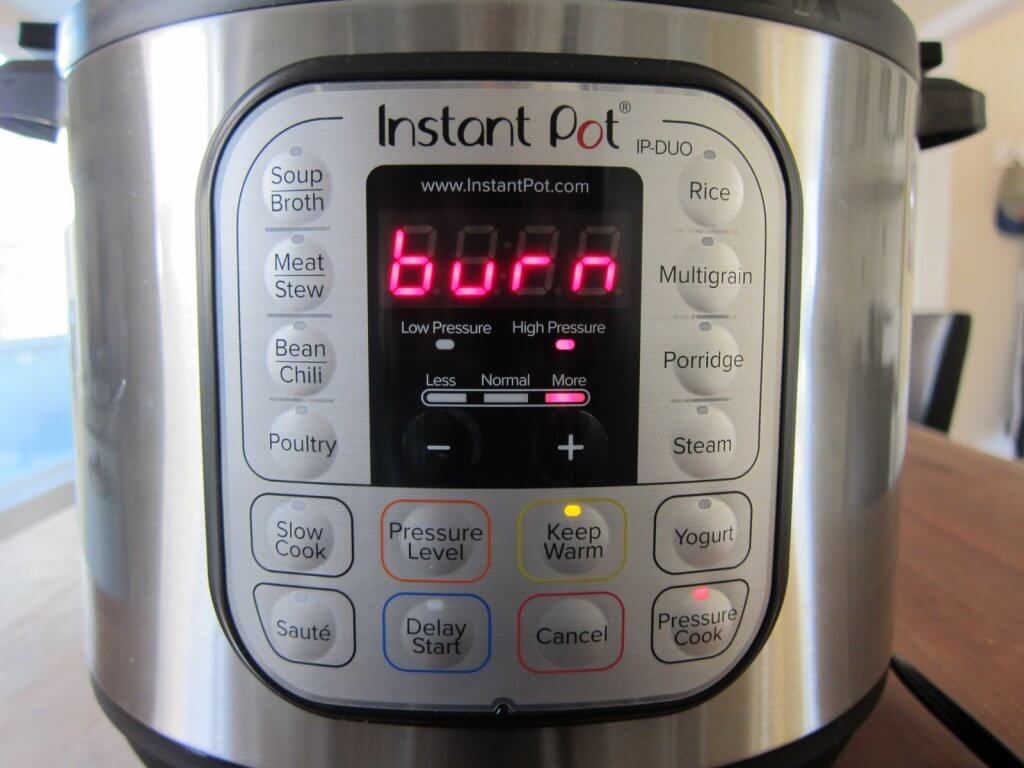
If you’re a new Instant Pot owner, the Burn message is a problem you’ll have at one point or another. There are many reasons for the Burn error.
It all comes down to the fact that the Instant Pot is overheating. Here are some of the ways you can prevent this issue:
- Make sure there’s enough thin liquid (water or broth), and it has reached the bottom of the inner pot. If you need to, lift the food with a spatula to make sure the liquid covers the bottom.
- Allow the Instant Pot to cool down after using the Saute function.
- Use the layering technique to prevent scorching: layer starches like pasta and thick sauces. See problem #7 below.
- Always deglaze the inner pot after you’ve used the Saute function. This means that after sauteeing your food, add a couple of tablespoons of liquid and scrape up the brown bits so there’s nothing stuck on the bottom.
But that’s not all. Find out all the reasons for the Food Burn error and how to avoid it.
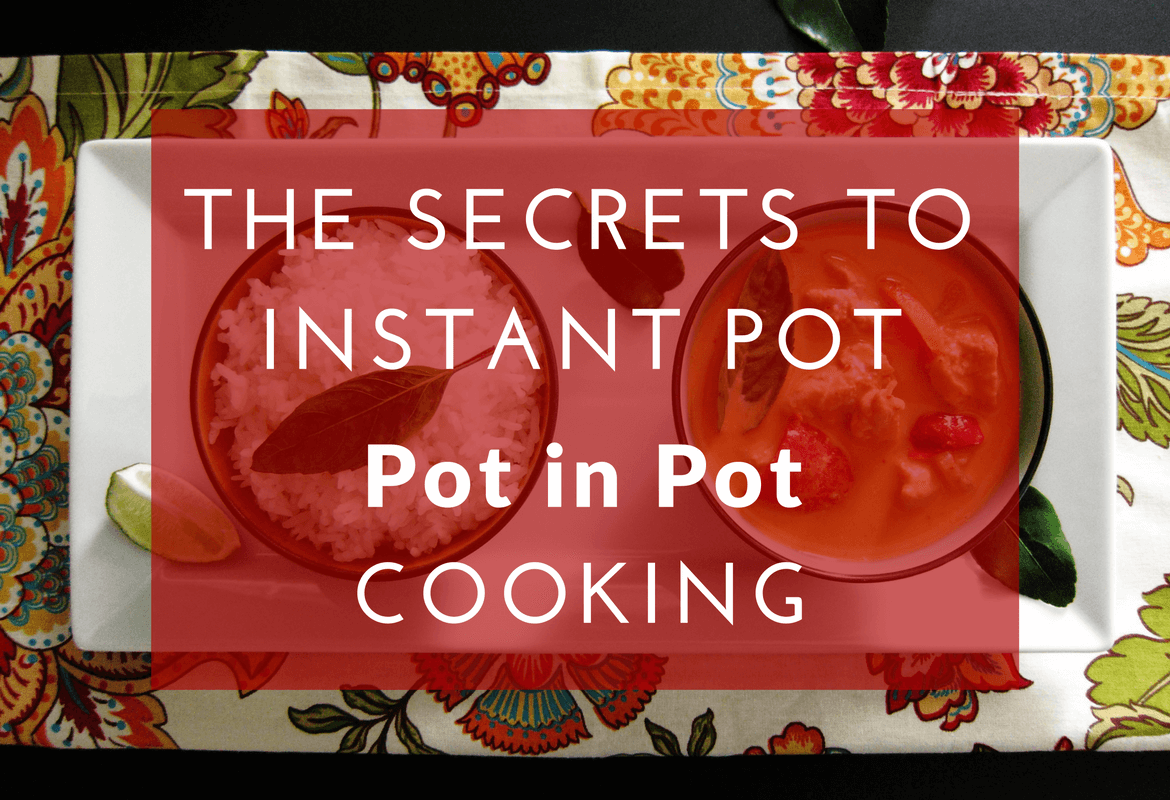
7. Instant Pot Won’t Come to Pressure When Making Recipes With Tomato Products or Store-Bought Sauces
This is another common problem Instant Pot owners have. Tomato products (e.g., tomato sauce, tomato paste, tomato puree) in the pressure cooker can be tricky. Tomato products can be thick and dense, which can lead to scorching.
Many store-bought sauces (e.g., alfredo sauce) have a high sugar content or fillers like corn starch or flour, which can also cause scorching. This can cause the Burn message.
Here are some things you can do to prevent the problem:
- Layer these sauces on top without stirring.
- Thin sauces with water or broth to make them less dense.
- Use the Pot in Pot method of cooking.
8. Recipes Mention ‘Cook on Manual’ and You Don’t Have Manual Mode
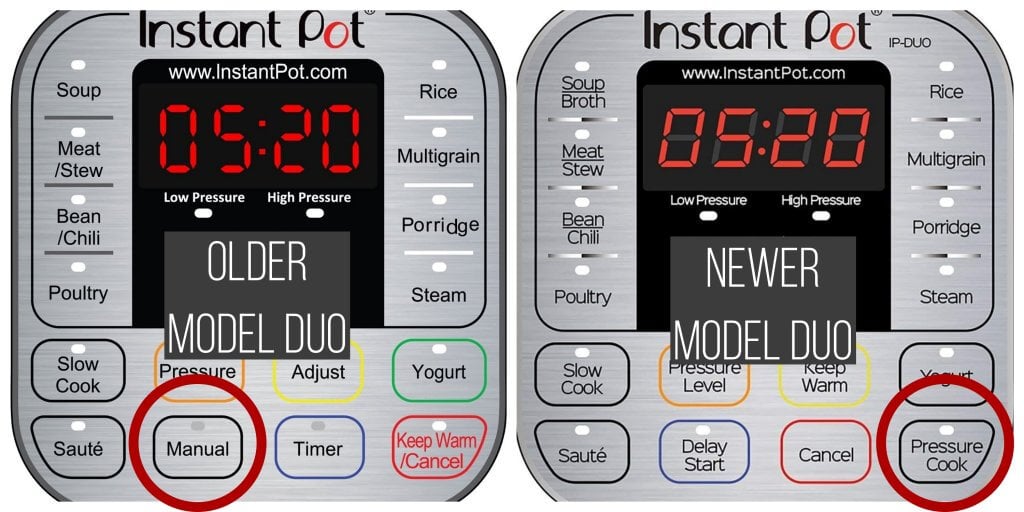
Some (older) versions of the Instant Pot have the Manual button rather than Pressure Cook. Many recipes that are posted online are created by people who own the older version.
If a recipe refers to Manual mode, use Pressure Cook mode instead. It’s the same thing.
9. How to Turn Off Instant Pot Beep
I love that chime, but many people don’t like it. Here’s how you turn off the beep.
On models without a knob, such as Instant Pot LUX, DUO:
Press and hold the Minus (-) button for 3 seconds to turn off the sound. Press and hold the Plus (+) button for 3 seconds to turn the sound back on.
On models that have a knob, such as ULTRA, PRO:
Press the knob for 5 seconds. In the menu, Sound will be highlighted. Press the knob to select Sound. Turn the knob to select Off (it will be blinking). Press Start to confirm your selection.
10. How to Use All the Different Instant Pot Buttons
Yes, there are many programs, basically presets, as you would have on your microwave.
For example, the Soup function is preset to cook for 30 minutes at high pressure. The Meat/Stew button is preset to cook for 35 minutes at high pressure.
However, you don’t need to use the presets. You can use the Pressure Cook program and manually set the pressure cooking time. You can get by with using just a few programs/buttons (varies by model):
- Pressure Cook (also called Manual on some models)
- Saute
- Keep Warm
- Cancel
- Start
Barbara over at Pressure Cooking Today has one of the most comprehensive guides covering most models: Which Instant Pot Buttons to Use.
11. Instant Pot Lid Smells | Sealing Ring Smells

The sealing ring is made of silicone, and it will retain the odors of whatever you last cooked (and more!)
There are many ways to try and remove the odors (e.g., keep it out in sunlight, soak it in denture cleanser, use lemon juice, vinegar, etc), and I’ve tried them all. They work okay, but the odors never completely go away.
I don’t find that the odor from the sealing ring transfers to whatever dish I’m cooking. So I don’t worry about the smell unless I make a dessert.
I have a second sealing ring for desserts. You can purchase sealing rings in multi-colored packs, which will help you remember which one is used for sweet or savory dishes.
You should never store the Instant Pot closed, with the sealing ring in the lid. I always store my lid upside down on the unit. This helps with reducing odors.
12. How to Clean Instant Pot | Inner Pot/Liner Has Rainbow Stains
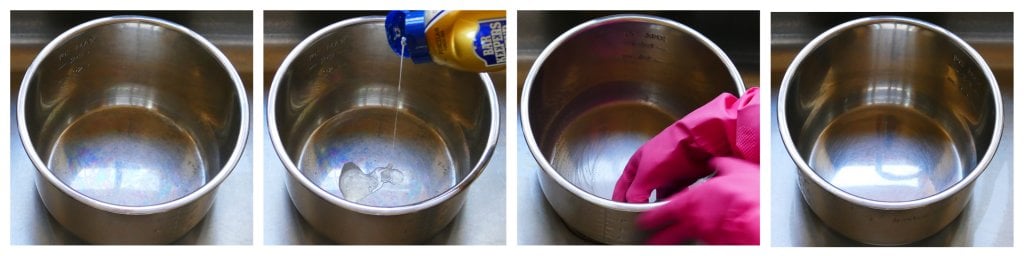
Sometimes, your inner pot (liner) can get a rainbow or blue-purple stain, especially when the pot is overheated. This happens to stainless steel pots, in general.
Barkeeper’s Friend is my favorite product for cleaning my Instant Pot inner pot. I use it to clean all my stainless steel pots and kitchen sink.
You can get Barkeeper’s Friend in powder or liquid form. I prefer the liquid. Be sure to shake it up before using it.
The inner pot, lid, sealing ring, pressure valve can all be washed in the dishwasher. Wipe down the outside of the Instant Pot with a damp cloth after every use.
13. Meats are Dry and Tough
One of the most common complaints I hear from new Instant Pot users is that they pressure cook meat or chicken, and it comes out dry and tough.
The Instant Pot is best for meats that have a higher fat content, like chicken thighs, pork shoulder, and beef chuck.
Chicken breasts, pork chops, pork tenderloin, and beef tenderloin are lean cuts of meat and don’t do as well in the Instant Pot. Don’t cook these cuts too long if you want to use them.
For example, if you’re substituting pork tenderloin for pork shoulder, you can’t cook it for the same time as pork shoulder because it’ll become tough! I cook pork tenderloin for about 4 minutes compared to pork shoulder, which can take 50 minutes!
Some newer Instant Pots come with the Sous Vide smart program. You can make perfectly cooked tender and moist chicken breast and lean meats if you have that functionality.
Another key to preventing meats from becoming dry is to use Natural Pressure Release (NPR). Allow the float valve to go down on its own.
This allows the meat to rest, the fibers to relax, and the juices to be re-absorbed into the meat rather than evaporating. This applies particularly to meat that is not immersed in liquid (like soups, stews, curries, and gravies.
Finally, contrary to a lot of advice about pressure cookers, more is not always better when it comes to meat. Meat becomes tender in about one-third the time it takes for conventional cooking. Pressure cooking meat for too long can cause it to become dry and tough.
As meat overcooks, the muscle fibers are depleted of fat and juices. To salvage the meat from this stage, you can cook the meat even further until it breaks down to the point it’s falling apart. You’ll lose flavor and nutrients, but you’ll have tender meat!
Laura from Hip Pressure Cooking has some great articles, including Choosing the Right Cut of Meat.
14. Placed Instant Pot on Stove and the Instant Pot Bottom Melted
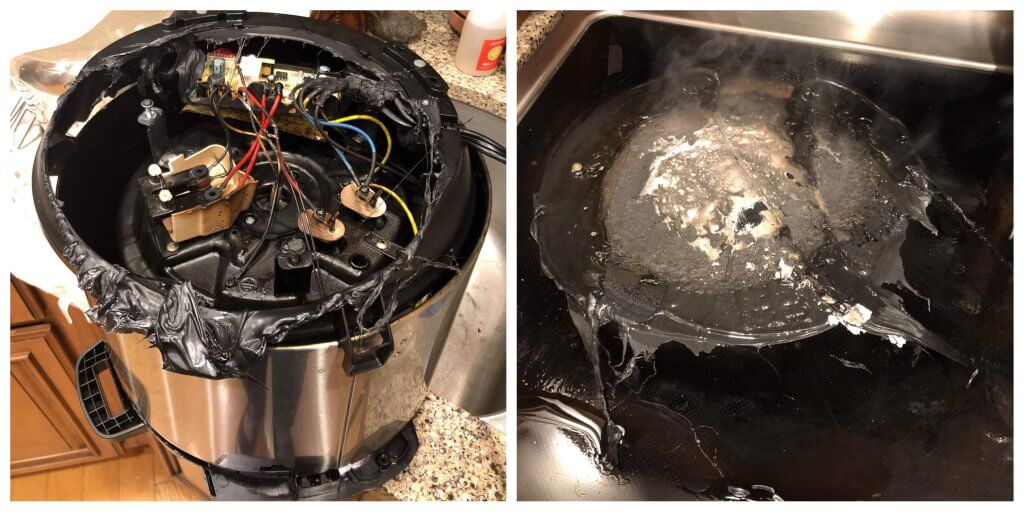
My thanks to Dale Falconer for providing the above photographs
Believe it or not, this is a common problem! Many people leave their Instant Pots on the stovetop, thinking they’ll be fine as long as they don’t turn on the burner.
But the problem is that someone in the household accidentally turns on the burner, or the Instant Pot is placed close to an adjacent burner that’s on.
If this happens, I suggest you get a replacement unit because you don’t want to risk damaging the circuitry.
There are a few places you can go to for Instant Pot spare parts, including base units, lids, and valves:
- The Instant Pot company website: Replacement parts (Disclosure: if you purchase from the site, I will receive a small commission)
- Instant Pot Facebook group for parts: Instant Pot Parts Swap or Sale
- ebay.com
15. Accidentally Poured Water into Instant Pot but Forgot to Put in Inner Pot / Liner
Forgetting to put in the inner pot and accidentally pouring liquid into the Instant Pot base unit is a common problem!
People wash the inner pot in the dishwasher and forget to put it back in the Instant Pot base unit before cooking.
If this happens to you, don’t panic! According to the Instant Pot Company, here’s what you can do for water or food spills:
- Unplug the Instant Pot right away!
- Wipe the inside of the Instant Pot base unit and heating element with a dry cloth to remove as much liquid as possible.
- Place the base unit upside down to let all the liquid drain from the cooker base.
- There is a plastic vent cover on the bottom of the base that you can take off by unscrewing the screws.
- While you have the cover off, please be gentle with the wires and circuitry.
- Try to carefully reach up into the cooker housing to see if you can remove any food debris (if necessary).
- Clean and dry everything as much as possible for 72 hours. Use a fan to speed up the drying out.
- Put everything back together, insert the inner pot, and plug the unit in.
- If it turns on, attempt to heat 2 cups of water in Saute mode.
- If that test is successful, do a water test to check if the Instant Pot works. If it is, you’re all set.
- If there is a burning smell at any point, turn the unit off and unplug it. Create a support ticket with Instant Pot customer service.
- If you can’t get the Instant Pot to turn on and successfully complete a water test, it’s probably time to get another Instant Pot. *
If oil spilled into the base unit, you can attempt to turn the pot upside–down to allow it to drip out. However, there is no safe way to determine whether it’s safe to use. Turning on the pot even to test would be a fire hazard.
* There are a few places you can go to for Instant Pot spare parts:
- The Instant Pot company website: Replacement parts (Disclosure: if you purchase from the site, I will receive a small commission)
- Instant Pot Facebook group for parts: Instant Pot Parts Swap or Sale
- ebay.com
The best way to prevent this problem is to put something in the base unit while the inner pot is out that will help you remember to replace the inner pot (e.g., a long wooden spoon or ladle).
16. Upper Kitchen Cabinets are Getting Damaged
When the Instant Pot is placed on the countertop, the steam release can shoot straight toward the upper cabinets.
Many people solve this problem by placing their Instant Pot on the stovetop. But this can cause even more significant issues. See Instant Pot Problem #15 above.
What I do is carefully turn the Instant Pot so that the steam release opening is toward the front or side, allowing the steam to be directed away from my upper cabinets.
Just be very careful when you release the pressure using the quick release (QR) method; keep your hands and face away from the flow of steam!
Another solution is to use the Instant Pot on a side table or cart, away from the cabinets.
17. Instant Pot Says On But No Timer
Several readers have reported this problem recently, and I experienced it the other day for the first time. The Instant Pot display says On, and the float valve comes up, but it never starts counting down, but the food gets cooked.
If this happens to you, after the float valve comes up, just set a separate timer for the desired cook time and press Cancel when the time is up. Do a pressure release according to your recipe and continue as usual. [Read More: Instant Pot Natural Release or Quick Release?]
Clean out the Instant Pot thoroughly and do a water test, and most likely, you’ll find out that it was a one-time problem. If the problem persists, you might want to contact Instant Pot Support and open a ticket.
In my case, I suspect it could have been too little liquid when I was cooking my Instant Pot Boiled Eggs. But that’s just a guess.
If your Instant Pot says On and your float valve does not go up, then your Instant Pot is not coming to pressure.
18. The Instant Pot Keypad is Unresponsive. Instant Pot Buttons Don’t Work.
First, check the power supply: make sure your Instant Pot plug is pushed into the outlet all the way, and if you have a detachable power cord, make sure it’s pushed into the Instant Pot base unit properly.
Once you’ve checked the power supply, if you’re still having the issue, it’s worth trying out this solution from one of my readers that actually works for some people. Thank you for sharing this hack, David!
“I have an Instant Pot DUO-60 and the keypad became unresponsive. When switched on, the keypad went straight to the Saute setting and wouldn’t do anything else. I discovered that by holding down the Cancel button BEFORE switching the mains power on, then releasing the button, the keypad reset itself and it is now working fine. I hope someone finds this tip useful..”
— David
If the issue persists, your keypad’s electronics/circuit board is likely faulty. You will probably need to contact Instant Pot Customer Service and open a ticket.
19. Instant Pot Saute Not Working
If you’re having trouble using the Saute mode, make sure that:
- The Instant Pot lid is not on.
- The Saute temperature isn’t set too low.
- The Saute time hasn’t run out. The Saute function has a timer that counts down and shuts it off when the time’s up. If you’ve changed it from the default of 30 minutes, that may be the reason it’s shutting off.
- You haven’t pressed Delay Start instead of Start.
If the Instant Pot Saute turns off automatically after just a few minutes, it could be an electrical issue, and the heat sensor in the Instant Pot may be defective. There are YouTube videos that show you how to fix the issue (if you’re handy!) Search for Instant Pot repair heat sensor. However, your best bet is to contact customer service.
20. Only the Instant Pot Pressure Cook Button Not Working
If you’re having trouble using the Pressure Cook mode only:
- Clean the float valve. Remove it and scrub it with a brush even if it looks clean.
- Clean the sealing ring. Wash the sealing ring and the sealing ring rack.
- Unplug it and plug it back in.
If you’re still having issues with just the Pressure Cook button but the other buttons work fine, it could be that the mechanism behind that button in the display panel is messed up. Contact customer service.
You can get around the issue by using one of the other presets, such as Meat or Soup. They’re basically the same thing as Pressure Cook.
21. Only the Instant Pot Rice Button Not Working
If you’re having trouble using the Rice mode only:
- Clean the float valve. Remove and scrub it with a brush, even if it looks clean.
- Clean the sealing ring. Wash the sealing ring and the sealing ring rack.
- Unplug it and plug it back in.
If you’re still having issues with just the Rice button but the other buttons work fine, it could be that the mechanism behind that button in the display panel is messed up. Contact customer service.
You can get around the issue by using Pressure Cook. Set the pressure level to Low and the time to 12 minutes.
22. How to Start Instant Pot
Some models of Instant Pot start automatically after you program them. For example, select the pressure cooking time and pressure level, and after a few seconds, the display will automatically turn to On, and the Instant Pot will start.
Other models have a Start button. You need to press Start after programming it. e.g., press Pressure Cook, set the time, set the pressure level, and press Start.
23. Instant Pot Won’t Open
If the Instant Pot has completed pressure cooking and the float valve is still up, it’s probably still under pressure. Wait until the float valve drops to open, and remove the lid. You can also release pressure using the Quick Release method to make the float valve go down.
If you’ve waited for hours and the Instant Pot won’t release pressure, you might think that the Instant Pot is not venting. But it could be that the pressure has already released, but the float valve is stuck.
If the pressure has already released and it still won’t open:
- Press Cancel and unplug the Instant Pot.
- Gently push down on the float valve with a wooden chopstick or ladle in case it’s stuck in the Up position.
- The lid may have been put on incorrectly, and you might have to use some force to open it. Make sure it’s completely cooled down. I’ve had to place the Instant Pot on the floor, lift it up, and rotate it by the lid in a counterclockwise direction. Be careful not to swing it too hard!
- If you have a model with the Ultimate lid (e.g., Duo Crisp with Ultimate lid), lift the Instant Pot by the lid and firmly tap it on the counter several times.
If you’re new to the Instant Pot and aren’t familiar with how to use it, here are my guides on how to use some popular Instant Pot models:
- Instant Pot Directions for Beginners
- Instant Pot ULTRA Beginner’s Manual
- Instant Pot DUO EVO PLUS Beginner’s Manual
- Instant Pot DUO NOVA Beginner’s Manual
- Instant Pot DUO GOURMET Beginner’s Manual
- Instant Pot PRO Beginner’s Manual
- Instant Pot DUO CRISP Beginner’s Manual
- Instant Pot PRO CRISP Beginner’s Manual
- Instant Pot PRO CRISP vs DUO CRISP
If you found this article to be helpful, please share it on social media using the social media share buttons at the top and bottom of this post. Thank you so much!
You Might Find These Articles to be Helpful!


Jess McKenzie says
We’ve just begun to use Instant Pot (IP), always for SAUTE. All worked fine, until we tried a recipe for “baking” a cake. That recipe called for pouring batter into a cake pan, placing the pan on a trivet, then cooking the cake at high temp (under pressure) for 30 minutes. The PRESSURE program called for 30MIN at HIGH temp. We’re not sure what the temp was; there was no indication. But as to TIME, the system counted down to ONLY 30 SEC (not MIN) and quit! Mystified, we reviewed the steps we followed, and compared our procedure against the recipe’s instructions — all matched! On a whim, I pressed CANCEL, and repeated the entire process — THEN the IP behaved in the expected manner.
We believe this experience was unusual enough to warrant discussion.
Neena Panicker says
Hi Jess, thank you for your question. If I had to guess, I think that the recipe creator was trying to say “pressure cook on high PRESSURE” rather than “high TEMP”. There are so many many new models out there so I have to ask: does your Instant Pot allow for seconds in addition to minutes, and could you have possibly programmed it to 30 seconds?
Donna Best Evans says
Hi! My first question was going to be the Instant Pot began “squealing” as the pressure was being released. I think it may be the silicon seal, which I will change. Second, I was planning to make Sous Vide Chicken breasts so I plugged the pot in and the inner base began getting really hot. I had not even chosen a program or started. I tried plugging it into another outlet (I had previously used a strip and thought the strip may have malfunctioned) and again the pot began heating up. I then filled the inner pot with water, chose Sous vide and 140° and within 1 minute it was at a rolling boil! This morning I tried to “work” on it and upon plugging the pot into an outlet the hase began heating up quickly on it’s own. What could be causing this?
Neena Panicker says
Hi Donna, yikes! That does not sound good. I would try and contact the company because coming to a rolling boil is not a feature of sous vide!