

Here are the top reasons for your Instant Pot not sealing. This guide helps you troubleshoot a common problem most Instant Pot users encounter: the Instant Pot won’t come to pressure. Learn how to seal your Instant Pot correctly the first time, and how to avoid the issue.
This post contains affiliate links. As an Amazon Associate, I earn from qualifying purchases. Please read the disclosure.
➡ Need more help? Check out my Instant Pot troubleshooting guide!
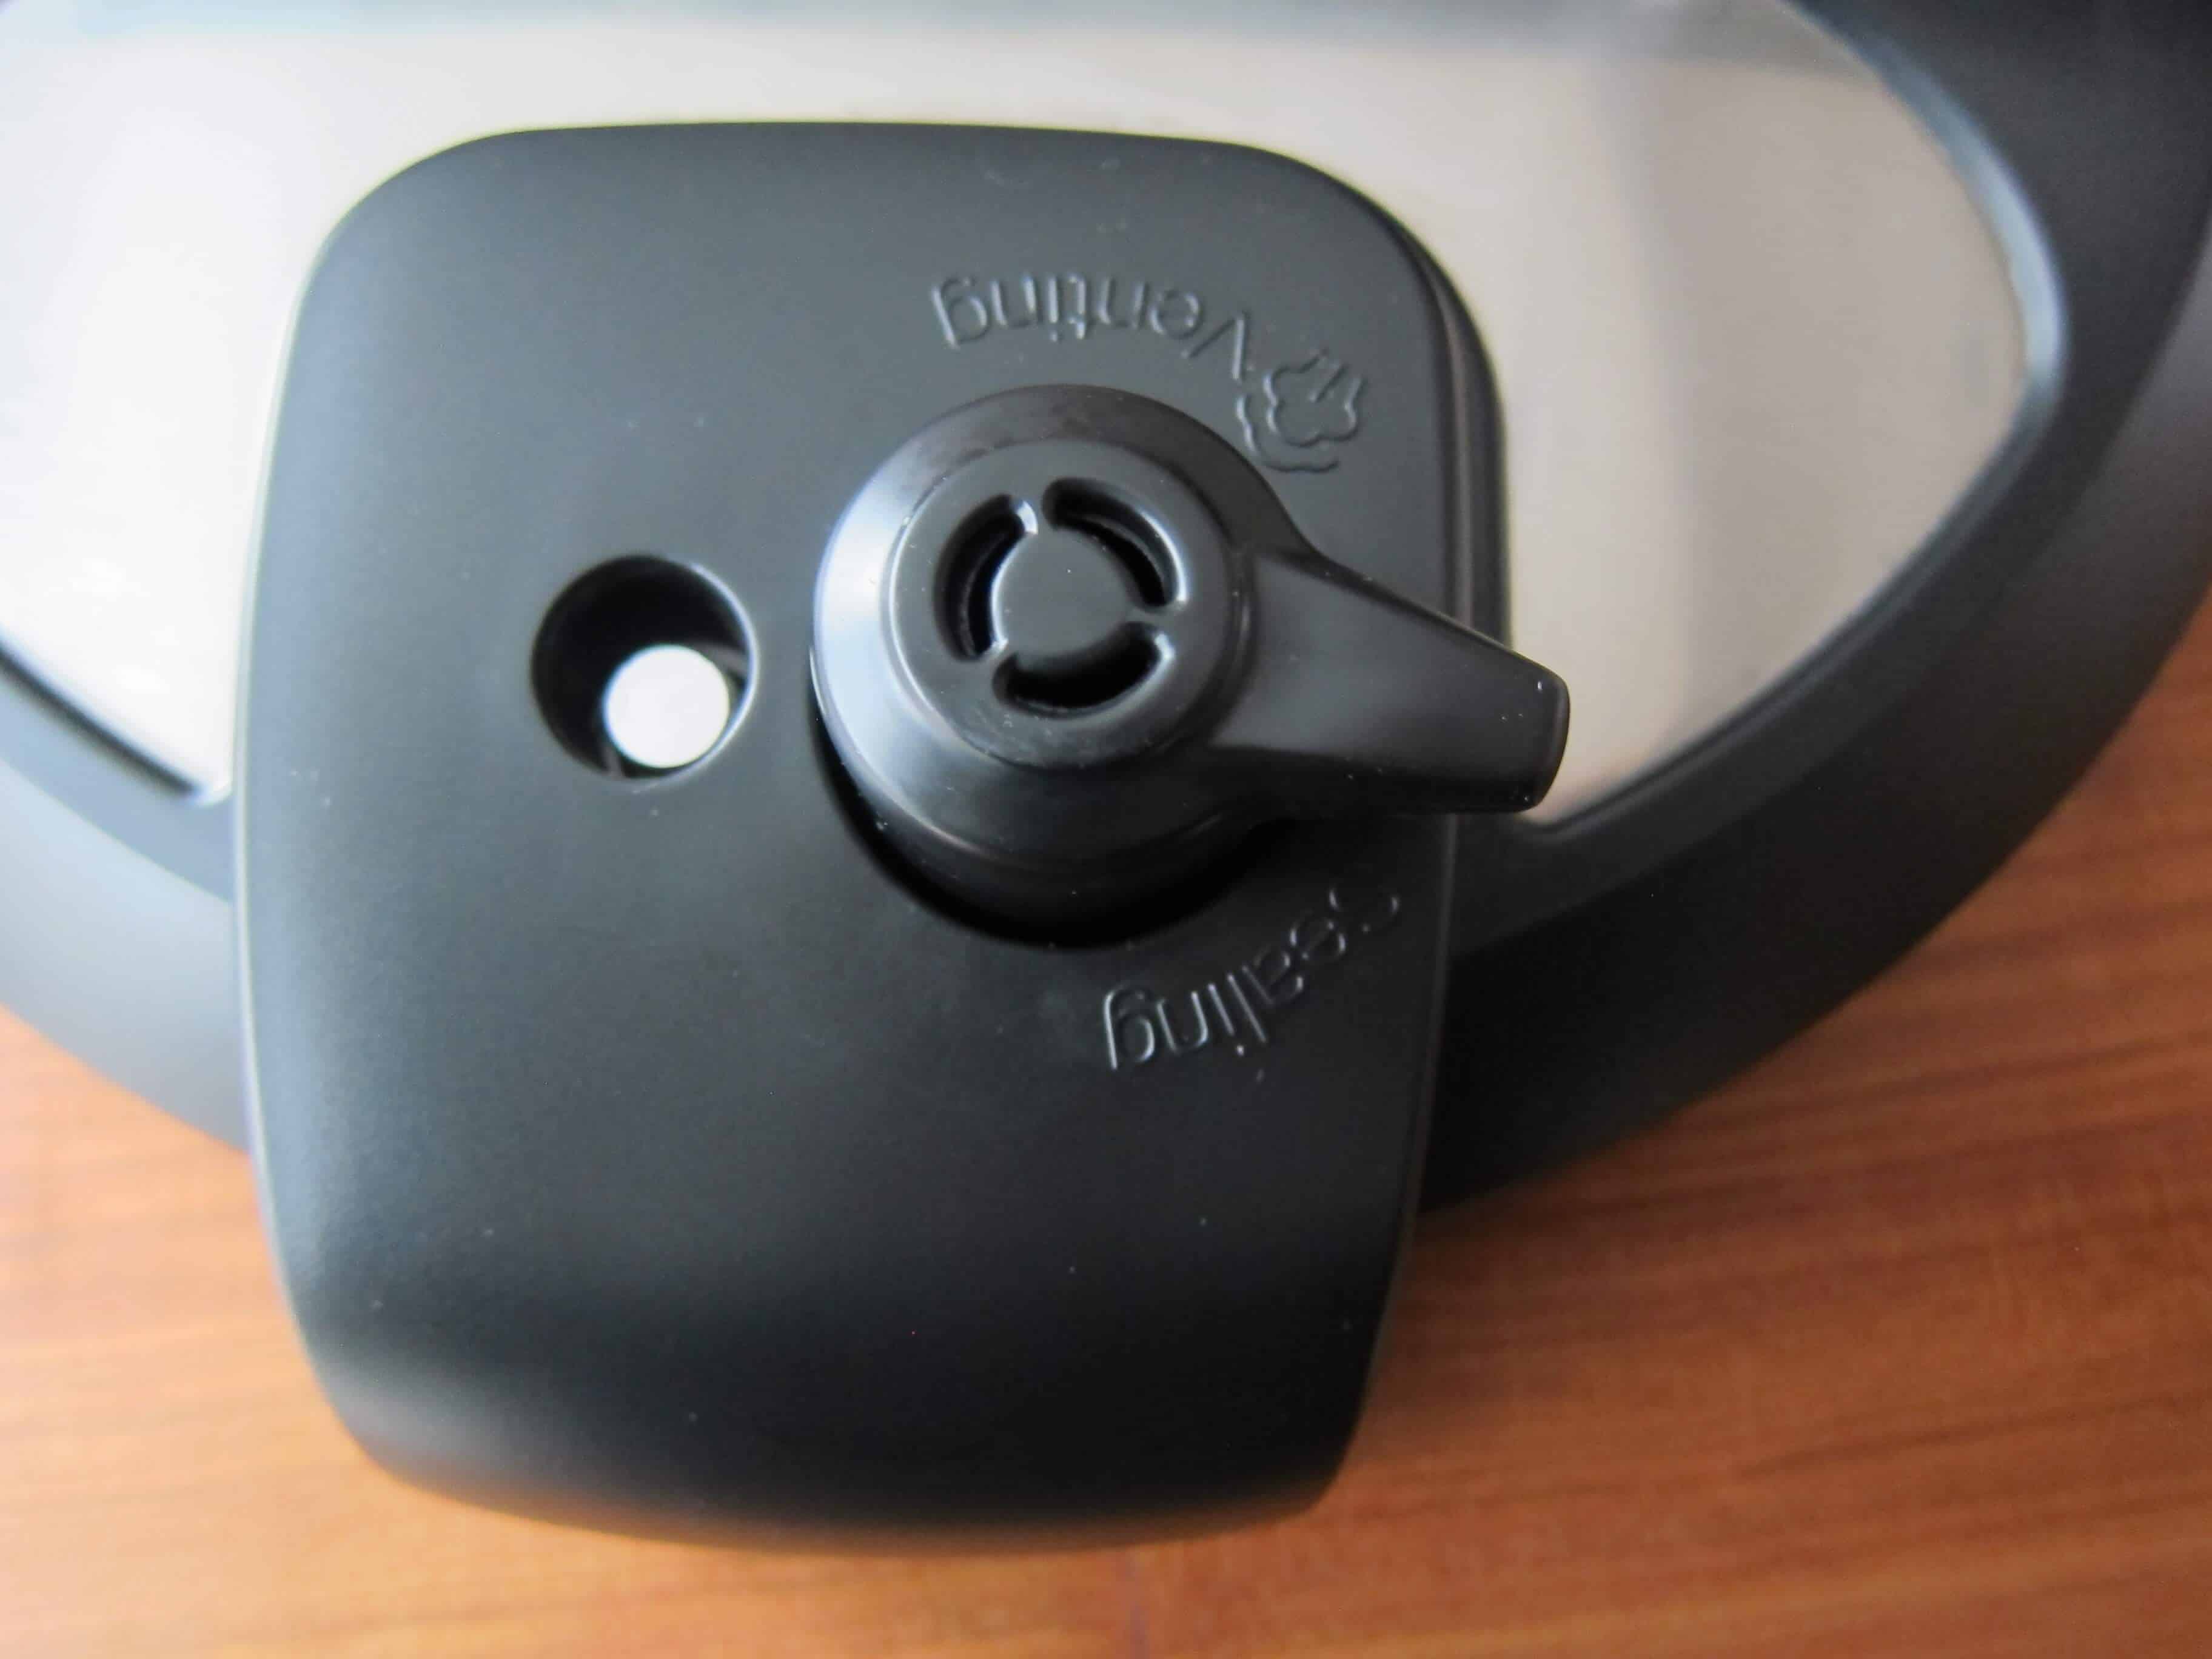
Pressure Release Valve Parts
Here are some of the parts that I refer to throughout this article. The steam release mechanism varies by Instant Pot model; some newer models may look slightly different.
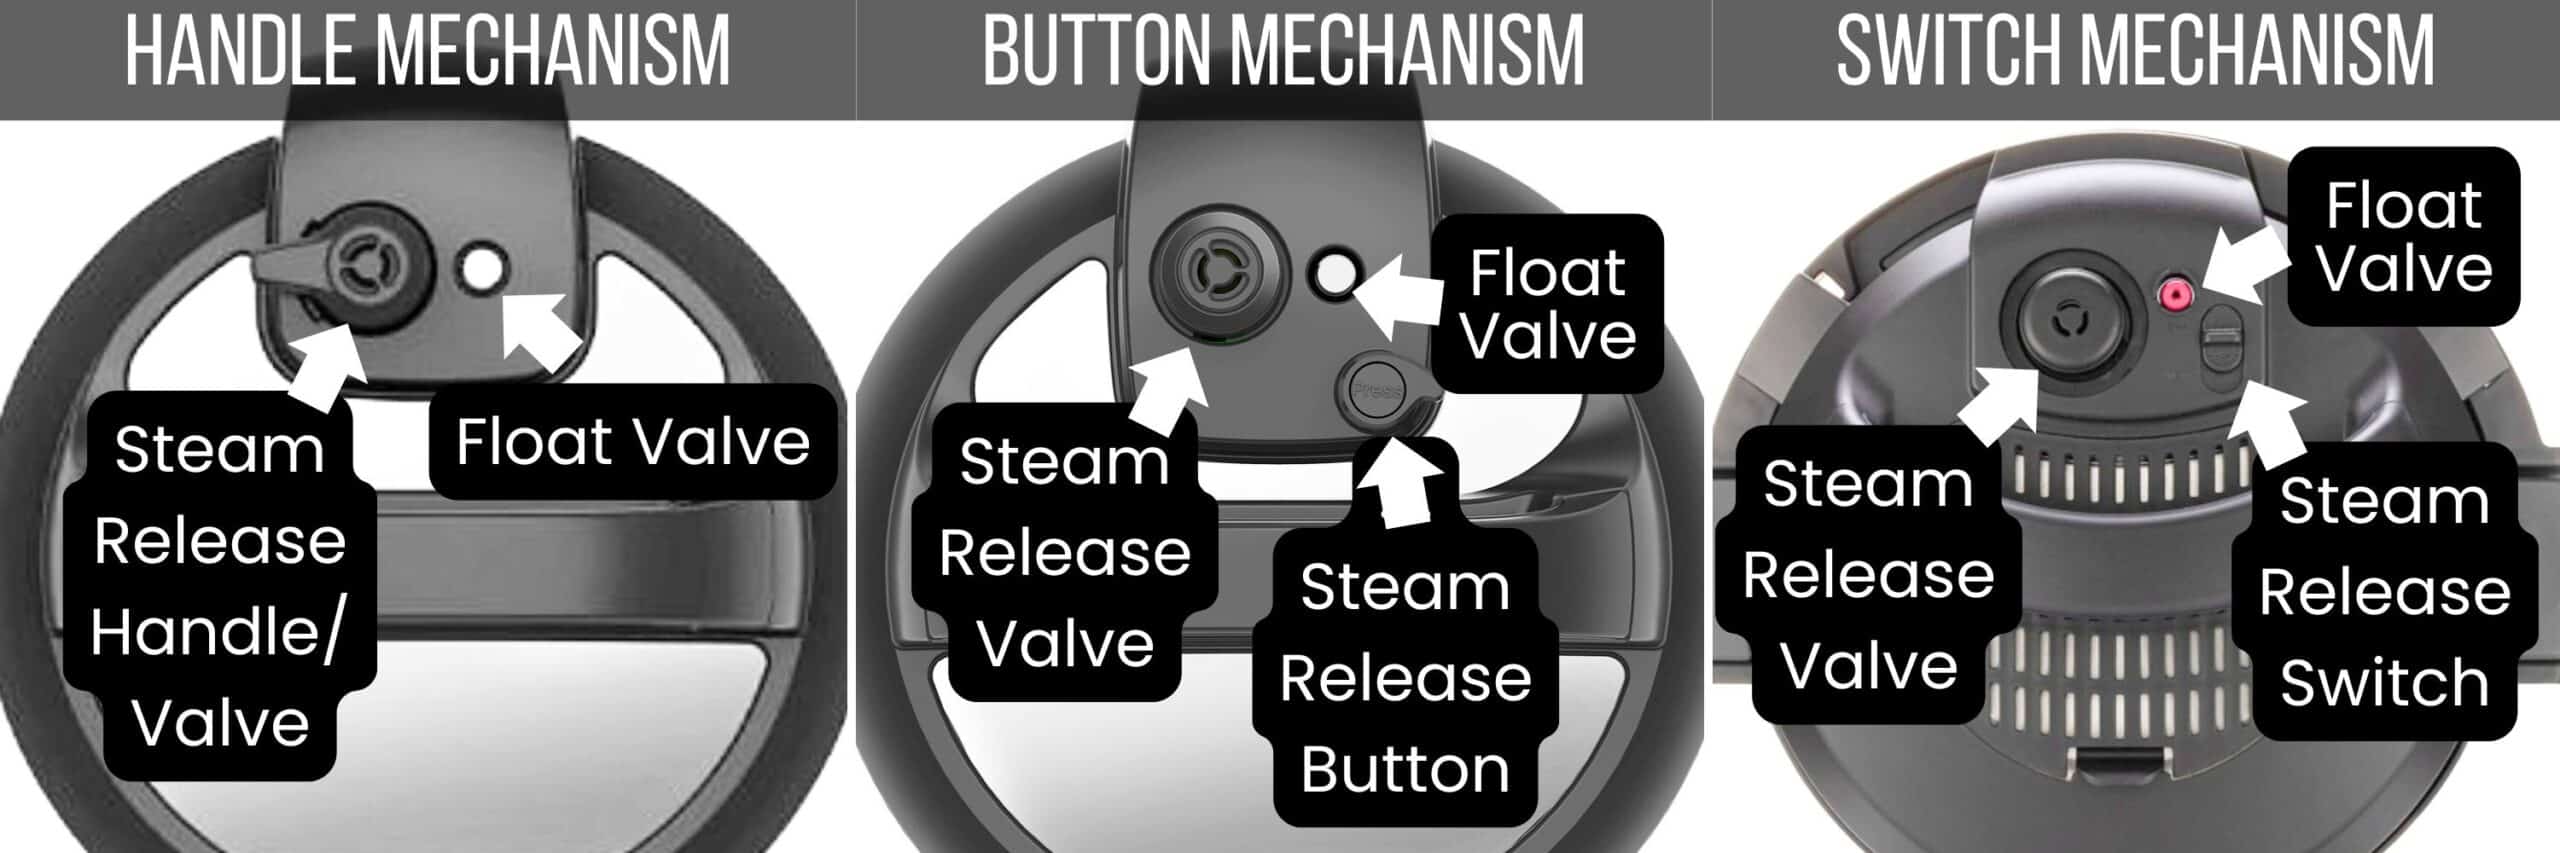
- Float Valve: a metal pin that pops up once the Instant Pot has pressurized.
- Steam Release Valve: Steam is released through the vents in the steam release valve. It’s also referred to as the Instant Pot pressure valve, pressure release valve, or venting knob.
- Steam Release Handle: Steam is released through the vents in the steam release handle. To seal the Instant Pot pressure cooker, turn this pressure knob to the Sealing position, and to release pressure, move it to the Venting position. The steam release handle is sometimes referred to as the Instant Pot venting knob or pressure valve.
- Steam Release Button: Click it counterclockwise to spring it up into the Sealing position. To release pressure, push the button until it clicks down into place in the Venting position.
- Steam Release Switch: To put it in Sealing mode, slide it into the Seal position. To release pressure, slide it into the Vent position.
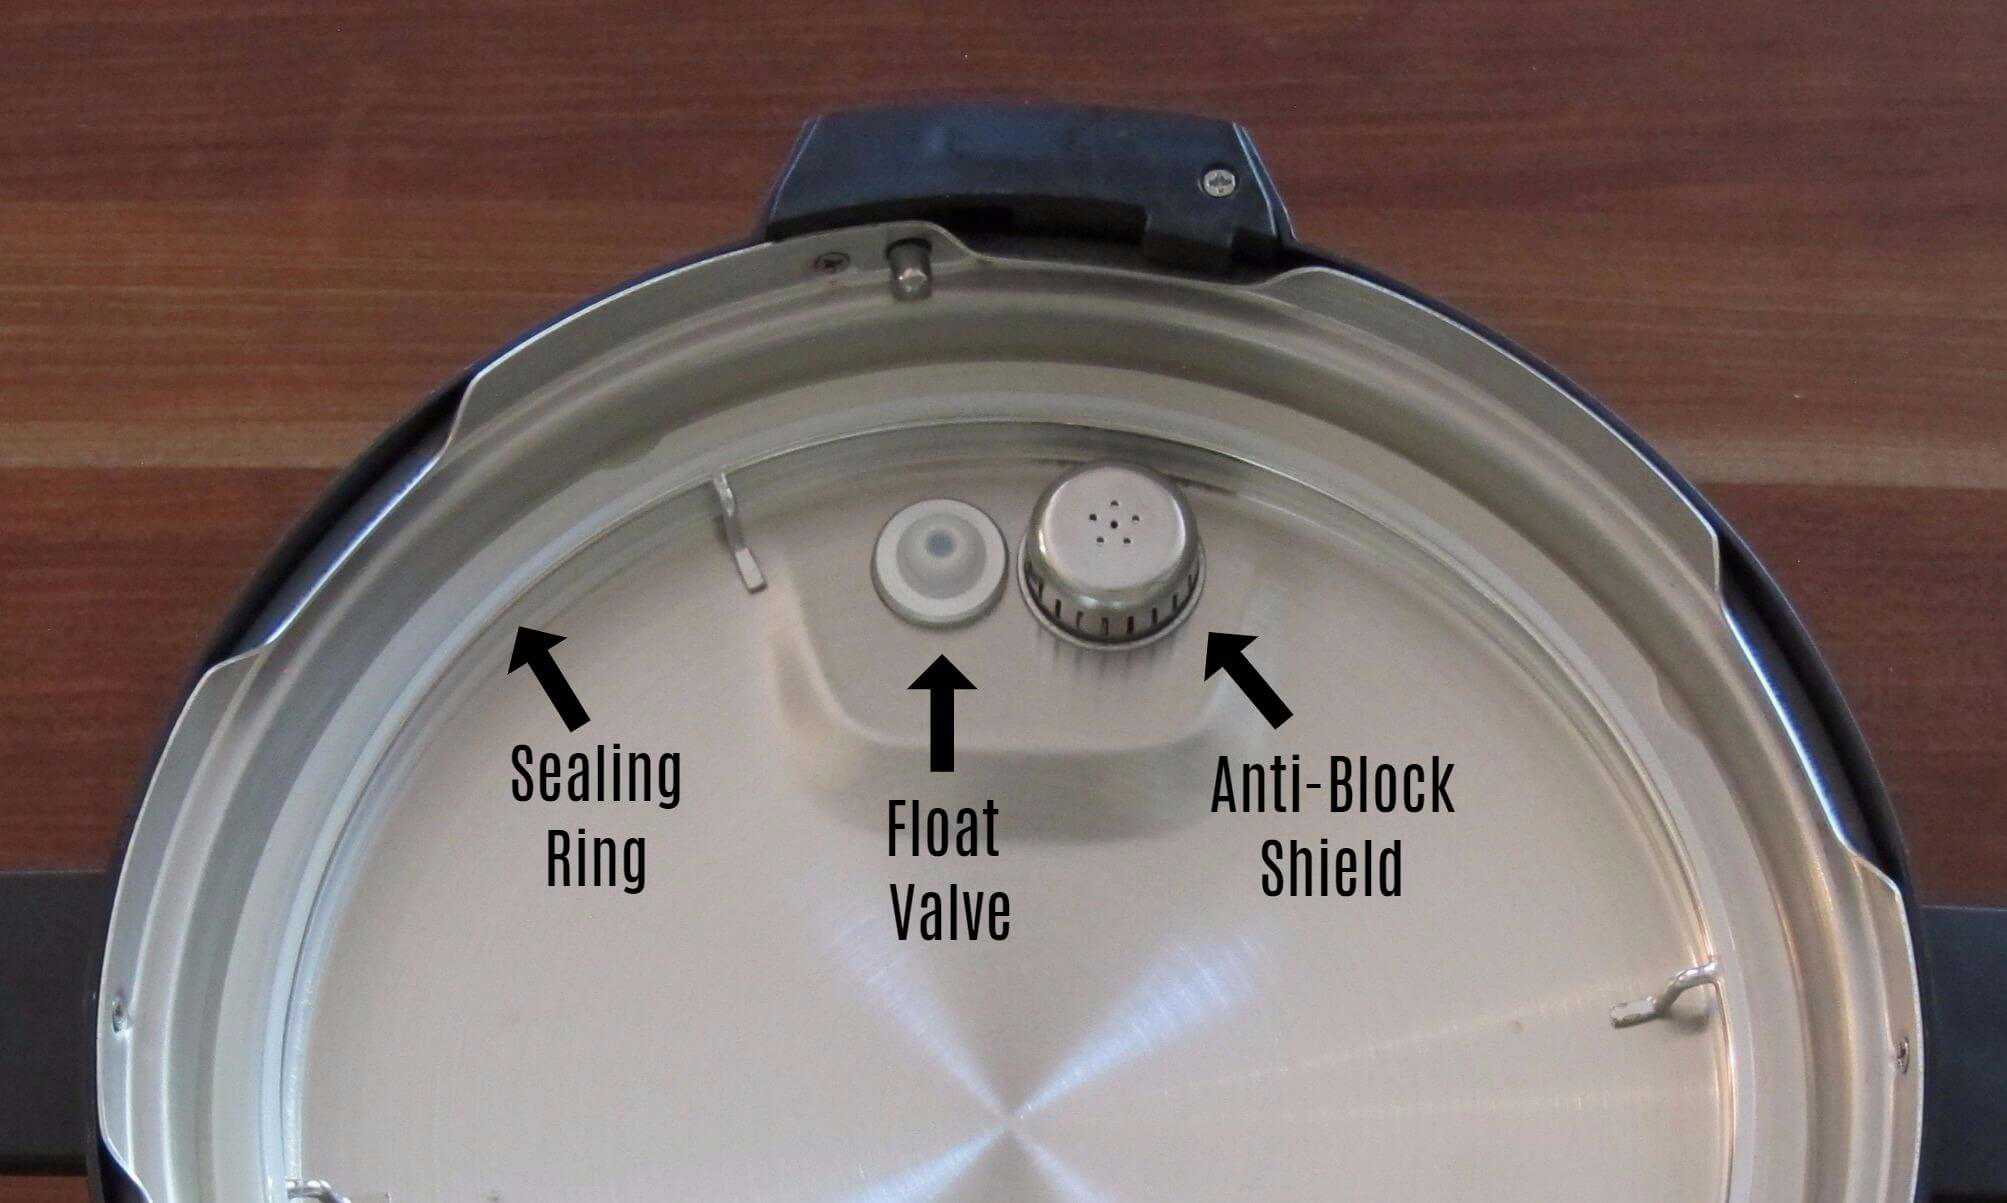
- Silicone Sealing Ring: a flexible ring that creates a seal between the Instant Pot’s base unit and the lid, allowing pressure to build up and pressurize the Instant Pot. It’s also referred to as a gasket.
- Float Valve: a metal pin covered with a silicone cover on the inside of the lid, which keeps it in place. It can be removed and cleaned.
- Anti-block Shield: metal cover that prevents food particles from entering and blocking the steam release pipe. The anti-block shield covers the exhaust valve and can be removed and cleaned.
Why Is Your Instant Pot Not Sealing?
One of the most common issues people encounter with Instant Pot (aka Instapot) is that their Instant Pot won’t pressurize or seal.
This happens to me, and I’m sure it happens to most electric pressure cooker users. Usually, it’s an easy fix!
New Instant Pot users, in particular, have difficulty troubleshooting what’s wrong when their Instant Pot is not sealing. They may think that the pressure sensor is busted or something is wrong with the unit.
If the countdown timer has begun and the float valve is not rising, the Instant Pot won’t seal.
If the Instant Pot is not pressurizing but counting down, timer has begun and the float valve is not rising, the Instant Pot won’t seal.
I’ve compiled a list of possible reasons why your Instant Pot is not pressurizing. You’ll most likely be able to troubleshoot your issue in one of the following cases.
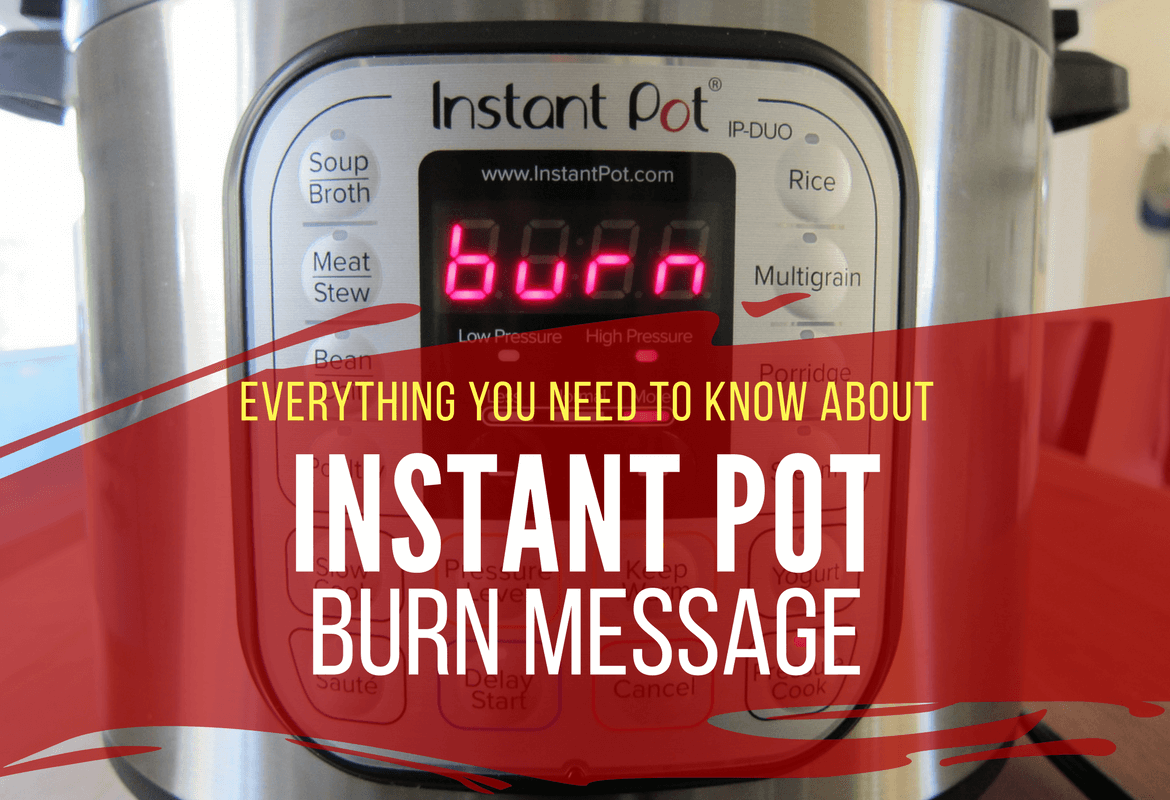
Another common problem when the Instant Pot is trying to come to full pressure is the Burn or Food Burn Message, so I encourage you to read that article too!
📍 PRO TIP
- There are various reasons for sealing problems, ranging from the Instant Pot sealing ring not being in place to the pressure release handle being in the Venting position. I’ll go into detail shortly.
- Once you diagnose the reason for your Instant Pot not coming to pressure, make sure you have enough liquid in the Instant Pot before you continue with pressure cooking.
- Often, some of the liquid evaporates while the steam is leaking. If you restart the pressure cooking process without compensating for the lost liquid, you will likely have more sealing issues.
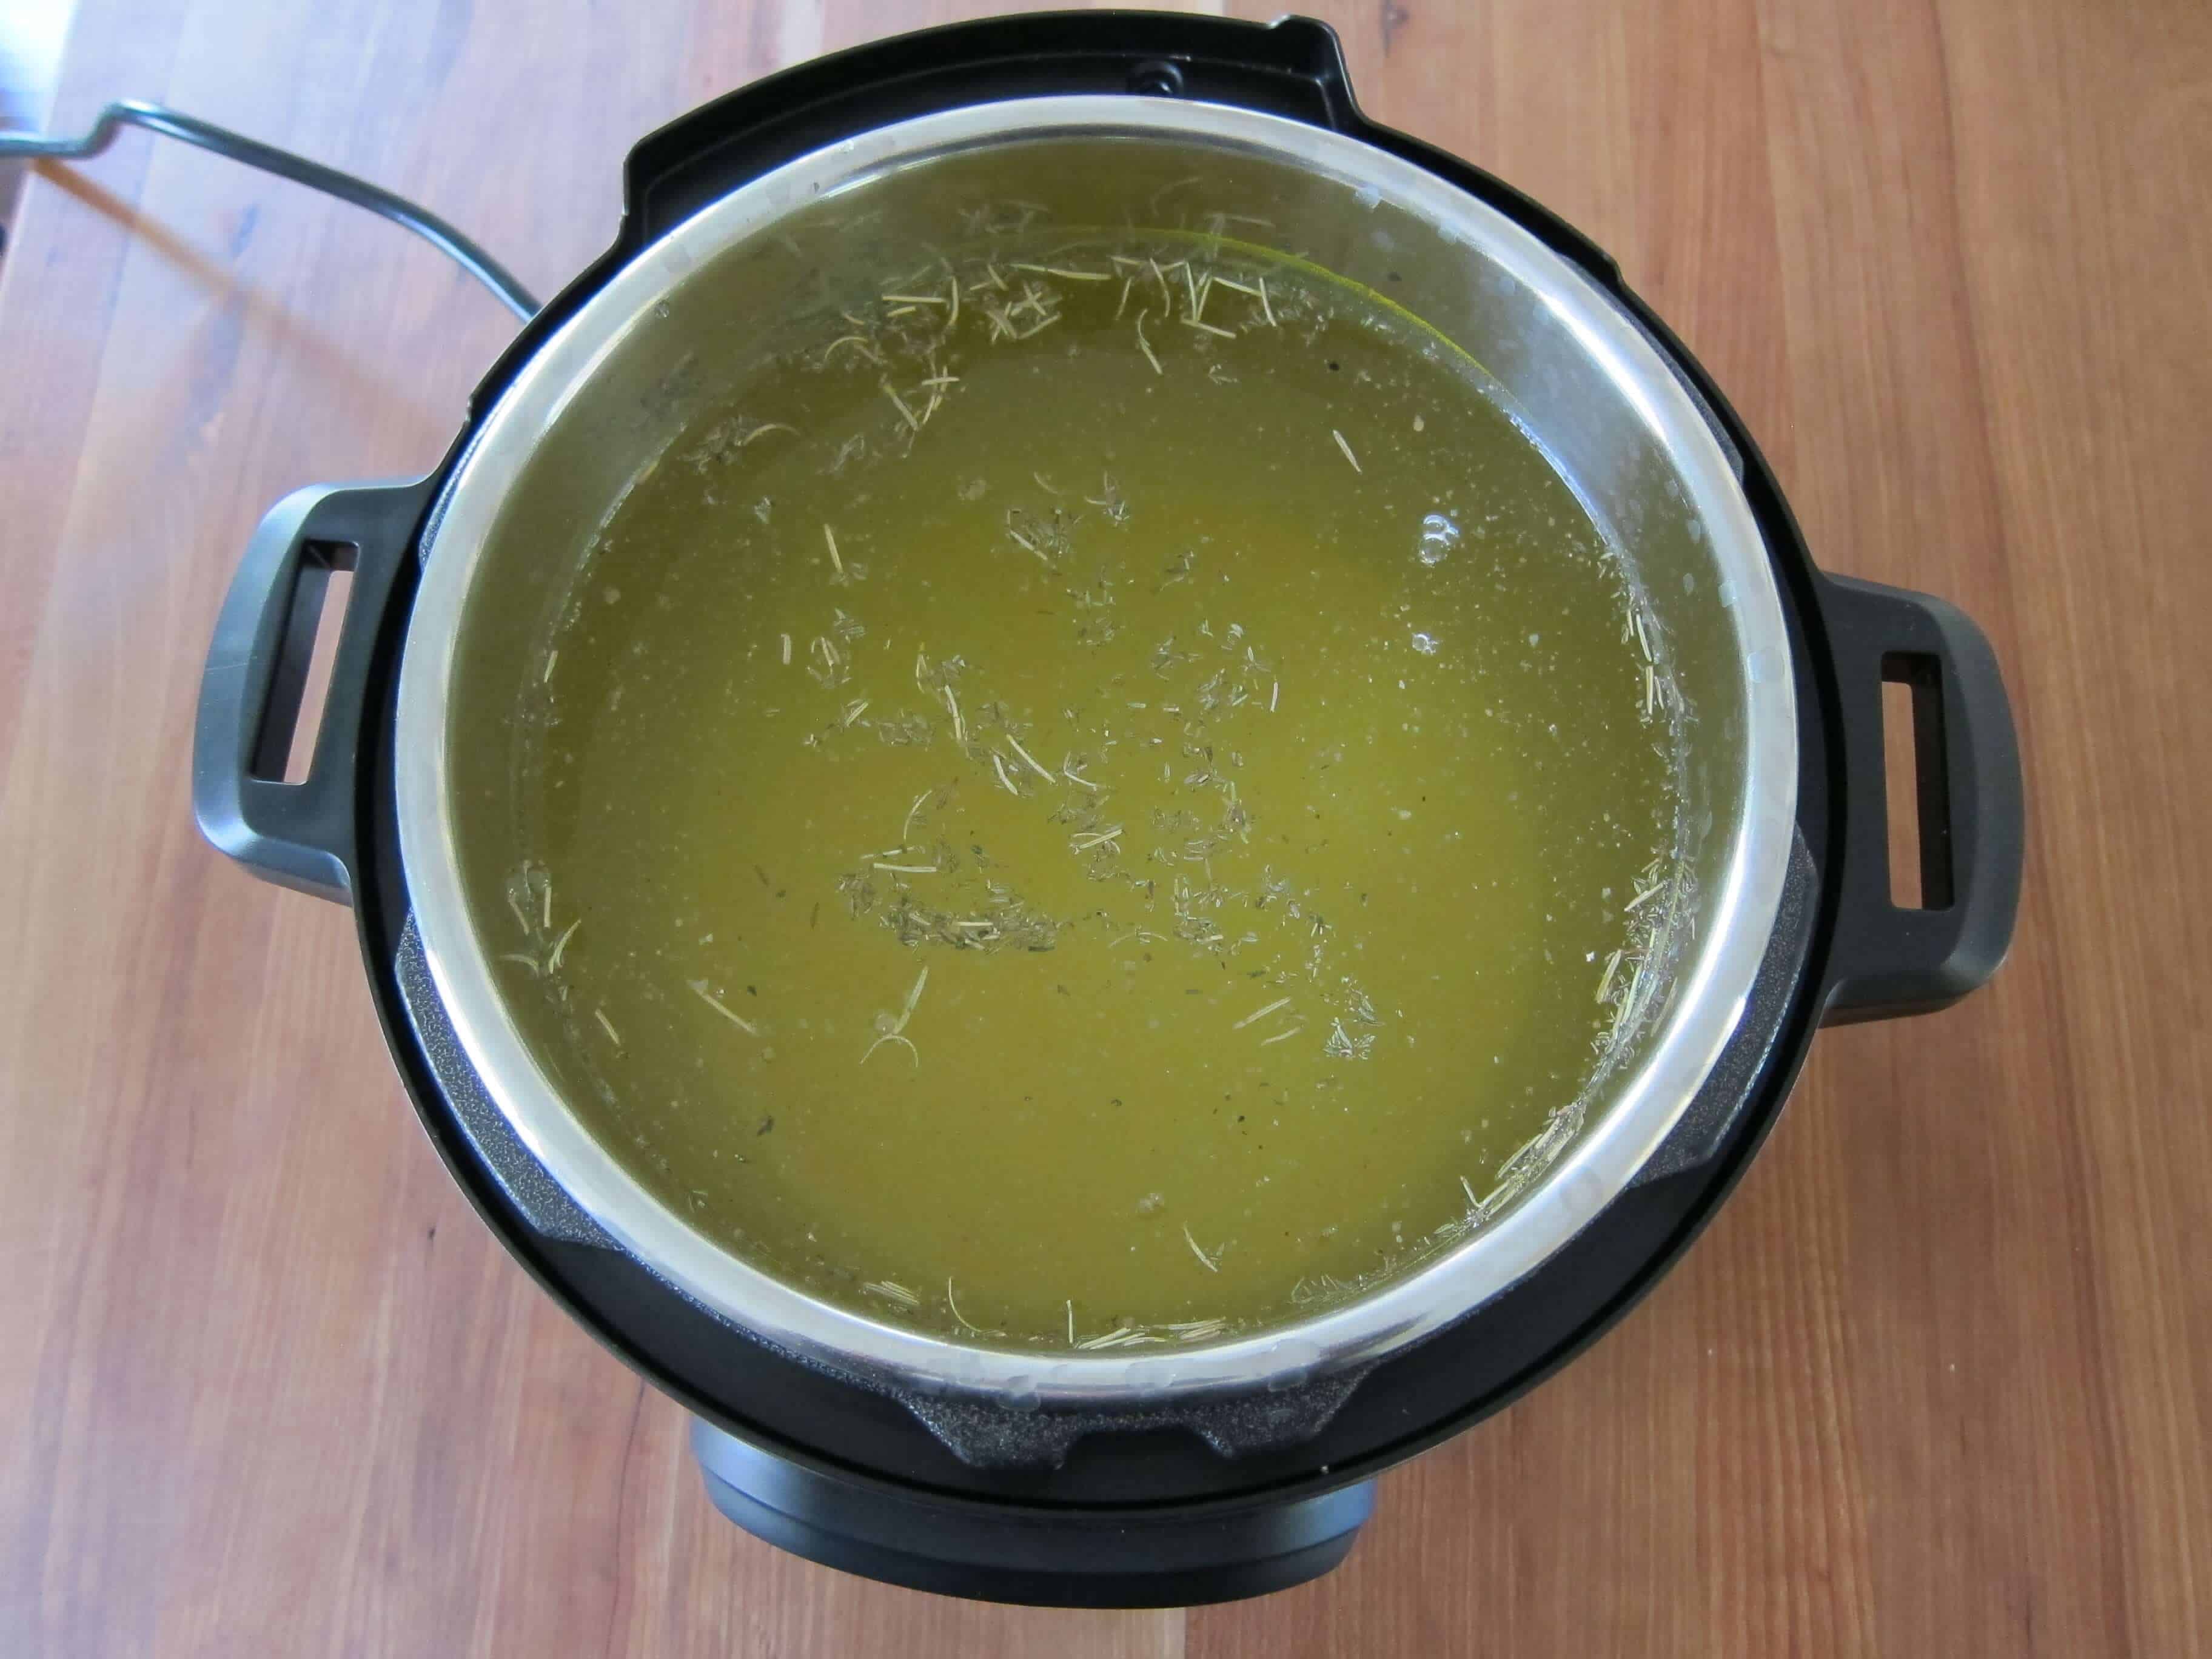
Should steam come out of the Instant Pot when pressurizing?
Yes, steam will escape from the steam release and float valves until the Instant Pot is sealed.
When you initially program the Instant Pot to pressure cook, the display says On. After a few minutes (anywhere from 5 to 30 minutes, depending on the quantity and temperature of the food), you’ll see steam coming out of the pressure release (steam release) handle and/or float valve on the top of the lid. This is perfectly normal.
After some hissing, steaming, and hesitation, the float valve usually rises to the Up position, and the Instant Pot is sealed. After a few minutes, the display should start counting down from the number of minutes you programmed the Instant Pot to pressure cook.
Should steam come out of the Instant Pot once sealed?
No heavy steam should come out once the float valve is in the sealing position (up position).
However, I have occasionally seen tiny wisps of steam when it’s sealed, and this is not a cause for concern. This usually happens when cooking something with a lot of liquid, such as soup.
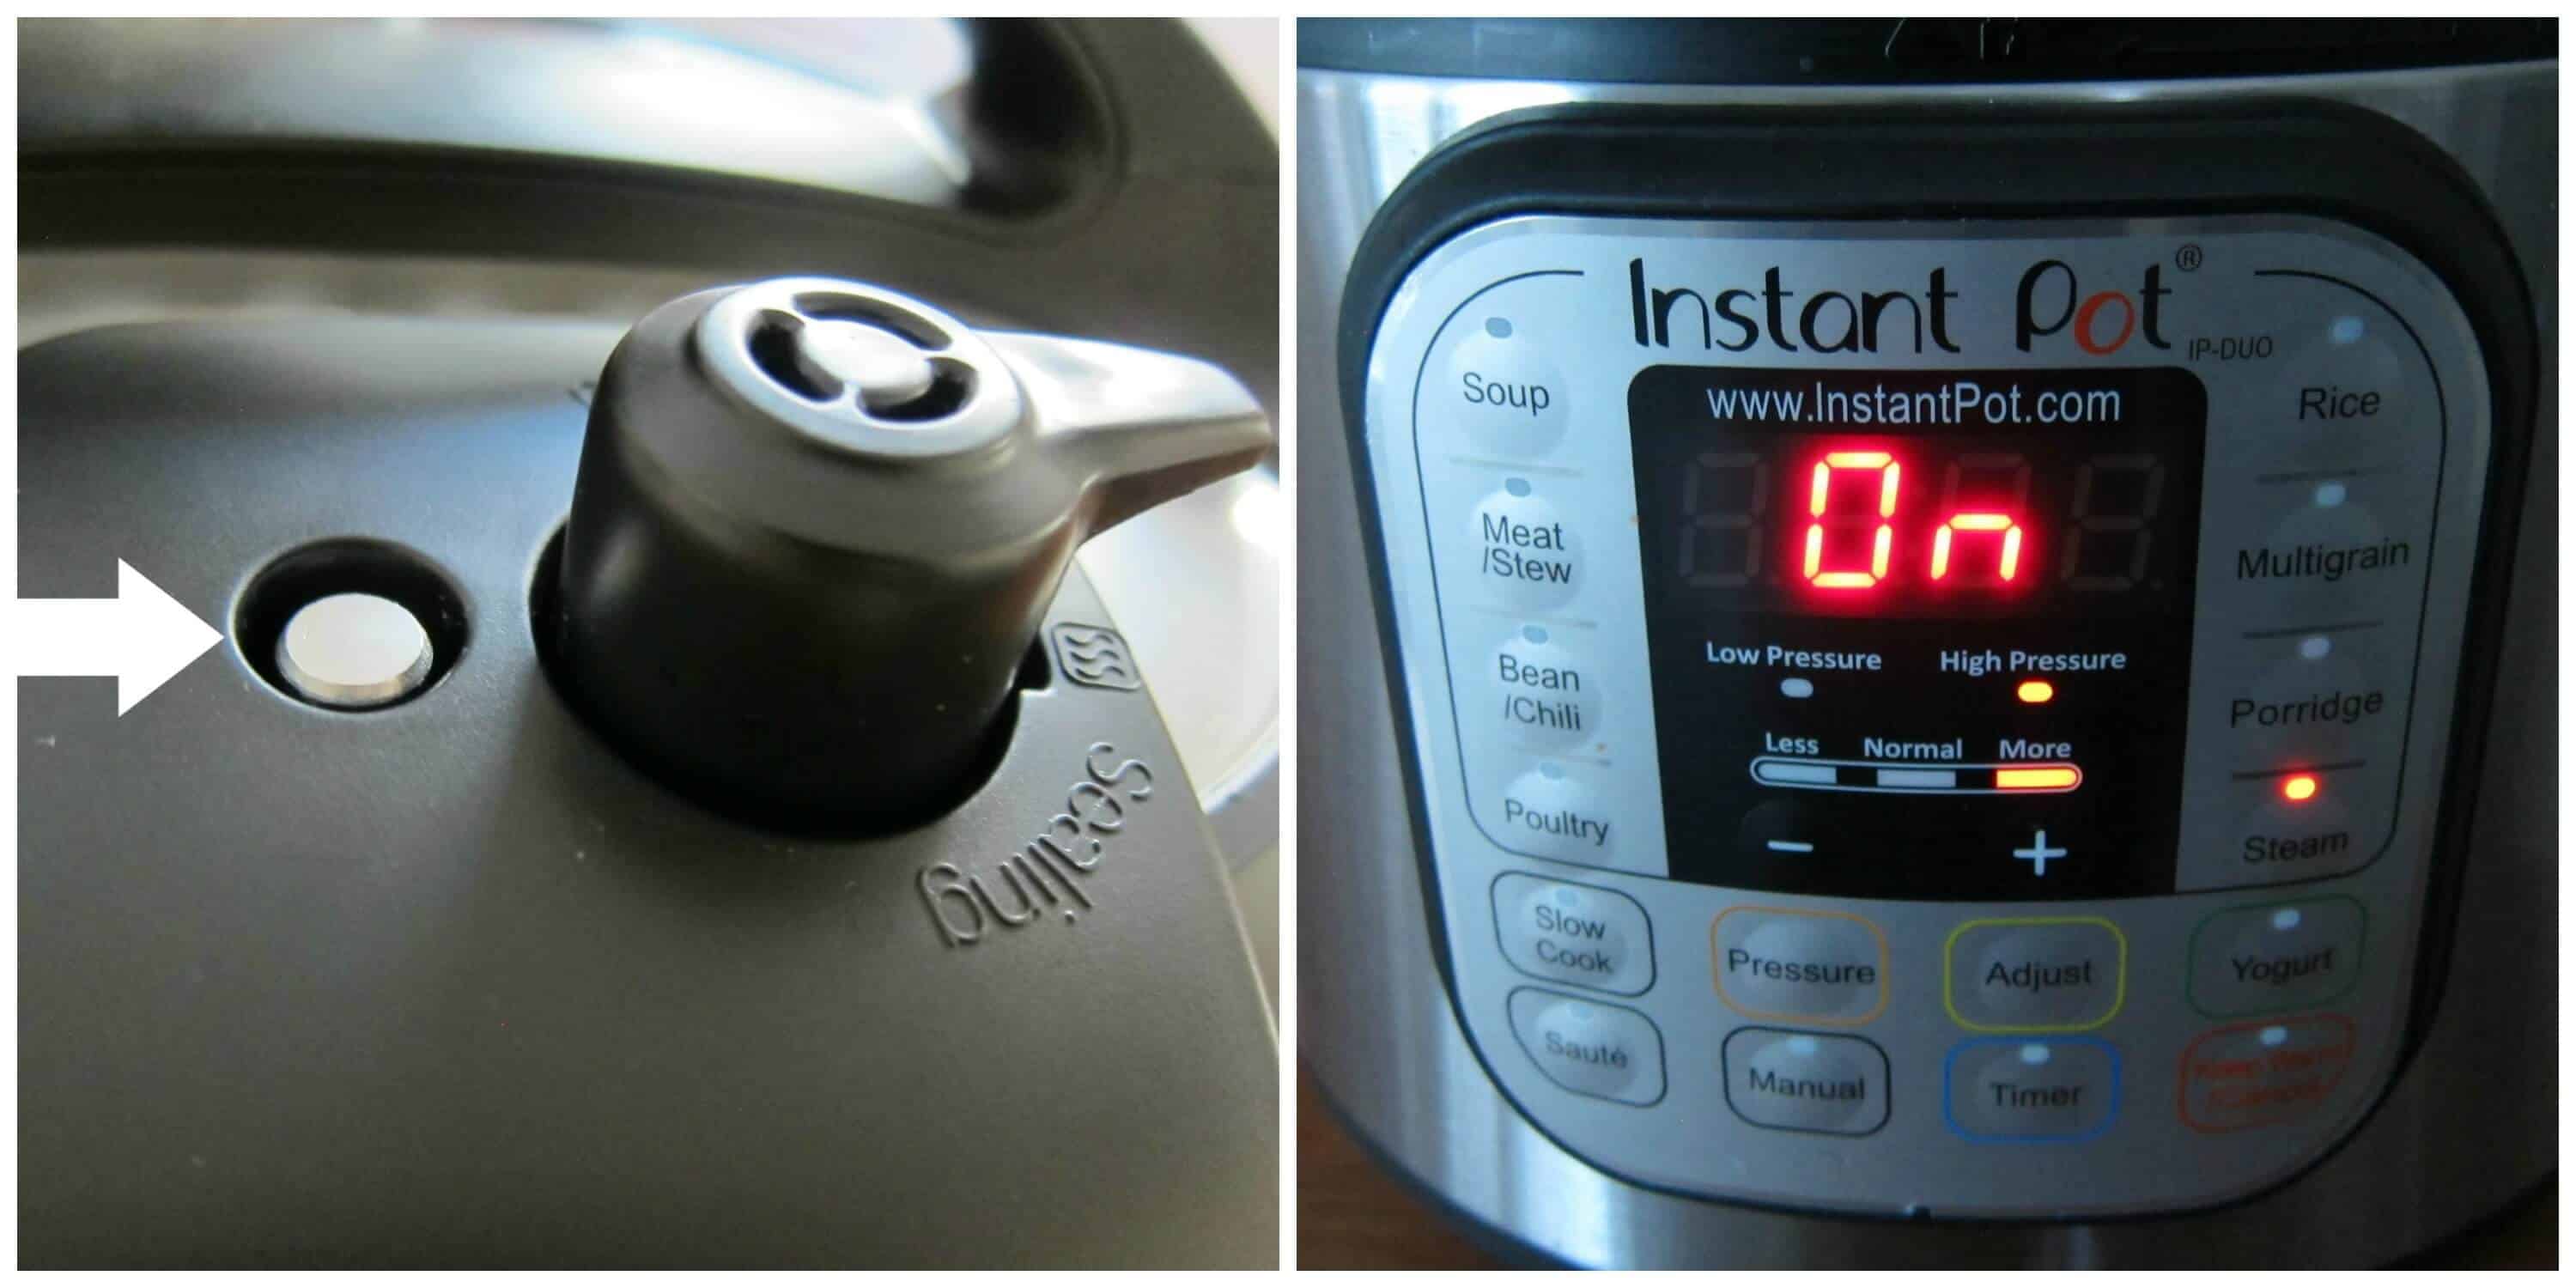
1. The Instant Pot Pressure Valve is in Venting Position
Different models of Instant Pot have different pressure release mechanisms.
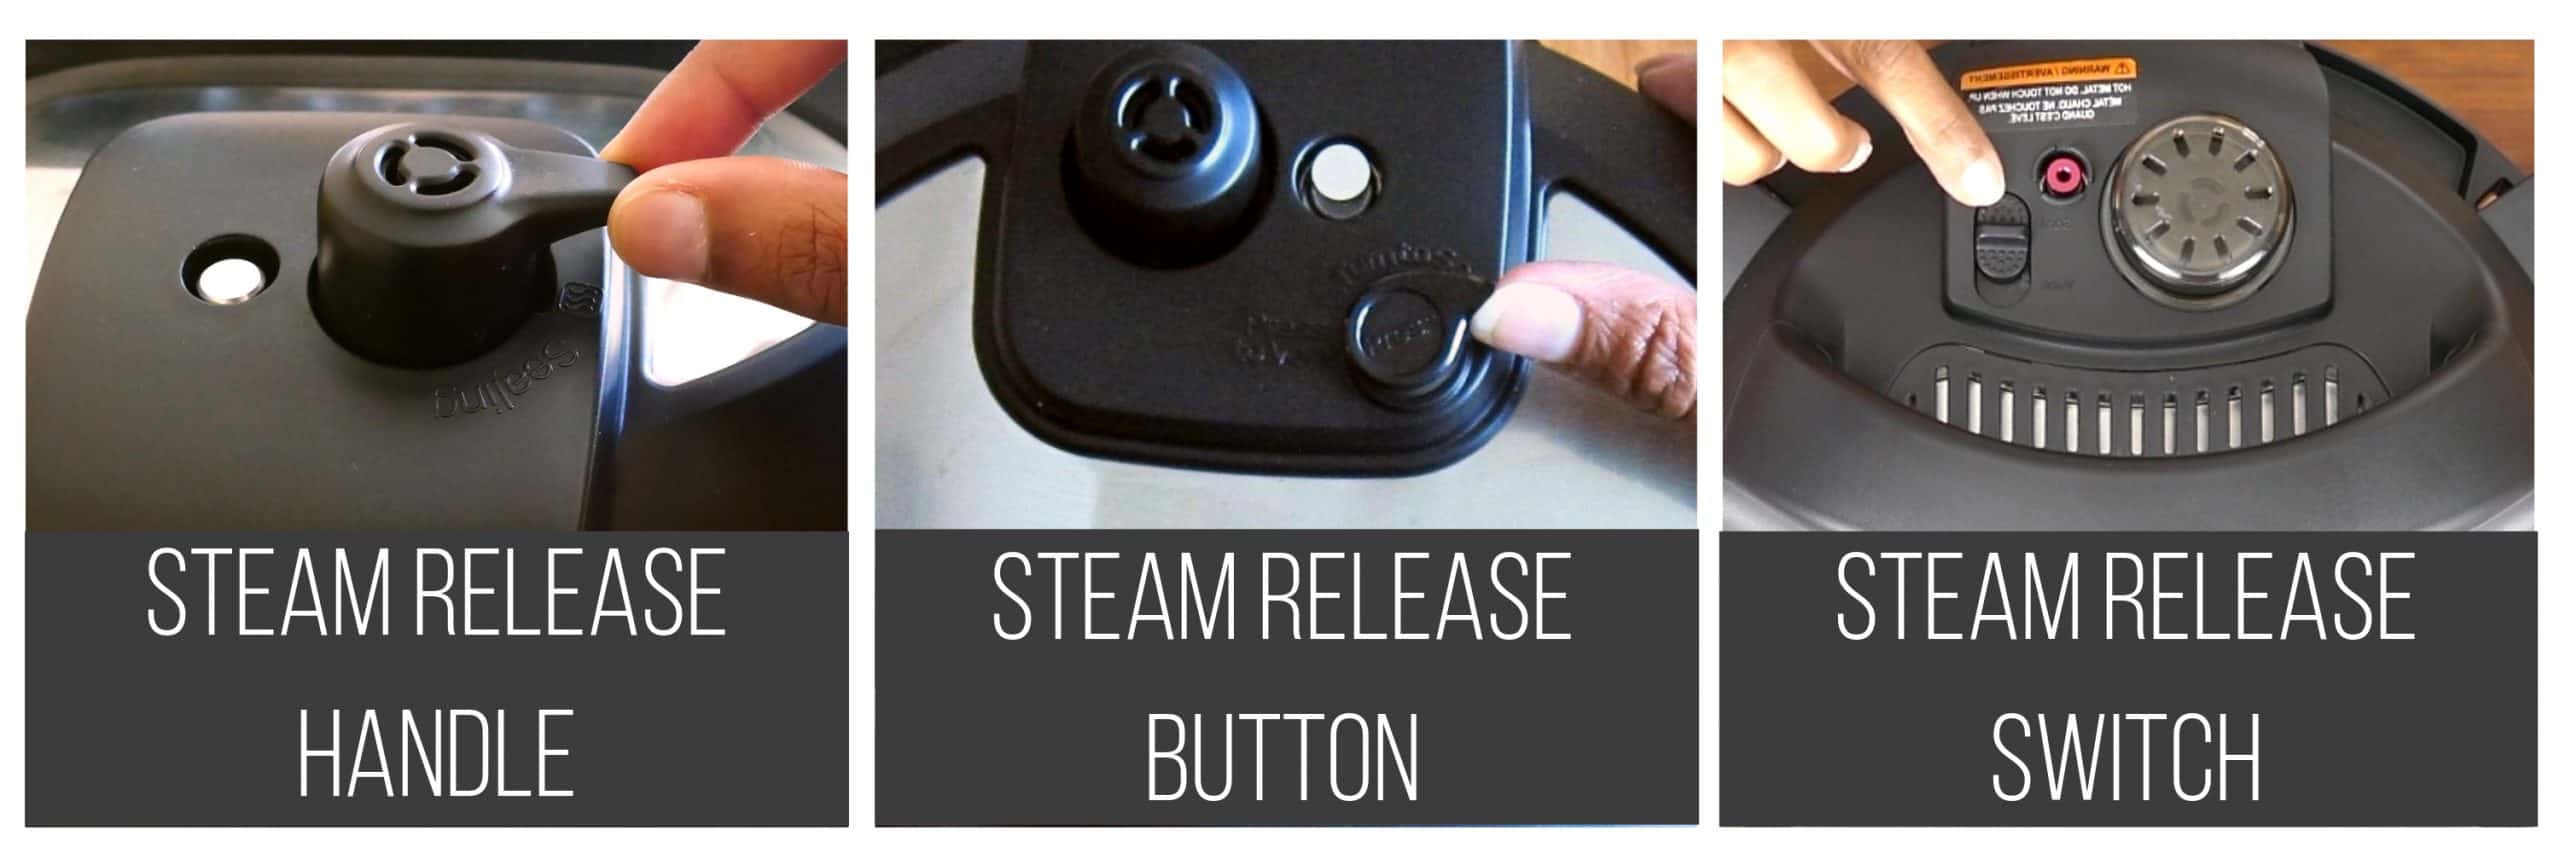
- Steam Release Handle: The venting knob can be turned from Venting to Sealing.
- Steam Release Button: When the button is up, it seals, and when it’s down, it vents.
- Steam Release Switch: The switch can go from Vent to Seal.
When using the Instant Pot for something other than Slow Cook, Yogurt, or Sous Vide, the pressure release needs to be in the Sealing position.
SOLUTION: Open the Instant Pot and make sure there’s enough liquid. If too much liquid has evaporated, the Instant Pot won’t pressurize, so add more liquid if necessary. Close the Instant Pot, ensure it’s in Sealing position, and resume pressure cooking.
If you have trouble closing the lid, it’s probably because the contents are hot. Move the steam release handle to the Venting position and make sure the lid is properly closed. Then, move the steam release handle to the Sealing position.
2. The Silicone Sealing Ring (Sealing Gasket) is not Properly Seated
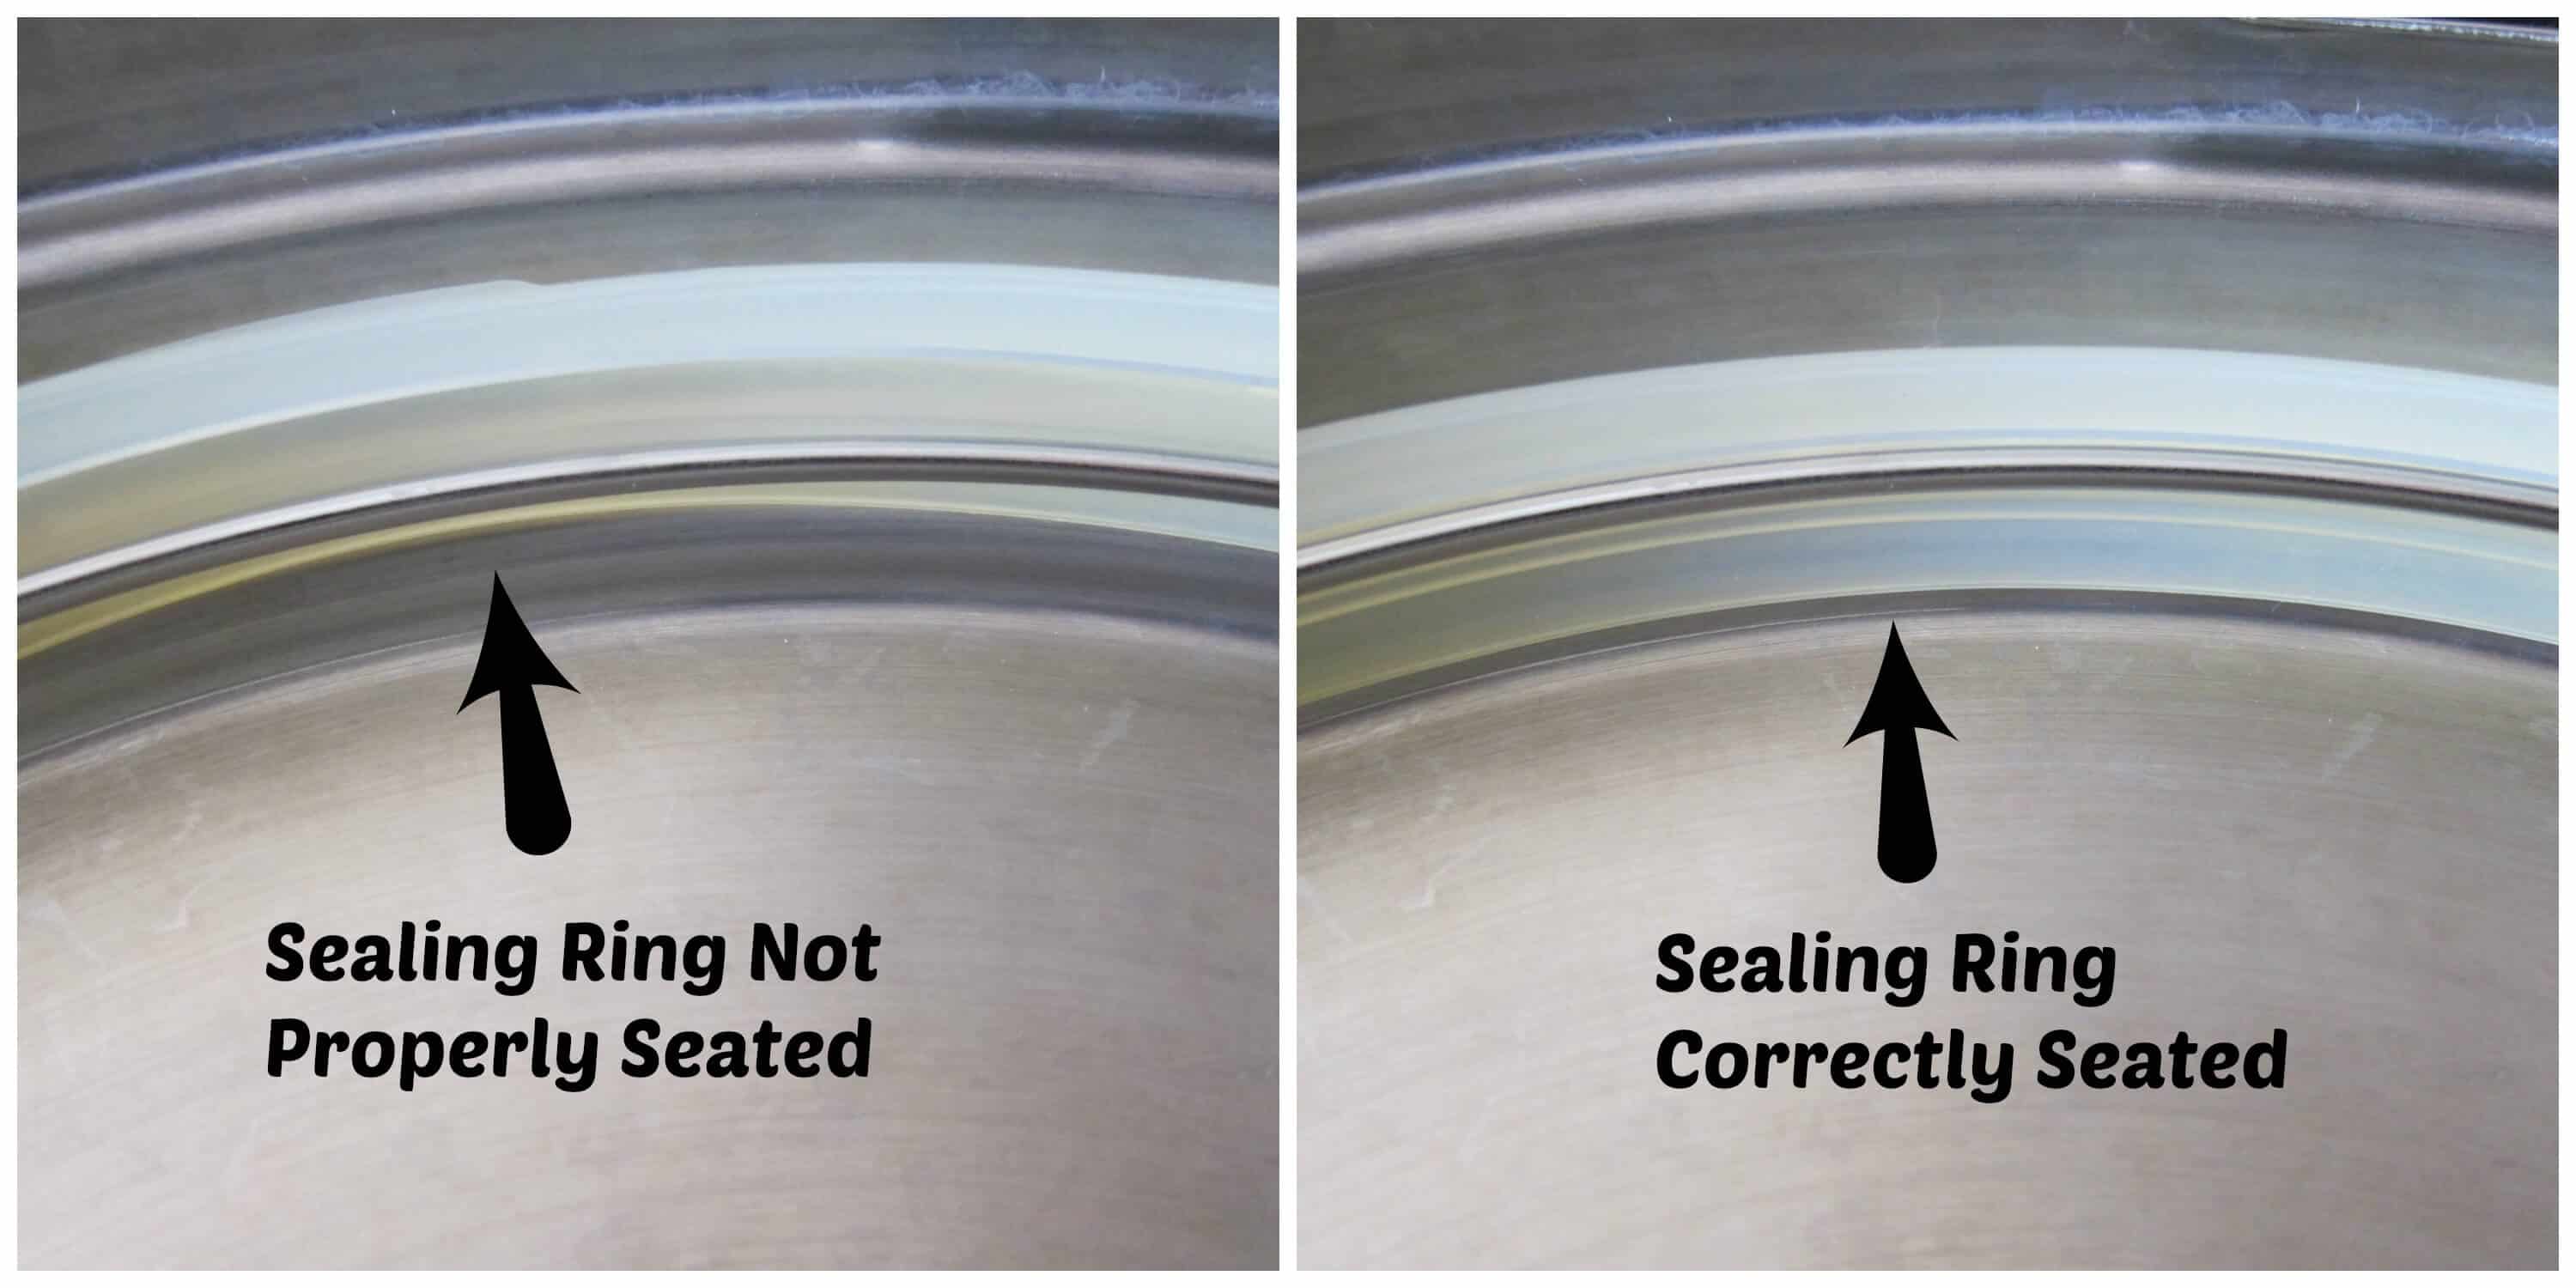
If the ring cannot be rotated around in the sealing ring rack, it’s not seated correctly. You should be able to turn it in place, maybe with a bit of effort. If the sealing ring hasn’t been installed correctly, you may find that steam is leaking out of the sides of the lid.
SOLUTION: Open the Instant Pot and push down the sealing ring all the way around the ring rack to make sure it’s properly seated. Then, try turning it in the ring rack. It should move/rotate around the ring rack. A new sealing ring can be harder to move, but you should be able to.
3. Sealing Ring is Missing/Misplaced
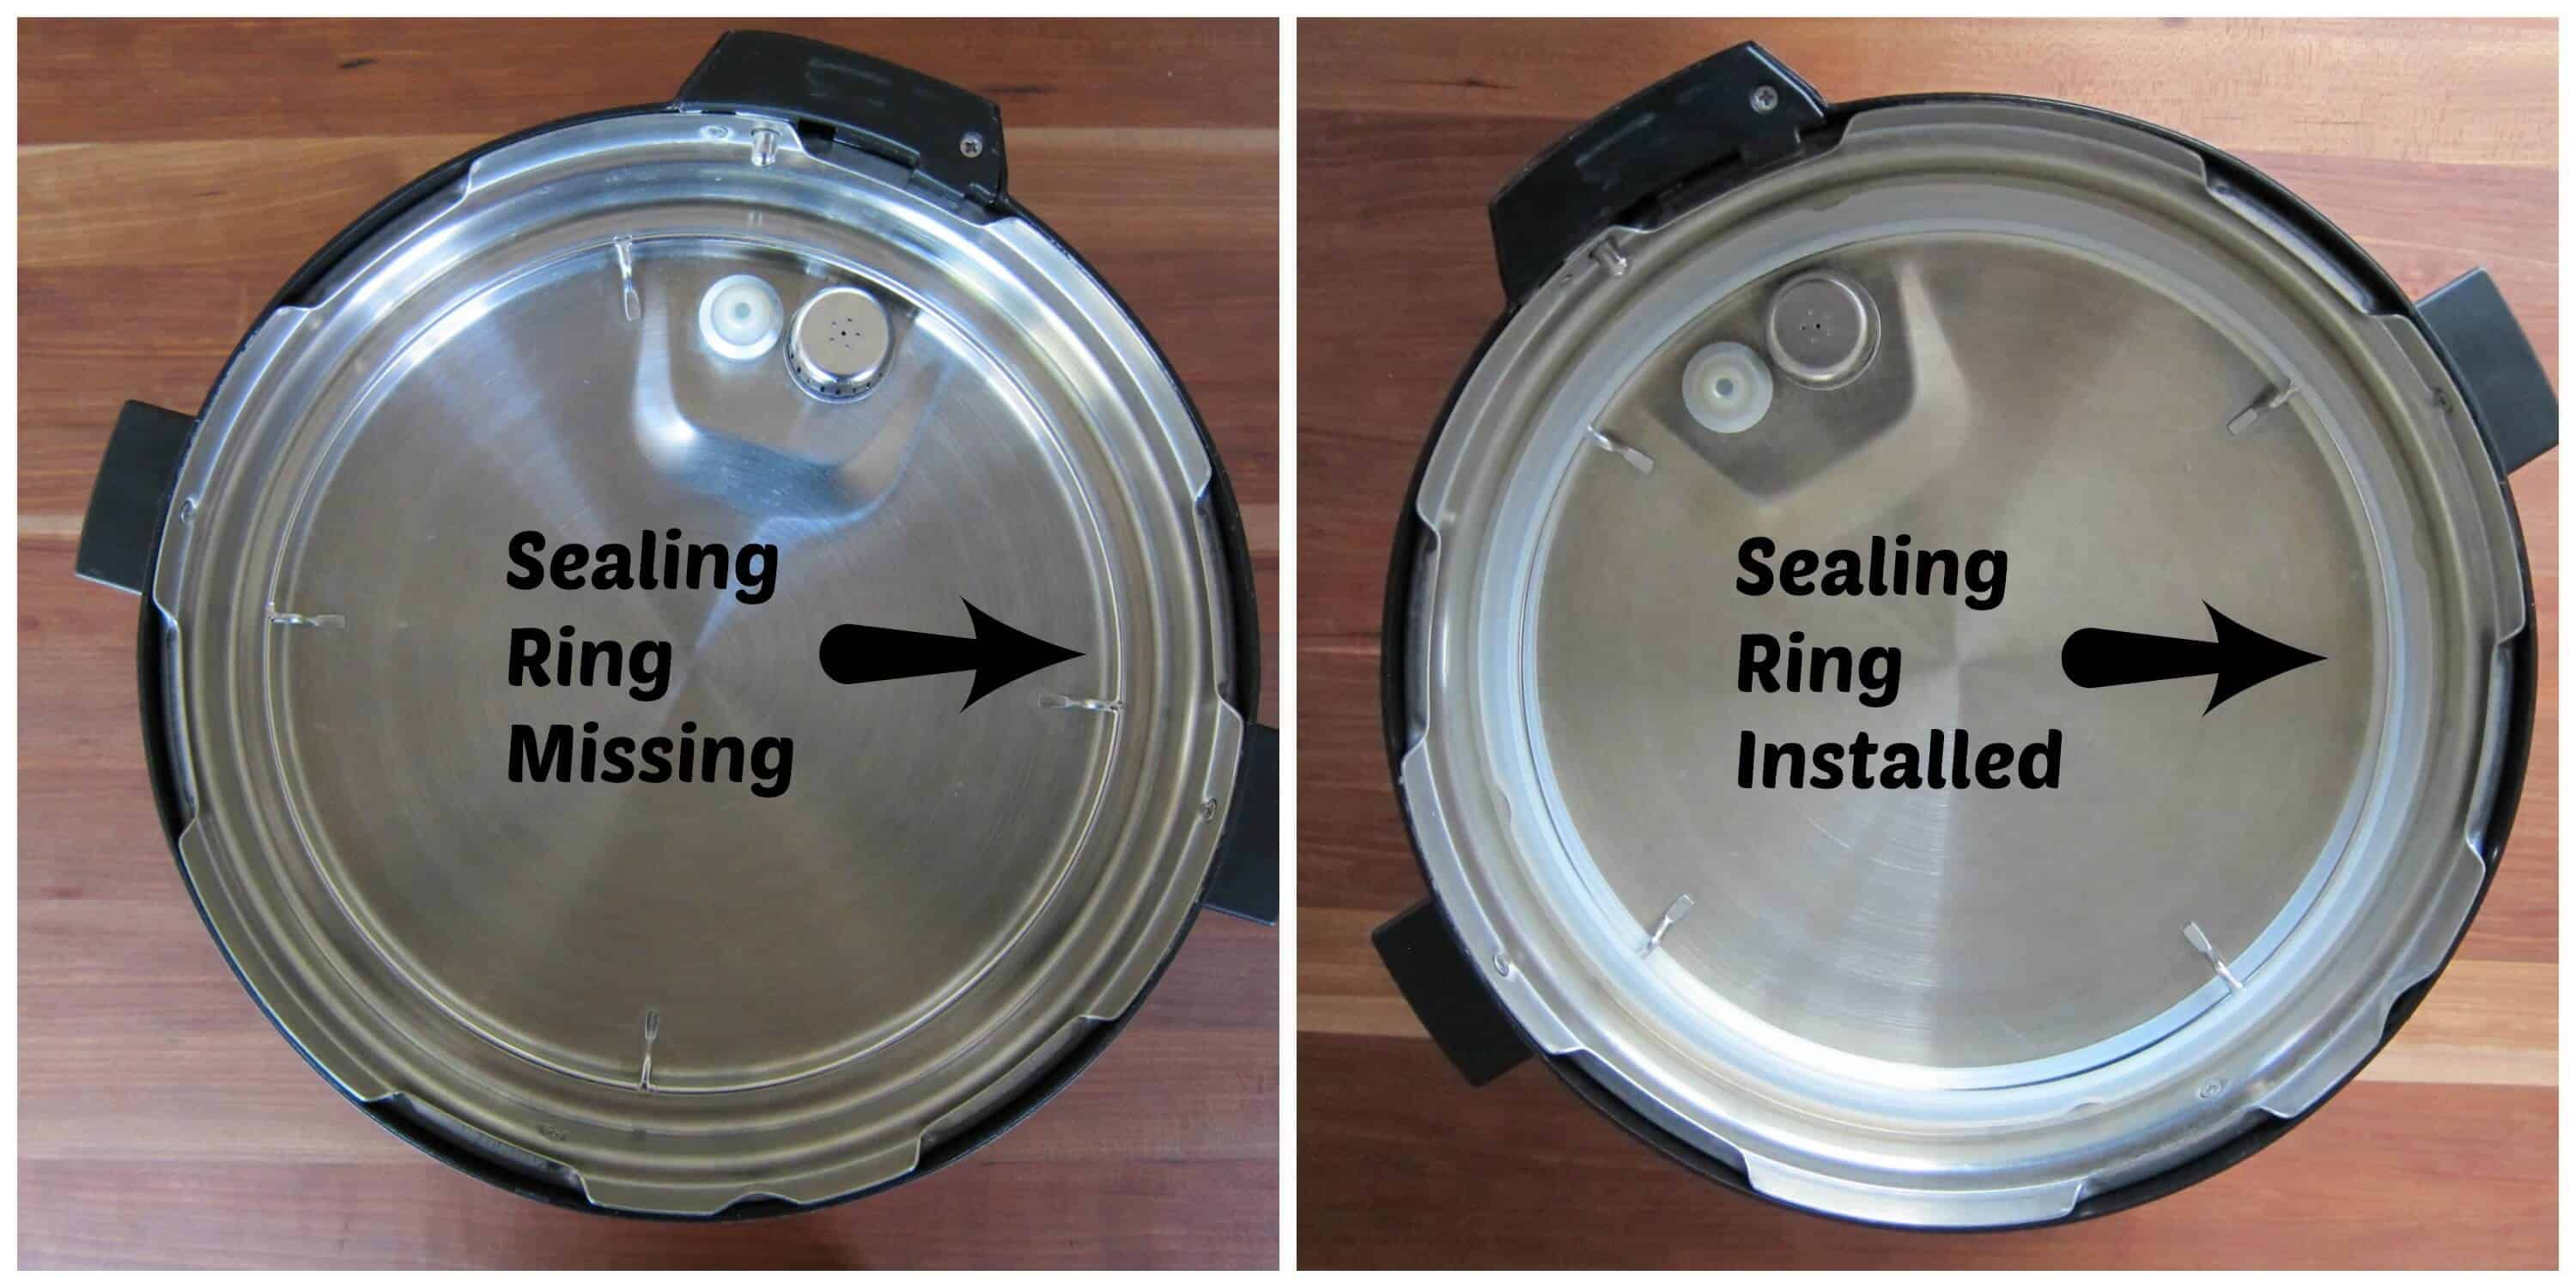
It’s possible that the sealing ring or gasket was removed for cleaning and not placed back in the Instant Pot lid’s ring rack. If your sealing ring is missing, you will see the Instant Pot leaking steam from the sides of the lid.
SOLUTION: Replace the Instant Pot gasket.
4. Not Enough Liquid in Instant Pot to Build Pressure
This is one of the most common Instant Pot issues when it’s trying to come to pressure. According to the official manual, the Instant Pot requires at least 1 cup of liquid. I’ve used as little as ½ cup and done fine with many Instant Pot recipes. Remember that it needs to be thin liquid such as water, broth, lemon juice, and soy sauce.
Some liquids like canned tomato sauce are too dense and require thinning out with broth or water. If your Instant Pot isn’t sealing, this is one of the more common reasons.
SOLUTION: Add more water or broth. If the final result is a dish that’s too thin or liquidy, you can use the Saute function and let the liquid reduce and thicken, or you can add a thickener like cornstarch, flour, potato flakes, etc.
5. Food is Scorched at the Bottom of the Inner Pot
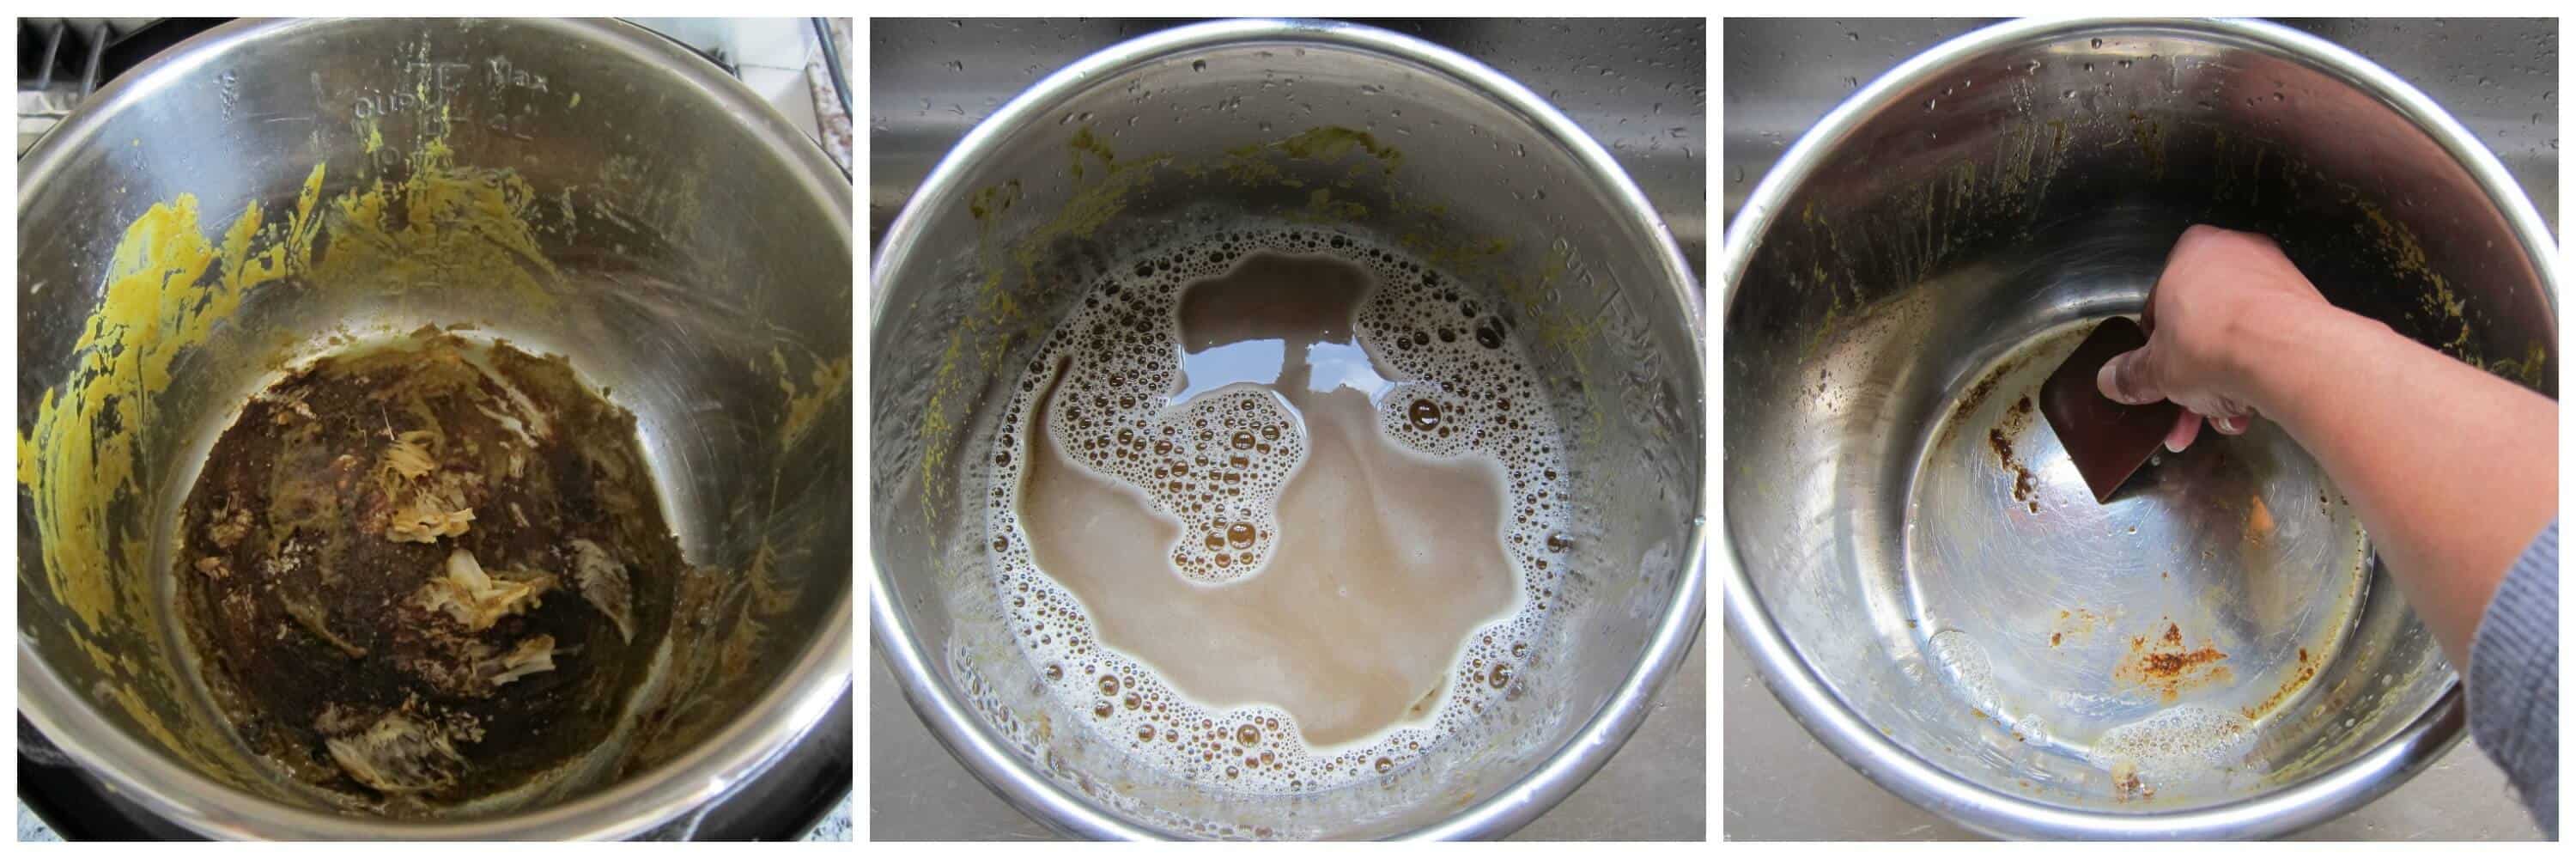
If food is scorched on the bottom of the pot, the liquid won’t make contact with the bottom, and the Instant Pot won’t build steam. Here are a few of the reasons food gets scorched on the bottom of the Instant Pot:
- After browning or sauteing, if browned bits are sticking to the bottom of the pot, you need to deglaze the pot. Deglazing involves adding liquid (e.g., water, broth) to the heated pot and stirring to allow the browned bits to come free.
- The liquid is too thick. This can happen with thick sauces such as tomato sauce, mole sauce, or pasta sauce. Thick sauces should be placed at the top without stirring them in, and you can also thin them out with water or broth.
- Starchy foods are making contact with the bottom of the inner pot. Starchy foods, such as pasta, rice, etc., should be layered on top of other ingredients without stirring them in.
- The Instant Pot is overfilled with food and there isn’t enough room for the liquid to circulate.
SOLUTION: Open the Instant Pot, transfer the contents to a large bowl, and clean the inner pot by scraping it with a plastic or wooden scraper. (You might even need to soak it with warm water and dish detergent for a bit.)
I have several of these pan scrapers that work well. Once the inner pot is clean, resume cooking, but add more liquid.
[Read More about layering problem ingredients such as sauces, pasta, rice, etc.]
6. The Sealing Ring has Expanded Too Much and Instapot Won’t Seal Properly
The sealing ring naturally expands when it’s heated. Once cool, it should return to its natural state. If you’ve just finished cooking something, the sealing ring may still be in its expanded state, preventing the Instant Pot from sealing.
SOLUTION: Try placing the Instant Pot sealing ring in the freezer or running it under cold water to contract it. You can also try turning the sealing ring over and replacing it.
7. Instant Pot Sealing Ring has Debris or Food
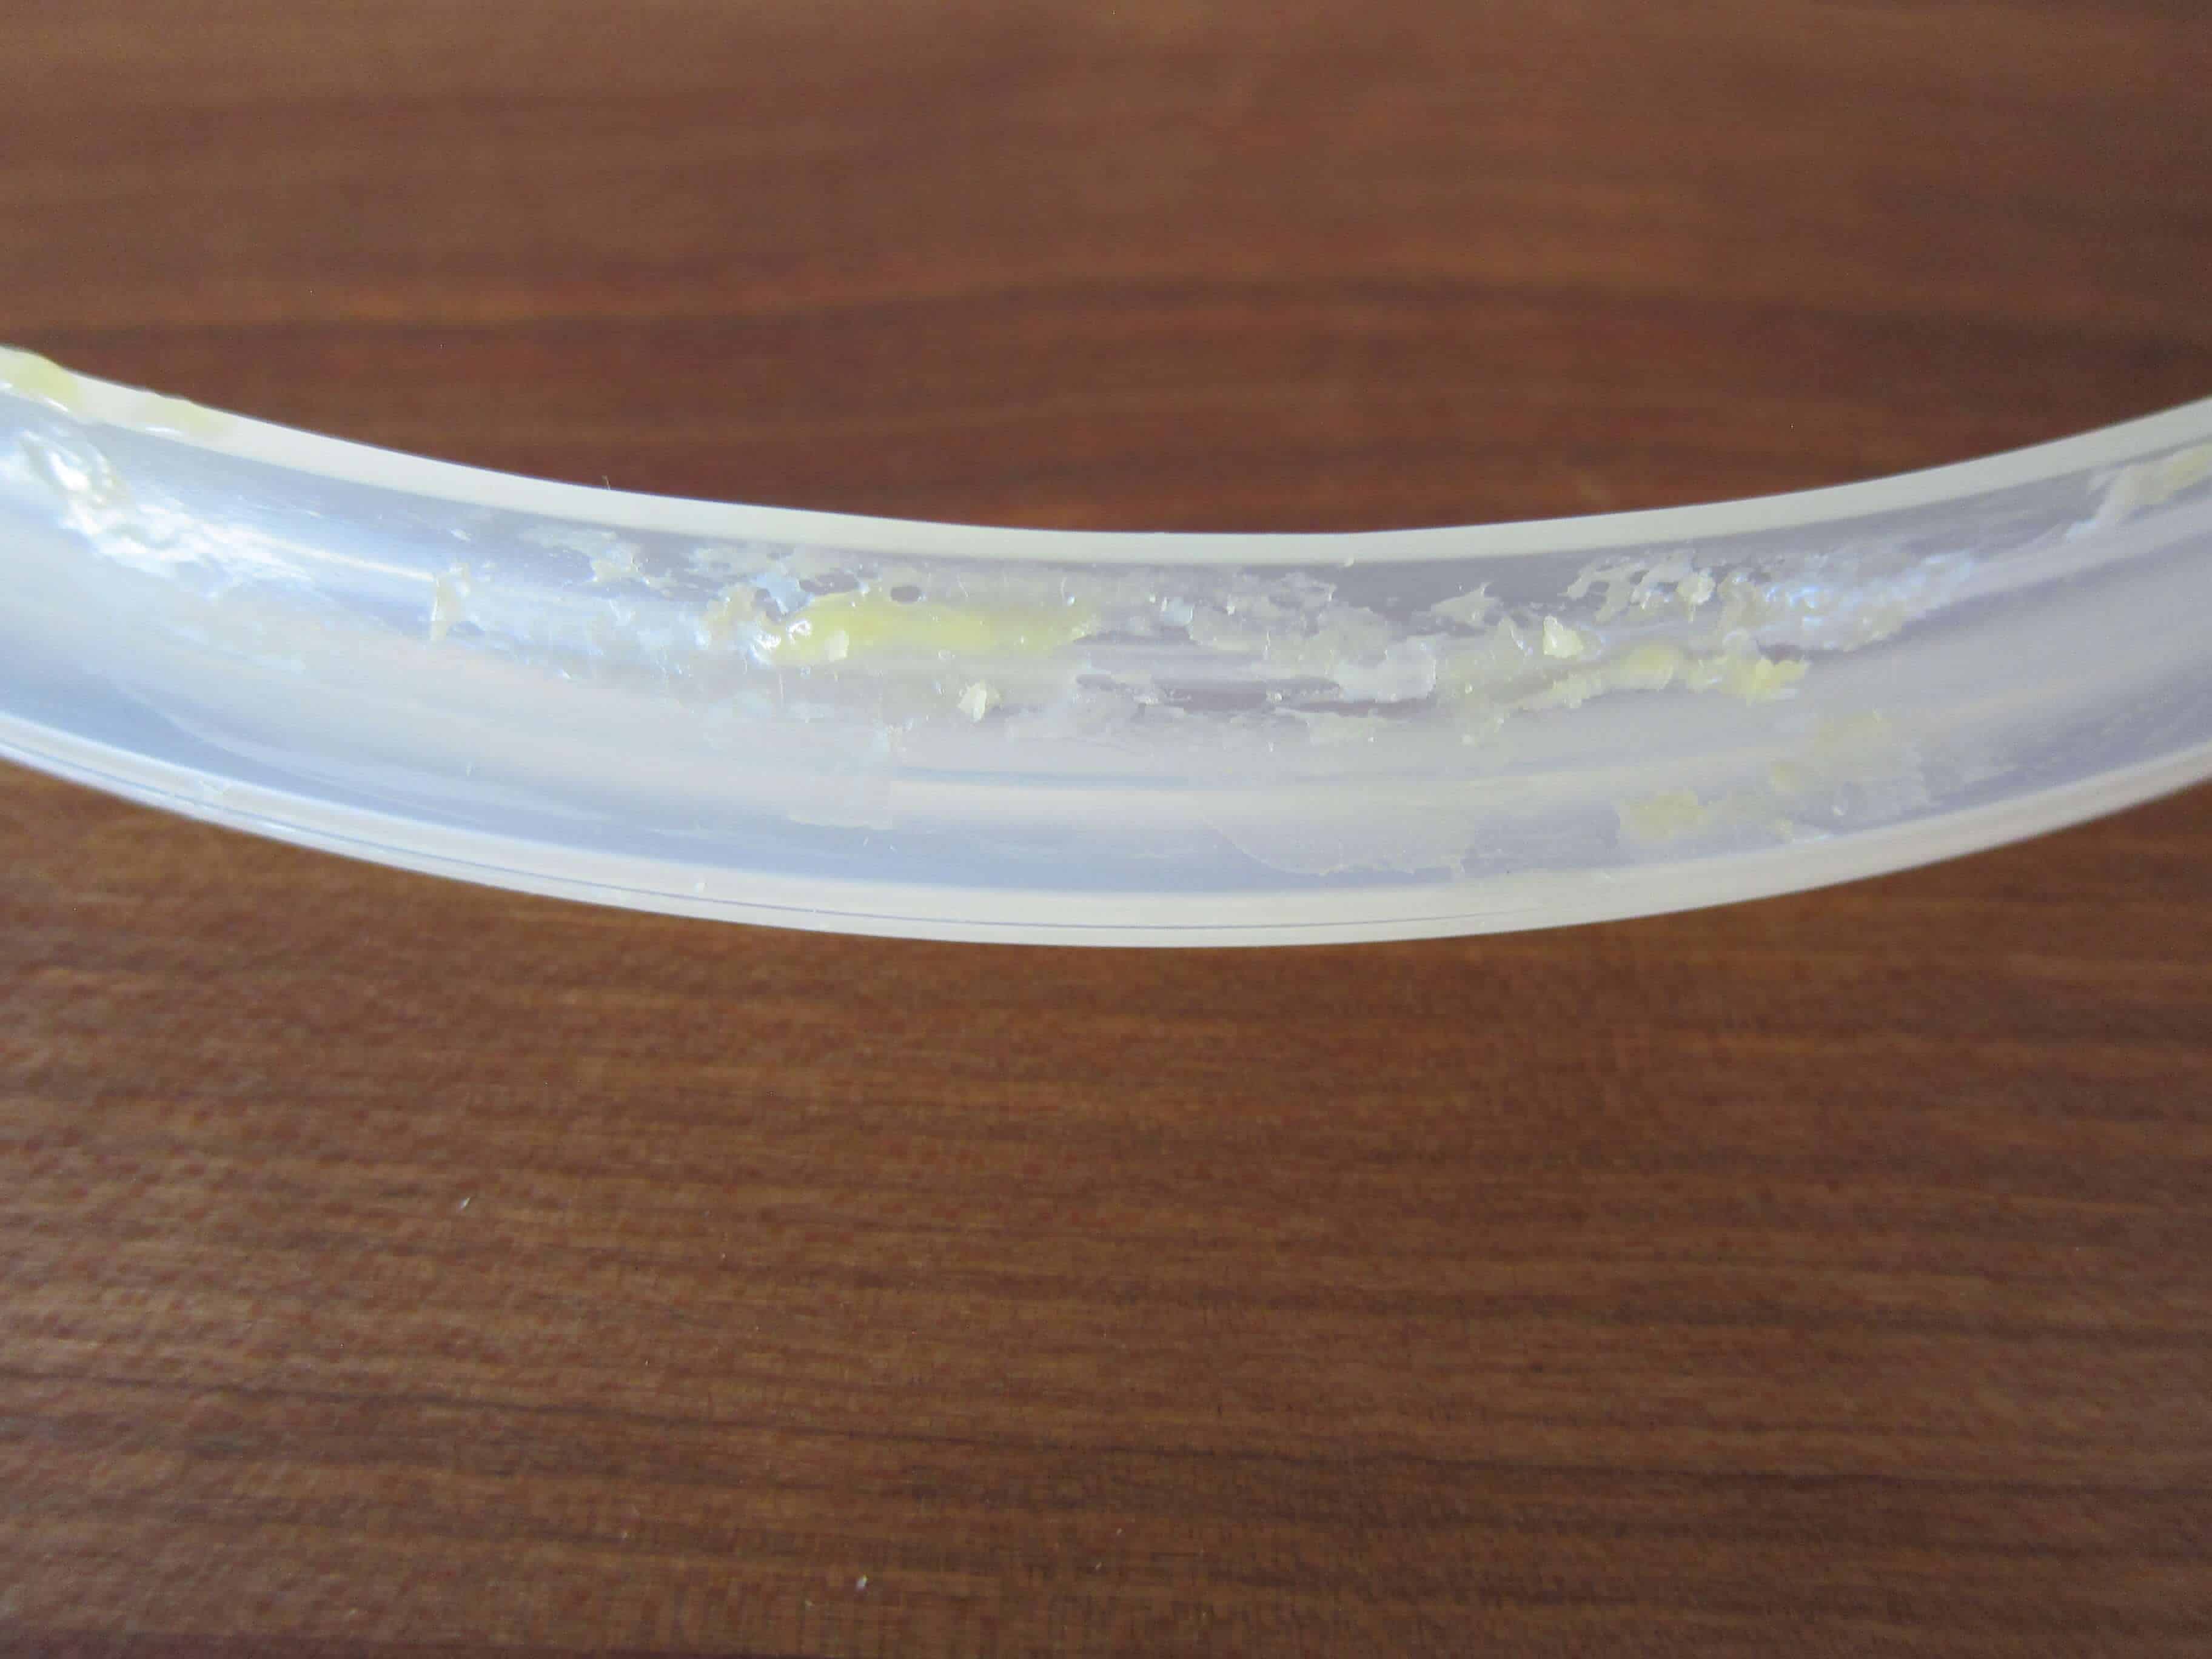
The Instant Pot sealing ring must be clean to create a proper seal.
SOLUTION: Make sure no food is stuck to the sealing ring and clean it with soap and water.
8. Too Much Water has Evaporated Before Problem was Fixed
If the pot wasn’t initially sealed properly and you corrected the problem, it’s possible that too much liquid evaporated, leaving the pot without enough liquid in the pot to create the required steam. This can cause the Instant Pot to not pressurize.
SOLUTION: Open the Instant Pot and check the quantity of liquid. You need ½ cup to 1 cup. Add more liquid if necessary.
9. The Sealing Ring is Damaged or Torn
If your seal is heavily used or pulled on too hard, it can wear out or tear, and you may need a new seal.
SOLUTION: Purchase a new sealing ring. Keeping a spare sealing ring on hand is always a good idea.
10. Timer Function was Used Instead of Manual or Pressure Cook
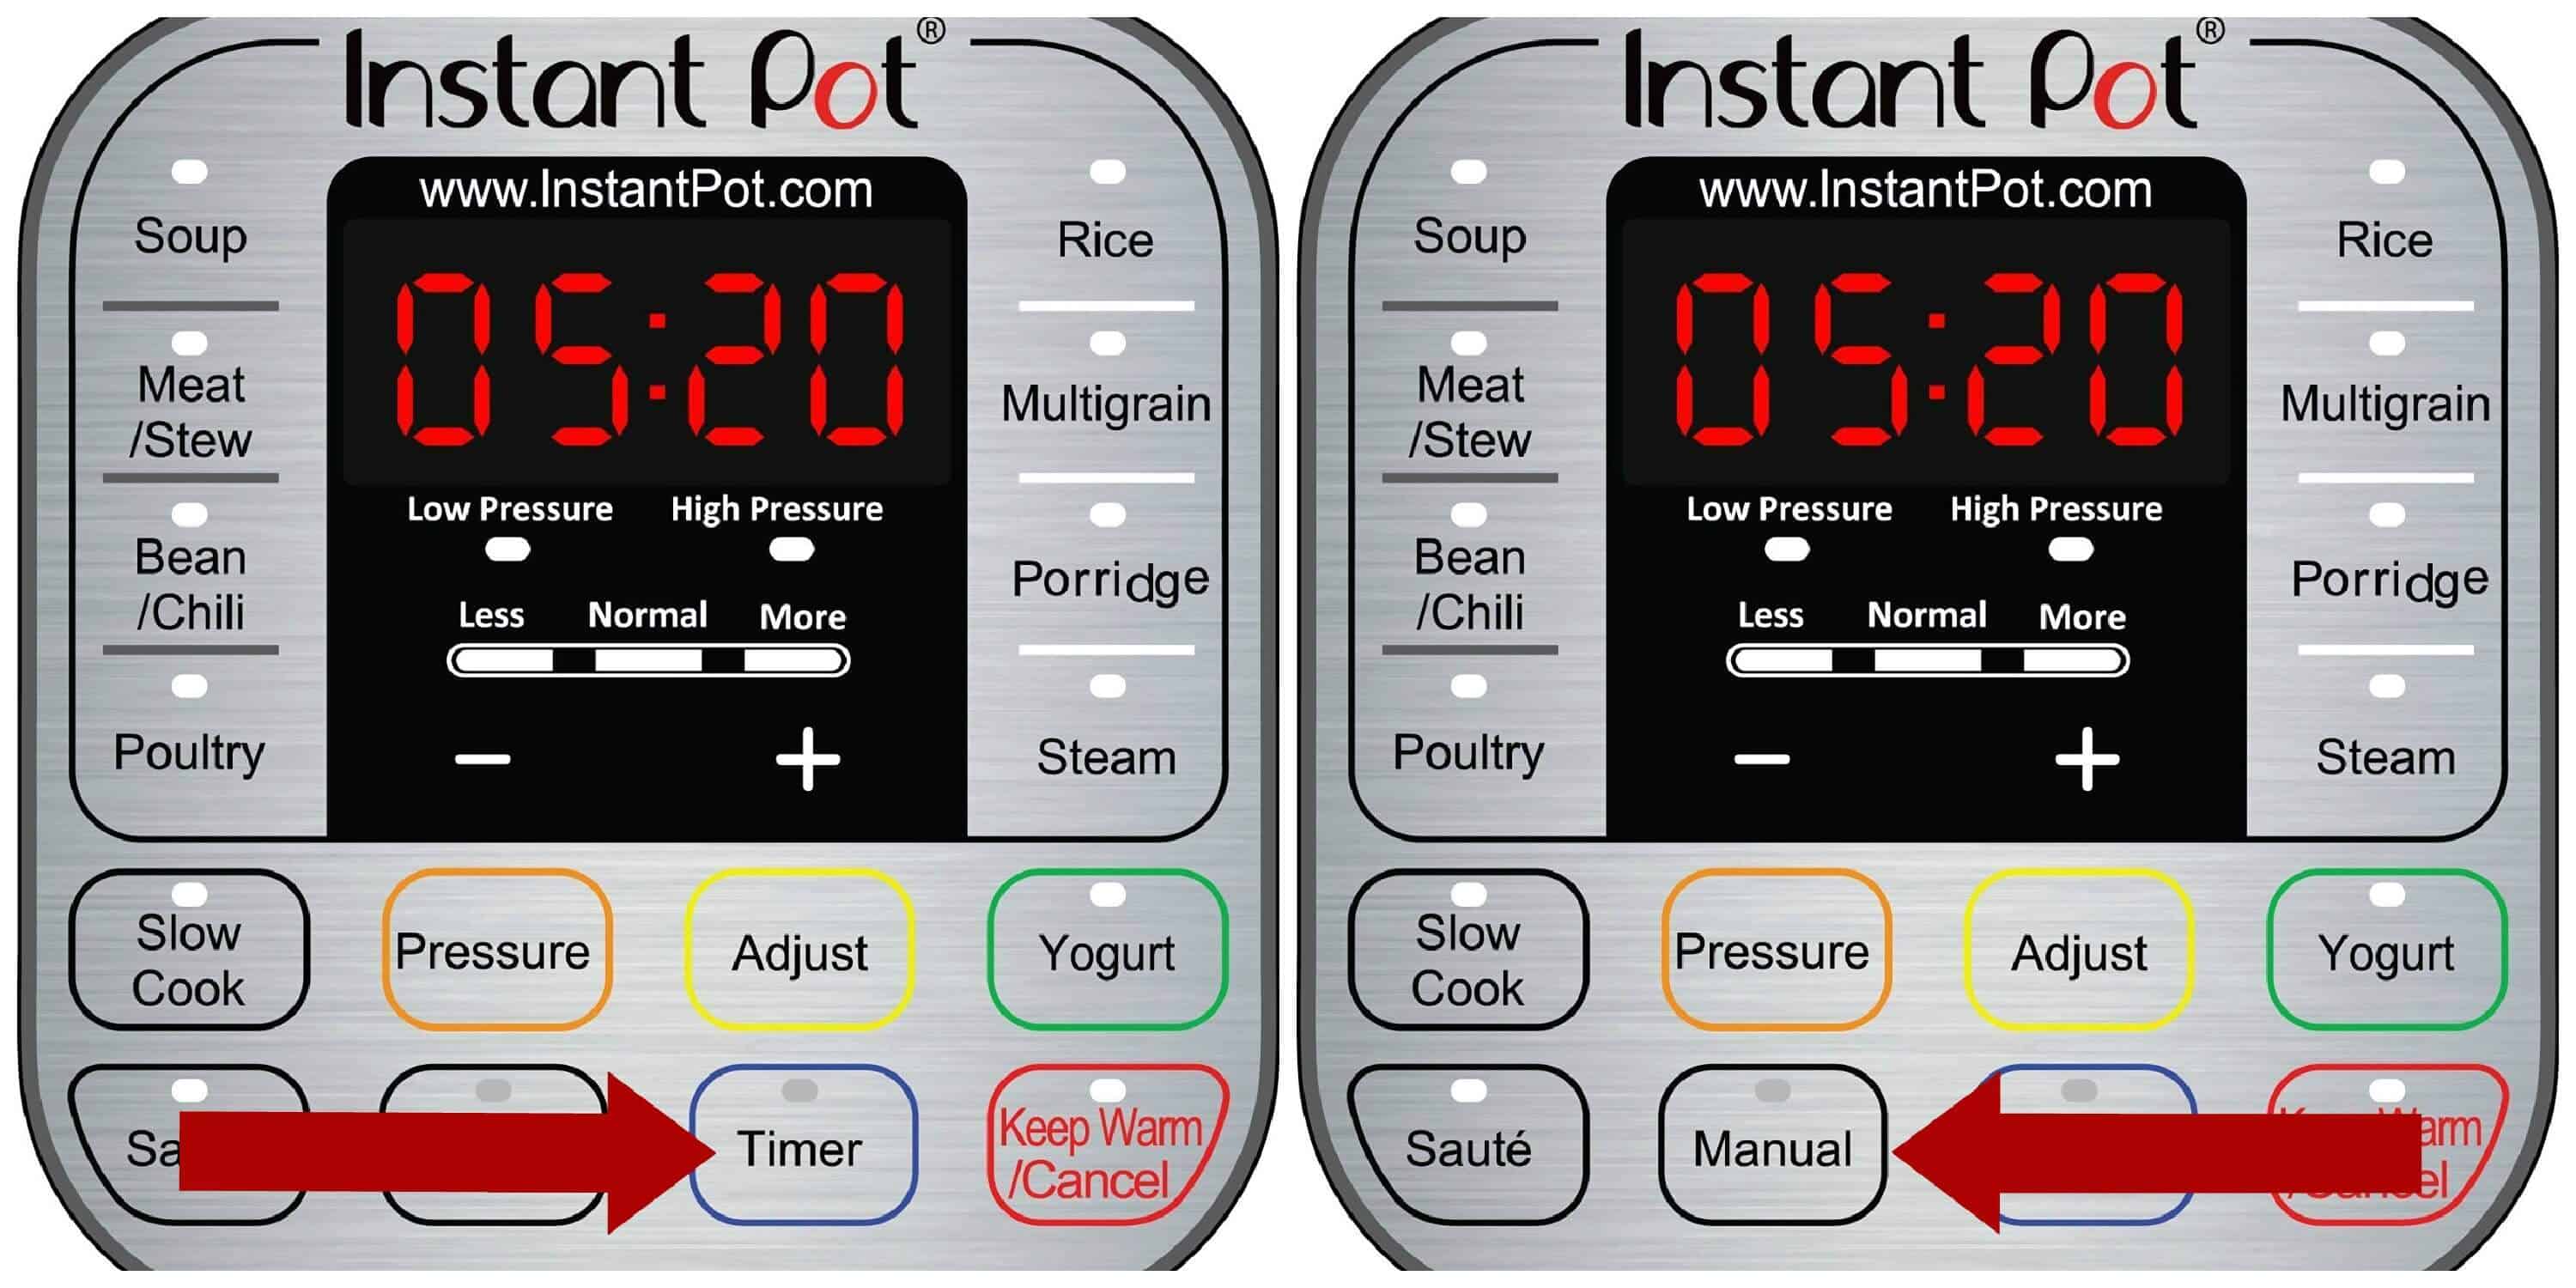
Some older models of the Instant Pot have a Timer button. The Timer button allows you to set a delayed start time. When you press the timer button, the time that shows up is the number of hours until cooking starts. So, if your Instant Pot timer is not starting, this could be the reason.
SOLUTION: Press Cancel to cancel the timer. Select Manual or Pressure Cook mode (or another cooking option, e.g., Poultry or Meat) and wait a few seconds for the Instant Pot display to change to On. If you wish to use the timer functionality, select the cooking function (e.g., Manual, Pressure Cook, Poultry) first, then press Timer or Delay Start (on newer models).
11. The Instant Pot Lid Area or Liner is Dirty
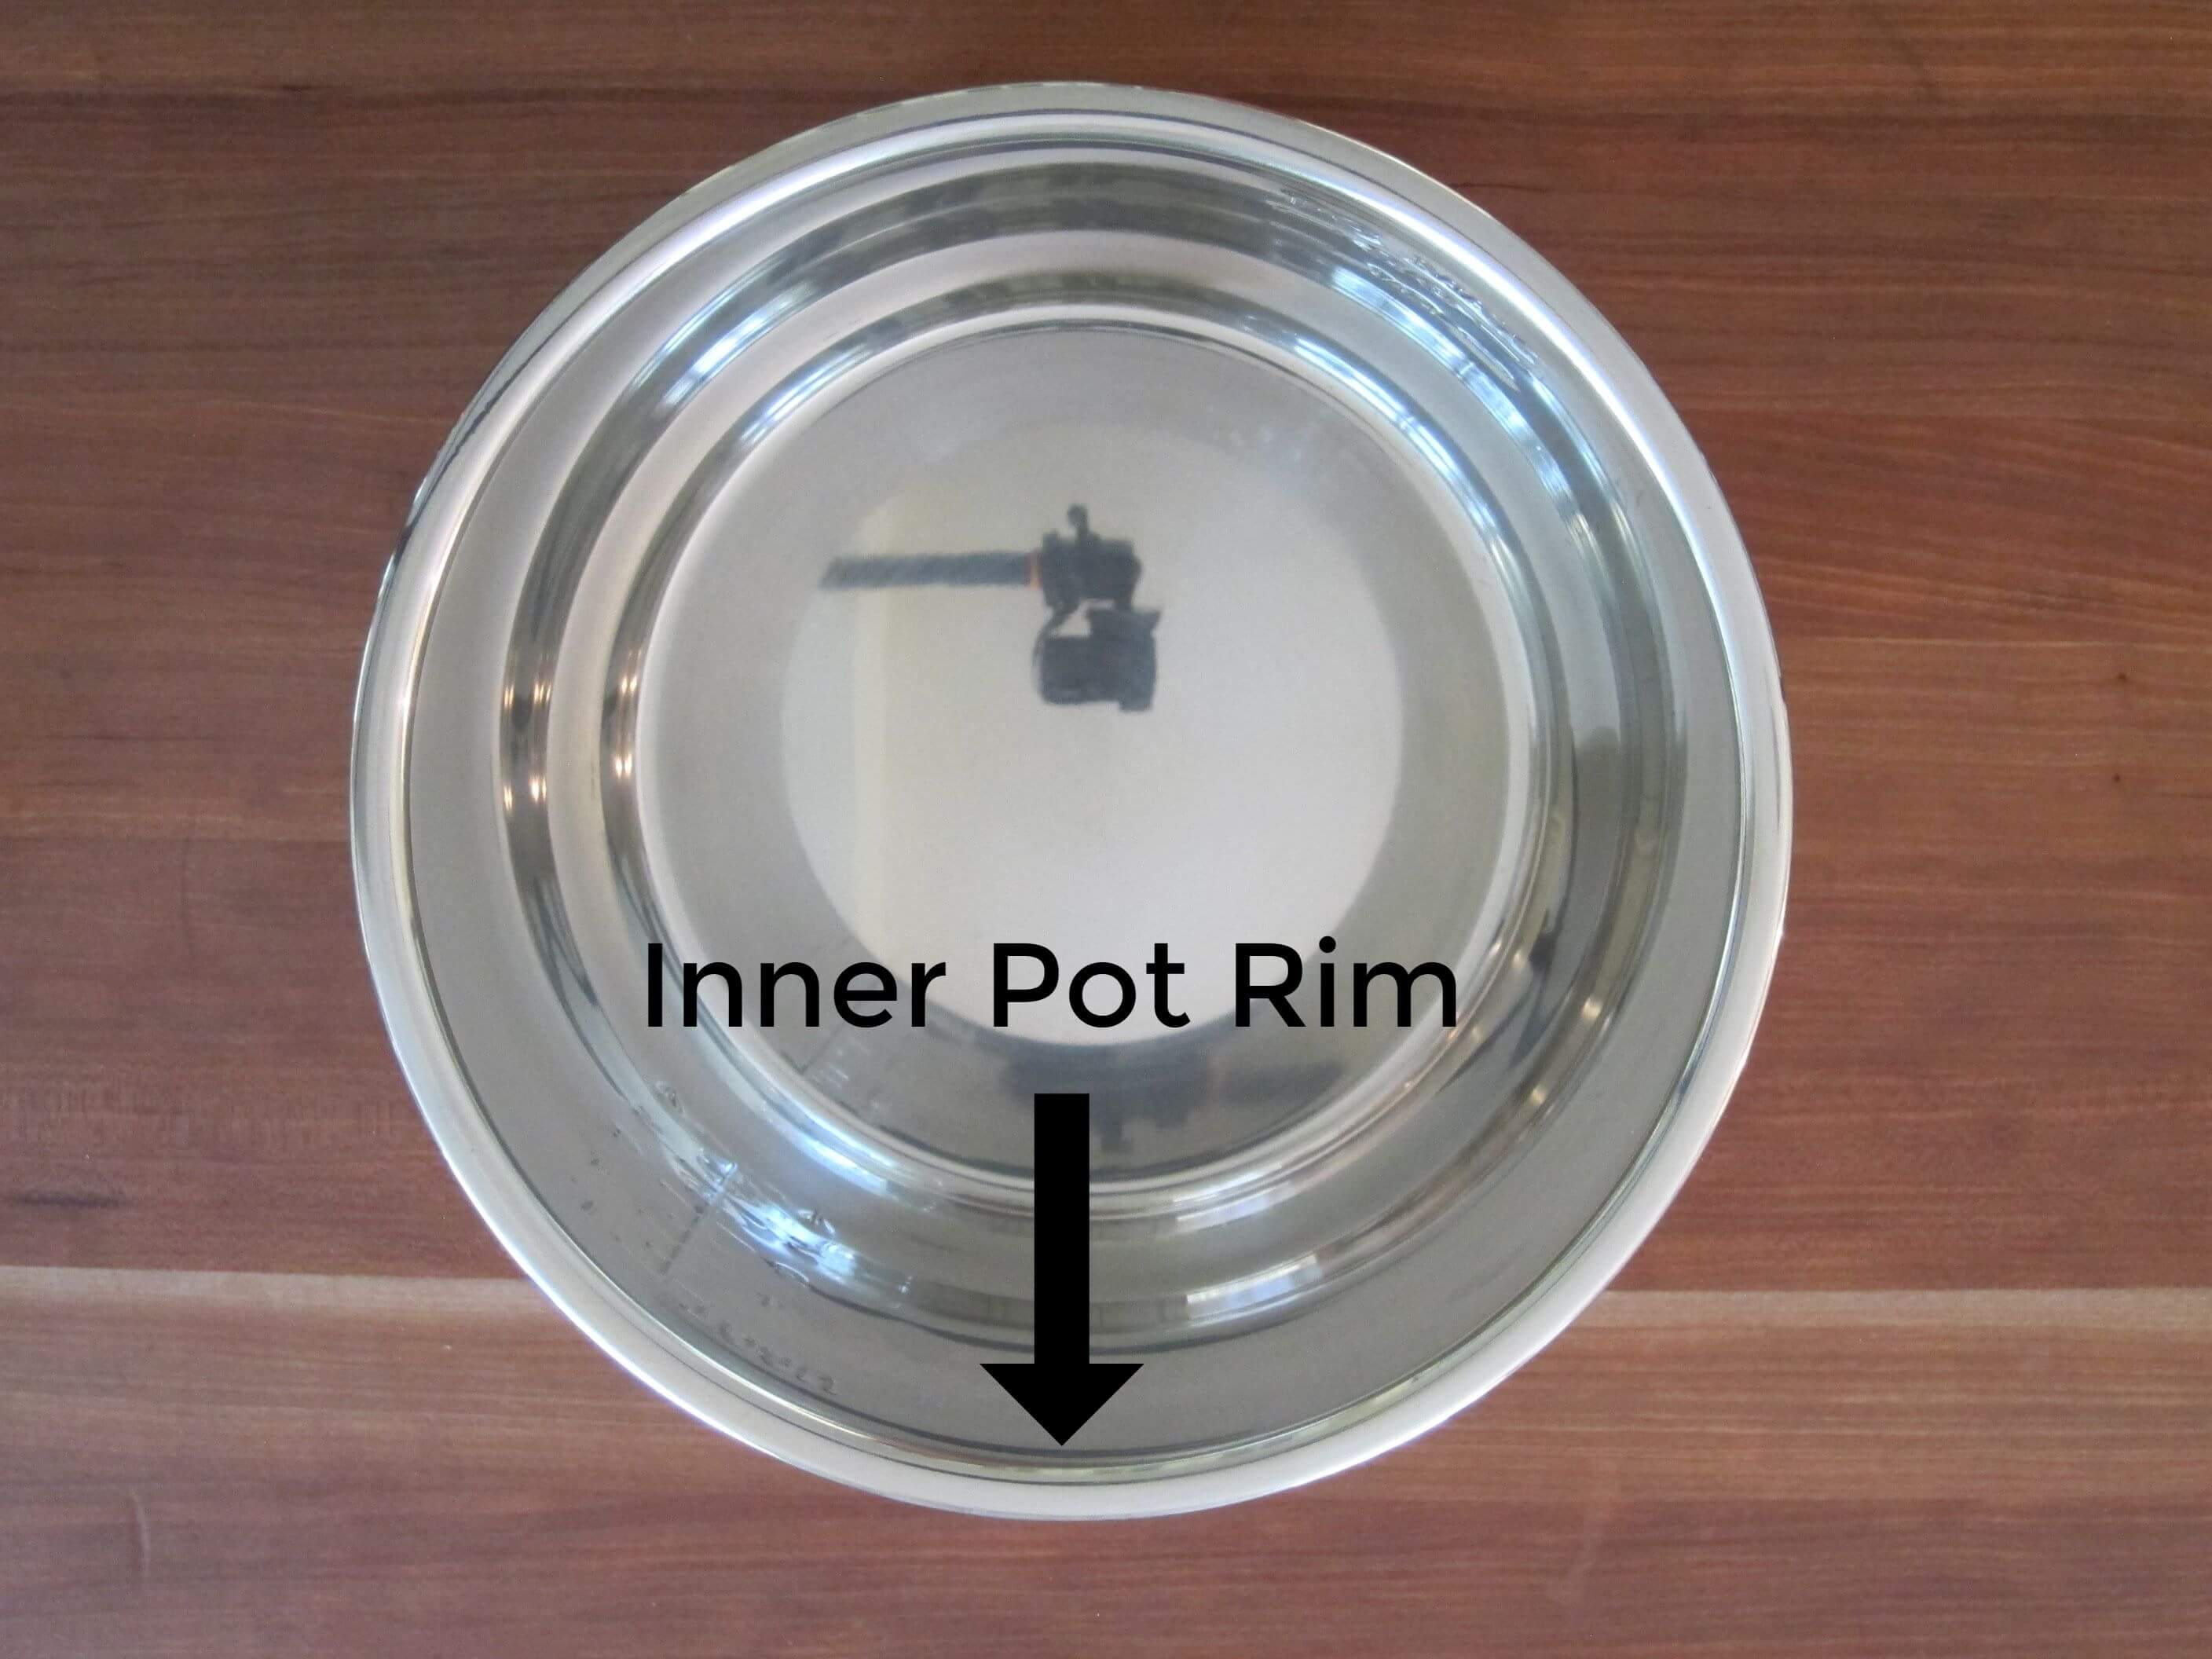
The Instant Pot lid and the area where it fits on the base unit need to be clean and free of food debris.
If food is stuck to the rim of the Instant Pot inner pot, the seal will not be tight when you close the Instant Pot lid, and steam can escape.
SOLUTION: Open the Instant Pot lid and use a cloth or clean toothbrush to wipe around the rim of the Instant Pot lid and the base unit. Thoroughly clean the inside, outside, and rim of the inner pot.
12. The Instant Pot Float Valve or Anti-Block Shield Has Debris
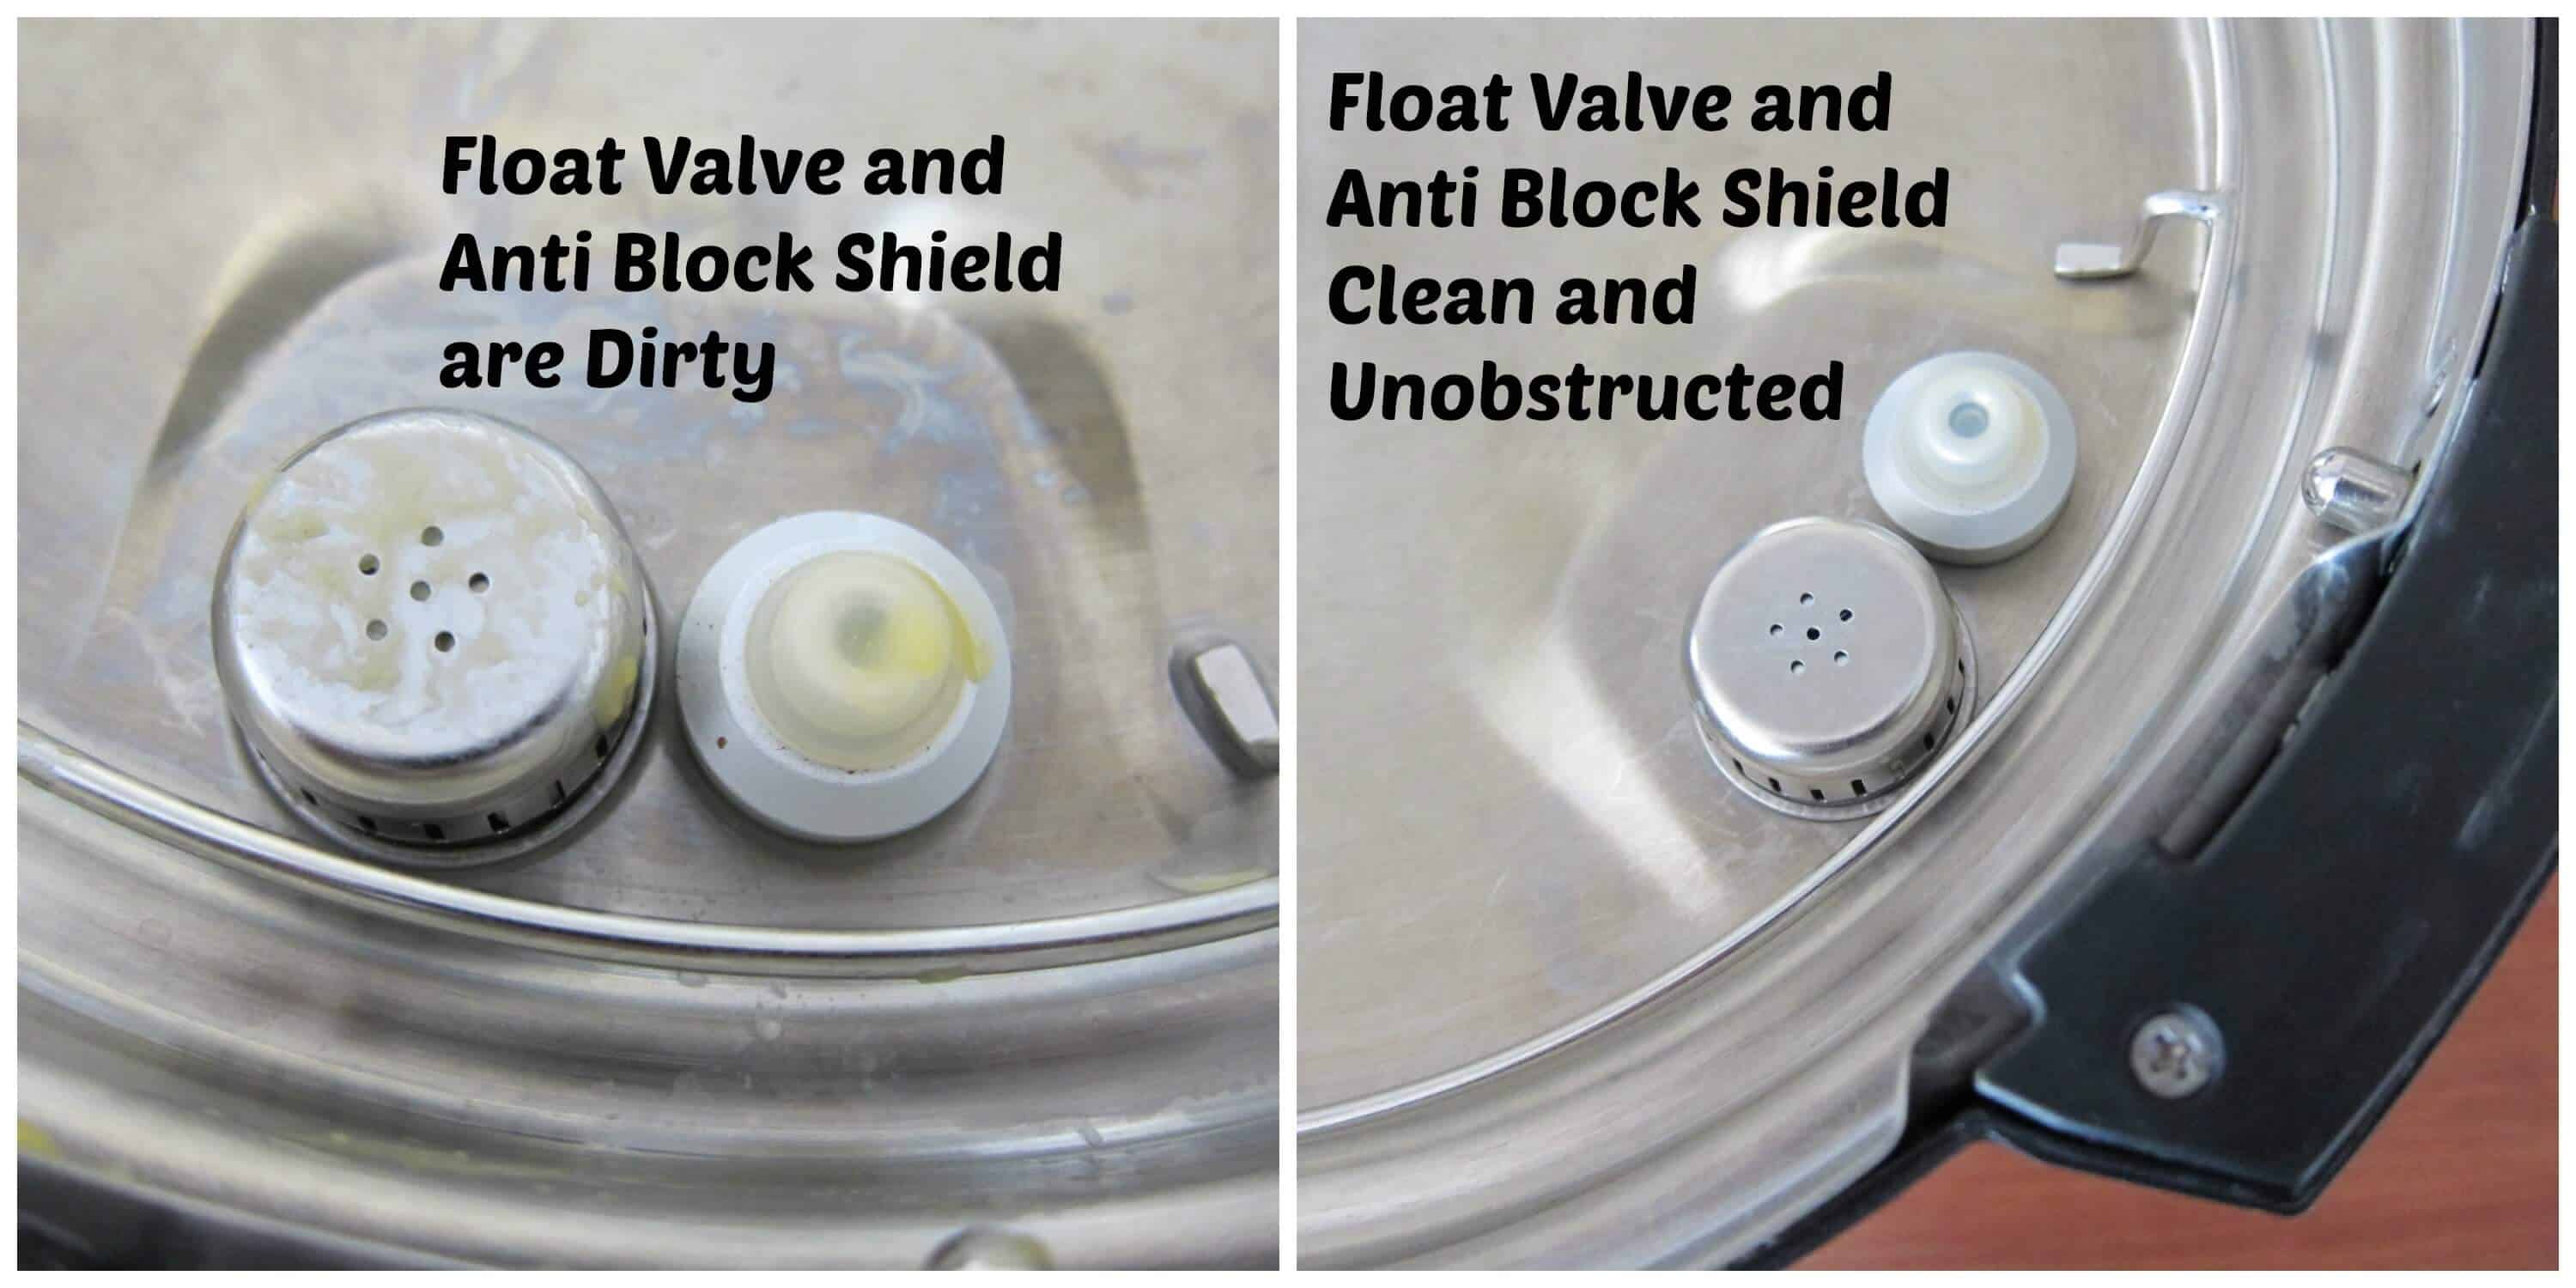
When you cook pasta or other messy foods, the Instant Pot valve and anti block shield can become dirty and obstructed.
SOLUTION: Remove the anti-block shield and float valve and clean with a clean toothbrush and soapy water. Clean the hole that the float valve goes into with a brush or pipe cleaner. Clean all parts of the lid. Dry well and replace the parts.
See my Instant Pot Beginner’s Guide to find out how to remove these.
13. Food is Frozen
Frozen food takes longer to cook, and the Instant Pot takes longer to come to pressure.
SOLUTION: If you’ve added frozen food to the pot, wait a bit longer to see if the Instant Pot will seal. If you’re cooking a large quantity of frozen food, I recommend thawing it first, because it will take a very long time to come to pressure and cook!
14. Large Quantity of Liquid in Instant Pot
If you’re making soup or cooking a larger quantity of food in the Instant Pot, you may have a lot of liquid. The more liquid you have, the longer it takes for the Instant Pot to seal.
You also need to ensure that your ingredients do not exceed the Max Fill mark (⅔ full). For foods that expand (e.g., rice, beans, and pasta), you should not exceed the ½ full mark.
SOLUTION: Wait longer to see if the Instant Pot will seal. If you’re above the recommended max fill lines, split up the recipe and cook it in two batches.
15. The Float Valve is Up, but Instant Pot Just Says On and the Countdown Timer Not Starting
If the Instant Pot just says ‘On,’ it could be because there is a delay between the float valve rising up and the timer starting to countdown.
I’ve had this happen when I’ve used less liquid than is recommended. The Instant Pot comes to pressure, and the float valve comes up, but the display says ‘On‘ and never counts down. In my case, it was just a one-time thing.
SOLUTION: Wait a bit to let the timer begin. The float valve coming up locks the lid but the Instant Pot may need more time to pressurize in order for the timer to start. If the ‘On‘ never changes to counting down, you must set an external timer and press Cancel when the time’s up. Try doing a water test to make sure the problem doesn’t recur. If the problem persists, open a support ticket.
16. The Power Cord is Loose
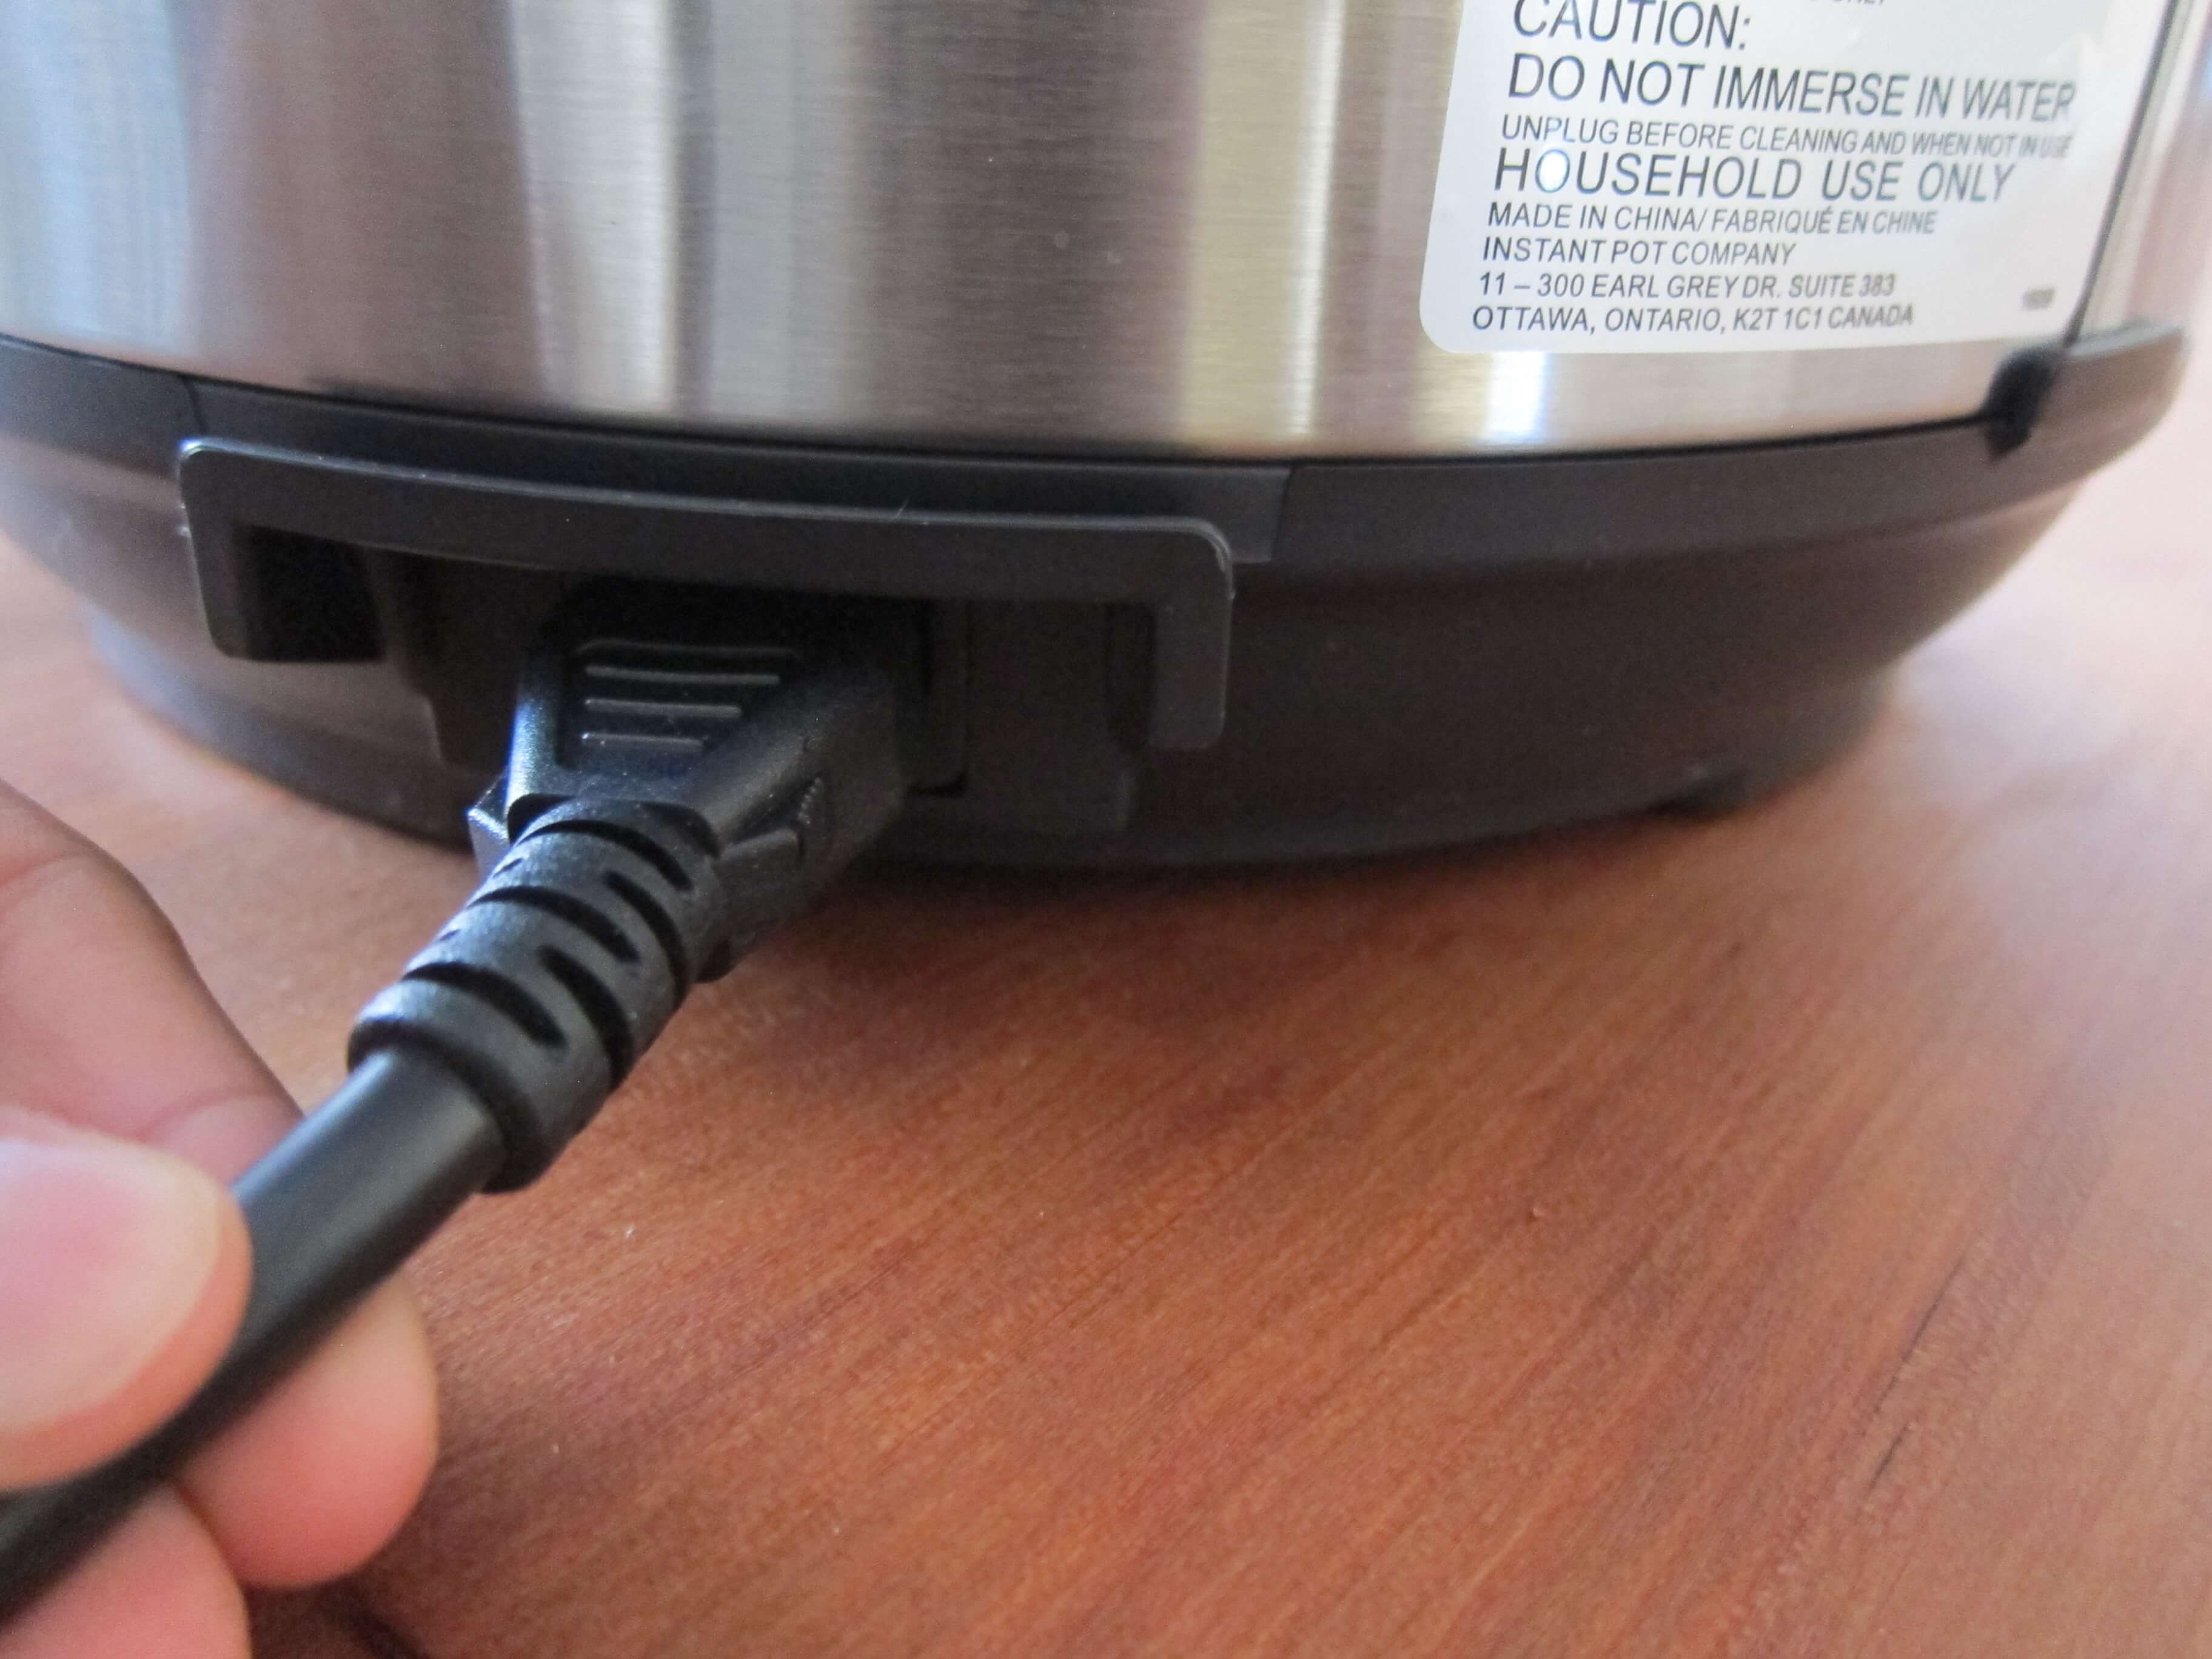
Some Instant Pots have detachable power cords. The power cord needs to be pushed into the base unit all the way. It can come loose if you move the Instant Pot or accidentally bump it.
SOLUTION: Push the power cord all the way into the base unit. Also, make sure the power cord is securely attached to the wall outlet. Test the outlet to make sure it is working with another appliance or an electrical outlet tester.
17. The Wrong Size Inner Pot was Used
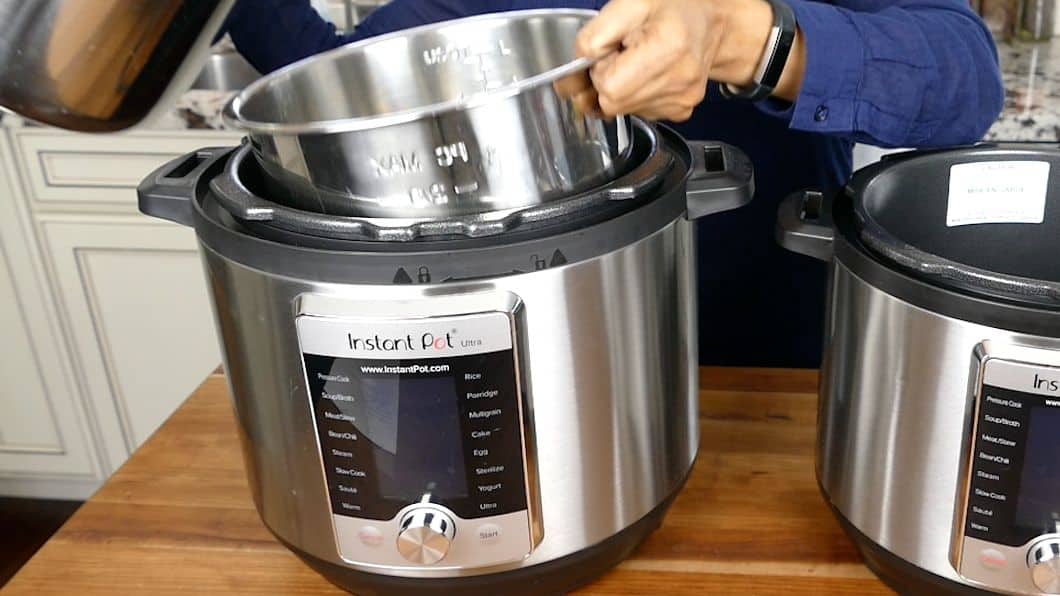
If you have multiple Instant Pots of different sizes, you may be using the wrong stainless steel inner pot/liner. The 6-quart inner pot fits into the 8-quart Instant Pot. It’s an easy mistake and a common issue!
SOLUTION: Make sure you use the correct inner pot.
18. The Float Valve is Missing
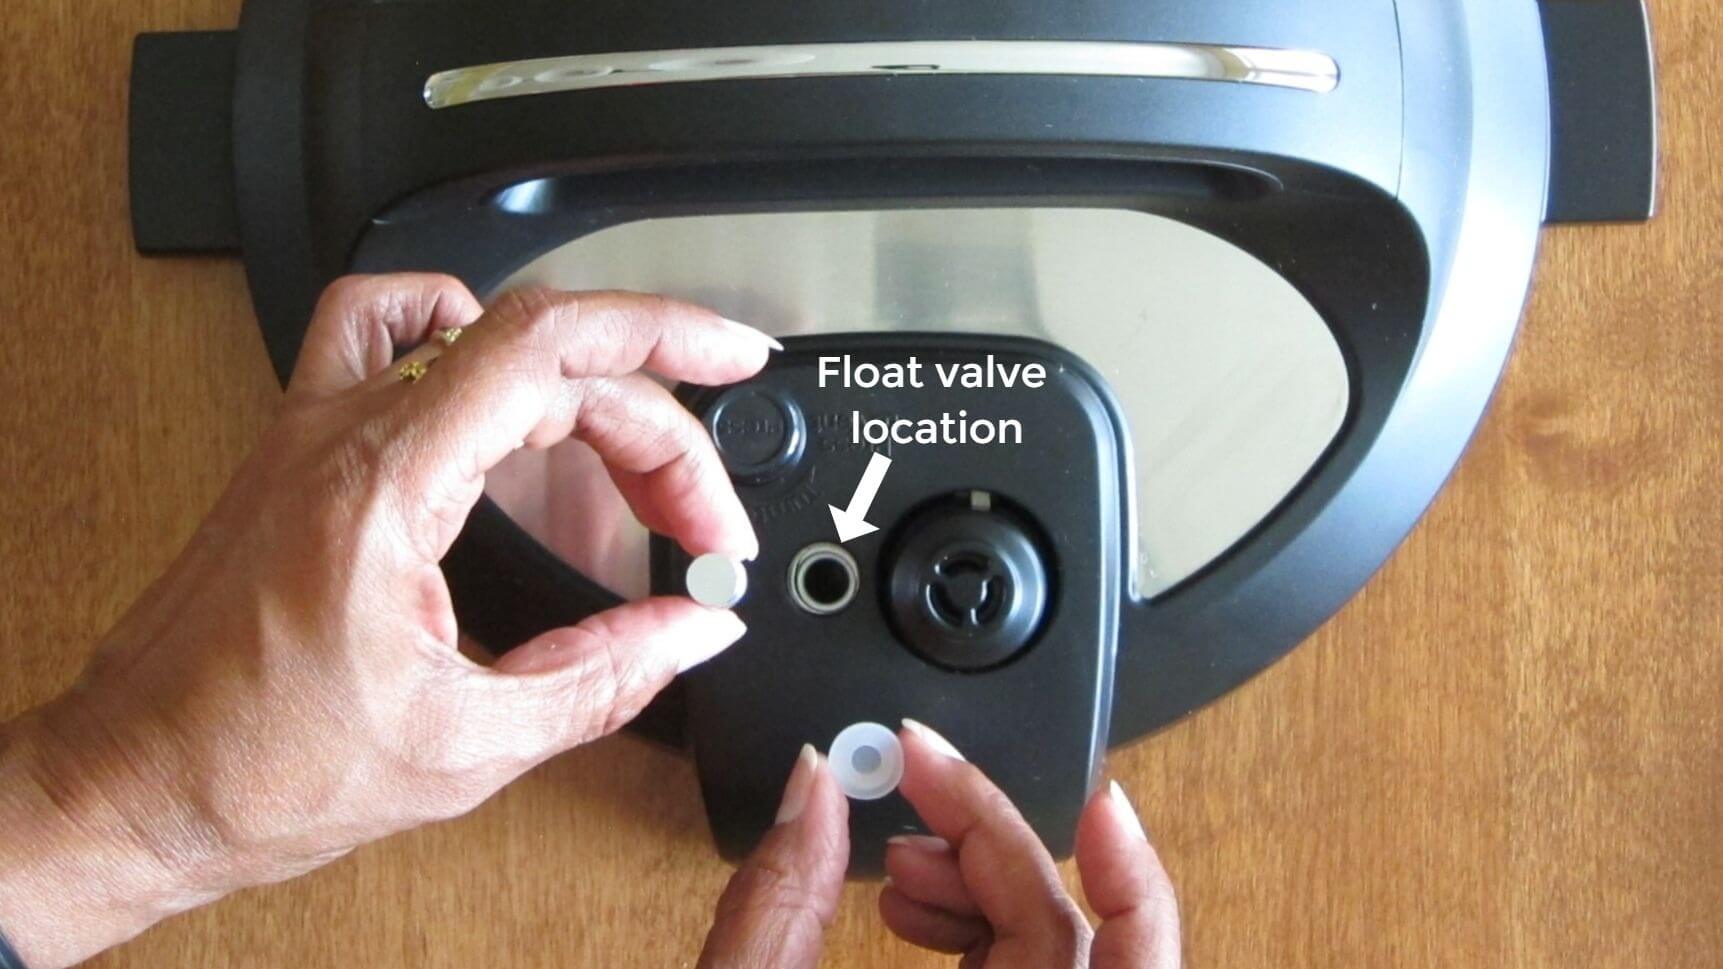
If you remove the float valve while cleaning the Instant Pot lid, you may forget to replace it.
SOLUTION: Put the float valve back in and replace the silicone cover.
19. The Steam Release Handle is Missing
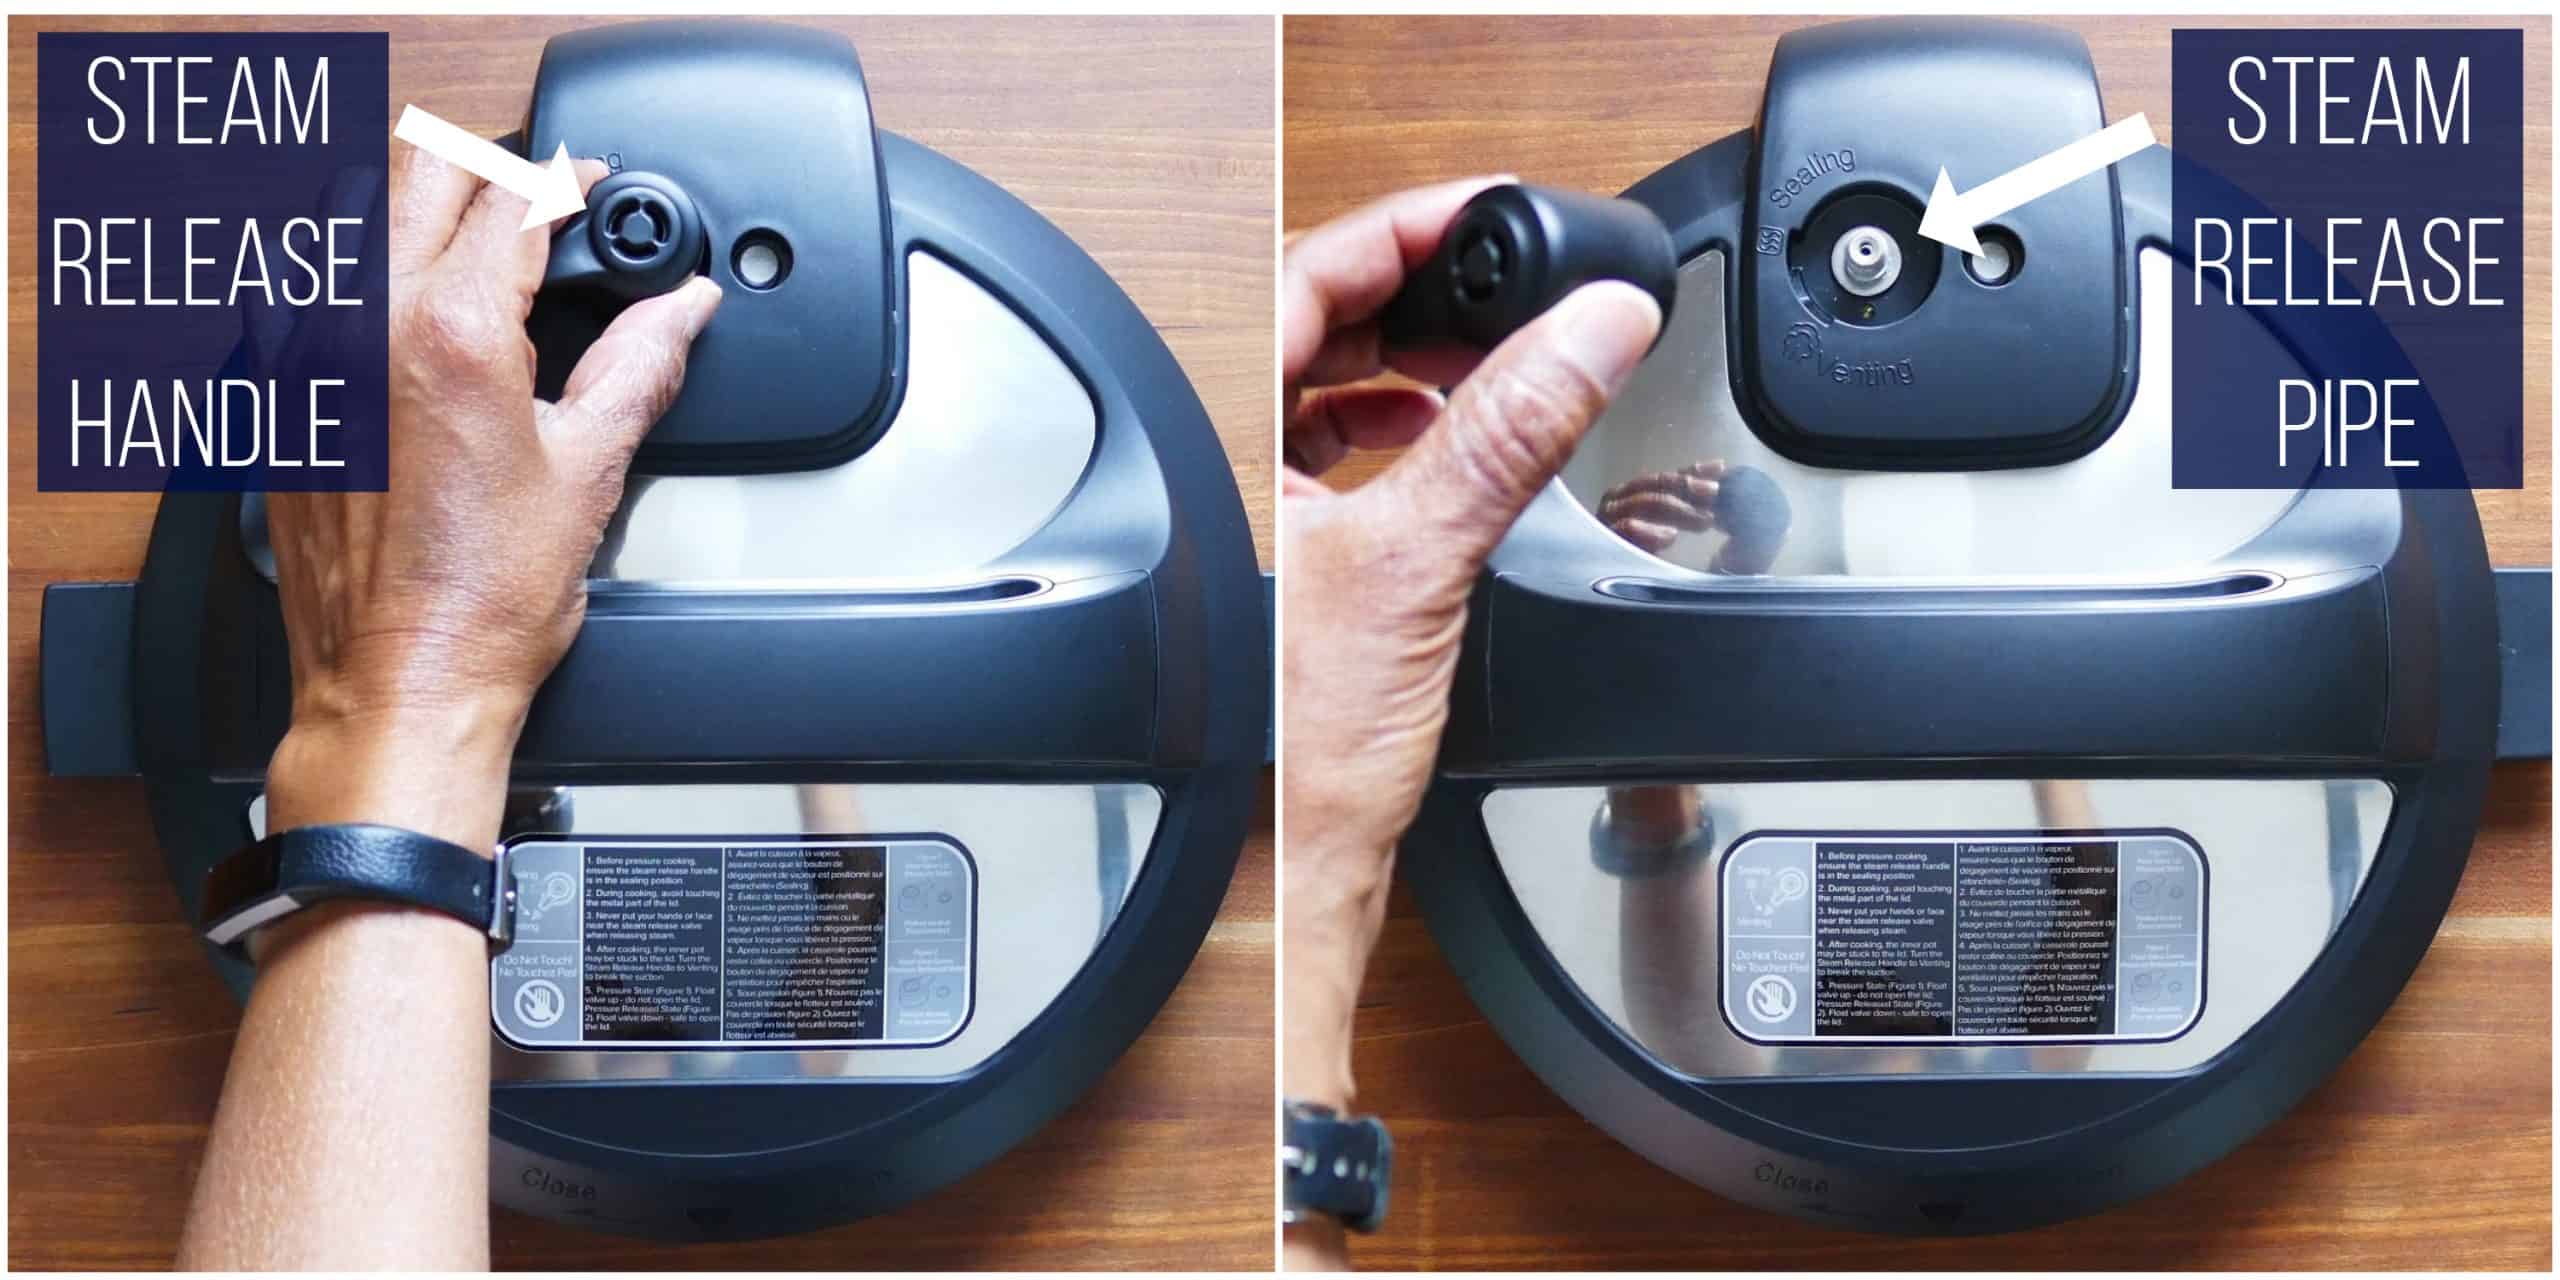
If you remove the steam release handle while cleaning the Instant Pot lid, you may forget to replace it.
SOLUTION: Put the steam release handle back onto the lid and push it down to make sure it’s properly seated on the steam release pipe.
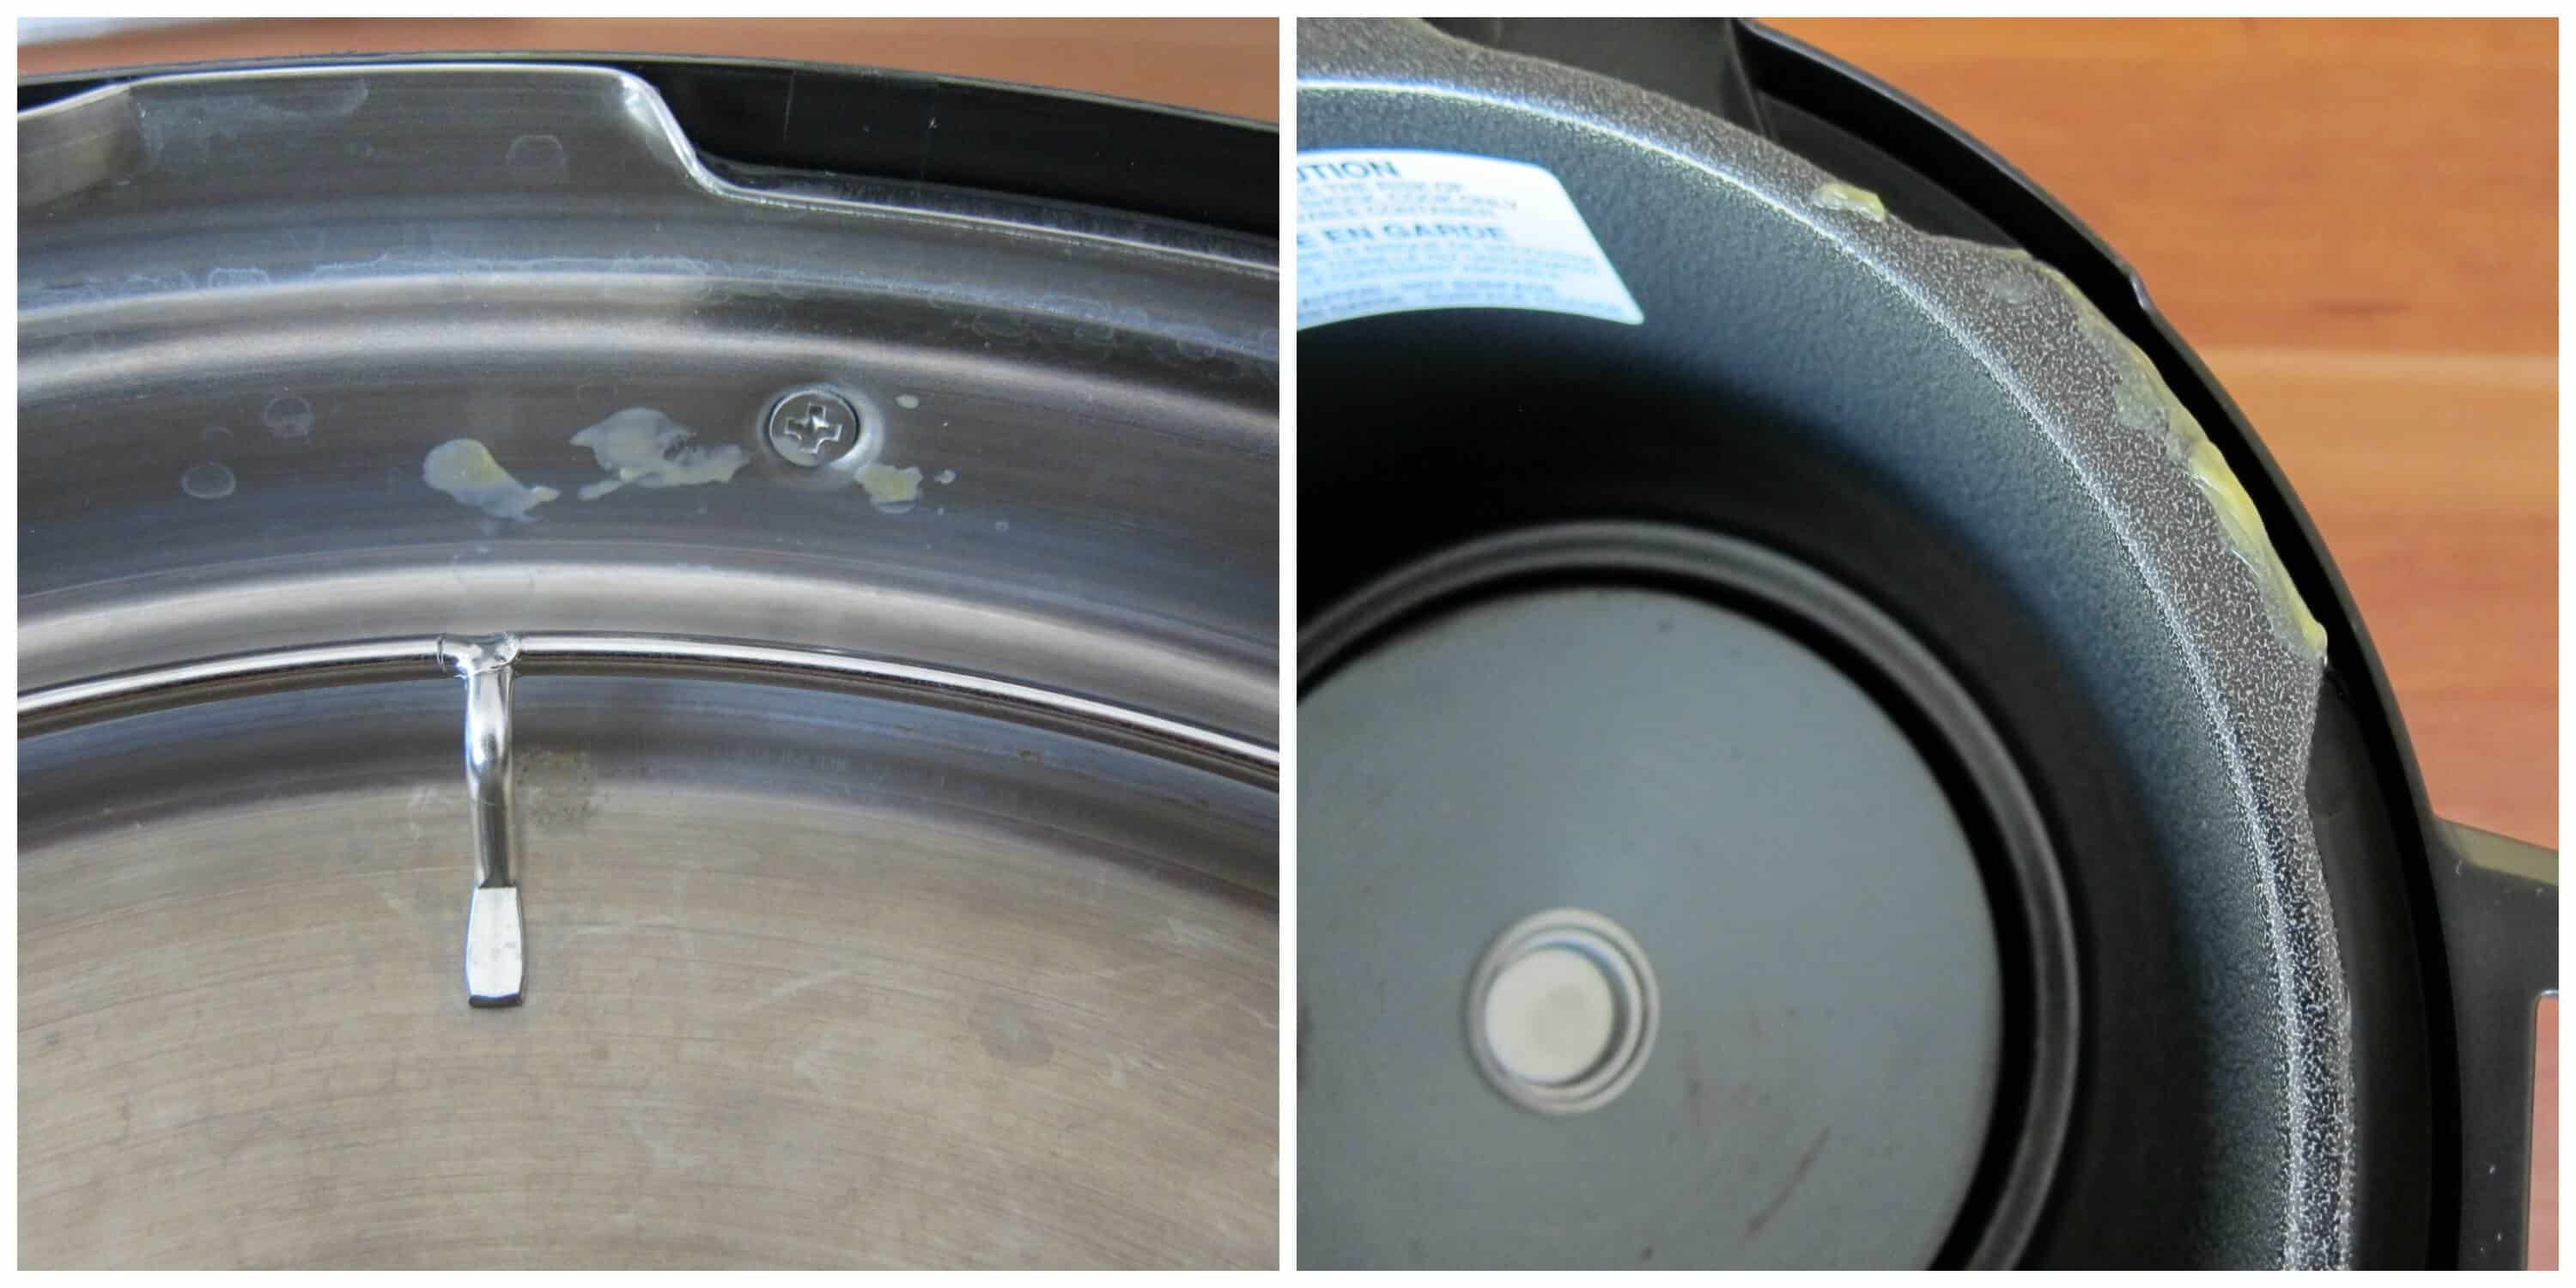
20. The Lid Locking Pin is Stuck
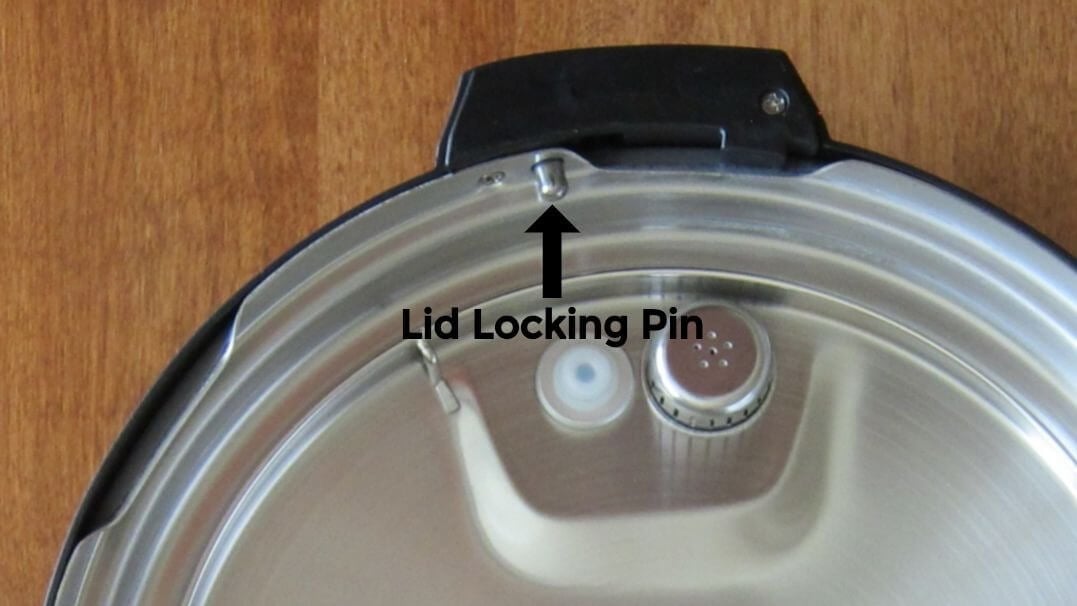
The spring-loaded pin (lid locking pin) on the rim at the back of the lid could be stuck in the retracted position and this means your Instant Pot lid won’t close properly.
SOLUTION: Push on it from the inside and outside of the lid or gently jiggle it to get the spring mechanism to reset the pin.
21. The Exhaust Valve is Loose
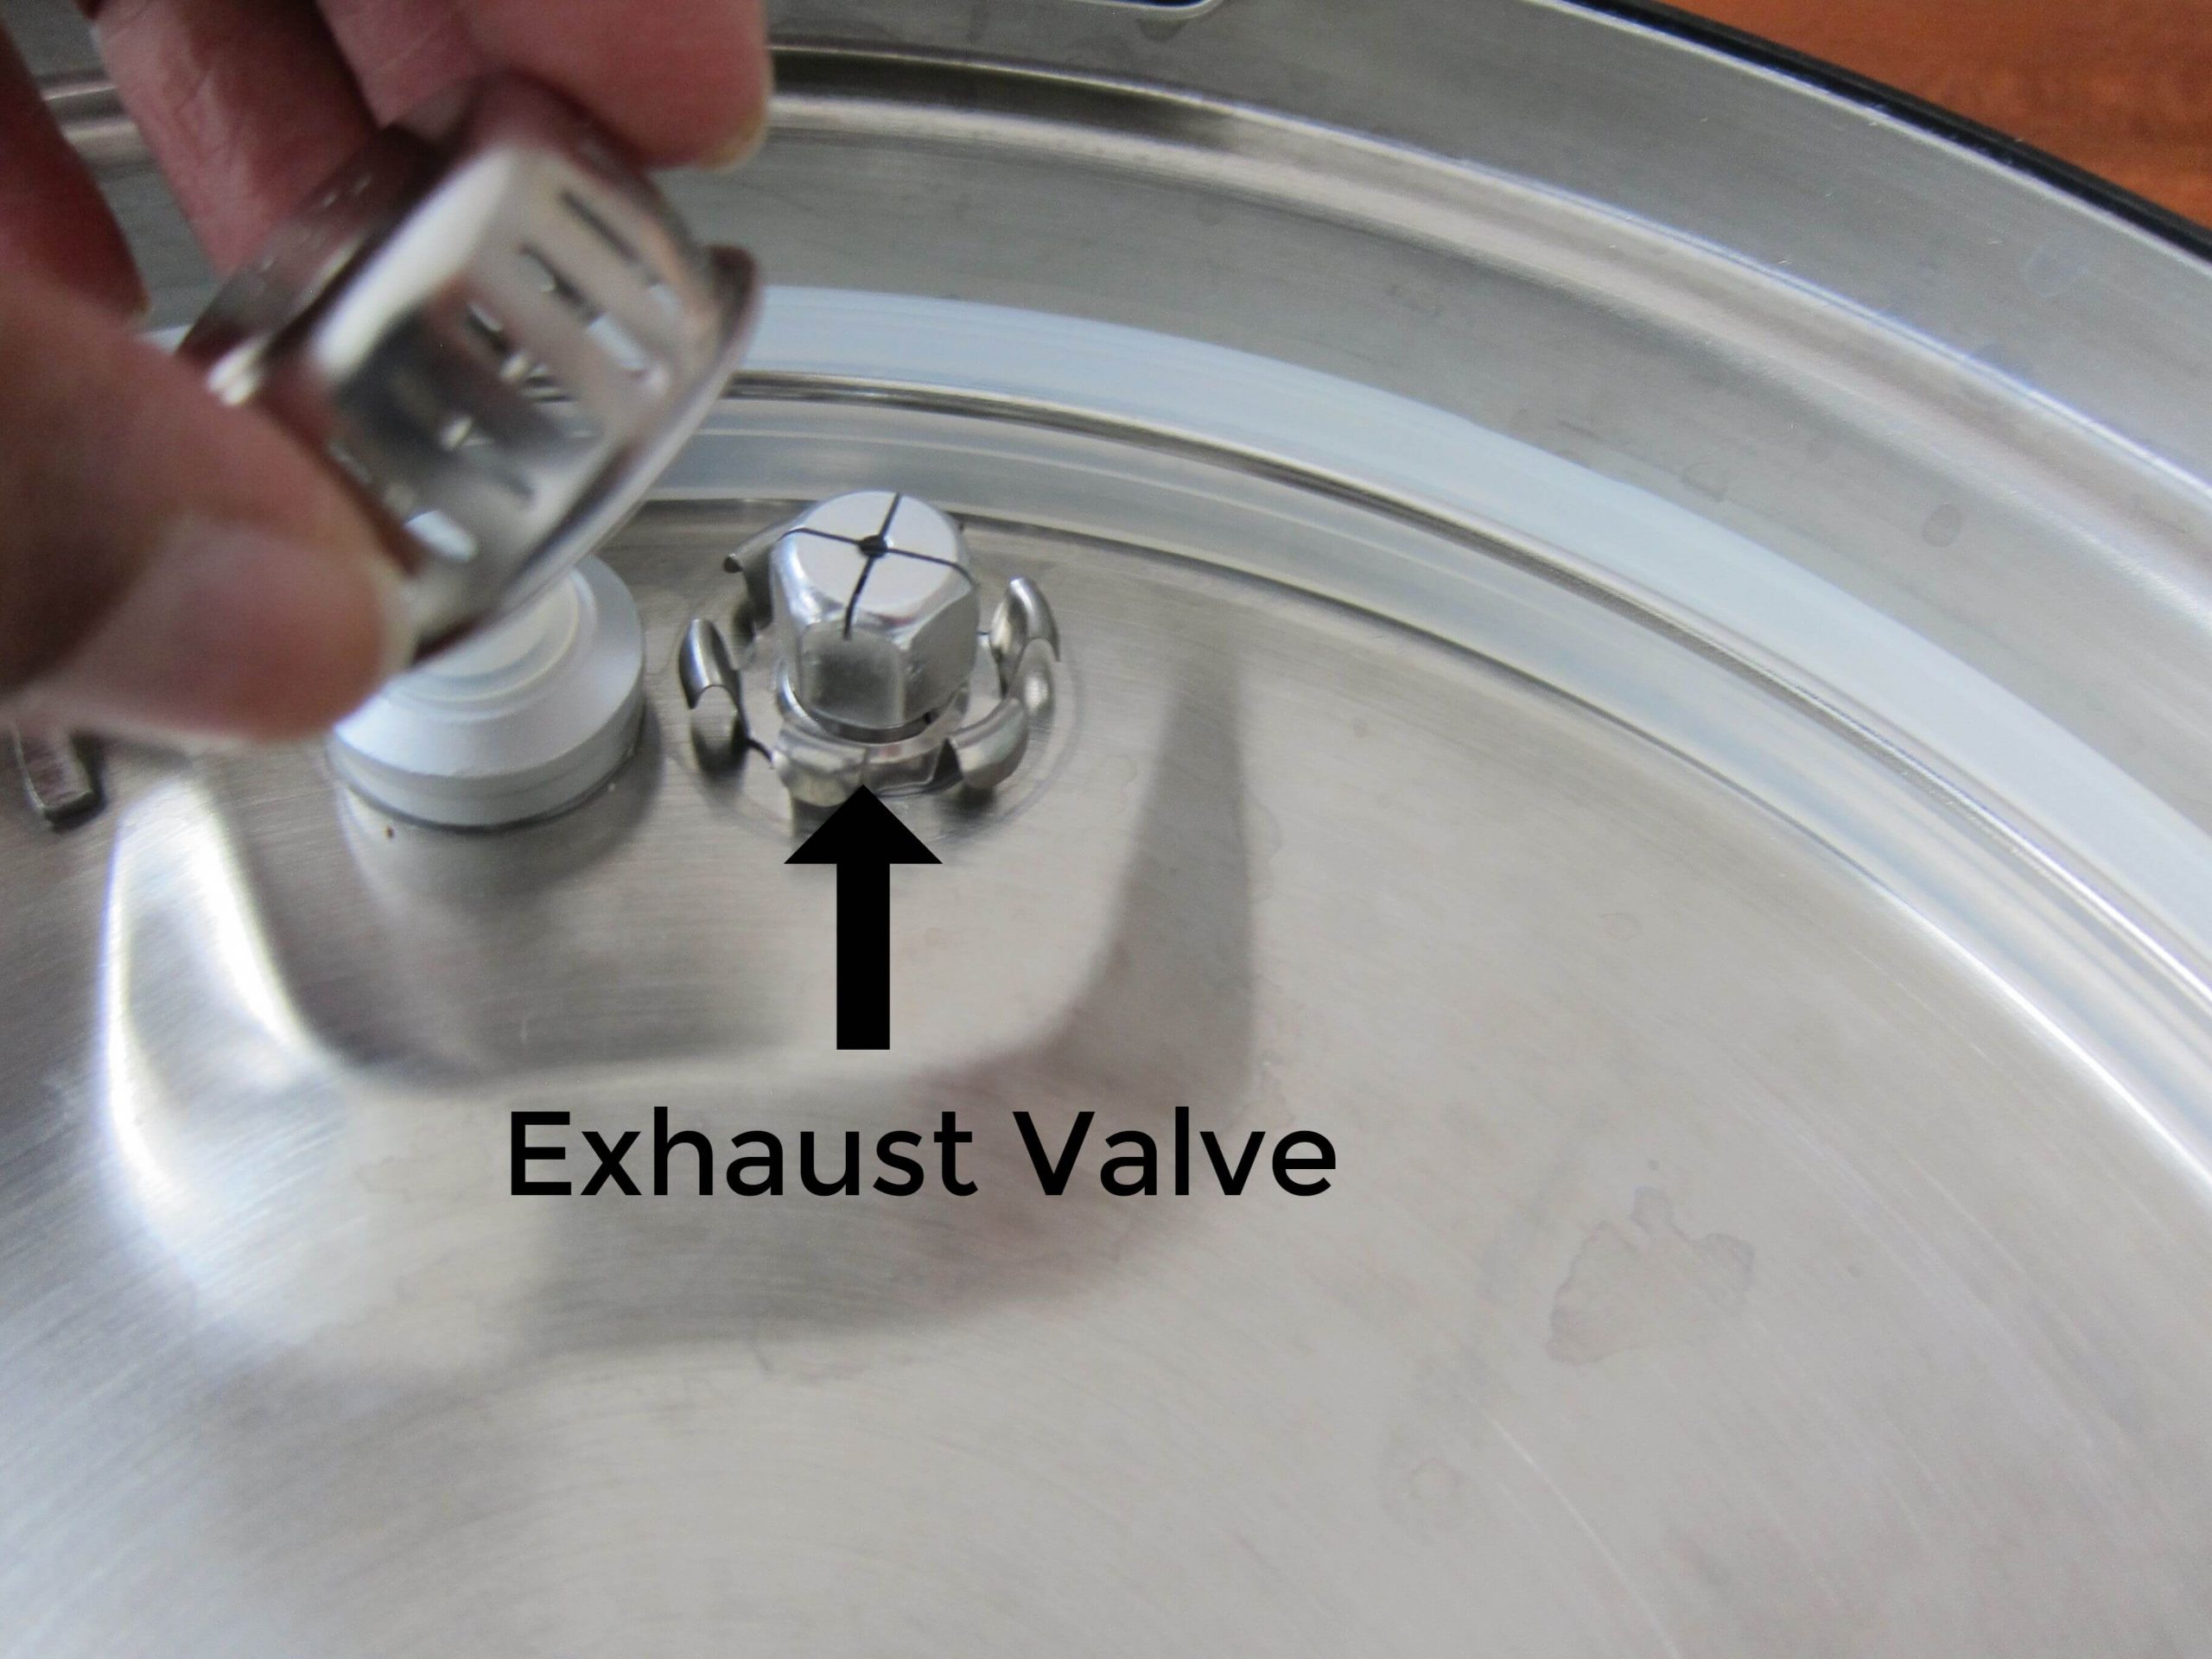
In rare cases, the exhaust valve inside the anti-block shield can become loose, such as during shipping.
SOLUTION: Carefully tighten the valve so it’s not loose anymore. Don’t overly tighten it.
22. The Steam Release Handle is Not Properly Seated
If you remove the Instant Pot steam release valve or handle while cleaning the lid, it may not be put back correctly. It needs to be pushed in all the way. If it isn’t securely seated, steam will leak from the valve or handle.
SOLUTION: Push in the Steam Release Valve and move it from Sealing to Venting a few times so it sits properly.
23. Instant Pot Display Says noPr
If the Instant Pot is showing the noPr error message, it could be that it couldn’t reach a high enough temperature during the pre-heating stage. This could be due to the quantity of food or liquid, frozen ingredients, or any of the reasons in this article.
SOLUTION: If you’re not making any of the above mistakes but get the noPr error, press Cancel and try restarting the pressure cooking program again.
24. Instant Pot Leaking Steam Even Though the Float Valve is Up
There’s a metal safety clip inside some older pressure release valves. It appears to prevent the Instant Pot from overpressurizing.
Unfortunately, this metal ring can get bent over time or through shipping. This causes the steam release handle to tilt in the sealing position as if it were set to the Venting, allowing steam to escape.
Newer models of the steam release handle and sealing valve do not have this problem since they now have a silicone retaining ring that prevents them from being improperly seated on the steam release pipe, thus creating a good seal.
SOLUTION: Purchase a new steam release handle or remove the metal ring, straighten it with a pair of pliers, and put it back in. Here’s a Youtuber who’s posted a video on how to fix the Instant Pot not building pressure due to this issue:
I thank Donald Task and the Reddit Instant Pot community for bringing this problem and solution to my attention!
25. No Liquid for Pot in Pot Cooking
The pot-in-pot cooking method is used for cakes, eggs, lasagna, and other dishes that require steaming. If you don’t add water to the bottom of the pot, it will not come to pressure.
I hope this Instant Pot troubleshooting guide has helped you find out the reason for your Instant Pot float valve not sealing so you can get back to cooking your favorite Instant Pot recipes. Over time and with experience, you should encounter this problem less frequently.
If you continue to have issues with the Instant Pot not pressurizing, try to do a water test to see if it’s an issue with your unit. If the water test fails, you should either return the Instant Pot to the place of purchase or contact Instant Pot customer service to file a support ticket.
✅ Why Trust Neena at Paint the Kitchen Red?

I’m Neena, and I have a lifetime of experience working with pressure cookers. I know how to maximize the potential of a pressure cooker to consistently produce delicious and easy meals. With my Instant Pot expertise, I can provide valuable insights, troubleshooting advice, and innovative recipe ideas so you can trust me on all things Instant Pot!
➡ New to the Instant Pot? Get my Instant Pot instructions for beginners.
If you’re new to the Instant Pot and aren’t familiar with how to use it, here are my guides on how to use some popular Instant Pot models:
- Instant Pot Directions for Beginners
- Instant Pot ULTRA Beginner’s Manual
- Instant Pot DUO EVO PLUS Beginner’s Manual
- Instant Pot DUO NOVA Beginner’s Manual
- Instant Pot DUO GOURMET Beginner’s Manual
- Instant Pot PRO Beginner’s Manual
- Instant Pot DUO CRISP Beginner’s Manual
- Instant Pot PRO CRISP Beginner’s Manual
- Instant Pot PRO CRISP vs DUO CRISP
If you found this article to be helpful, please share it on social media using the social media share buttons at the top and bottom of this post. Thank you so much!
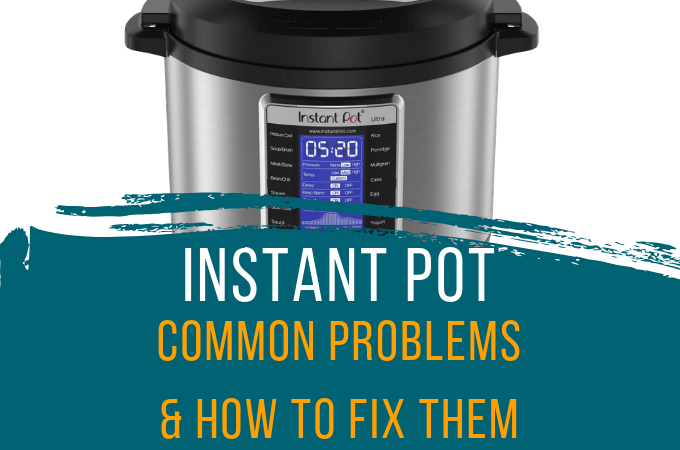
Troubleshoot Common Instant Pot Problems
Find out some of the frequently encounter Instant Pot problems and how to fix them. From the burn message to error codes, these resources will help you out.


Claude E. Rabb says
I have aquired an instant pot from a friend who abandoned it for leaking water. I bought an instant liner pot for it, but the unit doesn’t hold pressure to seal. it will do for as a crock pot, but but while I continue persuing suggestions here and elsewhere my question is this:
“Does the bottom whole with spring door to always vent (remain unsealed) during normal operation?”
The silicone gasket ring, venting and float valves all seem in proper order but the float doesn’t rise.
Neena Panicker says
Hi Claude, I’m sorry but I’m not sure what your question is, can you please rephrase it?
Ken says
Concerning incomplete sealing of the Sealing Ring, your article, and all of the other articles I’ve seen, miss the simplest solution. The problem is that the bottom of the Sealing Ring is too dry. Before you place the cover on the Instant Pot, turn it upside-down under a faucet, and fill it with water just higher than the bottom of the Sealing Ring. While the water is there, manipulate the Sealing Ring a little bit, to make sure water runs under the bottom of the Ring, all of the way around. Then, pour out the water, place the cover on the Instant Pot, and you will never have a problem again.
Neena Panicker says
Hi Ken, thanks for taking the time to comment and share your tip!
Stacey @ Pugmamastace says
OMG thank you so much for this!! I was using a little bit of water each time I hard boiled eggs, but then decided I didn’t know if it was making any difference and clearly that’s why it wasn’t sealing/pressurizing. Thank you! I thought I was losing my mind!
Neena Panicker says
Stacey, I’m glad you got your sealing problem figured out!
Remy says
This article is so stuffed with ads, it’s difficult to find the actual content.
Neena Panicker says
Remy, I’m sorry you found the blog post difficult to navigate.
Gopala Nadimpalli says
Thanks Neenaji.
Just bought first Instant Pot and could not figure out why lid is not sealing. Your video helped me out. Placed spare sealing ring and problem sorted out. Other videos that I watched to find a solution could not help me.
Thanks a lot
Paint the Kitchen Red says
Hi Gopala, I’m so happy you found it useful. I hope you enjoy your Instant Pot and happy cooking!
Danielle says
I really appreciated your well written, thorough article. Thank you!
Paint the Kitchen Red says
Danielle, thank you! Happy to help.
Diana says
Mine was doing the same thing as the video above, but mine is different. I have the 2020 8-qt duo plus with air fryer, so the valve is separate. I looked at it compared to my other 2001 6-qt Duo and there’s a flat metal piece inside the lid where the steam release valve goes. It was bent up on the Duo Plus, whereas the on my Duo, it was down. I pushed it down with a butter knife and now it’s working! Yay!
Paint the Kitchen Red says
Love hearing that!
Diana says
oops, I meant the 8-qt duo crisp, and the 2021 (not 2001) 6-qt Duo Plus.
Mark says
We had tried everything and our Instant Pot was still not sealing right. We were about to throw it away when I stumbled across this site. After reading these tips, I checked the lid locking pin, which completely fixed the problem. Thanks so much!
Paint the Kitchen Red says
Mark, that’s great – I love that I was able to help you out!
jude says
Thank you so much, Neena! I was searching for a place to buy a replacement seal and saw the link to your video.
Paint the Kitchen Red says
You’re so welcome, Jude. I’m glad to help!
Cat says
Your videos have been pretty helpful, although none of them solved my problem. If you find that your pressure release valve is faulty, there’s nothing you can do about it. The replacement part is not available, ANYWHERE, for the Duo Evo Plus. Unfortunately, the new Pro model has the same type of valve, and if it goes bad, I will have 2 non-functioning Instant Pot pressure cookers.
Paint the Kitchen Red says
Cat, I’m sorry to hear that. Have you tried the facebook group called Instant Pot parts swap or sale?
Lindy says
Thank you for the comprehensive guide with links to associated articles! I think I stumbled on a solution for my issue that wasn’t quite covered in your guide. My pressure cooker was not sealing even during the water test and after cleaning debris out of the anti-debris shield and removing and cleaning the float valve (I regularly clean the sealing ring already). I even re-cleaned them multiple times. The thing that ended up working that was not covered here was HOW to clean the steam valve (the guide only explains how to remove the shield). With the shield off and the lid upside-down, the vent handle was able to be removed entirely, and I was able to push a toothpick through the channel and clear some small amount of dirt from inside the handle. Even though the toothpick didn’t actually appear to remove anything from the hole through the lid, it appears to have fixed the problem, as the instant pot now seals again.
Ultimately, though, you helped me figure out the solution, so thank you!
Paint the Kitchen Red says
Lindy, thank you for the detailed comment. I’m sure it will help someone. The next time I update this article, I’ll incorporate your comments. Thanks again.
Ruby Lee says
Thank you so much for your article! My Instant Pot would not seal so I bought a new silicone ring, but that did not solve the problem. I followed all the steps that were applicable to my situation and my pot started sealing again! I am so excited!!!!! I was worried I would have to purchase a whole new pot so thank you for your help. 🙌🏻 Five stars for your helpful article. ⭐️⭐️⭐️⭐️⭐️
Paint the Kitchen Red says
Oh, you’re so welcome Ruby. I’m really happy the article was helpful to you!
Katrina says
Hi Neena,
Thanks for your helpful videos and tips.
I have run the water test several times in my brand new Instant pot Duo using your instructional video. It pressurises i.e. the float value pops up but then a minute or so later ALOT of steam comes out of the steam release value for several minutes before it stops. Is this normal?
Paint the Kitchen Red says
Hi Katrina, thank you for visiting the blog. No, that does not sound normal. Once the Instant Pot is pressurized, there may be very small wisps of steam coming out but no more than that. Sounds like the Instant Pot is not able to maintain the pressure for some reason. Since it’s probably still under warranty you may want to contact the company or return the unit. If you’re up for it, before you do, make sure everything is tightened, the lid is clean and do one more water test.
Dave says
It may be normal. If you have a small amount of liquid, e.g. for steaming eggs, it can overshoot the target temperature causing a release of steam for a short time. After this initial release, things should settle down. If the pan is more full this should not happen.
Loraine says
Very helpful … my lid wasn’t venting properly…it was the metal in seal button. Thank you
Paint the Kitchen Red says
Loraine, you’re welcome!
Kathryn Blacharski says
Thank you for such an informative article. I have gone through all the items you have listed, but my instant pot leaks steam from all the way around the cover. I have looked at the sealing ring inside the lid and can’t see any cuts, loose spots, etc. Also the steam release handle moves back and forth VERY loosely so it doesn’t seem to make any difference which direction it points. I’ve only used it twice to make spaghetti so it didn’t work from the get go. Do you have any other advice? It’s already out of warranty because it was a gift and I didn’t use it right away.
Paint the Kitchen Red says
Kathryn, sorry to hear you’re having trouble. The steam release handle is supposed to be wobbly so that shouldn’t be an issue. If there was a problem with the steam release valve, you would see a lot of steam coming out of the steam release valve. Since you’ve mentioned that steam is coming out the sides, it sounds like either the sealing ring or a faulty unit. If there’s any way for you to borrow someone’s sealing ring, that would be good. Even though you might not see anything wrong it could be defective. The only other thing would be to purchase another lid and/or contact the company – sometimes social media gets their attention.
Jeffrey A. says
Thank you very much! I’ve had the instant pot for years but it boiled over a bit today and I had no idea why. The culprit was that the sealing ring was crooked. I was able to secure/straighten it and then I verified it could move around, just like you said.
Thank you for creating this helpful page!
Paint the Kitchen Red says
Jeffrey, I’m glad you found it helpful!
Kim says
Thank you SO much for your videos! After 2 hours of frustration and trying to figure out why the instant was not sealing I watched your video and now know what I had done wrong. I appreciate you showing different models of instants that helped tremendously.
Paint the Kitchen Red says
Hi Kim, I’m so glad that you found it helpful. Thank you for taking the time to comment – much appreciated!
Gerald Knauss says
Thank you very much for posting all of this good advice and observations! Just bought the Instant Pot Pro 6 qt version. Made steel cut oats for my wife, no problem. It steamed a bit from the red vent tube, and then sealed. However, later today I was making some Mexican chicken, and it just sat there venting stream thru the red vent tube, finally gave the unit a small whack on side, and it sealed up and in a few minutes went from pre-heat to cook mode. Hopefully this doesn’t keep happening, or maybe I just need to be more patient. 😉
Paint the Kitchen Red says
Gerald, it’s probably fine – the amount of time it takes depends on how much food you’re cooking. If the Mexican chicken had a lot of liquid, it could take a while. I’d do a water test – i.e. pressure cook 2 cups of water for 5 minutes. It should take about 10 minutes to seal.
Kevin Lowry says
I’m an experience cook with three IP’s and this is the most exhaustive article I’ve read on this common problem. I printed this to have on hand because just when I think I’ve figured out every way my IP didn’t seal, I find a new way that was addressed in this article. Thank you so much for sharing and including the YouTube video.
Paint the Kitchen Red says
Kevin, thank you for your kind words. I’m so happy that you found the article helpful.
Katherine says
Thank you for your very comprehensive check list to trouble shoot issues with Instant Pot. I was having a problem closing the lid and to my surprise it was the seal not properly seated in the lid. Of all the places I looked to find help with my issue, no one mentioned the seal. Thank you so much!
Paint the Kitchen Red says
I’m glad you were able to figure out the problem and thanks for commenting!