

Thai BBQ Chicken (Gai Yang) is a popular Thai street food. This Thai barbecue chicken recipe uses chicken thighs, which are meaty and perfect for grilling because they stay moist. Cook in the Instant Pot and finish on the grill, or cook entirely on the grill, the choice is yours!

This post contains affiliate links. As an Amazon Associate, I earn from qualifying purchases. Please read the disclosure.
Introduction
Like most folks who live through snowy and cold winters, we love spending as much time outdoors as we can in the summertime! And that means we love eating outdoors and grilling. I especially love to grill bone-in chicken thighs!
I’ve found that the Instant Pot is a great time saver because it allows me to precook meat with the marinade ahead of time, and then when I’m ready, I just need to put the cooked meat on the barbecue grill for a few minutes to get that grilled look and flavor.
However, you don’t need to use the Instant Pot with this recipe. Simply marinate the chicken and put it on the grill. Instructions for only grilling are included below.
If you love Thai food as I do, you may be familiar with Gai Yang chicken which is a Thai bbq chicken that’s common in Thailand as street food. Whether you’ve had it before or not, I think you’re going to love this recipe. It’s really flavorful.
This recipe may require a trip to an Asian store unless you have a very well-stocked local grocery store. Of course, you can always find the ingredients on amazon.
If you’re looking for some grilled chicken recipes, try Instant Pot Jamaican jerk chicken or Instant Pot Korean chicken. They’re as delicious as this recipe!
Tips and Substitutions
Marination
- I recommend that you marinate the chicken. You’re really going to notice a difference when you marinate the chicken for even a few hours.
Broiling
- If you want to make this recipe in the winter time, or you don’t have access to a grill, place the chicken thighs in the oven 4 inches from the top and broil the chicken until done.
Basting
- Basting the chicken after it’s barbecued is an important step because the Thai sweet chili sauce acts as a glaze and adds amazing flavor.
Black Soy Sauce
- The one ingredient you might not be familiar with is Thai black soy sauce.
- Black soy sauce is a special Thai soy sauce. It’s dark, thick, sweet and has the consistency of molasses. If you can’t find it, look for Thai sweet soy sauce, which is similar.
- Thai black soy sauce is not the same thing as Chinese dark soy sauce, which is thinner and not sweet.
- My favorite brand is Healthy Boy but any Thai brand (e.g. Kwong Hung Seng) will do. If you can’t find it, you can substitute kecap manis, which is a very similar Indonesian soy sauce and may be more readily available.
Thai Sweet Chili Sauce
Thai sweet chili sauce is a tangy, spicy, sweet sauce that’s used as a dipping sauce, marinade, or basting sauce. If you can’t find it, try making it at home with this Thai sweet chili sauce recipe from The Flavor Bender.
Fish Sauce
I really like the quality of Red Boat fish sauce which you can find at Asian grocery stores or on amazon. But it is more expensive than other fish sauce brands. Tiparos is another brand of fish sauce I’ve used – it’s more affordably priced.
There’s no substitute for fish sauce. It adds that depth of flavor, the umami, to dishes. I’ve had vegetarian readers recommend the Fysh brand of sauce. But I haven’t tried it. You may need to add a little extra.
Soy sauce is also a substitute for fish sauce, but there is a flavor difference.
Chicken
I love the flavor bone-in chicken, but I do make this recipe with boneless skinless chicken thighs as well. The cooking time should be reduced to 6 minutes if you’re grilling the chicken after pressure cooking and 7 to 8 minutes if you’re not grilling.
Make Ahead
As a timesaver, I often pressure cook this Instant Pot Thai Grilled Chicken recipe, and then refrigerate the chicken. I remove the chicken from the fridge before I need to grill it. This works great if I want to prepare this for guests.
Burn Message
I haven’t encountered the burn message while making this Instant Pot recipe in my 6 quart Instant Pot. All the sauces contribute toward the liquid requirement. The chicken also releases some liquid.
If you’re prone to getting the Burn error, feel free to add a couple of tablespoons of chicken broth to the chicken before pressure cooking.
FAQS
Yes, you can substitute boneless chicken thighs for bone-in thighs. Reduce the cooking time to 6 minutes. If you’re not planning on finishing on the grill, pressure cook for 7 or 8 minutes.
I am not a big fan of pressure cooking chicken breasts. I find that the chicken comes out too dry. If you want to pressure cook chicken breasts, change the cooking time to 5 or 6 minutes.
If you’re not pressure cooking the chicken and just grilling, yes you can use chicken breasts instead of thighs.
You could add a chopped Thai chili pepper or half of one. They are quite spicy so a little goes a long way. If you can’t get it, use chopped serrano or jalapeno peppers.
Yes, you can double the recipe. Keep the cooking time the same.
When pressure cooking, to avoid the Instant Pot burn message, you can put a trivet in the inner pot and place the chicken on top of the trivet. This prevents overcrowding at the bottom.
If you’re making it in the Instant Pot, since this recipe has a minimal quantity of liquid already, halving it would most likely give you the Burn error. You might be able to get away with it if you’re using a 3 quart Instant Pot.
If you’re just grilling, yes you can halve the recipe.
Grilling the chicken isn’t necessary but it does add a special flavor to the chicken. You can also broil the chicken in the broiler. If you’re not planning on grilling or broiling the chicken, increase the pressure cooking time by a minute.
I often pressure cook the chicken ahead of time, refrigerate it, and then grill it right before we’re ready to eat.
If you’re new to the Instant Pot and aren’t familiar with how to use it, you might find it helpful to first read one of the following guides and then come back here to learn how to make this recipe.
- General Instant Pot Instructions for Beginners
- Instant Pot ULTRA Beginner’s Manual
- Instant Pot DUO EVO PLUS Beginner’s Manual
- Instant Pot DUO NOVA Beginner’s Manual
- Instant Pot DUO GOURMET Beginner’s Manual
- Instant Pot DUO CRISP Beginner’s Manual
- Instant Pot PRO Beginner’s Manual
- Instant Pot PRO CRISP Beginner’s Manual
Thai Grilled Chicken – Ingredients

- Chicken
- Sweet soy sauce
- soy sauce
- Thai sweet chili sauce
- cilantro stems
- Brown sugar
- White pepper
- Lime juice
- Fish sauce
- Garlic
More details in the recipe card at the bottom of this post
How to Make Instant Pot Thai Chicken Thighs (Step by Step Instructions)
- Marinate the chicken
- Pressure cook
- Quick release
- Transfer chicken to bowl
- Grill chicken
Marinate the chicken

- Whisk together soy sauce, sweet dark soy sauce, fish sauce, lemon juice, lime juice, white pepper, brown sugar, garlic, and cilantro stems in a medium bowl.
- Add mixture to chicken thighs in a large bowl. Marinate for at least 30 minutes, preferably 4 hours to overnight.
- Transfer chicken and marinade to Instant Pot inner pot.
Instant Pot Duo Pressure Cook 9 minutes

- Close the lid and make sure the steam release handle is in Sealing position.
- Press Manual (or Pressure Cook) and + or – until the display reads 9 (9 minutes).
Instant Pot Ultra Pressure Cook 9 minutes

- Close the lid.
- Select Pressure Cook mode and adjust the time to 9 minutes (00:09).
- Press Start.
Pressure Cooking Process (Duo and Ultra)
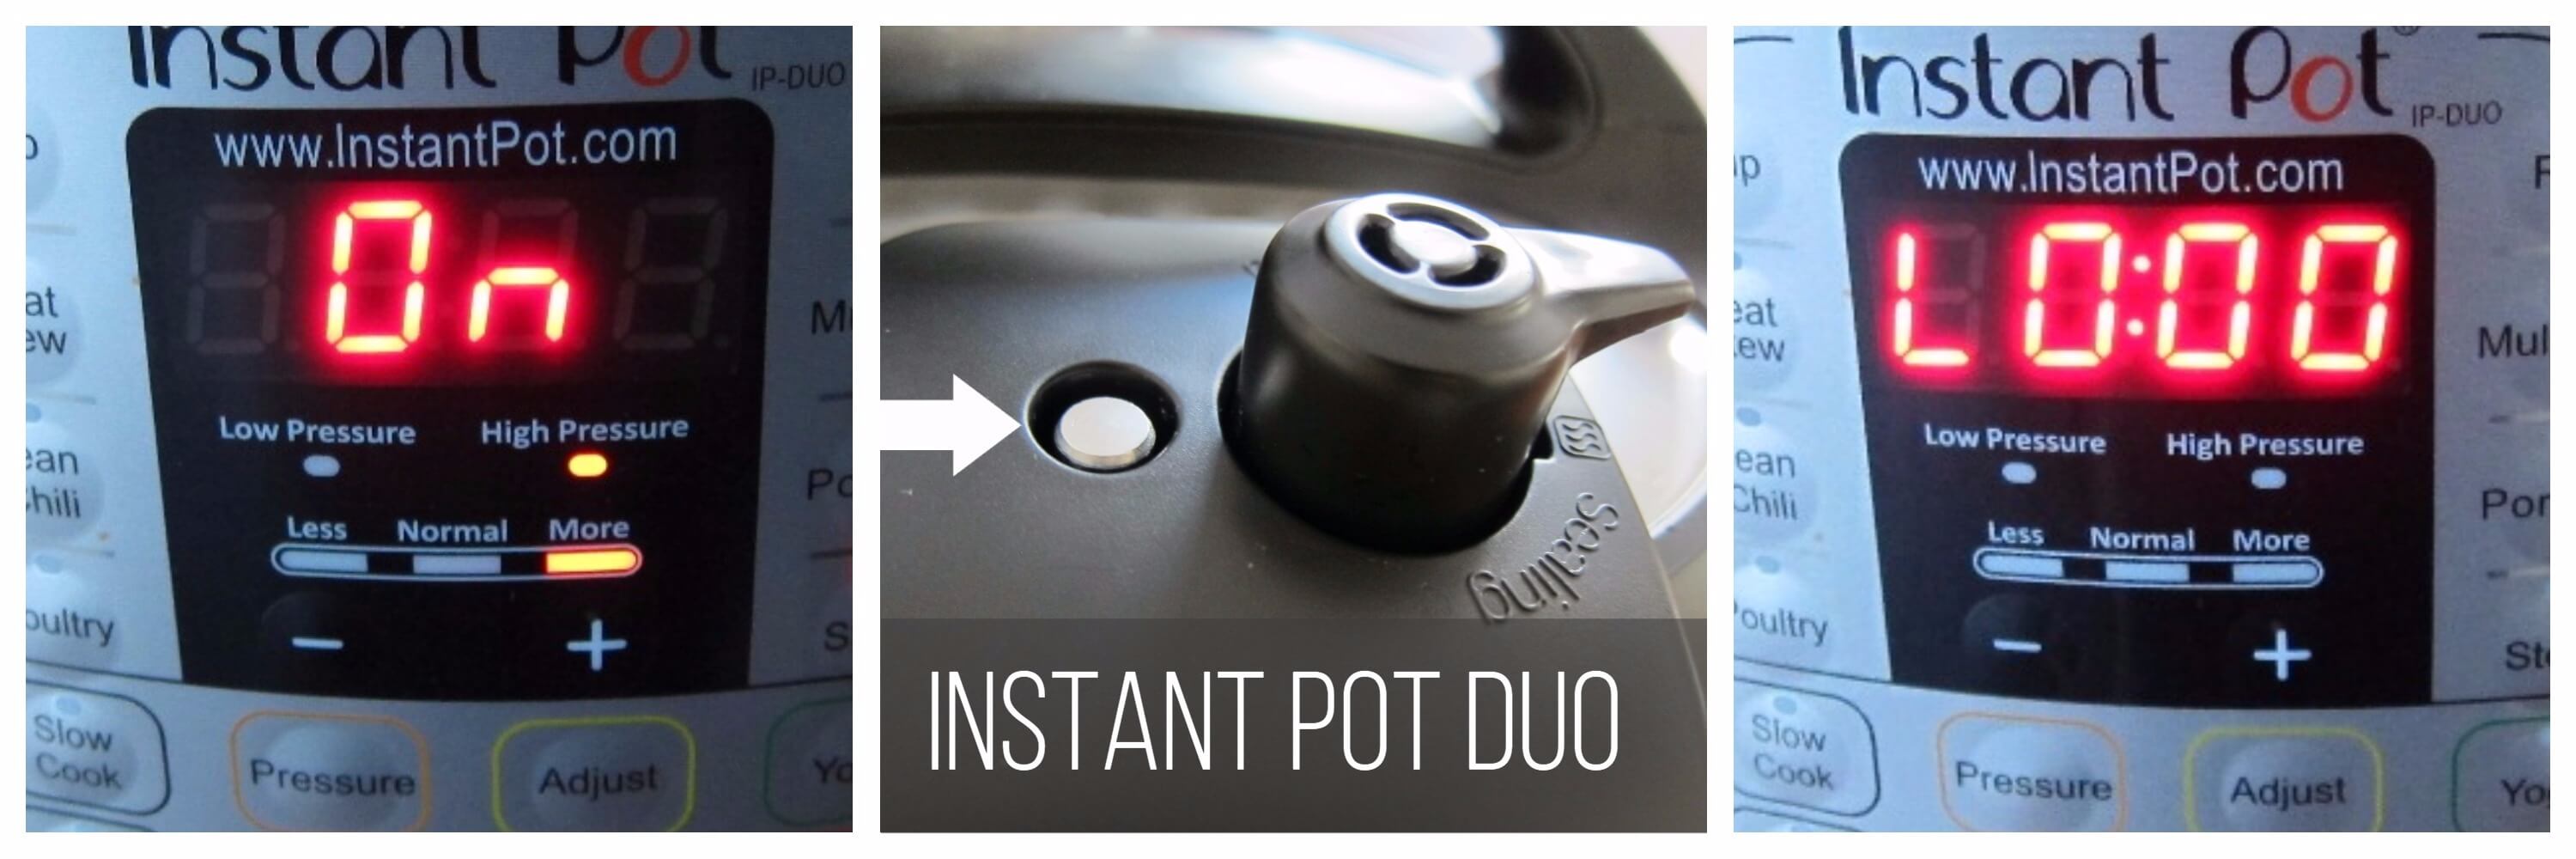

- Instant Pot display will change to On.
- Once the Instant Pot is pressurized, the float valve will go up.
- The display will count down to 0; it will then switch to Keep Warm mode and display L0:00 or 00 00 and begin to count up the number of minutes since pressure cooking completed.
How to Quick Release Pressure (QR) on the DUO

- Move the steam release handle to Venting. Steam will come out of the steam release handle.
- When your Instant Pot is depressurized, the float valve will be in the down position.
- Press Cancel and open the Instant Pot.
How to Quick Release Pressure (QR) on the ULTRA

- Press down on the Steam Release Button until it locks into place, and steam begins to come out of the Steam Release Valve.
- When your Instant Pot is depressurized, the float valve will be in the down position.
- Press Cancel and open the Instant Pot.
[Find out more about the pressure release methods and how and when to use them. ]
Transfer chicken to bowl

- Transfer chicken from Instant Pot to a large bowl with tongs or slotted spoon. Empty cooking liquid into the same bowl.
- Let the chicken thighs sit in the juices while you prepare your grill.
Grill chicken

- Preheat grill to 350 degrees Fahrenheit.
- Grill chicken for just enough time to get sear marks on both sides, and to give it a grilled look and flavor, about 4 minutes per side.
- Transfer grilled chicken to a serving dish and immediately baste both sides with Thai sweet chili sauce, using a basting brush.
- Sprinkle with green onions and chopped cilantro.
Grill Instructions for Thai Chicken Thighs
To make this recipe on the grill:
- Preheat the grill on medium-high (about 400 degrees Fahrenheit) .
- Grill chicken for about 20 minutes, turning every 5 minutes.
- Remove from grill when temperature reaches 165 degrees Fahrenheit.
See the recipe card below for detailed instructions.

Thai Grilled Chicken Thighs
Ingredients
- 2 Tbsp soy sauce
- 1 Tbsp Thai black soy sauce or kecap manis
- 2 tablespoon fish sauce
- 1 tablespoon lemon juice
- 1 tablespoon lime juice
- 1 teaspoon white pepper
- 2 tablespoon brown sugar
- 2 tablespoon garlic minced
- 2 tablespoon cilantro (stems, packed) chopped fine
- 6 chicken thighs bone-in
- 1 tablespoon Thai sweet chili sauce
- green onions thinkly sliced, for garnish
- cilantro leaves chopped, for garnish
Instructions
Instant Pot Instructions
- For the marinade, whisk together soy sauce, sweet dark soy sauce, fish sauce, lemon juice, lime juice, white pepper, brown sugar, garlic, and cilantro stems in a medium bowl.
- Place chicken thighs in a large bowl and pour in the marinade. Marinate for at least 30 minutes, preferably 4 hours to overnight.
- Transfer chicken and marinade to the Instant Pot inner pot.
- Pressure cook for 9 minutes on High Pressure.
- Do a quick release of pressure (QR). [Read More: The Different Pressure Release Methods]
- Using a slotted spoon or tongs, transfer chicken from Instant Pot to a large bowl. Empty cooking liquid into the same bowl.
- Let the chicken thighs sit in the juices while you prepare your grill.
- Preheat the grill to 350 degrees Fahrenheit.
- Grill chicken for just enough time to get sear marks on both sides, and to give it a grilled look and flavor, about 4 minutes per side.
- Transfer grilled chicken to a serving dish and immediately baste both sides with Thai sweet chili sauce using a basting brush.
- Sprinkle with green onions and chopped cilantro.
Grill Instructions
- For the marinade, whisk together soy sauce, sweet dark soy sauce, fish sauce, lemon juice, lime juice, white pepper, brown sugar, garlic, and cilantro stems in a medium bowl.
- Place chicken thighs in a large bowl and pour in the marinade. Marinate for at least 30 minutes, preferably 4 hours to overnight.
- Preheat grill to medium-high temperature (400 degrees Fahrenheit).
- Remove chicken from marinade and discard marinade.
- Grill chicken for until internal temperature reads 165 degrees Fahrenheit, flipping the chicken every 5 minutes, for a total of about 20 minutes.
- Transfer grilled chicken to a serving dish and immediately baste both sides with Thai sweet chili sauce.
- Sprinkle with green onions and chopped cilantro.
Notes
- Prep time does not include marination time.
- If you’re not planning on grilling or broiling the chicken, you can increase the pressure cooking time by a couple of minutes, and do a Natural Pressure Release (NPR).
Nutrition
Thank you for visiting Paint the Kitchen Red. All photos and content are copyright protected. Please don’t use any content without prior written permission. If you’ve made this recipe and would like to share it with your friends, please link back to this recipe. Thank you!
I am not a certified nutritionist. I provide my best estimate of nutritional information merely as a courtesy to my readers. If you depend on nutritional information for dietary or health reasons, I suggest using your favorite online nutrition calculator to confirm the nutritional value of this recipe based on the actual ingredients that you use.
Did you know that the best way to support your favorite bloggers is to comment and rate recipes, and share on social media? If you loved this recipe, please comment and give it a five ⭐ rating in the comment section below. If you’re a pinner, pin this post using the Pin buttons at the top and bottom of this post and in the recipe card above. Thank you for your support!
More Chicken Recipes


Jeannette Barker says
Do you use skinless thighs with instant pot method?
Paint the Kitchen Red says
Jeannette, yes I prefer to use skinless chicken always when pressure cooking.
Polly says
I really enjoyed this recipe! I had a dozen drumsticks, so I upped the marinade by 50%. After a 4 hour marinade, i put the chicken into the IP and poured the marinade into a measuring cup w/water to make it 3/4 cup to come up to pressure. (I didn’t read your instructions to note that 1/4 cup would have been enough.) I put a Pot-in-pot of 3 cups jasmine rice and 3 cups water on top of the drumsticks. Put them on HP for 8 mins, 10 mins NR.
Took out the rice, then broiled the drumsticks on each side for a few minutes. As instructed, the thai sweet chili sauce and garnishes really made it fantastic. Will make this again and again! Thanks for the roadmap. 🙂
Paint the Kitchen Red says
Hi Polly, thank you so much for taking the time to comment. I’m so glad you liked the recipe. I love the flavors in this recipe!
Polly says
I made this with a dozen chicken legs. Used the marinade to bake up the 3/4 cups of liquid to bring up to pressure. I should have followed your instructions more carefully. But it was still amazing after broiling and adding the thai sweet chili sauce. Really delicious!
Also made 3 cups of jasmine rice using pot-in-pot, so I did the meal w/8 mins at HP, 10 mins NR. It all turned out so well.
Elsie says
Is this enough liquid fir the IP? My instruction manual says it needs 1 cup of liquid.
Paint the Kitchen Red says
Elsie, I’ve never had any issues. Keep in mind that all the sauces count towards the liquid measurement plus liquid can be released from the chicken. If you’re prone to getting the Burn error, add 1/4 cup of broth.
Bob Rosenberg says
The Thai Chicken thighs were fantastic!. I live in the LA area so no problem getting all the ingredients in local stores. One comment: 350 is not “high”, at least not on my natural gas grill. High is more like 650. 350 is medium or even “medium low”. 350 is the right temp, the chicken is already cooked and is just getting spiffed up on the gril.
Paint the Kitchen Red says
Hi Bob, thanks for the comment! You’re right, I will remove the reference to ‘high’ and just leave the temperature. Thank you!
John says
I finally got around to making this last night. Another winner. Even though I accidentally burned the chicken skin on the grill, it still tasted great.