

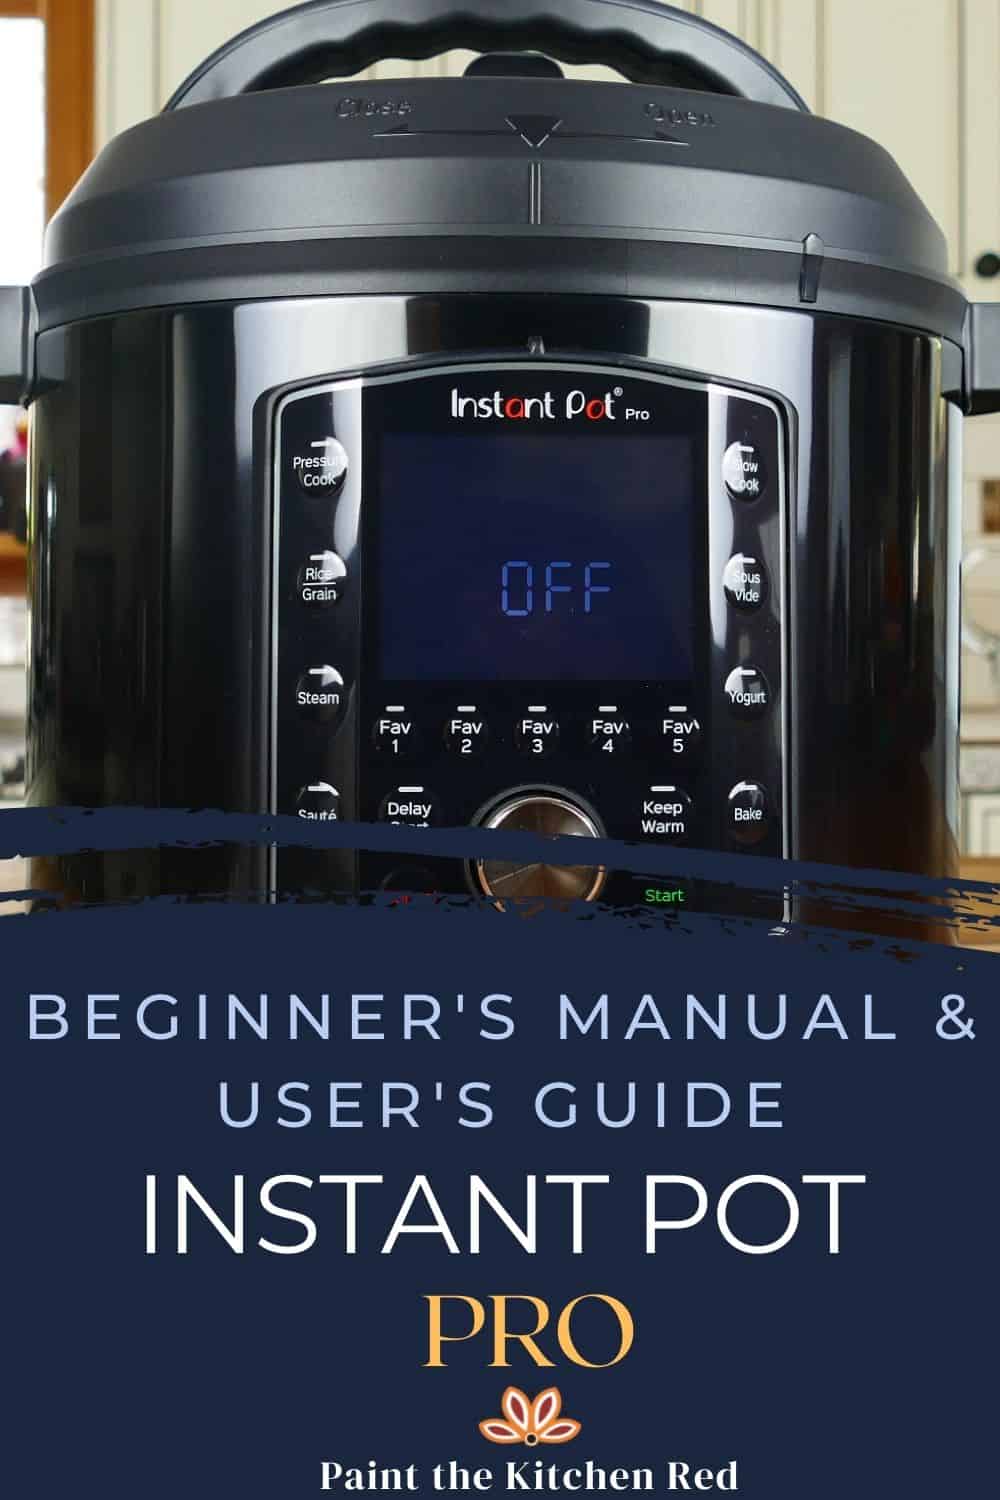
If you’ve just purchased an Instant Pot Pro model, this beginner’s manual will help you get started. This Pro user manual tells you about all the parts, the most important buttons, and functions, and gives you instructions on how to use the Instant Pot PRO model for the first time by doing the water test or initial test run.
This post contains affiliate links. As an Amazon Associate, I earn from qualifying purchases. Please read the disclosure.
Table of Contents
- Introduction with Video
- What is an Instant Pot?
- First Thing You Need to Do: Open the Box!
- Is the Instant Pot Safe to Use?
- Safety Precautions
- Instant Pot Pro vs Duo Evo Plus
- Parts
- Accessories
- Lid
- Sealing Ring
- Float Valve
- Anti-Block Shield
- Assembly
- Condensation Collector
- Open and Close the Lid
- Release Pressure
- Commonly Used Functions
- Initial Test Run/Water Test
- Pros and Cons
Introduction with Video
The Instant Pot Pro is one of the latest models that have been introduced. It’s an upgrade to my favorite model, the Instant Pot Duo Evo Plus, which was recently discontinued. I was sad to hear it was discontinued, but upon trying this new model, I got over it pretty quickly!
The Instant Pot Pro has all the features that I love about the Duo Evo Plus and improves on them even further.
If you have trouble seeing the instructional video below, disable your adblocker temporarily and refresh the browser.
What is an Instant Pot?
The Instant Pot has become so popular in recent years that Instant Pot is being used by some as a generic name for pressure cookers of any brand.
In reality, Instant Pot is the brand name of a multicooker that serves as a pressure cooker, slow cooker, rice cooker, yogurt maker, sauté/searing pan, steamer and warming pot all in one convenient appliance.
Some people use the name Instapot, but the correct name is Instant Pot.
The Instant Pot Company (Instant Brands) started out with one product – the Instant Pot – and now makes a wide range of kitchen appliances including air fryers, blenders, and toaster ovens.
Although the Instant Pot pressure multicooker has many different functions, the most commonly used is the Pressure Cook function. Pressure cooking allows you to cook foods at a fraction of the time it would take on the stovetop.
PURCHASE THE INSTANT POT PRO ON AMAZON!
First Thing You Need to Do: Open the Box!

I often hear from readers that they’re so intimidated by the Instant Pot that they’re scared to take it out of its box. If this is you, rest assured that there’s nothing to worry about. The Instant Pot has many layers of built-in safety features!
Besides, if you don’t get it out of the box and try it out, in the event you have a defective unit you might miss the warranty period and be stuck with a bulky paperweight!
In this guide, I’m going to (virtually) hold your hand and help you get going to the point where you’ll pressure cook something simple – water!
Is the Instant Pot Pro Safe to Use?
This is very different from your grandmother’s pressure cooker! If you’ve experienced stovetop pressure cooker mishaps in the past, you have nothing to worry about. The Instant Pot eliminates most of those pressure cooker issues.
According to Instant Pot, in the past, most pressure cooker disasters could usually be attributed to user error. Instant Pot pressure multicookers are carefully designed to eliminate and avoid most of the potential problems.
There are many safety features help reduce common errors. These include pressure sensor technology, lid close detection, lid lock technology, overheat protection, and automatic temperature and pressure controls.
Safety Precautions
Although there are many built-in safety features as explained above, as a user you need to follow common-sense precautions:
- Don’t touch the hot surfaces, particularly the stainless steel parts. Use the handles to move the Instant Pot or the inner pot.
- Don’t place the Instant Pot on or close to an electric or gas burner.
- Don’t move the Instant Pot when it’s under pressure.
- Don’t fill over ⅔ full.
- When cooking foods that expand e.g. rice, beans, pasta don’t fill over ½ full.
- Ensure anti-block shield, float valve, and steam release pipe are clean and not clogged.
- Don’t open the lid until the float valve is down i.e. the Instant Pot is depressurized.
- Keep hands and face away from the steam release mechanism.
- Don’t obstruct the steam release assembly when pressure is being released.
- When quick-releasing frothy foods such as applesauce, oatmeal, pasta, etc. take extra care. It’s best to release pressure is short bursts for these types of foods.
- Don’t use another Instant Pot model’s lid on the Pro model.
For more information about safety precautions, please read the Instant Pot Pro user manual.
Instant Pot Pro vs Duo Evo Plus
The Instant Pot Pro is an updated version of the Instant Pot Duo Evo Plus. Here are the main differences between the two models:
- The Instant Pot Pro allows you to save up to 5 favorite programs.
- The Instant Pot Pro allows you to set a reminder for 5-minute natural release or 10-minute natural release.
- Some people had issues with using the Saute feature on the Duo Evo Plus. When the temperature is set to the highest level, they get the C8 error code. This issue doesn’t seem to be happening with the Pro.
Parts

The Instant Pot Pro comes with the following main parts:
- Base unit/Outer Pot – stainless steel exterior that houses the heating element, control panel, and attached power cord
- Inner pot – removable stainless steel pot with easy-grip silicone handles. The inner pot is stove-friendly, so you can use it on your stovetop as you would a regular pot.
- Lid – closes the Instant Pot and seals it under pressure.
Accessories
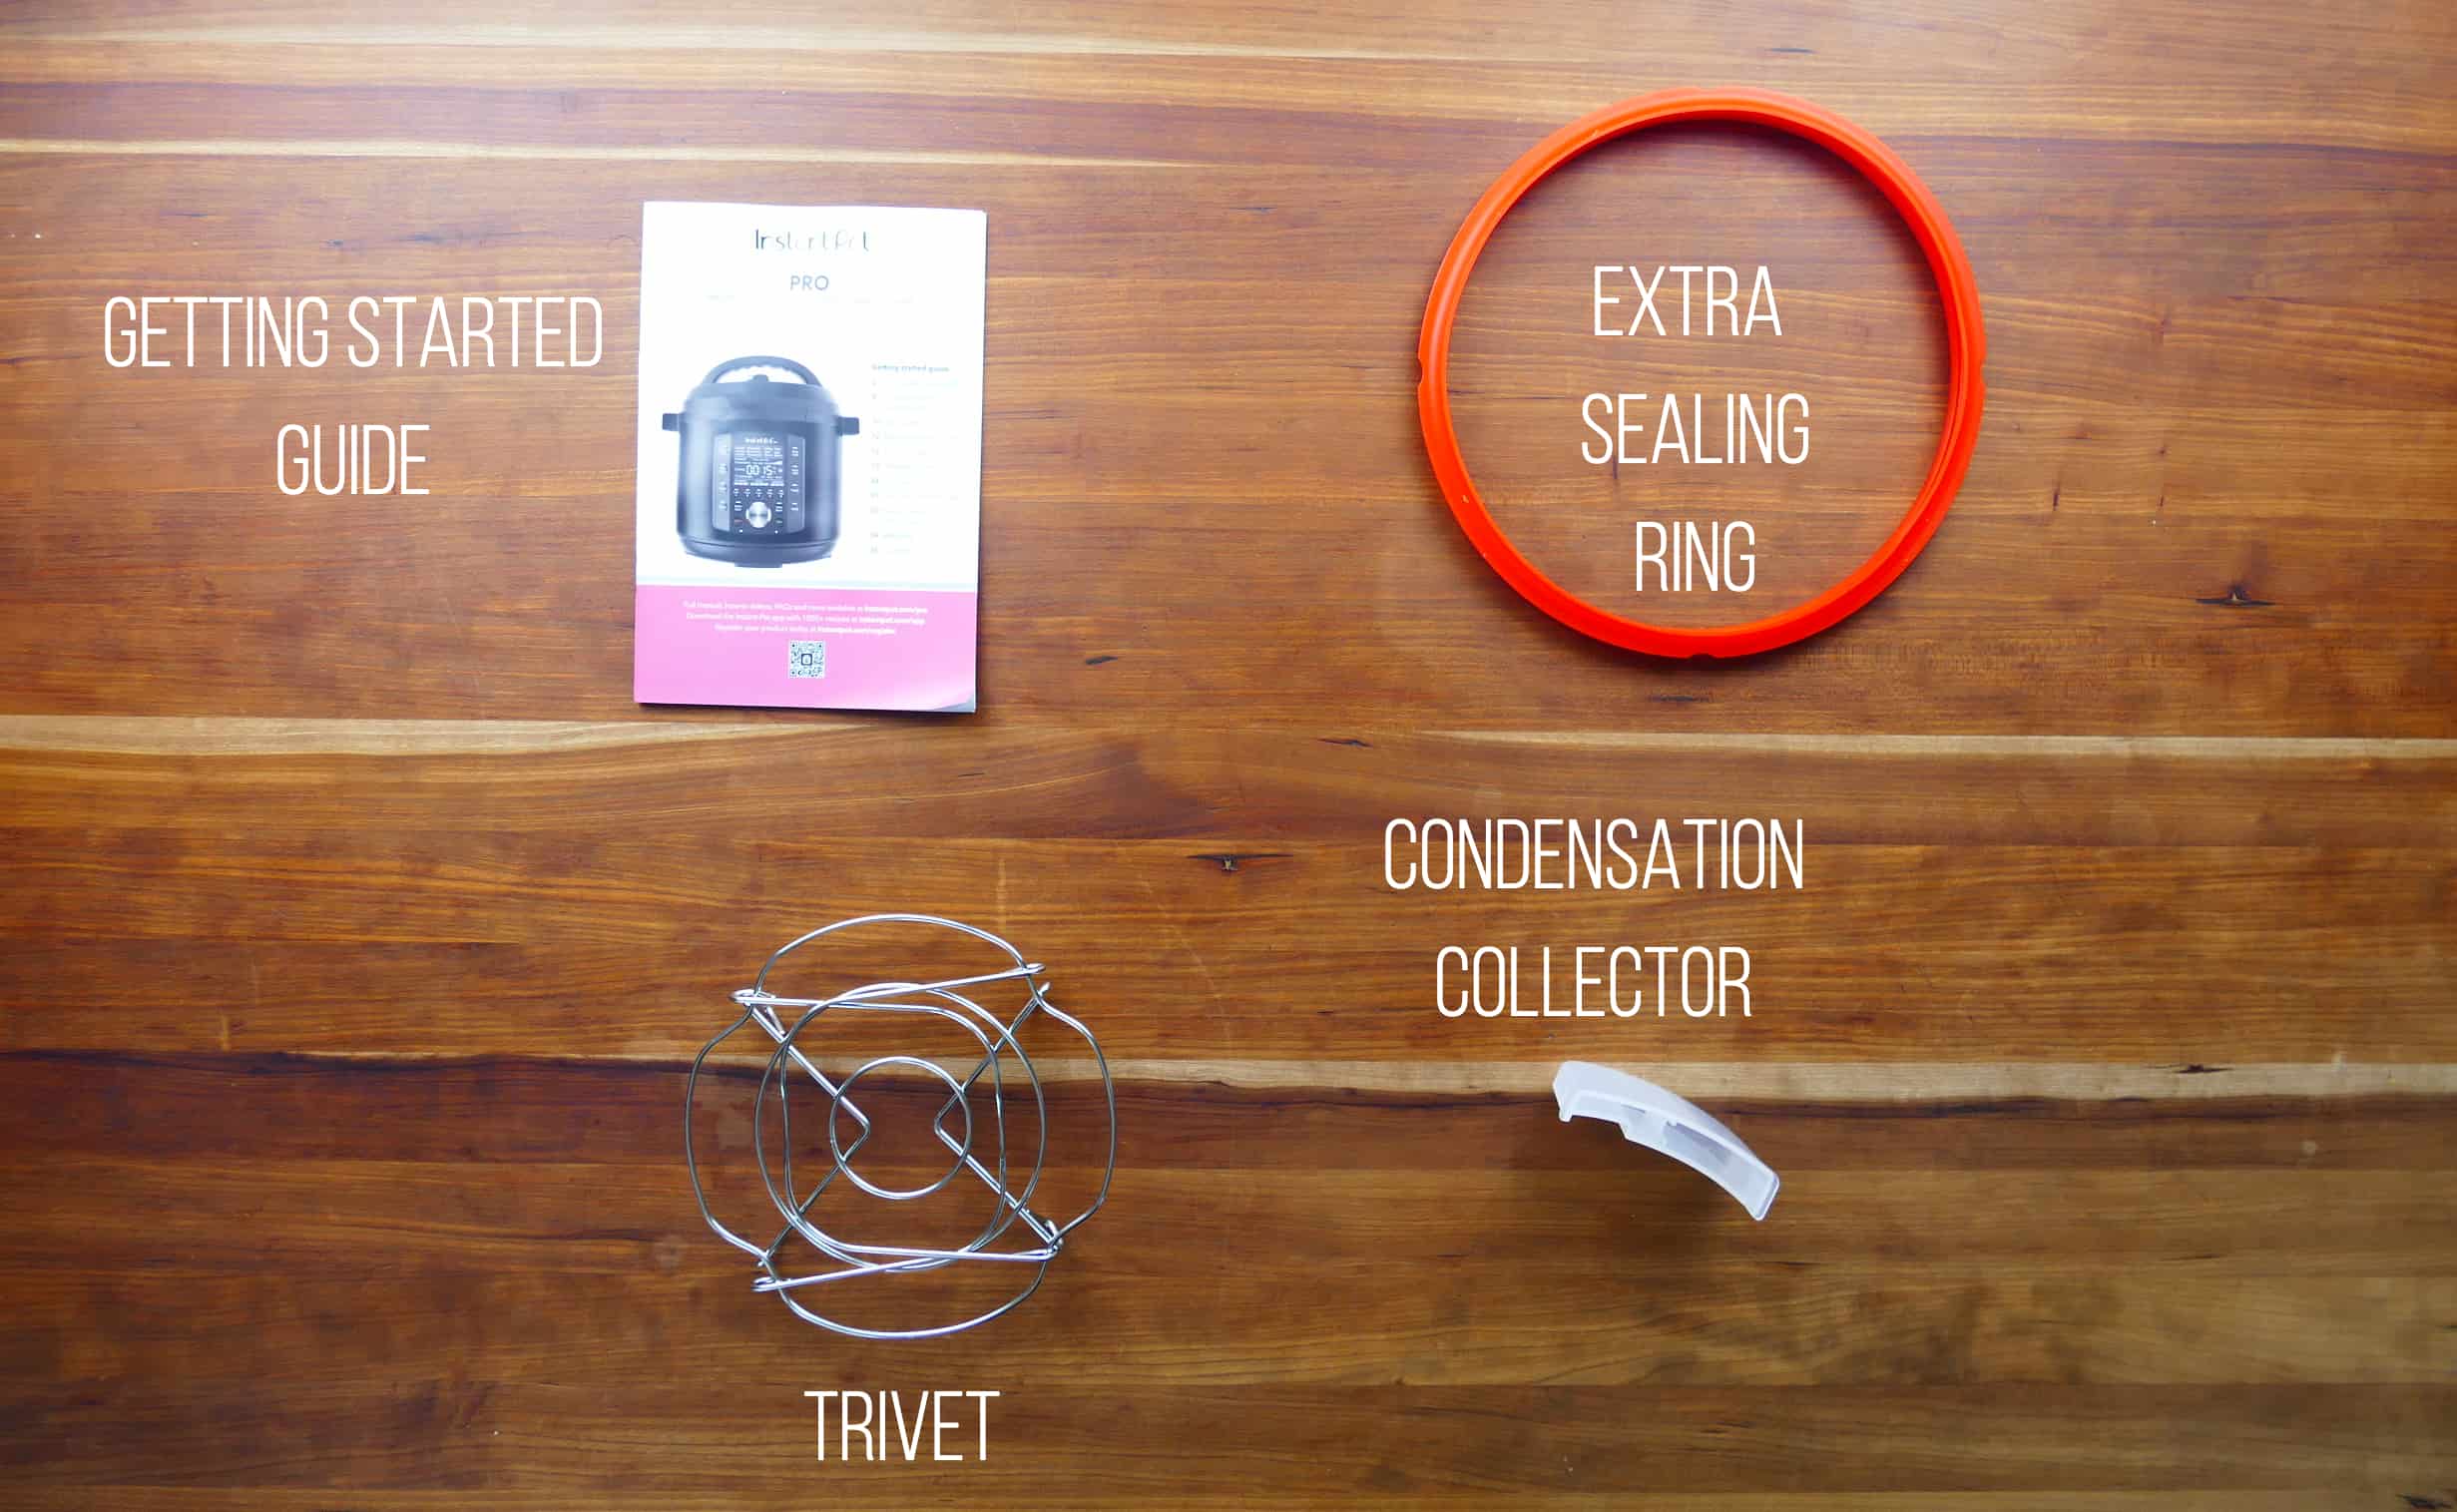
The Instant Pot Pro comes with the following manuals and accessories:
- Getting Started guide – setup, overview, and instructions
- Extra Sealing Ring – great for sweet recipes or desserts
- Trivet – the trivet is useful for elevating food above the liquid and for Pot in Pot cooking
- Condensation Collector – catches drips from condensation on the lid; attaches onto the back of the base unit
Instant Pot Pro Lid
Instant Pot Pro Lid Exterior Parts

- Lid Handle – used to put on and take off the lid
- Lid Fin – placed in the lid fin slot of the base unit to prop the lid open
- Steam Release Assembly – consists of steam release cover, steam release valve, and steam release pipe
- Float Valve – seals in the steam, allowing the Instant Pot to be pressurized
- Quick Release Switch – used to do a Quick Release (QR) of pressure
- QuickCool Cover – removable cover that allows the Instant Pot to cool down faster when doing a natural pressure release (NPR or NR)
Steam Release Assembly – Parts

The steam release assembly consists of:
- Steam release cover – diffuses the steam when pressure is released
- Steam release valve – regulates the internal temperature. It is supposed to be wobbly, but should be pushed in all the way
- Steam release pipe – steam travels from the inner pot through the pipe during steam release
Instant Pot Pro Lid Interior Parts

The inside of the Instant Pot Pro lid consists of the following parts:
- Silicone Cap for Float Valve – covers the float valve and keeps it in place
- Lid Locking Pin – safety mechanism that prevents the lid from opening under pressure
- Anti-Block Shield – prevents food from coming out of the inner pot through the steam release pipe
- Sealing Ring Rack – holds the sealing ring in place
- Sealing Ring – silicone sealing ring that allows the Instant Pot to seal
Sealing Ring
How to Remove the Sealing Ring

- Pull gently on the silicone ring until it detaches from the sealing ring rack.
- Continue to pull the silicone sealing ring out until it is completely separated.
How to Replace the Sealing Ring

- Place the silicone sealing ring on the sealing ring rack.
- Working your way all around, push the sealing ring until it’s firmly seated in the sealing ring rack.
- Make sure no part of the sealing ring is sticking out, or you may have sealing issues and get the Burn Message.
- The first few times, you may find it difficult to remove the sealing ring but after a few uses, it should stretch out a bit.
Float Valve
The float valve needs be cleaned periodically, especially after cooking frothy or starchy foods.
How to Remove the Float Valve

- While holding the float valve in place on the outside of the lid, remove the float valve’s silicone cap.
- Allow the float valve to fall out from the bottom.
- Be careful not to misplace the silicone cap.
How to Replace the Float Valve

- Thread the float valve through the float valve hole.
- While holding it in place on the exterior of the lid, replace the silicone cover by pushing it onto the float valve on the interior of the lid.
Anti-Block Shield
The anti-block shield should be cleaned periodically, especially after cooking frothy or starchy foods.
How to Remove and Replace the Anti-block Shield

- The anti-block shield can be hard to remove with your bare hands.
- Use a silicone trivet or a dish towel to push the anti-block shield in an upwards motion.
- Try it from the front or from behind (as shown above in the first image)
- To replace the anti-block shield, push it in until it clicks into place.
Instant Pot Pro Assembly

- Place the inner pot in the Instant Pot base unit with the handles resting in the handle notches.
Condensation Collector

The condensation collector catches any moisture that builds up on the rim. This usually comes from moisture dripping from inside the lid into the rim of the Instant Pot base, when the lid is propped open. Here’s how to attach the condensation collector:
- Line up the condensation collector with the edges aligned with the notches on the back of the Instant Pot base unit.
- Slide in the condensation collector until it’s pushed in all the way.
Open and Close the Lid
How to Close the Lid

- Place the lid onto the Instant Pot base unit with the arrow mark on the lid lined up with the small bar that is above the right corner of the control panel.
- You will hear a chime (if the volume is turned on).
- Turn the lid clockwise until you hear another chime.
- The lid will be closed.
How to Open the Lid

- Turn the lid counterclockwise until you hear a chime.
- The arrow on the lid will be lined up with the bar on the base unit.
- Lift the lid to remove it.
- If you feel a slight resistance, wiggle the lid back and forth and the suction should release.
How to Prop Open the Lid
Propping open the lid keeps it out of the way and allows you to use the Instant Pot hands-free.

- Locate the lid fin slots in the rim of the base unit.
- Insert the left lid fin into the left slot or the right lid fin into the right slot.
Release Pressure
There are a few different ways to release pressure from the Instant Pot Pro:
- Natural Pressure Release/Natural Release
- Quick Release
- 10-minute or 15-minute Natural Pressure Release
- Quick Release in Short Bursts
[Find out more about the pressure release methods.]
How to do a Faster Natural Pressure Release with QuickCool
There is one additional pressure release method available with the Instant Pot Pro.

Back in the days of stovetop pressure cookers, you were able to cool the pressure cooker down faster by running cold water over the closed lid. This allowed the pressure to drop faster. This isn’t possible with an electric pressure cooker.
To speed up the cooling process, remove the QuickCool cover on the Instant Pot Pro and place the quick cool tray accessory filled with ice on the metal surface. This allows the pressure to be naturally released faster (up to 50% faster).
Here’s how you remove the cover and add the ice.
- Push the tab inwards and pull up.
- Lift the cover upward and towards you to remove it.
- Add ice to the QuickCool tray and place the tray on the metal part of the lid.
- The float valve will drop and you will be able to open the lid.
USES: tender-crisp vegetables, delicate fish
Commonly Used Functions of the Instant Pot Pro
The Instant Pot Pro has many buttons that may appear confusing and complicated. But they really aren’t. Just think of them as presets or shortcuts.
For the purposes of just getting you going, in this guide I’ll show you the most commonly used Instant Pot Pro buttons and functions:
- Pressure Cook | Custom option
- Saute
- Favorites
- Reminder
- Keep Warm
- Start
- Cancel
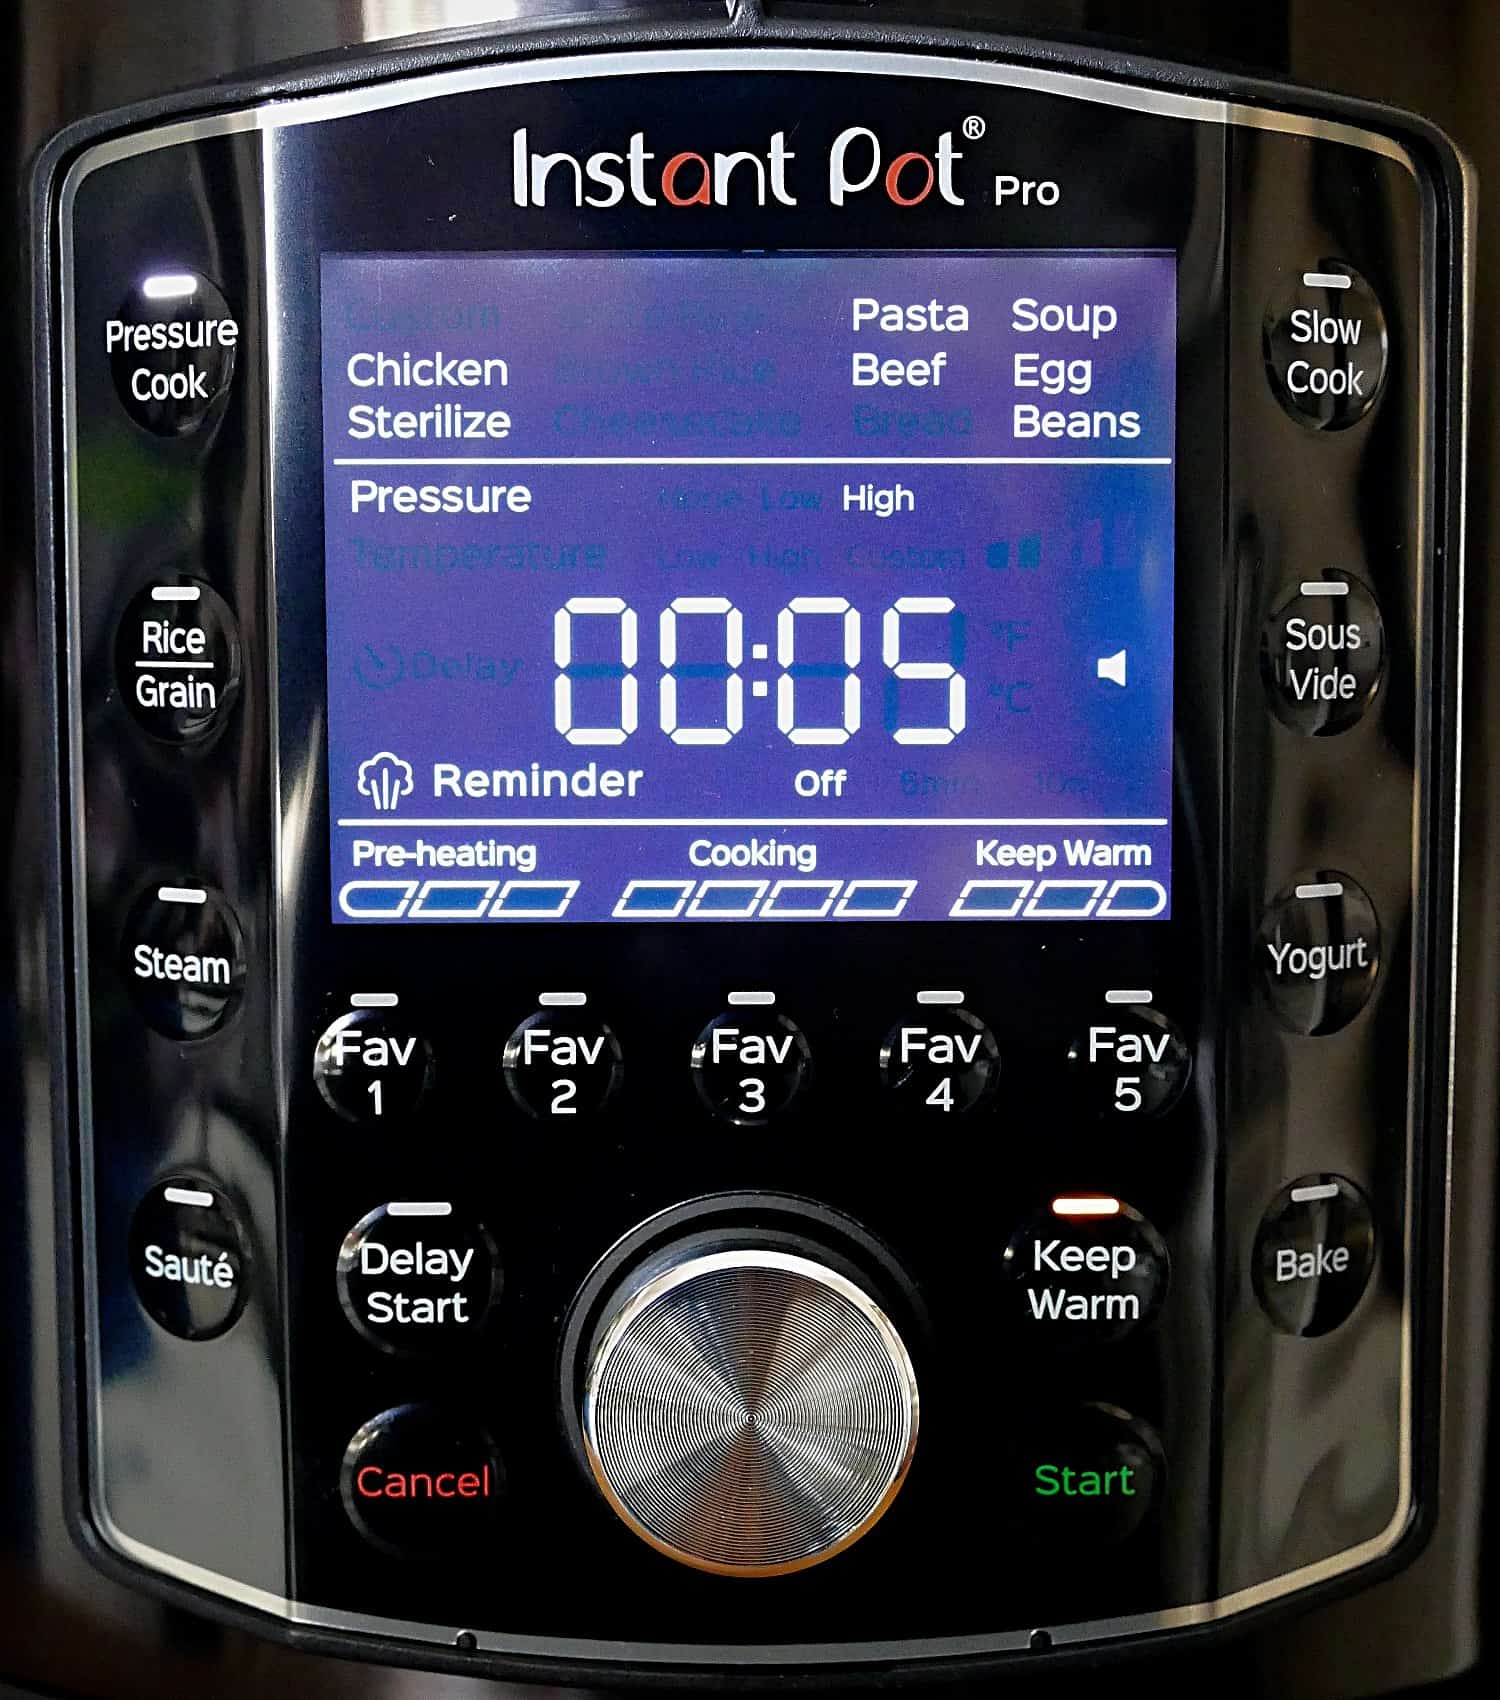
Pressure Cook | Custom

- Press the Pressure Cook button.
- Custom will be blinking. If it isn’t blinking, turn the knob until it’s blinking.
- Press the knob to confirm Custom.

- High pressure should be blinking. If it isn’t blinking, turn the knob until it’s blinking.
- Press the knob to confirm High.
- The time will be blinking. This is usually what you last set the custom pressure cook time to.
- Turn the knob until you see 00:05 (5 minutes) or your desired pressure cooking time.
- Press Start.
Saute

- Press Saute.
- The temperature setting will be blinking e.g. Low, High or Custom.
- Turn the knob to toggle between Low, High and Custom saute temperatures.
- Press the knob to confirm your selection. In this example, I’ve selected Custom.

- You can adjust the temperature level for Custom.
- The bar graph for temperature level will be blinking. Turn the knob to change the temperature level.
- Level 1 is the same as Low and is the lowest setting and Level 5 is the same as High and is the hottest.
- Press the knob to confirm the temperature level. I’ve chosen the highest.
- The time will be blinking – this is the duration of the Saute function. Turn the knob to set the saute time to anywhere between one minute and one hour. In this example, I set it to one hour (01:00).

- Press the knob to confirm the Saute duration setting.
- Press the Start button to begin the Saute function.
Favorites

- Program the Instant Pot as desired. In this example Custom, High Pressure, 5 minutes.
- Press and hold a favorite button. In this example Fav 1.
- There will be a beep and a message showing the favorite has been set e.g. Set 1, Set 2, etc.
- The next time you want to pressure cook something for 5 minutes at high pressure, press Fav 1 and Start.
Reminder
The Instant Pot Pro has a feature that allows you to set a reminder for a 5-minute or 10-minute natural pressure release. Find out more about natural vs quick release and the 5 and 10-minute pressure release methods.
- While programming any pressure cooking function, select the pressure cooking time and press the knob. You’ll see Reminder blinking.
- Turn the knob to toggle between Off, 5min, and 10min.
- Press the knob to select your option.
- Press Start to begin pressure cooking.
Keep Warm, Start and Cancel

- Press the Keep Warm button to turn the Keep Warm function on and off. Turn it on when you want your food to stay warm after being pressure cooked.
- Press the Start button to initiate the selected function or preset. e.g. press Saute and press Start. The Instant Pot Display will say On.
- Press Cancel to end the selected function. Instant Pot display will say Off.
Instant Pot Pro Initial Test Run / Water Test
What is the Water Test?
A water test is done by pressure cooking water for a few minutes. According to the Instant Pot manual you need to use 3 cups of water but I’ve found that using 2 cups of water is adequate. The advantage of using 2 cups is that it takes less time for the Instant Pot to come to pressure.
Why You Should do the Water Test
The initial test run or water test serves two purposes: it familiarizes you with using your new Instant Pot Pro and it allows you to establish that your Instant Pot is working properly. If you have a defective unit, the water test will identify that and you can get a replacement unit.
You should do a water test before the first use but you can also do it when you’re having problems with the Instant Pot pressurizing. Doing the water test will pinpoint whether there’s something about the recipe that’s causing your sealing issues.
How to do the Initial Test Run / Water Test
This section tells you how to use the Instant Pot Pro for the first time, right out of the box. You will do a water test i.e. pressure cook water.

- Make sure the sealing ring is properly seated.
- Place the inner pot into the base unit.
- Plug power cord into an outlet.

- Pour 2 cups of water into the inner pot.
- Close the lid.
- Make sure the steam release switch is in the Seal position.

- Press the Pressure Cook button.
- Select Custom, High pressure and set the pressure cooking time to 00:05 (5 minutes). See the instructions for commonly used functions above for how to set the Pressure Cook function.
- Press Start to begin pressure cooking.
- The display will change to On.

- You’ll hear and see small amounts of steam coming from the top of the lid. This is normal and safe! Just keep your hands and face away from the steam.
- Once pressure has built up, the float valve will come up.
- After the float valve comes up, the display will change from On to 00 05. This can take a few minutes.

- The display will count down from 00 05 to 00 00.
- When the pressure cooking is complete, you’ll hear a series of beeps.
- Press Cancel.
- Do a quick release: move the steam release switch from Seal to Vent.
- Steam will gush out of the steam release cover. Keep your hands and face away from the steam.

- Once all the steam has been released, the float valve will go down.
- This can take a few minutes.

- Open the lid and prop the lid open.
- That’s it! You’ve completed the water test.
Pros and Cons of the Pro
As I’ve mentioned before, I really love this model of the Instant Pot and it’s now my favorite model. But there are a couple of things that I don’t like.
Pros
- Pressure release is diffused
- Pressure release switch is easy to use and self sealing
- Bake function allows for dry baking
- Sous vide function
- Convenient access to functions through buttons and less reliance on the knob.
- Inner pot has handles
Cons
- Handles don’t allow the inner pot to be rotated while sauteing.
(Some find the rotating inner pot annoying, but I love being able to rotate the inner pot in place while sauteing.) - The minimum cook time is 00:01 instead of 00:00 as in some models.
(Sometimes I like to pressure cook for 00:00 minutes e.g. for quick-cooking vegetables.)
[UPDATE: I’ve had questions from readers about a workaround for this. Here’s what I do: I program the Instant Pot to pressure cook for 1 minute, and the moment it switches from On to 00:01, I press cancel and release pressure.]
First Recipes to Try
You should be all set to try out your first recipe! Here are some of my favorite easy recipes:
- Instant Pot Chipotle Shrimp Soup
- Instant Pot Thai Red Curry
- Instant Pot Chicken Tikka Masala
- Instant Pot Cream of Chicken Soup
- Instant Pot Vegetarian Moroccan Stew
- Instant Pot Chicken Curry Soup
If you found this article to be helpful, please share it on social media using the social media share buttons at the top and bottom of this post. Thank you so much!


Susan Cameron says
Hello Neena, we are making L. Reuteri Yoghurt in the IP PRO. Because this is very TEMP sensitive, if I test the temp of the yoghurt and it is too low, can I adjust the TEMP manually while it is in the cooking cycle? So if I set 41 degrees C, and the yoghurt is at 38 degrees, can I up the temp or do I need to cancel and re-progamme?
Neena Panicker says
Susan, sorry for the delay! Yes, you can adjust the temperature while it’s in yogurt mode (working).
Zenita says
Hi Susan, thank you very much for the information. I would like to ask a question When I turn on my instant pot, it keeps flashing all the lights and emitting a beep after a few minutes as it starts cooking, is this normal?
Neena Panicker says
It will beep when you press start and also when it reaches pressure. I’m not sure about all the lights flashing, but if it’s brief, you’re probably fine.
Susan Cameron says
Thanks so much for all the information on the IP PRO. I would love your input on the following: The problem I’ve had from the outset is the amount of time it takes to preheat. In my most recent slow cooking experiment, I wanted to do a silverside for 6 hours on high. I had the pressure lid on as instructed. The device took fully 4 hours to preheat, during which time is showed no signs of cooking or bubbling. This was after I used the sauté function to heat up the contents to a rolling bubble. The pot was not more than ¼ full.
I’ve had similar issues with the sous vide feature, it just does not seem to come up to heat in a reasonable time.
Research on the interwebs indicate that the preheat should take around 20 – 30 minutes.” Thanks 🙂
Neena Panicker says
Hi Susan, 4 hours sounds unacceptable. However, I think this is a common problem with the “Slow Cook” function. Instant Pot has told people that they need 1.5 to 2 cups of liquid when using it as a slow cooker. The liquid helps distribute the heat since there’s only a heating element on the bottom, unlike a tradtional slow cooker. So for recipes that don’t have much liquid, it doesn’t work well.You could try contacting the company and submitting a ticket, but slow cooking is not the appliance’s forte, unfortunately.
Susan Cameron says
Thanks so much Neena, I actually tested this specific unit against another unit and both performed identically.
I got the following reply form Instant Brands UK:
“Pre-heating for extended periods of time – Once you press start, the cooker will show ‘pre-heating’ but will actually start counting down/cooking immediately. This is because slow cookers purposefully take a while to hit their max temp (target temp). The cookers will only display ‘cooking’ once max/target temp has been hit, but this does not mean that the food has not been cooking during the pre-heating phase. Pre-heating in slow cookers, like the overall cooking process is just slower.
Pressure Build Up – Whilst the slow cook function does not use pressure to cook food, it can sometimes accumulate a small amount of pressure due to steam and heat being trapped in a sealed pot; if this occurs, just release by moving the switch to vent.
General Tip – Trust the process, removing the lid whilst slow cooking will sacrifice heat and add around 30 mins to the total cooking time. This is often the mistake when there are complaints around food not getting hot during the long pre-heat phase (people are continuously checking as they think the product is faulty, therefore losing all the heat and further extending the timing). “
Neena Panicker says
I don’t suppose that helps you much. Thank you for sharing that!
Ayelet says
Do you know what the max time limit is for pressure cooking on the Pro (if there is one one)? On the Dup, there is a max of 4 hours… thanks!!
Paint the Kitchen Red says
Ayelet, using the custom program you can set pressure cooking time to 8 hours.
Loren says
Thank you for this very useful introduction to the IP pro.
I’m wondering if the cooking times for the Pro are different than those for the Duo? I have the 6qt. Model. Do I need to adjust recipes times or pressure settings?
Thanks
Paint the Kitchen Red says
Loren, no I’ve not had to change anything specifically for this model.
Barbara says
Thank you for this post. Very helpful!
Have you tried the steam function on the pro? I understand it is without pressure on this model and wonder how this impacts the time.
Paint the Kitchen Red says
Barbara, I just tried it and it does seal, come to pressure. If you wanted it to not pressurize you’d have to leave the sealing switch in the Vent position. So bottom line, the steam appears to work as with other models.
Polona Kuzman says
I have instant pot pro crisp and with steam function if I don’t close the vent, the water boils at max and wil evaporate before preheat cycles are finished.
Is it possible to gently steam (not pressurized) something with ip pro for 1h?
Neena Panicker says
I’m not sure why it’s evaporating so quickly, I am usually able to steam veggies with the steam release set to “vent”.
debra keaton says
I ordered a instant pot pro, it came 4 days ago. It has a huge dent in it …how do I get a new one?
Paint the Kitchen Red says
I would either return it to where you bought it from or contact the company at https://support.instantpot.com/index.php.
Sasha says
HI i have my steam pipe but have lost the steam release valve and cover.
first, can i cook without release valve and cover?
second, where can i buy a replacelment?
Paint the Kitchen Red says
Sasha, you need the steam release valve, not necessarily the cover, which is just a diffuser – handy and useful but not necessary. I’ve heard that the company will sometimes send out a replacement if you’re persistent. The other place to look is on ebay. Good luck!
Shawn karabacz says
Hello. I tried to make yogurt for the first time in the pro, but I couldn’t find a way to get to ‘medium’ temp like all the videos call for. I goes from low to boil am I missing something?
Paint the Kitchen Red says
Shawn, on the Pro you can use the Low option for fermenting. I think they may have got rid of the old low which was super low. You can also use Custom and set the temperature to 110 degrees. Hope that helps.
Julia says
Hi,
Thank you very much for this most clear and helpful guide! I was planning to buy Duo Evo Plus, but if in this model the error message problem doesn’t occur, it seems to be a real improvement on the Evo..
I just can’t find any information on the Bake function. Nowhere! Not even on Instant Pot website.. Would you happen to have any recipes that use it?
Thank you again!!
Paint the Kitchen Red says
You’re welcome, Julia! I haven’t posted a recipe for it because in my experience the cake took 2 to 2.5 hours (7 inch round at highest temperature – 347F I believe?) to bake. I didn’t change the proportions of the oven recipe, just halved it. You could give it a try and maybe you’ll have a different experience.
Chuck Andeel says
Thanks for the helpful information related to the instant pot pro. I am wondering how do you change the temperature read out from celsius to fahrenhiet
Paint the Kitchen Red says
Hi Chuck, I actually cover it in the video. Press and hold the knob – you’ll be able to change the temperature unit and turn sound on and off. Hope that helps.
Lise Buisson says
Re, instant pot pro. I’ve been making yogurt but it’s way too thin. I’ve tried different milks, different cultures, still too thin. so I thought I’d try increasing the boil time for the milk to reach closer to 200, but I can’t figure out how to do that? Any suggestions?
Neena Panicker says
Lise, have you tried adding some nonfat milk powder to the milk. That can help thicken it. You can use Saute mode, and just boil the milk till it reaches your desired temperature.