


The Instant Pot Food Burn message can be scary the first time you encounter it! The good news is that it’s a fairly common error, especially with new users. Find out why your Instant Pot says burn, what to do when you see the dreaded burn message, and how to avoid it in the future.

This post contains affiliate links. As an Amazon Associate, I earn from qualifying purchases. Please read the disclosure.
➡ Learn more about other Instant Pot error codes and how to solve them!
What does Food Burn Message Mean on my Instant Pot?
I’ve had my share of burn messages over the many years I’ve been using the Instant Pot. I rarely get them now, but they do happen occasionally!
The Instant Pot has over a dozen safety mechanisms and one of them is the burn-protection sensor that monitors the temperature.
You may see a burn notice when the Instant Pot has detected that the temperature inside the pot has gotten too hot.
When you get the burn notice, the Instant Pot will not reach pressure i.e. the float valve will be in the down position. All the buttons will light up, there’ll be multiple beeps and the display will alternate between the words burn and food.
Although it might seem scary, this is a good thing. The Instant Pot burn notice is protecting you and your food. It stops cooking so you can fix the problem and continue!
Learn more about your Instant Pot…
- Natural or Quick Release: What is Instant Pot natural release vs quick release and when should you use them?
- Instant Pot Tips and FAQs: What are Instant Pot frequently asked questions?
- Instant Pot Not Sealing: Why is your Instant Pot not sealing and what can you do to fix it?
- Common Instant Pot Problems: This Instant Pot troubleshooting guide explains common problems and errors and how to solve them.
- Sous Vide Button: How to use sous vide Instant Pot function for perfectly cooked foods.
Why Does the Instant Pot Say Burn?
Let’s troubleshoot this Instant Pot message by going over the most common problems and how to solve them.
1. The sealing ring isn’t put in correctly
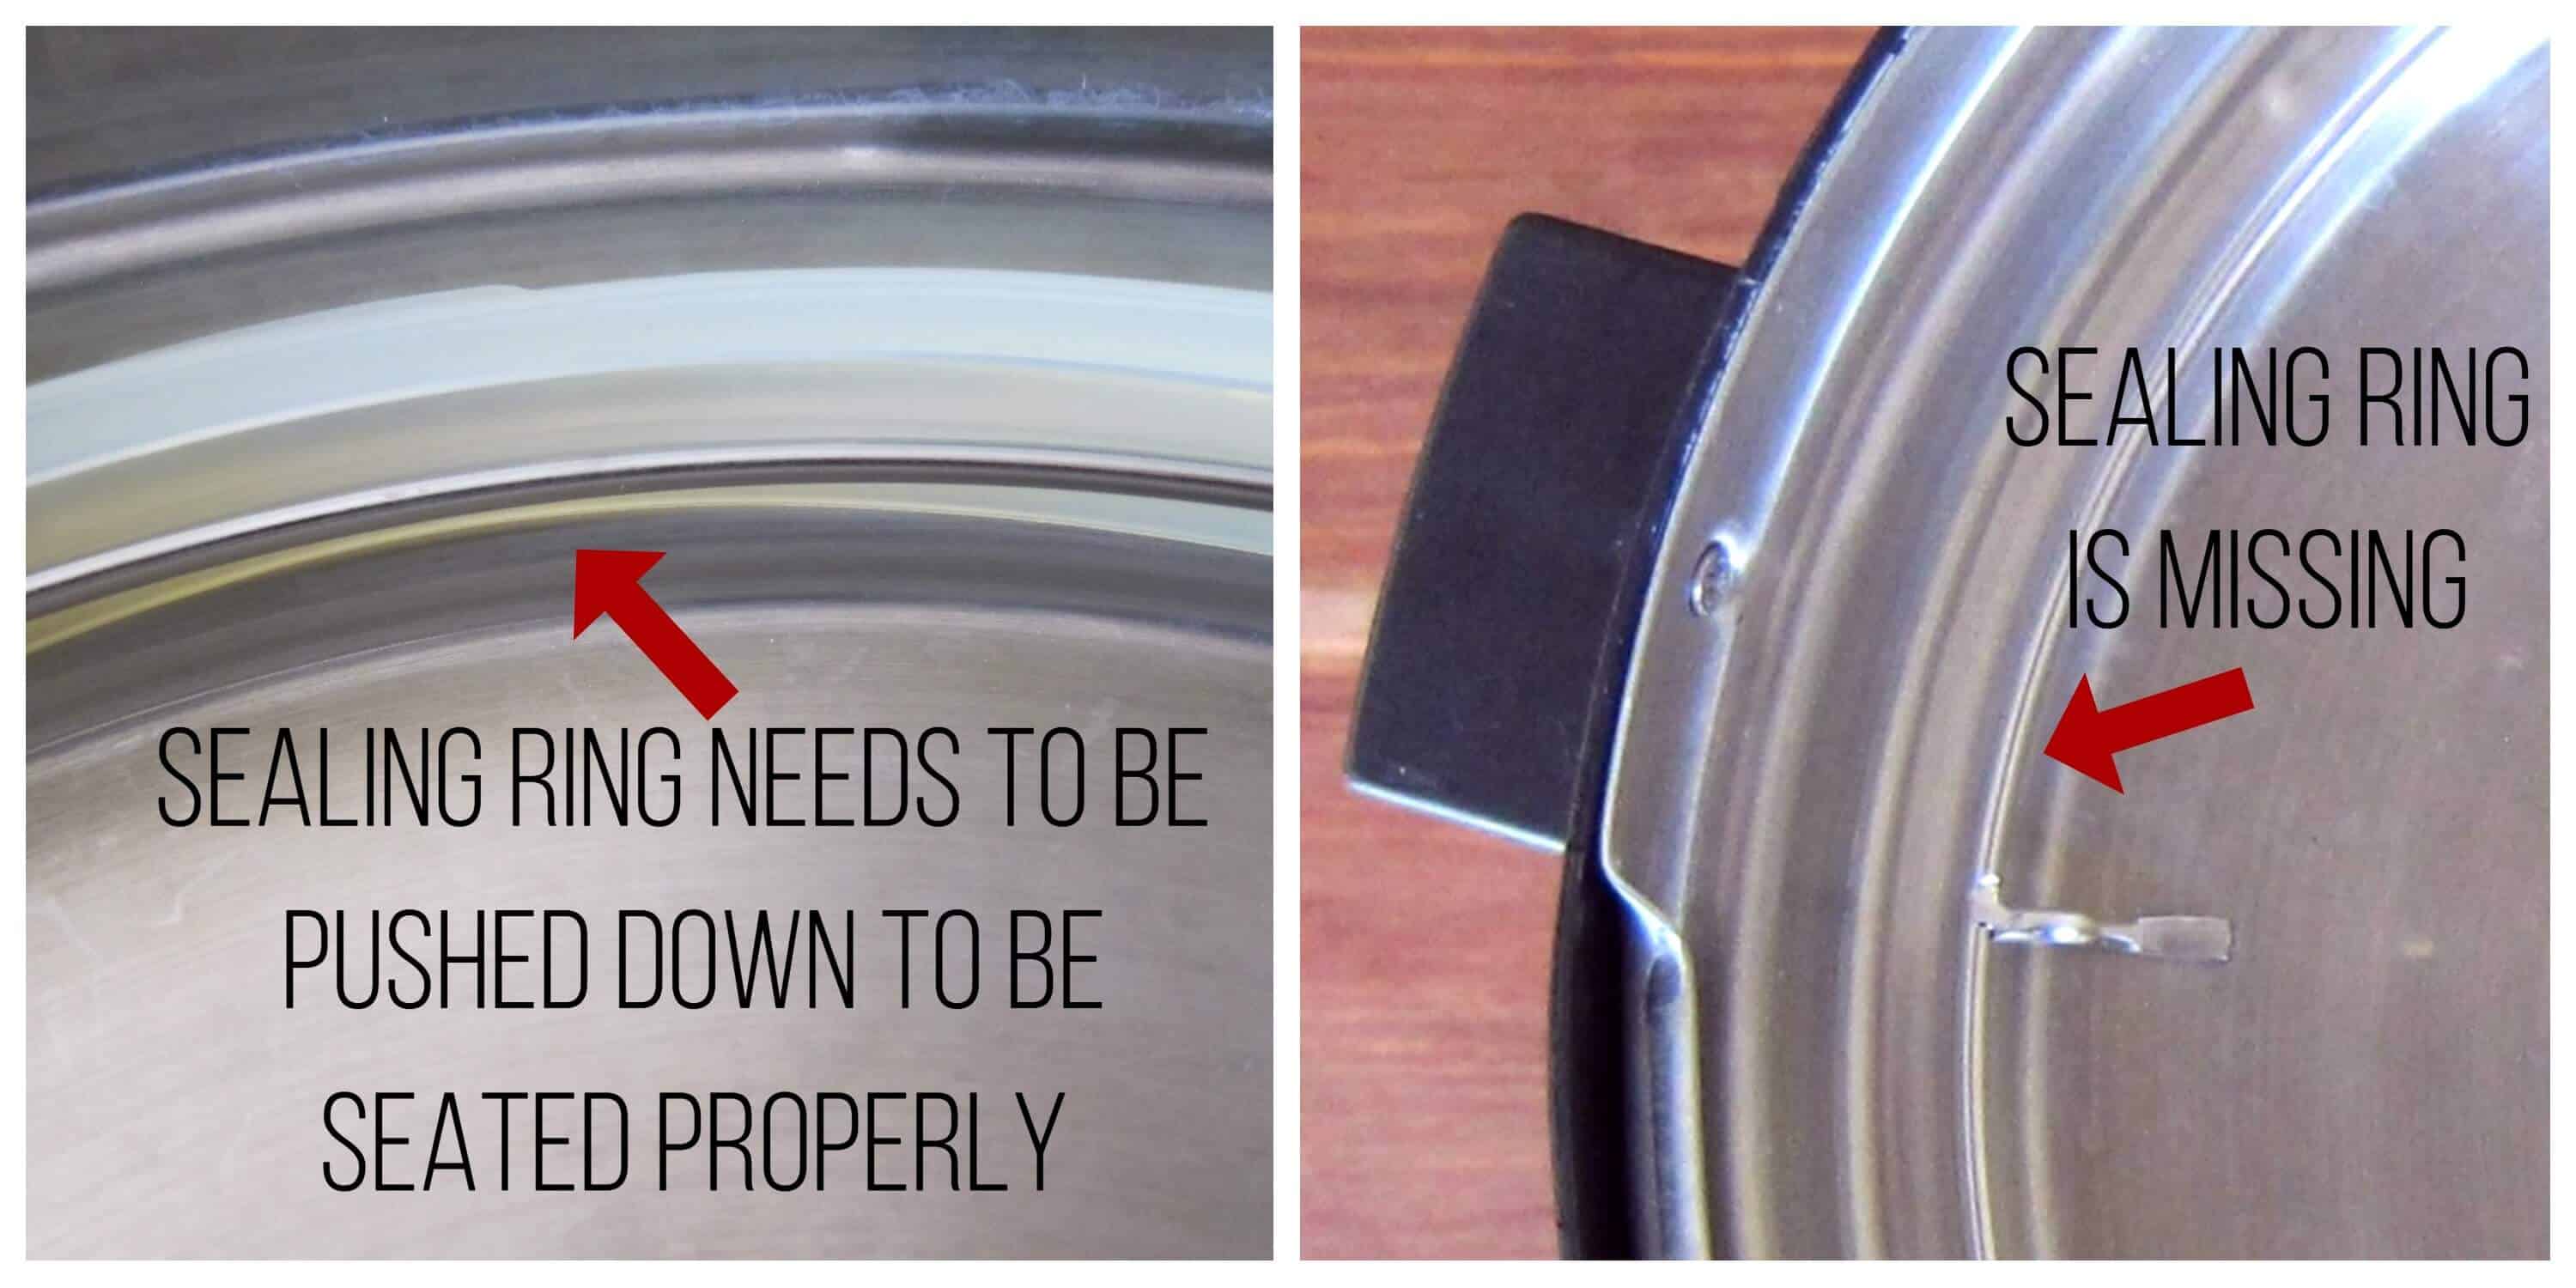
If your sealing ring is not installed properly or if it’s missing when you use your Instant Pot, your pressure cooker will leak steam, and that will cause the food at the bottom to scorch and your Instant Pot display will say burn.
💡 Solution: Make sure the sealing ring is in place and pushed in all the way every time you use your Instant Pot.
2. Steam release valve is in the venting position

The different Instant Pot models have different mechanisms for steam release. If your steam release is in the Venting position, the pressure valve will leak steam, and that will cause the contents to burn.
💡 Solution: Make sure the steam release valve is in the sealing position before pressure cooking.
3. There isn’t enough liquid
Pressure cookers work by building pressure from steam inside the pot, which in turn cooks food at high temperatures. This steam cannot be created if there isn’t enough liquid in the pot and you can get a burn notice.
💡 Solution: Make sure you add enough thin liquid (water or broth). The minimum quantity of liquid depends on the size of Instant Pot:
- 3 quart: 1 cup
- 6 quart: 1 ½ cups
- 8 quart: 2 cups
- 10 quart: 2 ½ cups
Canned tomato products and thick sauces DO NOT count toward the minimum quantity of liquid because they are too dense.
When you’re adding liquid, make sure it gets underneath any food that’s already in the stainless steel liner. This prevents the food from scorching and helps create steam in the pot.
4. Food is stuck on the bottom of the inner pot during Saute mode
If you use the Saute function before you use the Pressure Cook function, food can caramelize and stick to the bottom of your pot.
When you begin pressure cooking, that food debris can get further scorched. This can block the heat sensor and you can get a burn warning.
💡 Solution: After you’re done sauteing, make sure you deglaze the pot. To deglaze the pot, add water or broth to the hot inner pot and scrape the bottom with a wooden spoon or silicone spatula.
The brown bits should get incorporated and the bottom should be clear of all stuck-on food. Try not to use the Saute function at a very high temperature.
5. Instant Pot Recipe contains dense or starchy ingredients
Recipes containing dense or starchy ingredients can be problematic.
Thick liquids such as tomato products (e.g. tomato paste, tomato sauce), prepared soup concentrates (e.g. cream of chicken), and thick sauces (e.g. alfredo sauce, mole sauce) can cause a burn error.
These ingredients are not thin enough to build steam and some contain fillers like cornstarch, flour, or cheese which tend to scorch.
Starches such as rice and pasta, and dairy products like cheese and heavy cream can also cause the Instant Pot to say food burn.
I frequently see complaints about chili recipes and pasta sauces causing the burn error. Take a look at this Instant Pot vegetarian pasta, and how I’ve layered the ingredients.

💡 Solution: To avoid the burn error when pressure cooking tricky ingredients, add ingredients in the following order in your Instant Pot recipes:
- First, add liquid such as water or broth.
- Next, add vegetables and meats.
- Next, add any pasta, rice, or other starchy ingredients, and push down gently with a large spatula so they’re covered by the liquid but DON’T stir!
- Finally, add any dense ingredients on top e.g. tomato sauce, tomato paste, and DON’T stir.
- Close the lid and pressure cook as directed.
6. Recipe contains starch
It’s common to use cornstarch and flour to thicken dishes such as soups. You can use these ingredients in the pressure cooker but you need to add them in after pressure cooking.
Stirring in and incorporating starchy ingredients like flour with all the other ingredients may give you a burn code.
💡 Solution: If the recipe calls for starches such as flour or cornstarch, add them in at the end, after pressure cooking. Heat through in Saute mode.
7. The recipe was tested with a different size of Instant Pot
If the recipe was written for the 6-quart, and you are using an 8-quart, it’s possible that there may not be enough liquid for the 8-quart to come to pressure.
💡 Solution: If you have an 8 quart Instant Pot and the quantity of liquid in the recipe is below the manufacturer-recommended quantity (see #3 above), either double the recipe or add an extra ½ to 1 cup of liquid. Keep the cooking time the same.
8. There’s a hot spot on the bottom of the pot
Some people notice that scorching happens at certain ‘hot spots’ on the bottom of the stainless steel liner. If you consistently notice food sticking to the bottom in one particular spot, you may have this issue.
💡 Solution: Although this is rare, if you encounter it, file a ticket with Instant Pot customer support.
What to do if you get the Instant Pot Burn message
If you’re getting the burn message, it’s usually possible to salvage your meal.
- The first thing to do is turn off the Instant Pot.
- Do a quick release of pressure if the float valve is up.
- Open the lid and take out the inner pot. The pot may be very hot, so use silicone gloves to remove it.
- Allow the Instant Pot unit to cool down for a bit.
- If there’s nothing stuck on the bottom of your pot, add more water or broth. Lift the food with a spatula to allow the liquid to reach the bottom of your inner pot.
- If there’s burnt food on the bottom of the pot:
- Transfer the contents to a large bowl, taking care to avoid the burnt parts.
- Scrape out the burned food from the pot and clean the inner pot so there’s nothing stuck on the bottom. The best way to clean out burnt food is to use very hot water and scrape out the burnt bits.
- Add water to the pot. Most likely, the original liquid may have fully or partially evaporated. Add enough liquid to replace the original liquid that evaporated, plus an additional ½ to 1 cup.
- Return the food to the pot.
- Resume pressure cooking the recipe. You might be able to reduce the original pressure cooking time since the food might have already been partially cooked.
- If there’s too much liquid left after pressure cooking has completed, reduce the liquid by cooking on Saute mode.
FOOD BURN MESSAGE FAQS
Many foods (e.g. vegetables, meats) release liquid and that counts toward the minimum liquid requirement. My Asian pulled pork recipe and chorizo and potato recipe are good examples. They have less than the minimum required liquid but come to pressure with no issue.
Sometimes my Instant Pot says food burn but the display changes to On. If this happens to you, you can just ignore the message and let it keep cooking. You’ll probably have some food stuck on the bottom, but you should be able to salvage most of it.
The fire symbol (a flame under a pot) is not the same as the burn error. It just means that the heating element is on and the Instant Pot is cooking.
Since the food burn notification is a safety feature, there is no way to override the error. You will need to open the lid, clean out the inner pot, add more liquid, and resume the pressure cooking process.
Bonus Tips to Avoid a Burn Message
1. Use pot in pot (PIP) cooking method
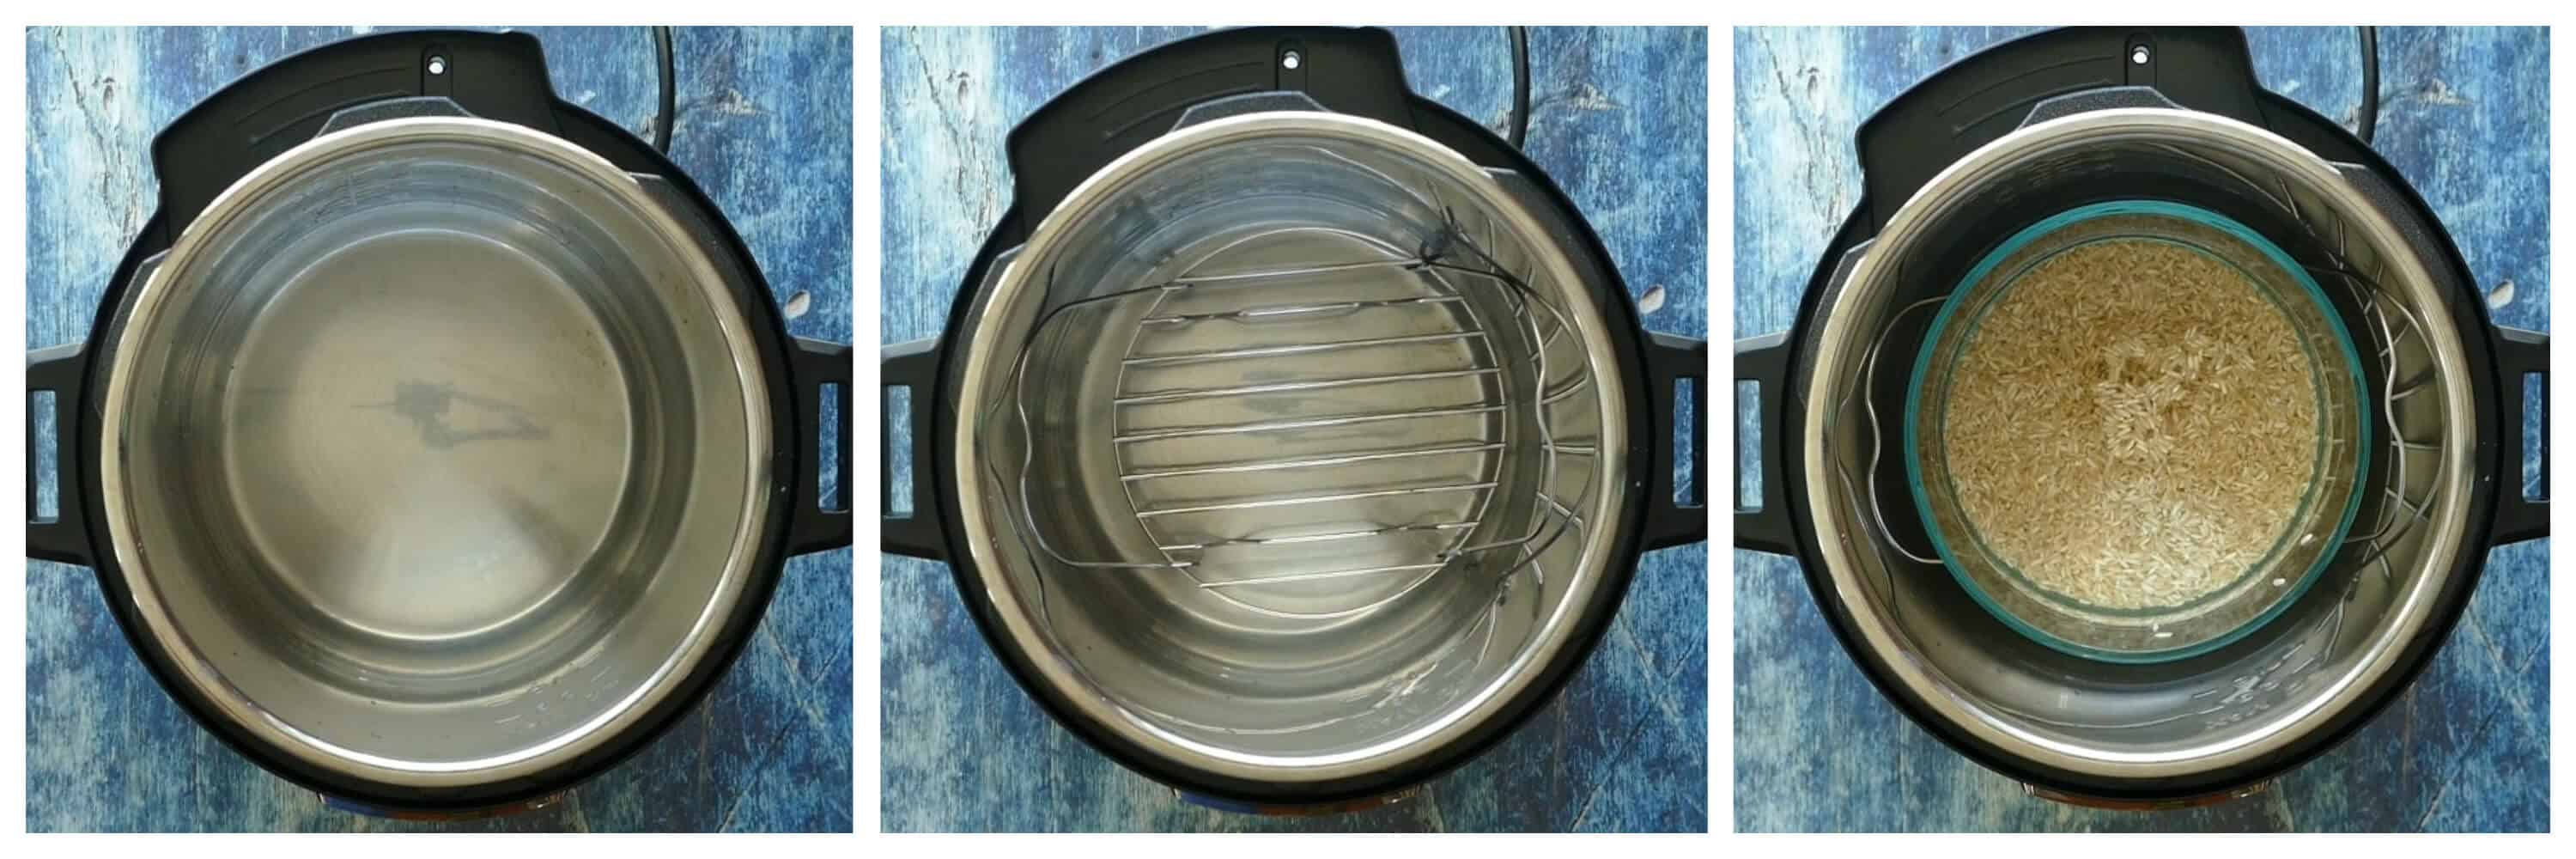
One way to avoid the burn notice in the future is to use the Pot-in-Pot (PIP) cooking method to cook dishes that have thick sauces, starchy foods, or minimal liquid.
You cook the food in a container that’s placed on a rack in some water. You don’t ever have to worry about this problem when you use the PIP technique.
2. Raise the food using a trivet

- I frequently put the food I’m pressure cooking (especially meat) on a trivet to raise it up a bit so that the liquid can cover the bottom of the inner pot. What is a trivet?
- This works really well when the quantity of liquid in a recipe is minimal.
3. Grease the inner pot
- Use a cooking spray or oil to grease the pot before you begin pressure cooking. This can help prevent food from sticking to the bottom.
Key Takeaways (TL;DR – Too Long; Didn’t Read)
I get it. You’re in a time crunch and just want to know why your Instant Pot says Food Burn. Here are the important points in this article but I suggest you come back and read the whole post so you can avoid the burn message in the future!
- Make sure the sealing ring is in place and the steam release valve is in the Sealing position.
- Deglaze after using Saute mode.
- Add adequate liquid to your recipes.
- Layer your food with starchy and dense ingredients on top.
✅ Why Trust Neena at Paint the Kitchen Red?

I’m Neena, and I have a lifetime of experience working with pressure cookers. I know how to maximize the potential of a pressure cooker to consistently produce delicious and easy meals. With my Instant Pot expertise, I can provide valuable insights, troubleshooting advice, and innovative recipe ideas so you can trust me on all things Instant Pot!
➡ New to the Instant Pot? Get my Instant Pot instructions for beginners.


Roger Manning says
Your web page here is very useful. I just got the “food burn” message on my second use of an Instant Pot. The Instant Pot manual does not say anything about this error message. Problem now is that I don’t know how to fix things. One is supposed to add water. But my stew recipe already had lots of water in it. I had even done the water test exercise shortly before attempting my stew. Water test worked.
Anyway, I just transferred the stew to a crock-pot. Will have to cook it until about midnight tonight.
Paint the Kitchen Red says
Hope that it tasted fine in the end! Thank you for your comment!
Cherie says
Hi Nina. We have a different brand PC that intimidates me – having grown up with a mom who, decades ago, had a pressure cooker for a very brief time (it was scary). I just picked up a little IP Mini at a thrift store and feel MUCH more confident with it. So I’m trying to learn everything I can BEFORE jumping in. I wanted to know what the “Burn” was about, so started researching and pulled up your article. As I got to the bottom, it dawned on me that I was ON YOUR SITE, and had to smile. NOW, I feel like a member of your IP family! Thank you so much for all the wonderful videos.
Paint the Kitchen Red says
Hi Cherie, so great to hear this! Thank you for taking the time to comment.
Margie says
Thank you!!!!!
Paint the Kitchen Red says
You’re very welcome, Margie.
Meera says
This ‘burn’ issue is what puts me off buying an instant pot!! A lot of people complain about this. I think gonna get a ninja foodi jnstead!
DL says
Thanks much. I wondered if the IP would continue the cook time where it left off agree addressing the food burn signal.
Paint the Kitchen Red says
Unfortunately, no you’d have to start the timer over if you get the burn message.
Not Happy says
My instapot is defective and we just opened it out of the box. Worthless and a waste of money time and effort.
Paint the Kitchen Red says
Are you getting the burn error with the water test? If so, you’re right – it’s defective. If not, it could be the recipe. I can’t say without knowing what you were cooking. Sorry to hear about your frustration.
Toni Oosthuis says
Thank you for this article Neena. After 3 “burn” messages, in desperation I went to the Internet for help. I didn’t find your site, but found geoffmobile who was having the same problem and hadn’t resolved it but had a suggestion and also sent me to your site happily for me. What I tried after the rice was nearly cooked and the chicken half-cooked, was to deglaze the inner pot AGAIN (didn’t know about the cooling down bit) after taking everything out AGAIN. I sliced enough potatoes and laid them on the bottom. I then put MORE water in the pot, threw all the rice with other vege without mixing anything, and laid the chicken once again snuggly in the rice and started again. As the food was partially cooked I only put it on for half the time. Voila! No “burn” message this time and food now cooked. I am happy to find your site and your Chicken and Rice recipe comes highly recommended!!
Paint the Kitchen Red says
Toni, I know how frustrating it is! But hopefully, you’ll be able to avoid the issue in the future. As I tell people, the key to avoiding the Burn message is layer, layer, layer!
kirian says
Yup, especially when none of the solutions resolve the issue… issues.
Paint the Kitchen Red says
If you’re layering, using enough liquid, using a lower temperature to saute, avoiding dense ingredients including flour based sauces and you’re still getting the Burn error, you might have a defective Instant Pot. That has been known to happen.
not giving you my name says
i just wish the burn notice feature wasnt a thing, would rather have burned food then have to be back and forth trying to make sure my food actually cooks. new instapots are just major design fails
Una Blogger says
Yup, especially when none of the solutions resolve the issue… issues.
Cyndi says
Thank you for your post, Neena! I’m thinking I keep getting a burn notice due to cream of chicken… I had no idea to add it last. Sometimes using an instant pot is all about trial and error!
Paint the Kitchen Red says
Hi Cyndi. I’m happy to be able to help you out. Yes, cream of chicken would definitely do it.
Trish says
I am very new to the instant pot. I never have pressure cooked anything. My children gave me an instant pot duo. Do you have recipes geared to that pot? I think if I can find some recipes made for that pot, I would be able to prepare more. Thank you!
Paint the Kitchen Red says
Thanks for your question, Trish. All my recipes can be made as written in the DUO. The nice thing is that I give step-by-step instructions and photos for the DUO. For example, if you visit this recipe and go to the step by step section: Instant Pot Fried Rice you’ll see what I mean. Enjoy!