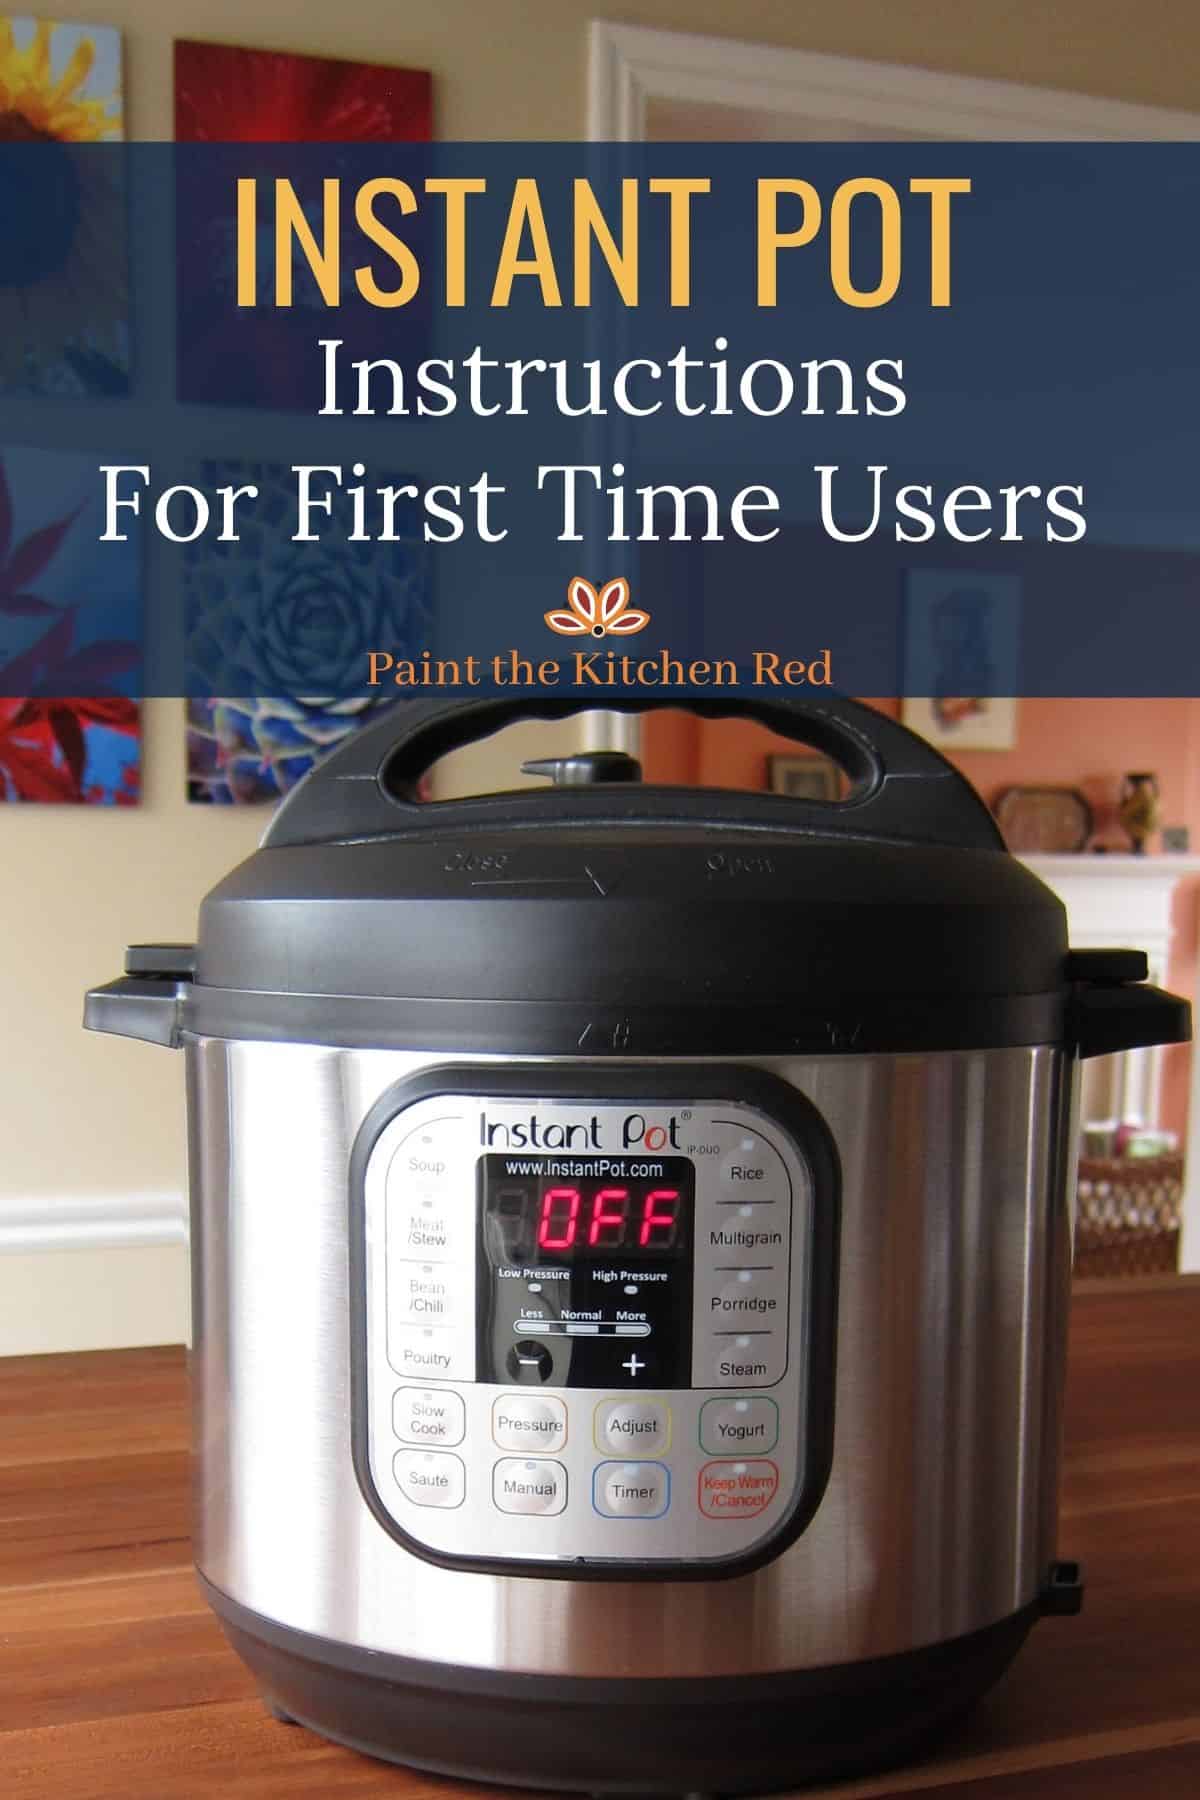
If you just got a new Instant Pot and are looking for Instant Pot directions, this beginner’s guide will help you learn how to use your Instant Pot electric pressure cooker. With these Instant Pot pressure cooker instructions, you’ll learn about the parts of the Instant Pot, setup, safety features, pressure release, and the water test. [Video included.]
This post contains affiliate links. As an Amazon Associate, I earn from qualifying purchases. Please read the disclosure.
Table of Contents
✏️ IMPORTANT NOTE
There are numerous Instant Pot models, each with its own design. Use this Instant Pot instruction manual to get a basic understanding of the functions. It has everything a beginner needs to get started. If you have questions about how to use another model, try my Instant Pot instructions for beginners with videos:
Instant Pot Parts and Accessories
Make sure all the parts are included. The guide that came with your Instant Pot will tell you what’s included. Here are the common parts of the Instant Pot:
➡ Is your Instant Pot clicking? This is pretty normal!
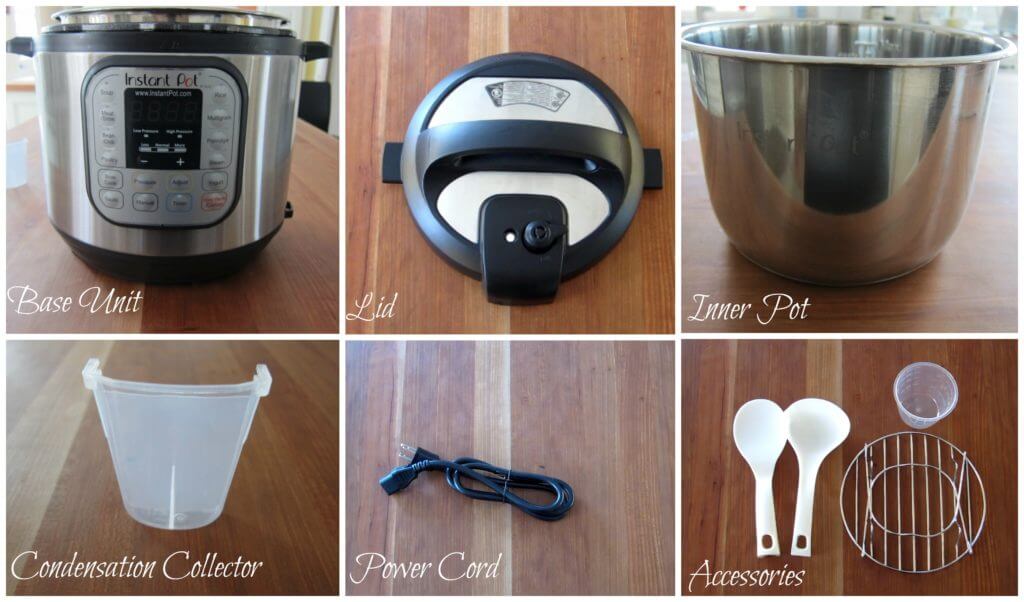
- Base unit/Outer Pot – stainless steel exterior that houses the heating element, control panel, and detachable power cord.
- Lid – closes the Instapot and seals it under pressure.
- Inner pot – removable stainless steel pot, also known as a liner or insert.
- Condensation Collector – catches drips from condensation on the lid.
- Power cord – the 3-prong detachable power cord is plugged into the back of some models. Other models have a permanently attached cord.
- Accessories – may include rice paddle, ladle, measuring cup, and trivet. Some models come with an extra sealing ring.
Instant Pot Lid

Every Insta Pot model will look slightly different, but the basics are the same. Some lids will have a handle, while others will have a knob or switch to release pressure.
Lid Exterior Parts
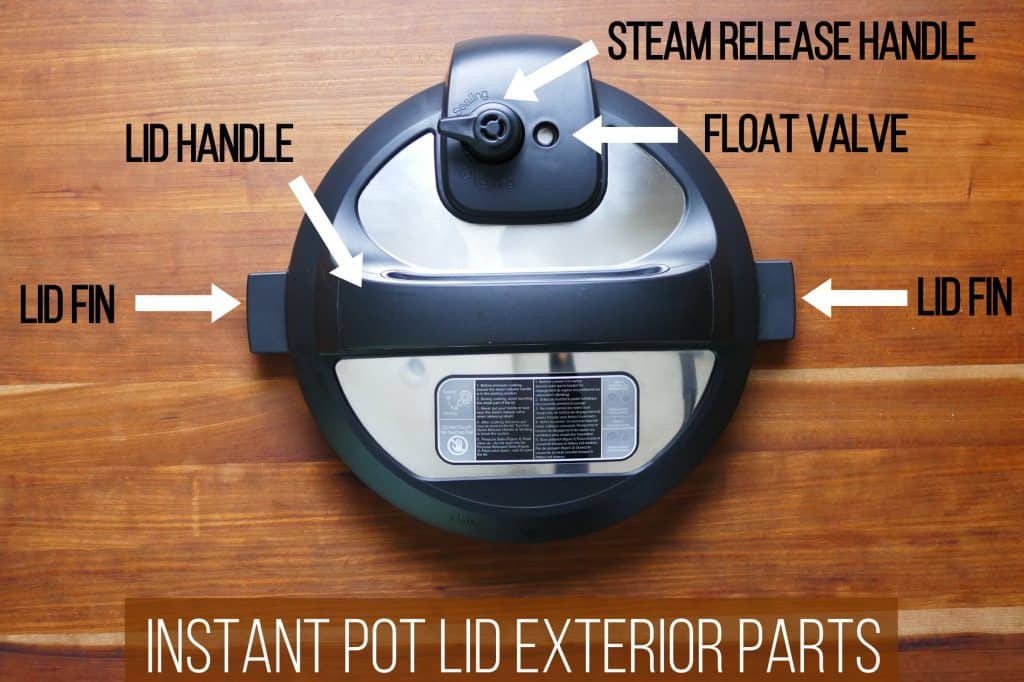
- Lid Handle is used to put on and take off the lid. Some models have a switch, while others have a teardrop-shaped button.
- Lid Fin is placed in the lid fin slot of the base unit to prop the lid open.
- Steam Release Handle is sometimes called the pressure valve, and it fits over the steam release pipe and releases pressure. On some models, the steam release valve has a plastic diffuser that fits over the valve to help the steam release with less force.
- Float Valve seals in the steam, pressurizing the Instant Pot.
Lid Interior Parts
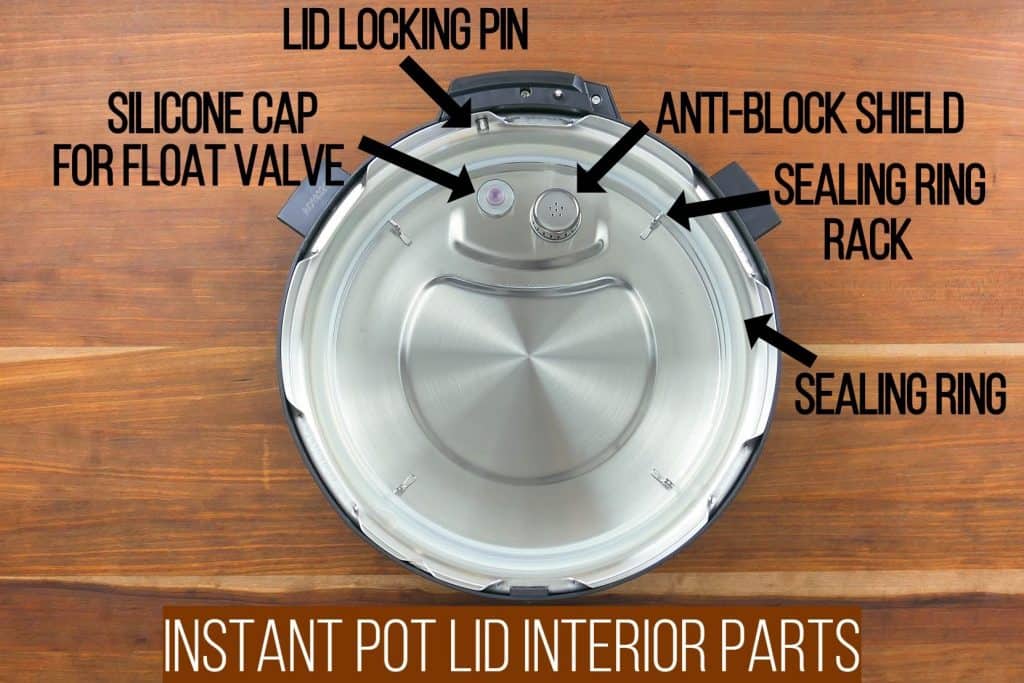
- Silicone Cap for Float Valve covers the instant pot valve and keeps it in place
- Lid Locking Pin is a safety mechanism that prevents the lid from opening under pressure
- Anti-Block Shield prevents food from coming out of the stainless steel inner pot through the steam release pipe
- Sealing Ring Rack – holds the sealing ring in place
- Silicone Sealing Ring allows the Instant Pot to seal
Setting Up
Now that you are familiar with the parts of your Instant Pot, you’re ready to begin setting it up so you can run a water test.
1. Unbox
I regularly hear from people who purchased or got the Instant Pot as a gift and leave it unopened because they’re too intimidated.
If you have a defective unit, you might miss the warranty period if you don’t get it out of the box and try it out!
Place the Instant Pot base unit on a stable surface, away from any open flame. Place it so that the steam won’t blow up onto any cabinets.
2. Place the inner pot in the base unit

- Make sure the base unit is empty and clean.
- Place the stainless steel inner pot inside the Instant Pot base unit.
3. Attach the condensation collector
The condensation collector catches any moisture that builds up on the rim. This usually comes from moisture dripping from inside the lid into the rim of the Instant Pot base when the lid is opened.

- Line up the condensation collector with the notches on the back of the Instant Pot base unit.
- Slide in the condensation collector until it’s pushed in all the way.
4. Plug in the Instant Pot

If you have a detachable cord, plug it into the base unit. Plug the cord into an electrical outlet.
Essential Tips Before You Use an Instant Pot Pressure Cooker
Important Information
- There are so many buttons on the Instant Pot, and it can seem overwhelming. You can get by using just a handful of buttons: Pressure Cook, Cancel, Start, and Saute.
- Many buttons or functions on the Instant Pot are presets for pressure cooking various foods, similar to those on a microwave. You can use these shortcuts (e.g., Meat, Soup, Rice) or the Pressure Cook function, which is the same thing.
- Before using the Instant Pot, always have the inner pot (aka liner or insert) in the base unit. Don’t put food or liquid into the Instant Pot base unit! I like to leave a trivet in the base unit when the inner pot is being washed to remind myself and others in the household not to forget the liner.
- The pressure release handle, button, or switch must be in the Sealing position, not Venting.
- The Instant Pot needs a minimum quantity of clear liquid (e.g. water, broth) for pressure cooking. (3 quart – 1 cup, 6 quart 1.5 cups, 8 quart – 2 cups). Some foods, such as vegetables and meats, release liquid during the cooking process, allowing you to use slightly less liquid.
- After using Saute mode, deglaze the inner pot. This involves pouring a small amount of liquid and scraping the bottom of the inner pot to make sure nothing is stuck to the bottom.
- Most Instant Pot recipes require High pressure unless otherwise noted. Low pressure is used in some rice recipes and for quick-cooking vegetables or fish.
- When cooking with dense or starchy ingredients, use the layering technique. Put meat, vegetables, and clear liquid at the bottom of the pot. Add pasta, rice, tomato sauce, and other thick sauces on top, and don’t stir them in. This helps prevent sealing issues and the Food Burn message. Another option is to use a trivet for the pot-in-pot method.
- There are multiple ways to release pressure. The most common methods are the natural release and quick-release methods. In general, use natural pressure release for meats, beans, and foods that need to rest after cooking. Use quick release for foods that will overcook if you let them sit, such as vegetables.
- The total time required to pressure cook is the time the Instant Pot comes to pressure, the time it takes to cook, and the time it takes to release the pressure. If you allow the pressure to release naturally, it can take 10 to 45 minutes, depending on the quantity of food inside the pot. Take this into account when planning how long a recipe will take!
➡ Are you getting an error code? Head over to my post about Instant Pot error codes and how to solve them!
How to open Instant Pot lid

- If the lid is on, turn the lid counterclockwise until you hear a chime.
- The arrow on the lid will be lined up with the open lock icon on the base unit.
- Lift the lid to remove it.
- If you’ve just finished pressure cooking something and feel a slight resistance, wiggle the lid back and forth, and the suction should release.
How to close the lid

- Here’s how to put the lid on the Instant Pot: place the lid onto the Instant Pot base unit with the arrow mark on the lid lined up with the open lock icon above the right corner of the control panel.
- You will hear a chime (if the volume is turned on).
- Turn the lid clockwise until you hear another chime.
- The lid will be closed.
Float valve positions
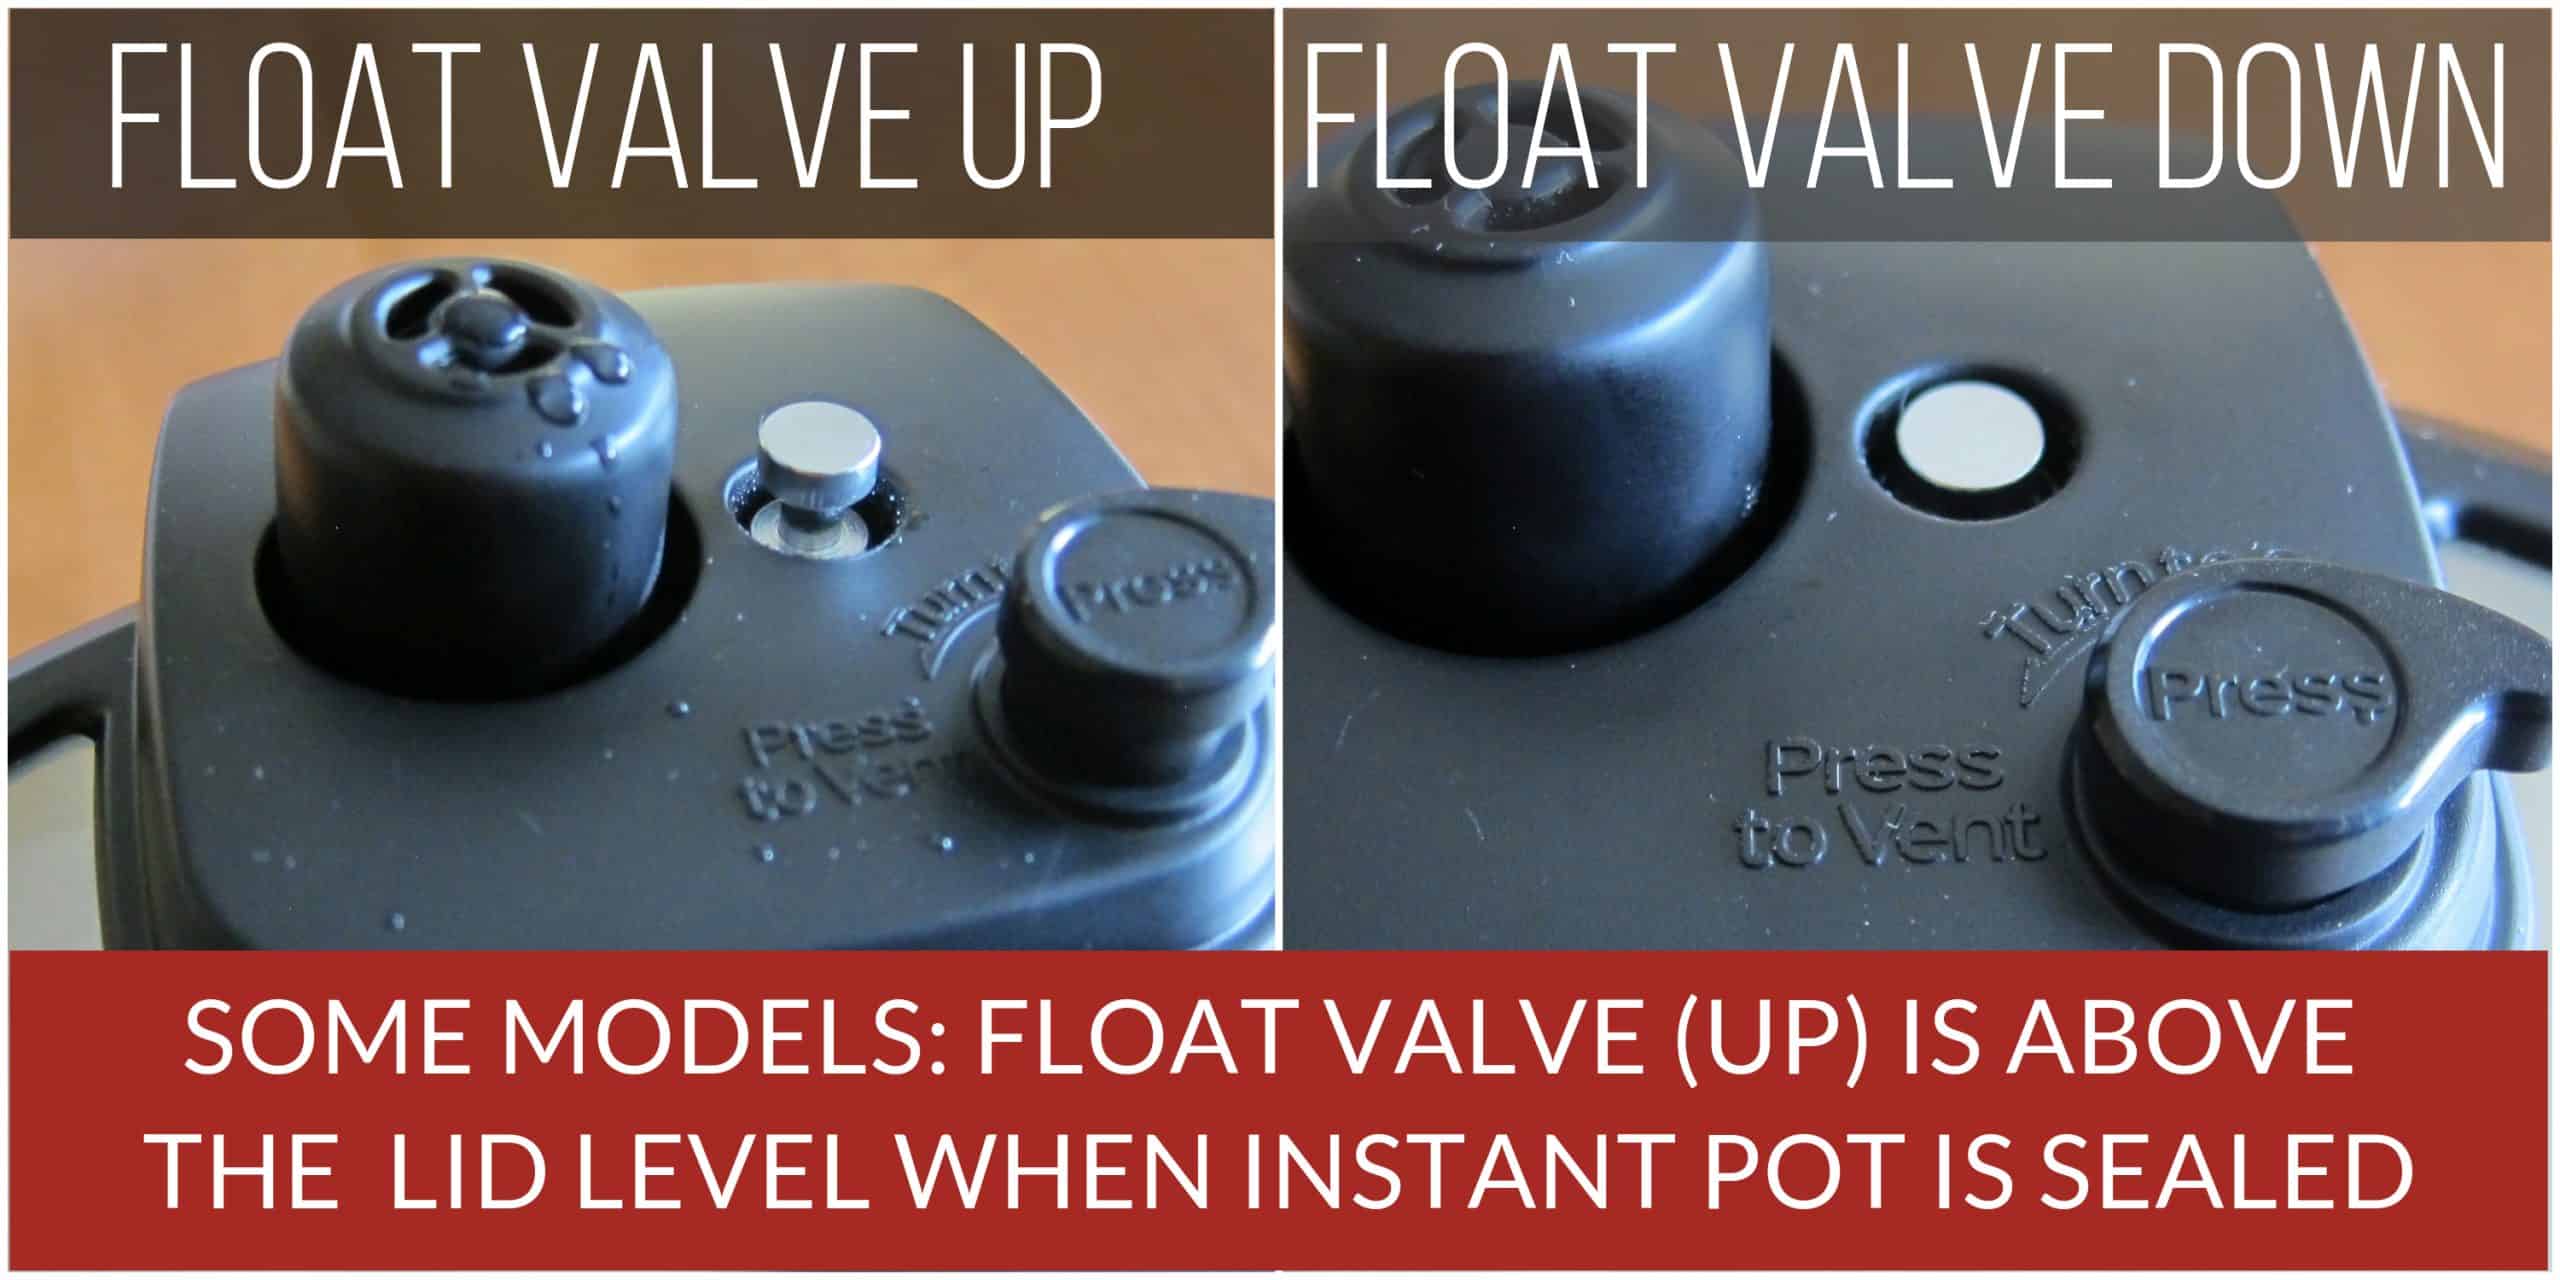
- In some models, the float valve is above the lid level when under pressure and at the lid level when not under pressure.
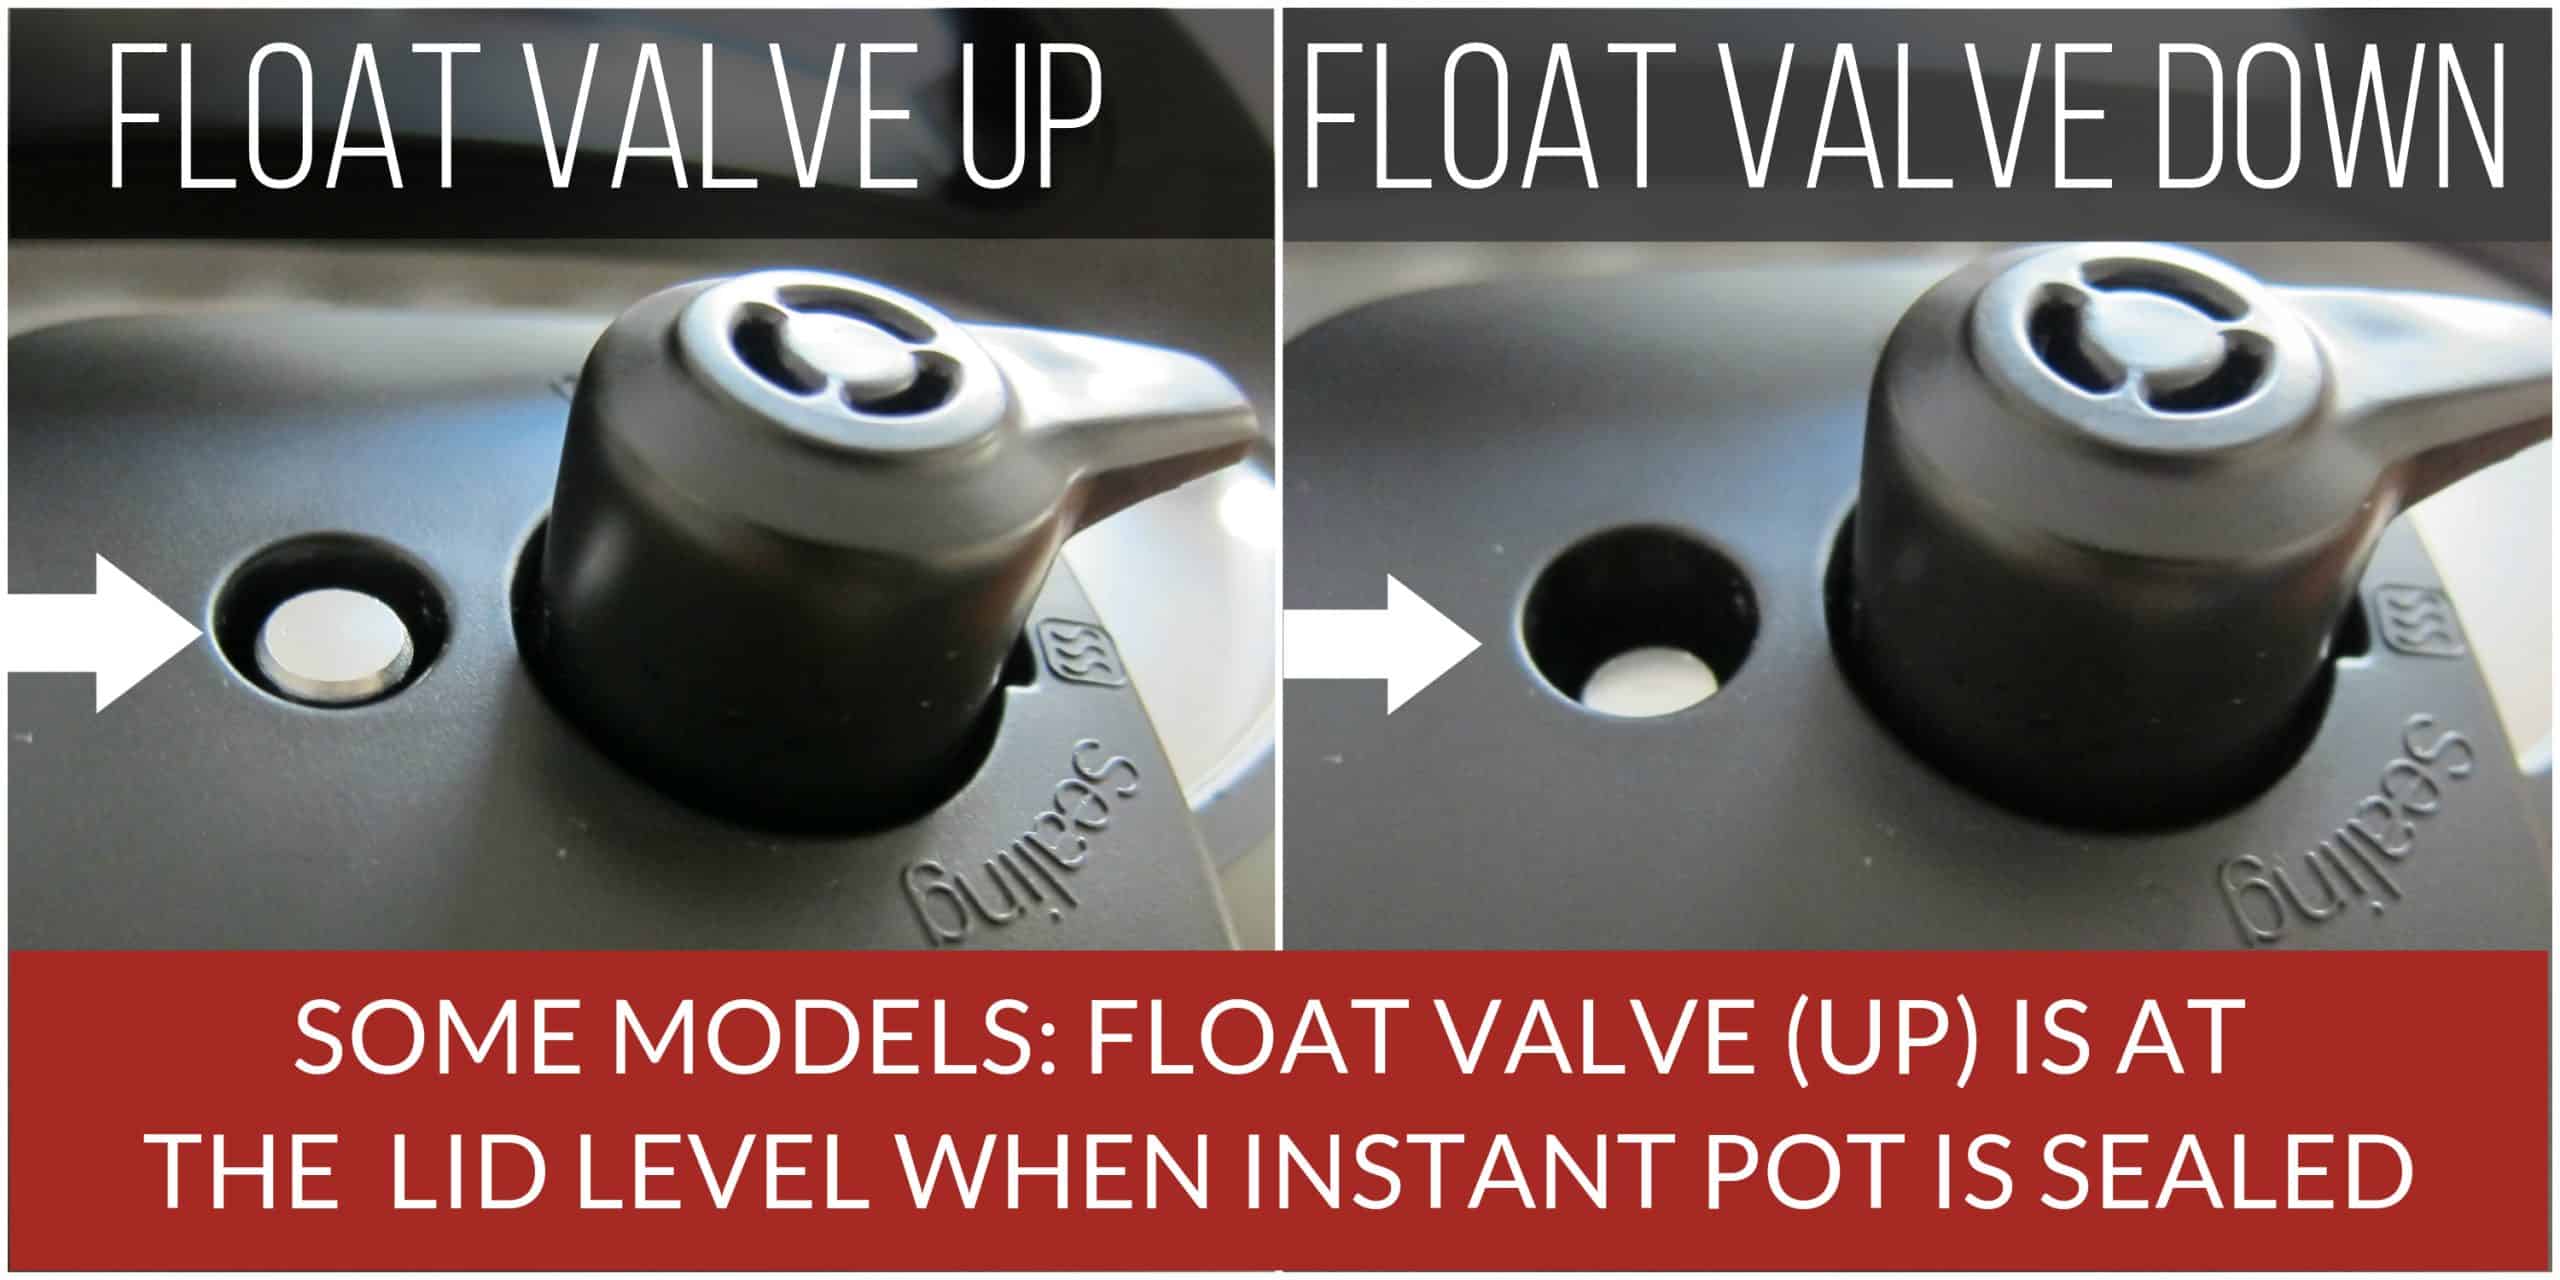
- In other models, the float valve is at the lid level when under pressure and below the lid level when not under pressure.
Safety Precautions
There are many built-in safety features, including automatic pressure sensors. However, as a user, you need to follow essential safety guidelines, including:
- Don’t touch the hot surfaces, particularly the stainless steel parts. Use the handles to move the Instant Pot and gloves to remove the inner pot.
- Keep hands and face away from the steam and pressure release mechanism.
- Don’t move the Instant Pot when it’s under pressure.
- Don’t fill over ⅔ full. However, when cooking foods that expand, e.g., rice, beans, and pasta, don’t fill over ½ full.
- Don’t open the Instant Pot until the float valve is down, i.e., the Instant Pot is depressurized.
- Don’t obstruct the steam release valve when pressure is released.
Instant Pot Water Test Instructions
What is the Water Test?
A water test is done by pressure cooking water for a few minutes. This allows you to familiarize yourself with the basic operations and ensure your new Instant Pot works.
You should do a water test before the first use, but you can also do it when you have problems with the Instant Pot pressurizing. The water test will pinpoint whether something about a particular recipe is causing your sealing issues.
How to do the Initial Test Run / Water Test
- Pour water into the inner pot. (1 cup for 3 qt, 1.5 cups for 6 qt, 2 cups for 8 qt).
- Close the lid and put the steam release valve, button, or switch into the Sealing position.
- Select the Manual or Pressure Cook button. Some models have buttons, while others have a knob.
- Change the cook time to 5 minutes using the + or – buttons or knob.
- On models with a Start button, press Start. On models without Start, it will automatically start in a couple of seconds.
- The display will change to On.
- Soon, you’ll hear and see small amounts of steam coming from the top of the lid. This is normal and safe! Just keep your hands and face away from the steam. You might also notice a plastic smell. Don’t worry – it will go away and shouldn’t happen again after the first use.
- Once pressure has built up, the float valve will come up.
- After the float valve comes up, the display will change from On to 5 (or 00:05), which can take a few minutes.
- The display will count down from 5 to 0 or (00:05 to 00:00).
- When pressure cooking is complete, you’ll hear a series of beeps, and the display shows L0:00, which means it’s in Keep Warm mode (if the Keep Warm function is turned on.)
- Press the Cancel button. The display will say Off.
- Do a quick release or manual pressure release by moving the steam release knob, button, or switch from sealing position to venting position. Keep hands and face away from the flow of steam. Once all the pressure inside the pot has been released, the float valve goes down, and the Instant Pot is de-pressurized. This can take a few minutes. You can also let the pressure release naturally, which takes 10 to 15 minutes.
- Once the pressure has been released, it’s safe to open and prop the lid.
What to do if the water test fails
If the water test is successful, you can use your new Instant Pot. If it fails and you’re not able to get the Instant Pot to come to pressure, use the following articles to troubleshoot the issue:
Instant Pot Buttons
- Each Instant Pot model has different buttons. Some buttons are cooking modes or programs (e.g. Rice, Bean) while others are operational (e.g. Cancel, Start).
- On some models, pressing a cooking mode button toggles between Less, Normal, and More, which have customizable default cooking times. You can adjust the time by pressing + or – and set High or Low pressure by pressing Pressure Level.
- On other models, pressing a button lets you customize the pressure level and cooking time using the display panel.
Programs and Default Times
| Button | Less | Normal | More |
|---|---|---|---|
| Bean/Chili | 25 minutes | 30 minutes | 40 minutes |
| Cake | 25 minutes | 40 minutes | 50 minutes |
| Egg | 3 minutes | 4 minutes | 5 minutes |
| Meat/Stew | 20 minutes | 35 minutes | 45 minutes |
| Multigrain (Soaks for 45 minutes first) | 20 minutes | 40 minutes | 60 minutes |
| Poultry | 5 minutes | 15 minutes | 30 minutes |
| Porridge/Oatmeal | 15 minutes | 20 minutes | 30 minutes |
| Pressure Cook | 20 minutes | 35 minutes | 45 minutes |
| Rice | – | 12 minutes (Low Pressure) | – |
| Soup/Broth | 20 minutes | 30 minutes | 40 minutes |
| Steam | 3 minutes | 10 minutes | 15 minutes |
| Slow Cook | 180–190°F (similar to keep warm on slow cooker) | 190–200°F (similar to low on slow cooker) | 200–210°F (similar to high on slow cooker) |
| Yogurt | 106°F to 113°F (for Chinese fermented rice) | 110°F to 115°F (for incubating yogurt) | 160°F to 180°F (for boiling milk before incubating) |
Other Button Functions
| Button | Function |
|---|---|
| Start | Begin the current program |
| Cancel | Cancels the current program |
| Delay Start | Start the cooking at a later time |
| Fav | Saves custom presets (on some models) |
| Keep Warm | Keeps food warm after pressure cooking; tracks time since cooking completed |
| Pressure Cook | Primary pressure cooking function; adjust pressure level and time |
| Pressure Level | Toggles between High and Low pressure |
| Saute | Allows sautéing before pressure cooking |
| Sous Vide | Cooks food using the sous vide method. You can set the cooking time and temperature |
| Temp | Adjusts temperature (use + or – buttons) |
| Time | Adjusts cooking time (use + or – buttons) |
| Ultra | Customizes temperature, pressure level, and cooking time (Ultra model only) |
Air Fryer Functions (on applicable models)
Some Instant Pot models have an air fryer lid and a pressure cooker lid. These models have pressure cooker and air fryer settings. These are some of the common air fryer modes:
- Air Fry
- Roast
- Broil
- Bake
- Dehydrate
- Proofing
FAQs
The Instant Pot turns on as soon as it’s plugged in. Attach the cord to the Instant Pot (if it’s detachable) and plug the cord into an outlet. The Instant Pot will say Off.
– The Instant Pot first needs to be plugged in.
– If the display is blank, press any button to turn on the Instant Pot.
– Choose the program and set the cook time.
– To start pressure cooking, some models have a Start button. Press Start.
– Other models automatically start. A few seconds after you program it, the Instant Pot display changes to On, which means it has started cooking.
On older models of the Instant Pot, the Pressure Cook button is called Manual. If you see a recipe that tells you to use the Manual setting, use the Pressure Cook function.
On some models, to set the Instant Pot to high pressure, press the Pressure Level button. It allows you to toggle between High and Low pressure. On other models, select the Pressure Cook function, and you’ll be able to program the pressure level and cooking time on the display panel using the knob.
The amount of time it takes to reach pressure and the float valve to go up depends on the amount of liquid inside the cooker and the temperature of the food. The more liquid in the pot and the colder the food, the longer it takes the Instant Pot pressure cooker to reach pressure.
If the Instant Pot has about 2 cups of liquid, it may take 10 minutes for the Instant Pot to reach pressure if the food isn’t frozen. The Instant Pot can take 15 to 30 minutes if it has more liquid.
A trivet and a small dish are useful for Pot in Pot cooking. An extra sealing ring is also a handy accessory. A tempered glass lid is convenient for sauteing, using the Instant Pot as a slow cooker, or for Yogurt mode.
Recipes for the Instant Pot
I hope these Instant Pot directions have helped you get comfortable with your new pressure cooker. Now you’re ready to try your first recipe!
Don’t try to improvise or wing it with your first recipe. Select a recipe from a trusted Instant Pot or Pressure Cooker cookbook or blog and follow it as written.
If you want to make changes or adjustments, you might want to contact the blogger or ask for advice from an experienced Instant Pot user.
Try an easy chicken recipe like Instant Pot Chicken Stew, Instant Pot Chicken Curry Soup, or Instant Pot Thai Red Curry; a dump and start Instant Pot Pork Carnitas or Instant Pot Mac and Cheese; or Indian restaurant vegetarian favorite Instant Pot Chana Masala.
Related Articles
I hope you’ve found these Instant Pot pressure cooker instructions useful. Here are some more articles that are helpful to beginners and intermediate Instant Pot users.
If you found this article to be helpful, please share it on social media using the social media share buttons at the top and bottom of this post. Thank you so much!



Sherry says
Are these Instructions available to print?
Neena Panicker says
Sherry, I’m sorry but you’d have to right click in your browser and print the web page.
Diane says
Just opened my duo plus. I did the water test. My question is when I finished and hit cancel it never switched to OFF , it just said READY. I’m worried it’s not safe to unplug if it’s not actually off.
Paint the Kitchen Red says
Diane, that’s a newer message. It means the same as “off” for other models. You should be fine unplugging it.
Terri Moses says
Help, my instant pot has never shown an L and count up in time when done, it’s always on keep warm.
Paint the Kitchen Red says
Terri, does it just turn off? What happens on the display when it’s done pressure cooking? If it’s going to OFF,then there’s something wrong with the keep warm functionality.
Lavonda says
I have a insta pot and just now trying it out but I need help not sure bout water test not sure if I did it right.csn you pls help willing to do a facetime 😂 I’m dying to try s small roast today if possible pls help
Paint the Kitchen Red says
Lavonda, unfortunately I’m not able to do a one-on-one call but I have so many resources that can help you. If you’re more of a visual learner, I have very detailed youtube videos that go over the water test.Let me know your model and I can share a link with you.
Jerry Eskew says
How do I change the cook time — increase or decrease on any setting?
Paint the Kitchen Red says
Jerry, it depends on the model. On the Duo, you press ‘pressure cook’ and then press + or – to change the cook time.
Marguerite says
I put water in and it all came out of the bottom on floor what would cause it not to hold water
Paint the Kitchen Red says
Marguerite, you need to put the stainless steel inner pot (liner) in the base unit before you add anything. You’ll need to make sure the Instant Pot completely dries out before you turn it on or it can short-circuit.
Zandra Peterson says
Hi, I bought the IP Duo 8quart 4 yrs ago. Just now opening it and going to try it out. Just wanted to know where I get replacement parts ie. Sealing ring. Also do you know if there’s a Sous Vide attachment for this model? I saw one at the the store 2yrs ago and should’ve bought it then. Thank you for helping all us newbies out🤗
Paint the Kitchen Red says
Zandra, replacement sealing rings and other parts can be purchased on the Instant website or on amazon. There are sous vide wands that work independent of the Instant Pot. They can attach onto the inner pot or just a deep pot.
Bernadette Vines says
I wish I’d found your page when I first bought my IP Dou about 2 years ago. I wasn’t confident in the use so it’s sat in the corner hardly being used. Now I’m more excited because I know how to cook in it AND how to take care of it.
I’m very excited to try some of your recipes!!
I have the 3qt model to cook for one so hopefully you have recipes for smaller batches.
Paint the Kitchen Red says
Bernadette, I think my recipes will work in the 3 quart as written. However, you can cut them in half or 2/3. The only time this becomes an issue is a recipe that has a minimal quantity of liquid. You’d need to experiment with those recipes. Welcome!
PRagna says
Can I use Instant pot recipes for my nutricook smart pot multi cooker.
Paint the Kitchen Red says
Pragna – I don’t see why not. However, you might need to adjust the cooking times. With some experimenting, you might figure out that you need to modify recipes by x percent more pressure cooking time.
Col says
Thank you for this useful info. I just bought my Instant pot in China ( I live here) and from my translations of the screen, they look different from the manual I downloaded in English. I’m assuming I should go with what is on the pot… I made simple sweet potatoes today as a first dish. So quick and so yum. Excited to learn more.
Paint the Kitchen Red says
Happy to help – glad it all worked out for you!
Linda Henderson says
I want to make yoghurt in an instant pot, but want to know if I can put glass jars containing the milk and started I to the instant pot to culture at a steady temp for the required time. I’ve only read about it being made in bulk in the inner pot.
Neena Panicker says
Hi Linda, yes you can use glass containers. I put them on a wire rack (no water below) and it works great.
Julie S. says
Excellent site! I wish this content was shipped with my IP! I have a 3 quart Duo that I’ve had for about a week. How do I scale down recipes which are generally written for 6 quart IPs. I’m thinking more in terms of timing and how much liquid to (not?) include. I can scale the ingredients but would like more guidance on what else needs adjusting. Perhaps you have an article about that?
Paint the Kitchen Red says
Julie, thanks for reaching out. I don’t have a guide for the 3-quart. You can scale recipes down for the 3-quart but you have to keep a few things in mind:
– cook time stays about the same.
– the quantity of liquid shouldn’t go too low. e.g. if you have a recipe for the 6 quart that has a minimal amount of liquid to start with, it might not be an option to scale that recipe.
– the 3 quart might have some variation in how fast the food cooks, you might need to do some experimentation.
Hope that helps.
JulieS says
Thank you – that does help. I appreciate the reply! Lots of experimentation with this tool.
Joyce says
Towards the base of the Instant Pot, there is a hole, where the silver and the black meet. Below the handle on the right. Is that meant for anything specific? I thought maybe a cup or holder for the spoons might go in that spot but I don’t remember the Instant Pot coming with a holder.
Paint the Kitchen Red says
This notch is not available on all models, but you can rest in there the spoon or ladle that’s shipped with some models.
Ann says
Should the steam valve be closed on all cooking functions… such as slow cook or baking.
Enjoyed all the info and recipes you shared.
Thanks, Ann
Paint the Kitchen Red says
Ann, I leave the steam release valve open for sous vide, slow cook, and dry baking (available on only some models – “no pressure” custom setting).
Susan says
Hello, I am new to the instant pot. When I press manual I am unable to set/adjust the time. It immediately says On. Once it is pressurized a random time appears that I am still unable to adjust.
I did a test run using the steam button. I was able to set the time etc and all good.
Is my manual button defective?
Paint the Kitchen Red says
Susan, it sounds like pressing the Manual button is beginning the cooking process immediately, rather than taking a few seconds to start up. That doesn’t sound right. What you could do is find another button that works e.g. Meat and it should work just about the same as the Manual button. Or if you have the option to return/exchange it, I would try that.
Carol says
I recieved the insta pot duo nova as a 2019 Christmas gift. I hate it. It’s confusing and feel it’s a total waste of money. I also don’t like the taste of the food cooked in it. The food as no taste. I would not recommend it
Paint the Kitchen Red says
Carol, I’m sorry that you’ve had a bad experience. Here’s the thing: the Instant Pot is an appliance that has its strengths but can’t be used for everything. e.g. there are many recipes out there that don’t produce the best results e.g. cakes or recipes with lean meats. In addition, if you’re using too much water or liquid, the results will be watered down and bland. If you’re adapting your own recipes, you might consider increasing the quantity of spices. I don’t what type of recipes you like, but you might want to try some of mine. They are not bland 🙂
Joycelyn Roney says
My IP came with an orangerubber ring and I can’t figure out where it goes
Paint the Kitchen Red says
Joycelyn, some models ship out with an extra sealing ring. You can use it for desserts only, or you can save it as an extra for when your original gets damaged or stretched out.
Mary Lou says
I HATE this appliance!,,,
Paint the Kitchen Red says
Mary Lou, oh no – I’m so sorry to hear that you’re so frustrated. Make sure you read my guides on burn message and sealing problems. Feel free to reach out to me with specific questions.
Kristen says
I have a few favorite recipes that I would like to do in my IP. How do I convert the recipe? It’s easy to put it all in at once, but how do you adjust how long it needs to cook?
Paint the Kitchen Red says
Kristen, the best way is to look at a similar tried and tested pressure cooker recipe and use those timings and liquid quantities. There’s no set rule of thumb. Sometimes, it’s trial and error 🙂 Let me know if you have specific questions, I can do my best to help you out.
Terry says
Hello, How do I set the instant pot to hours? I have a Instant Pot LP Duo. I can only get it to minutes. The only numbers that light up, are the two middle ones on display. It goes to 120 minutes, but not hours (example: 2:00 hours)
Thank you
Paint the Kitchen Red says
Are you sure it’s 120 minutes and not 1 hour 20 minutes?
Joanne says
Your articles are amazing – my Instant pot sat on my counter for a year, and we finally used it today. I used a generic recipe I found online, and apparently we cooked too long. We got the Food Burn warning. But thanks to your site, we knew what to do.
Is your instructions article available in printed form? I would love to have it on paper instead of just online.
Paint the Kitchen Red says
Hi Joanne, thank you very much for your request. I’m sorry to say it’s not available in printed form.
carol says
How long does it take to preheat before automatic rice program starts?
Paint the Kitchen Red says
Carol, the amount of time an Instant Pot takes to come to pressure and begin cooking depends on the quantity of food and liquid. So for 2 cups of liquid and rice, it takes less than 10 minutes. For a larger quantity, it takes longer.
Maryle Peterson says
This is a very helpful page. Wish I would have seen it the day my IP arrived. I have made some great meals in it already. I have the 3qt Duo Nova. When making soup the other day, using the soup button I found it was letting off steam from the top even though I had it in seal. It did this for sometime without building pressure and I knew the soup would be hot enough, so I pushed cancel. Would it have built pressure if I had waited? Is it correct that some pressure releases when in soup mode?
Paint the Kitchen Red says
Maryle, depending on how much soup you had in the IP and the initial temperature, it can take a while to come to pressure even after it starts releasing some steam. I would try again and give it some time after it starts steaming (maybe 10 minutes or so).
Carol says
hi, my name is carolina. Is the pressure release valve supposed to be able yo turn 360°??
Your articles is great and very informative!!
Thank you
Paint the Kitchen Red says
Carolina, yes it does turn 360 degrees if it’s pulled up a bit. But when it’s in the proper position and pushed in all the way, it should only turn from ‘venting’ to ‘sealing’ and back.