Paint The Kitchen Red

  • HOME
  • RECIPES AND GUIDES
  • ABOUT
menu icon
go to homepage
  • HOME
  • RECIPE INDEX
  • MEET NEENA
subscribe
search icon
Homepage link
  • HOME
  • RECIPE INDEX
  • MEET NEENA
×
Home » Page Templates

Perfect Instant Pot Jasmine Rice Recipe

March 7, 2017 by Neena Panicker 27 Comments

Instant Pot Jasmine Rice in white bowl on straw placemat with colorful napkin and a spoon - Paint the Kitchen Red

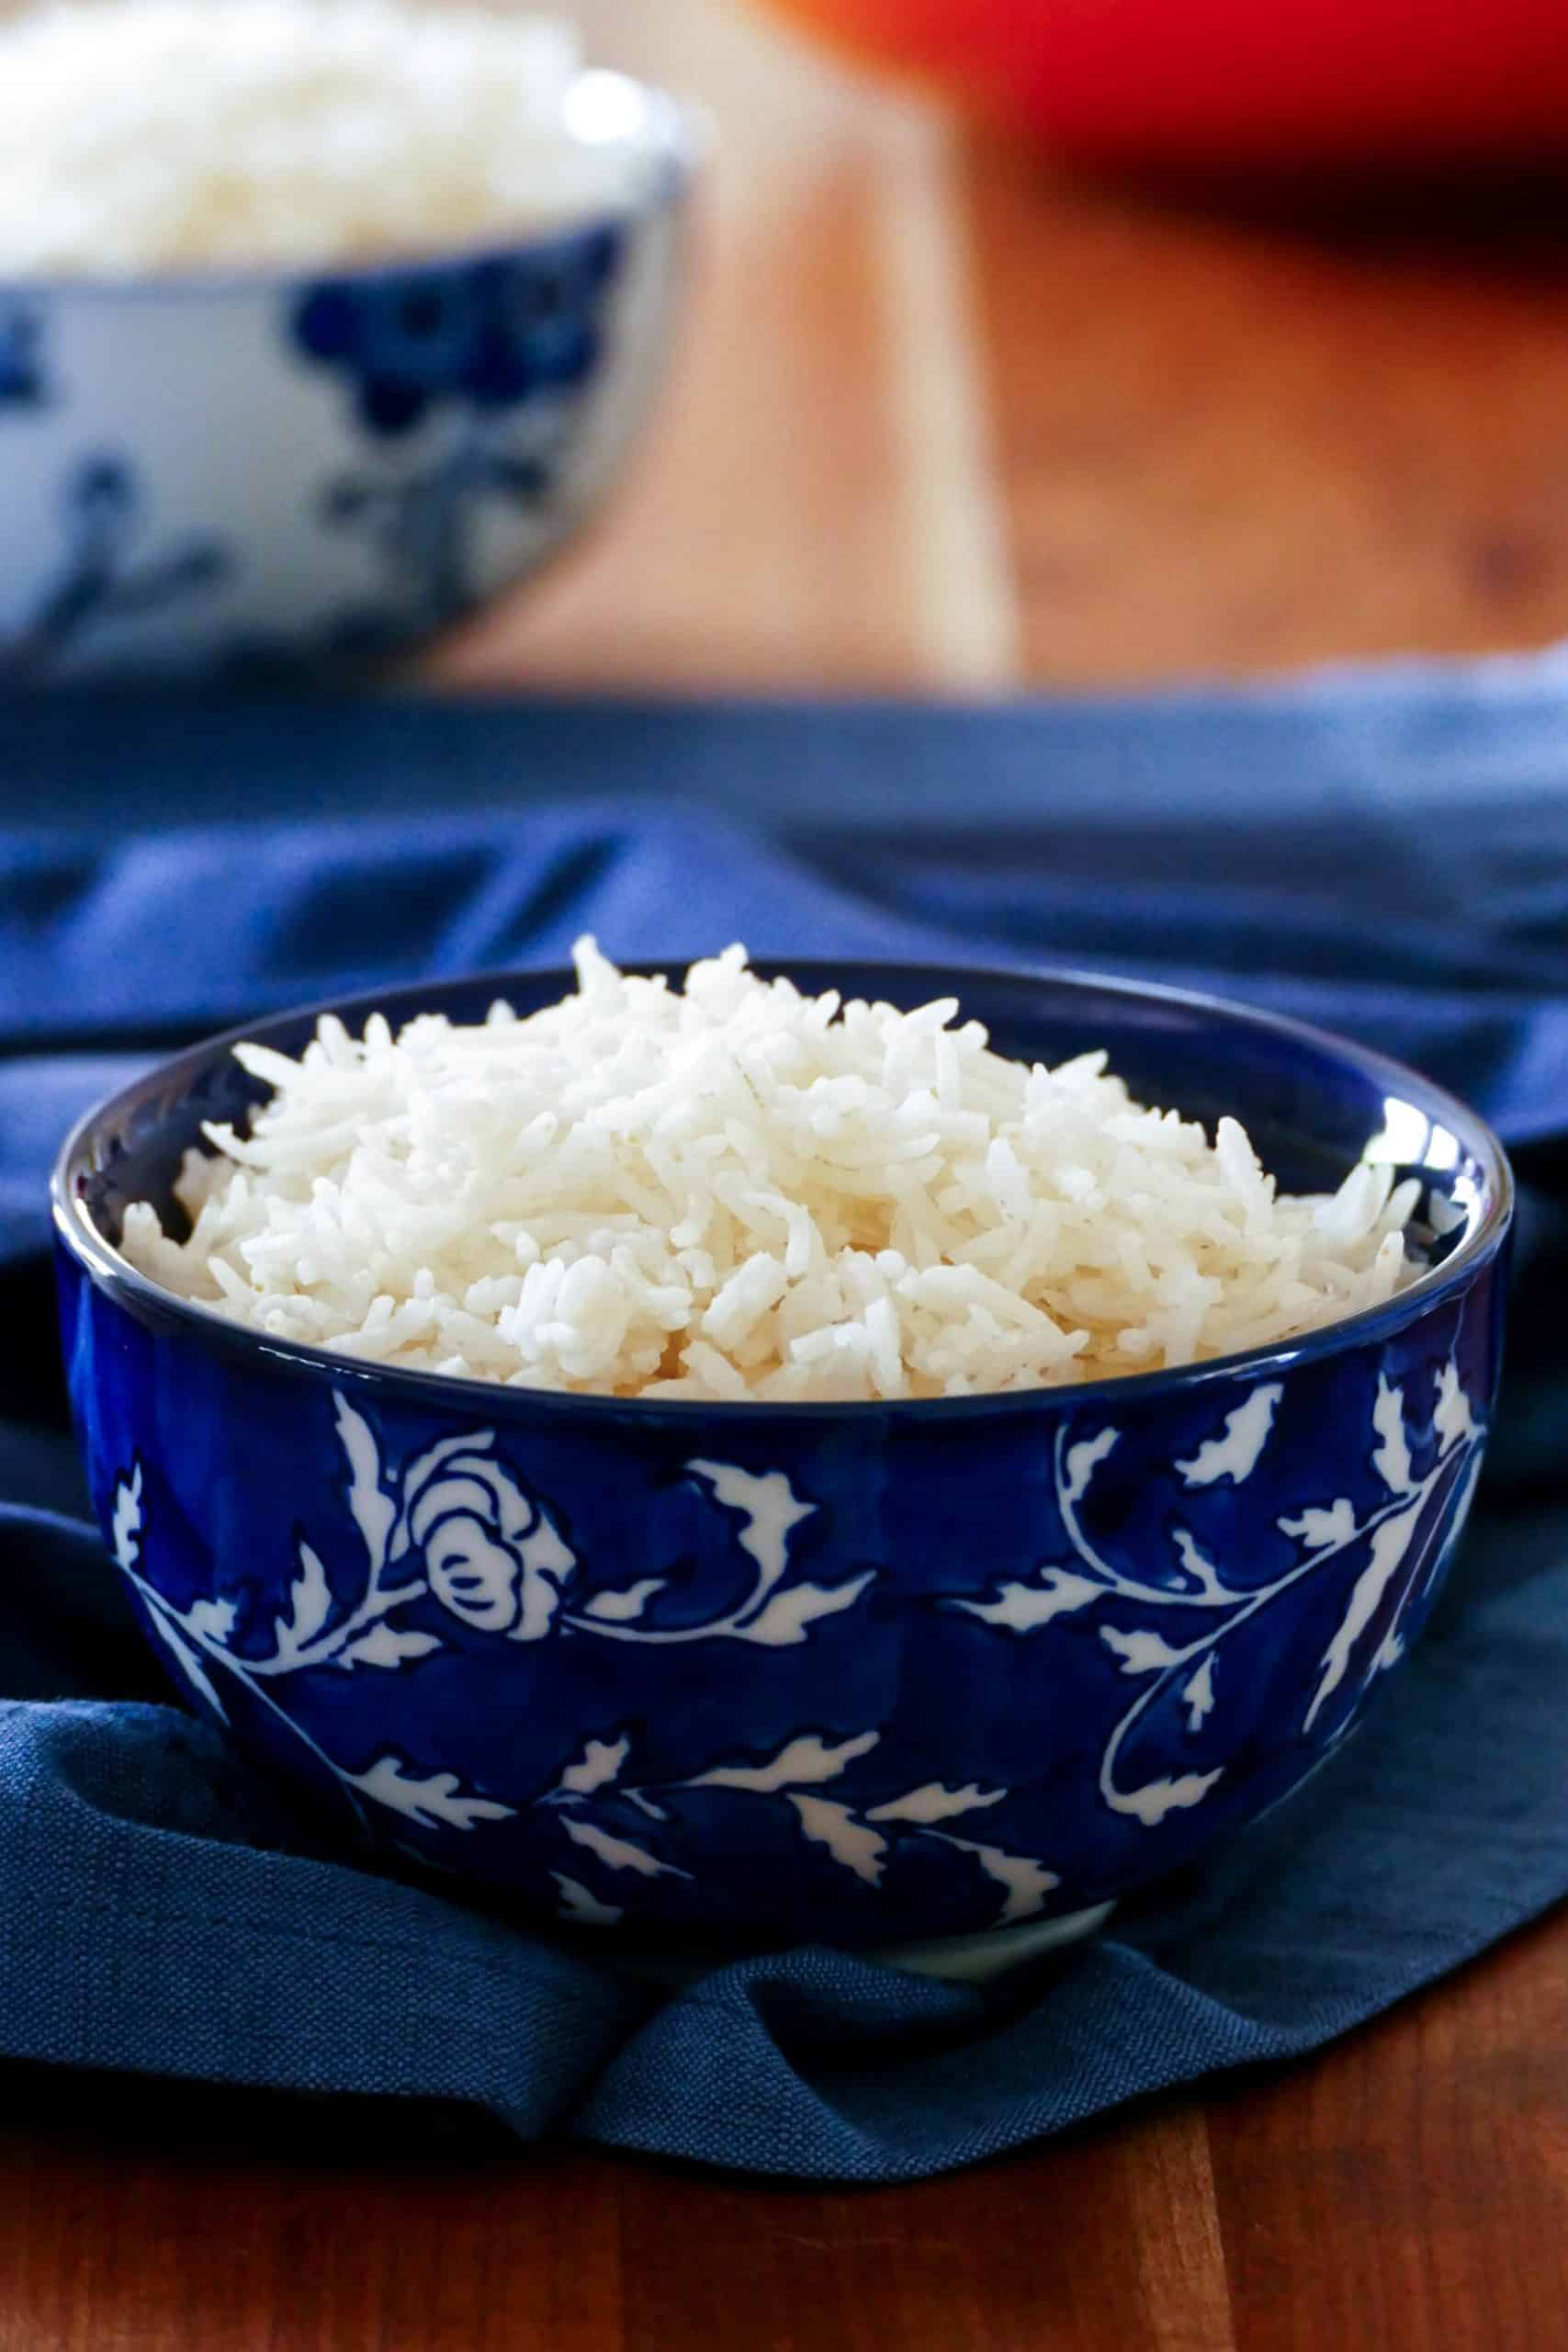
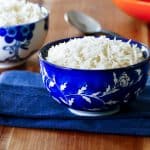
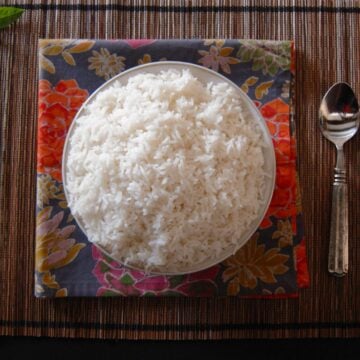
Instant Pot Jasmine Rice is the perfect complement to Thai curries.  This recipe gives you perfectly cooked rice every time, quick and easy. You’ll never go back to regular long-grain rice, especially with Thai food!  This recipe can also be cooked using the Pot in Pot method.

Instant Pot Jasmine Rice in white bowl on flowery colorful napkin and straw placemat with a spoon- Paint the Kitchen Red

This post contains affiliate links. As an Amazon Associate, I earn from qualifying purchases. Please read the disclosure.

Table of Contents


  1. Introduction
  2. Tips
  3. FAQS
  4. Ingredients
  5. Step by Step Instructions
  6. Recipe Card – Printable
  7. Related Recipes and Guides

ℹ️ Introduction

What is Jasmine Rice?

Jasmine rice is a long-grain white rice that’s from Thailand. It gets its name from the jasmine flower because of the floral aroma.

Jasmine rice is sticky when cooked. The grains are also shorter and plumper than other types of rice, like basmati.

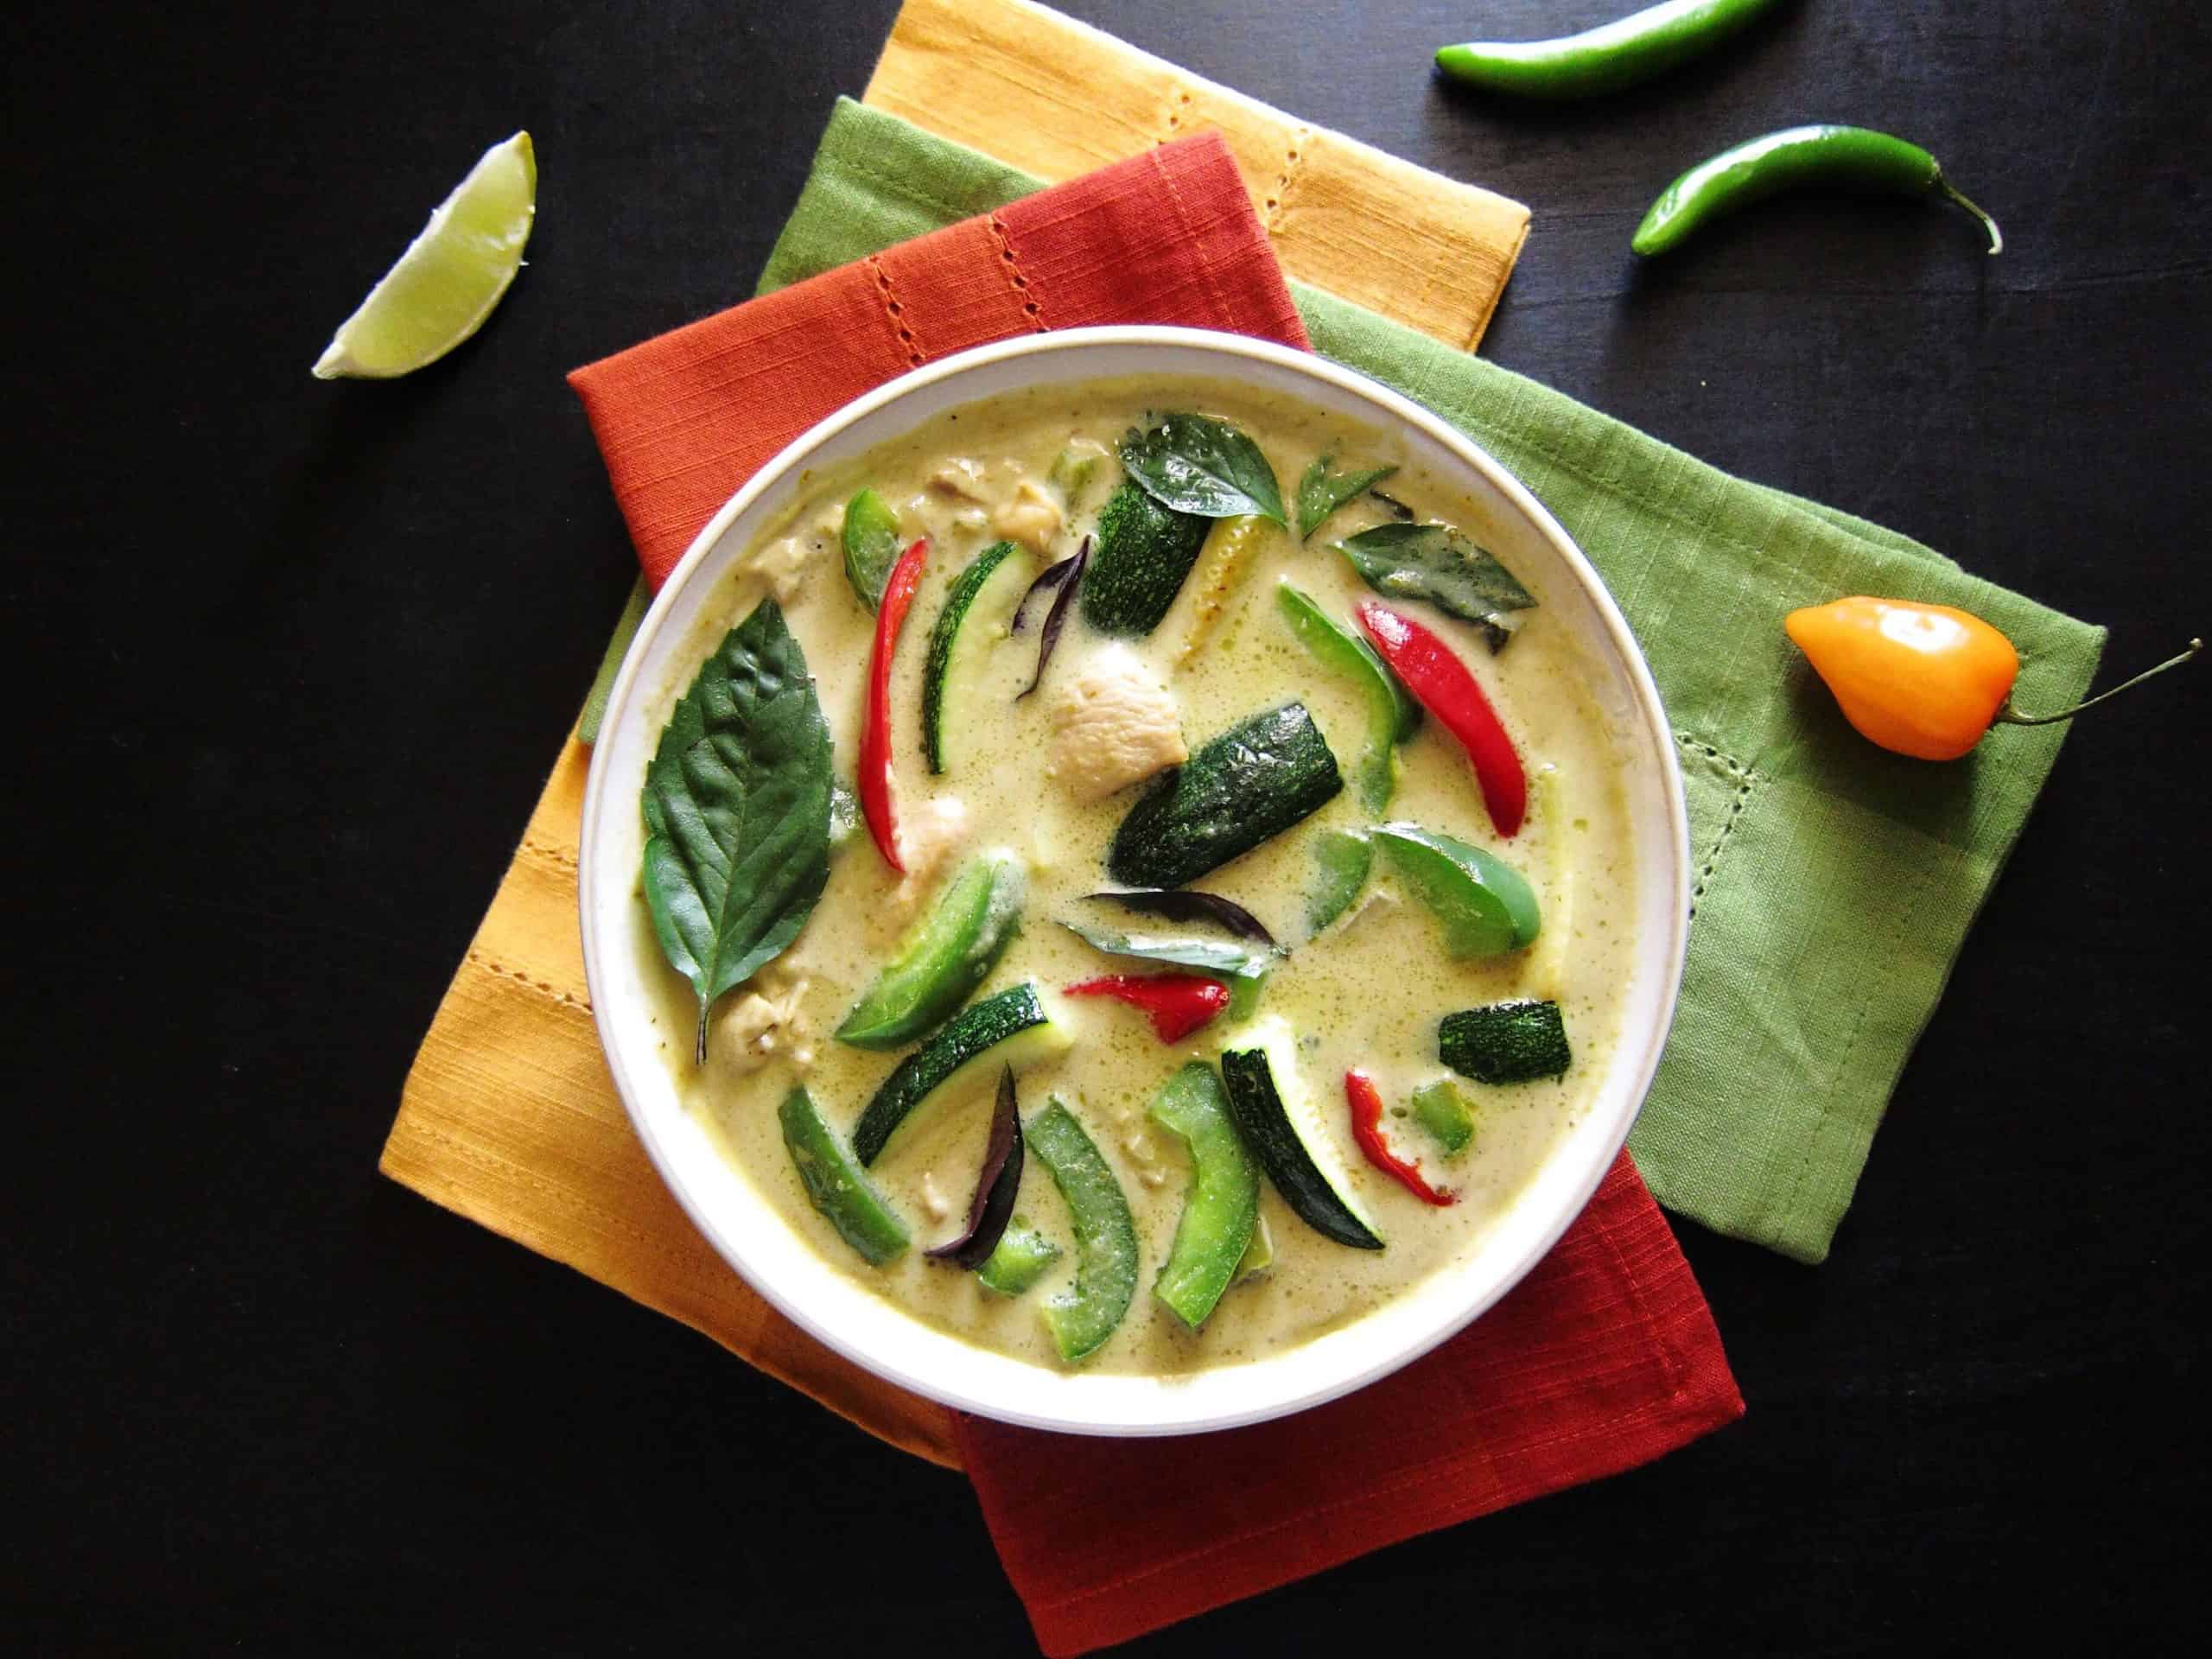
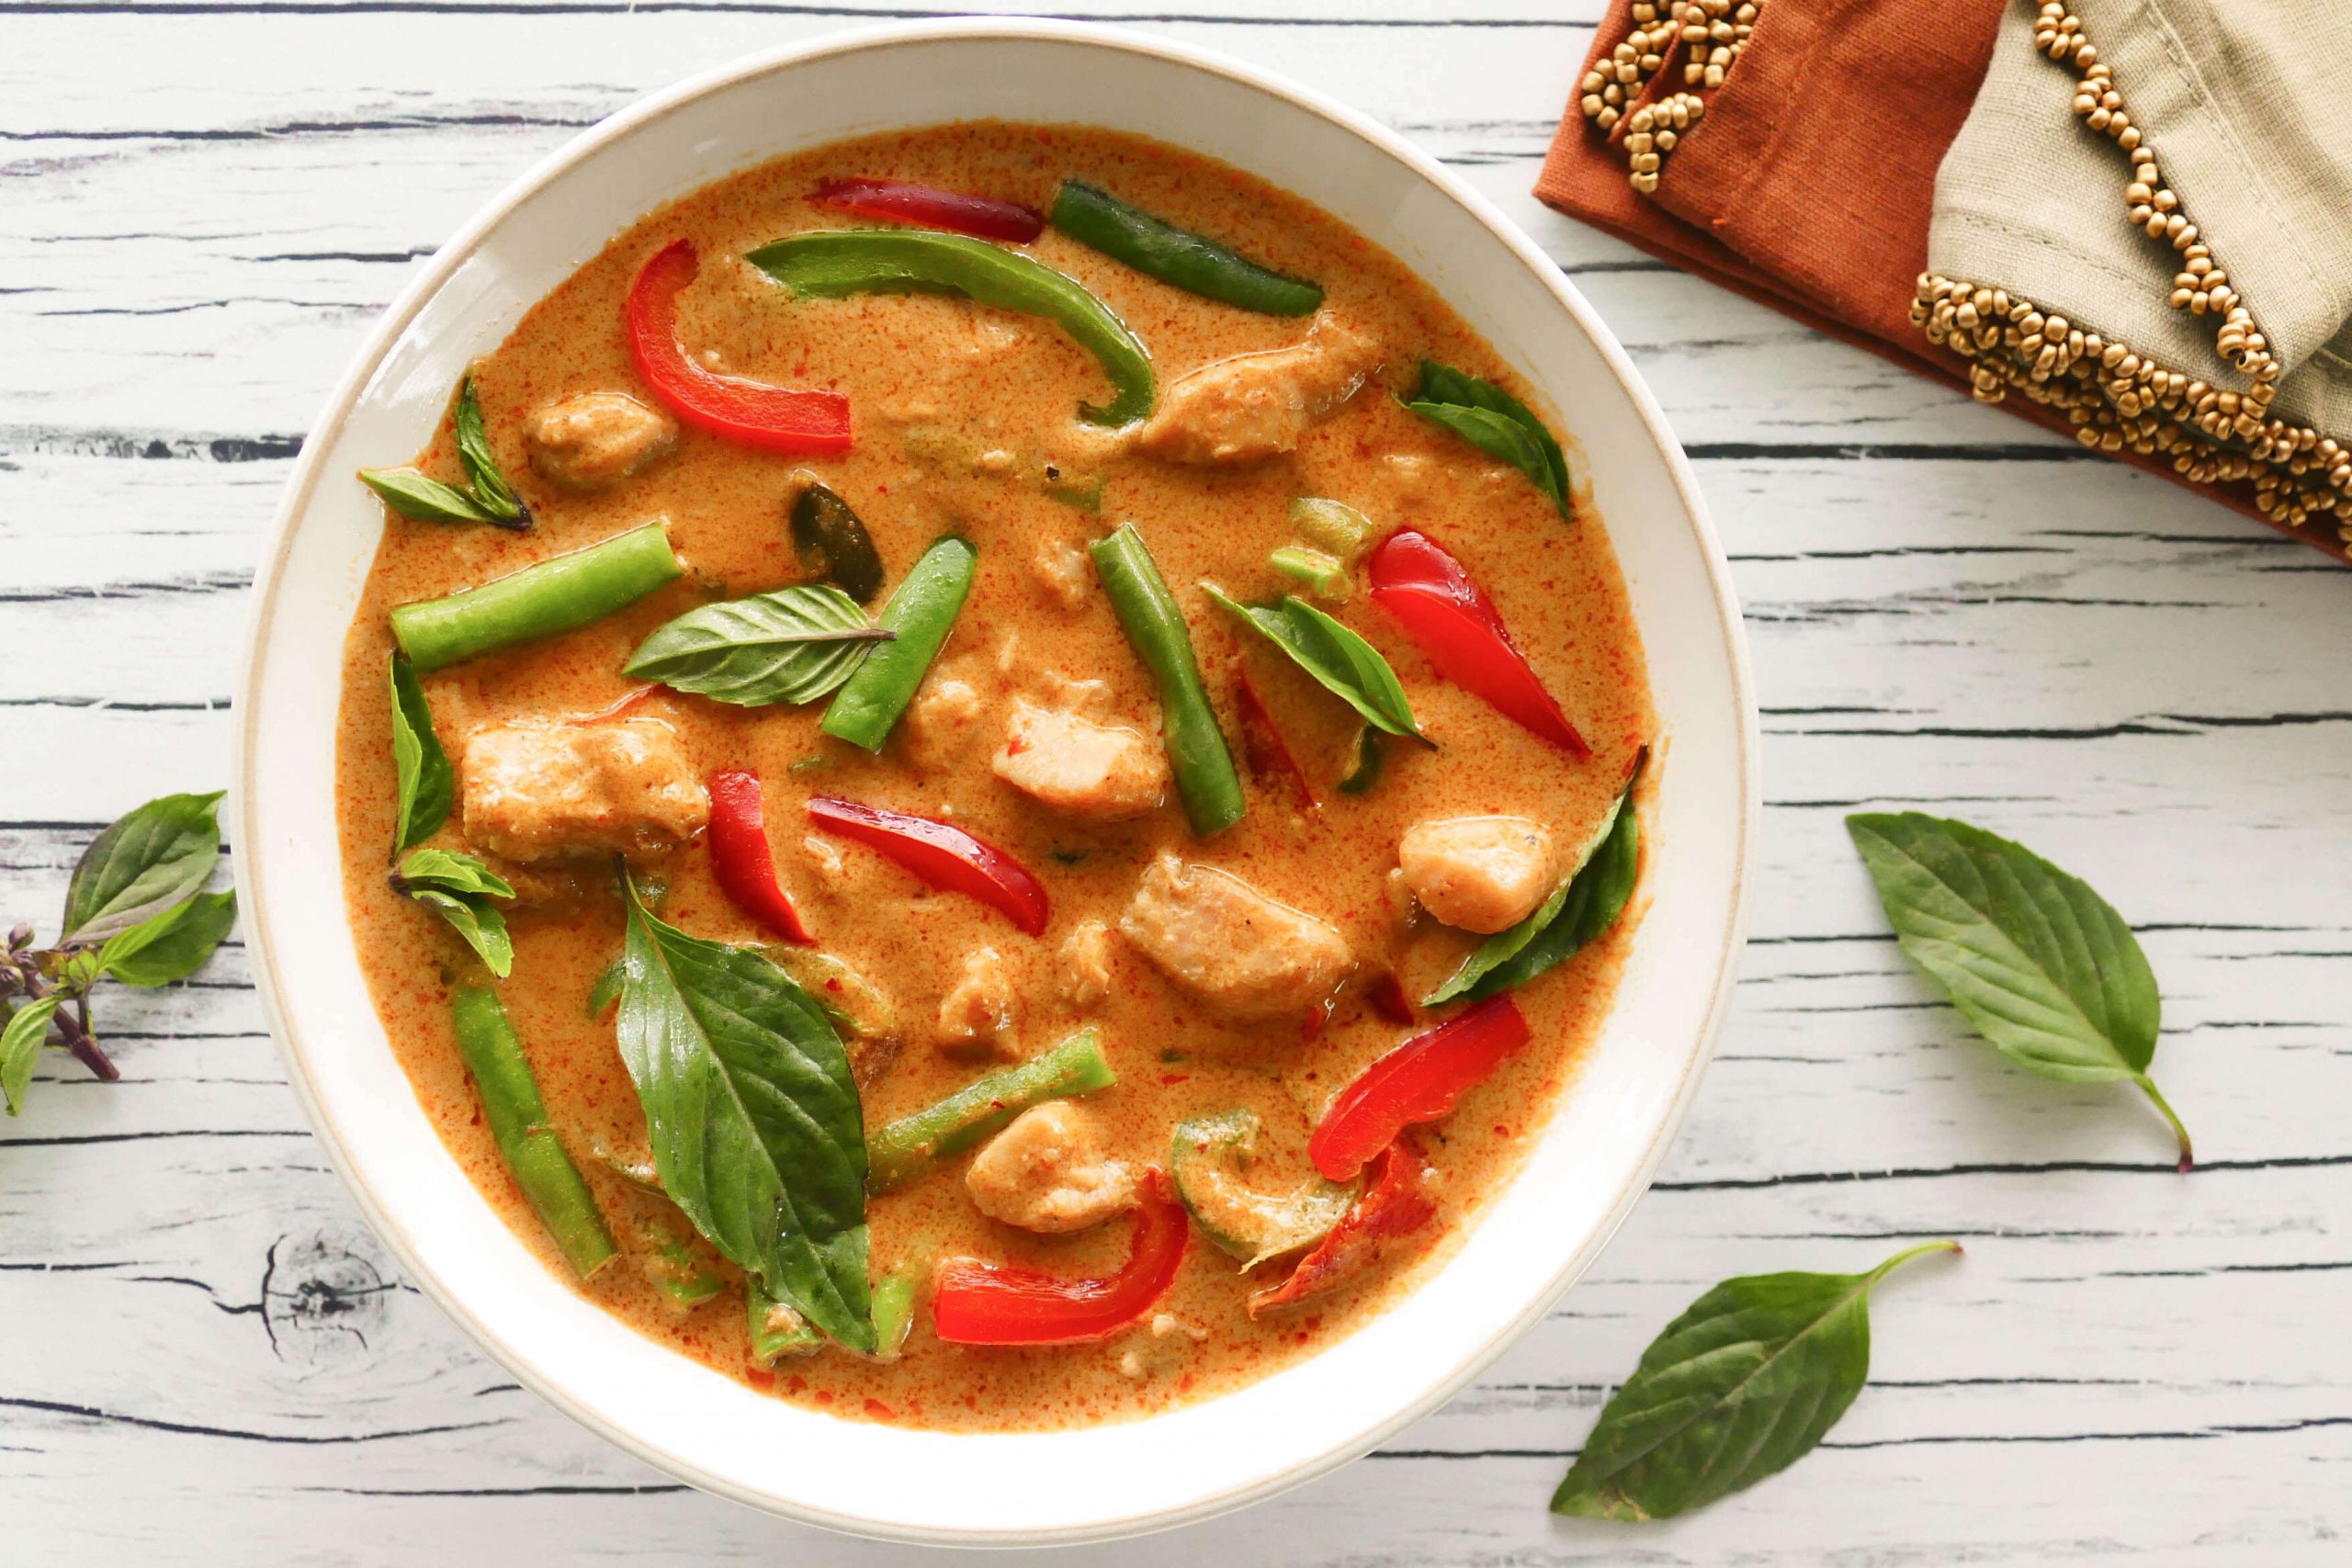
Jasmine rice is widely used in Thai cuisine as well as Southeast and South Asian cuisines. It’s particularly well suited for absorbing spices and flavors in dishes like curries.

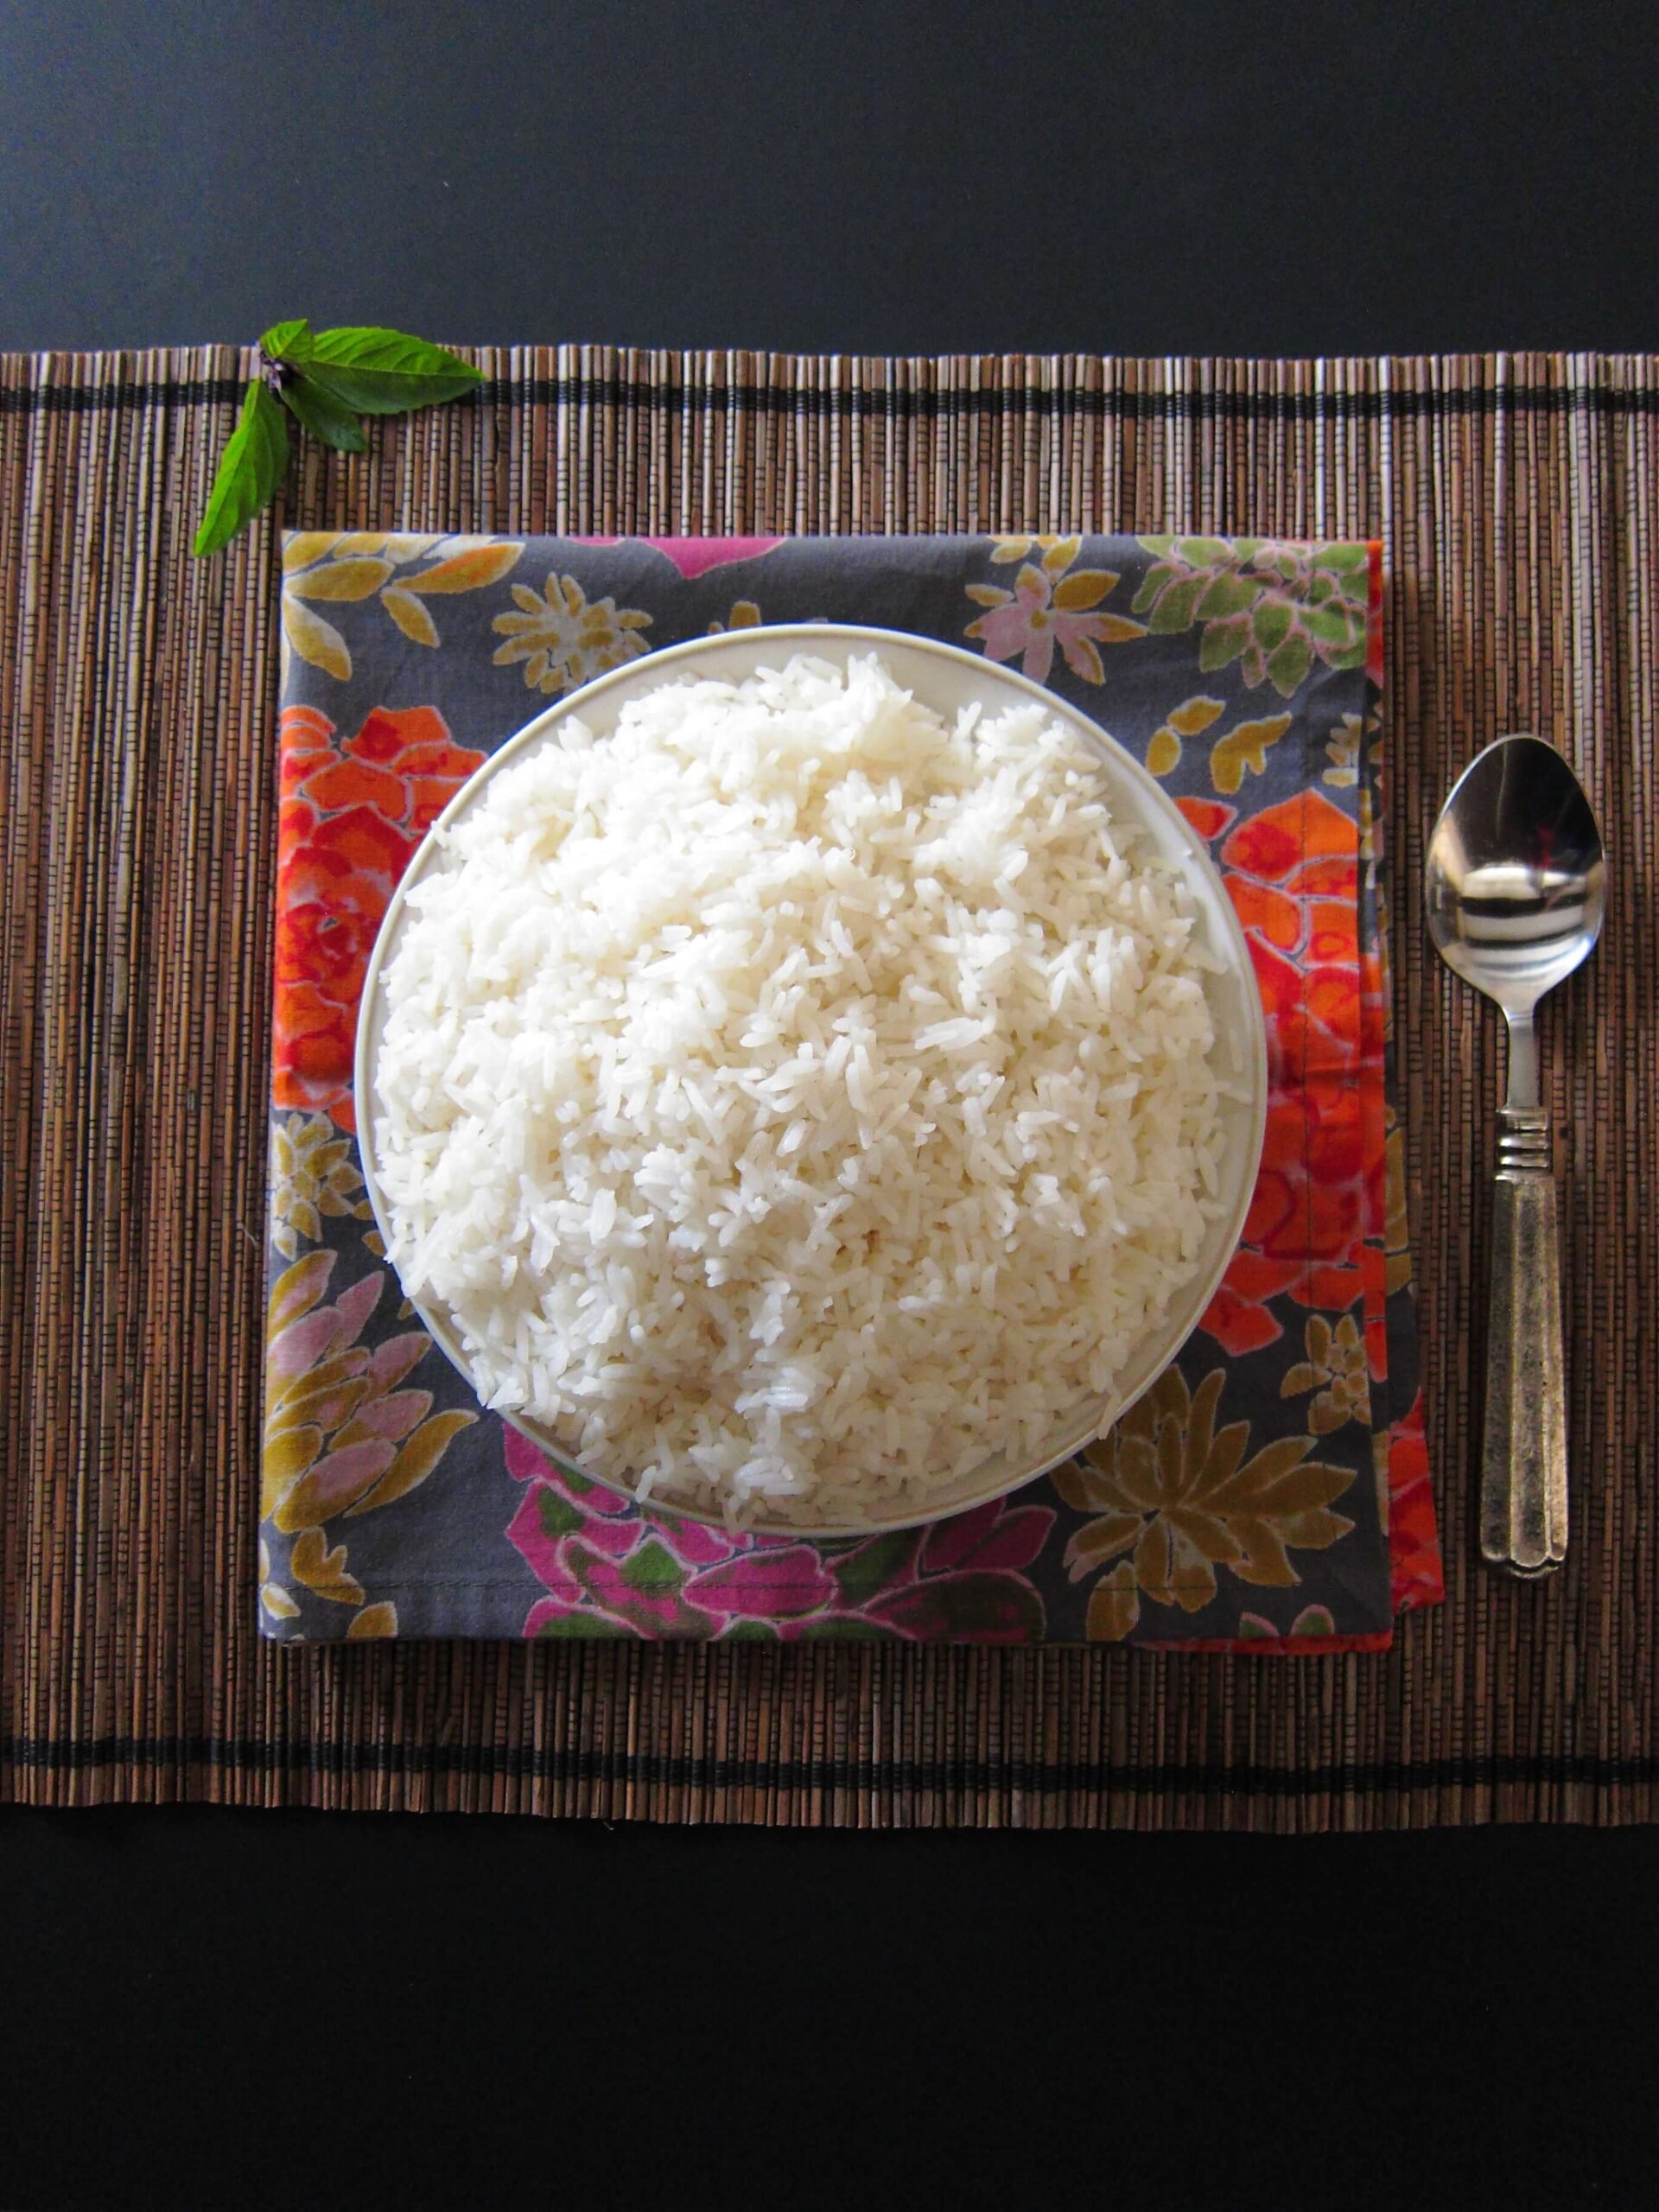
Making jasmine rice in the Instant Pot results in fluffy rice every single time. There’s no need to use your rice cooker or the stove top to make rice anymore!

Cooking rice in a rice cooker works well, but I haven’t used one in years because the Instant Pot makes perfect rice and it’s one less appliance I have to get out.

The Instant Pot is the perfect way to cook foolproof rice every time. The rice cooks evenly and thoroughly under pressure, so you get tender grains with a bite, but no crunchy or hard pieces.

Learn more about your Instant Pot…

  • Natural or Quick Release: What is Instant Pot natural release vs quick release and when should you use them?
  • Instant Pot Tips and FAQs: What are Instant Pot frequently asked questions?
  • Instant Pot Not Sealing: Why is your Instant Pot not sealing and what can you do to fix it?
  • Common Instant Pot Problems: This Instant Pot troubleshooting guide explains common problems and errors and how to solve them.
  • Sous Vide Button: How to use sous vide Instant Pot function for perfectly cooked foods.

How Do you Cook Jasmine Rice in Instant Pot?

There are two ways to make white jasmine rice in the Instant Pot electric pressure cooker.
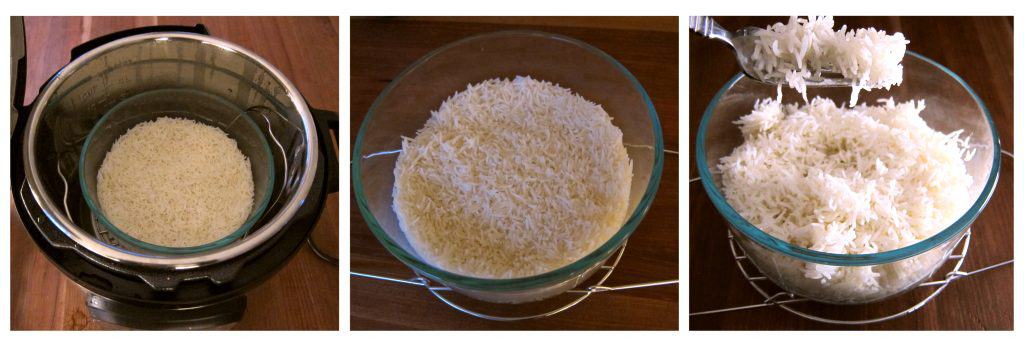
Pot in Pot Method

One is the pot-in-pot method, where you pour water into the inner pot, have a separate bowl in which you put rice and cold water, and place that on a trivet in the inner pot. I have a recipe for regular white rice (e.g. basmati rice) that uses the pot in pot method.

With pot-in-pot, I can store the rice in the same dish that I cook it in, and I don’t have a messy inner pot to clean.

Directly in Inner Pot Method

The second method of cooking Instant Pot rice is to cook it directly in the inner pot. This allows you to cook larger quantities of rice than the pot-in-pot method allows for. And that is what I’m going to be showing you in this Instant Pot jasmine rice recipe.

Although the Instant Pot pressure cooker has a Rice button, I prefer to use the Pressure Cook setting (also known as Manual setting). The rice setting uses low pressure for 12 minutes whereas my method uses high pressure and the rice is done in 4 minutes.

Cooking jasmine rice on the stove can be inconsistent because the burner can distribute heat unevenly, leading to hot and cool spots.

This causes parts of the rice to be undercooked while other parts end up mushy. Evaporation also makes it harder for the rice to say hydrated.

❤️ WHY SHOULD YOU MAKE RICE IN THE INSTANT POT?

  • The Instant Pot allows you to just set it and forget it – no need to constantly watch the stove. This gives you consistent results every single time.
  • The sealed environment of the pressure cooker retains more of the natural nutrients in the rice that can be lost through steaming on the stove.
  • Making rice on the stovetop can cause the water to overflow. The Instant Pot doesn’t have this issue, which makes cleanup easy.
  • The Keep Warm setting is perfect for keeping the rice ready to serve if your meal is not quite ready yet.
  • You can cook big batches for meal prep throughout the week. This recipe for Instant Pot jasmine rice can be easily doubled or tripled, depending on the capacity of your Instant Pot.

💡 Tips for Instant Pot Jasmine Rice


How to get light and fluffy grains

Rinsed rice doesn’t have excess surface starch and will be less sticky, which will result in perfect pressure cooker rice every time.

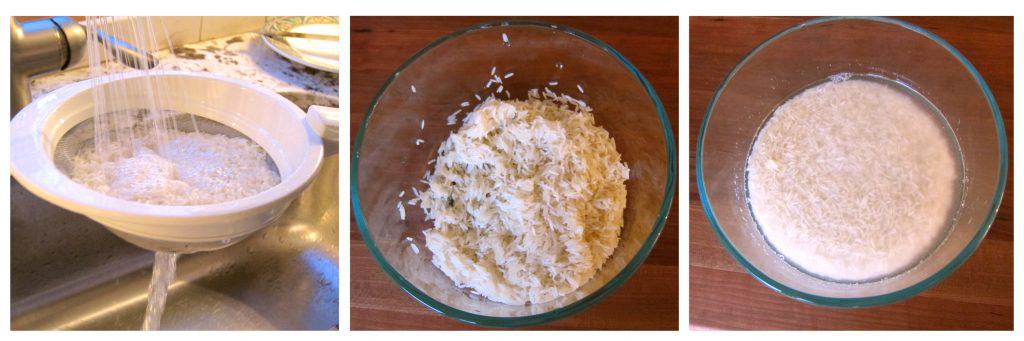
  • I recommend that you rinse the rice thoroughly before you pressure cook it. I like to put the rice in a fine mesh strainer and run it under the faucet till the water runs clear.
  • Stir the rice with a fork to fluff it, after opening the lid, to separate the grains while it rests. I usually like to use the rice paddle that came with the Instant Pot.

How to prevent sticking

  • Spritzing the pot with oil before adding the rice helps prevent it from sticking.
  • Using a nonstick inner pot is also very effective.
  • Letting the pressure release naturally for 10 minutes gives time for the rice to settle before you vent the remaining steam.

Storage tips

Refrigerate unused rice immediately or within 2 hours. Leftover rice should be stored in an airtight container in the fridge for up to 5 days. I use leftover rice to make fried rice.


Using the Pot in Pot Method

Cooking rice in a separate bowl placed directly in the Instant Pot is great for smaller batches or easier cleanup. See my pot-in-pot rice recipe for step-by-step instructions.


Change the Quantity

This recipe is for 3 cups of jasmine rice and makes about 9 cups of cooked rice.  You can adjust the quantities, but keep the same cook time and keep the rice to water ratio at 1:1.25. For 1 cup of rice, use 1 ¼ cup of water.

Use the same dry measuring cup to measure the rice and the water.

Instant Pot Jasmine Rice Quantity Cheat Sheet
DRY RICE (cups) WATER (cups)
2 2 ½
2 ½ 3 ⅛
3 3 ¾
3 ½ 4 ⅓
4 5

Flavor

You can change the recipe up and add more flavor by doing any of the following:

  • Substitute the water with chicken broth or vegetable broth.
  • Add a teaspoon of olive oil, coconut oil, vegetable oil, or butter to add flavor.
  • Add ¾ teaspoon of salt.
  • Replace ¼ quantity of liquid with coconut milk. Be sure to stir the water and coconut milk together well. Add a teaspoon of coconut oil to the rice and water for even more coconut flavor.

How to Release Presssure

Once pressure cooking has completed, you can either wait 10 minutes and release pressure OR you can allow for a natural pressure release. I do either, depending on how much time I have.


❓ FAQS


Why did my rice turn out mushy?

If you soak it ahead of time, you could end up with sticky and mushy rice. For this recipe, you just need to rinse your rice. It’s also possible that you need to add a little less water.

How long does it take to cook jasmine rice in the Instant Pot?

The Instant Pot takes about 10 minutes to come to pressure, another 4 minutes to pressure cook the rice, and another 15 minutes for natural release. This brings the total time to about 29 minutes.

What is the best way to store leftover rice?

Leftover jasmine rice can be stored in the fridge in an airtight container for 3 to 4 days. Refrigerate the leftover rice immediately.

How can I make brown jasmine rice?

Get the recipe for how to make brown jasmine rice in the Instant Pot. I also have a recipe for pot in pot Instant Pot brown rice.

Can I substitute other liquids for the water?

You can use chicken or vegetable broth instead of water for more flavor.

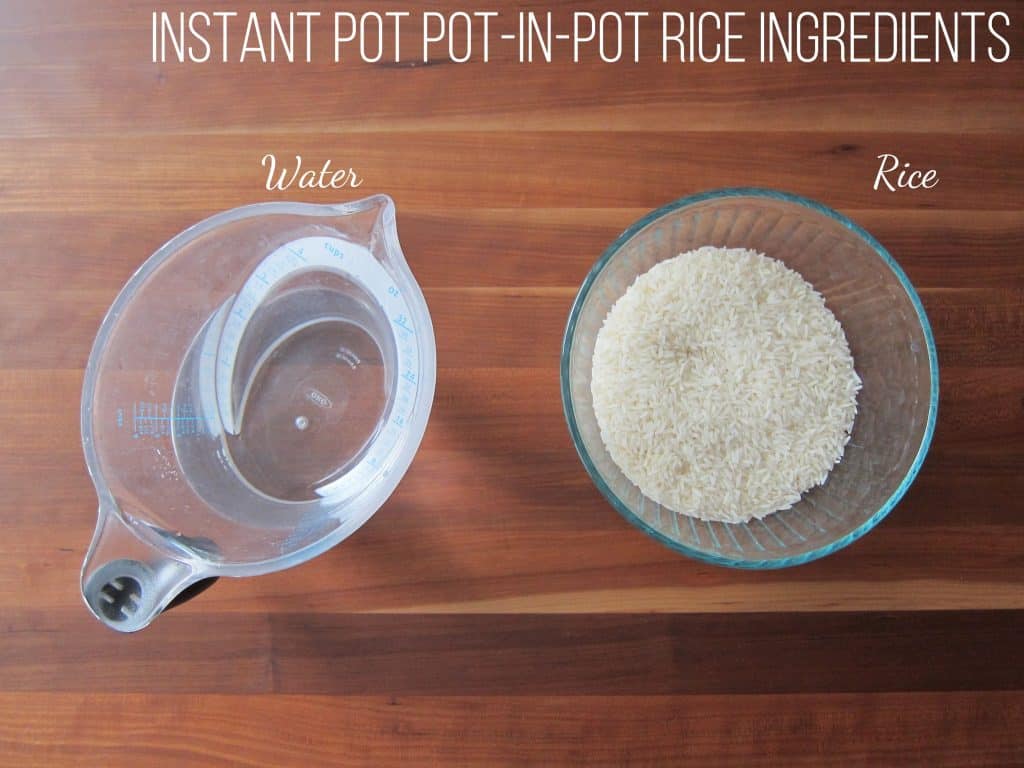
🧂 Instant Pot Jasmine Rice Ingredients

Instant Pot Jasmine Rice - Ingredients - Paint the Kitchen Red

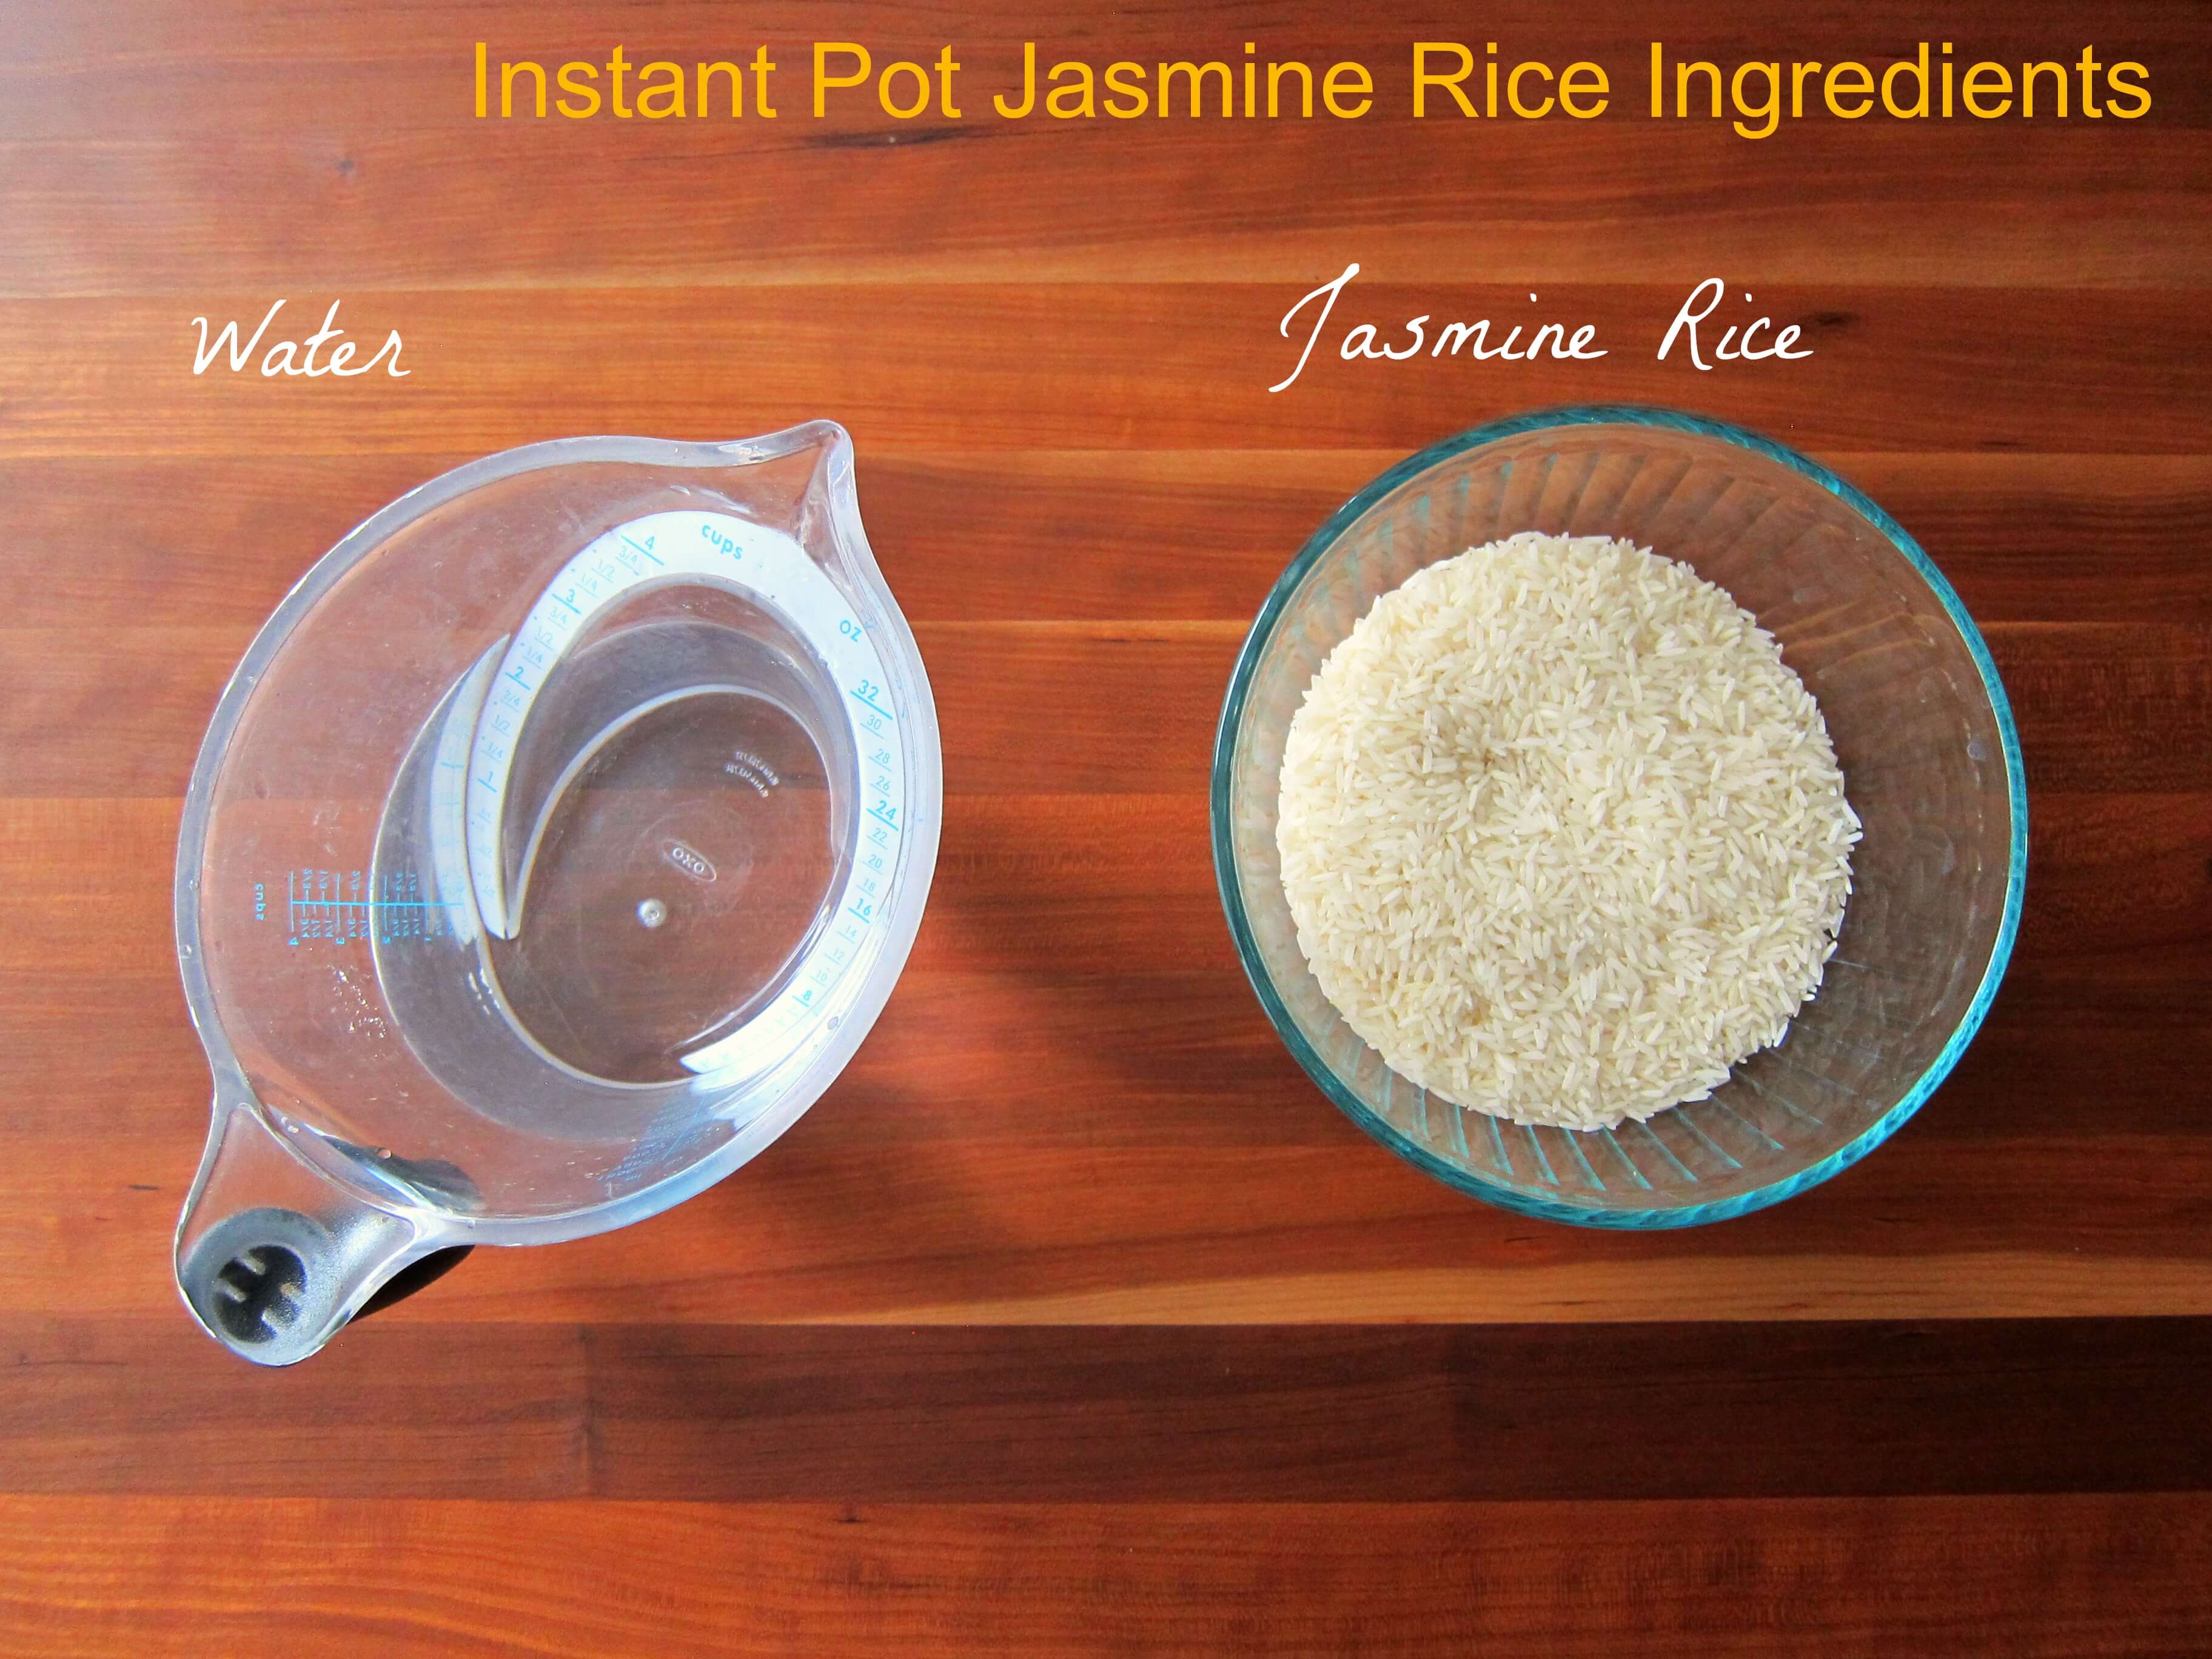
Quantities provided in the recipe card at the bottom of this post

📝 How to Cook Jasmine Rice in the Instant Pot Pressure Cooker

  • Add rice and water to the Instant Pot
  • Pressure cook the rice and release pressure
  • Fluff the rice

Add Rice and Water to Instant Pot

Collage of cooking stages - rinsed jasmine rice, and water added to instant pot
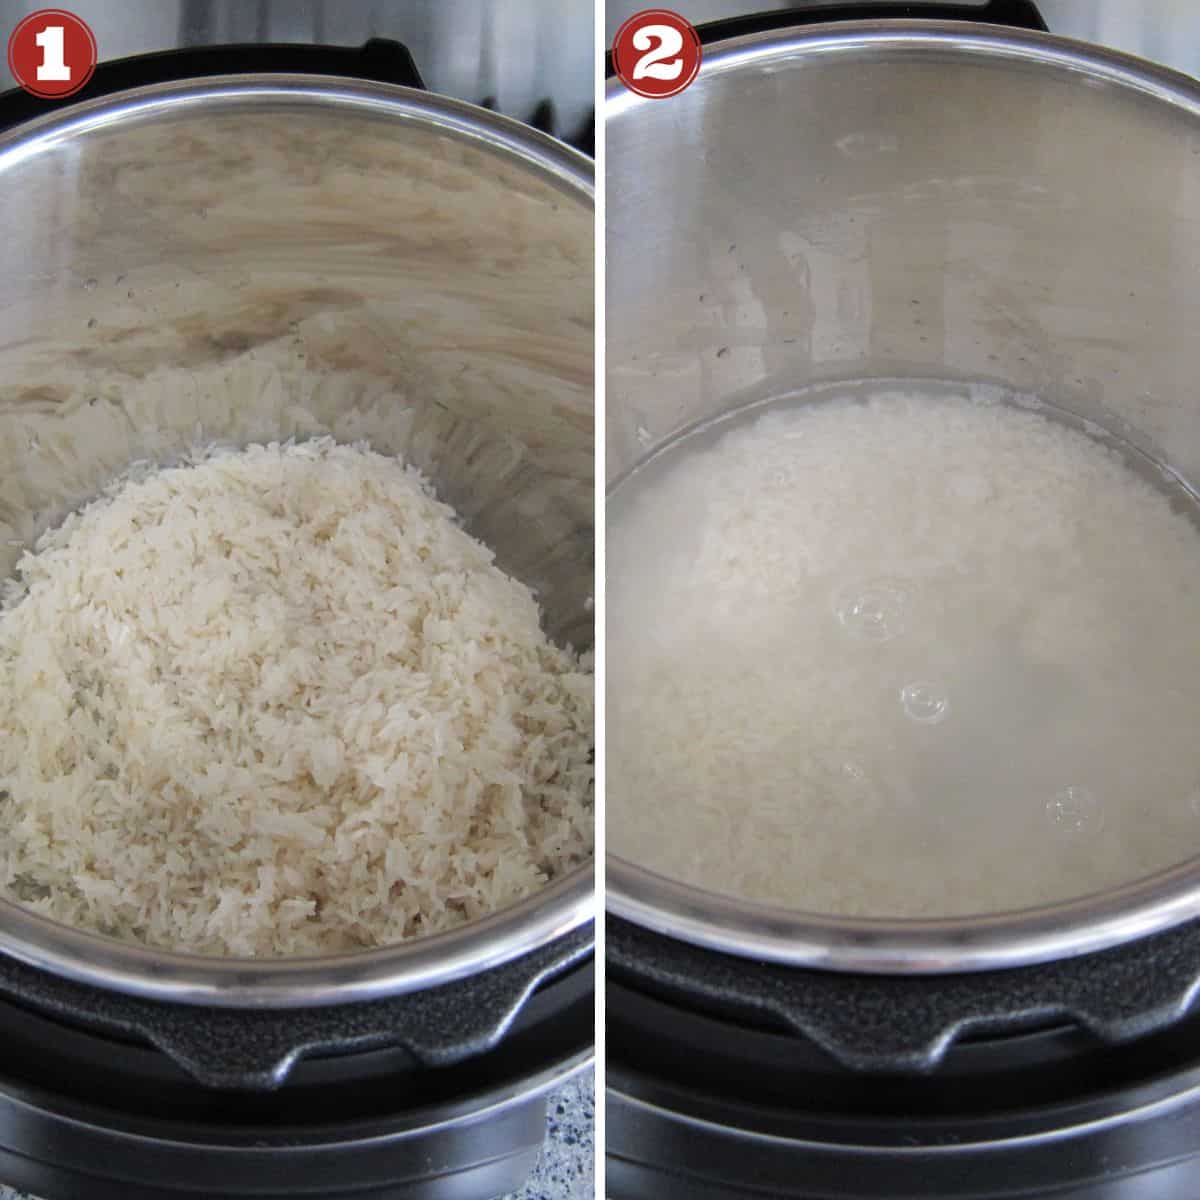
  1. Wash the rice and place the rinsed rice in the Instant Pot.
  2. Add water to the Instant Pot.

Program the Instant Pot and release pressure
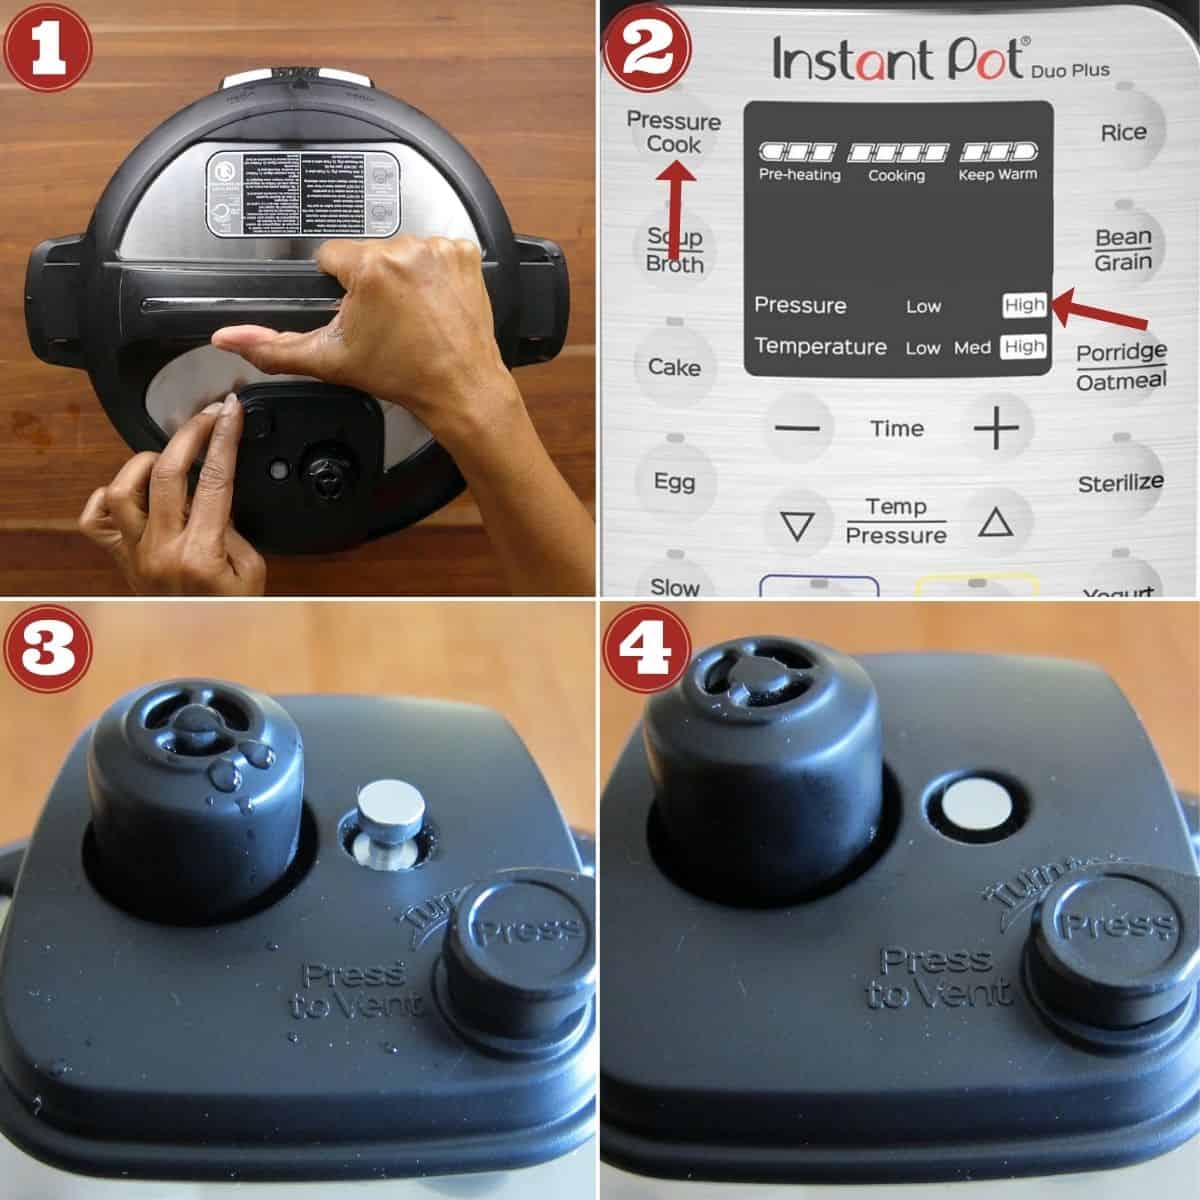
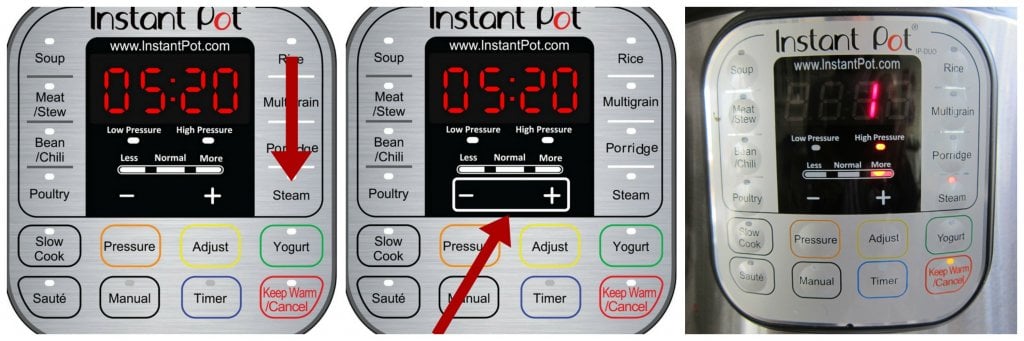
Instant Pot pressure cook instructions collage: close lid, program, float valve up, float valve down
  1. Close the lid.
  2. Program the Instant Pot to pressure cook on high pressure for 22 minutes.
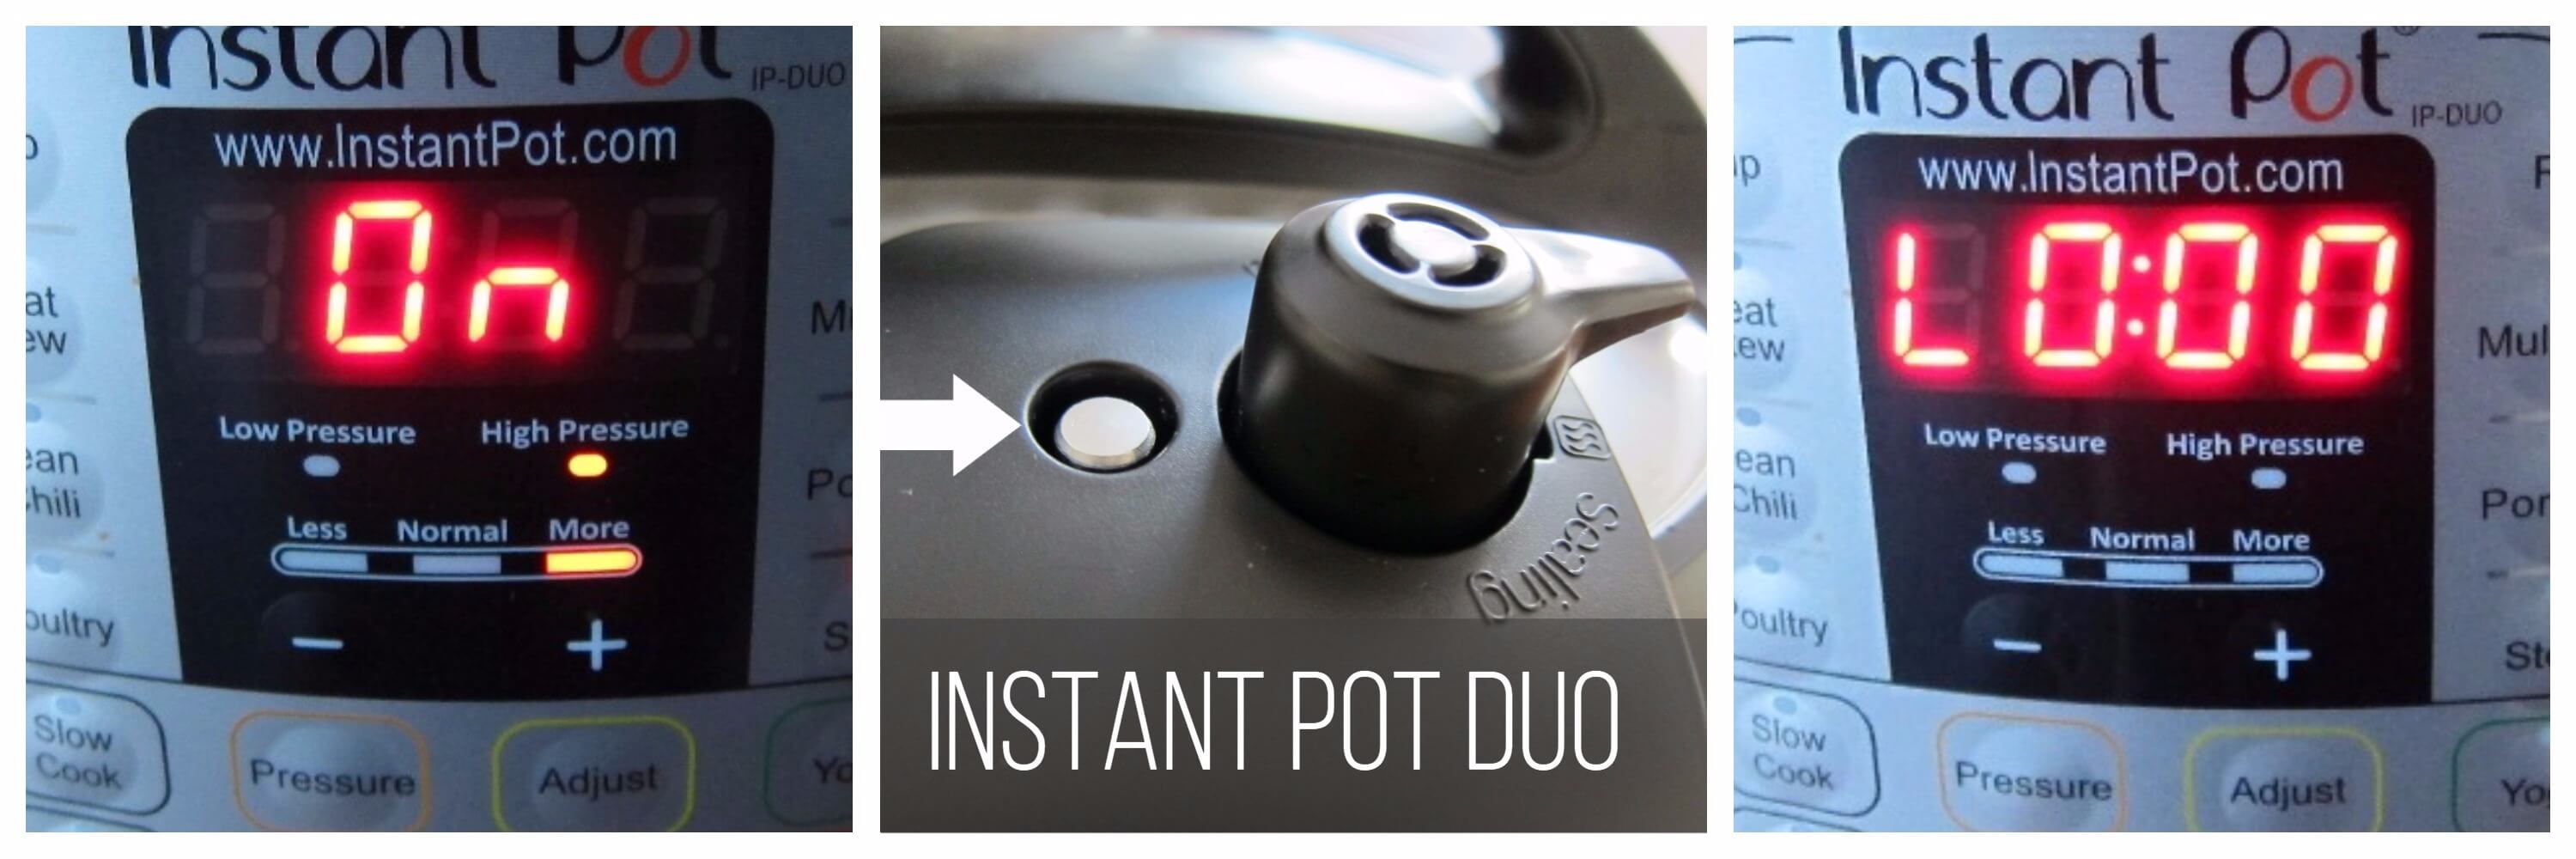
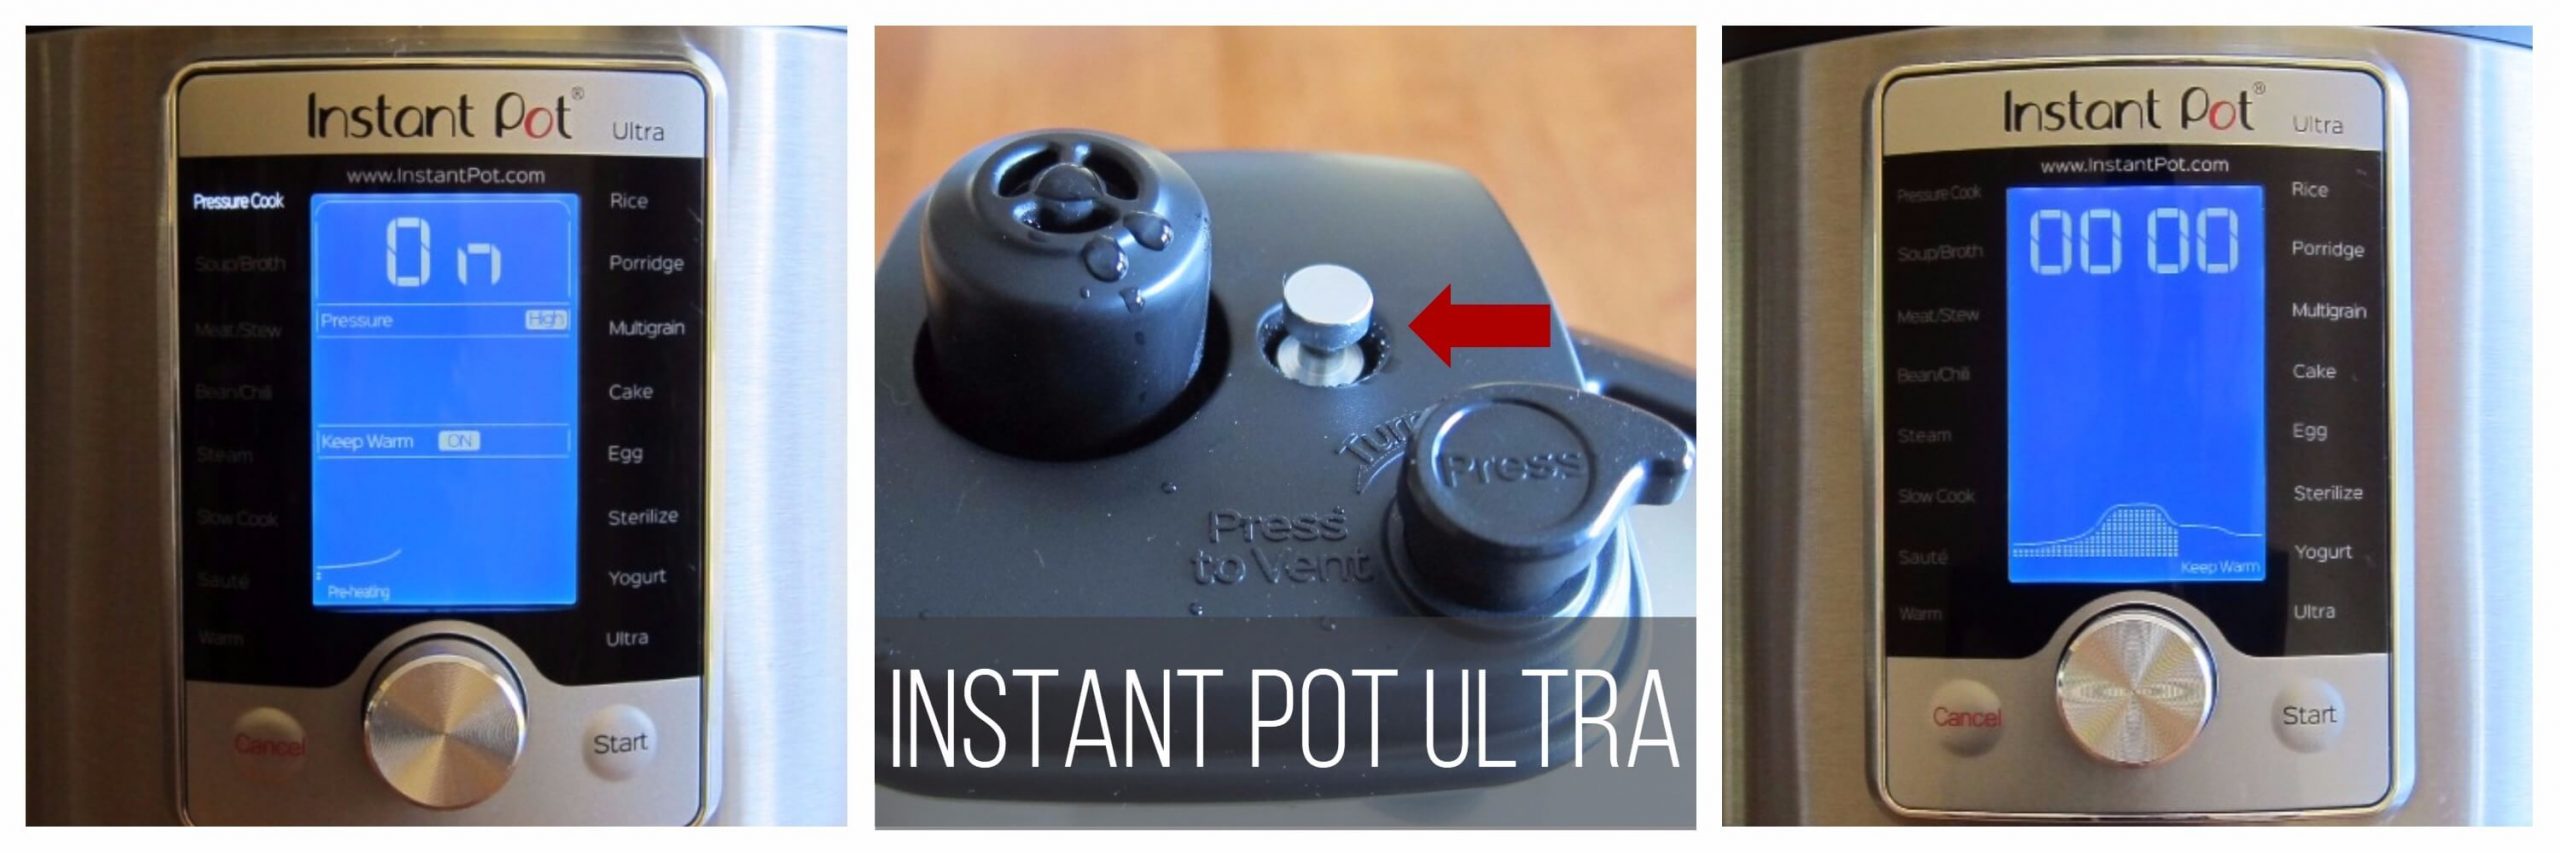
  3. The display will go from On to 22:00. The float valve will go up after a few minutes. The display will count down to 00:00.
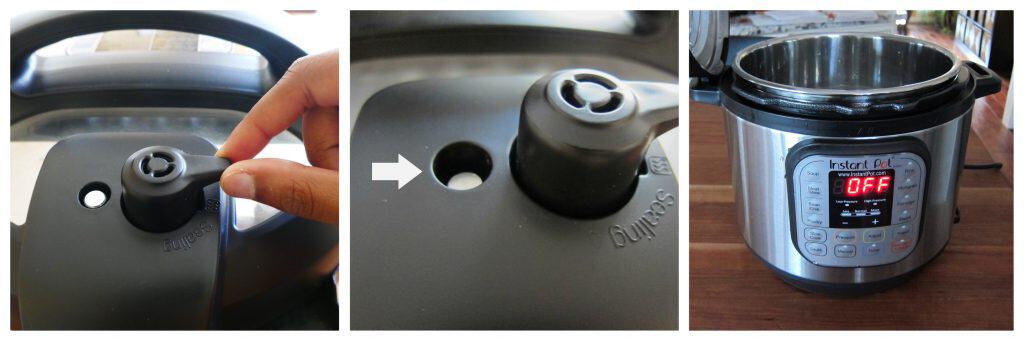
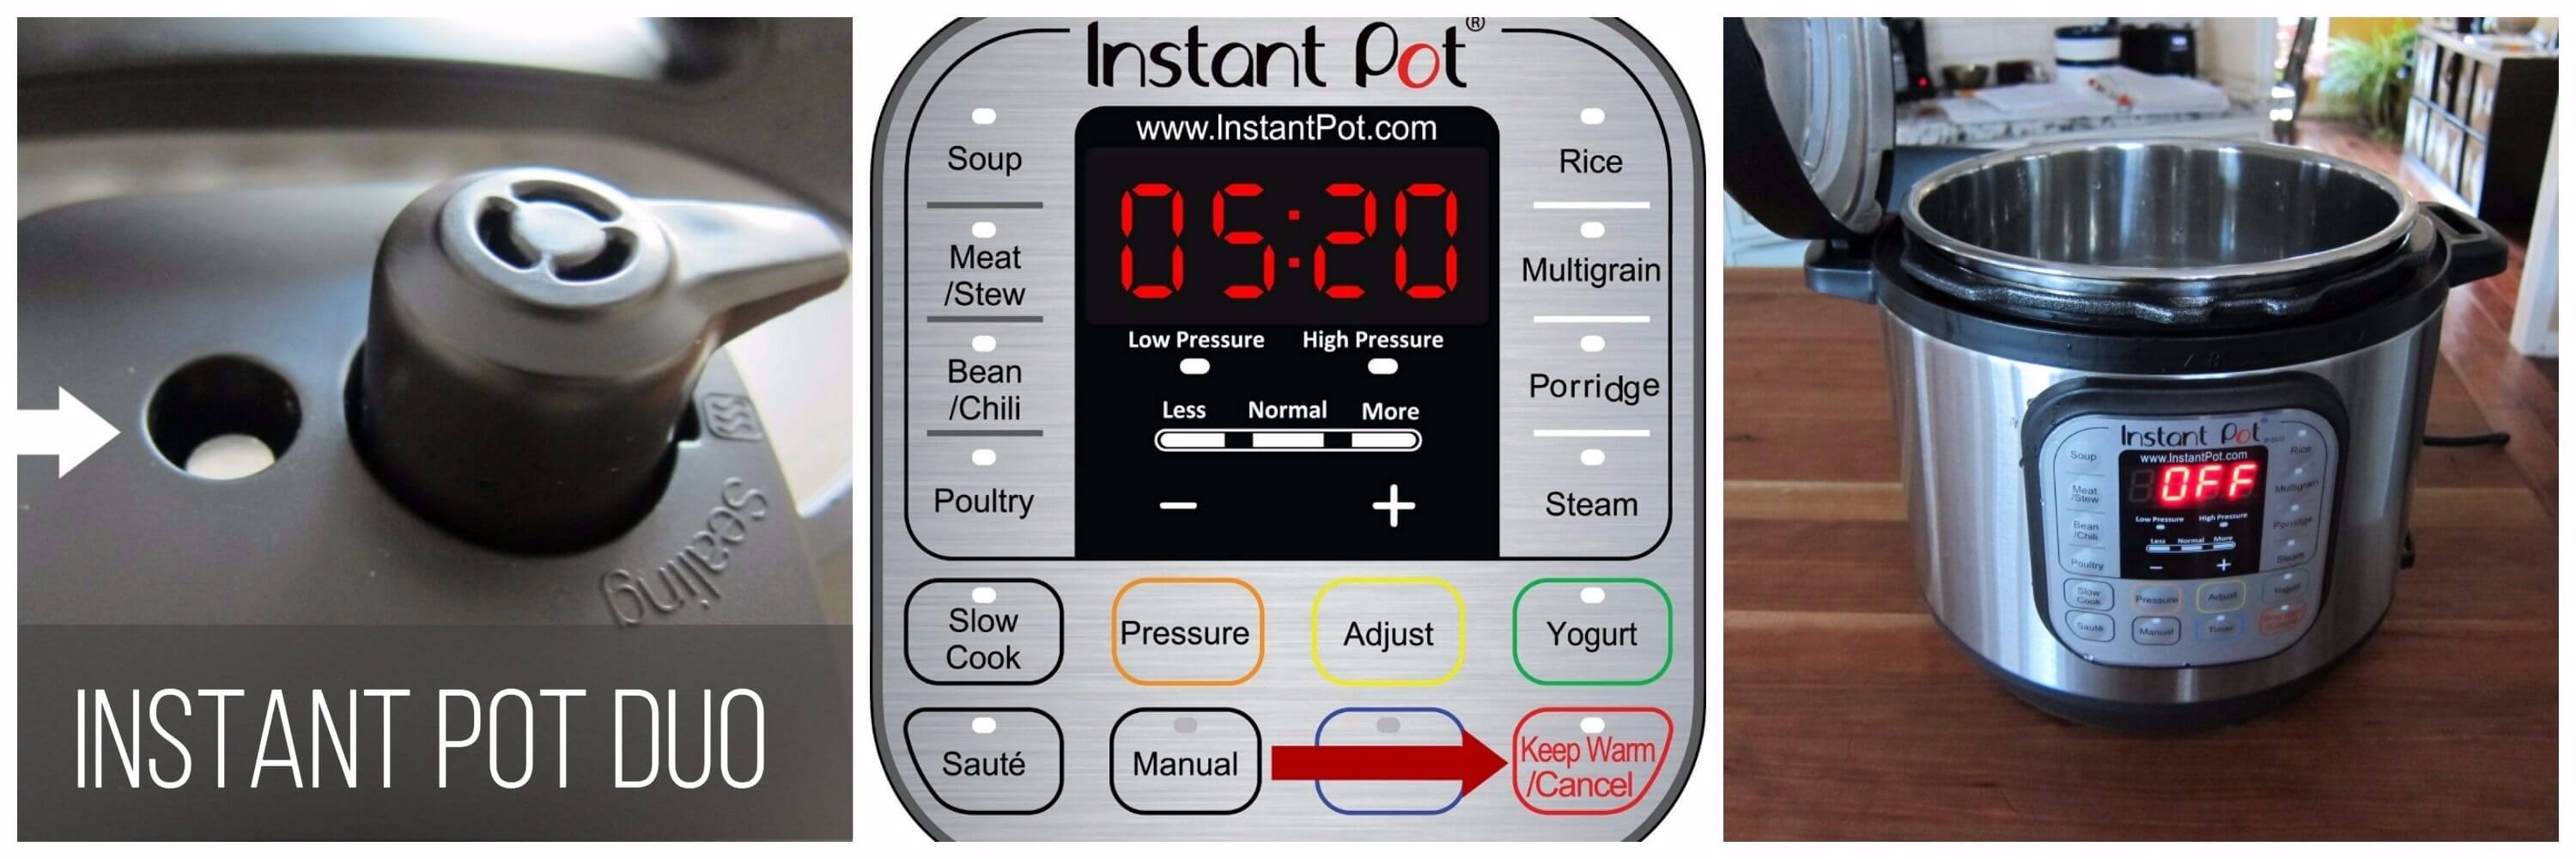
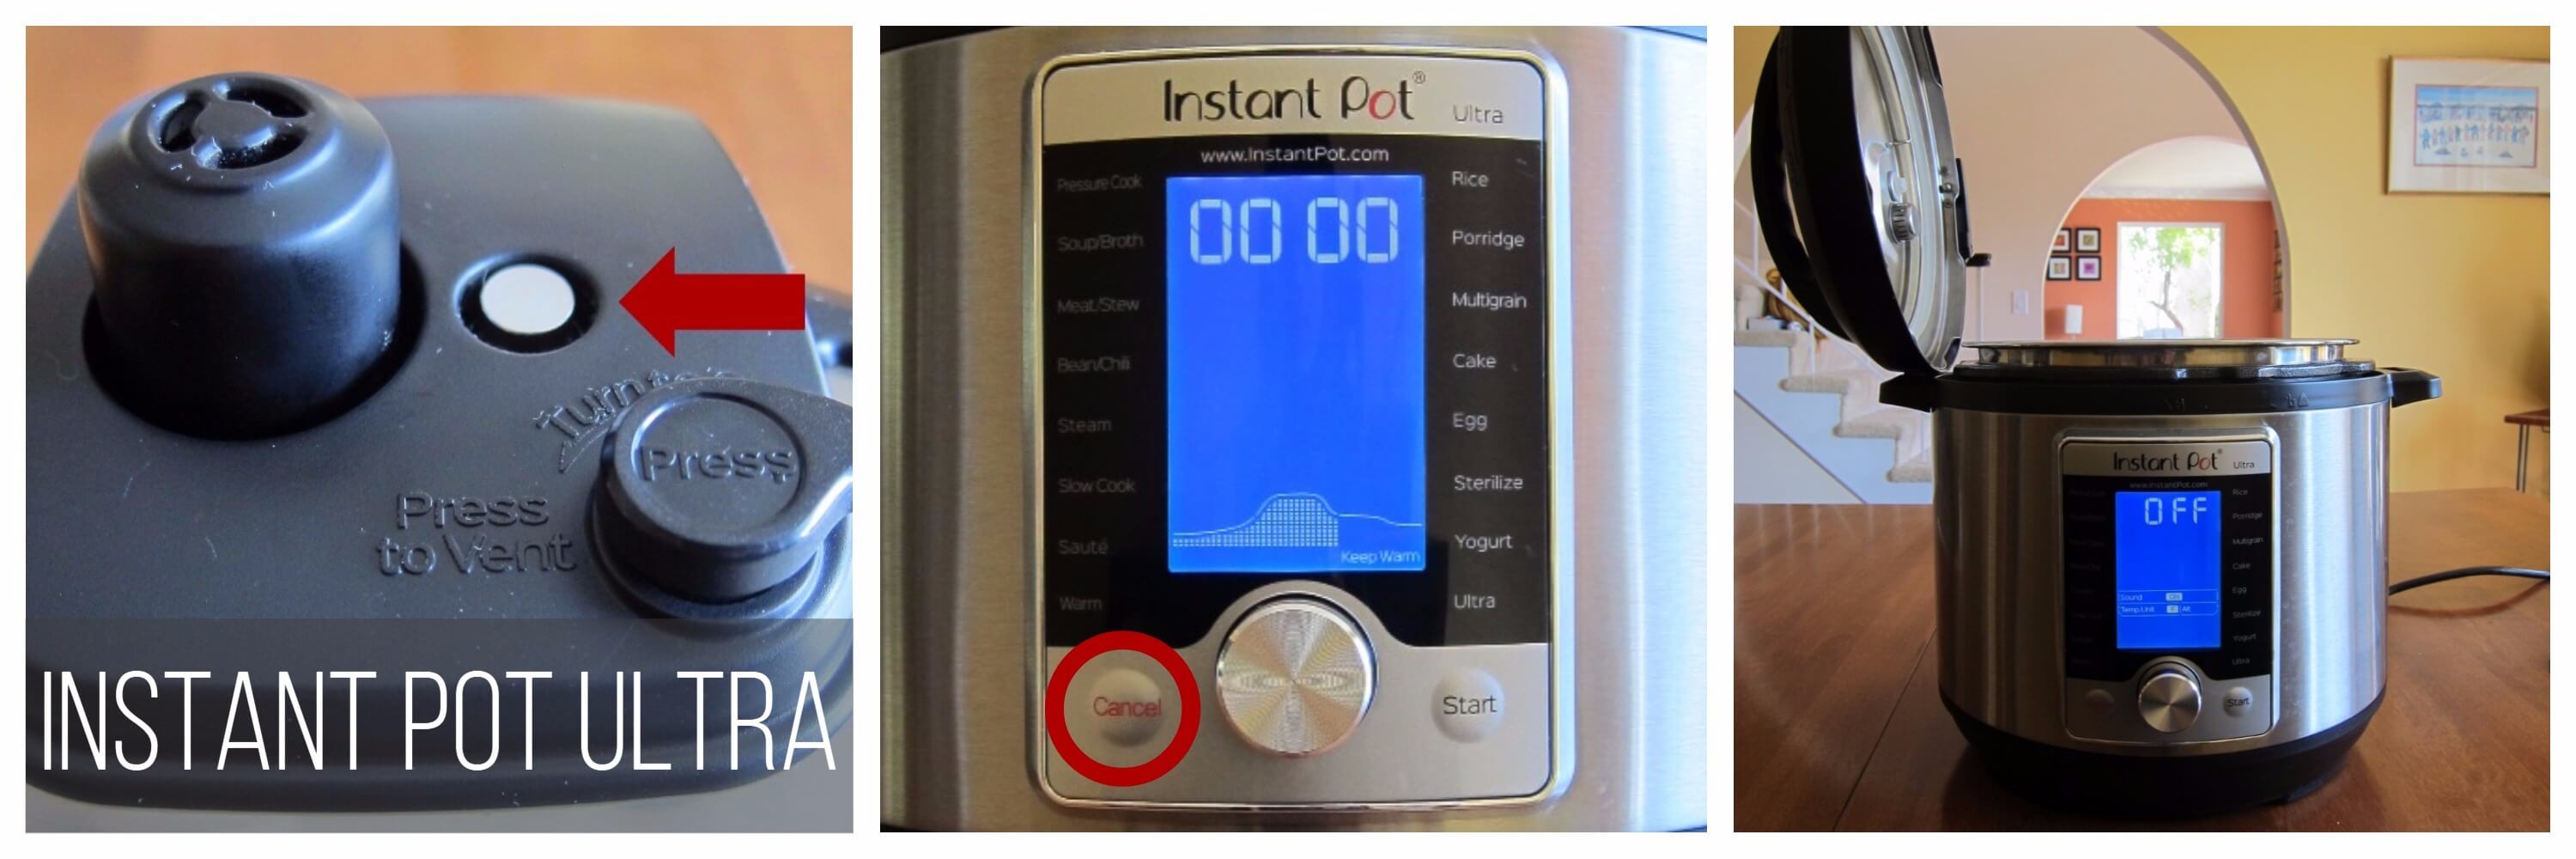
  4. Do a 15 minute natural release of pressure. Wait 15 minutes and release any remaining pressure. Once the float valve goes down, the lid can be opened.

Fluff the Rice

Collage of cooking stages - jasmine rice cooked in Instant Pot, and stirred up.
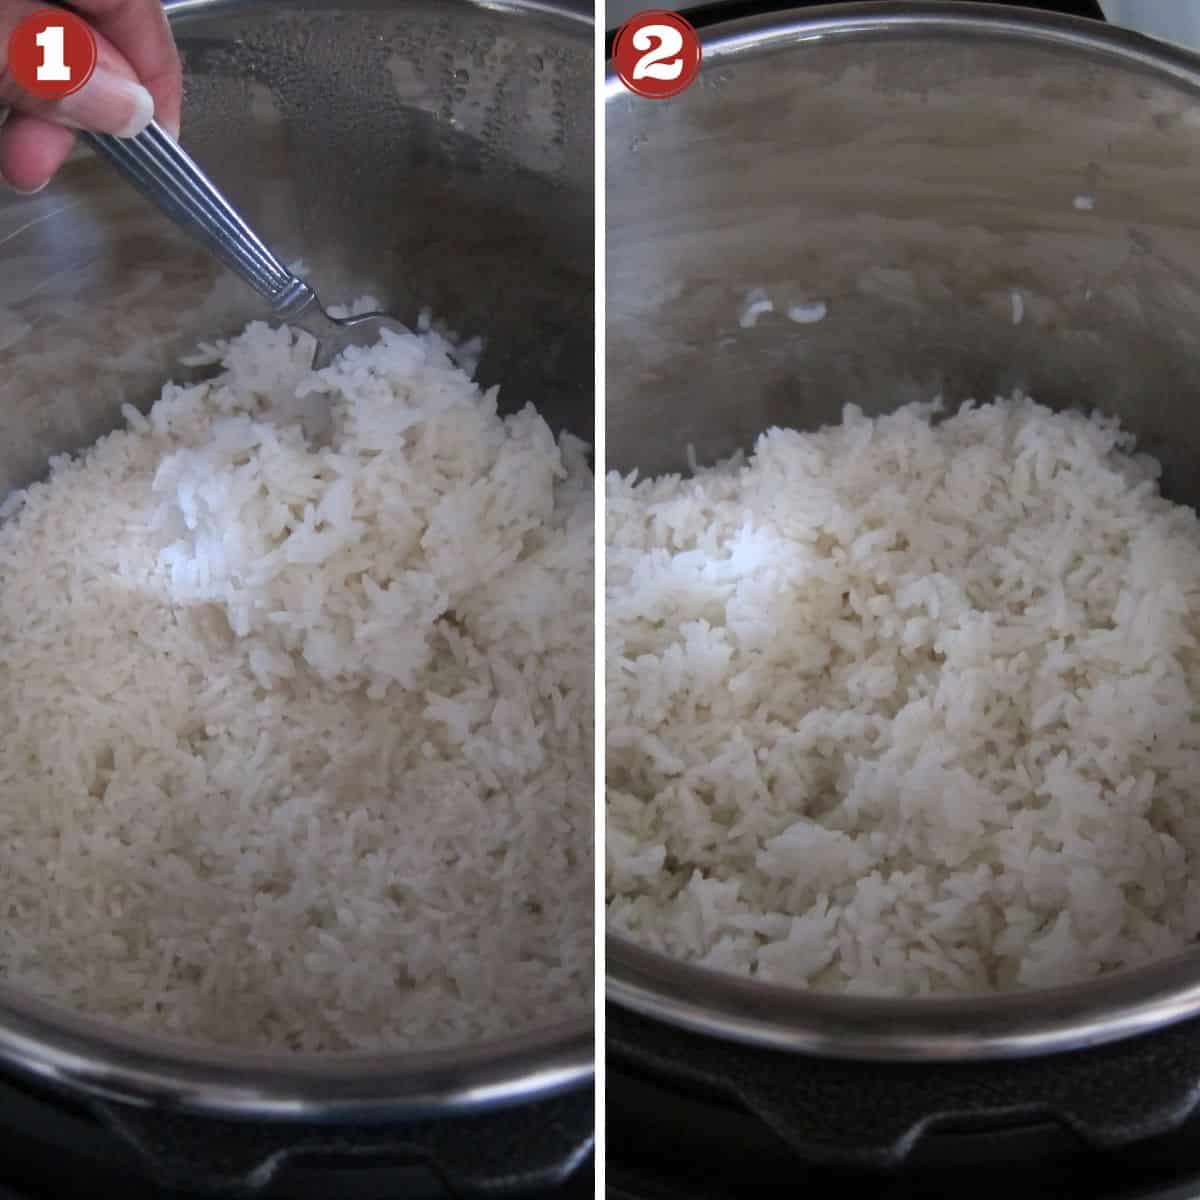
  1. Once the rice is cooked, it may appear sticky or wet.
  2. Fluff up the cooked rice with a rice paddle or fork. Let the rice rest for a few minutes for perfect Instant Pot fragrant jasmine rice. The rice paddle that comes with some Instant Pots is very useful!

Instant Pot Tips and Tricks

Delay Start
Learn about how to use the Instant Pot Delay Start feature, which allows you to begin pressure cooking at a future time.

Pot in Pot
Find out how to use the Instant Pot pot in pot cooking method, which allows you to cook multiple foods together.

Cooking Times
Find out Instant Pot Cooking Times and what method of pressure release to use.

More Instant Pot Rice Recipes

  • Instant Pot basmati rice is another white rice that’s aromatic and fragrant. This recipe can be used for other long grain white rice varieties too.
  • Try making pot in pot brown rice using the PIP method for smaller quantities of rice and easy cleanup.
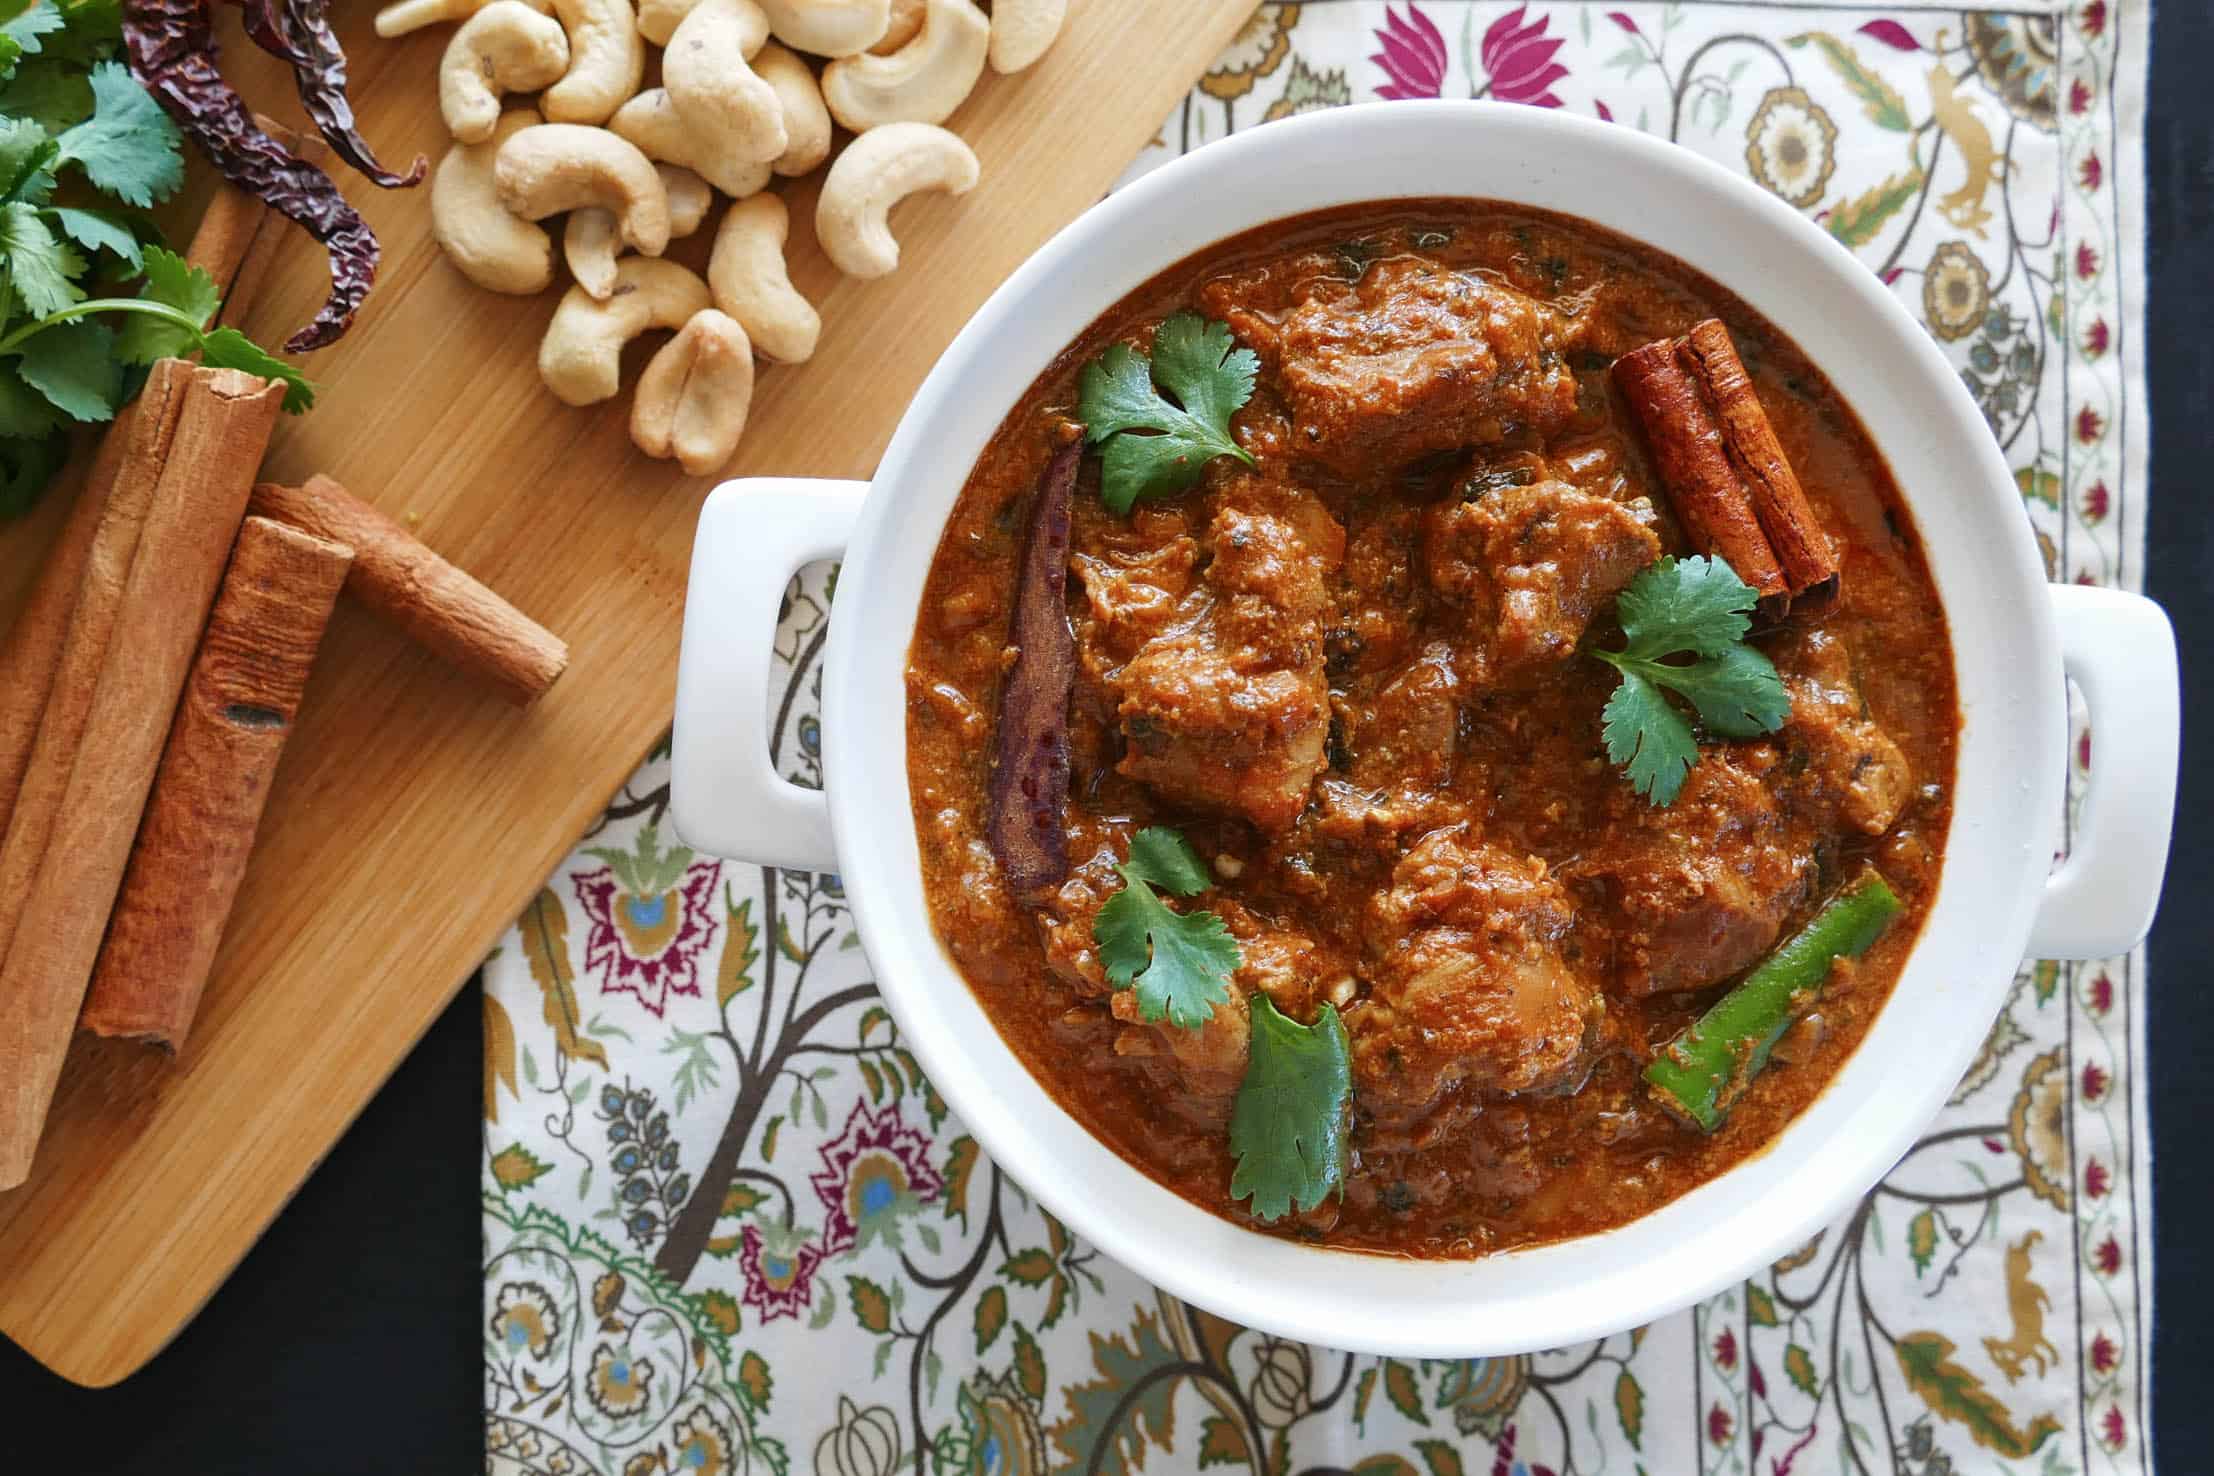
  • Arroz con Pollo a Latin chicken and rice easy recipe that comes out perfect every time.
Instant Pot Jasmine Rice in white bowl on flowery colorful napkin and straw placemat with a spoon- Paint the Kitchen Red
Print Recipe
5 from 9 votes

Instant Pot Jasmine Rice

A step by step guide that shows you how to make Instant Pot Jasmine Rice. You can use an Instant Pot to get perfect rice every time!
Prep Time3 minutes mins
Cook Time20 minutes mins
Total Time23 minutes mins
Course: Sides
Cuisine: Asian, Miscellaneous, Thai
Main Ingredient: rice and grains
Servings: 8 cups
Calories: 205kcal
Author: Paint the Kitchen Red

Equipment

  • Instant Pot Pressure Cooker
  • Fine mesh sieve

Ingredients

  • 3 cups Jasmine rice
  • 3 ¾ cups water

Instructions

Cook Directly in Inner Pot

  • Rinse out Jasmine rice in a fine-mesh strainer and drain.
  • Place rice and water in Instant Pot inner pot. Stir to combine.
  • Close the lid and pressure cook on High Pressure for 4 minutes.
  • Once pressure cooking is complete, do a 10-minute natural release (i.e. let the rice stay in Keep Warm mode for 10 minutes after cooking is complete. Release remaining steam to depressurize Instant Pot), or allow pressure to release naturally. Open the lid.  [Read More: The Different Pressure Release Methods]
  • Open Instant Pot and fluff rice with a fork before serving.

Use Pot in Pot Method *

  • Rinse out 2 cups of Jasmine rice in a fine-mesh sieve and drain.
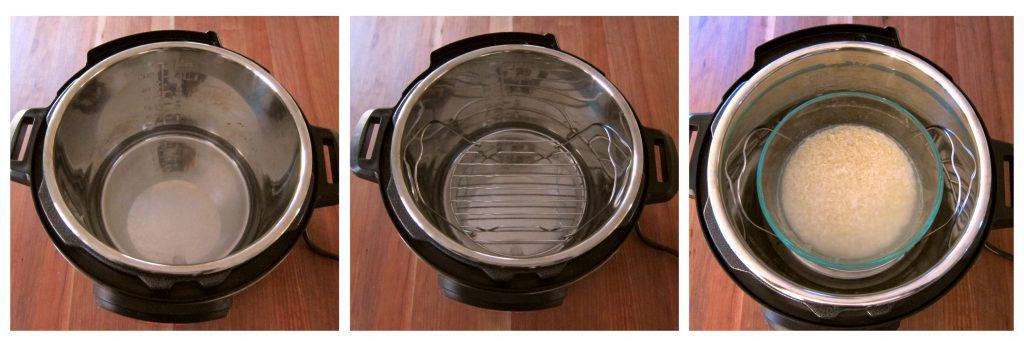
  • Transfer rinsed rice and 2½ cups of water to a 1.75 quart or larger oven-safe medium bowl.
  • Pour 2 cups water into the Instant Pot's main compartment (inner pot) and place a trivet in the water.
  • Place rice bowl on trivet and close the Instant Pot.
  • Close the lid and pressure cook on High Pressure for 4 minutes.
  • Do a 10 or 15 minute natural pressure release.  [Read More: The Different Pressure Release Methods]
  • Open Instant Pot and fluff rice with fork and allow it to rest for a few minutes before serving.

Video

Notes

  • * To use the pot in pot method, the recipe has been adjusted to use 2 cups of rice.
  • To adjust the quantities, keep the ratio of rice to water at 1:1.25.
  • Be sure to use the same cup for measuring both rice and water.
* Do not overfill your pot with rice, i.e. past ½ mark.

Nutrition

Serving: 1cup | Calories: 205kcal | Carbohydrates: 44.5g | Protein: 4.3g | Fat: 1g | Sodium: 1.6mg | Fiber: 0.5g

I am not a certified nutritionist.  I provide my best estimate of nutritional information merely as a courtesy to my readers.  If you depend on nutritional information for dietary or health reasons,  I suggest using your favorite online nutrition calculator to confirm the nutritional value of this recipe based on the actual ingredients that you use.

Did you know that the best way to support your favorite bloggers is to comment and rate recipes, and share on social media? If you loved this recipe, please comment and give it a five ⭐ rating in the comment section below. If you’re a pinner, pin this post using the Pin buttons at the top and bottom of this post and in the recipe card above. Thank you for your support!

BACK TO TOP

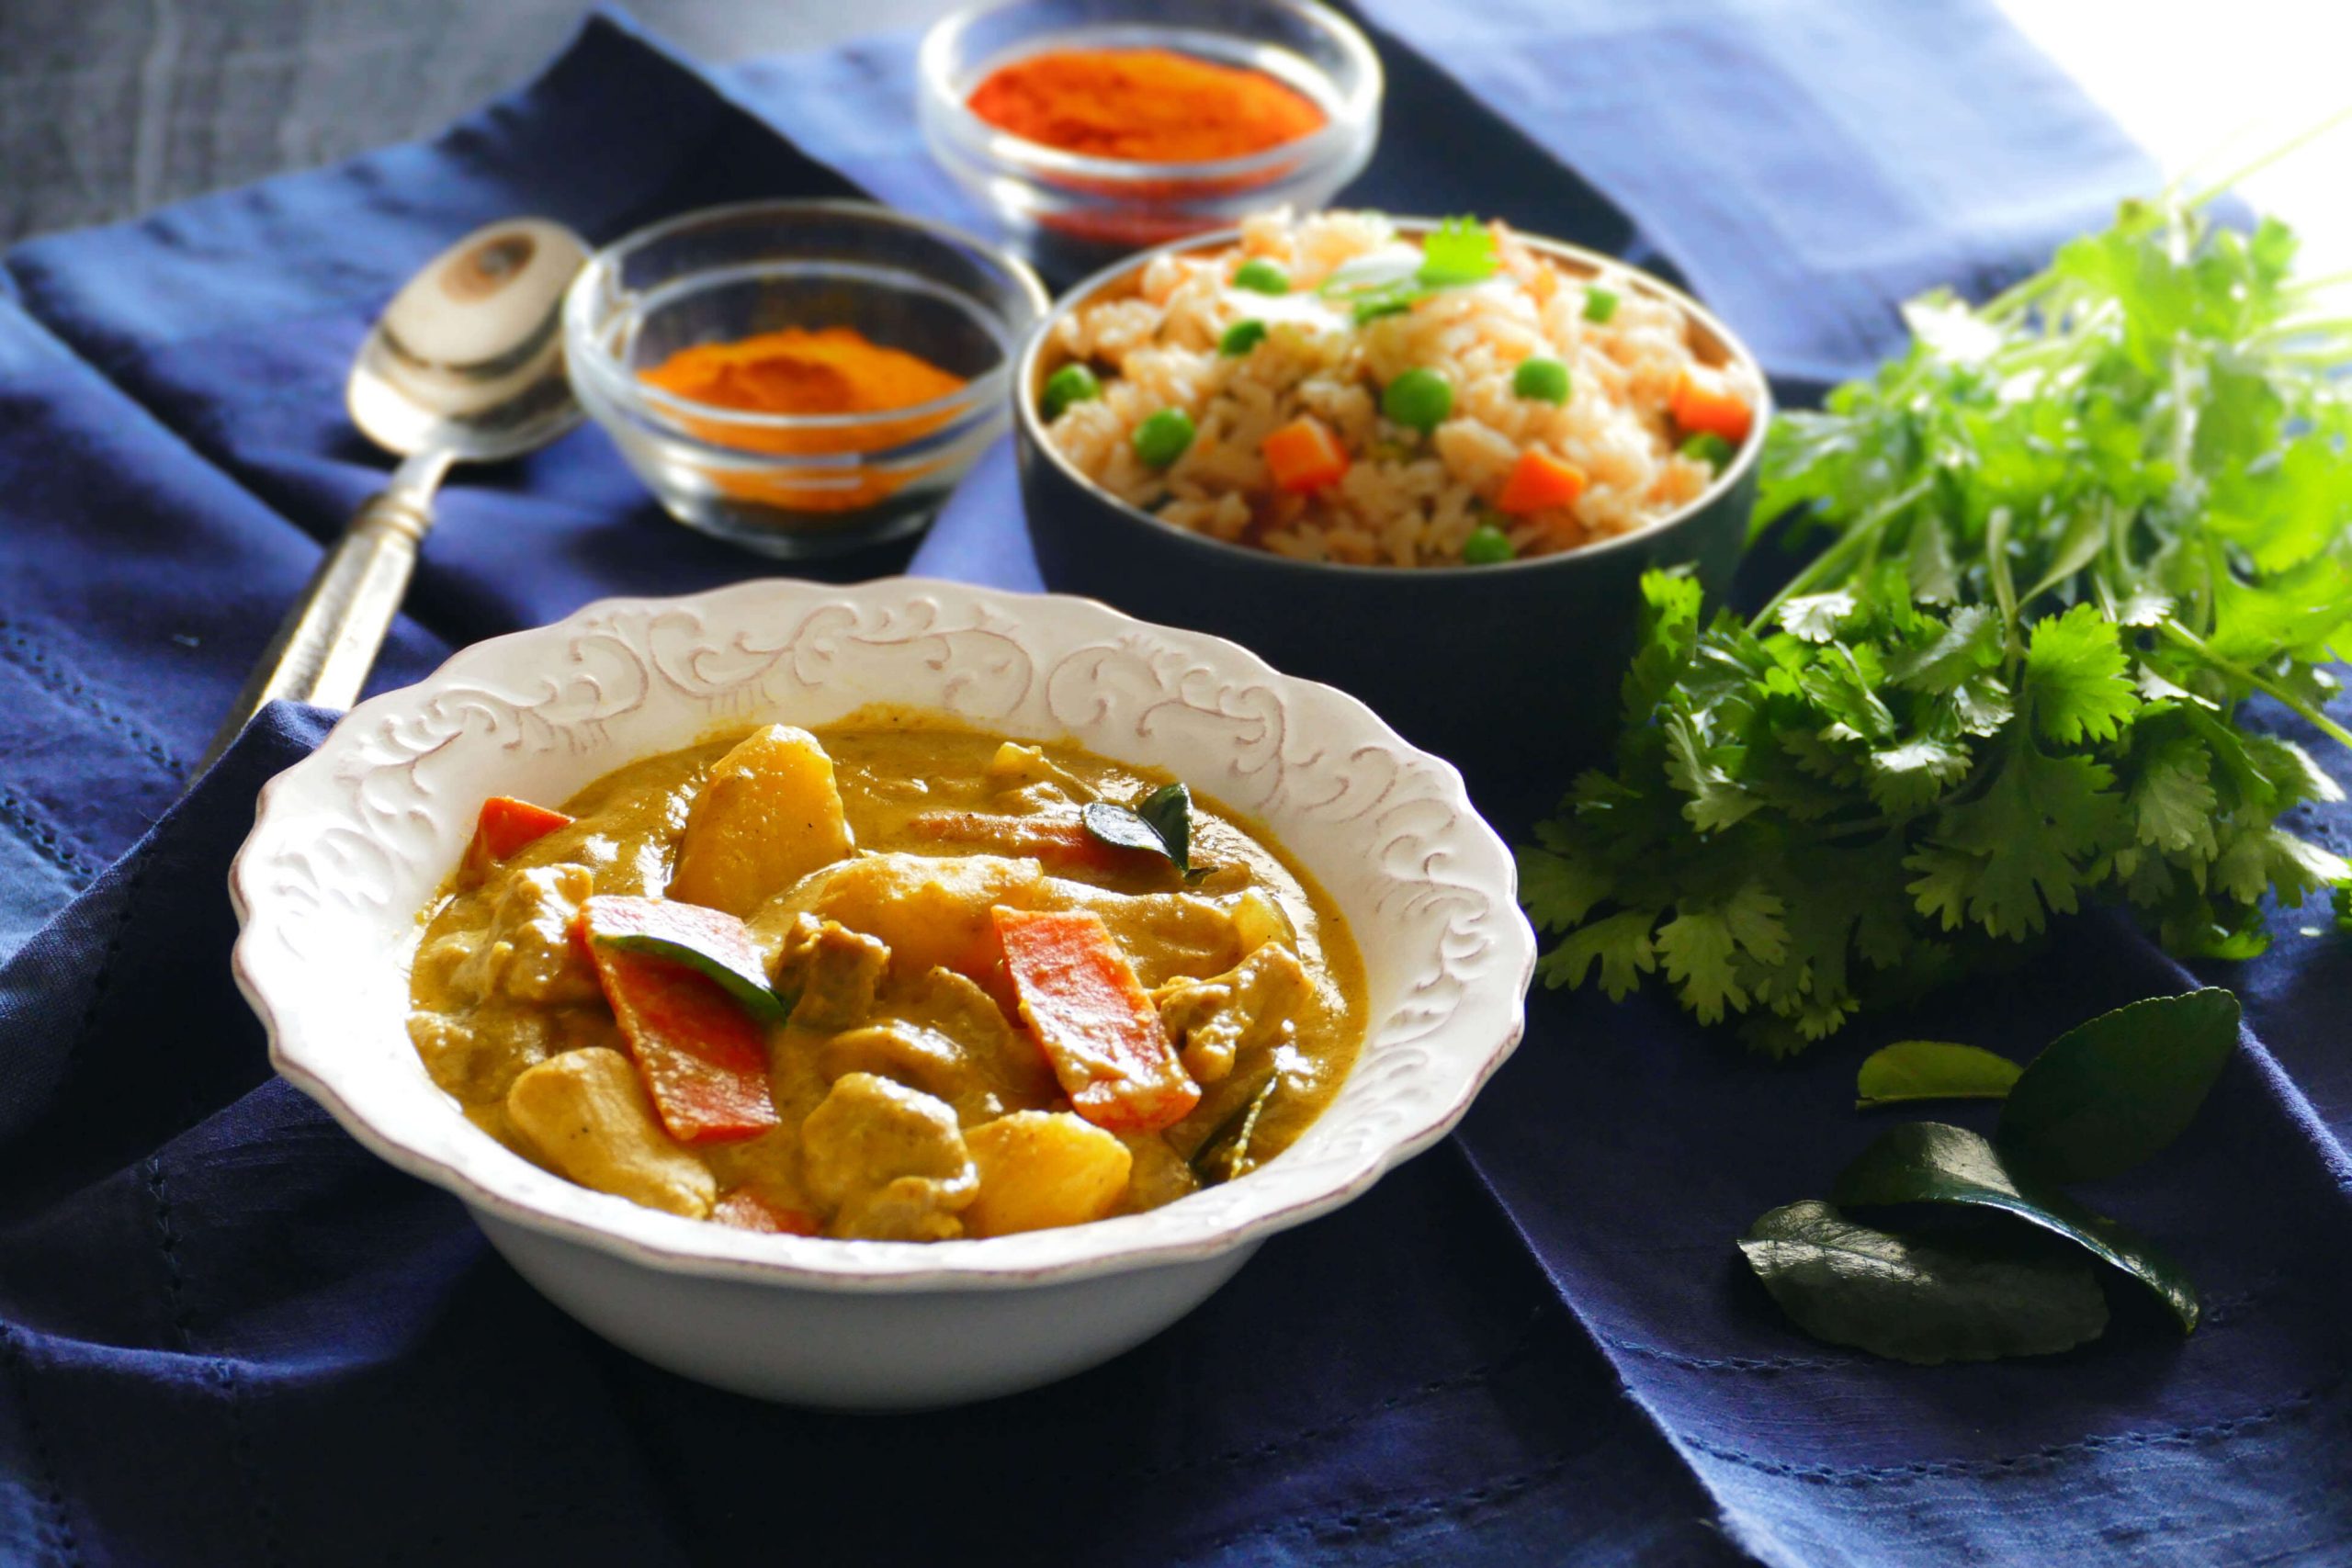
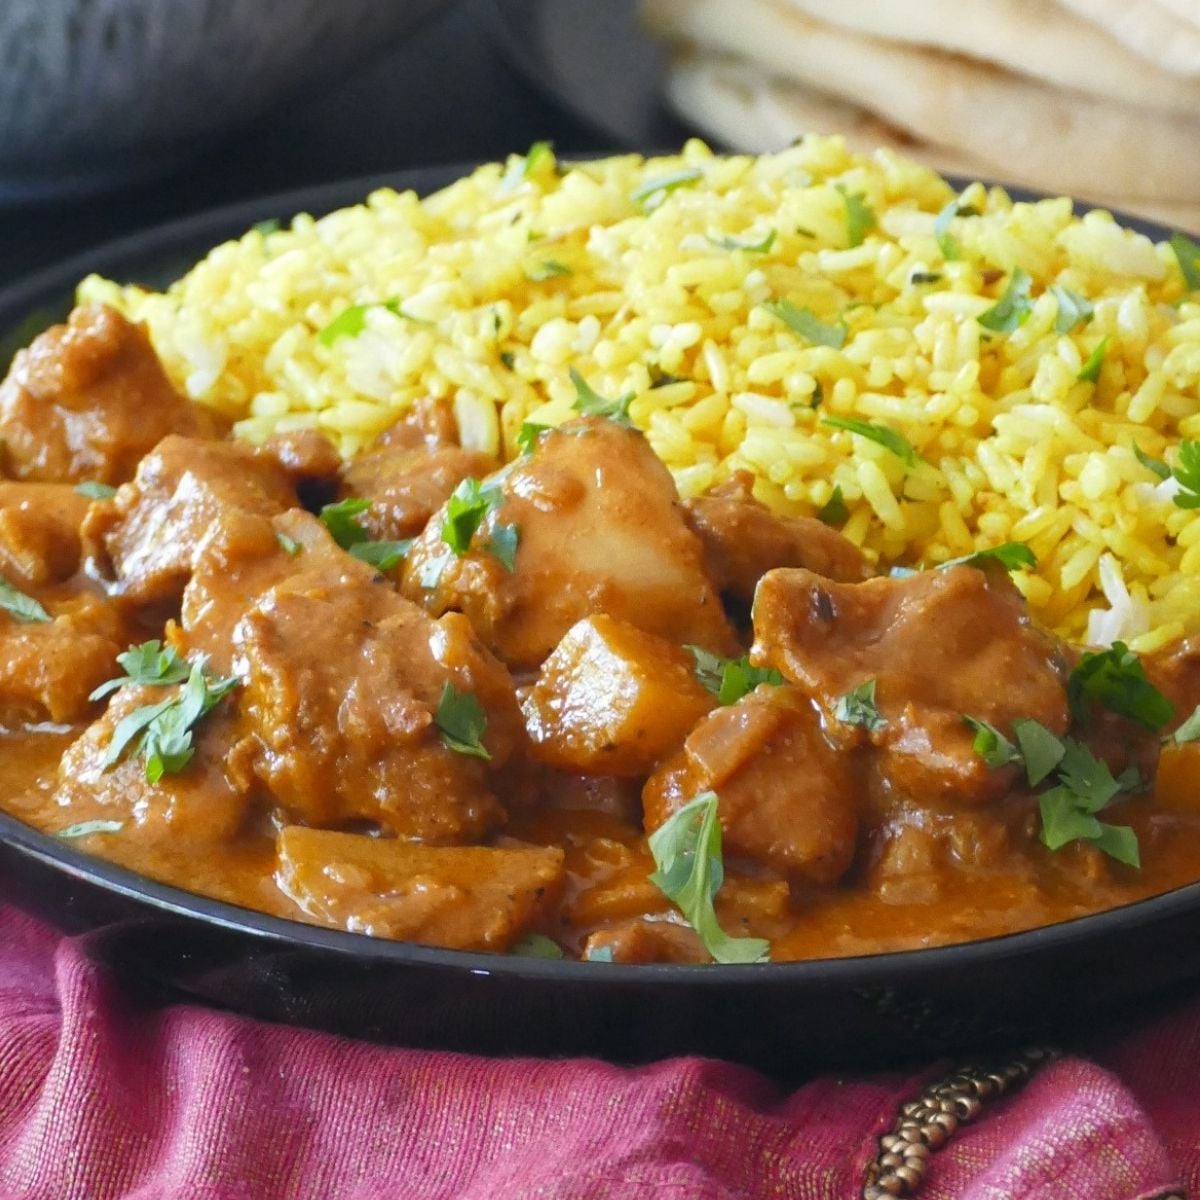
Instant Pot Recipes to Serve with Jasmine Rice

1
Instant Pot Thai Green Curry with Chicken with colorful green curry in white bowl on three colorful napkins. With lime slice and chilies on a black background- Paint the Kitchen Red
Instant Pot Thai Green Curry with Chicken
Instant Pot Thai Green Curry is a creamy coconut curry with the flavors of green chilies, Thai Basil, lime, coriander, cumin. This spicy curry will rival your favorite Thai takeout green curry but is so easy that it can be ready in less than 20 minutes.
INSTANT POT THAI GREEN CURRY
2
Instant Pot Thai Yellow Curry with Chicken in white bowl on blue napkin, with fried rice in another bowl
Thai Instant Pot Yellow Curry with Chicken
This Instant Pot Thai Yellow Curry with Chicken has the perfect combination of flavors: creamy coconut milk, Thai yellow curry paste, chicken, and vegetables. To top it off, curry powder gives this Thai yellow curry its unique taste.  This curry is soul-satisfying comfort food perfect for any time of year.
INSTANT POT YELLOW CURRY
3
Instant Pot Panang Curry with chicken, green beans, red and green peppers, Thai basil in a white bowl on a light wood background
Thai Instant Pot Panang Curry with Chicken
This Instant Pot Thai Panang Curry with Chicken tastes amazing!  It’s quick and easy enough to make on a weeknight and tastes like you got if from a Thai restaurant.  Creamy coconut milk, Panang curry paste, chicken, vegetables, and spices come together to make a delicious curry that tastes great with jasmine rice.
INSTANT POT PANANG CURRY

Instant Pot Oreo Cheesecake

March 1, 2017 by Neena Panicker 14 Comments

Instant Pot Oreo Cheesecake on a plate - Paint the Kitchen Red

This decadent Instant Pot Oreo Cheesecake recipe is special because has a triple dose of chocolate: a generous Oreo crust, Oreo cookies in the batter, and melted chocolate swirled in.  It’s super easy to prepare, and hard to mess up in the Instant Pot!

Instant Pot Oreo Cheesecake slice on a white plate with swirled chocolate sauce below

This post contains affiliate links. As an Amazon Associate, I earn from qualifying purchases. Please read the disclosure.

I could eat cheesecake every day; I love it so much! Maybe you can relate? Sadly, I’m the only one in my family who loves cheesecake.

But we all love Oreos. So I created the best of both worlds with this Instant Pot Oreo Cheesecake recipe with a thicker Oreo crust.

My cheesecake differs slightly from other recipes because I add pieces of Oreos and swirl some melted chocolate into the batter.

If you’re a chocolate lover, this Oreo cheesecake Instant Pot recipe will become one of our favorite desserts!

If you love cheesecake but have never made one, this recipe is for you. It’s foolproof when made in the Instant Pot and always perfect!

I feel the Instant Pot is the best method for making cheesecake, and I’ve tried them all! Of course, you can use any brand of pressure cooker, including a Ninja Foodi.

➡ I have plenty of other pressure cooker desserts for you to try, such as apple crisp, cupcakes, Instant Pot lava cakes, and peach crisp!

Ingredients and Tips

🧂 Ingredients for Oreo Cheesecake Instant Pot Method

Instant Pot Oreo Cheesecake Ingredients - oreos, butter, chocolate, cream, sugar, chopped oreos, vanilla, cream cheese, eggs, sour cream, flour.

More ingredient details in the recipe card at the bottom of this post.

💡 Ingredient and Recipe Tips for Cheesecake

🌡️ Temperature: Use room-temperature eggs and softened cream cheese. This is super important; otherwise, you’ll overbeat your batter and/or have clumps.

🧀 Cream Cheese: Use full-fat cream cheese! I prefer Philadelphia brand cream cheese in a block.

🥄 Batter: Once you add the eggs, don’t overmix the batter, as this can cause the cheesecake to puff up and deflate, producing cracks.

❄️ Cool: Cool the cake completely before refrigerating. Refrigerate the cheesecake for at least 4 hours, preferably overnight.

🥮 Accessories: For a  6-quart Instant Pot, you’ll need a 7-inch push pan. It also comes in handy for air fryer desserts like pound cake, pear tart, or almond cake! You can use a 7-inch springform pan instead. You’ll also need a trivet with handles, which is usually shipped with the Instant Pot. If you use a 6-inch pan, increase the pressure cooking time by about 5 minutes.

⏲ Pressure Cooking Time: Cooking times can change based on different factors, including the size of the pan or pressure cooker. If your cheesecake is not fully set, pressure cook for 3 to 5 more minutes.

❓ FAQS

Why is the cheesecake runny?

It’s probably undercooked. If the cheesecake is not firm enough, program it for another 2 to 3 minutes of pressure cooking time and let it naturally release pressure.

Why is my cheesecake cracked?

If your cheesecake has cracks on top, you may have made it too airy by over-mixing, which causes it to rise and fall and then crack, or you might have overcooked it. Sprinkle some crushed oreos on top to cover up any cracks.

Why does my cheesecake have condensation on the top?

The condensation comes from covering the cheesecake. If your cooked cheesecake has condensation on the top when you remove the foil cover, just lightly dab it with a paper towel.

Why is the cheesecake lumpy?

One way to avoid lumps is to make sure all your ingredients are at room temperature. This allows the batter to be smooth and less lumpy.

Why is my cheesecake dense?

Mixing the batter at a low speed will allow it to be airy and light. Mixing it for too little time can make the Oreo cheesecake dense. But don’t mix for too long; it can become runny and crack.

♨️ How to Make Oreo Cheesecake in the Instant Pot

Instant Pot Oreo Cheesecake collage - press crushed oreos, batter with oreos, batter in pan uncooked, cooked Oreo cheesecake.
  1. Prepare the pan. Combine Oreo cookies and butter and firmly press into the pan. Freeze crust while making the filling.
  2. Beat batter ingredients until combined and stir in chopped chopped Oreos.
  3. Pour filling into pan, and swirl in chocolate and cream mixture.
  4. Add water to the inner pot and pressure cook the cheesecake on a trivet. Do a natural release of pressure. Cool completely and refrigerate. Decorate and serve!
Instant Pot Oreo Cheesecake P1 Paint the Kitchen Red
Print Recipe
5 from 3 votes

Chocolate Swirl Instant Pot Oreo Cheesecake

This wonderful Chocolate Swirl Instant Pot Oreo Cheesecake has a triple dose of chocolate: a generous Oreo crust, Oreo cookies in the batter and melted chocolate swirled in.  It’s super easy to prepare, and hard to mess up in the Instant Pot!
Prep Time20 minutes mins
Cook Time50 minutes mins
Total Time1 hour hr 10 minutes mins
Course: Desserts
Cuisine: American
Servings: 8
Calories: 177kcal
Author: Paint the Kitchen Red

Equipment

  • Instant Pot Pressure Cooker
  • Trivet
  • Handheld Mixer
  • Cake Pan (7-inch)
  • Parchment paper
  • Large Bowl

Ingredients

  • 1 cup Oreo cookies crushed, packed (about 15 cookies)
  • 2 ½ tablespoon butter melted
  • 16 oz. cream cheese at room temperature (full-fat)
  • ½ cup granulated sugar
  • ¼ cup sour cream at room temperature
  • 1 tablespoon all purpose flour
  • ½ teaspoon vanilla extract
  • 2 eggs at room temperature, lightly beaten
  • ½ cup Oreo cookies about 4 cookies, chopped
  • 2 oz. semi-sweet chocolate chopped
  • 1 tablespoon heavy cream at room temperature

Instructions

  • Lightly spray the inside of the pan with spray oil.
  • Line the inside bottom of the pan with parchment paper.
  • To make the crust, combine the crushed 1 cup Oreo cookies and 2 ½ tablespoon butter in a small bowl.
  • Firmly press cookie mixture onto the bottom and 1 inch up the sides of a 7-inch springform or push pan, using the bottom of a measuring cup or hands.
  • Freeze the crust for 10 minutes while you make the filling.
  • In a large bowl, use a hand mixer to to beat 16 oz. cream cheese, ½ cup granulated sugar, ¼ cup sour cream, 1 tablespoon all purpose flour, ½ teaspoon vanilla extract on low speed, just until combined.
  • Beat in 2 eggs, one at a time, until combined, making sure not to over-beat.
  • Stir in chopped ½ cup Oreo cookies.
  • Pour filling onto crust-lined pan.
  • Microwave 2 oz. semi-sweet chocolate in a small bowl for 30 seconds. Stir and repeat heating at 15-second intervals, until the chocolate is melted and smooth.
  • Mix 1 tablespoon heavy cream with the chocolate.
  • Drop the chocolate by the spoonful on the batter. You may have some left over. You can use it to decorate the cooked Instant Pot Oreo Cheesecake.
  • Drag a knife or toothpick all around the batter to swirl in the chocolate.
  • Pour 1 cup of water in the Instant Pot and place a trivet in the Instant Pot. (If your trivet does not have handles, make an aluminum foil sling to place under the pan to help lift the pan out when done.) [See Note 1]
  • Place the cheesecake pan on the trivet.
  • Close the lid and pressure cook for 30 minutes.
  • Allow the pressure to release naturally, about 10 to 15 minutes. [Read More: The Different Pressure Release Methods].
  • Press Cancel and open the lid and remove the pan carefully using either the trivet handles or aluminum foil sling. [See Note 1]
  • Cool the Instant Pot Oreo cheesecake completely on a cooling rack for about 2 hours. The sides will shrink away from the pan. Run a knife around the outside edge of the cake.
  • Refrigerate the cheesecake for at least 4 hours, preferably overnight.
  • Detach the cake from the pan and place on a serving plate.
  • Decorate the top of the cake with chocolate sauce, chopped mini Oreo cookies, caramel sauce or fruit pie filling (optional).
  • Cut into wedges to serve.

Notes

  • Cooking times can vary based on the type of pan, type of cream cheese, whether you cover the pan, whether you freeze the crust, etc. If your cheesecake is not cooked when the time is up, just close the Instant Pot again and pressure cook for an additional 2 or 3 minutes.
  • If your Instant Pot Oreo cheesecake has cracks, you might have overcooked it or over-mixed it. Just decorate it with a topping and adjust next time.
  • If your Oreo cheesecake has condensation on the top, just dab it gently with a paper towel.
Note 1: To make an aluminum foil sling, take a 20 inch sheet of aluminum foil and fold it over in thirds, lengthwise. Use the sling to remove the pan from the Instant Pot.

Nutrition

Serving: 1slice | Calories: 177kcal | Carbohydrates: 21g | Protein: 3g | Fat: 10g | Saturated Fat: 6g | Polyunsaturated Fat: 1g | Cholesterol: 63mg | Sodium: 74mg | Sugar: 18g

I am not a certified nutritionist.  I provide my best estimate of nutritional information merely as a courtesy to my readers.  If you depend on nutritional information for dietary or health reasons,  I suggest using your favorite online nutrition calculator to confirm the nutritional value of this recipe based on the actual ingredients that you use.

Did you know that the best way to support your favorite bloggers is to comment and rate recipes, and share on social media? If you loved this recipe, please comment and give it a five ⭐ rating in the comment section below. If you’re a pinner, pin this post using the Pin buttons at the top and bottom of this post and in the recipe card above. Thank you for your support!

BACK TO TOP

Best Instant Pot Jambalaya Recipe

February 16, 2017 by Neena Panicker 450 Comments

Instant Pot Jambalaya in orange bowl with shrimp, sausage and rice - Paint the Kitchen Red

I adapted this Instant Pot Jambalaya recipe from an authentic jambalaya recipe with spicy andouille sausage, chicken, shrimp, and rice. Flavored with Louisiana spices and cooked to perfection, it’s a delicious one pot meal that can be made in the pressure cooker or on the stovetop. Great for an easy dinner on busy weeknights or a special occasion!

Instant Pot Jambalaya in orange bowl with shrimp, sausage and rice - Paint the Kitchen Red

This post contains affiliate links. As an Amazon Associate, I earn from qualifying purchases. Please read the disclosure.

ℹ️ Introduction to Jambalaya

Nawlins. New Or-linz. New Or-leens. No matter how you pronounce it, if you’ve visited New Orleans, you have to agree that it’s one of the most historic and charming cities in the United States.

I feel it’s a city that everyone should have a chance to visit. I was introduced to New Orleans by a friend when we worked together at my first job right out of college. Mary was born and raised in New Orleans and I now realize how lucky I was to experience New Orleans (including Mardi Gras!) with a local girl.

I’ve been back to New Orleans since those early trips at different stages of my life, with different people, and the city never loses its charm. I just discover new things each time!

Some of my favorite dishes include Jambalaya, Etouffee, Red Beans and Rice, and Gumbo. Jambalaya is a hearty one pot meal made with rice, meat and seafood, similar to Spanish paella.

There are two types of Jambalaya. Creole, which includes tomatoes, and Cajun, which is made without tomatoes.

Chez Helene cookbook - Paint the Kitchen Red

My version of Jambalaya includes tomatoes and is derived from a cookbook I’ve had in my possession forever, but have no idea when or where I got it!

It’s a tiny little cookbook a bit larger than a smart phone, written by chef Austin Leslie of the famed New Orleans restaurant Chez Helene, which closed in the 1990’s.

Hope you get to try out this Instant Pot Jambalaya. It’s a meal in one that doesn’t really need any side dish. It’s also a great dish to make for a group.

This recipe has over 150 reviews!

Patricia says ⭐️⭐️⭐️⭐️⭐️
I am originally from New Orleans, now living in California. Whenever I need a taste of home, this is my go to recipe. I leave out the tomato and it tastes just like my Cajun grandmother used to make it! Thank you for sharing this recipe!

And this recipe can easily be doubled! See the FAQs below for details.

➡ Looking for more rice recipes? Try my Instant Pot arroz con pollo, Lebanese lentils and rice (mujadara), or Instant Pot fried rice! They are all amazing.

Ingredients and Tips

🧂 Ingredients for Instant Pot Jambalaya

Instant Pot Jambalaya - Ingredients Paint the Kitchen Red

💡 Cook’s Tips for Jambalaya Recipe

🍖 Proteins: Use chicken, andouille, and shrimp as written, or customize the recipe. Try chicken-only, skip the shrimp, or make it a seafood jambalaya – lots of combinations!

🍗 Chicken: Thighs stay tender and flavorful in the Instant Pot, but chicken breast works too. Cut into bite-sized pieces.

🌭 Sausage: Andouille is traditional, but Spanish chorizo or Polish kielbasa works great. For this recipe, use smoked sausage, not raw, for that essential smoky flavor! Some readers use Aidell’s smoked chicken sausage.

🦐 Shrimp Prep: Always peel and devein shrimp so spices penetrate the meat for maximum flavor.

🫕 Shrimp Cooking Method: The shrimp can be cooked one of two ways: You can rub some Cajun seasoning over the shrimp and set aside for 15 minutes, then briefly saute and add at the end (as stated in the recipe). Or you can stir in the uncooked shrimp at the end and let it cook in residual heat with the Instant Pot covered, just add a couple of extra minutes. The advantage of adding it in at the end is that the shrimp juices get absorbed into the rice and thereís less of chance that the shrimp is dried out.

⚡ Work Fast: It’s important to add shrimp immediately after pressure releases to capture the maximum residual heat. The shrimp will steam perfectly in the hot rice. You may be skeptical, but it really does work!

🔒 Lid Closing Trick: If the Instant Pot lid won’t close after adding shrimp, set the steam release to the Venting position first. Once closed, switch back to Sealing – it may seal up again, and that’s perfectly fine!

📏 Shrimp Size: Extra-large or jumbo shrimp need 3-5 extra minutes in the covered pot. Smaller shrimp may need less time than suggested.

🍳 Alternative Method: Prefer to sauté shrimp with other proteins? Cook it with sausage and chicken at the beginning, do a natural pressure release for 10-15 minutes once the rice is done, and add the shrimp in at the end.

🍚 Rice: Use long-grain white rice or basmati for best results. Jasmine rice works too – just cook for 5 minutes instead. Brown rice needs 22-24 minutes but that may overcook your proteins.

🧂 Seasoning: Creole and Cajun spices are interchangeable. Go easy on salt if using extra seasoning or if your spice blend is already salty. Taste and adjust!

🍲 Seafood Stock: Try my Instant Pot Shrimp Stock instead of chicken stock for deeper seafood flavor. You’ll already have shrimp shells – why not use them?

🧅 Shallots: Skip the shallots if anyone in your family dislikes raw onions. The jambalaya tastes amazing either way!

❓ FAQS

Can this recipe be doubled?

Yes, you can double the recipe. Double all ingredients but keep the cooking time the same.

How can you make this jambalaya spicier?

To make it spicier, add some cayenne pepper. You could add more Creole spice, but watch out for the salt. You can also serve it with tabasco sauce or other hot sauce on the side.

How can you make brown rice jambalaya?

You have a few options:
– Substitute brown rice for long-grain rice and cook for about 24 minutes. Brown rice cooks for much longer than white rice, so the meats and vegetables could get a bit overcooked. However, many of my readers do it and like it.
– Use parboiled brown rice, and increase the original cooking time by a couple of minutes.
– Another option is to reduce the quantity of liquid in the recipe, pressure cook everything but the rice for a couple of minutes, and stir in cooked brown rice at the end.

Why is the rice undercooked?

Different models and sizes of pressure cookers can vary. If you find your rice is undercooked, add some more liquid and cook for a few extra minutes. Next time, add an extra tablespoon or two of liquid and pressure cook for 2 extra minutes.

Why am I getting the dreaded Burn or Food Burn message?

Ensure you deglaze and scrape the bottom of the pot well before pressure cooking. Also, don’t stir the rice or tomatoes. Add them on top and gently press down to ensure the rice is submerged. If you’re still having issues, increase the liquid by ¼ cup. Find out how to food burn Instant Pot message.

⏲️ How to Make Authentic Jambalaya in the Instant Pot

Instant Pot Jambalaya instructions collage - marinate shrimp with spices - Paint the Kitchen Red
  • Thaw and thoroughly dry the shrimp with a paper towel.
  • Rub creole spices all over the shrimp and reserve.
Instant Pot Jambalaya Instructions collage - oil, saute andouille, remove - Paint the Kitchen Red
  • Heat the Instant Pot in Saute mode. Once it has preheated, add oil to the inner pot and let it heat up.
  • Add sausage slices and cook until browned, about 6 minutes.
  • If the sausage browns too quickly, press Cancel until the Instant Pot cools down a bit, and press the Saute button again. Deglaze the bottom of the pot as needed with a tablespoon of broth.
  • Using a slotted spoon, transfer sausage slices to a plate.
Instant Pot Jambalaya Instructions collage - saute chicken, remove, add vegetables - Paint the Kitchen Red
  • Add chicken and cook until no longer pink, about 5 minutes. Deglaze as needed.
  • Using a slotted spoon, transfer the chicken to a plate.
  • Press Cancel to turn off the heat if the Instant Pot is too hot, and turn it back on when it’s cooled down a bit.
  • Now add the holy trinity of Cajun cuisine (onions, bell peppers, celery) and garlic.
Instant Pot Jambalaya Instructions collage - deglaze, add spices and broth - Paint the Kitchen Red
  • Saute vegetables until the onion is translucent.  The liquid released from the vegetables should be enough to deglaze the pan.  If it’s not, add a few tablespoons of broth to deglaze the bottom of the pot and incorporate the brown bits. The bottom of the pot should be completely clean.
  • Add thyme, Creole seasoning, salt, and Worcestershire sauce and stir to coat for about 30 seconds.
  • Stir in broth and bay leaves.
Instant Pot Jambalaya Instructions collage - add chicken and sausage, tomatoes, rice - Paint the Kitchen Red
  • Stir in the reserved chicken and sausage.
  • Add the tomatoes and gently spread them out with a spatula. Don’t stir.
  • Add the rice and gently push down with a spatula till covered with broth. Don’t stir the rice mixture.
Instant Pot pressure cook instructions collage: close lid, program, float valve up, float valve down
  1. Close the lid.
  2. Program the Instant Pot to pressure cook on high pressure for 7 minutes.
  3. The display will go from On to 7:00. The float valve will go up after a few minutes. The display will count down to 00:00.
  4. Do a quick release of pressure. Once the float valve goes down, the lid can be opened.
Instant Pot Jambalaya Instruction collage - cooked rice, shrimp added and stirred - Paint the Kitchen Red
  • Open the lid and add in shrimp.
  • Using a spatula, stir up the rice mixture and nestle the shrimp in the rice.
  • It’s important to work quickly so that too much steam doesn’t escape.
Instant Pot Jambalaya Instruction collage - close lid, lid opened, add cilantro - Paint the Kitchen Red
  • Close the Instant Pot and allow the shrimp to finish cooking in the residual heat. If you have trouble closing the lid, move the steam release to the Vent position and then back to Seal after shutting the lid.
  • After 10 minutes, open the Instant Pot and add parsley. Gently fluff the rice with a fork.
  • Let the jambalaya rest (lid open) for 5 to 8 minutes before serving
  • Serve with hot sauce on the side.

♨️ How to make jambalaya on the stovetop

  • Season the shrimp with the creole seasoning and reserve.
  • Heat oil in a dutch oven over medium-high heat. Saute the sausage and chicken separately, and remove.
  • Saute the onions, bell peppers, and celery until the onions are translucent. Saute garlic until fragrant.
  • Add the spices and saute briefly. Deglaze the bottom of the pan.
  • Return the meats to the pot. Stir in the broth and tomatoes, and bring to a boil. You’ll need to add an extra cup of broth compared to the Instant Pot version of the recipe.
  • Add in the rice.
  • Bring to a boil, stir, reduce heat to low, and cover. Don’t stir again.
  • Let the rice simmer until the liquid is absorbed and the rice is cooked through.
  • Add the shrimp to the rice and allow the shrimp to cook through.
  • Once the shrimp is cooked, open the pot and garnish.

See the recipe card below for detailed instructions.

Instant Pot Jambalaya in orange bowl with shrimp, sausage and rice - Paint the Kitchen Red
Print Recipe
4.93 from 155 votes

Easy Instant Pot Jambalaya

This Instant Pot Jambalaya was adapted from an authentic Creole Jambalaya recipe and has andouille sausage, chicken and shrimp combined with rice, is flavored with Cajun spices and cooked to perfection.
Prep Time15 minutes mins
Cook Time30 minutes mins
Total Time45 minutes mins
Course: Main Dishes
Cuisine: Cajun / Creole
Main Ingredient: chicken, pork, rice and grains, seafood
Servings: 6
Calories: 404kcal
Author: Paint the Kitchen Red

Equipment

  • Instant Pot Pressure Cooker
  • Slotted Spoon
  • Medium Bowl

Ingredients

  • 1 lb. shrimp peeled and deveined
  • 1 tablespoon Creole seasoning or to taste
  • 1 tablespoon vegetable oil
  • 12 oz. Andouille sausage (340 grams) cut into ½ inch slices
  • 12 oz. boneless skinless chicken thighs (340 grams) cut into 1-inch pieces
  • 1 cup onion chopped
  • 1 cup bell pepper chopped
  • 1 cup celery chopped
  • 1 tablespoon garlic minced
  • 1 teaspoon dried thyme
  • ½ teaspoon salt or to taste *
  • 1 teaspoon  worcestershire sauce
  • 2 cups low sodium chicken broth (3 cups for stovetop version)

    or homemade Instant Pot Shrimp Stock

  • 2 small bay leaves or 1 large
  • 14.5 oz. diced tomatoes (411 grams)
  • 1 ½ cups long grain white rice
  • 2 tablespoon parsley chopped, to garnish
  • ½ cup shallots thinly sliced – optional
  • hot sauce to taste

Instructions

  • Dry 1 lb. shrimp with a paper towel, rub with 1 teaspoon of Creole seasoning and set aside.

Instant Pot Instructions

  • Press 'Saute' and add 1 tablespoon vegetable oil to inner pot of the Instant Pot.
  • Once the oil is hot, add the 12 oz. Andouille sausage and cook until browned, about 6 minutes. Use a slotted spoon to transfer to a medium bowl and set aside. If the sausage browns too quickly, press ‘Cancel’ until the Instant Pot cools down a bit and press the ‘Saute’ button again. Deglaze as needed with a tablespoon of broth.
  • Add 12 oz. boneless skinless chicken thighs to the inner pot, and cook until browned, about 5 minutes. Use a slotted spoon to transfer to the bowl containing the sausage, and set aside. If the chicken browns too quickly, press ‘Cancel’ until the Instant Pot cools down a bit and press the ‘Saute’ button again. Deglaze as needed with a tablespoon of broth.
  • Add 1 cup onion, 1 cup bell pepper, 1 cup celery, and 1 tablespoon garlic. Stir until onion is translucent.  The liquid released from the vegetables should be enough to deglaze the pan.  If it's not, add a tablespoon or more of broth to deglaze.
  • Add 1 teaspoon dried thyme, remaining Creole seasoning, ½ teaspoon salt, 1 teaspoon  worcestershire sauce and stir to coat, about 30 seconds.
  • Stir in 2 cups low sodium chicken broth and 2 small bay leaves.  Make sure there's nothing stuck to the bottom of the inner pot – deglaze as needed.
  • Stir in the reserved sausage and chicken.  
  • Add the 14.5 oz. diced tomatoes (with the liquid) and spread out with a spatula, but don't stir.
  • Add the 1 ½ cups long grain white rice and gently push down with a spatula till immersed in the liquid, but don't stir in.
  • Close the lid and pressure cook on High Pressure for 7 minutes. **
  • Do a quick release of pressure (QR) and open the lid.  [Read More: The Different Pressure Release Methods].
  • Carefully stir in shrimp. Take care to not allow too much steam to escape because the shrimp will cook in the residual heat.
  • Close the Instant Pot and allow the shrimp to finish cooking in the residual heat for about 10 minutes. Jumbo shrimp may require an additional 5 minutes. If you have trouble closing the lid, move the steam release to 'Vent', close the lid, and move it back to 'Seal'.
  • Open the Instant Pot and add 2 tablespoon parsley. Gently stir the jambalaya. Allow the Instant Pot jambalaya to rest for a few minutes. Garnish with ½ cup shallots, if using.
  • Serve with hot sauce on the side.

Stovetop Instructions

  • Heat a large dutch oven over medium heat on the stovetop. Add the oil and heat until the oil is hot and shimmering.
  • Add andouille sausage, and saute until browned. Use a slotted spoon to transfer to a medium bowl and set aside. Repeat with the chicken.
  • Add onions, bell pepper, celery, and garlic. Add more oil as needed. Stir until onion is translucent.  The liquid released from the vegetables should be enough to deglaze the pot.  If it's not, add a tablespoon or more of broth to deglaze.
  • Add thyme, remaining Creole seasoning, salt, worcestershire sauce and stir to coat, about 30 seconds.
  • Add the broth, bay leaves, reserved meats, and diced tomatoes, and bring to a boil. Add rice to the pot. Stir just until combined and bring to a boil. Reduce heat to low, and cover. Don’t stir again.
  • Let the rice simmer for 25 minutes, or until the liquid is absorbed and the rice is cooked through. If you find it sticking, add some more broth.
  • Add the seasoned shrimp to the rice, stirring gently so that the shrimp is nestled in the rice. Allow the shrimp to cook through (about 5 to 7 minutes).
  • Once the shrimp is cooked, open the pot and sprinkle with parsley and shallots (optional). Serve with hot sauce on the side.

Video

Notes

  • Prep time does not include steps that are already accounted for in the ingredient list, e.g. cut up chicken, chopped onion, etc.
  • * Quantity of salt will depend on your Cajun seasoning. If it’s more salty, go easy on the extra salt.
  • ** I find that 7 minutes is perfect. However, some people find the rice to be undercooked at 7 minutes. This could be due to variations in pressure cooker models and brands of rice. Modify the recipe to add an extra 2 minutes to the cooking time if you experience this.
  • If you prefer, you can very briefly saute the shrimp at the beginning and remove.  I find that adding the raw shrimp at the end allows the juices to get absorbed by the rice, without the shrimp drying out.
  • This recipe has been modified from the original publication version: tomatoes and rice are layered on top without stirring in to avoid the Burn Message.

Nutrition

Serving: 1serving | Calories: 404kcal | Carbohydrates: 35g | Protein: 44g | Fat: 15g | Saturated Fat: 4g | Polyunsaturated Fat: 2g | Cholesterol: 192mg | Sodium: 1594mg | Fiber: 4g | Sugar: 7g

I am not a certified nutritionist.  I provide my best estimate of nutritional information merely as a courtesy to my readers.  If you depend on nutritional information for dietary or health reasons,  I suggest using your favorite online nutrition calculator to confirm the nutritional value of this recipe based on the actual ingredients that you use.

Did you know that the best way to support your favorite bloggers is to comment and rate recipes, and share on social media? If you loved this recipe, please comment and give it a five ⭐ rating in the comment section below. If you’re a pinner, pin this post using the Pin buttons at the top and bottom of this post and in the recipe card above. Thank you for your support!

BACK TO TOP

Homemade Instant Pot Yogurt – Pot in Pot method

February 1, 2017 by Neena Panicker 139 Comments

Instant Pot Yogurt in Mason Jars - mint and honey, strawberry, cinnamon stick, blackberry - Paint the Kitchen Red

Yes, the Instant Pot makes yogurt! Learn how to make homemade Instant Pot yogurt in jars or individual cups using the Pot in Pot (PIP) method. This Instant Pot yogurt recipe is free of additives and preservatives and is full of healthy probiotics, vitamins and minerals.

Instant Pot Yogurt in jars - individual mason jars of yogurt: strawberry, honey mint, cinnamon brown sugar, blackberries

This post contains affiliate links. As an Amazon Associate, I earn from qualifying purchases. Please read the disclosure.

Table of Contents


  1. Introduction
  2. Tips
  3. Ingredients
  4. Step by Step Instructions
  5. Recipe Card – Printable
  6. Related Recipes and Guides

Introduction

A favorite food of mine as a kid was just plain rice and yogurt – I just loved it! When I had an upset stomach, I was given yogurt. While growing up, I remember every Indian household made homemade yogurt every day, and that’s the case even today. My dad once told me that the yogurt active culture (starter) used in his childhood home was handed down through the generations!

So, I’ve pretty much felt like a failure (as far as yogurt goes!) my whole adult life because I bought my yogurt in the grocery store and I didn’t have much luck making homemade yogurt.

I was very intrigued when I learned that the Instant Pot makes yogurt and that was one reason I purchased my first Instant Pot. Almost all Instant Pot models make yogurt. The only Instant Pot without the yogurt function is the Instant Pot Lux.

If you own an Instant Pot Lux, you can try to make Instant Pot yogurt without the yogurt button. It’s a bit more work but this is how it can be done.

Instant Pot yogurt is smooth, creamy, all-natural and better than what I buy in the store. Another great thing is that I can use my own yogurt as a starter and keep it going for a few generations.

Homemade fresh yogurt is much better for you than yogurt that’s been on the shelves of the grocery store. You’ve probably heard about all the health benefits of yogurt. But in case you haven’t, here are some of yogurt’s health benefits:

  • contains helpful bacteria (probiotics) for your gut
  • aids your digestion
  • helps to replace your gut bacteria after you’ve taken antibiotics
  • is a good source of protein, vitamins (including B-12), potassium, calcium and more

My Instant Pot Yogurt recipe uses the pot-in-pot (PIP) method i.e. the yogurt is not made directly in the inner pot, but rather this Instant Pot yogurt recipe uses glass jars placed on a trivet in the inner pot.
[Read more: Instant Pot Pot in Pot (PIP) Cooking Method]

I like to use the PIP method because it frees up my Instant Pot inner pot/liner.  If you make the yogurt directly in the inner pot, then while the yogurt cools in the fridge for 8 hours or more, you can’t use your Instant Pot.  

Plus, I prefer to make my yogurt frequently, rather than make a big batch and keep it in the fridge for too long.  The potency of the active cultures diminishes the longer you keep the yogurt.  So the quantity of yogurt I can make using the PIP method in individual cups is just right for me.

Here are some other some of my recipes that use yogurt:
– Instant Pot Chicken Tikka Masala
– Instant Pot Cashew Butter Chicken

– Instant Pot Chicken Shawarma
– Instant Pot Lamb Biryani

Tips and Substitutions


Yogurt Starter

For the yogurt starter/culture, I use my own yogurt. If I am starting from scratch, I use Fage brand of Greek yogurt. Fage has a mild taste, but if you like your yogurt tangy, try and experiment with other brands. I use full-fat yogurt.

Always remember to set aside a couple of tablespoons of yogurt so you can use it as a starter for the next batch.

I bring the starter yogurt to room temperature to allow the live and active cultures to flourish.

If the yogurt starter loses its potency over multiple batches, just add a tiny bit of lime juice to the starter and allow it to sit at room temperature for a while before adding the starter to the milk

For even better results, smear the yogurt around the edges of the inside of the jar.


Individual Cups vs Larger Bowl

For this Instant Pot yogurt recipe, I use separate jars, but you can just as easily use a larger oven-safe bowl that fits in the Instant Pot.

If you’re using the larger bowl, use about 2 teaspoons to 1 tablespoon of starter for 32 ounces (1 quart) of milk.

Make sure your canning jars or bowls are oven-safe. If you use something too thin, your milk can overflow or the container can crack.

The Instant Pot company offers yogurt maker cups as an accessory. These are convenient because they come in their own tray.


Temperature

You’ll need a simple kitchen thermometer to measure the temperature of the milk.


Milk

I use whole milk to make my Instant Pot yogurt recipe, and it comes out thick and creamy. You should be able to substitute 2% milk, but if you want to try out 1% or skim milk, make a smaller quantity (so you don’t waste milk) and see how it goes. You might need to add some nonfat dried milk.


Sealing Ring

If your sealing ring has a lingering odor, just remove the sealing ring during the Yogurt cycle. The Instant Pot doesn’t come to pressure in the Yogurt setting, so you don’t need it.


Greek Yogurt

I don’t normally make Greek yogurt because I like regular yogurt better. But if you want to make Greek yogurt, once the yogurt has completely chilled and set, strain it through a double-layered cheesecloth or coffee filter.


Accessories Required

Here’s the accessories you’ll need for this Instant Pot yogurt recipe:

  • Mason jars or yogurt maker cups with tray
  • Digital thermometer
  • Steam rack or trivet
  • Optional: Yogurt maker cups with tray

Common Problems

PROBLEMREASON
Yogurt is runny– You didn’t use whole milk
– Yogurt needs to ferment longer
– Yogurt needs to be cooled completely after setting
– Yogurt starter isn’t potent enough; get new started
Yogurt is sour– Yogurt was fermented for too long
– Yogurt starter is too sour
– Milk was too hot when the starter was added
Yogurt never sets– Yogurt starter doesn’t have enough bacteria
– Jars or container wasn’t clean to begin with
– Milk temperature wasn’t in the correct range when yogurt was added
Milk overflows– Instant Pot runs hotter than recipe test model (known to happen in 8 quart). Try to steam for zero minutes.

If you’re new to the Instant Pot and aren’t familiar with how to use it, you might find it helpful to first read one of the following guides and then come back here to learn how to make this recipe.

  • General Instant Pot Instructions for Beginners
  • Instant Pot ULTRA Beginner’s Manual
  • Instant Pot DUO EVO PLUS Beginner’s Manual
  • Instant Pot DUO NOVA Beginner’s Manual
  • Instant Pot DUO GOURMET Beginner’s Manual
  • Instant Pot DUO CRISP Beginner’s Manual
  • Instant Pot PRO Beginner’s Manual
  • Instant Pot PRO CRISP Beginner’s Manual

Instant Pot Yogurt Recipe – Ingredients

Instant Pot Yogurt Ingredients - Fage yogurt and whole milk in 4 jars - Paint the Kitchen Red
  • Yogurt
  • Whole milk

How to Make Yogurt in the Instant Pot (Step by Step Instructions)

  1. Fill jars with milk and place in Instant Pot
  2. Steam for 1 minute
  3. Quick release of pressure
  4. Remove jars and add starter
  5. Return jars to Instant Pot
  6. Yogurt setting for 8 hours

Fill Jars with Milk and Place in the Instant Pot

Instant Pot Yogurt Instructions - four jars with milk, trivet and water in inner pot, jars on trivet, lid being closed - Paint the Kitchen Red
  • Fill four 8 oz. canning jars with milk up to ½-inch below the rim.
  • Pour 2 cups of water into the Instant Pot inner pot and place trivet in the inner pot.
  • Carefully place jars on the trivet and close the Instant Pot.  You can choose to cover the jars loosely with aluminum foil.
  • Close the lid.

Steam for 1 minute

Instant Pot Yogurt Instructions 2 - Paint the Kitchen Red
  • Press Steam and ‘+’ or ‘-‘ until display reads 1 (1 minute).
Instant Pot Manual mode collage - Display reads On, float valve up, display reads L0:00
  • Instant Pot display will change to On.
  • Once the Instant  Pot is pressurized, the float valve will go up.
  • The display will count down from 1 to 0 and it will switch to Keep Warm mode and display L00:00.

Quick Release of Pressure

Instant Pot Quick Release collage - move handle to venting, float valve down, lid propped open - Paint the Kitchen Red
  • Do a Quick Release: move the steam release handle to Venting.
  • When your Instant Pot is depressurized, the float valve will be in the down position.
  • Press Cancel and open the Instant Pot.

Remove Jars and Add Starter

Instant Pot Yogurt Instructions - temperature at 110, remove cream from milk with spoon, add spoon of yogurt - Paint the Kitchen Red
  • Carefully remove jars from Instant Pot.  I just use the trivet to lift the jars.  If you have trouble with this, use a mitt or towel to remove the jars from the Instant Pot.  Or alternately, let the jars cool in the Instant Pot for a bit before removing.
  • Let milk cool to a temperature of 110 degrees F.
  • Remove skin or creamy layer (if present) from the top of the milk and discard.
  • Add ½ teaspoon of starter yogurt to each jar and stir well.

Return Jars to Instant Pot

Instant Pot Yogurt Instructions - four jars with lids on a steam rack, instant pot closed - Paint the Kitchen Red
  • Place trivet back in Instant Pot and carefully place jars back on trivet.  The inner pot should already have water in it from the previous run.
  • Place lids over jars ( but don’t screw in the covers.) This will prevent condensation from dripping into the jars.  You can also use aluminum foil.
  • Close the Lid. Steam release can be in Sealing or Venting position. It doesn’t matter because the Instant Pot is not coming to pressure in the Yogurt setting.

Yogurt Setting for 8 Hours

Instant Pot Yogurt Instructions - yogurt button, - or +, 800 cook time - Paint the Kitchen Red
  • Press Yogurt and ‘+’ or ‘-‘ until display reads 8:00 (8 hours).
  • When the 8 hours are up, the display will read yogt. Open the Instant Pot and move the jars to the fridge for a few hours.

Add in Fruits or Toppings

Instant Pot Yogurt in Mason Jar with Spoon - Paint the Kitchen Red
  • Add fruit, honey, cinnamon and brown sugar or any add-in of your choice.   Remember to save a few teaspoons of your plain yogurt for the next batch.
Instant Pot Yogurt - individual mason jars of yogurt: strawberry, honey mint, cinnamon brown sugar, blackberries
Print Recipe
4.82 from 27 votes

Instant Pot Yogurt in Jars

This homemade Instant Pot yogurt is free from additives and preservatives, and is full of probiotics, vitamins, calcium, protein and more.
Prep Time20 minutes mins
Cook Time8 hours hrs 10 minutes mins
Total Time8 hours hrs 30 minutes mins
Course: Sides
Cuisine: Miscellaneous
Main Ingredient: vegetarian
Servings: 4
Calories: 151kcal
Author: Paint the Kitchen Red

Equipment

  • Instant Pot Pressure Cooker
  • 8 oz. canning jars
  • Steam rack / trivet
  • Digital thermometer

Ingredients

  • 2 teaspoon to 1 tablespoon starter yogurt (leftover yogurt from previous batch, or store-bought full fat Greek yogurt)
  • 32 oz. whole milk

Instructions

  • Fill four 8-oz. canning jars with milk up to ½-inch below the rim.
  • Pour 2 cups of water into the Instant Pot inner pot and place steam rack/trivet in inner pot.
  • Carefully place jars on the trivet and close the Instant Pot. You can choose to cover the jars loosely (with aluminum foil or jar lids without screwing them on).
  • Set Instant Pot to Steam for 1 minute. If you don't have the Steam function, use the Pressure Cook function (High Pressure).
  • Do a Quick Release to de-pressurize the Instant Pot.
  • Open the Instant Pot and remove jars when cool enough to handle. Using a digital thermometer to measure the milk's temperature, let milk cool to 110 degrees F.
  • Remove skin (if present) from the top of the milk.
  • Add ½ teaspoon of starter yogurt to each jar and stir well.
  • Place jars back on trivet.
  • Place lids over jars ( but don’t screw in the covers.) This will prevent condensation from dripping into the jars. You can also use aluminum foil.
  • Close the Instant Pot lid and set to Yogurt mode for 8 hours.
  • Press Cancel and open the Instant Pot and move the jars to the fridge for a few hours to chill.

Notes

  • It’s best (but not absolutely necessary) to take your starter out of fridge and bring it to room temperature.
  • I used the full fat variety of Fage brand of yogurt.
  • I have not found a need to sanitize the pot before making yogurt. If you wish to do so, just run a water test like you did the first time you used your Instant Pot.
  • It is important to use canning jars or an oven safe dish.
  • Remember to save a few teaspoons of your plain yogurt for the next batch.

Nutrition

Serving: 8oz. | Calories: 151kcal | Carbohydrates: 12g | Protein: 8g | Fat: 8g | Saturated Fat: 5g | Polyunsaturated Fat: 3g | Cholesterol: 35mg | Sodium: 120mg | Sugar: 11g

I am not a certified nutritionist.  I provide my best estimate of nutritional information merely as a courtesy to my readers.  If you depend on nutritional information for dietary or health reasons,  I suggest using your favorite online nutrition calculator to confirm the nutritional value of this recipe based on the actual ingredients that you use.

Did you know that the best way to support your favorite bloggers is to comment and rate recipes, and share on social media? If you loved this recipe, please comment and give it a five ⭐ rating in the comment section below. If you’re a pinner, pin this post using the Pin buttons at the top and bottom of this post and in the recipe card above. Thank you for your support!

BACK TO TOP

Recipes you Might Also Like!

1
Instant Pot Ghee - four mason jars with golden ghee on black background with pink petals - Paint the Kitchen Red
Homemade Instant Pot Ghee
Enjoy the health and nutritional benefits of homemade ghee with this Homemade Instant Pot Ghee recipe, perfect every time.
INSTANT POT GHEE
2
Instant Pot Jasmine Rice in white bowl on flowery colorful napkin and straw placemat with a spoon- Paint the Kitchen Red
Instant Pot Jasmine Rice
A step by step guide that shows you how to make Instant Pot Jasmine Rice. You can use an Instant Pot to get perfect rice every time!
INSTANT POT JASMINE RICE
3
Instant Pot lamb biryani in a black bowl has rice, cashews, pieces of browned lamb on a blue napkin.
Instant Pot Lamb Biryani Recipe
Instant Pot Lamb Biryani is an aromatic one-pot dish made with basmati rice and lamb.  Flavored with complex spices, it is topped with caramelized onions, raisins, and nuts.  One of my favorite recipes, it's the pressure cooker version of a family recipe for biryani.  A feast in every bite!
INSTANT POT LAMB BIRYANI

Instant Pot Lava Cakes

January 17, 2017 by Neena Panicker 139 Comments

Instant Pot chocolate lava cake with powdered sugar sprinkled on top in four ramekins on a black background with black and white napkin and spoon - Paint the Kitchen Red

These Instant Pot lava cakes are the ultimate in decadence. They have a gooey chocolate center that oozes molten chocolate with every bite. With minimal ingredients and short preparation time, this easy Instant Pot dessert is perfect for satisfying your sweet tooth or impressing dinner guests! [Oven instructions also provided.]

Instant Pot lava cakes in ramekins sprinkled with powdered sugar - Paint the Kitchen Red

This post contains affiliate links. As an Amazon Associate, I earn from qualifying purchases. Please read the disclosure.

When searching for a dessert recipe to adapt to the Instant Pot, this lava cake recipe stood out as the perfect choice. The original oven recipe uses a bain-marie (water bath), making it an ideal candidate for a quick and easy pressure cooker version.

Another reason I made this switch is to avoid heating up the kitchen during the summer months when the air conditioning is running.

These lava cakes are a wonderfully decadent treat that my whole family loves. With rich chocolate flavors and soft, gooey centers—true to their name—these molten lava cakes are always a hit.

I also love that I always have all the ingredients on hand and I can make them whenever I’m craving a chocolate treat.

They taste best when served warm, making them the perfect dessert for any occasion!

➡ I have many other desserts for you to try, like Instant Pot Oreo cheesecake, cupcakes, Instant Pot apple crisp, or peach crisp!

Ingredients and Tips

🧂 Instant Pot Lava Cake Ingredients

Instant Pot Chocolate Lava Cake Ingredients - semi sweet chocolate, all purpose flour, salt, powdered sugar, instant coffee, granulated sugar, eggs, egg yolks, vanilla, butter

💡Ingredient and Recipe Tips


Here are some tips to help you make perfect Instant Pot lava cakes.

🥣 Equipment: Use 3 ½ inch ramekins or glass Pyrex custard cups. The recipe is for 6 oz. ramekins. Adjust cooking time for different containers or pressure cookers. Use the trivet that came with your Instant Pot.

☕ Coffee Flavor: Instant coffee granules add a nice balance to chocolate. Omit if you don’t like coffee.

🍫 Chocolate: Microwave at 50% power for a minute. Stir and repeat in 15-second bursts, stirring well between bursts. Stop when a few pieces remain unmelted. Let residual heat melt remaining chocolate. Overheating can ruin the recipe. Use the best quality chocolate you can afford to get.

⏱️ Cooking Time: May vary due to altitude, ingredient measurements, or Instant Pot model. If you’re a first-timer: Try 7 minutes, then add 1-2 minutes if undercooked. Experiment to find the perfect time for your setup.

❓ FAQS


Do I need to cover the ramekins with foil?

You can cover them to prevent condensation from dripping in but I generally don’t.

What’s the best way to reheat the lava cakes?

These lava cakes taste best when eaten fresh. However, you can refrigerate them and warm them in the microwave. You may not have any molten lava, though.

Why are the lava cakes overcooked?

I’ve found that different Instant Pot models cook these lava cakes at different rates. I would suggest cooking for two fewer minutes next time.

Why are the cakes undercooked?

Again, it probably comes down to your specific Instant Pot model. If you see that the cake looks too jiggly, pressure cook for another 1 to 2 minutes.

How to Make Chocolate Lava Cakes

⏲️ Instant Pot Method

  1. Melt Chocolate
  2. Add eggs and flour
  3. Fill containers and set on a trivet
  4. Pressure cook and quick-release pressure
  5. Cool on a rack
  6. Sprinkle powdered sugar
Instant pot lava cakes collage - batter, flour, in ramekings, on trivet.
  1. Microwave butter and chocolate in medium bowl at 50% power for 1 minute. Stir. Heat in 15-second bursts, stirring each time, until mostly melted with a few small pieces remaining. Stir until completely smooth. Stir in confectioner’s sugar. *
  2. Whisk in eggs, yolks, coffee and vanilla. Stir in flour and salt.
  3. Grease the bottom and sides of four 6 oz. ramekins. Coat each with sugar. Divide batter among the lava cake containers.
  4. Pour 2 cups water into the Instant Pot’s main compartment (inner pot) and place the trivet in water. Place 3 ramekins on the trivet and stack the fourth container on top.

    * Make sure you don’t over-melt the chocolate. See this article about melting chocolate in the microwave.

✏️ Pro Tip

  • Pressure cook time varies by Instant Pot model. First time? Try 7 minutes. If undercooked, add 1-2 minutes more.
Instant Pot pressure cook instructions collage: close lid, program, float valve up, float valve down
  1. Close the lid.
  2. Program the Instant Pot to pressure cook on high pressure for 9 minutes.
  3. The display will go from On to 9:00. The float valve will go up after a few minutes. The display will count down to 00:00.
  4. Do a quick release of pressure. Once the float valve goes down, the lid can be opened.
Instant pot lava cakes instructions collage - cooked lava cakes, cooling on racks
  1. Lift the trivet by the handles and carefully remove the ramekins from the Instant Pot. Use heat-resistant gloves.
  2. Place the lava cakes on a cooling rack to cool for a few minutes.
Instant Pot Lava Cake on plate turned out of baking dish, with powdered sugar on top - Paint the Kitchen Red
  • Serve warm. To plate: Loosen cake edges with a knife. Place a plate on the ramekin. Flip both. The cake should release onto the plate. Sprinkle with powdered sugar.

♨️ Oven Method

  1. Follow the same directions to prepare the batter as the Instant Pot version
  2. Bake the lava cakes at 400 degrees F (204 degrees C) for about 12 minutes or until a thermometer reads 160 degrees F (71 degrees C)
  3. Remove ramekins to a wire rack and cool for 5 minutes
  4. Invert warm cakes onto serving plates and dust with powdered sugar
Instant Pot chocolate lava cakes in ramekins sprinkled with powdered sugar - Paint the Kitchen Red
Print Recipe
4.44 from 30 votes

Instant Pot Chocolate Lava Cake

These molten Instant Pot Chocolate Lava Cakes have a gooey chocolate center and a hint of coffee; A delicious Instant Pot dessert that's super easy to make. Oven instructions also provided.
Prep Time10 minutes mins
Cook Time30 minutes mins
Total Time40 minutes mins
Course: Desserts
Cuisine: American
Servings: 4
Calories: 560kcal
Author: Paint the Kitchen Red

Equipment

  • Instant Pot Pressure Cooker
  • Medium Bowl
  • Whisk
  • Silicone gloves
  • Steam rack / trivet
  • Ramekins

Ingredients

  • 1 tablespoon granulated sugar
  • ½ cup butter – 1 stick, cut into pieces (4 oz. or 113 grams)
  • 4 oz. semisweet chocolate chopped (113 grams)
  • 1 cup confectioners sugar
  • 2 eggs
  • 2 egg yolks
  • 1 teaspoon instant coffee granules
  • 1 teaspoon vanilla extract
  • 6 tablespoon all purpose flour
  • ¼ teaspoon salt

Instructions

  • Grease the bottom and sides of four 6 oz ramekins. Coat each with sugar.
  • Melt the chocolate and butter: In a medium-sized microwave-safe bowl, microwave butter and chocolate on medium heat for about 1 minute. Stir and scrape sides of the bowl with a silicone spatula and repeat heating at 15-second intervals, until the chocolate is melted and smooth but a few small pieces of chocolate still remain.  Keep stirring to allow the chocolate to completely melt in the residual heat.
  • Stir in confectioner’s sugar.
  • Whisk in eggs, yolks, coffee and vanilla.
  • Stir in flour and salt.
  • Divide batter among the ramekins.

Instant Pot Instructions

  • Pour 2 cups water into the Instant Pot’s main compartment (inner pot) and place trivet in water.
  • Place 3 ramekins on the trivet and place 1 more on top of them, in the middle (staggered).
  • Close the lid and pressure cook on High Pressure for 9 minutes. *
  • Do a quick release of pressure (QR) and open the lid.  [Read More: The Different Pressure Release Methods].
  • Use the trivet handles to lift the trivet out of the inner pot and carefully remove the ramekins. Gently dab off any condensation from the surface of the cake.
  • Dust the Insant Pot chocolate lava cakes with powdered sugar.
  • Serve warm and enjoy!

Oven Instructions

  • Preheat oven to 400 degrees Fahrenheit (204 degrees Celsius)
  • Bake the ramekins for 12 minutes or until a thermometer reads 160 degrees F (71 degrees C), and the cake sides are set and the centers are soft.
  • Transfer the ramekins to a wire rack and cool for about 5 minutes. Run a small knife around the edge of the cakes to loosen them. Invert the warm cakes onto serving plates and dust them with powdered sugar.

Video

Notes

  • If you have a larger Instant Pot, you might be able to fit all 4 ramekins in one layer.
  • I use 6 oz ceramic ramekins and a 6 quart Instant Pot Duo and Ultra for this recipe as written; if you’re using different size or type of containers or pressure cooker, your cooking time may need to change.  
  • * The pressure cook time for this recipe can vary based on model of Instant Pot.  If you’re doing this for the first time, you might want to try 7 minutes and if the lava cakes are undercooked, pressure cook them for another 1 to 2 minutes.

Nutrition

Serving: 1lava cake | Calories: 560kcal | Carbohydrates: 58g | Protein: 7g | Fat: 36g | Saturated Fat: 21g | Cholesterol: 233mg | Sodium: 80mg | Fiber: 2g | Sugar: 49g

I am not a certified nutritionist.  I provide my best estimate of nutritional information merely as a courtesy to my readers.  If you depend on nutritional information for dietary or health reasons,  I suggest using your favorite online nutrition calculator to confirm the nutritional value of this recipe based on the actual ingredients that you use.

Did you know that the best way to support your favorite bloggers is to comment and rate recipes, and share on social media? If you loved this recipe, please comment and give it a five ⭐ rating in the comment section below. If you’re a pinner, pin this post using the Pin buttons at the top and bottom of this post and in the recipe card above. Thank you for your support!

BACK TO TOP

Instant Pot Hard Boiled Eggs in 2 Minutes

December 27, 2016 by Neena Panicker 52 Comments

Three Instant Pot eggs cut into half in a white bowl, yellow side up

Using this Perfect Instant Pot Hard Boiled Eggs recipe, you can finally make easy-to-peel eggs. This 2-minute Instant Pot eggs recipe requires no ice bath and it’s the hands-off way to cook hard boiled eggs quickly and easily. Make a dozen eggs or one egg with the same recipe!

Instant Pot hard boiled eggs on straw background with red and white writing: Instant Pot perfectly cooked easy to peel hard boiled eggs - Paint the Kitchen Red

This post contains affiliate links. As an Amazon Associate, I earn from qualifying purchases. Please read the disclosure.

Table of Contents


  1. Introduction
  2. Tips
  3. Ingredients
  4. Step by Step Instructions
  5. Recipe Card – Printable
  6. Related Recipes and Guides

Introduction

Until I started making electric pressure cooker hard boiled eggs, I had the hardest time getting perfect eggs that are easy to peel.

Egg white would come off in bits and pieces when I peeled the eggs.  I tried all kinds of tips and tricks, including adding baking soda or vinegar to the water, putting cold eggs in boiling water, and sticking them in an ice bath after boiling them.

Once I tried to make hard boiled eggs in my Instant Pot, I was finally able to make perfect hard boiled eggs every time!

It’s an easy and uncomplicated recipe. And here’s the best part.  The eggs peel with little effort! This method is great for making deviled eggs, easter eggs, or meal prep. I like to add boiled eggs to my salad, and I make a half dozen eggs for the week.

Many recipes show you how to steam eggs in the Instant Pot and I’ve tried them, particularly the 555 or 5-5-5 method, where you cook the eggs for 5 minutes, let the pressure release after 5 minutes, and place the eggs in an ice bath for 5 minutes.

Although it works pretty well, it’s pretty hands-on – you need to stick around while the eggs cook and cool down.

Why go through all that when you can do it completely hands-off?  This 2-minute Instant Pot boiled eggs method requires no formula, timer, or ice bath.  It’s so easy!

Boil eggs in the Instant Pot and use them in Wasabi deviled eggs or Instant Pot Kerala Egg Curry.

Tips for the Best Instant Pot Hard Boiled Eggs


How Many Eggs Can You Cook at One Time?

I’ve cooked up to 12 eggs and have had no problems.  I’ve had readers cook up to two dozen large eggs stacked on each other with no issues. I’ve also made just one or two eggs and that’s worked out great too. Use the same pressure cook timings.

I frequently make hard-boiled eggs at the beginning of the week and store them in a container in the fridge. We use the eggs throughout the week and find they are as easy to peel as when they’re first cooked.


Accessories

You should already have a trivet or steam rack that ships with the Instant Pot. You can place the eggs directly on the trivet.

Some Instant Pot models don’t include the trivet so you can either purchase a trivet or get a tall basket whose bottom sits above the water level.

I like to use the trivet and a collapsible steamer basket on it. However, if I were purchasing one today, I’d get a steamer basket that sits higher so I don’t need to use a trivet.

I also love this deep basket that comes as an accessory to the Mealthy CrispLid. I place it on the trivet and it perfectly fits a dozen eggs. It’s also easy to remove because of the convenient handles.
[Read More: How to Convert your Instant Pot into an Air Fryer with the Mealthy CrispLid]


How to Avoid Cracked Eggs

Although I rarely have cracked eggs, here are some tips if you’re getting cracked eggs:

  • Bring the eggs out of the fridge and let them warm up before cooking.
  • Avoid eggs that have hairline cracks.  I notice that white eggs have these more often.
  • Try using low pressure and do a full NPR (Natural Pressure Release).  You may need to increase the cooking time to about 5 minutes.
  • Try a different brand of eggs.
  • Although many folks have no trouble pressure cooking farm fresh eggs, if you’re having trouble with peeling the eggs using this method, try using store-bought eggs.
  • Use cold water, not warm or room temperature water in the inner pot.

Make Instant Pot Eggs Without a Steamer Rack

My method of cooking eggs is actually steaming the eggs because you’re putting the eggs on a rack, trivet, or basket.  I have tried pressure cooking eggs without a rack by placing the eggs in enough water to cover the eggs (about 1 ½ to 2 cups of water) and the results were good. I prefer to pressure cook the hard-boiled eggs with a rack.

Instant Pot hard boiled eggs 8 qt: The 8 quart Instant Pot will be able to accommodate more eggs. You may also need to add a bit more water to the pot to ensure it comes to pressure: about 2 cups. No other changes are needed.

Boil Eggs in the Instant Pot Using the Egg Setting

The Egg button on the Instant Pot defaults to 5 minutes. I select the Egg function but modify the time to 2 minutes. * Many models remember the last setting and this allows you to use the Egg button even if you don’t want to pressure cook for the default 5 minutes.

* The Instant Pot Duo model does not have an Egg button. You need to use the Pressure Cook or Manual button.


How to Make Soft Boiled Eggs in the Pressure Cooker

To make perfectly cooked soft boiled eggs, pressure cook the eggs as directed and do a 1-minute Natural Release (wait 1 minute and do a quick pressure release of pressure) and place the eggs into an ice bath for 3 to 5 minutes or until cool enough to handle.


Different Instant Pot Models

I usually use a 6 quart Instant Pot but you can use this recipe to make eggs in any model or size of Instant Pot. In the Instant Pot Mini (3 quart) model, you’ll be able to accommodate fewer eggs.

Instant Pot hard boiled eggs 8 qt: The 8 quart Instant Pot will be able to accommodate more eggs. You may also need to add more water to the pot to ensure it comes to pressure: about 2 cups. No other changes are needed.

If you’re new to the Instant Pot and aren’t familiar with how to use it, you might find it helpful to first read one of the following guides and then come back here to learn how to make this recipe.

  • General Instant Pot Instructions for Beginners
  • Instant Pot ULTRA Beginner’s Manual
  • Instant Pot DUO EVO PLUS Beginner’s Manual
  • Instant Pot DUO NOVA Beginner’s Manual
  • Instant Pot DUO GOURMET Beginner’s Manual
  • Instant Pot DUO CRISP Beginner’s Manual
  • Instant Pot PRO Beginner’s Manual
  • Instant Pot PRO CRISP Beginner’s Manual

Instant Pot Hard-Boiled Eggs Ingredients

Instant Pot Hard Boiled Eggs Ingredients - Eggs
  • Eggs

How to Boil Eggs in the Instant Pot (Step by Step Instructions)

  1. Add water and place eggs on a trivet or basket
  2. Pressure cook
  3. Natural release
  4. Cool and peel eggs

Add Water and Place Eggs on Trivet

Instant Pot Hard Boiled Eggs Instructions collage - water, steamer basket in water, eggs in basket
  • Add water to the bottom of your Instant Pot.
  • Place steamer rack/trivet or steamer basket in the Instant Pot.
  • Carefully place eggs on the rack or steamer basket.

Instant Pot Duo Pressure Cook 2 minutes

Instant Pot Duo Manual mode 2 minutes collage - close lid, press manual, press + -, display says 2 - Paint the Kitchen Red
  • Close the lid and make sure steam release handle is in ‘Sealing’ position
  • Press Manual or Pressure Cook and + or – until the display reads 2 (2 minutes).

Instant Pot Ultra Pressure Cook 2 minutes

Instant Pot Ultra pressure cook 2 minutes collage - open lid, select pressure cook and set time to 00:02, display says on - Paint the Kitchen Red
  • Close the lid.
  • Select Pressure Cook mode and adjust the time to 2 minutes (00:02).
  • Press Start.

Pressure Cooking Process (Duo and Ultra)

Instant Pot Duo Pressure Cooking collage - display shows On, float valve is down, display shows L0:00 - Paint the Kitchen Red
Instant Pot Ultra pressure cooking collage - Ultra display shows On, float valve is up, display shows 00 00 - Paint the Kitchen Red
  • Instant Pot display will change to On.
  • Once the Instant Pot is pressurized, the float valve will go up.
  • The display will count down to 0; it will then switch to Keep Warm mode and display L0:00  or 00 00 and begin to count up the number of minutes since pressure cooking completed.

How to Naturally Release Pressure (NPR) on the DUO and ULTRA

Instant Pot Duo natural release cancel and open collage - float valve is down, arrow pointing to Cancel, lid is open - Paint the Kitchen Red
Instant Pot Ultra Natural Release Cancel and Open collage - arrow pointing to float valve down, press cancel button, lid is open and Instant Pot Ultra display shows Off - Paint the Kitchen Red
  • Allow the pressure to release naturally (NPR).  The float valve will be in the down position.  This may take 15 to 30 minutes. [Find out more about the pressure release methods and how and when to use them. ]
  • Press Cancel and open the Instant Pot.

Cool Eggs and Peel

Instant Pot Hard Boiled Eggs Instructions collage - remove eggs, cool, peel
  • Your Instant Pot eggs should be perfectly cooked.
  • Carefully remove eggs from Instant Pot. Allow the eggs to cool naturally. Optionally, transfer eggs to a bowl of water to cool down faster.
  • Once they are cool enough to handle, peel hard boiled eggs.  

The inspiration for this recipe is This Old Gal’s Instant Pot hard boiled egg recipe. The original recipe had a 10 or 15-minute natural release and I modified it to be a full natural release.

Bowl of cut hard boiled eggs on straw background with red and white writing: Instant Pot perfectly cooked easy to peel hard boiled eggs - Paint the Kitchen Red
Print Recipe
4.86 from 14 votes

Perfect Instant Pot Hard Boiled Eggs

Instant Pot eggs are perfectly cooked and easy to peel. No more messing up hard boiled eggs either by over or under cooking or breaking apart while peeling!
Prep Time3 minutes mins
Cook Time17 minutes mins
Total Time20 minutes mins
Course: Sides
Cuisine: Miscellaneous
Main Ingredient: eggs
Servings: 6 eggs
Calories: 78kcal
Author: Paint the Kitchen Red

Equipment

  • Instant Pot Pressure Cooker
  • Steamer Basket
  • Steam rack / trivet

Ingredients

  • 10 eggs or any quantity *
  • water 1 ½ cups

Instructions

  • Add water to the inner pot and place trivet in the Instant Pot.
  • Place eggs directly on the trivet or in a steamer basket on the trivet. If the steamer basket has tall legs, you won't need a trivet.
  • Close the lid and pressure cook the eggs on High Pressure for 2 minutes.
  • Do a Natural Release of Pressure and open the lid.  [Read More: The Different Pressure Release Methods]
  • Open the Instant Pot and carefully remove the eggs. Cool the eggs naturally. Optionally, place them in a bowl of ice water to cool faster.
  • Once the eggs are cool enough to handle, peel them.

Video

Notes

  • * Although you should be able to pressure cook more than a dozen eggs at a time, the first time you use this recipe, try out no more than 6 eggs to make sure you are satisfied with the results.

Nutrition

Serving: 1egg | Calories: 78kcal | Carbohydrates: 0.6g | Protein: 6g | Fat: 5g | Saturated Fat: 1.6g | Polyunsaturated Fat: 2.7g | Cholesterol: 187mg | Sodium: 62mg | Sugar: 0.6g

I am not a certified nutritionist.  I provide my best estimate of nutritional information merely as a courtesy to my readers.  If you depend on nutritional information for dietary or health reasons,  I suggest using your favorite online nutrition calculator to confirm the nutritional value of this recipe based on the actual ingredients that you use.

Did you know that the best way to support your favorite bloggers is to comment and rate recipes, and share on social media? If you loved this recipe, please comment and give it a five ⭐ rating in the comment section below. If you’re a pinner, pin this post using the Pin buttons at the top and bottom of this post and in the recipe card above. Thank you for your support!

BACK TO TOP

More Instant Pot Recipes

1
Wasabi Instant Pot Deviled Eggs with wasabi and pickled ginger on colorful blue plate - Paint the Kitchen Red
Wasabi Deviled Eggs Recipe
In this Japanese take on a crowd-pleasing recipe, plain deviled eggs get a flavorful kick from wasabi and pickled ginger. The delicious, creamy, wasabi-spiced mayo filling is piped into the eggs and topped with boldly flavored pickled ginger. The perfect easy appetizer to take to any party. And the Instant Pot makes cooking the eggs a breeze!
GET RECIPE
2
Instant Pot Khao Suey - Burmese noodles in coconut curry broth topped with fried onions, garlic, boiled egg and cilantro
Khow Suey – Burmese Noodles
Khow Suey is the Burmese version of the popular Thai recipe called Khao Soi. This recipe is a one-pot easy version that has all the wonderful flavors of the original. Tender chicken and noodles cooked in creamy coconut curry broth make this a hearty and comforting meal. It can be made in the Instant Pot or stovetop.
GET RECIPE
3
Instant Pot Korean Beef on a bed of rice with sauteed vegetables and fried egg in a black bowl
Instant Pot Korean Beef
This streamlined recipe for Korean beef bulgogi makes for a quick weeknight dinner that tastes great on a bed of rice or ramen noodles, accompanied by pickled carrots, Kimchi, and a fried egg on top.  
GET RECIPE

Pot in Pot Rice (Instant Pot Rice)

December 15, 2016 by Neena Panicker 89 Comments

Instant Pot Rice using pot in pot method - two bowls of white rice

Find out how to make perfectly cooked pot in pot Instant Pot rice in this step-by-step guide. Use the PIP method to make a smaller quantity of perfectly pressure-cooked Instant Pot rice every time, quick and easy.

Pot in pot rice Instant Pot method - two bowls of white rice

This post contains affiliate links. As an Amazon Associate, I earn from qualifying purchases. Please read the disclosure.

You may be wondering whether Instapot rice is as quick, easy and perfectly cooked as rice made in a rice cooker.

Once I learned how to cook rice in the Instant Pot, I’ve found that I have no need for a rice cooker at all. Making rice in the Instant Pot works just as well, if not better.  

It’s so convenient because there’s no need to plan ahead. I don’t need to soak the rice when I’m making it in the Instant Pot, so if I need white rice at the last minute when I’m making a curry like Instant Pot fish curry or Instant Pot beef curry, I can make a fresh pot of rice in short order.

There are two ways to make Instant Pot rice:

  1. Inner Pot Rice: You can cook it directly in the inner pot that comes with the Instant Pot, as I do in this Instant Pot Jasmine Rice recipe.
  2. Pot in Pot Rice: You can cook it in a smaller oven-safe bowl placed on a trivet inside the inner pot. This is called the “Pot in Pot” method (often referred to as “PIP”).  I use a Pyrex glass bowl and it works perfectly for one or two cups of uncooked long grain rice.  

[Find out: what is a trivet and how to use it in the Instant Pot?]

Ingredients and Tips

Ingredients

Instant Pot Pot in Pot Rice Ingredients - Paint the Kitchen Red

💡 Recipe and Ingredient Tips


🍚 Rice-to-Water Ratios: The ratio of rice to water is important for perfect results. Use the same measuring cup for both the rice and water to ensure accuracy.

  • For long-grain white rice or basmati rice, use a 1:1 ratio. This means 1 cup of rice needs 1 cup of water, 1.5 cups of rice needs 1.5 cups of water, and so on.

🥣 Bowls for Pot-in-Pot Cooking: Always use an oven-safe bowl for the pot-in-pot cooking method. Metal or ceramic bowls work well, but they must be oven-safe.

  • Be sure to follow your bowl manufacturer’s recommendations to avoid any issues.
  • I use an older PYREX glass bowl and haven’t had any issues. However, newer Pyrex bowls may crack.
    A helpful tip: glass bowls with the uppercase “PYREX” logo are typically safer (made with borosilicate glass), while those with the lowercase “pyrex” may not be as durable.
Different Types of RiceRatioTime
Long Grain White Rice1:15 minutes
Basmati Rice1:16 minutes
Jasmine Rice1:1.254 minutes
Brown Rice1:122 minutes
Wild Rice1:126 minutes

❓FAQS


Can I make this in an 8 quart Instant Pot?

Making PIP rice in the 8 quart Instant Pot may require more time. Add an extra 2 to 3 minutes to the pressure cooking time.

Can I double the recipe?

You are only limited by the size of the container. A 7-cup container is just right for 2 cups of rice and water.

Can I use the Instant Pot rice setting?

The Instant Pot rice button cooks rice on low pressure for 12 minutes. I prefer using high pressure for pot in pot rice. The rice setting works best when you’re cooking the rice directly in the inner pot.

Can I cook the rice directly in the inner pot or liner?

If you’d like to make a larger quantity, you can cook the rice directly in the inner pot using my Instant Pot Jasmine Rice method, but use the time and ratio from this recipe.

How to Make Pot in Pot Instant Pot White Rice (Step by Step Instructions)

  1. Add rinsed rice and water to bowl
  2. Add water, trivet, and rice to the inner pot
  3. Pressure cook and release pressure
  4. Fluff rice
Instant Pot Pot Rice - Pot in Pot Method Instructions - rinse rice with faucet spray, wet rice in glass bowl, add water to rice - sprayPaint the Kitchen Red
  1. Rinse out 1 cup of rice in a fine-mesh sieve.
  2. Transfer rice from sieve to a Pyrex glass bowl.
  3. Add 1 cup of water to the bowl.
Instant Pot Pot Rice - Pot in Pot Method Instructions 2 - water in inner pot, trivet in water, bowl of rice on trivet - Paint the Kitchen Red
  1. Pour water into the inner pot.
  2. Place trivet in the inner pot.
  3. Place the glass bowl on the trivet.
Instant Pot pressure cook instructions collage: close lid, program, float valve up, float valve down
  1. Close the lid.
  2. Select Pressure Cook mode and cook on high pressure for 6 minutes.
  3. The display will go from On to 00:06. The float valve will go up after a few minutes. The display will count down to 00:00.
  4. Do a 10 minute natural release of pressure or a full natural release. Once the float valve goes down, the lid can be opened.
Instant Pot Pot Rice - Pot in Pot Method Instructions - cooked rice in inner pot, cooked rice taken out, fluff rice with fork - Paint the Kitchen Red
  1. The white rice should be perfectly cooked.
  2. Carefully remove the glass bowl from the inner pot.
  3. Fluff the rice with a fork and let it rest for a few minutes.

You may like some other rice recipes like Instant Pot Brown Rice (Pot in Pot method), Wild Rice Pilaf, Parboiled Rice, Fried Rice, or Brown Fried Rice.

Instant Pot Rice using pot in pot method - two bowls of white rice
Print Recipe
4.53 from 21 votes

Instant Pot Pot in Pot Rice Recipe

A step by step guide to cooking Instant Pot Pot in Pot (PIP) Rice. Perfectly cooked rice every time, quick and easy.
Prep Time5 minutes mins
Cook Time20 minutes mins
Total Time25 minutes mins
Course: Sides
Cuisine: Miscellaneous
Main Ingredient: rice and grains
Servings: 2
Calories: 206kcal
Author: Paint the Kitchen Red

Equipment

  • Instant Pot Pressure Cooker
  • Fine mesh sieve
  • Oven safe glass bowl

Ingredients

  • 1 cup Basmati rice or long grain white rice
  • 1 cup water + more for inner pot

Instructions

  • Rinse out 1 cup of basmati rice in a fine mesh sieve.
  • Transfer rinsed rice and 1 cup water to an oven-safe medium bowl.
  • Pour 2 cups water into the Instant Pot's main compartment (inner pot) and place a trivet in the water.
  • Place rice bowl on trivet and close the Instant Pot.
  • Close the lid and pressure cook on High Pressure for 6 minutes.
  • Do a 10 or 15 minute natural pressure release.  [Read More: The Different Pressure Release Methods]
  • Open Instant Pot and fluff rice with fork and allow it to rest for a few minutes before serving.

Video

Notes

  • To substitute Jasmine rice, change the ratio of rice to water to 1 : 1 ¼  and only cook for 4 minutes.

Nutrition

Serving: 1cup | Calories: 206kcal | Carbohydrates: 45g | Protein: 4g | Fat: 0.4g | Sodium: 2mg

I am not a certified nutritionist.  I provide my best estimate of nutritional information merely as a courtesy to my readers.  If you depend on nutritional information for dietary or health reasons,  I suggest using your favorite online nutrition calculator to confirm the nutritional value of this recipe based on the actual ingredients that you use.

Did you know that the best way to support your favorite bloggers is to comment and rate recipes, and share on social media? If you loved this recipe, please comment and give it a five ⭐ rating in the comment section below. If you’re a pinner, pin this post using the Pin buttons at the top and bottom of this post and in the recipe card above. Thank you for your support!

BACK TO TOP

Instant Pot Recipes To Go With White Rice

1
Instant Pot Chicken Tikka Masala in black bowl with rotis.
Instant Pot Chicken Tikka Masala
This Easy Instant Pot Chicken Tikka Masala recipe makes a restaurant-quality Indian curry that has succulent pieces of boneless chicken in a flavorful creamy sauce.  Ginger, garlic and Indian spices combine to give the curry a heavenly aroma and taste!  [Instant Pot and Stovetop Instructions]
TIKKA MASALA
2
Chicken curry and rice on plate.
South Indian Chicken Curry (Kerala Style)
An authentic home-style Indian red curry chicken from South India is also known as nadan kozhi curry (pronounced nah-done koh-rhee). This chicken curry is sure to please any Indian food lover.
CHICKEN CURRY
3
Instant Pot Cashew Butter Chicken in white bowl on flowered napkin, with cinnamon, cilantro, cashews in background - Paint the Kitchen Red
Healthy Instant Pot Butter Chicken with Cashew Butter
Instant Pot Cashew Butter Chicken is an irresistible recipe inspired by butter chicken, but without the extra calories. The succulent pieces of chicken are spiced to perfection and cooked in a rich and vibrant tomato sauce. This is a quick and easy recipe that’s perfect for a weeknight!
CASHEW BUTTER CHICKEN

Indian Roasted Cauliflower

December 2, 2016 by Neena Panicker 11 Comments

Indian Roasted Cauliflower


Indian Roasted Cauliflower

Indian roasted cauliflower is one of my favorite dishes to make. Aloo Gobi (translation: Potato Cauliflower) is probably the most popular Indian cauliflower dish that’s on restaurant menus. I do like it in the curry/gravy form, but this dry dish that’s roasted has so much flavor that it’s my go-to cauliflower recipe when I’m cooking Indian food. I came up with the recipe myself because I love roasted vegetables of any kind and of course, I love Indian spices.

So, this is the way I roast most veggies: I place a stone baking dish in the oven and preheat the oven to 425 degrees F. Once the oven has reached its temperature, I remove the baking pan, drizzle with oil and add the vegetables already mixed with spices. Then I bake it until the vegetables are cooked and slightly blackened in spots. There’s something about roasting vegetables that brings out amazing flavors – I think it’s the caramelization, which brings out the sweetness.

roasted-brussels-sprouts

If your kids don’t like some vegetables, try serving them roasted – you just might get them to eat it.  Even brussels sprouts taste good!  If you’ve never tried vegetables this way, what are you waiting for?


GO DIRECTLY TO RECIPE

Indian Roasted Cauliflower Ingredients

Indian Roasted Cauliflower Ingredients

Indian Roasted Cauliflower Stages of Roasting

Indian Roasted Cauliflower Stages

The garlic is roasted whole, unpeeled.  It tastes delicious when you squeeze out the garlic from the skin once it’s cooked.  It’s also perfectly fine to have a few charred bits of vegetables, they add to the taste.  Keep an eye on the dish, though.  Every oven is different, so make sure not to burn it.  Oh, and one more secret, I’ll sometimes sprinkle parmesan cheese over the top, right when it comes out of the oven.  Not very Indian, but don’t knock it till you try it!

Indian Roasted Cauliflower
Print Recipe
5 from 1 vote

Indian Roasted Cauliflower

Indian Roasted Cauliflower takes roasted cauliflower to another level. This easy-to-prepare dish is delicious with its sweet, sour, salty, spicy flavors.
Prep Time10 minutes mins
Cook Time40 minutes mins
Total Time50 minutes mins
Course: Sides
Cuisine: Indian
Main Ingredient: vegetarian
Method: Non Instant Pot
Servings: 6 servings
Author: Paint the Kitchen Red

Ingredients

  • ½ teaspoon brown sugar
  • ½ teaspoon turmeric powder
  • ¼ teaspoon cayenne pepper or Indian chili powder
  • ½ teaspoon garam masala
  • 1 teaspoon salt
  • 2 teaspoon lemon juice
  • 2 tablespoon vegetable oil
  • 2 cups 1-inch cubed potatoes
  • 2 cups sliced onions
  • 1 large head of cauliflower cut into florets
  • 2 teaspoon minced garlic
  • Vegetable oil for drizzling
  • ¼ cup cilantro chopped

Instructions

  • Line a large heavy baking sheet or baking dish with aluminum foil.
  • Place baking sheet in oven and preheat to 425 degrees F.
  • Add cubed potatoes to a saucepan with enough water to cover the potaotes. Stir in ¼ teaspoon turmeric and bring to a boil.
  • Simmer for 7 minutes or until partially cooked (potatoes should be parboiled: barely tender when pierced with a skewer).
  • Drain potatoes and set aside.
  • In a small bowl, mix brown sugar, ¼ teaspoon turmeric, cayenne, garam masala, salt with lemon juice and oil.
  • Place potatoes, onions, cauliflower and garlic into a large bowl, and pour oil mixture over the top and stir to coat.
  • Once the oven has reached the desired temperature, remove the baking sheet and drizzle with vegetable oil.
  • Transfer contents of bowl to the baking pan.
  • Place baking pan on the center rack of the oven.
  • Bake for 30 to 40 minutes or until vegetables are cooked through and lightly charred, stirring the cauliflower mixture halfway through.
  • Garnish with cilantro.

Notes

I use a stoneware baking sheet to roast the cauliflower. When you transfer the contents of the bowl to the baking sheet, watch out for splatters because the vegetables are wet and the baking sheet is hot, hot, hot.

BACK TO TOP

Swedish Visiting Cake – Almond Cake

November 22, 2016 by Neena Panicker 28 Comments

Swedish visiting cake on a plate with piece cut.

This Swedish Visiting Cake is the perfect dessert to whip up when friends drop by or for afternoon tea. With its crispy almond-studded top and chewy, cookie-like interior, this dense, buttery almond cake comes together in minutes and is always a crowd-pleaser.

Swedish visiting cake on a plate with piece cut in the background.

This post contains affiliate links. As an Amazon Associate, I earn from qualifying purchases. Please read the disclosure.

This almond vanilla cake is a treasured recipe that’s earned its place as my most-requested dessert.

Years ago, a dear friend came over for dinner and brought this Swedish visiting cake which I fell in love with. When I requested the recipe, she told me that she got it from a friend who got it from another friend!

There’s something special about recipes passed between friends; they carry not only the ingredients and instructions but also stories.

This recipe is also known as a Scandinavian welcome cake. True to its name, this easy almond cake is the perfect treat for impromptu visits and casual gatherings. I make this recipe at least once a month!

I have also made another version of this recipe from Dorie Greenspan that uses melted butter, but I find that recipe tends to be slightly greasier than this Swedish visiting cake recipe, which uses softened butter (room temperature).

But it’s a great option when you haven’t softened your butter and need a cake pronto!

The dense, chewy texture sets it apart from typical coffee cakes, landing somewhere between a traditional cake and a giant cookie, with a perfectly crisp, almond-scattered top contrasting perfectly from the chewy interior.

It’s the kind of dessert that feels special and comfortable – sophisticated enough for a dinner party yet homey enough for a quiet afternoon treat, perfect with a cup of tea or coffee.

➡ If you’re looking for other dessert recipes from scratch, try Coca-Cola cake, pear cake, sour cream coffee cake with pecans, or cardamom cookies. They’re all family favorites!

Ingredients and Tips

🧂 Ingredients You’ll Need for this Almond Vanilla Tea Cake

Swedish visiting cake Ingredients on wooden table.

💡 Ingredient and Recipe Tips

🧈 Butter: Room-temperature unsalted butter (Kerrygold or Land O Lakes are my favorite brands). To make Dorie Greenspan’s original recipe for Swedish Visiting cake, use melted butter. Whisk the eggs and sugar, then the extracts, flour and salt, and finally fold in the melted butter.

🌾 Flour: King Arthur all-purpose recommended. Spoon into measuring cup – don’t scoop directly.

🍰 Cake Pan: Use a 9-inch springform cake pan or cast iron skillet.

🔄 Mixing: Use a handheld mixer, stand mixer with paddle, or whisk.

✨ Tips for Success: Use room temperature ingredients, cream butter and sugar until airy, spoon-measure the flour, and avoid overmixing.

🍋 Lemon: Add the grated zest of a lemon to the sugar for a different twist!

♨️ How To Make Swedish Almond Cake

Swedish visiting cake instructions collage - butter and sugar, batter mixed, cake in pan, cake on rack.
  1. Preheat the oven. Use a mixer to beat butter and sugar until light and fluffy.
  2. Beat in egg, almond and vanilla extracts. Add the flour and beat until combined.
  3. Evenly pour the batter into the cake pan. Sprinkle almonds over the batter. Bake the cake until a toothpick comes out clean.
  4. Cool on rack for 10 to 15 minutes. Turn cake out of pan and cool completely. Sprinkle with powdered sugar, if desired.

Full instructions below in the recipe card.

Swedish visiting cake on a plate with piece cut.
Print Recipe
4.60 from 5 votes

Swedish Visting Cake – Scandinavian Almond Cake

A beloved Scandinavian classic, this Swedish almond cake recipe is the perfect treat to make when friends drop by or for afternoon tea. With its crispy almond-studded top and chewy, cookie-like interior, this dense, buttery almond tea cake comes together in minutes and is my most-requested dessert.
Prep Time20 minutes mins
Cook Time40 minutes mins
Total Time1 hour hr
Course: Desserts
Cuisine: American
Method: Non Instant Pot
Servings: 6 pieces
Calories: 281kcal
Author: Paint the Kitchen Red

Ingredients

  • 1½ cups all purpose flour
  • ⅛ teaspoon salt
  • 12 tablespoon butter unsalted – 1½ sticks,

    6 oz. (170 grams), room temperature

  • 1½ cups granulated sugar
  • 2 eggs room temperature
  • 1 tablespoon almond extract
  • 1 teaspoon vanilla extract
  • ¼ cup sliced almonds
  • powdered sugar optional

Instructions

  • Preheat the oven to 350 degrees F (177 degrees C).
  • Line the bottom of a 9-inch springform pan with parchment paper, and grease and flour the sides of the pan.
  • Mix together 1½ cups all purpose flour and ⅛ teaspoon salt with a whisk and set aside.
  • Use a handheld mixer to beat the 12 tablespoon butter and 1½ cups granulated sugar on medium speed until light and creamy.  Scrape the sides of the bowl using a silicone spatula periodically.
  • Add the 2 eggs, one at a time, and mix on medium speed until combined. Beat in the 1 teaspoon vanilla extract and 1 tablespoon almond extract.
  • Add the flour and mix until combined. Scrape the sides and bottom of the bowl periodically to incorporate all ingredients.
  • Pour the batter into the prepared cake pan. Use a spatula to gently even out the batter. The batter will be quite thick. Sprinkle ¼ cup sliced almonds evenly over the batter.
  • Bake the cake for 40 to 50 minutes or until a toothpick comes out without wetness and just a few crumbs.
  • Transfer the cake onto a cooling rack and allow to cool for 15 minutes.
  • Turn the cake out onto a cake rack and allow it to cool completely.
  • Once completely cool, dust with powdered sugar, if desired.

Notes

  • This recipe was originally published with melted butter, but I find that softened butter is better. To make it with melted butter, whisk together the sugar and eggs, stir in the extracts, stir in the flour, and finally fold in the melted butter. Bake as per the recipe instructions.

Nutrition

Serving: 1piece | Calories: 281kcal | Carbohydrates: 37g | Protein: 3g | Fat: 13g | Saturated Fat: 7g | Monounsaturated Fat: 1g | Cholesterol: 57mg | Sodium: 35mg | Fiber: 1g | Sugar: 25g

I am not a certified nutritionist.  I provide my best estimate of nutritional information merely as a courtesy to my readers.  If you depend on nutritional information for dietary or health reasons,  I suggest using your favorite online nutrition calculator to confirm the nutritional value of this recipe based on the actual ingredients that you use.

Did you know that the best way to support your favorite bloggers is to comment and rate recipes, and share on social media? If you loved this recipe, please comment and give it a five ⭐ rating in the comment section below. If you’re a pinner, pin this post using the Pin buttons at the top and bottom of this post and in the recipe card above. Thank you for your support!

BACK TO TOP

Top 10 Kitchen Hacks and Tips to Save Time, Reduce Waste

November 15, 2016 by Neena Panicker 12 Comments

Top 10 Kitchen Hacks

Top 10 Kitchen Hacks


This is my first post that’s not a recipe.  I’m excited to share with you my favorite kitchen hacks.  I use so many shortcuts and time savers in the kitchen that have just become second nature to me.  I’ve picked up many of these kitchen tips because I’ve become more conscious about waste.  It kills me when I have to throw something out because it’s unusable or gone bad.  Other kitchen tips come from a desire to save time.  

It was really hard to narrow down the kitchen tips and tricks that I’ve learned over the years to just 10! I have a feeling this will be the first of many posts that I will share about kitchen hacks.  So here are the first 10 in no particular order: 


1. Use Aluminum foil to cover unused burners while cooking

Aluminum Foil Stove Protector - Top 10 Kitchen Hacks

I’m a messy cook and the types of food I cook tend to splatter, so this kitchen hack is one of those things I do just instinctively every time I cook.  I have a quadruple layer of heavy duty aluminum foil that is sized to cover my back burner and another one to cover the front and back burner.  When I’m cooking on the front burner, I put these sheets over the remaining burners, and it saves me so much time when I’m cleaning up because I just quickly wipe down the foil, fold it up and put it away for next time.  I use the same foil many times before I have to replace it.

2. Use Baker’s Grease to grease baking pans for easy removal of cakes.

Greased pans

Using spray oil or butter just didn’t cut if for me especially when I was baking Bundt cakes.  I discovered this amazing miracle kitchen hack called Baker’s Grease and I use it to grease my pans for any type of cake, like this chocolate cake.  It’s really easy to make and it can keep in the fridge for months.  I make a batch and put it in a bottle in the back of my fridge.  Just mix equal parts of all-purpose flour, vegetable shortening and vegetable oil.  So you could do a half teaspoon of each if you just wanted it for a one-time use or use a tablespoon or two of each if you wanted to make a larger quantity, and store it in the refrigerator.

3. Brown onions faster by covering the pot with a lid.

Onions Cooking

Many of the curries I make require browning onions, garlic and ginger to a deep golden brown.  Curries like Indian Chicken Curry taste better when the onion mixture is browned to just the right shade of golden brown.  I feel it’s essential to a good curry, but the downside is that it can take a long time.  I usually leave my pan uncovered but if I’m in a rush, I cover the pan while the onions are browning.  But it’s very very important to keep an eye on the onions and stir them frequently, because they can burn quickly.  I speak from experience!  It’s not fun when a time-saver becomes a time-waster!

4. Cut brownies cleanly with a plastic disposable knife.

Almond Brittle Brownies

Have you ever made a batch of brownies and tried to cut them with a regular knife and they break apart and become a mess?  All that work, and they aren’t presentable.  Of course my kids are very happy, because they get to eat all the ugly pieces!  I read about this kitchen hack a few years ago, and now I always keep a disposable plastic knife in my utensil drawer to cut the brownies into clean squares.  Try it the next time you make brownies, maybe these almond brittle brownies.

5. Keep herbs fresh by placing them in a glass jar halfway filled with water.

Place Fresh Herbs in Water - Top 10 Kitchen Hacks

Have you stored fresh herbs in the refrigerator and ended up having to just throw them out because they got wilted and soggy?  It’s happened to me too many times.  I now keep fresh basil, cilantro and other fresh herbs in a glass jar with water and they stay fresh longer than in the fridge.  I refresh the water every few days.  And the added bonus is that I don’t forget about them.

6. Use white vermouth instead of white wine for cooking.

 white wine bottle

An opened bottle of white wine just doesn’t keep well and so when a recipe calls for white wine, I usually don’t have any on hand.   But I don’t want to open a new bottle just for a recipe, so I use the same quantity of white (dry) vermouth to substitute for the white wine.  Works great and it’s more economical.  A bottle of cheaper quality vermouth costs much less than a decent bottle of white wine. 

7. Store mushrooms in a paper bag in the refrigerator to keep them fresh.

Store Mushrooms in Paper Bag - Top 10 Kitchen Hacks

I love using mushrooms in my dishes but mushrooms get slimy and go bad easily.  I usually try and use the entire container in a recipe but once in a while I will have leftover mushrooms.  I’ve found the best way to store them is in closed paper bag in the produce drawer of the fridge.  The paper bag absorbs the moisture released from the mushrooms without drying them out.  They last an extra few days compared to leaving them in a regular container.

8. Use milk + vinegar to make your own buttermilk.

Buttermilk Biscuits

There are many times when I want to make buttermilk biscuits or pancakes on a weekend and I don’t have enough buttermilk on hand.  To make 1 cup of buttermilk, pour 1 tablespoon of white vinegar into a measuring cup.  Add enough milk to the measuring cup to make 1 cup.  Let the mixture sit for about 10 minutes and it’s ready to be used in your recipe. 

9. Add a small piece of bread to brown sugar to soften it.

Add bread to brown sugar to soften - Top 10 Kitchen Hacks

Hardened brown sugar is a pain to use in recipes.  I used to microwave brown sugar to soften it before adding it to recipes.  But I’ve found that adding a piece of bread to the brown sugar keeps it from getting hard.  If you have hardened brown sugar, add the bread to the brown sugar and store in a sealed container.  The sugar will soften in a day or two, and be ready to use.   And although you might think that the bread will become moldy, it doesn’t.  It might dry out, in which case you can just replace it.

10. Use a silicone spatula to make scrambled eggs.

Scrambled Eggs

For years I used a regular spatula or a large wooden spoon to make scrambled eggs.  These utensils would leave behind  a thin layer as I scrambled the egg, and there would be dried up bits of scrambled egg left on the pan.  A silicone spatula does a much better job of lifting and folding the eggs and leaves the pan super clean.  Less work and less waste!

I hope you can take away some of these kitchen hacks to help you out in the kitchen.What favorite tips do you have to share?  Let us know!

  • « Previous Page
  • 1
  • …
  • 22
  • 23
  • 24
  • 25
  • 26
  • 27
  • Next Page »
Neena in red sweater head tilted

Hi, I'm Neena Panicker, and welcome! I am the creator, photographer, and author of recipes and tips at Paint the Kitchen Red. I live in the glorious west in Salt Lake City, Utah with my family.

More about me →

Popular

  • Reasons Why Instant Pot is Not Sealing or Pressurizing
    Reasons For Your Instant Pot Not Sealing
  • Instant Pot Thai Red Curry with colorful vegetables in white bowl with spoon on rich red napkin.
    Instant Pot Thai Red Curry with Chicken
  • 4 Instant pots - 3, 6, 8 and 10 quart - what size instant pot should i buy?!
    Sizes of Instant Pot – What Size do you Need?
  • Instant Pot Chili in white bowl on green cloth with cornbread; topped with cheese, sour cream and green onions - Paint the Kitchen Red
    Homemade Instant Pot Chili (using Dried Beans)
  • Natural Release vs Quick Release
    How To Natural Release Instant Pot vs Quick Release
  • Instant Pot Panang Curry with chicken, green beans, red and green peppers, Thai basil in a white bowl on a light wood background
    Thai Instant Pot Panang Curry with Chicken
  • Beginner's Manual and User's Guide Instant Pot Duo Crisp Air Fryer
    How to Use the Instant Pot Duo Crisp + Air Fryer | Beginner’s Manual

Seasonal

  • 4 ears of corn sitting on husks on a white plate
    Instant Pot Corn on the Cob
  • Wasabi Instant Pot Deviled Eggs with wasabi and pickled ginger on colorful blue plate - Paint the Kitchen Red
    Wasabi Deviled Eggs Recipe – Delicious Appetizer
  • Instant Pot Korean Chicken two thighs and four drumsticks on a dark background, garnished with sesame seeds
    Instant Pot Korean Chicken with Gochujang
  • Instant Pot Thai Grilled Chicken Thighs on dark background with sprinkled cilantro and green onions
    Thai BBQ Chicken
  • Instant Pot Banh Mi sandwich on black background, with meat, daikon, carrots and cilantro; cilantro and green onions sprinkled on surface - Paint the Kitchen Red
    Instant Pot Banh Mi | Vietnamese Sandwich
  • Instant Pot Jamaican Jerk Chicken L1 - Paint the Kitchen Red
    Grilled Instant Pot Jamaican Jerk Chicken
  • Instant Pot beet, arugula, candied walnut salad on white plate with fork or dark background
    Arugula Goat Cheese Beet Salad
  • Instant Pot Ratatouille - round wooden board with cheeses, basil, olives, crostini, cherries, nuts, crackers
    Instant Pot Ratatouille | Braised Summer Vegetables with Fresh Herbs

Featured In

Media that have featured Paintthekitchenred.com including cnet, nbc news, cnbc, instant pot, the huffington post.

Social Media

Footer

↑ back to top

About

  • About Me
  • Contact

Disclosures

  • Privacy Policy
  • Accessibility Statement

Shop

  • Amazon

As an Amazon Associate I earn from qualifying purchases.

Copyright © 2016 - 2026 Paint the Kitchen Red

Rate This Recipe

Your vote:


A rating is required
A name is required
An email is required