

These Instant Pot Cupcakes are made in the style of a pound cake and they are going to have you swooning as you take each bite! Moist and buttery, these made-from-scratch cupcakes are reminiscent of homemade old-fashioned cakes your grandmother would have made, with simple ingredients. Add vanilla, lemon or cardamom to give them extra flavor.

This post contains affiliate links. As an Amazon Associate, I earn from qualifying purchases. Please read the disclosure.
Table of Contents
Introduction
It’s been almost a year and a half since I posted an Instant Pot dessert recipe. That’s not for lack of trying. I’ve made, at the very least, a DOZEN different desserts in the Instant Pot but nothing met my standards. It killed me to waste that time and money but I was on a mission!
Cheesecakes, lava cakes, and puddings including flan and creme brulee are exceptional in the Instant Pot. Cakes, not so much. They tend to be dense and gummy. Cakes from boxed mixes fare better, but I like to make cakes from scratch.
This pressure cooker cupcake recipe was a completely accidental discovery! I made so many different Instant Pot cakes over the past year and was so disappointed in the results that I was just about ready to give up!
Recently, when I was getting ready to bake one of my husband’s favorite cakes for his birthday, I decided to take out enough batter to pressure cook just one cupcake. Just to give it a try. And guess what? It was really really good!!
So began my quest to shrink my pound cake recipe for the Instant Pot. In the process, I may have gained 10 pounds! But it was worth it – you’ll see why if you try this recipe.
So why would you make dessert in the Instant Pot when you can just bake it? Pressure cooker desserts are convenient if you don’t have access to an oven, if you’re craving dessert in the summer and you don’t want to turn on the oven, or if you want to make enough for just one or two people.
➡ Try my other desserts, like Instant Pot Oreo cheesecake, apple crisp, Instant Pot lava cakes, Instant Pot apple crisp, or peach crisp!
Tips and Substitutions
Custard Cups
This recipe calls for dividing the batter between four custard cups. I’ve also tried it with five or six custard cups. The more bowls I used, the smaller the cupcakes (and fewer calories!) But I also found that the cupcakes were slightly fluffier and airier.
I like to use cupcake liners inside the custard cups for easy cleanup. You don’t need to use the liners; just grease and flour the bowls really well and pour the batter directly into the bowls.
I use oven-proof custard cups because of their angled shape that easily accommodates the cupcake liner. You can use other types of bowls like ramekins, silicone egg molds, or silicone muffin cups. I have not tried using these containers for this recipe, so you might need to experiment with the cooking time.
Eggs
Two tablespoons of egg sounds a bit odd but that’s about half an egg which is optimum for this quantity of cupcakes. If you add a whole egg, you’ll get a slightly eggy flavor. Obviously, you could double the recipe and use a whole egg.
Flavorings
I frequently make this recipe with cardamom. If you’ve never tried cardamom, you are missing out on one of my favorite flavors in the world! I like to buy whole cardamom pods and powder the cardamom as needed. But you can also buy cardamom powder.
If you’re using whole cardamom pods, use the back of a spoon to smash the pod and open it. Take out the seeds and use a coffee grinder or mortar and pestle to grind the seeds into a fine powder.
Another option is to add lemon zest to the batter to make lemon cupcakes. When making the glaze, use lemon juice instead of milk.
Sour Cream
Feel free to use whole milk sour cream or whole milk yogurt. I like to use yogurt in many recipes that call for sour cream. Both work well in this cupcake recipe.
Stirring
I use my handheld mixer in this recipe but if you have a stand mixer, feel free to use it with the paddle attachment – your arms will be less tired!
Glazing
If you don’t wish to glaze the Instant Pot cupcakes, you can dust them with confectioners sugar or just omit the topping.
Pro Tips
Here are some secrets to the success of these Instant Pot cupcakes:
- Use room temperature ingredients
- Beat the butter and sugar till light and airy (about 3 minutes) on medium speed, not high speed.
- Spoon the flour into the measuring cup and level off with a straight edge spatula or butter knife. Don’t scoop the flour directly from the container.
- Sift the flour into the butter mixture using a flour sifter or fine mesh sieve.
- Scrape down the sides of the bowl periodically using a silicone spatula.
- Incorporate the flour mixture in two or more batches, beating on low speed until combined. Don’t overmix.
If you’re new to the Instant Pot and aren’t familiar with how to use it, you might find it helpful to first read one of the following guides and then come back here to learn how to make this recipe.
- General Instant Pot Instructions for Beginners
- Instant Pot ULTRA Beginner’s Manual
- Instant Pot DUO EVO PLUS Beginner’s Manual
- Instant Pot DUO NOVA Beginner’s Manual
- Instant Pot DUO GOURMET Beginner’s Manual
- Instant Pot DUO CRISP Beginner’s Manual
- Instant Pot PRO Beginner’s Manual
- Instant Pot PRO CRISP Beginner’s Manual
Instant Pot Cupcakes – Ingredients

- Butter
- Sugar
- Flour
- Egg
- Salt
- Baking powder
- Sour cream or yogurt
- Vanilla
- Cardamom (optional)
- Baking soda

- Confectioners sugar
- Milk
- Cardamom (optional)
More details in the recipe card at the bottom of this post
How to Make Cupcakes in the Instant Pot (Step by Step Instructions)
- Prepare flour mixture
- Cream butter and sugar
- Beat in egg
- Add sour cream
- Sift in flour
- Fill cupcakes
- Place cupcakes on trivet
- Pressure cook
- Release pressure
- Cool cupcakes
- Prepare the glaze
- Drizzle cupcakes with glaze
Prepare Flour Mixture

- In a small bowl, whisk together flour, baking powder, baking soda, salt, and cardamom (if using).
- Set aside.
Cream Butter and Sugar

- Use a handheld or stand mixer to beat the butter and sugar on medium speed until light and airy, about 3 minutes. Do not use high speed.
- Scrape the sides of the bowl every so often using a silicone spatula.
Beat in Egg

- Add the egg and beat on medium speed until just combined.
- Scrape the sides and bottom of the bowl.
Add Sour Cream

- Add sour cream and vanilla and beat until just incorporated.
Sift in Flour

- Sift in half the flour mixture and beat until combined. Don’t overmix!
- Repeat with remaining flour mixture.
- Scrape the sides and bottom of the bowl.
Fill Cupcake Liners

- Line 4 custard cups with cupcake liners.
- Divide batter amongst the bowls.
- Cover tightly with aluminum foil.
Place Cupcakes on Trivet

- Add 1 ½ cups water to the inner pot.
- Place a trivet with handles in the inner pot.
- Place 3 bowls on the bottom layer and the remaining bowls on top of them, staggered.
Instant Pot Duo Pressure Cook 35 minutes

- Close the lid and make sure the steam release handle is in the Sealing position.
- Press Manual (or Pressure Cook) and + or – until the display reads 35 (35 minutes).
Instant Pot Ultra Pressure Cook 35 minutes

- Close the lid.
- Select Pressure Cook mode and adjust the time to 35 minutes (00:35).
- Press Start.
Pressure Cooking Process (Duo and Ultra)
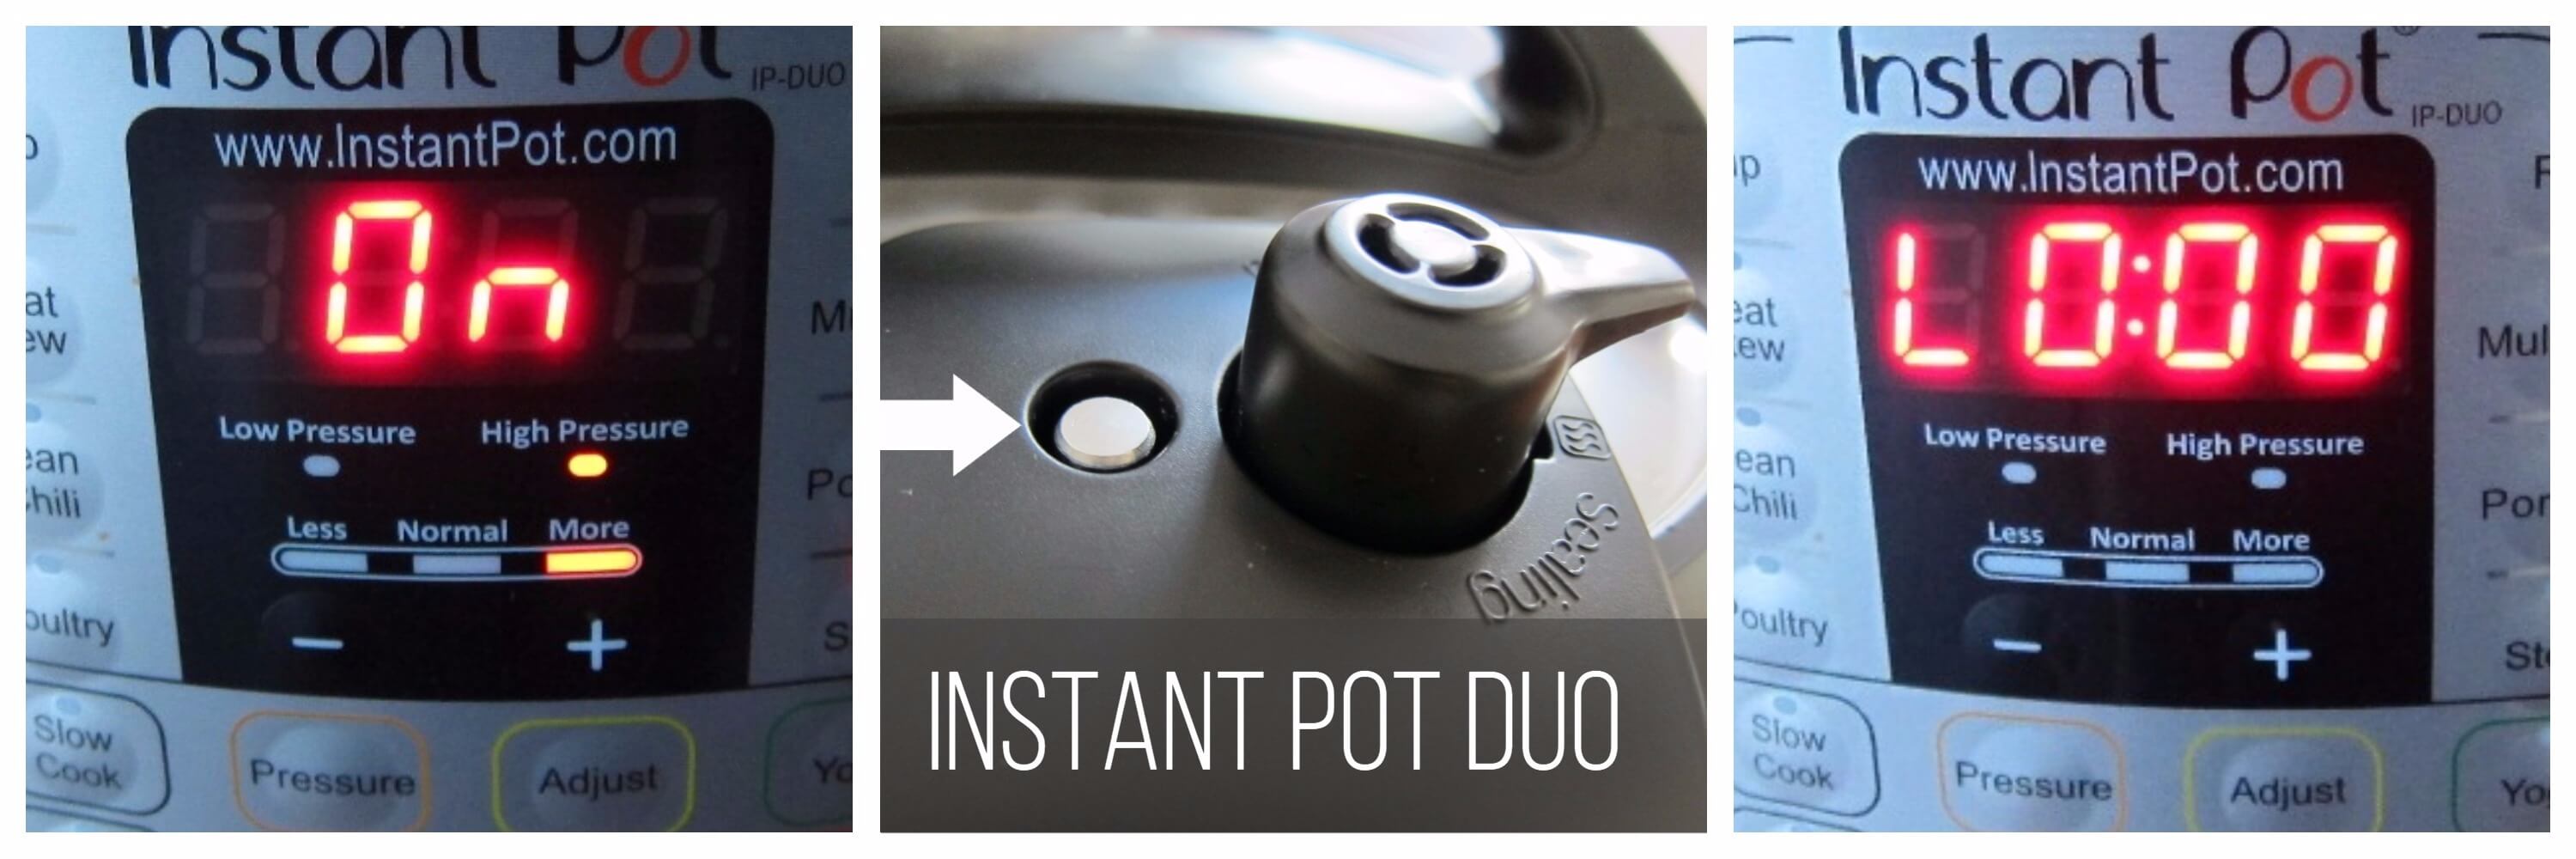

- Instant Pot display will change to On.
- Once the Instant Pot is pressurized, the float valve will go up.
- The display will count down to 0; it will then switch to Keep Warm mode and display L0:00 or 00 00 and begin to count up the number of minutes since pressure cooking completed.
How to do a 15-minute Natural Release of Pressure

- Allow the Instant Pot to stay in Keep Warm mode for 15 minutes.
How to Release any Remaining Pressure on the DUO

- Move the steam release handle to Venting. Any remaining steam will come out of the steam release handle.
- When your Instant Pot is depressurized, the float valve will be in the down position.
- Press Cancel and open the Instant Pot.
How to Release any Remaining Pressure on the ULTRA

- Press down on the Steam Release Button until it locks into place, and any remaining steam will come out of the Steam Release Valve.
- When your Instant Pot is depressurized, the float valve will be in the down position.
- Press Cancel and open the Instant Pot.
[Find out more about the pressure release methods and how and when to use them. ]
Cool Cupcakes

- Carefully remove bowls from the Instant Pot. Use silicone gloves if necessary.
- Place bowls on a cooling rack and remove the aluminum foil.
- Once cool enough to handle, remove the cupcakes from the bowls and allow to cool on the cooling rack.
Prepare the Glaze

- Right before you’re ready to glaze the cupcakes, whisk together confectioners sugar, and milk till smooth. To make cardamom glaze, add cardamom. To make a lemon glaze, replace milk with lemon juice.
Drizzle Cupcakes with Glaze

- Once Instant Pot cupcakes are completely cooled, remove cupcake liners if desired.
- Place a plate below the cupcakes to catch drips.
- Drizzle the glaze over the cupcakes. The glaze will harden at room temperature.

Instant Pot Cupcakes
Equipment
Ingredients
For the Cupcakes
- ½ cup all purpose flour
- ¼ teaspoon baking powder
- ⅛ teaspoon baking soda
- pinch salt
- ½ teaspoon cardamom powder more to taste
- 4 tablespoon butter unsalted
- 6 tablespoon granulated sugar
- 2 tablespoon egg beaten (about ½ egg)
- ¼ cup sour cream or whole milk yogurt
- ¼ teaspoon vanilla extract
For the Cardamom Glaze
- ¼ cup confectioners sugar
- 2 teaspoon whole milk
- ⅛ teaspoon cardamom powder
Instructions
Make the Cupcakes
- In a small bowl, stir together flour, baking powder, baking soda, salt, and cardamom (if using) using a whisk and set aside.
- Use a handheld or stand mixer to beat the butter and sugar on medium speed until light and airy, for about 3 minutes. Do not use high speed. Periodically scrape the sides of the bowl using a silicone spatula.
- Beat in the egg on medium speed until just combined.
- Beat in the sour cream (or yogurt) and vanilla until just incorporated.
- Use a sieve or flour sifter to sift in half the flour mixture.
- Beat until just combined. Don’t overmix!
- Repeat with remaining flour mixture. Scrape the sides and bottom of the bowl periodically.
- Line 4 custard cups with cupcake liners. *
- Divide batter amongst the bowls and cover tightly with aluminum foil.
- Add 1 ½ cups water to the inner pot and place a trivet (with handles) in inner pot.
- Place custard cups on the trivet in two rows, staggering them to help them sit properly.
- Close the lid and pressure cook on High Pressure for 35 minutes and allow for a 15 minute natural pressure release. [Read More: The Different Pressure Release Methods]
- Release any remaining pressure, open the lid and carefully remove bowls from the Instant Pot. Use silicone gloves if necessary.
- Place bowls on a cooling rack and remove the aluminum foil.
- Once cool enough to handle, transfer the cupcakes from the bowls onto the cooling rack and allow to cool completely.
Glaze the Cupcakes
- Right before you’re ready to glaze the cupcakes, stir together confectioners sugar, milk and cardamom (if using) in a small bowl, to create a smooth glaze.
- Once Instant Pot Cupcakes are completely cooled, remove cupcake liners if desired.
- Place a plate below the cupcakes to catch drips.
- Drizzle the glaze over the cupcakes. The glaze will harden at room temperature.
Notes
- Prep time does not include steps that are already accounted for in the ingredient list, e.g. beaten egg, softened butter, etc.
- * You can use up to 6 custard cups. Your cupcakes will be smaller but a bit fluffier.
Nutrition
Thank you for visiting Paint the Kitchen Red. All photos and content are copyright protected. Please don’t use any content without prior written permission. If you’ve made this recipe and would like to share it with your friends, please link back to this recipe. Thank you!
I am not a certified nutritionist. I provide my best estimate of nutritional information merely as a courtesy to my readers. If you depend on nutritional information for dietary or health reasons, I suggest using your favorite online nutrition calculator to confirm the nutritional value of this recipe based on the actual ingredients that you use.
Did you know that the best way to support your favorite bloggers is to comment and rate recipes, and share on social media? If you loved this recipe, please comment and give it a five ⭐ rating in the comment section below. If you’re a pinner, pin this post using the Pin buttons at the top and bottom of this post and in the recipe card above. Thank you for your support!
Some Dessert Recipes You Might Like


Bindu C. says
I thought I’d commented before, but it seems to be gone, so please delete if a duplicate. This is a really good recipe, both well written and delicious after execution. A standby when I want something good, quick and home-made (especially with ongoing lockdowns). Thanks for posting it!
Paint the Kitchen Red says
Thanks, Bindu! Did you use a flavoring, like the cardamom? I love making it with cardamom, but one of my kids isn’t a fan so I sometimes make it with lemon zest. If you have an airfryer, I’ll be sharing a version of this recipe soon 🙂
Bindu C. says
I did, I used cardomom (ground in my spice grinder from the pods.) I’m not even that much of a cardomom fan, but I think it is very good in this! I made one yesterday after posting, meant to be shared with a couple of people, but ate half of it, so will have to do it again tomorrow 🙂
Paint the Kitchen Red says
Thanks Bindu – I’ve made this cake in the IP air fryer and it comes out soooo good – recipe coming soon.
meaganne says
These look delicious! Do you know if gluten free flour mix would fare as well?
Paint the Kitchen Red says
Meaganne, I’m so sorry but I really don’t know. I know you can use gluten-free flour for recipes in the IP, but not sure if it’s a straight substitution.
Letty says
I love the flavor of cardamom and needed to try this! I followed your recommendation to make 6 mini cakes and they were perfect. great recipe, thanks!
Paint the Kitchen Red says
Thanks, Letty! I had a bunch of these cupcakes in my fridge after photographing them and savored every bite!