
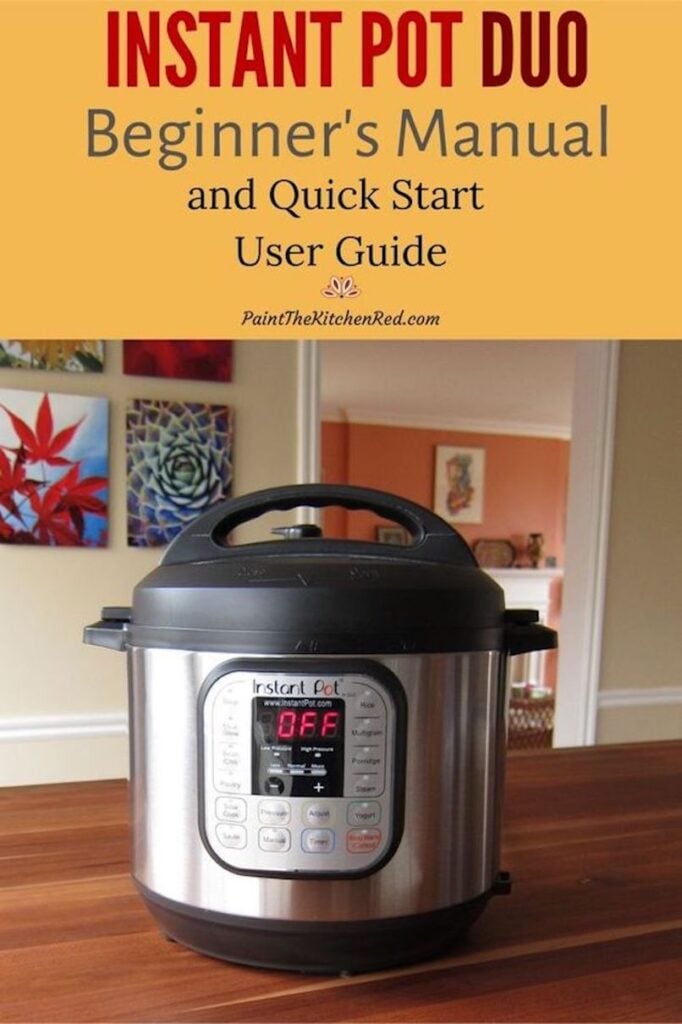
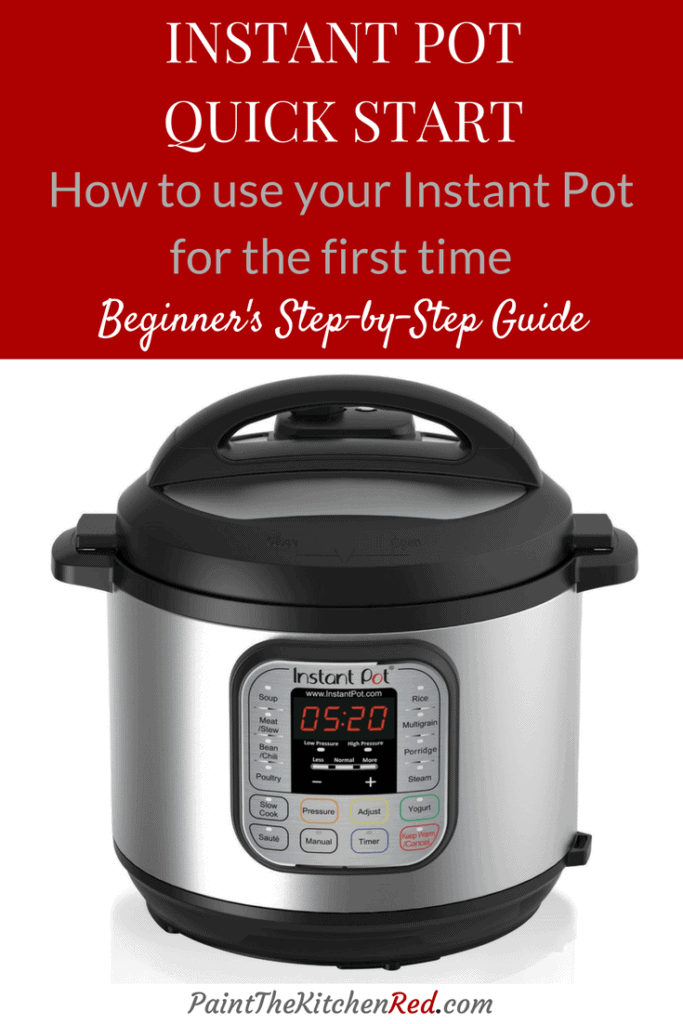
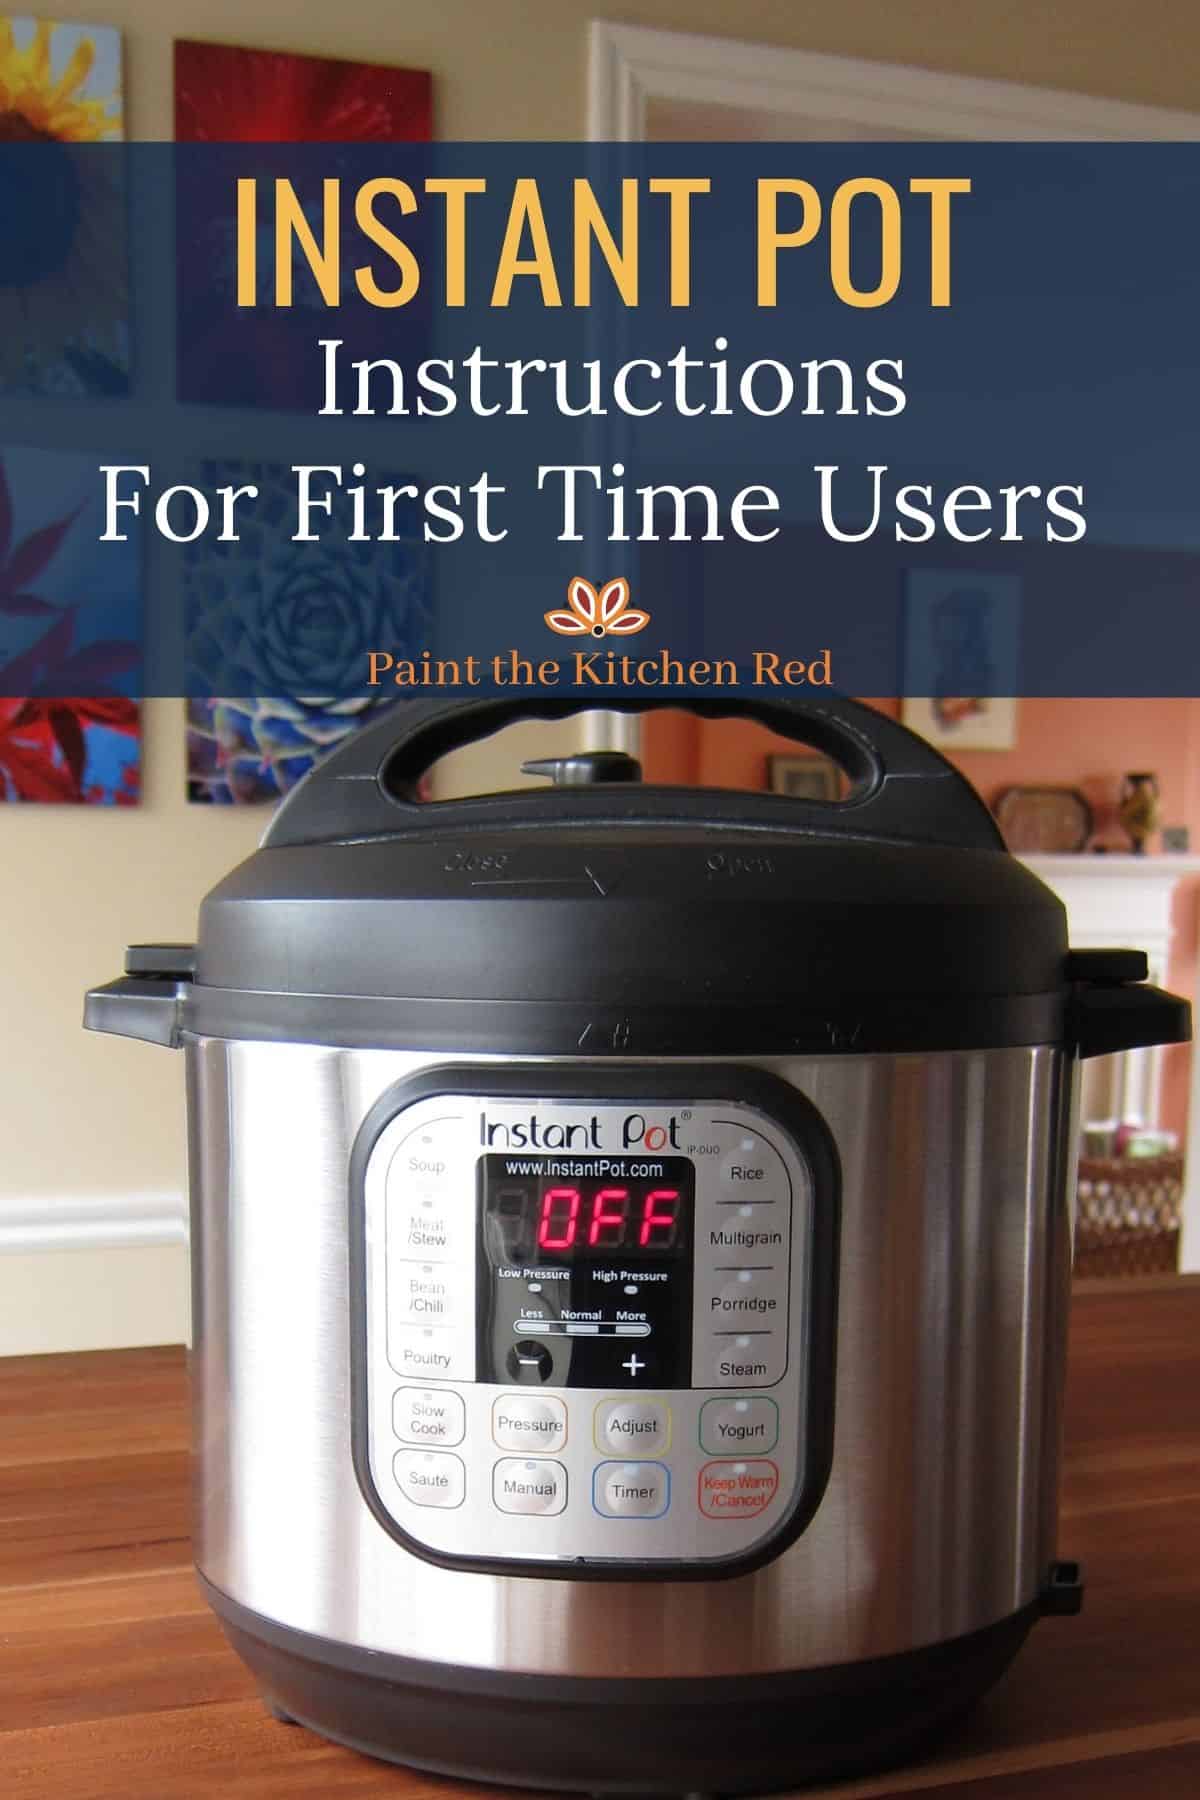
If you just got a new Instant Pot and are looking for Instant Pot directions, this beginner’s guide will help you learn how to use your Instant Pot electric pressure cooker. With these Instant Pot pressure cooker instructions, you’ll learn about the parts of the Instant Pot, setup, safety features, pressure release, and the water test. [Video included.]
This post contains affiliate links. As an Amazon Associate, I earn from qualifying purchases. Please read the disclosure.
Table of Contents
✏️ IMPORTANT NOTE
There are numerous Instant Pot models, each with its own design. Use this Instant Pot instruction manual to get a basic understanding of the functions. It has everything a beginner needs to get started. If you have questions about how to use another model, try my Instant Pot instructions for beginners with videos:
Instant Pot Parts and Accessories
Make sure all the parts are included. The guide that came with your Instant Pot will tell you what’s included. Here are the common parts of the Instant Pot:
➡ Is your Instant Pot clicking? This is pretty normal!
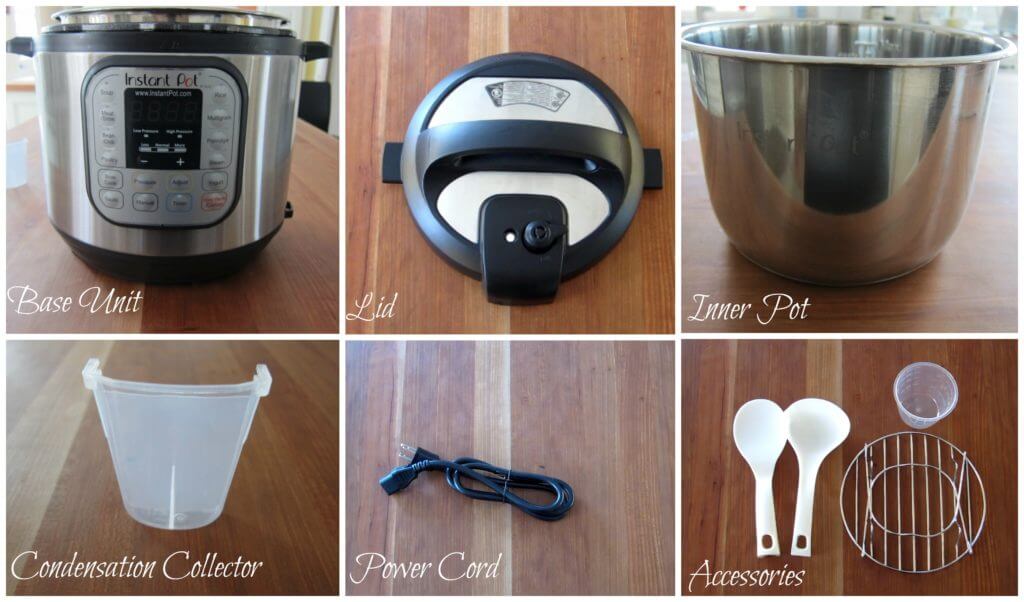
- Base unit/Outer Pot – stainless steel exterior that houses the heating element, control panel, and detachable power cord.
- Lid – closes the Instapot and seals it under pressure.
- Inner pot – removable stainless steel pot, also known as a liner or insert.
- Condensation Collector – catches drips from condensation on the lid.
- Power cord – the 3-prong detachable power cord is plugged into the back of some models. Other models have a permanently attached cord.
- Accessories – may include rice paddle, ladle, measuring cup, and trivet. Some models come with an extra sealing ring.
Instant Pot Lid
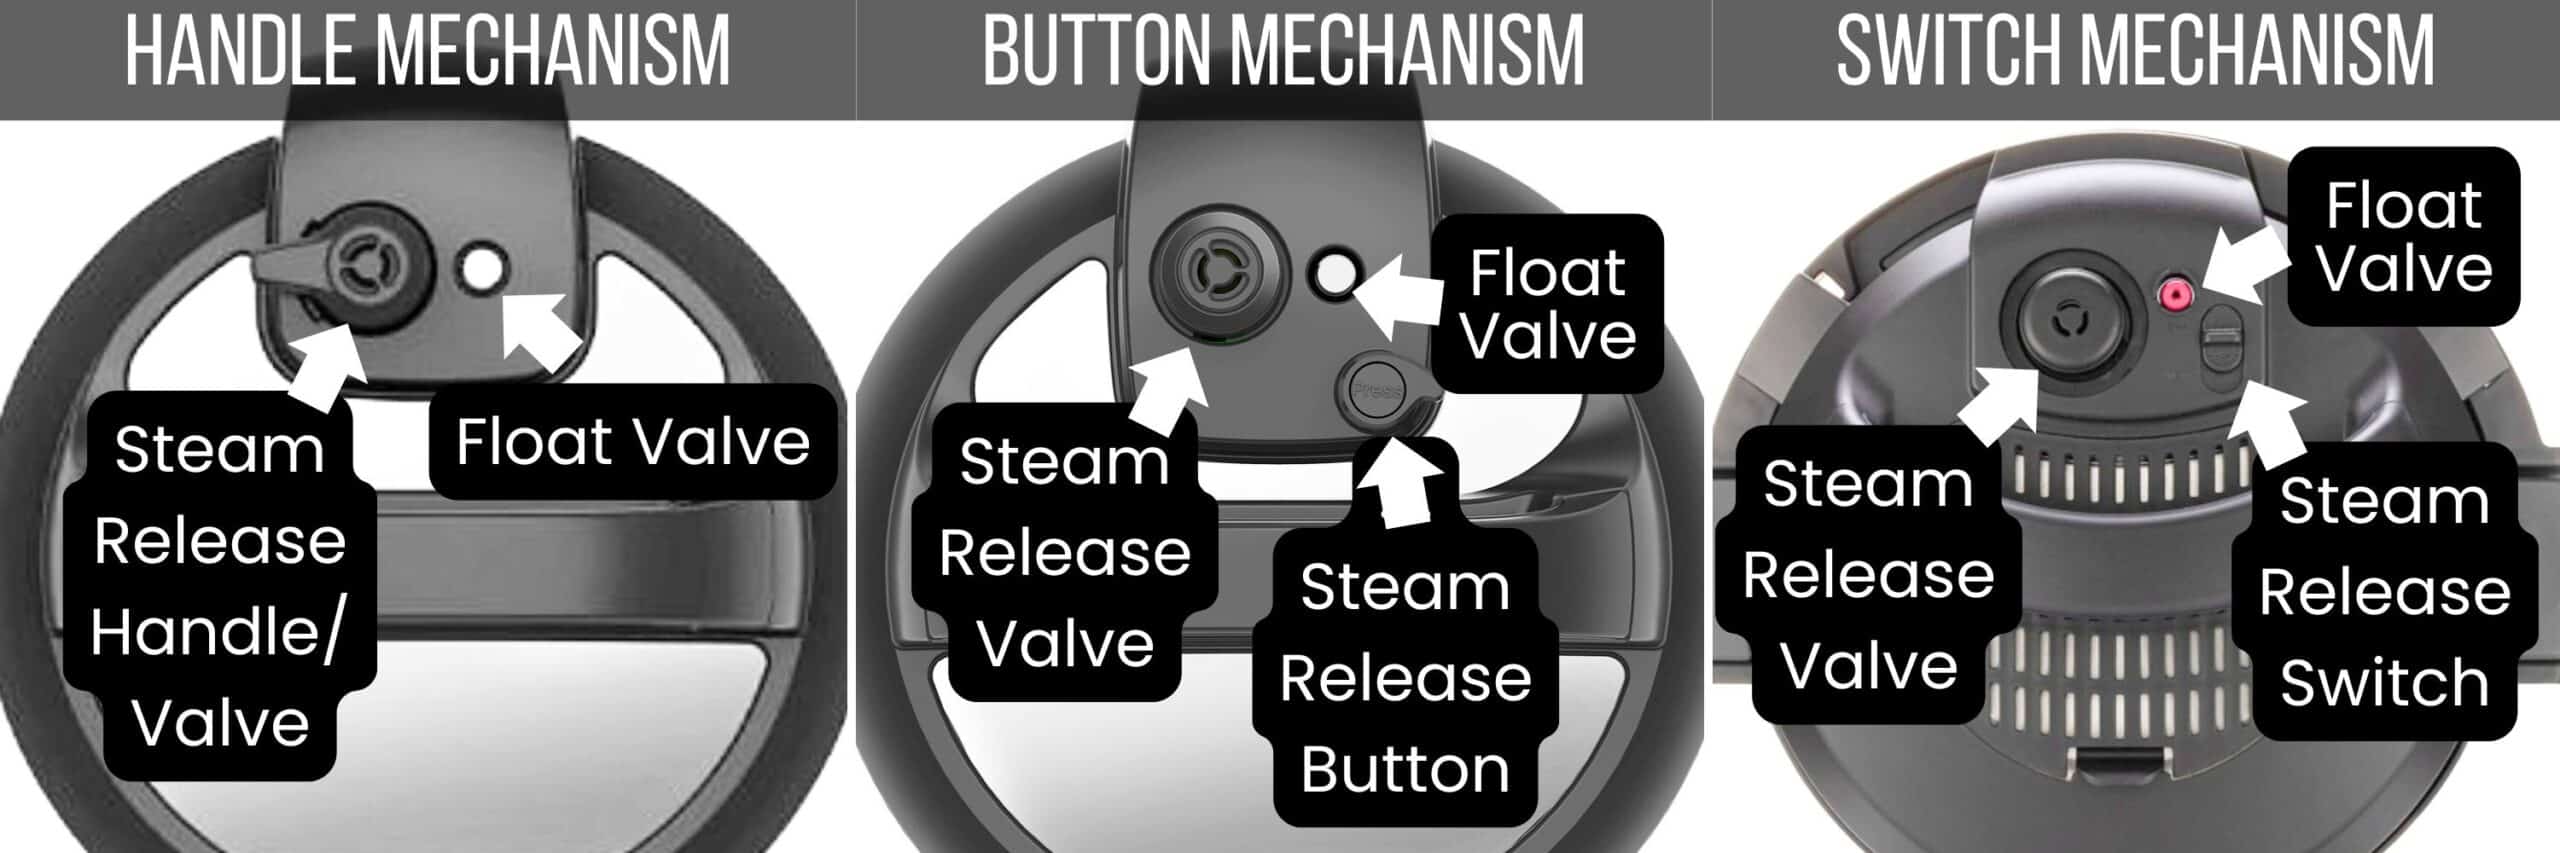
Every Insta Pot model will look slightly different, but the basics are the same. Some lids will have a handle, while others will have a knob or switch to release pressure.
Lid Exterior Parts
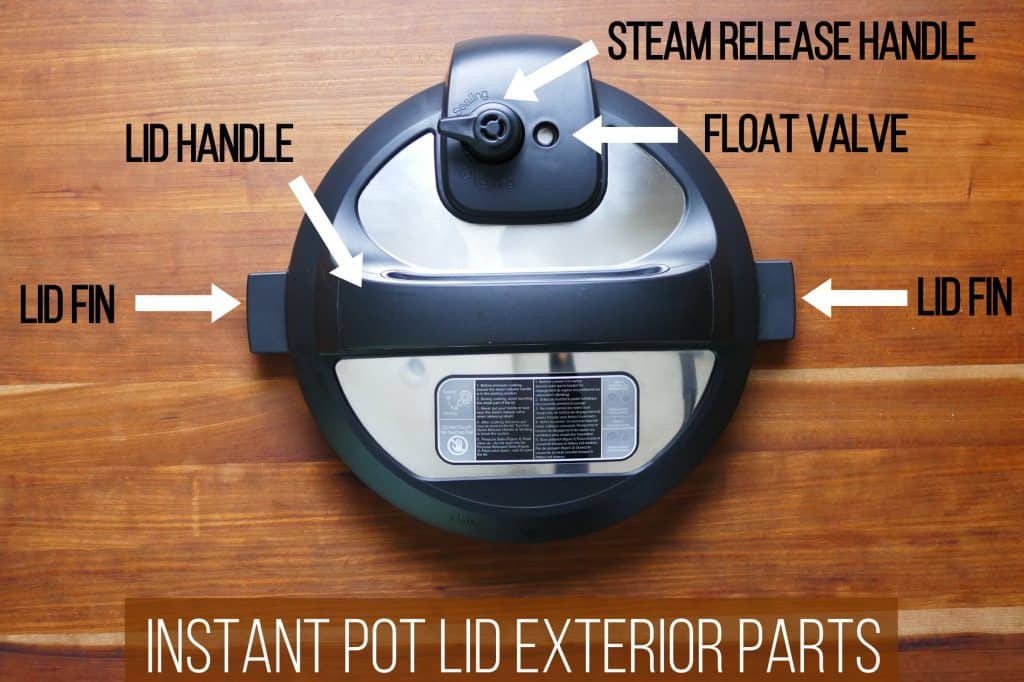
- Lid Handle is used to put on and take off the lid. Some models have a switch, while others have a teardrop-shaped button.
- Lid Fin is placed in the lid fin slot of the base unit to prop the lid open.
- Steam Release Handle is sometimes called the pressure valve, and it fits over the steam release pipe and releases pressure. On some models, the steam release valve has a plastic diffuser that fits over the valve to help the steam release with less force.
- Float Valve seals in the steam, pressurizing the Instant Pot.
Lid Interior Parts
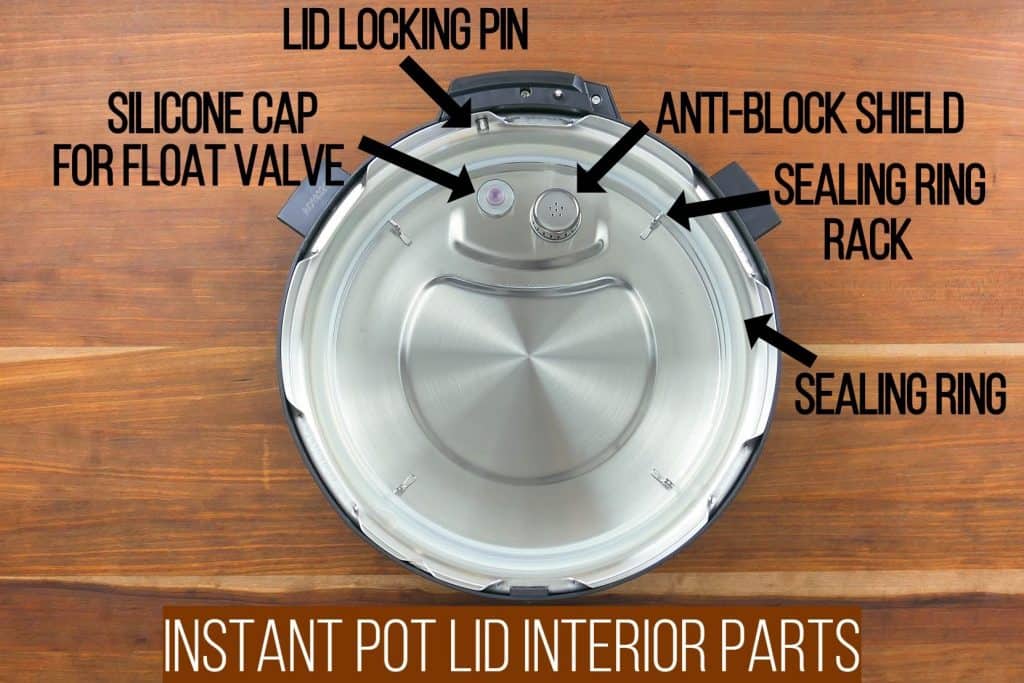
- Silicone Cap for Float Valve covers the instant pot valve and keeps it in place
- Lid Locking Pin is a safety mechanism that prevents the lid from opening under pressure
- Anti-Block Shield prevents food from coming out of the stainless steel inner pot through the steam release pipe
- Sealing Ring Rack – holds the sealing ring in place
- Silicone Sealing Ring allows the Instant Pot to seal
Setting Up
Now that you are familiar with the parts of your Instant Pot, you’re ready to begin setting it up so you can run a water test.
1. Unbox
I regularly hear from people who purchased or got the Instant Pot as a gift and leave it unopened because they’re too intimidated.
If you have a defective unit, you might miss the warranty period if you don’t get it out of the box and try it out!
Place the Instant Pot base unit on a stable surface, away from any open flame. Place it so that the steam won’t blow up onto any cabinets.
2. Place the inner pot in the base unit
- Make sure the base unit is empty and clean.
- Place the stainless steel inner pot inside the Instant Pot base unit.
3. Attach the condensation collector
The condensation collector catches any moisture that builds up on the rim. This usually comes from moisture dripping from inside the lid into the rim of the Instant Pot base when the lid is opened.

- Line up the condensation collector with the notches on the back of the Instant Pot base unit.
- Slide in the condensation collector until it’s pushed in all the way.
4. Plug in the Instant Pot
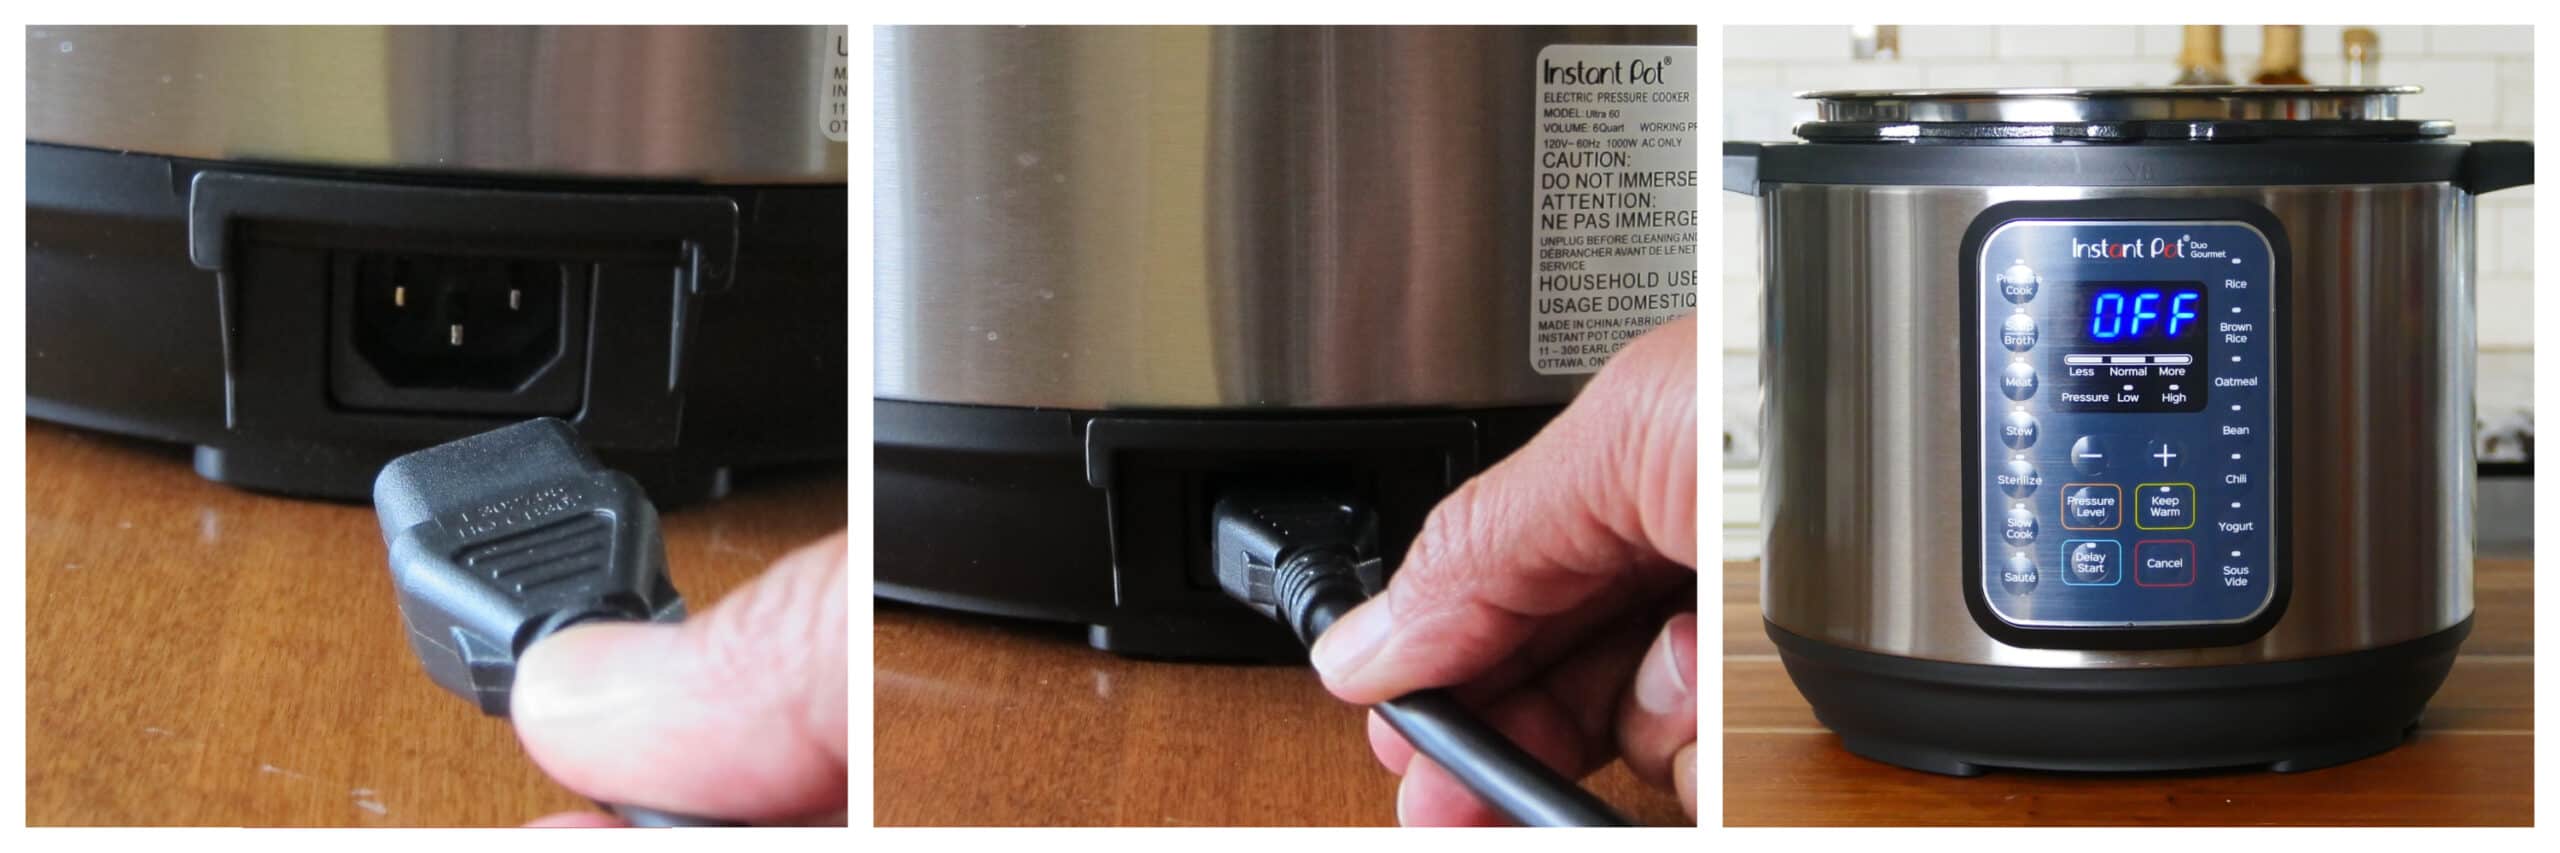
If you have a detachable cord, plug it into the base unit. Plug the cord into an electrical outlet.
Essential Tips Before You Use an Instant Pot Pressure Cooker
Important Information
- There are so many buttons on the Instant Pot, and it can seem overwhelming. You can get by using just a handful of buttons: Pressure Cook, Cancel, Start, and Saute.
- Many buttons or functions on the Instant Pot are presets for pressure cooking various foods, similar to those on a microwave. You can use these shortcuts (e.g., Meat, Soup, Rice) or the Pressure Cook function, which is the same thing.
- Before using the Instant Pot, always have the inner pot (aka liner or insert) in the base unit. Don’t put food or liquid into the Instant Pot base unit! I like to leave a trivet in the base unit when the inner pot is being washed to remind myself and others in the household not to forget the liner.
- The pressure release handle, button, or switch must be in the Sealing position, not Venting.
- The Instant Pot needs a minimum quantity of clear liquid (e.g. water, broth) for pressure cooking. (3 quart – 1 cup, 6 quart 1.5 cups, 8 quart – 2 cups). Some foods, such as vegetables and meats, release liquid during the cooking process, allowing you to use slightly less liquid.
- After using Saute mode, deglaze the inner pot. This involves pouring a small amount of liquid and scraping the bottom of the inner pot to make sure nothing is stuck to the bottom.
- Most Instant Pot recipes require High pressure unless otherwise noted. Low pressure is used in some rice recipes and for quick-cooking vegetables or fish.
- When cooking with dense or starchy ingredients, use the layering technique. Put meat, vegetables, and clear liquid at the bottom of the pot. Add pasta, rice, tomato sauce, and other thick sauces on top, and don’t stir them in. This helps prevent sealing issues and the Food Burn message. Another option is to use a trivet for the pot-in-pot method.
- There are multiple ways to release pressure. The most common methods are the natural release and quick-release methods. In general, use natural pressure release for meats, beans, and foods that need to rest after cooking. Use quick release for foods that will overcook if you let them sit, such as vegetables.
- The total time required to pressure cook is the time the Instant Pot comes to pressure, the time it takes to cook, and the time it takes to release the pressure. If you allow the pressure to release naturally, it can take 10 to 45 minutes, depending on the quantity of food inside the pot. Take this into account when planning how long a recipe will take!
➡ Are you getting an error code? Head over to my post about Instant Pot error codes and how to solve them!
How to open Instant Pot lid
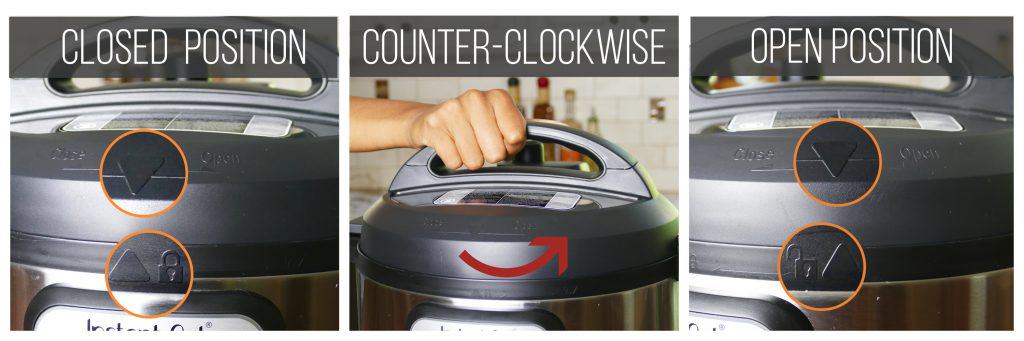
- If the lid is on, turn the lid counterclockwise until you hear a chime.
- The arrow on the lid will be lined up with the open lock icon on the base unit.
- Lift the lid to remove it.
- If you’ve just finished pressure cooking something and feel a slight resistance, wiggle the lid back and forth, and the suction should release.
How to close the lid
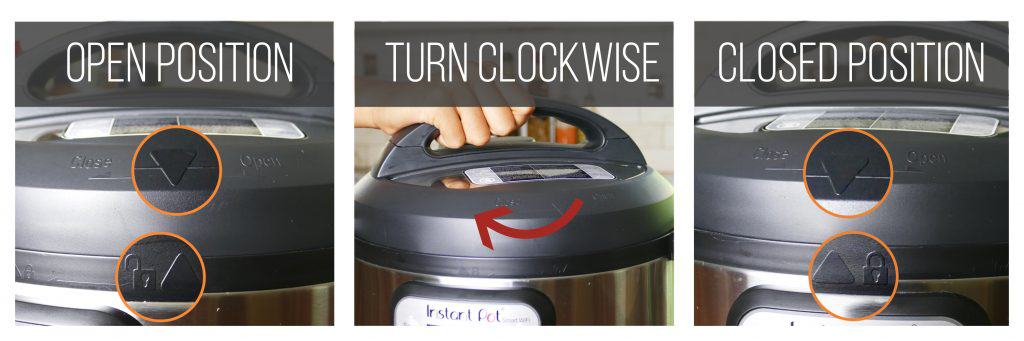
- Here’s how to put the lid on the Instant Pot: place the lid onto the Instant Pot base unit with the arrow mark on the lid lined up with the open lock icon above the right corner of the control panel.
- You will hear a chime (if the volume is turned on).
- Turn the lid clockwise until you hear another chime.
- The lid will be closed.
Float valve positions
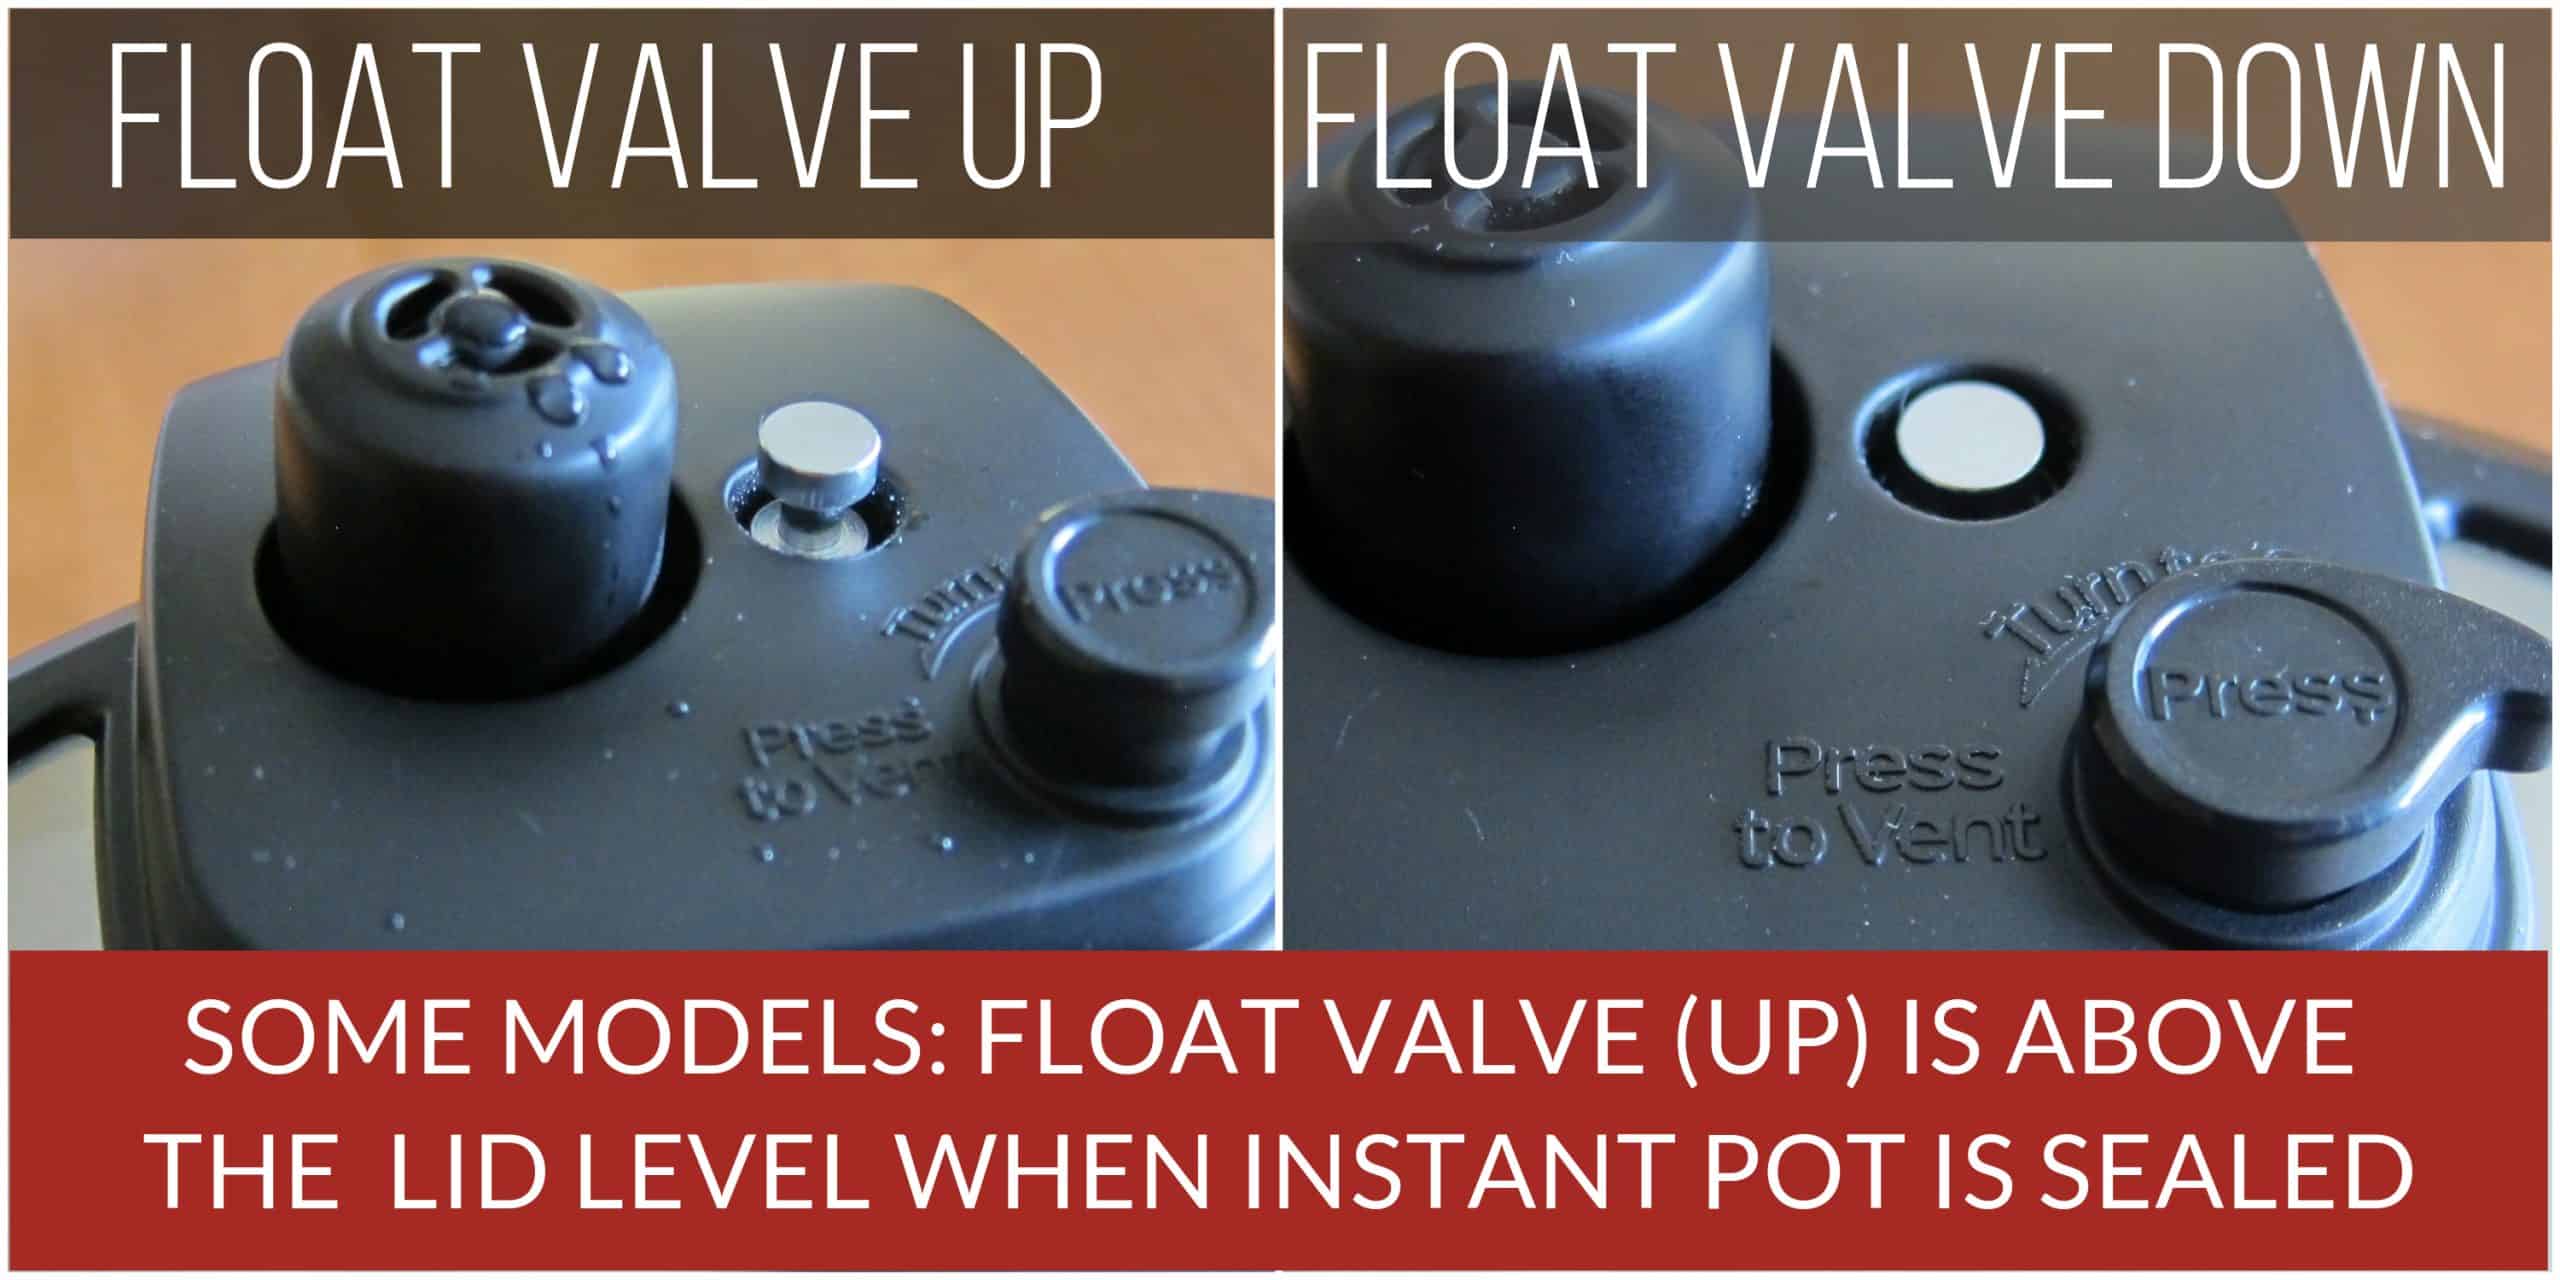
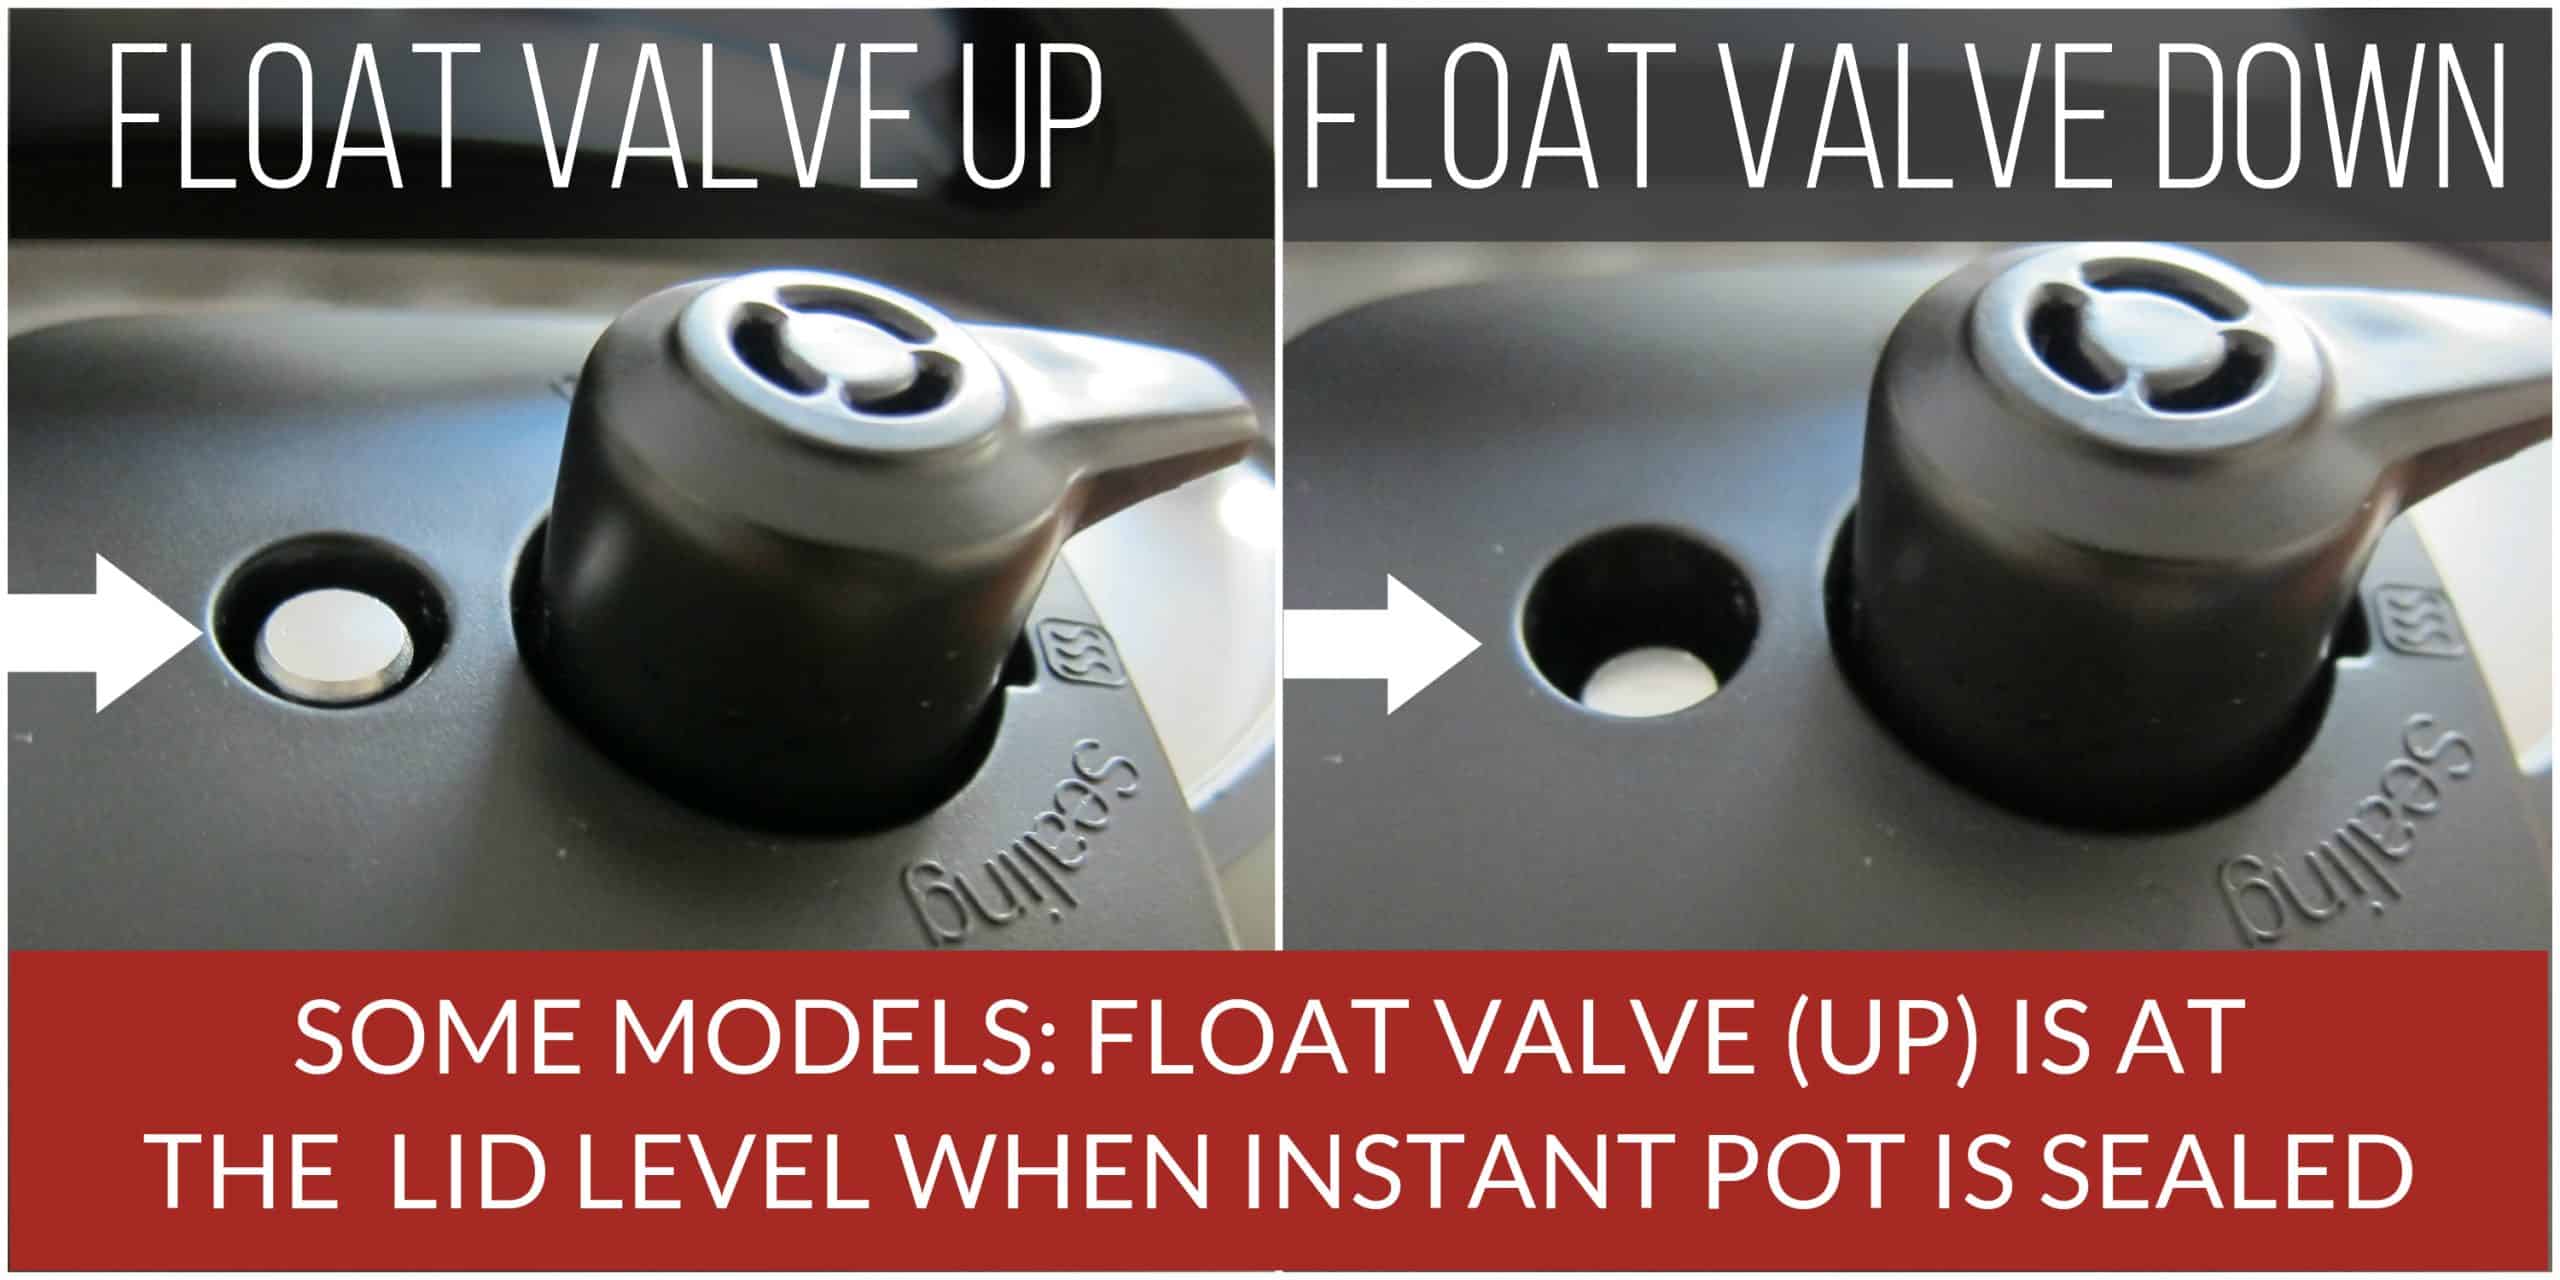
- In some models, the float valve is above the lid level when under pressure and at the lid level when not under pressure.
- In other models, the float valve is at the lid level when under pressure and below the lid level when not under pressure.
Safety Precautions
There are many built-in safety features, including automatic pressure sensors. However, as a user, you need to follow essential safety guidelines, including:
- Don’t touch the hot surfaces, particularly the stainless steel parts. Use the handles to move the Instant Pot and gloves to remove the inner pot.
- Keep hands and face away from the steam and pressure release mechanism.
- Don’t move the Instant Pot when it’s under pressure.
- Don’t fill over ⅔ full. However, when cooking foods that expand, e.g., rice, beans, and pasta, don’t fill over ½ full.
- Don’t open the Instant Pot until the float valve is down, i.e., the Instant Pot is depressurized.
- Don’t obstruct the steam release valve when pressure is released.
Instant Pot Water Test Instructions
What is the Water Test?
A water test is done by pressure cooking water for a few minutes. This allows you to familiarize yourself with the basic operations and ensure your new Instant Pot works.
You should do a water test before the first use, but you can also do it when you have problems with the Instant Pot pressurizing. The water test will pinpoint whether something about a particular recipe is causing your sealing issues.
How to do the Initial Test Run / Water Test
- Pour water into the inner pot. (1 cup for 3 qt, 1.5 cups for 6 qt, 2 cups for 8 qt).
- Close the lid and put the steam release valve, button, or switch into the Sealing position.
- Select the Manual or Pressure Cook button. Some models have buttons, while others have a knob.
- Change the cook time to 5 minutes using the + or – buttons or knob.
- On models with a Start button, press Start. On models without Start, it will automatically start in a couple of seconds.
- The display will change to On.
- Soon, you’ll hear and see small amounts of steam coming from the top of the lid. This is normal and safe! Just keep your hands and face away from the steam. You might also notice a plastic smell. Don’t worry – it will go away and shouldn’t happen again after the first use.
- Once pressure has built up, the float valve will come up.
- After the float valve comes up, the display will change from On to 5 (or 00:05), which can take a few minutes.
- The display will count down from 5 to 0 or (00:05 to 00:00).
- When pressure cooking is complete, you’ll hear a series of beeps, and the display shows L0:00, which means it’s in Keep Warm mode (if the Keep Warm function is turned on.)
- Press the Cancel button. The display will say Off.
- Do a quick release or manual pressure release by moving the steam release knob, button, or switch from sealing position to venting position. Keep hands and face away from the flow of steam. Once all the pressure inside the pot has been released, the float valve goes down, and the Instant Pot is de-pressurized. This can take a few minutes. You can also let the pressure release naturally, which takes 10 to 15 minutes.
- Once the pressure has been released, it’s safe to open and prop the lid.
What to do if the water test fails
If the water test is successful, you can use your new Instant Pot. If it fails and you’re not able to get the Instant Pot to come to pressure, use the following articles to troubleshoot the issue:
Instant Pot Buttons
- Each Instant Pot model has different buttons. Some buttons are cooking modes or programs (e.g. Rice, Bean) while others are operational (e.g. Cancel, Start).
- On some models, pressing a cooking mode button toggles between Less, Normal, and More, which have customizable default cooking times. You can adjust the time by pressing + or – and set High or Low pressure by pressing Pressure Level.
- On other models, pressing a button lets you customize the pressure level and cooking time using the display panel.
Programs and Default Times
| Button | Less | Normal | More |
|---|---|---|---|
| Bean/Chili | 25 minutes | 30 minutes | 40 minutes |
| Cake | 25 minutes | 40 minutes | 50 minutes |
| Egg | 3 minutes | 4 minutes | 5 minutes |
| Meat/Stew | 20 minutes | 35 minutes | 45 minutes |
| Multigrain (Soaks for 45 minutes first) | 20 minutes | 40 minutes | 60 minutes |
| Poultry | 5 minutes | 15 minutes | 30 minutes |
| Porridge/Oatmeal | 15 minutes | 20 minutes | 30 minutes |
| Pressure Cook | 20 minutes | 35 minutes | 45 minutes |
| Rice | – | 12 minutes (Low Pressure) | – |
| Soup/Broth | 20 minutes | 30 minutes | 40 minutes |
| Steam | 3 minutes | 10 minutes | 15 minutes |
| Slow Cook | 180–190°F (similar to keep warm on slow cooker) | 190–200°F (similar to low on slow cooker) | 200–210°F (similar to high on slow cooker) |
| Yogurt | 106°F to 113°F (for Chinese fermented rice) | 110°F to 115°F (for incubating yogurt) | 160°F to 180°F (for boiling milk before incubating) |
Other Button Functions
| Button | Function |
|---|---|
| Start | Begin the current program |
| Cancel | Cancels the current program |
| Delay Start | Start the cooking at a later time |
| Fav | Saves custom presets (on some models) |
| Keep Warm | Keeps food warm after pressure cooking; tracks time since cooking completed |
| Pressure Cook | Primary pressure cooking function; adjust pressure level and time |
| Pressure Level | Toggles between High and Low pressure |
| Saute | Allows sautéing before pressure cooking |
| Sous Vide | Cooks food using the sous vide method. You can set the cooking time and temperature |
| Temp | Adjusts temperature (use + or – buttons) |
| Time | Adjusts cooking time (use + or – buttons) |
| Ultra | Customizes temperature, pressure level, and cooking time (Ultra model only) |
Air Fryer Functions (on applicable models)
Some Instant Pot models have an air fryer lid and a pressure cooker lid. These models have pressure cooker and air fryer settings. These are some of the common air fryer modes:
- Air Fry
- Roast
- Broil
- Bake
- Dehydrate
- Proofing
FAQs
The Instant Pot turns on as soon as it’s plugged in. Attach the cord to the Instant Pot (if it’s detachable) and plug the cord into an outlet. The Instant Pot will say Off.
– The Instant Pot first needs to be plugged in.
– If the display is blank, press any button to turn on the Instant Pot.
– Choose the program and set the cook time.
– To start pressure cooking, some models have a Start button. Press Start.
– Other models automatically start. A few seconds after you program it, the Instant Pot display changes to On, which means it has started cooking.
On older models of the Instant Pot, the Pressure Cook button is called Manual. If you see a recipe that tells you to use the Manual setting, use the Pressure Cook function.
On some models, to set the Instant Pot to high pressure, press the Pressure Level button. It allows you to toggle between High and Low pressure. On other models, select the Pressure Cook function, and you’ll be able to program the pressure level and cooking time on the display panel using the knob.
The amount of time it takes to reach pressure and the float valve to go up depends on the amount of liquid inside the cooker and the temperature of the food. The more liquid in the pot and the colder the food, the longer it takes the Instant Pot pressure cooker to reach pressure.
If the Instant Pot has about 2 cups of liquid, it may take 10 minutes for the Instant Pot to reach pressure if the food isn’t frozen. The Instant Pot can take 15 to 30 minutes if it has more liquid.
A trivet and a small dish are useful for Pot in Pot cooking. An extra sealing ring is also a handy accessory. A tempered glass lid is convenient for sauteing, using the Instant Pot as a slow cooker, or for Yogurt mode.
Recipes for the Instant Pot
I hope these Instant Pot directions have helped you get comfortable with your new pressure cooker. Now you’re ready to try your first recipe!
Don’t try to improvise or wing it with your first recipe. Select a recipe from a trusted Instant Pot or Pressure Cooker cookbook or blog and follow it as written.
If you want to make changes or adjustments, you might want to contact the blogger or ask for advice from an experienced Instant Pot user.
Try an easy chicken recipe like Instant Pot Chicken Stew, Instant Pot Chicken Curry Soup, or Instant Pot Thai Red Curry; a dump and start Instant Pot Pork Carnitas or Instant Pot Mac and Cheese; or Indian restaurant vegetarian favorite Instant Pot Chana Masala.
Related Articles
I hope you’ve found these Instant Pot pressure cooker instructions useful. Here are some more articles that are helpful to beginners and intermediate Instant Pot users.

If you found this article to be helpful, please share it on social media using the social media share buttons at the top and bottom of this post. Thank you so much!


Shelley says
I use the manual button to increase times but will only go as far as 22 minutes, am I doing something wrong?
Paint the Kitchen Red says
Hi Shelley – what model do you have? You should be able to press ‘Manual’ and then + or – to change the time.
christine penberthy says
It seems to take my Instant Pot FOREVER to get to pressure. How long is normal? How often do you have to clean the various valves, etc.?
Paint the Kitchen Red says
Hi Christine – I clean the sealing ring almost every time – I just stick it in the top rack of the dishwasher. I don’t clean the valves very often. Usually when I make something that has splattered on the lid. One great way to clean the Instant Pot is to just run it with water and half a lemon in steam mode. Re: time to come to pressure, it’s directly dependent on the quantity of liquid. I often cook with just 1/4 to 1/2 cup and that takes about 6 to 10 minutes. If you have 2 cups plus, it can take 20 minutes, sometimes more.
Steve Bell says
My new IP Duo60 6 qt. V.3 arrived a few days ago and I’ve been experiencing what may be a problem. Perhaps you can shed some light as to whether it is a problem and, if so, the possible cause & cure. As a preface FYI , I followed the initial set-up, check, and steaming test per manual and all passed fine. As for cooking, I’ve only tried veggies using the “Pressure Cook” (manual) setting and found that the cooking times are 3-6x longer than those listed in the IP recipe booklet charts and most online info. (To be clear, I use “cooking time” as defined by IP – the time that elapses AFTER the unit reaches working pressure). E.g. potatoes: Stated cooking time for cubed potatoes = 2-3min. using “Pressure Cook”/ “high” (default pressure). However, here’s what I found using a 3 min. setting: Just one medium (ca. 0.4 lb/ 0.2 kg) fresh Yukon Gold potato peeled, cut into 1cm (ca. 1/2″) cubes, & steamed in an IP-approved stainless steaming basket placed on trivet w/ 1 cup water in the IP inner pot took 9 min., and 18 min. in a 4″/ 10 cm diam. pyrex bowl. No steam is escaping from the steamer during cooking, and the float valve & press. release vent work OK. so where’s the pressure during cooking? And is this even a problem? If so, I suspect a faulty pressure sensor or that the unit is actually cooking on Low press even though the display indicates High. But if you can think of anything I’m doing wrong, please inform. Note: I always make sure the sealing ring is seated, the float valve & anti-block shield on the press. vent are clear, the unit is properly closed, and the pressure vent knob is on “Sealed”. Yet another problem may simply be my definition of “done” re: cooking: Steamed potatoes should come out creamy, but with the indicated cooking times in the IP, they are grainy and the fork sticks in the pieces. I suspect other veggies will take longer than stated also.
Thanx f/ any help/ suggestions you can render.
SB
Paint the Kitchen Red says
Steve – I’ve sent you an email with some information.
Jo Anne Corbin says
Oh so very very helpful video and website! I’m new to this so I am excited to start. My husband and kids are going to love me even more. 🙂
Paint the Kitchen Red says
Welcome to the world of Instant Pot – thanks for your comment – Enjoy!
Steve Bell says
And yet another ques. 4 U:
Re: Use of the CANCEL button: Is it necessary or desirable for any reason to press Cancel after food has finished cooking and the “Warm” function has been turned off? I’m asking, b/c the manual for the new Instant Pot Duo60 (which will arrive at my door later today) lists pressing the Cancel button as a final step (i.e. after food has cooked and Warm has been turned off and pressure released), whereas your instructions stop at turning the Warm function off. Your instructions seem to make more sense, b/c you state that turning the Warm function off after cooking is complete turns the unit OFF (as indicated on the display shown in your photo). Further, it seems that pressing Cancel after that might cancel the Warm off command that you just entered (??). As I understand from my readings, pressing Cancel simply cancels the last set of cooking programming instructions you entered and returns the unit to Standby..
And a related question re: unplugging as a final step after finishing and removing food to turn power to machine off: Does unplugging delete the programming instructions you just used for that round of cooking (as when pressing Cancel)?
Sorry to bug you again. I want to know & be prepared as much as possible on the basics when my Pot arrives.
Thanx so much f/ your patience & expertise!!!
SB
Paint the Kitchen Red says
Hi Steve – I believe for the the unit you’re getting, the Keep Warm and Cancel are separate so there is no problem pressing the cancel button multiple times. Cancel serves to turn off the current cooking mode and also cancels any programming you’re currently in the process of doing. I am not sure how your IP will work, but many of them ‘remember’ the last programming you did even if unplugged. Good luck!
Steve Bell says
For pot-in-pot cooking (especially steaming), is it OK to use a small ceramic casserole dish made for conventional oven baking? Or must it absolutely be pyrex, oven-proof silicon, or stainless steel?
Paint the Kitchen Red says
Yes, you can use oven-safe ceramic dishes. Maybe I didn’t mention that in the Pot-in-Pot post; I will edit it. You’ve become my copy editor 🙂
Steve Bell says
Thanks so much for a succinct set of instructions – well -written! But here’s a question: I just cancelled an order f/ the model Duo60 7-in-1 b/c the amazon photo of the control panel on that model does not show a “Manual” button like the one I see on your model IPDuo60 7-in-1. But is there a way model 60Duo 7-in-1 can still be manually programmed? Thanks in advance.
SB
Paint the Kitchen Red says
Hi Steve – the ‘Manual’ button on older models was replaced with the ‘Pressure Cook’ button in newer models- they’re the same thing. So you should keep your order. I’ll try and update the post to mention this – thanks for bringing it up.
Steve Bell says
Thanks soooo much again for your answer! But here’s another ques: How is cooking TIME adjusted on the newer Duo60 7-in-1? There’s no “Adjust” button. (Do you do this by repeatedly pressing the cooking mode that you’ve chosen (e.g. Saute) repeatedly, as you mentioned in a reply to “Joanne” dated Jan. 17, 2018?).
Thanx again. Your web page is a gold mine. The company should pay you to write their manuals.
SB
Paint the Kitchen Red says
Aww, thanks Steve – that’s a nice compliment! You are partially right – cooking time can be adjusted on the presets by pressing the button repeatedly but that will just give you preset Low, Med and High cooking times. To change the cooking time to a custom time, press + or – . Good luck and feel free to ask more questions – I’m here to help!
Steve Bell says
Thanks again! Hate to bug U so much, but didn’t know where else to turn right now. I will be doing most of my cooking w/ manual, b/c I like to tweak programming for my tastes & my wife’s.
I re-ordered the Duo60 as U recommended. Will arrive in 2 days. I probably will have more ques. 4 U after I follow your initial set-up guide & start playing w/ it.
By the way – in case U want to update your page to include tips & instructions for the new Duo60 model, here’s the Amazon web. p. that I ordered from:
https://www.amazon.com/Instant-Pot-Multi-Use-Programmable-Packaging/dp/B00FLYWNYQ/ref=sr_1_5?s=home-garden&ie=UTF8&qid=1517020863&sr=1-5&keywords=instant+pot+6+quart
Paint the Kitchen Red says
Thanks Steve, the affiliate links I have on the page usually update to the next model so they should be current. It’s just that the images are older. I did add a blurb to the top of the post saying the ‘Manual’ button has changed to PC. I’m sure you’ll have no trouble getting started, but feel free to ask away.
Nancy says
Thank you. Thank you. Thank you. The instructions that came in the box were pathetic and confusing at best. This was my first pressure cooker and was extremely intimidated. Your post saved the day. So happy to have found you and all the great information.
Paint the Kitchen Red says
Hi Nancy, thanks for the feedback! It’s always a great day when I hear I’ve helped someone – thank you. And good luck.
Joanne says
My ip duo60v3 buttons are labelled differently at the bottom mine read : slow cook pressure level keep warm yogurt On the bottom of that row they read: sauté delay start cancel and pressure cook my question is what is my manual button where is my adjust button which button turns everything off is it keep warm button or cancel button?
Paint the Kitchen Red says
Joanne – A. Manual on your model is Pressure Cook. B. What is controlled by the Adjust button on some models is done by pressing the cooking mode button repeatedly on your model. e.g. to toggle between Less, Normal and More for Saute is done by pressing Saute multiple times. C. Cancel will shut off the Instant Pot and puts it in standby mode, but you should unplug it to completely shut it off. I hope that helps you out.
Judith Utley says
My first time on here and I have not used my new Instapot yet. How do I make brown rice? Its the only rice I eat due to medical reasons. Your tutorial is excellent!!
Paint the Kitchen Red says
Thanks, Judith! For brown rice, follow my jasmine rice or pot-in-pot basmati rice recipe, but cook for 22 minutes. Ratio of rice to water can be 1:1 or 1:1.25. Good luck.
Kay Rooney says
Just got my instant pot & Im making a rice & porkchop meal. But the countdown never started and it said “burn” I shut it off and restarted it but still no countdown. The float is up, Ill wait for that to go down & open it & see whats going on but I have no clue???
Paint the Kitchen Red says
Hi Kay – most likely you either didn’t deglaze the pot before you added all the liquid and started pressure cooking OR you didn’t have enough liquid. Don’t worry – this happens to most Instant Pot users at one time or another, better to get it over with 🙂 Read this post about sealing problems to find out why you may have had problems. Let me know if I can help further.
Liz says
Thank you so much. This quick start guide was way clearer than the guide that came with the UP. Question on recipes though. If I want to make a recipe that I find vegetarian and leave out the meat, are there any modifications I should make to cooking time to account for the lower volume of food in the pot? Or if I want to cut the amount of food I’m cooking compared to a recipe, does that matter?
Paint the Kitchen Red says
Liz – you’re welcome! I’ll answer your second question first. In general the only reason to change the cooking time is a) different size/density of ingredient e.g. potatoes: 2-inch pieces of potatoes are going to cook slower than 1-inch or b) different size container for pot-in-pot cooking eg. a cheesecake in a 6 inch pan vs a 7 inch pan. Regarding omitting the meat, you would reduce the cooking time to the amount of time required for the slowest-cooking ingredient. This is where the chart in the Instant Pot manual comes in handy. My suggestion is that you should use tried and tested Instant Pot vegetarian recipes the first few times to figure out how the ingredients cook and how long they take, and that will give you the experience to modify a non-veg recipe. If you have a specific recipe you’d like to modify, you can email me and I’ll give you my opinion.
Terry says
I wish I would have found your site and instructions before I started using my Instant Pot. I bumbled through it, because the instructions that come with the pot are kind of vague. I have used it several times, and I have had some successes and some mediocre efforts. I am looking forward to getting your newsletter and more pointers. Thank you for clarifying the instructions!
Paint the Kitchen Red says
Hi Terry – I agree; I wrote the article because I myself struggled through it! Please go to the Tips menu option and read through the 16 reasons why your instant pot is not sealing and 17 tips and FAQs.
Cindy K. says
This was great – thank you! I got mine today and was not sure about that little silicone piece on the float valve! So I Googled and found your blog with all of these helpful pictures and tips! Thanks again.
Paint the Kitchen Red says
Hi Cindy – I’m so glad you found me! Enjoy your new Instant Pot.
Diana Dodge says
Hello, I have an Instant Pot but stay confused about using manual settings. Is there a “principle” to understand, for example when cooking hard boiled eggs, what exact buttons must I choose? And in what order? Today, I thought I cooked eggs to be hard boiled, but they didn’t cook at all! Can you explain the “concept” of manual, timed etc please? Perhaps my Instant Pot has a problem, maybe malfunctioning, (or maybe it’s just me!!!). Thank you!
Paint the Kitchen Red says
Hi Diana, don’t worry – you’re not the only one to have questions like this. The buttons like ‘Meat’, ‘Poultry’, ‘Soup’, etc are preset buttons that have been pre-programmed to cook for a certain time. For example ‘Poultry’ is preset to cook for 20 minutes on High pressure. Pressing ‘Manual’ and then ‘+’ or ‘-‘ until you get to ’20’ is the same as pressing ‘Poultry’. I tend to NOT use the preset buttons and always use just the ‘Manual’ button. All recipes on my site guide you with step-by-step photos and instructions. Look at this recipe for eggs and you will probably see where you went wrong: https://www.paintthekitchenred.com/instant-pot-hard-boiled-eggs/ I suspect you pressed ‘Timer’. ‘Timer’ does not cook anything, it just sets a delayed timer for cooking to begin. Does that help? Good luck and feel free to ask more questions.
Peggy says
Thank you so much, after staring at the pot and te instructions for 3 weeks, I found your instructions without all the caveats, and am enjoying the instant Pot.
Paint the Kitchen Red says
That’s the hardest part – getting it out of the box and turning it on ? I’m glad you’re using it now – happy Instapotting!
Em says
Yikes, thought I was the only confused one out here! Just bought the IP DUO Plus 60 direction are very confusing. Super happy to find your step by step pictures, so informative. Also comforting to hear that others are having the same problems with the manual. Did the test run according to the directions up to information about KEEP WARM, but was left high and dry as to when to open it. Special thanks for your help!!!
Paint the Kitchen Red says
That’s funny Em! No, you’re definitely not alone. I wish you happy cooking adventures with your new IP!
Marion Dies says
Thank you! The instructions and recipes that came with my IP are not well written and super confusing. The steps of the process and the buttons are not fully explained. This was very helpful. 🙂
Paint the Kitchen Red says
I’m really glad you found it helpful. Yes, I know what you mean about the instructions ? Enjoy your Instant Pot!
Connie Lee says
Thanks so much. I didn’t get any instructions with my 7 n 1 instant pot. Can only adjust minutes in increments of 10 though.
Paint the Kitchen Red says
Connie, it’s possible you’re referring to the timer button – which does adjust the time by 10 minute increments when you press the + or – button. Don’t press ‘timer’, but press ‘manual’, ‘poultry’, ‘meat’, etc and then you’ll be able to adjust the time properly. Let me know if you have further questions.
Dean says
Thank you for this awesome guide!!
Paint the Kitchen Red says
You’re welcome!