
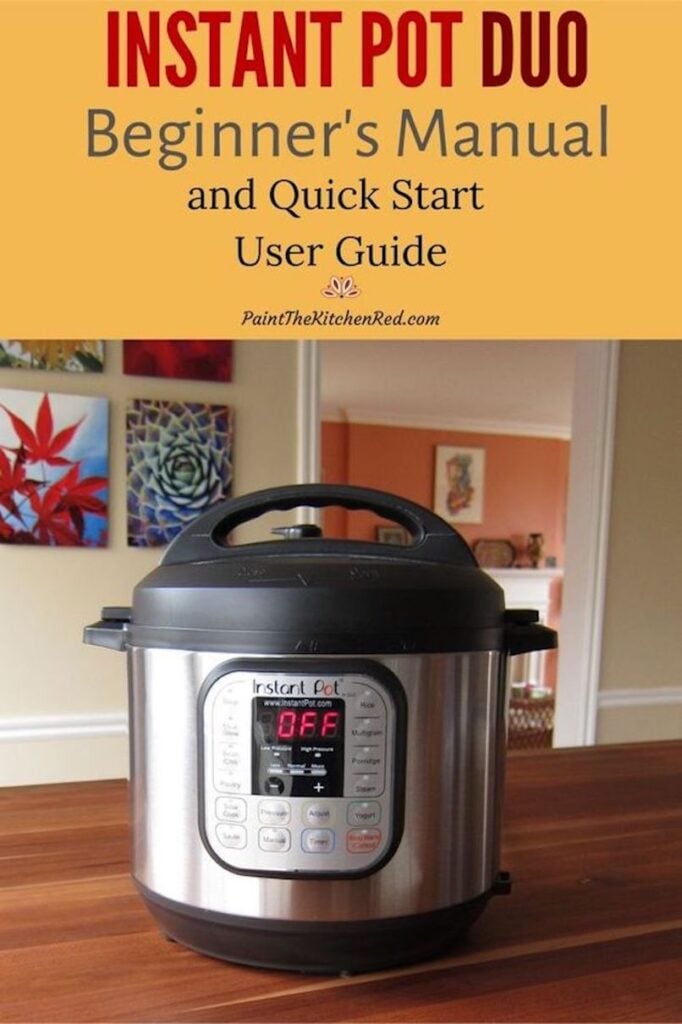
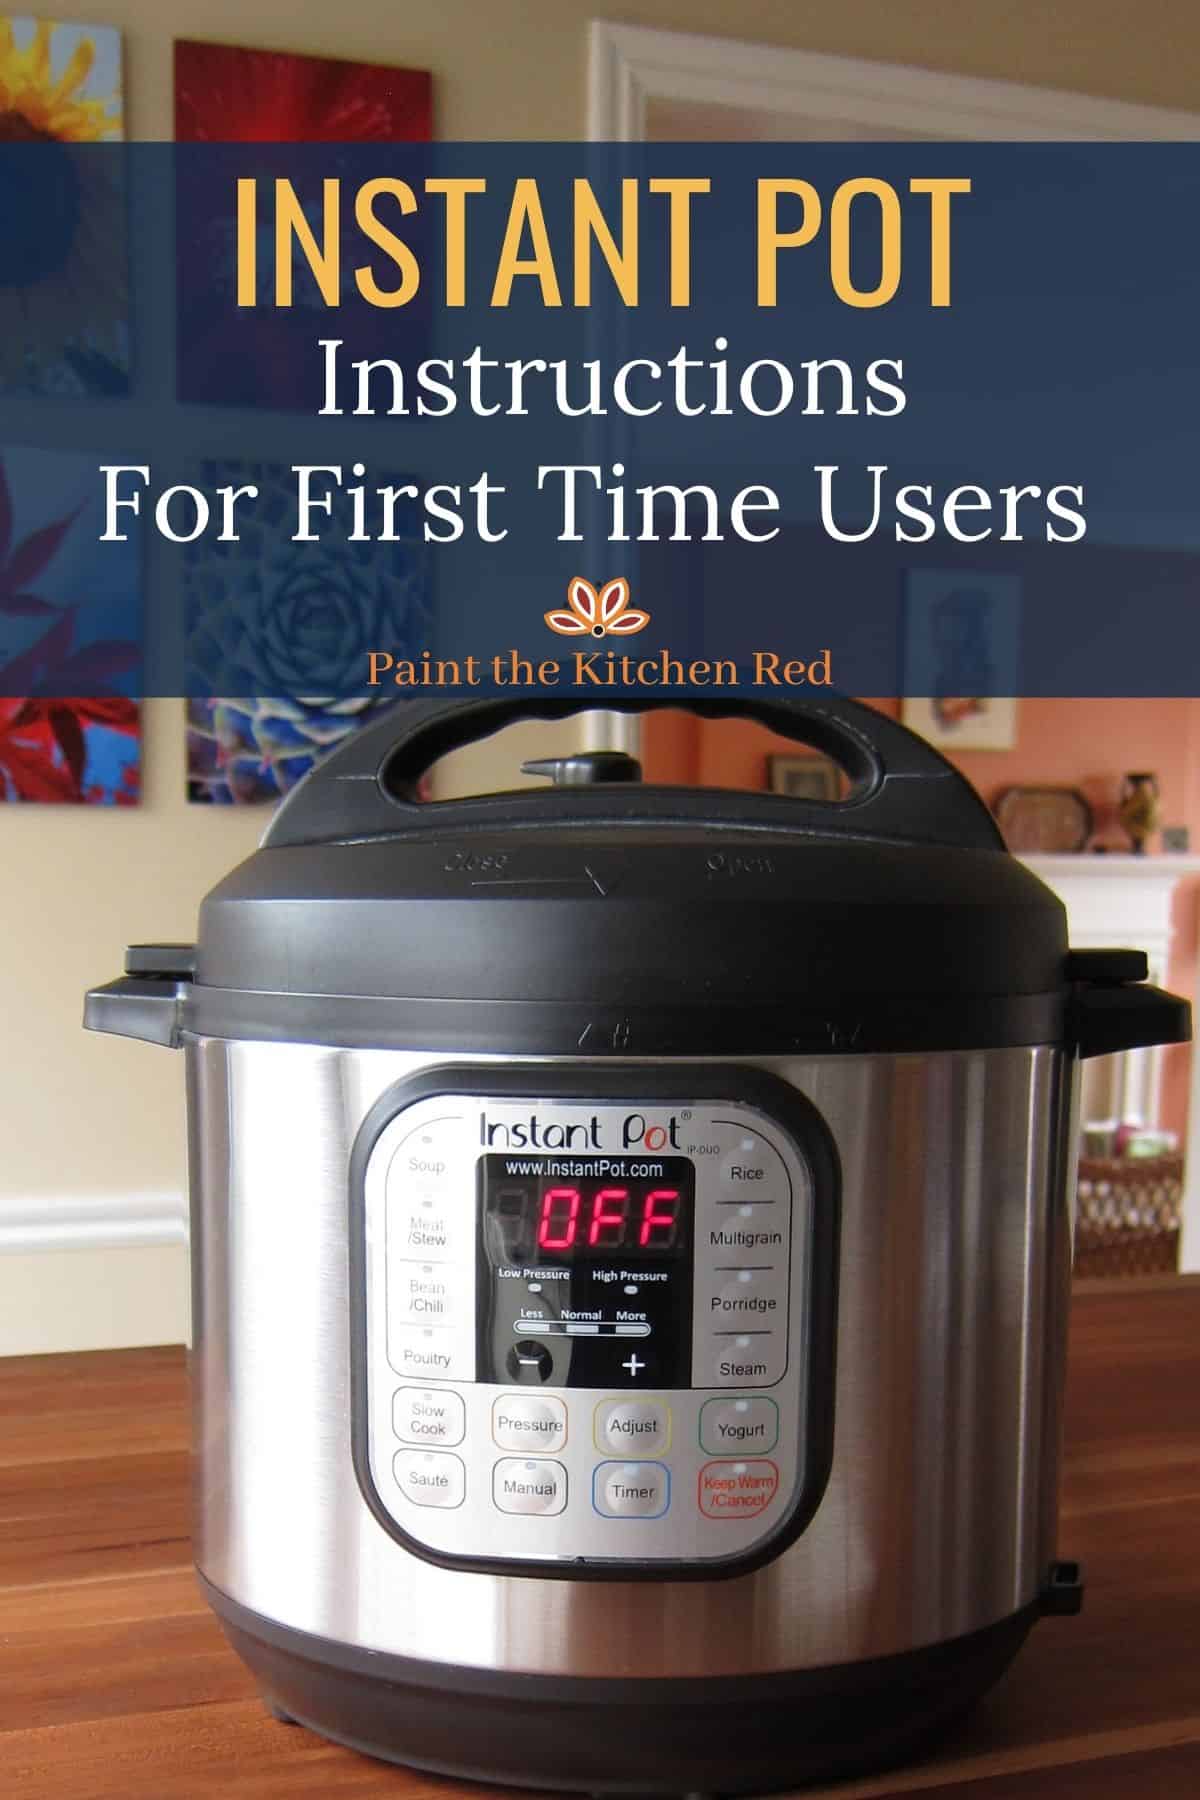
If you just got a new Instant Pot and are looking for Instant Pot directions, this beginner’s guide will help you learn how to use your Instant Pot electric pressure cooker. With these Instant Pot pressure cooker instructions, you’ll learn about the parts of the Instant Pot, setup, safety features, pressure release, and the water test. [Video included.]
This post contains affiliate links. As an Amazon Associate, I earn from qualifying purchases. Please read the disclosure.
Table of Contents
✏️ IMPORTANT NOTE
There are numerous Instant Pot models, each with its own design. Use this Instant Pot instruction manual to get a basic understanding of the functions. It has everything a beginner needs to get started. If you have questions about how to use another model, try my Instant Pot instructions for beginners with videos:
Instant Pot Parts and Accessories
Make sure all the parts are included. The guide that came with your Instant Pot will tell you what’s included. Here are the common parts of the Instant Pot:
➡ Is your Instant Pot clicking? This is pretty normal!
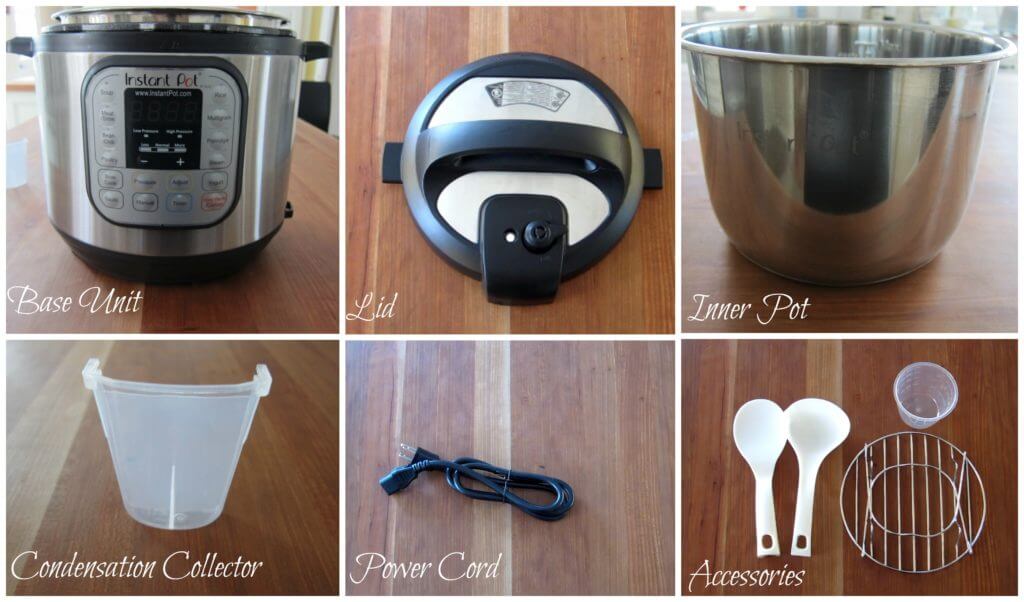
- Base unit/Outer Pot – stainless steel exterior that houses the heating element, control panel, and detachable power cord.
- Lid – closes the Instapot and seals it under pressure.
- Inner pot – removable stainless steel pot, also known as a liner or insert.
- Condensation Collector – catches drips from condensation on the lid.
- Power cord – the 3-prong detachable power cord is plugged into the back of some models. Other models have a permanently attached cord.
- Accessories – may include rice paddle, ladle, measuring cup, and trivet. Some models come with an extra sealing ring.
Instant Pot Lid
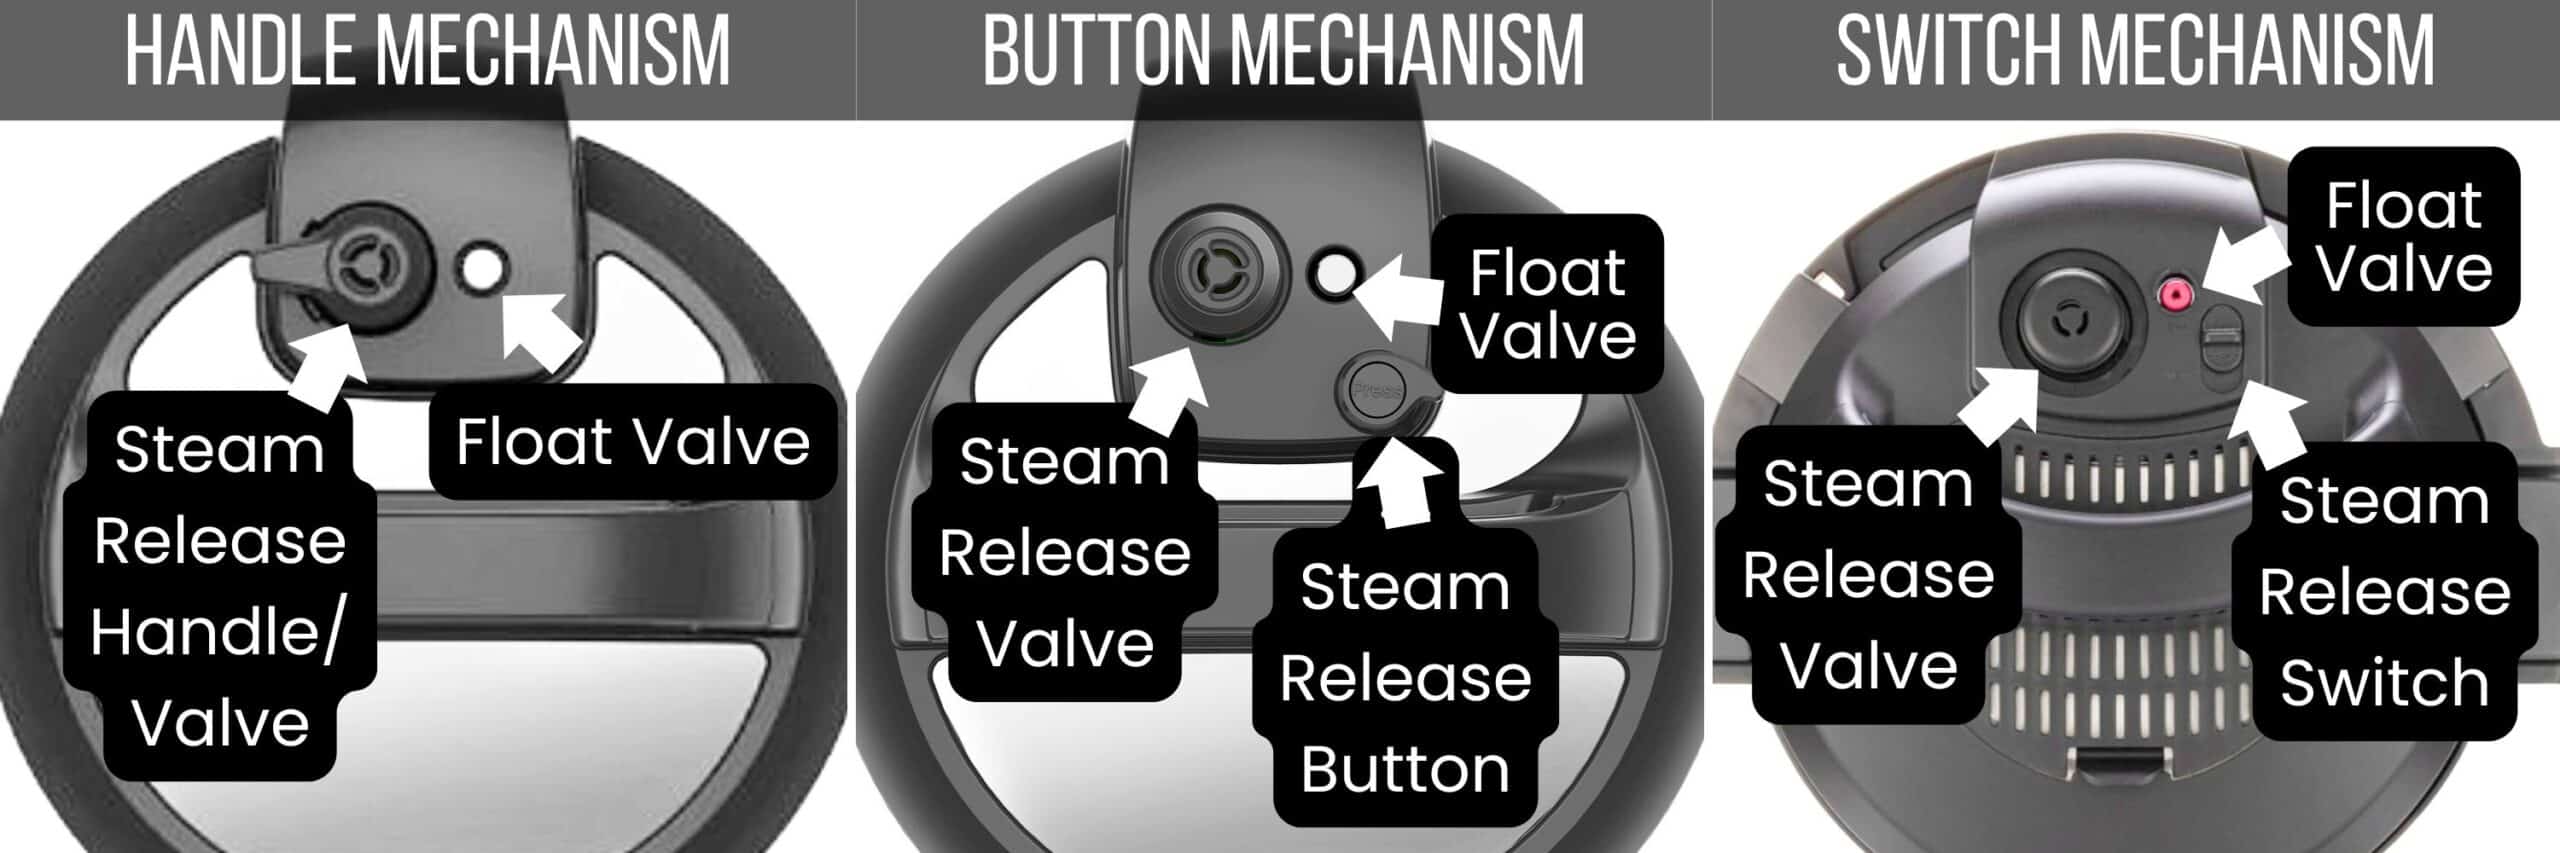
Every Insta Pot model will look slightly different, but the basics are the same. Some lids will have a handle, while others will have a knob or switch to release pressure.
Lid Exterior Parts
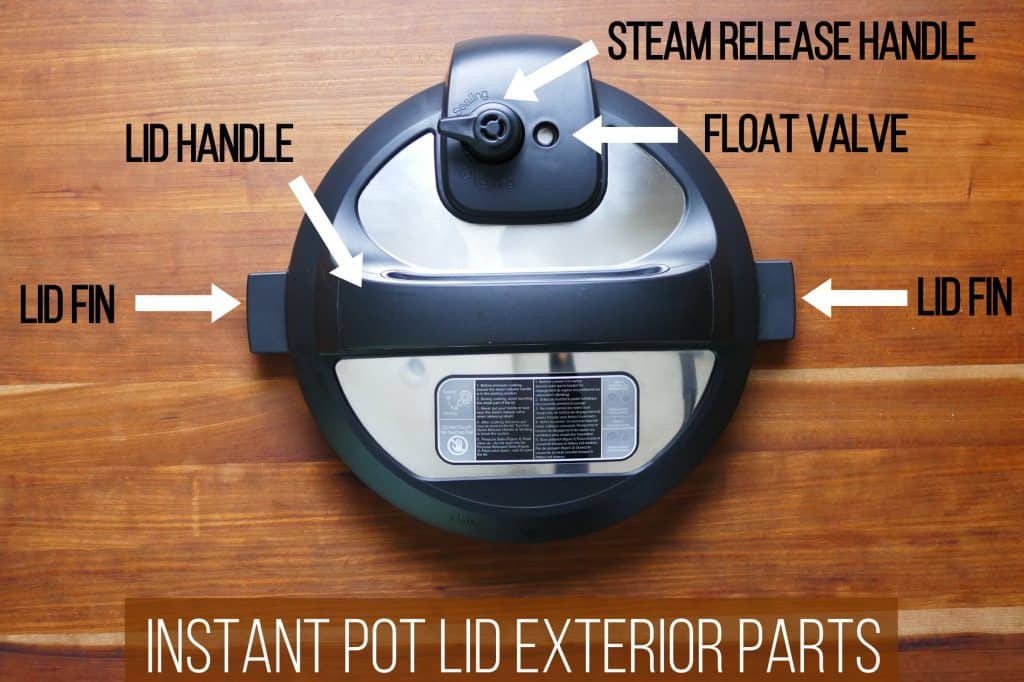
- Lid Handle is used to put on and take off the lid. Some models have a switch, while others have a teardrop-shaped button.
- Lid Fin is placed in the lid fin slot of the base unit to prop the lid open.
- Steam Release Handle is sometimes called the pressure valve, and it fits over the steam release pipe and releases pressure. On some models, the steam release valve has a plastic diffuser that fits over the valve to help the steam release with less force.
- Float Valve seals in the steam, pressurizing the Instant Pot.
Lid Interior Parts
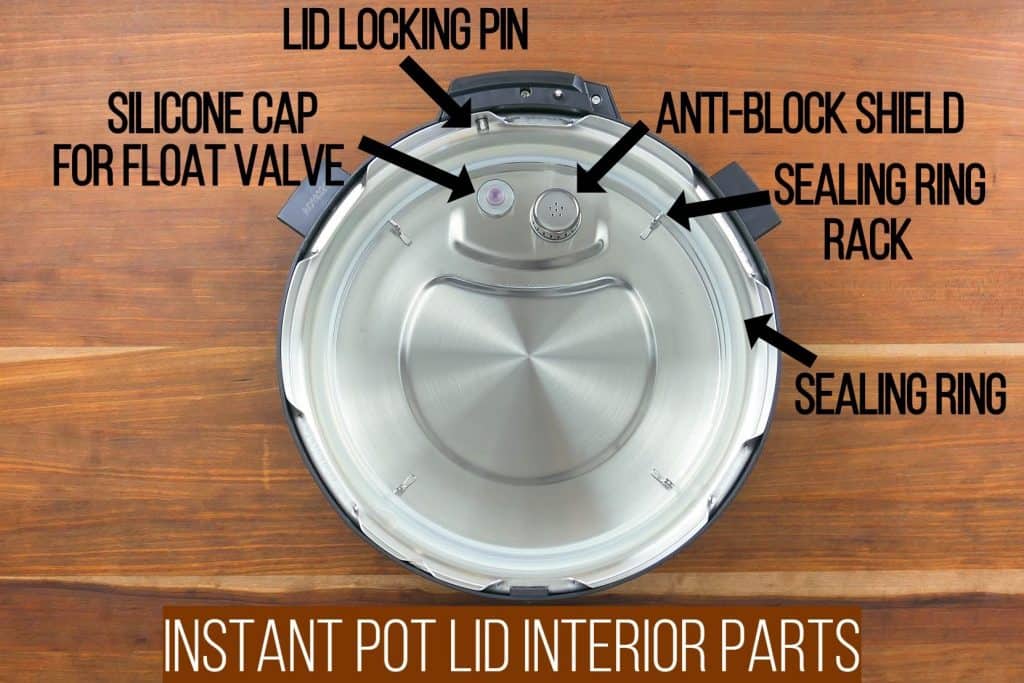
- Silicone Cap for Float Valve covers the instant pot valve and keeps it in place
- Lid Locking Pin is a safety mechanism that prevents the lid from opening under pressure
- Anti-Block Shield prevents food from coming out of the stainless steel inner pot through the steam release pipe
- Sealing Ring Rack – holds the sealing ring in place
- Silicone Sealing Ring allows the Instant Pot to seal
Setting Up
Now that you are familiar with the parts of your Instant Pot, you’re ready to begin setting it up so you can run a water test.
1. Unbox
I regularly hear from people who purchased or got the Instant Pot as a gift and leave it unopened because they’re too intimidated.
If you have a defective unit, you might miss the warranty period if you don’t get it out of the box and try it out!
Place the Instant Pot base unit on a stable surface, away from any open flame. Place it so that the steam won’t blow up onto any cabinets.
2. Place the inner pot in the base unit
- Make sure the base unit is empty and clean.
- Place the stainless steel inner pot inside the Instant Pot base unit.
3. Attach the condensation collector
The condensation collector catches any moisture that builds up on the rim. This usually comes from moisture dripping from inside the lid into the rim of the Instant Pot base when the lid is opened.

- Line up the condensation collector with the notches on the back of the Instant Pot base unit.
- Slide in the condensation collector until it’s pushed in all the way.
4. Plug in the Instant Pot
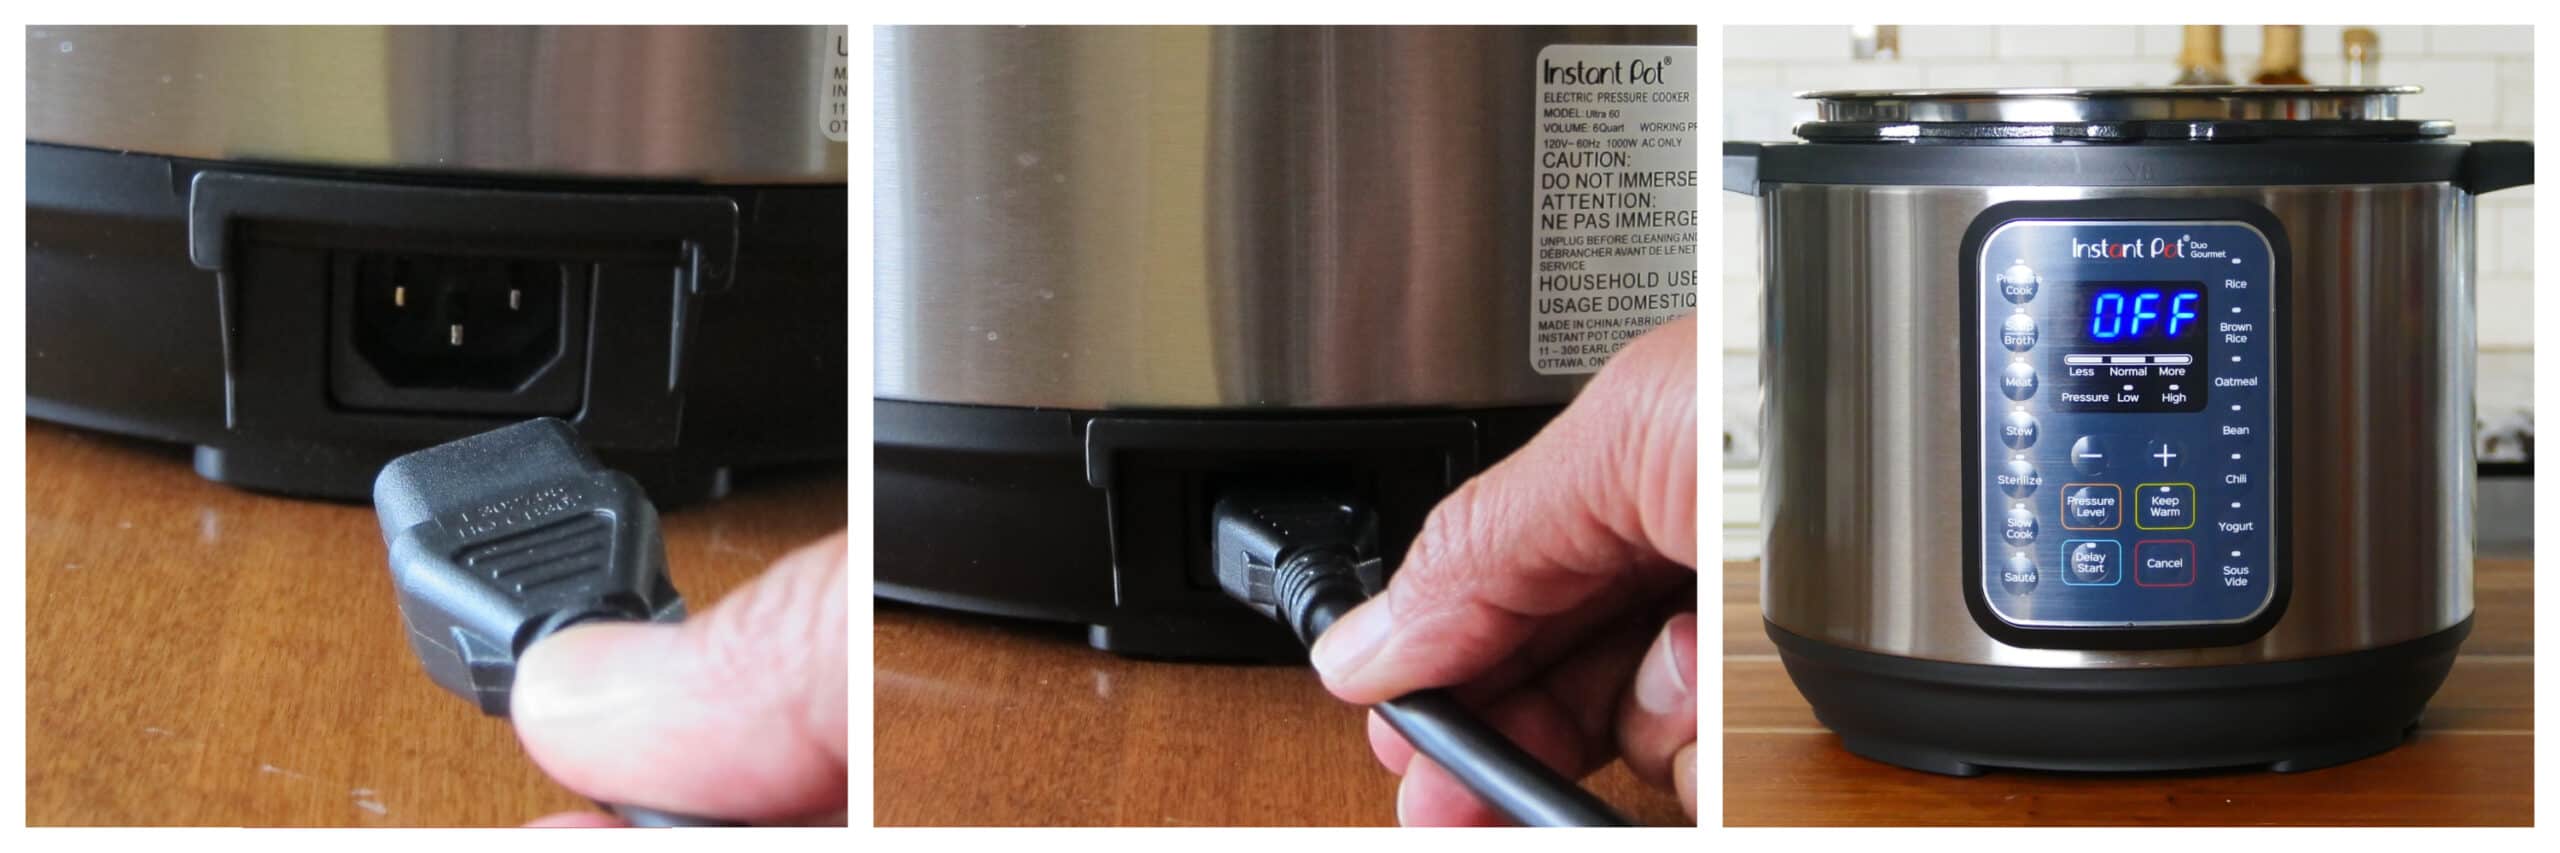
If you have a detachable cord, plug it into the base unit. Plug the cord into an electrical outlet.
Essential Tips Before You Use an Instant Pot Pressure Cooker
Important Information
- There are so many buttons on the Instant Pot, and it can seem overwhelming. You can get by using just a handful of buttons: Pressure Cook, Cancel, Start, and Saute.
- Many buttons or functions on the Instant Pot are presets for pressure cooking various foods, similar to those on a microwave. You can use these shortcuts (e.g., Meat, Soup, Rice) or the Pressure Cook function, which is the same thing.
- Before using the Instant Pot, always have the inner pot (aka liner or insert) in the base unit. Don’t put food or liquid into the Instant Pot base unit! I like to leave a trivet in the base unit when the inner pot is being washed to remind myself and others in the household not to forget the liner.
- The pressure release handle, button, or switch must be in the Sealing position, not Venting.
- The Instant Pot needs a minimum quantity of clear liquid (e.g. water, broth) for pressure cooking. (3 quart – 1 cup, 6 quart 1.5 cups, 8 quart – 2 cups). Some foods, such as vegetables and meats, release liquid during the cooking process, allowing you to use slightly less liquid.
- After using Saute mode, deglaze the inner pot. This involves pouring a small amount of liquid and scraping the bottom of the inner pot to make sure nothing is stuck to the bottom.
- Most Instant Pot recipes require High pressure unless otherwise noted. Low pressure is used in some rice recipes and for quick-cooking vegetables or fish.
- When cooking with dense or starchy ingredients, use the layering technique. Put meat, vegetables, and clear liquid at the bottom of the pot. Add pasta, rice, tomato sauce, and other thick sauces on top, and don’t stir them in. This helps prevent sealing issues and the Food Burn message. Another option is to use a trivet for the pot-in-pot method.
- There are multiple ways to release pressure. The most common methods are the natural release and quick-release methods. In general, use natural pressure release for meats, beans, and foods that need to rest after cooking. Use quick release for foods that will overcook if you let them sit, such as vegetables.
- The total time required to pressure cook is the time the Instant Pot comes to pressure, the time it takes to cook, and the time it takes to release the pressure. If you allow the pressure to release naturally, it can take 10 to 45 minutes, depending on the quantity of food inside the pot. Take this into account when planning how long a recipe will take!
➡ Are you getting an error code? Head over to my post about Instant Pot error codes and how to solve them!
How to open Instant Pot lid
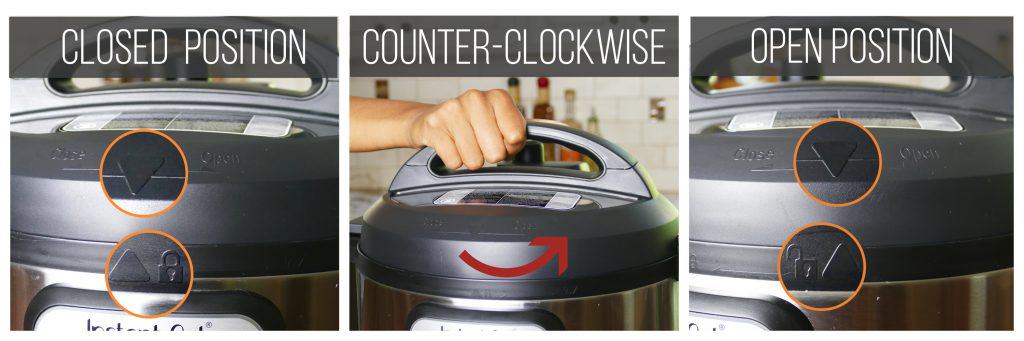
- If the lid is on, turn the lid counterclockwise until you hear a chime.
- The arrow on the lid will be lined up with the open lock icon on the base unit.
- Lift the lid to remove it.
- If you’ve just finished pressure cooking something and feel a slight resistance, wiggle the lid back and forth, and the suction should release.
How to close the lid
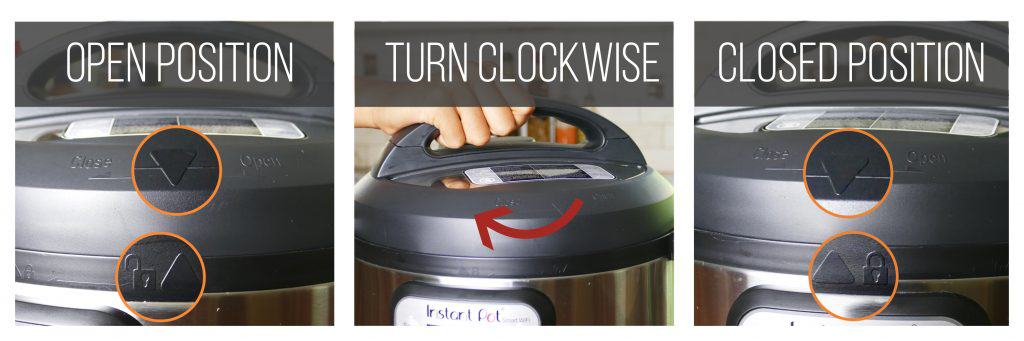
- Here’s how to put the lid on the Instant Pot: place the lid onto the Instant Pot base unit with the arrow mark on the lid lined up with the open lock icon above the right corner of the control panel.
- You will hear a chime (if the volume is turned on).
- Turn the lid clockwise until you hear another chime.
- The lid will be closed.
Float valve positions
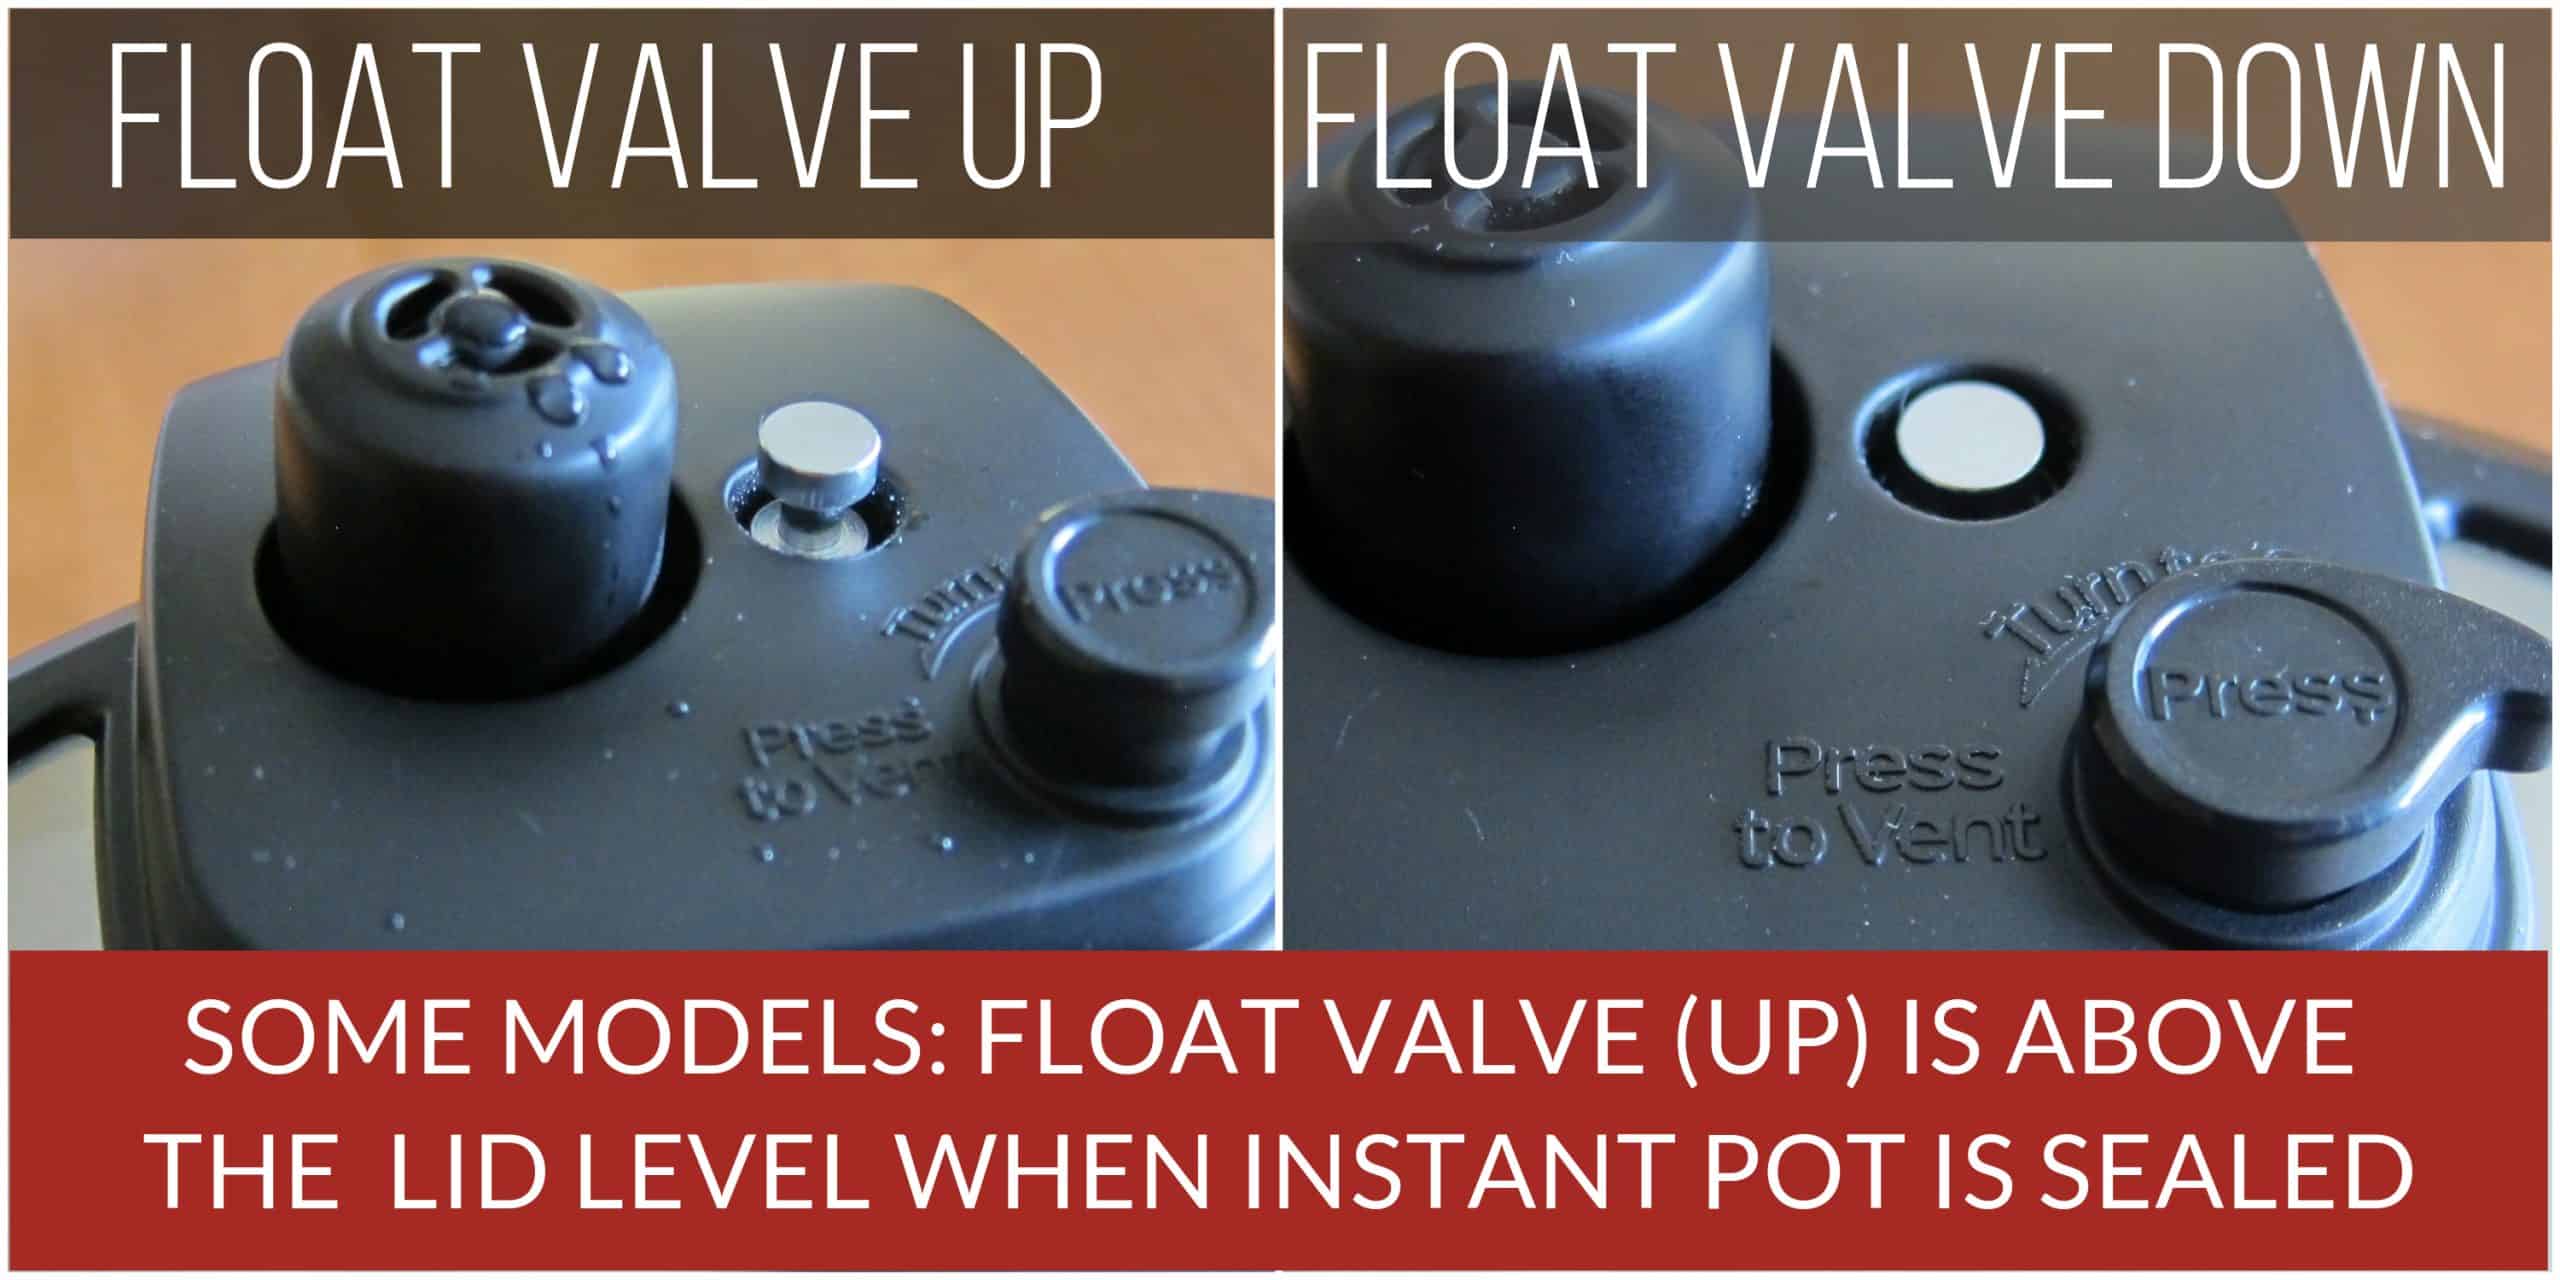
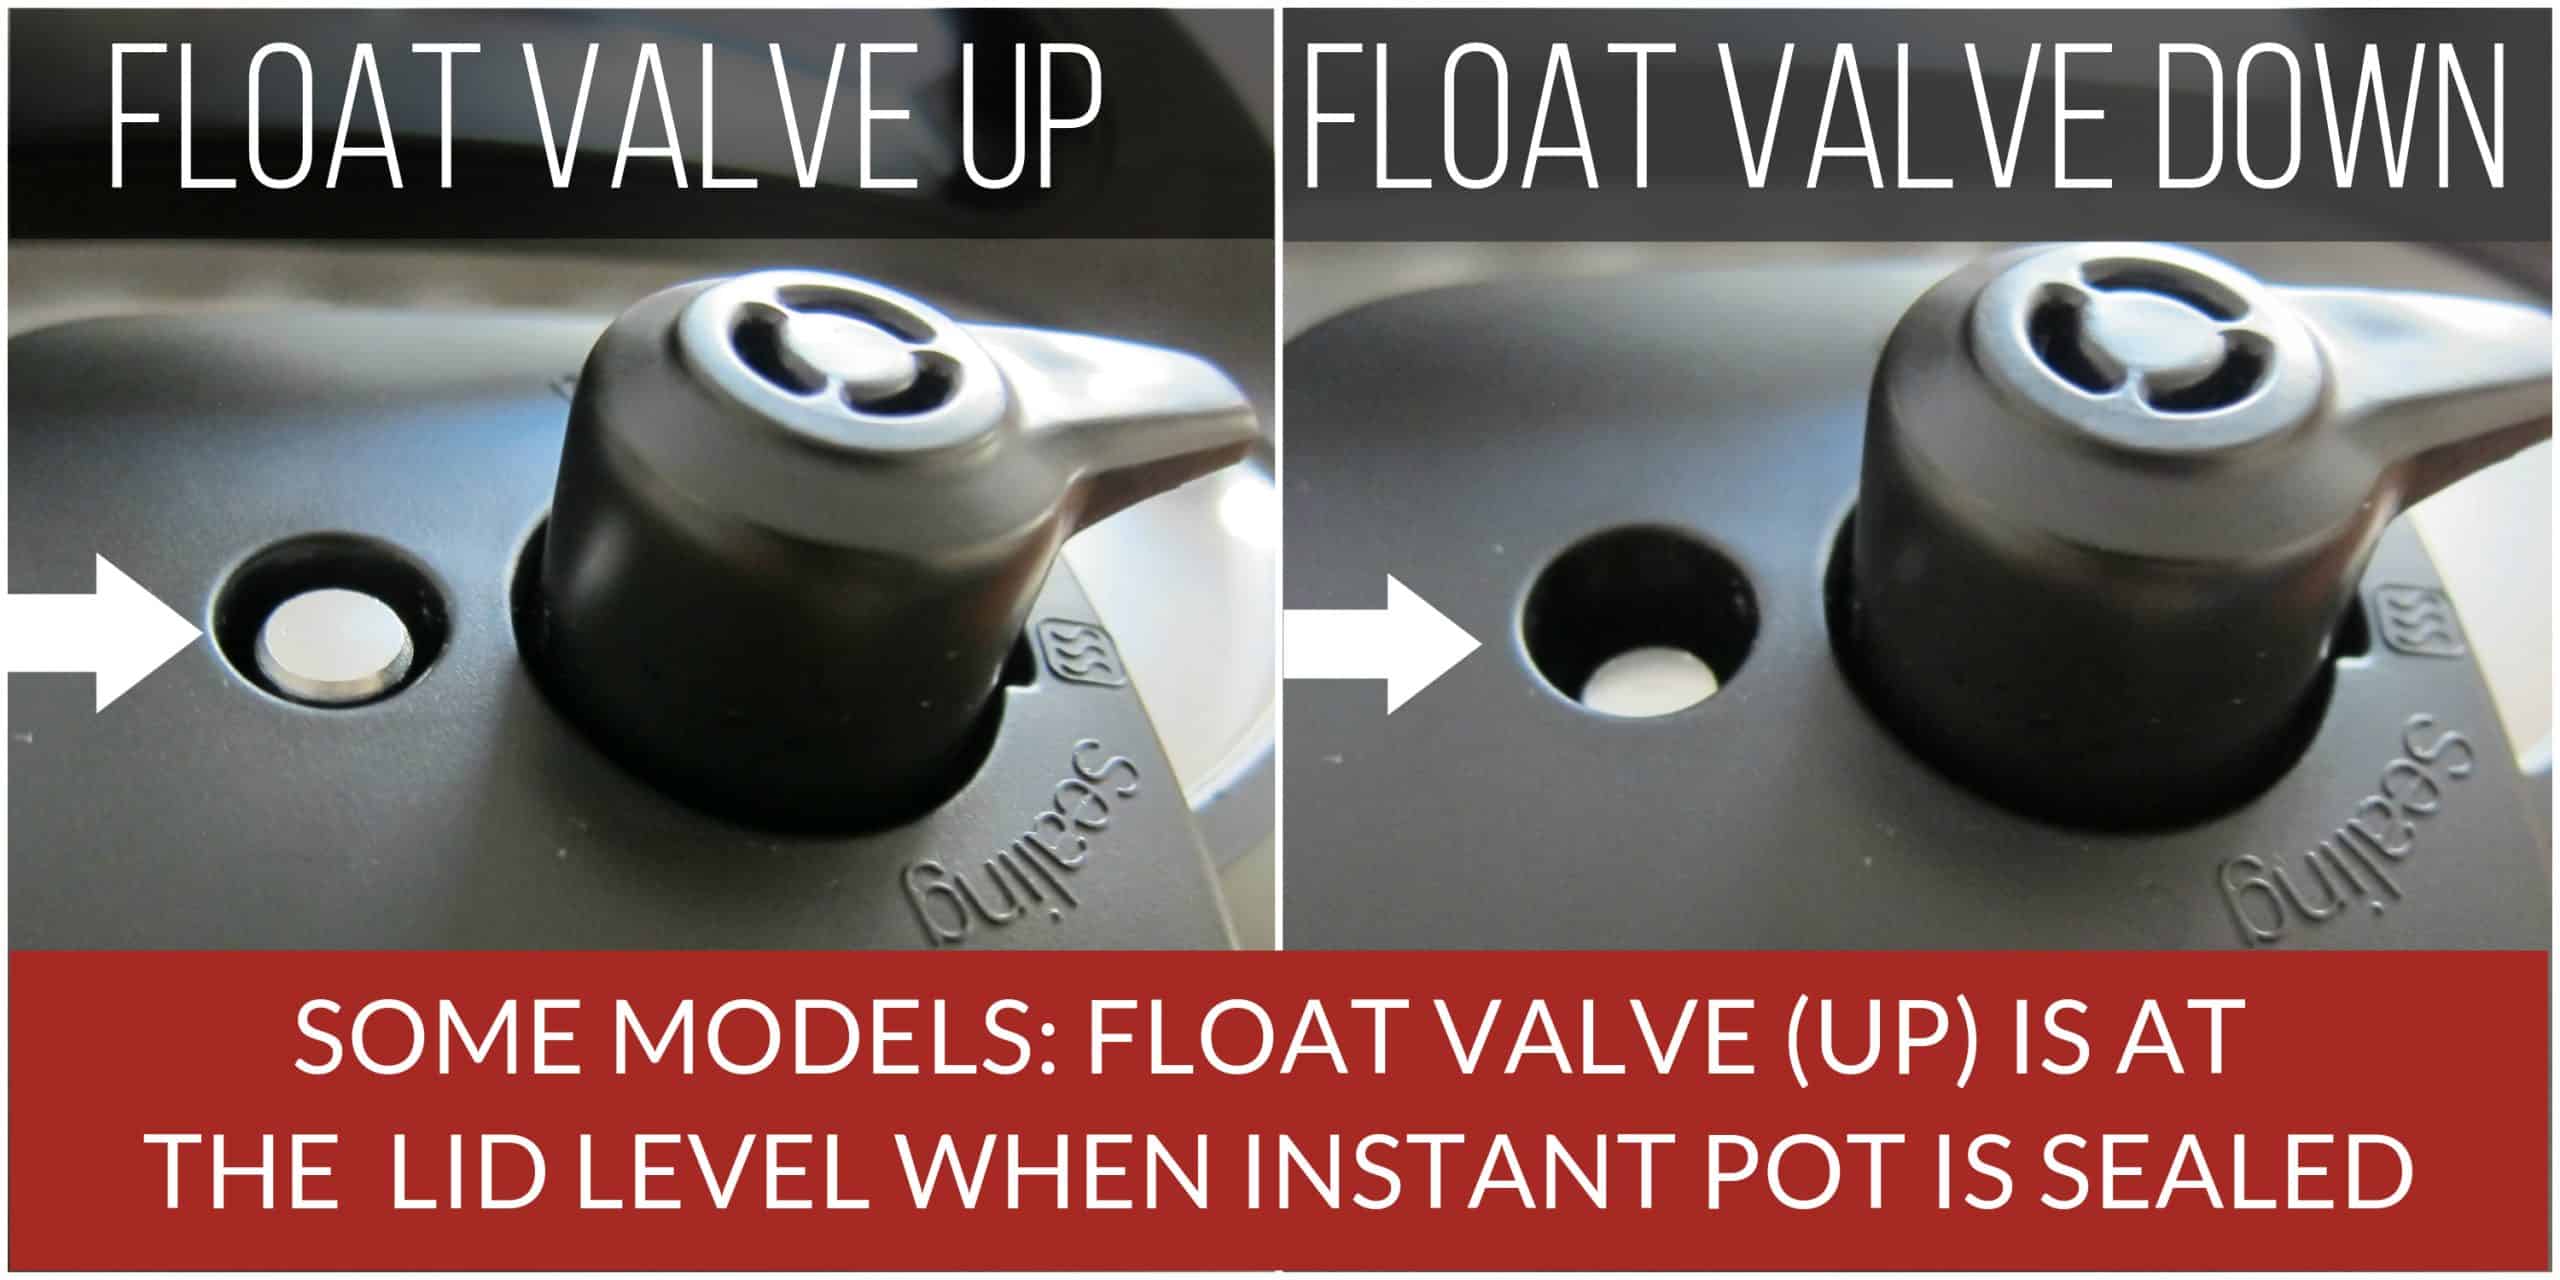
- In some models, the float valve is above the lid level when under pressure and at the lid level when not under pressure.
- In other models, the float valve is at the lid level when under pressure and below the lid level when not under pressure.
Safety Precautions
There are many built-in safety features, including automatic pressure sensors. However, as a user, you need to follow essential safety guidelines, including:
- Don’t touch the hot surfaces, particularly the stainless steel parts. Use the handles to move the Instant Pot and gloves to remove the inner pot.
- Keep hands and face away from the steam and pressure release mechanism.
- Don’t move the Instant Pot when it’s under pressure.
- Don’t fill over ⅔ full. However, when cooking foods that expand, e.g., rice, beans, and pasta, don’t fill over ½ full.
- Don’t open the Instant Pot until the float valve is down, i.e., the Instant Pot is depressurized.
- Don’t obstruct the steam release valve when pressure is released.
Instant Pot Water Test Instructions
What is the Water Test?
A water test is done by pressure cooking water for a few minutes. This allows you to familiarize yourself with the basic operations and ensure your new Instant Pot works.
You should do a water test before the first use, but you can also do it when you have problems with the Instant Pot pressurizing. The water test will pinpoint whether something about a particular recipe is causing your sealing issues.
How to do the Initial Test Run / Water Test
- Pour water into the inner pot. (1 cup for 3 qt, 1.5 cups for 6 qt, 2 cups for 8 qt).
- Close the lid and put the steam release valve, button, or switch into the Sealing position.
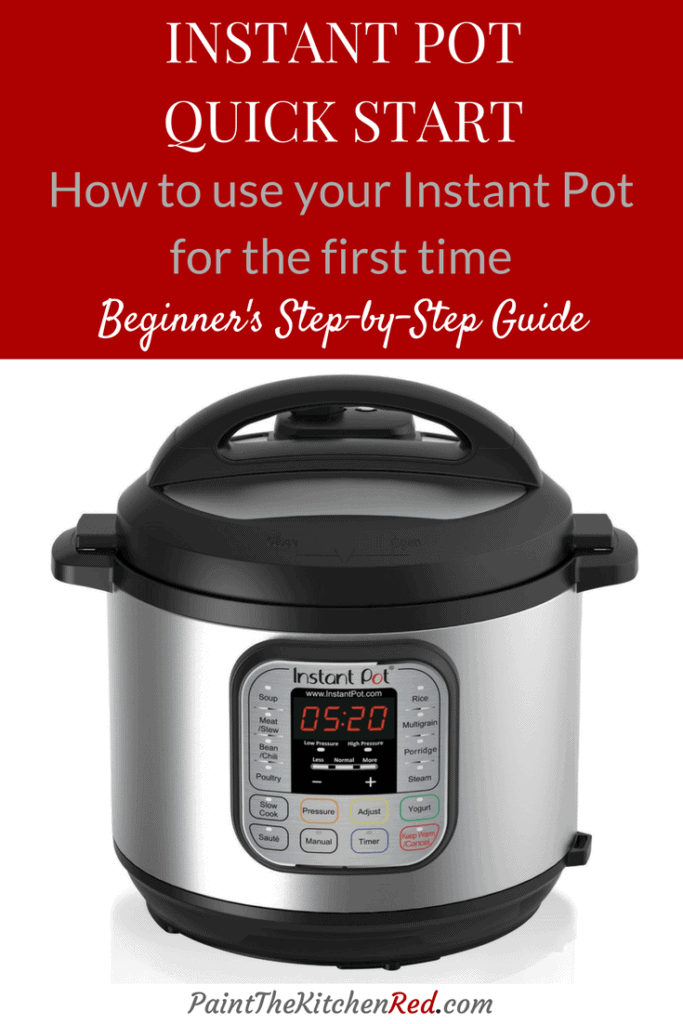
- Select the Manual or Pressure Cook button. Some models have buttons, while others have a knob.
- Change the cook time to 5 minutes using the + or – buttons or knob.
- On models with a Start button, press Start. On models without Start, it will automatically start in a couple of seconds.
- The display will change to On.
- Soon, you’ll hear and see small amounts of steam coming from the top of the lid. This is normal and safe! Just keep your hands and face away from the steam. You might also notice a plastic smell. Don’t worry – it will go away and shouldn’t happen again after the first use.
- Once pressure has built up, the float valve will come up.
- After the float valve comes up, the display will change from On to 5 (or 00:05), which can take a few minutes.
- The display will count down from 5 to 0 or (00:05 to 00:00).
- When pressure cooking is complete, you’ll hear a series of beeps, and the display shows L0:00, which means it’s in Keep Warm mode (if the Keep Warm function is turned on.)
- Press the Cancel button. The display will say Off.
- Do a quick release or manual pressure release by moving the steam release knob, button, or switch from sealing position to venting position. Keep hands and face away from the flow of steam. Once all the pressure inside the pot has been released, the float valve goes down, and the Instant Pot is de-pressurized. This can take a few minutes. You can also let the pressure release naturally, which takes 10 to 15 minutes.
- Once the pressure has been released, it’s safe to open and prop the lid.
What to do if the water test fails
If the water test is successful, you can use your new Instant Pot. If it fails and you’re not able to get the Instant Pot to come to pressure, use the following articles to troubleshoot the issue:
Instant Pot Buttons
- Each Instant Pot model has different buttons. Some buttons are cooking modes or programs (e.g. Rice, Bean) while others are operational (e.g. Cancel, Start).
- On some models, pressing a cooking mode button toggles between Less, Normal, and More, which have customizable default cooking times. You can adjust the time by pressing + or – and set High or Low pressure by pressing Pressure Level.
- On other models, pressing a button lets you customize the pressure level and cooking time using the display panel.
Programs and Default Times
| Button | Less | Normal | More |
|---|---|---|---|
| Bean/Chili | 25 minutes | 30 minutes | 40 minutes |
| Cake | 25 minutes | 40 minutes | 50 minutes |
| Egg | 3 minutes | 4 minutes | 5 minutes |
| Meat/Stew | 20 minutes | 35 minutes | 45 minutes |
| Multigrain (Soaks for 45 minutes first) | 20 minutes | 40 minutes | 60 minutes |
| Poultry | 5 minutes | 15 minutes | 30 minutes |
| Porridge/Oatmeal | 15 minutes | 20 minutes | 30 minutes |
| Pressure Cook | 20 minutes | 35 minutes | 45 minutes |
| Rice | – | 12 minutes (Low Pressure) | – |
| Soup/Broth | 20 minutes | 30 minutes | 40 minutes |
| Steam | 3 minutes | 10 minutes | 15 minutes |
| Slow Cook | 180–190°F (similar to keep warm on slow cooker) | 190–200°F (similar to low on slow cooker) | 200–210°F (similar to high on slow cooker) |
| Yogurt | 106°F to 113°F (for Chinese fermented rice) | 110°F to 115°F (for incubating yogurt) | 160°F to 180°F (for boiling milk before incubating) |
Other Button Functions
| Button | Function |
|---|---|
| Start | Begin the current program |
| Cancel | Cancels the current program |
| Delay Start | Start the cooking at a later time |
| Fav | Saves custom presets (on some models) |
| Keep Warm | Keeps food warm after pressure cooking; tracks time since cooking completed |
| Pressure Cook | Primary pressure cooking function; adjust pressure level and time |
| Pressure Level | Toggles between High and Low pressure |
| Saute | Allows sautéing before pressure cooking |
| Sous Vide | Cooks food using the sous vide method. You can set the cooking time and temperature |
| Temp | Adjusts temperature (use + or – buttons) |
| Time | Adjusts cooking time (use + or – buttons) |
| Ultra | Customizes temperature, pressure level, and cooking time (Ultra model only) |
Air Fryer Functions (on applicable models)
Some Instant Pot models have an air fryer lid and a pressure cooker lid. These models have pressure cooker and air fryer settings. These are some of the common air fryer modes:
- Air Fry
- Roast
- Broil
- Bake
- Dehydrate
- Proofing
FAQs
The Instant Pot turns on as soon as it’s plugged in. Attach the cord to the Instant Pot (if it’s detachable) and plug the cord into an outlet. The Instant Pot will say Off.
– The Instant Pot first needs to be plugged in.
– If the display is blank, press any button to turn on the Instant Pot.
– Choose the program and set the cook time.
– To start pressure cooking, some models have a Start button. Press Start.
– Other models automatically start. A few seconds after you program it, the Instant Pot display changes to On, which means it has started cooking.
On older models of the Instant Pot, the Pressure Cook button is called Manual. If you see a recipe that tells you to use the Manual setting, use the Pressure Cook function.
On some models, to set the Instant Pot to high pressure, press the Pressure Level button. It allows you to toggle between High and Low pressure. On other models, select the Pressure Cook function, and you’ll be able to program the pressure level and cooking time on the display panel using the knob.
The amount of time it takes to reach pressure and the float valve to go up depends on the amount of liquid inside the cooker and the temperature of the food. The more liquid in the pot and the colder the food, the longer it takes the Instant Pot pressure cooker to reach pressure.
If the Instant Pot has about 2 cups of liquid, it may take 10 minutes for the Instant Pot to reach pressure if the food isn’t frozen. The Instant Pot can take 15 to 30 minutes if it has more liquid.
A trivet and a small dish are useful for Pot in Pot cooking. An extra sealing ring is also a handy accessory. A tempered glass lid is convenient for sauteing, using the Instant Pot as a slow cooker, or for Yogurt mode.
Recipes for the Instant Pot
I hope these Instant Pot directions have helped you get comfortable with your new pressure cooker. Now you’re ready to try your first recipe!
Don’t try to improvise or wing it with your first recipe. Select a recipe from a trusted Instant Pot or Pressure Cooker cookbook or blog and follow it as written.
If you want to make changes or adjustments, you might want to contact the blogger or ask for advice from an experienced Instant Pot user.
Try an easy chicken recipe like Instant Pot Chicken Stew, Instant Pot Chicken Curry Soup, or Instant Pot Thai Red Curry; a dump and start Instant Pot Pork Carnitas or Instant Pot Mac and Cheese; or Indian restaurant vegetarian favorite Instant Pot Chana Masala.
Related Articles
I hope you’ve found these Instant Pot pressure cooker instructions useful. Here are some more articles that are helpful to beginners and intermediate Instant Pot users.

If you found this article to be helpful, please share it on social media using the social media share buttons at the top and bottom of this post. Thank you so much!


Elizabeth says
My son-in-law gets impatient waiting for pressure to come down even when using a quick release. What he has started doing is depressing the float valve along with turning the steam valve to venting. Is this dangerous? It seems like it would be but I can’t find any information one way or the other.
Thank you!
Paint the Kitchen Red says
Elizabeth, I agree with you. I wouldn’t push down on the float valve. The float valve really doesn’t need any help going down. Once pressure is released, it should go down automatically.
Ellie says
Just got my 3QT Duo Mini out of the box. Thank you for your step to step guide with pictures! Makes it really clear and easy to understand. I kept flipping the pages of the manual that seemed to be incomplete.
Paint the Kitchen Red says
You’re welcome, Ellie. I wish you happy adventures with your new Instant Pot 🙂
Kelly says
So I have tried the water test twice now the first time all the water was gone when I stopped it, it never counted down. Trying it again and it has taken over 25 min and it still has not started the 2 min. Timer. Feeling frustrated and stupid. What could I be doing wrong its water for goodness sake.
Paint the Kitchen Red says
Hi Kelly, first of all, don’t feel stupid – we all went through a learning curve with the Instant Pot. It sounds like your lid is not sealing and that means that probably your pressure release valve is in the venting position or your sealing ring isn’t pushed in all the way. After checking those two things, check to see if the bolt under the anti-block shield on the inside of the lid is finger-tight. Try the water test again (don’t wait 25 minutes – if you have just a cup of water, it should come to pressure in about 5 to 10 minutes), and if you are still having trouble, you might want to either return it or open a support ticket at the IP company. Feel free to email me through my contact page if you have further questions – I’m happy to help.
Sheryl Meyers says
on the timer readout, it goes 0.0:0.0. Which are the minutes? I set what I thought was 6 minutes, the timer read 0.6:00. I was cooking spaghetti. About 30 minutes later it still had not shut off and my spaghetti noodles were mush! Going left to right, would the first 2 zeroes be hours? And the last 2 zeroes on the right be minutes? Also, on mine IP, the farthest zero on the right does not change that i’ve seen so far, it stays at zero.
Paint the Kitchen Red says
Sheryl, the time is displayed as hours:minutes. You were setting it for 6 hours, which is the maximum cook time. To cook spaghetti at 6 minutes, you would set it for 00:06. Hope that helps. Sorry your spaghetti became mush; I’m sure it will be perfect next time!
Palm says
Thank you for this guide. I bought all 3 of my daughters an Instant Pot for Christmas and am putting together a booklet for them, since they are all beginners at cooking, and will include this and a few recipes to get them started. This is very helpful.
Paint the Kitchen Red says
Thank you for you comment – what a nice mom and what a great gift you’re giving them – not just the IP but a plan!
Jennifer Scheel says
Hi, I just got the insta pot smart wifi duo. I have been trying to put it on pressure cook but every time I try to go past 6 minutes it starts over at 0… sm i doing something wrong? The time read out looks like 6:00. And thethen if I press the plus button it starts over.. I’m confused. Thanks!
Paint the Kitchen Red says
Jennifer, the time on the display is hours:minutes so I think you’re doing 6 hours rather than 6 minutes. 6 minutes is 00:06. Thanks for the question and let me know if you need further help.
Becca says
Hello!
Thank you, thank you, thank you! I got the InstaPot because my sister uses it all the time. When I went to get instructions she did it all for me and I was lost!
Question… Does it matter in recipes if you use the quick release or the natural release for the pressurization?
Thanks!
Paint the Kitchen Red says
Becca – you should follow the recipe release method. In general, I use quick release for foods that can get overcooked like veggies, fish, etc. I use natural release for meats that are not fully submerged in liquid. I use either for meats that are submerged in liquid like curries, preferring to use natural. There are some foods like rice where I wait for 10 minutes and then do a release of pressure, or if I am in a hurry and it’s a natural release recipe.
Sasha George says
I’m confused on setting the timer for cooking brown rice it says 24 minutes. Is that 24 minutes after it pressures up? Or total minutes?
Paint the Kitchen Red says
Sasha, recipes usually just mention what you need to program the pressure cooking time to be. You would just select ‘Pressure Cook’ and 24. The Instant Pot will come to pressure and then the display will get set to 24 and count down to 0. It will then go into Keep Warm mode until the pressure releases on its own or you do a quick release. Hope that helps.
Sue Hanks says
HELLO THANK YOU SO MUCH FOR THIS GUIDE. I JUST PURCHASED MY POT YESTERDAY SO WAS HAPPY TO DISCOVER YOUR WONDERFUL GUIDE. BELIEVE IT OR NOT I COOKED BEEF BURGERS IN MINE LAST NIGHT, MY FIRST THING I COOKED, I WRAPPED THEM IN FOIL THEY WERE DELICIOUS. SADLY MY POT DIDN’T COME WITH THE TRIVET SO I’VE HAD TO ORDER ONE FROM AMAZON.
Paint the Kitchen Red says
Awesome Sue! Glad you found a trivet to order – you’ll use it a lot!
Patti says
Hi
Thank you for posting the slow cooker times
chart for the instant pot.
I am going to be making a quick vegetarian chili in the pot with different kinds of canned veggies.
I was going to use the more button but wasn’t sure for how long.
Pam says
Yikes! This Insta Pot has caused me so much frustration! I did manage to cook a turkey breast and and 4 chicken breasts but in both cases they were dried out. Trying to follow the poorly written directions is a waste of time! Cooking the old fashioned way is much easier with better results. I am going to send this poorly concepted piece of junk back!
Paint the Kitchen Red says
Pam, I’m sorry you’ve had a frustrating time with your Instant Pot. Let me just say that I generally don’t cook a lot of white meat in the Instant Pot. It does best with thighs and dark meat, and meats that have marbled fat. I would try out a different recipe with those types of meats before you decide to give up.
Aileen Hutchins says
I just ran the water test but the float valve did not go up. What is wrong?
Paint the Kitchen Red says
Hi Aileen – did you figure it out? If the float valve didn’t go up, the Instant Pot probably didn’t seal and that may be because your sealing ring was not put on correctly or the steam release handle was in the venting position.
Sherry Morgan says
Have always used pressure cookers and pressure canners no problem. Then hubby surprises me with this contraption and talk about confusing! Glad I looked up IP Manual on google and yours was the first one that didn’t have a PDF after it’s title. You clearly have technical writing experience or else an awesome undeveloped talent – whichever – thank you over and over again for your website concerning this pot. It’s embarrassing to be intimidated by a modern cooking device and it’s a first. You are the golden standard every company should model their manuals after to help clear up all the confusion about how to assemble parts or operate equipment. I like manuals, I look for them and use them as reference a lot. Not having a manual for my iPhone is a prime example of what not having a manual for an intimidating device can do to people who were born before the 1980’s with a computer chip in their brains – no idea how to use the darn thing to it’s fullest potential for years!
You;ve done a good job and a nice service for many people so you must have a good heart too. Take Care.
Paint the Kitchen Red says
Oh my goodness – that is so so kind of you! Your comment means so much to me – thank you 💗! Feel free to ask me any questions you might have. You can use my contact page or send an email (email address is on the contact page too). All the best!
Sandy says
Someone posted your site in our IP Group. This is wonderful. You should be paid by IP to straighten out all the confusion. We listen to. Everyone to get pointers.But this morning I am reading thst people are putting just BBQ Sauce or some sort of sauce not liquid in the pot and saying it works fine.
That doesn’t seem right, and i have seen damage of old pressure cookers and that is no fun being burned. My answer would be pip when you want thivk sauce and water in the Outer pot. Is that correct? I sm new too but I love this machine and the time it gives me. Love your site.
Paint the Kitchen Red says
Hi Sandy, welcome to the IP world! So here’s the thing: it is possible to cook with a prepared sauce if the sauce doesn’t have a lot of thickeners (like corn starch, flour, etc) and that can count as the “liquid”. The quantity of liquid is also important. Another variable is the model of Instant Pot. The newer models appear to be a bit more sensitive and show the ‘burn’ error more often. One more consideration is that some foods (e.g. vegetables) release liquid and that means you can use less liquid . You will figure out what works for you as you use it more. I test my recipes thoroughly and if people have had issues, I try to provide alternate instructions too. So take a look around and even if you don’t make a recipe, it will give you an idea of what works and doesn’t. Thanks for your comment.
sue says
my I pot does not have a manual button sooooo how do you start cooking
Paint the Kitchen Red says
Hi Sue, on some DUO models, it’s ‘Manual’ and on other models, it’s ‘Pressure Cook’ – they’re the same thing.
Evelyn says
First time using my instant pot. Doing the water test, I only used 2 cups in my mini and it took at least 10 minutes for the float valve to come up. Now, there’s a lot of clicking but the time hasn’t started counting down and it still reads “On”. What’s wrong?
Paint the Kitchen Red says
Evelyn – the more liquid you put in, the longer it takes to come to pressure. As long as it says ‘On’,it’s still building pressure. It will change from ‘On’ to the number of minutes you set it for. You just have to be patient. The clicking is also fairly normal. Please see my 17 tips for the Instant Pot.
Camille Poe says
Greetings from sunny hot southern California I would like to know if there is a little brush you like to help scrub the pressure cookers lid and top also is it okay to clean the steam holes on lid with pipe cleaners ? so what is the best method to clean the washable parts of the pot Many Thanks in advance Camille
Paint the Kitchen Red says
Hi Camille, I like to use a baby bottle brush. I also know people use pipe cleaners, but I have not.
Anne Walker says
I recently bought the 6 qt Instant Pot and have been reading through Laurel Randolph’s Instant Pot cookbook. Most of the recipes serve 6 people. I cook mostly for my just husband and I. Do I need to adjust the cooking time?
Paint the Kitchen Red says
Hi Anne, you can reduce the quantity you’re cooking but keep the same cook time in general. There are some exceptions e.g. if you have a smaller roast or chunk of meat, you might be able to reduce cooking time. When you’re reducing recipes, make sure you don’t go below the minimum quantity of liquid required to have your Instant Pot come to pressure.
Kristin says
I have the IP DUO60 v2 and I can’t figure out how to set the timer for anything but times divisible by 10s. I see all these recipes where you set the timer for 6 minutes or so and I can’t figure out how to do it.
Paint the Kitchen Red says
Hi Kristin, are you pressing the ‘timer’ button? That’s actually a delay start timer i.e. begin cooking after a certain amount of time. You need to press ‘Manual’ and then adjust the time to 6 minutes using the + or – buttons. You can read this 17 tips post to find out more FAQs.
Andy Borka says
Hi,
This guide helped me understand my IP duo 60 a little more than the user’s guide. However, a few simple, but stupid questions linger: Keep in mind that I am visually impaired and can’t read the display. I am going completely on memory.
1. How do you do a global reset of the IP? Pressing warm/cancel and holding it for 3 seconds resulted in a constant beeping sound. Another manual mentioned pressing and holding adjust for a few seconds. This resulted in some unknown cooking cycle starting.
2. Starting the water test cycle resulted in the IP working up to pressure for around 5 minutes. When it arrived at this point, the sealing valve closed. 30 seconds or so later, the IP beeped once. The question is this: (a). When you press steam, what is the default value displayed, and (b). When pressing +/- to change time, what is the incremented value: 30 seconds, 1 minute?
Paint the Kitchen Red says
Hi Andy – thanks for your question. Either one of those methods should work for the different models. It’s possible that you needed to press cancel once and then press and hold it a second time. I am traveling at the moment, and don’t have my Instant Pot, otherwise I would have tested it out for you. For your second question, the sequence of events sounds about right. The beep indicated that the display changed from ‘On’ to x minutes. I believe the default time is 10 minutes, but I’ll double check for you. + and – when adjusting the time, goes by 1 minute. Let me know if you have further questions, I’ll try and help out. I can imagine it would be very frustrating for you especially because there are so many models and information out on the web doesn’t always mention the model or version!