Paint The Kitchen Red

  • HOME
  • RECIPES AND GUIDES
  • ABOUT
menu icon
go to homepage
  • HOME
  • RECIPE INDEX
  • MEET NEENA
subscribe
search icon
Homepage link
  • HOME
  • RECIPE INDEX
  • MEET NEENA
×
Home » Page Templates

Mutabal (Middle Eastern Eggplant Dip)

March 1, 2025 by Neena Panicker 2 Comments

Bowl with mutabal or baba ganoush with parsley and olive oil on top.

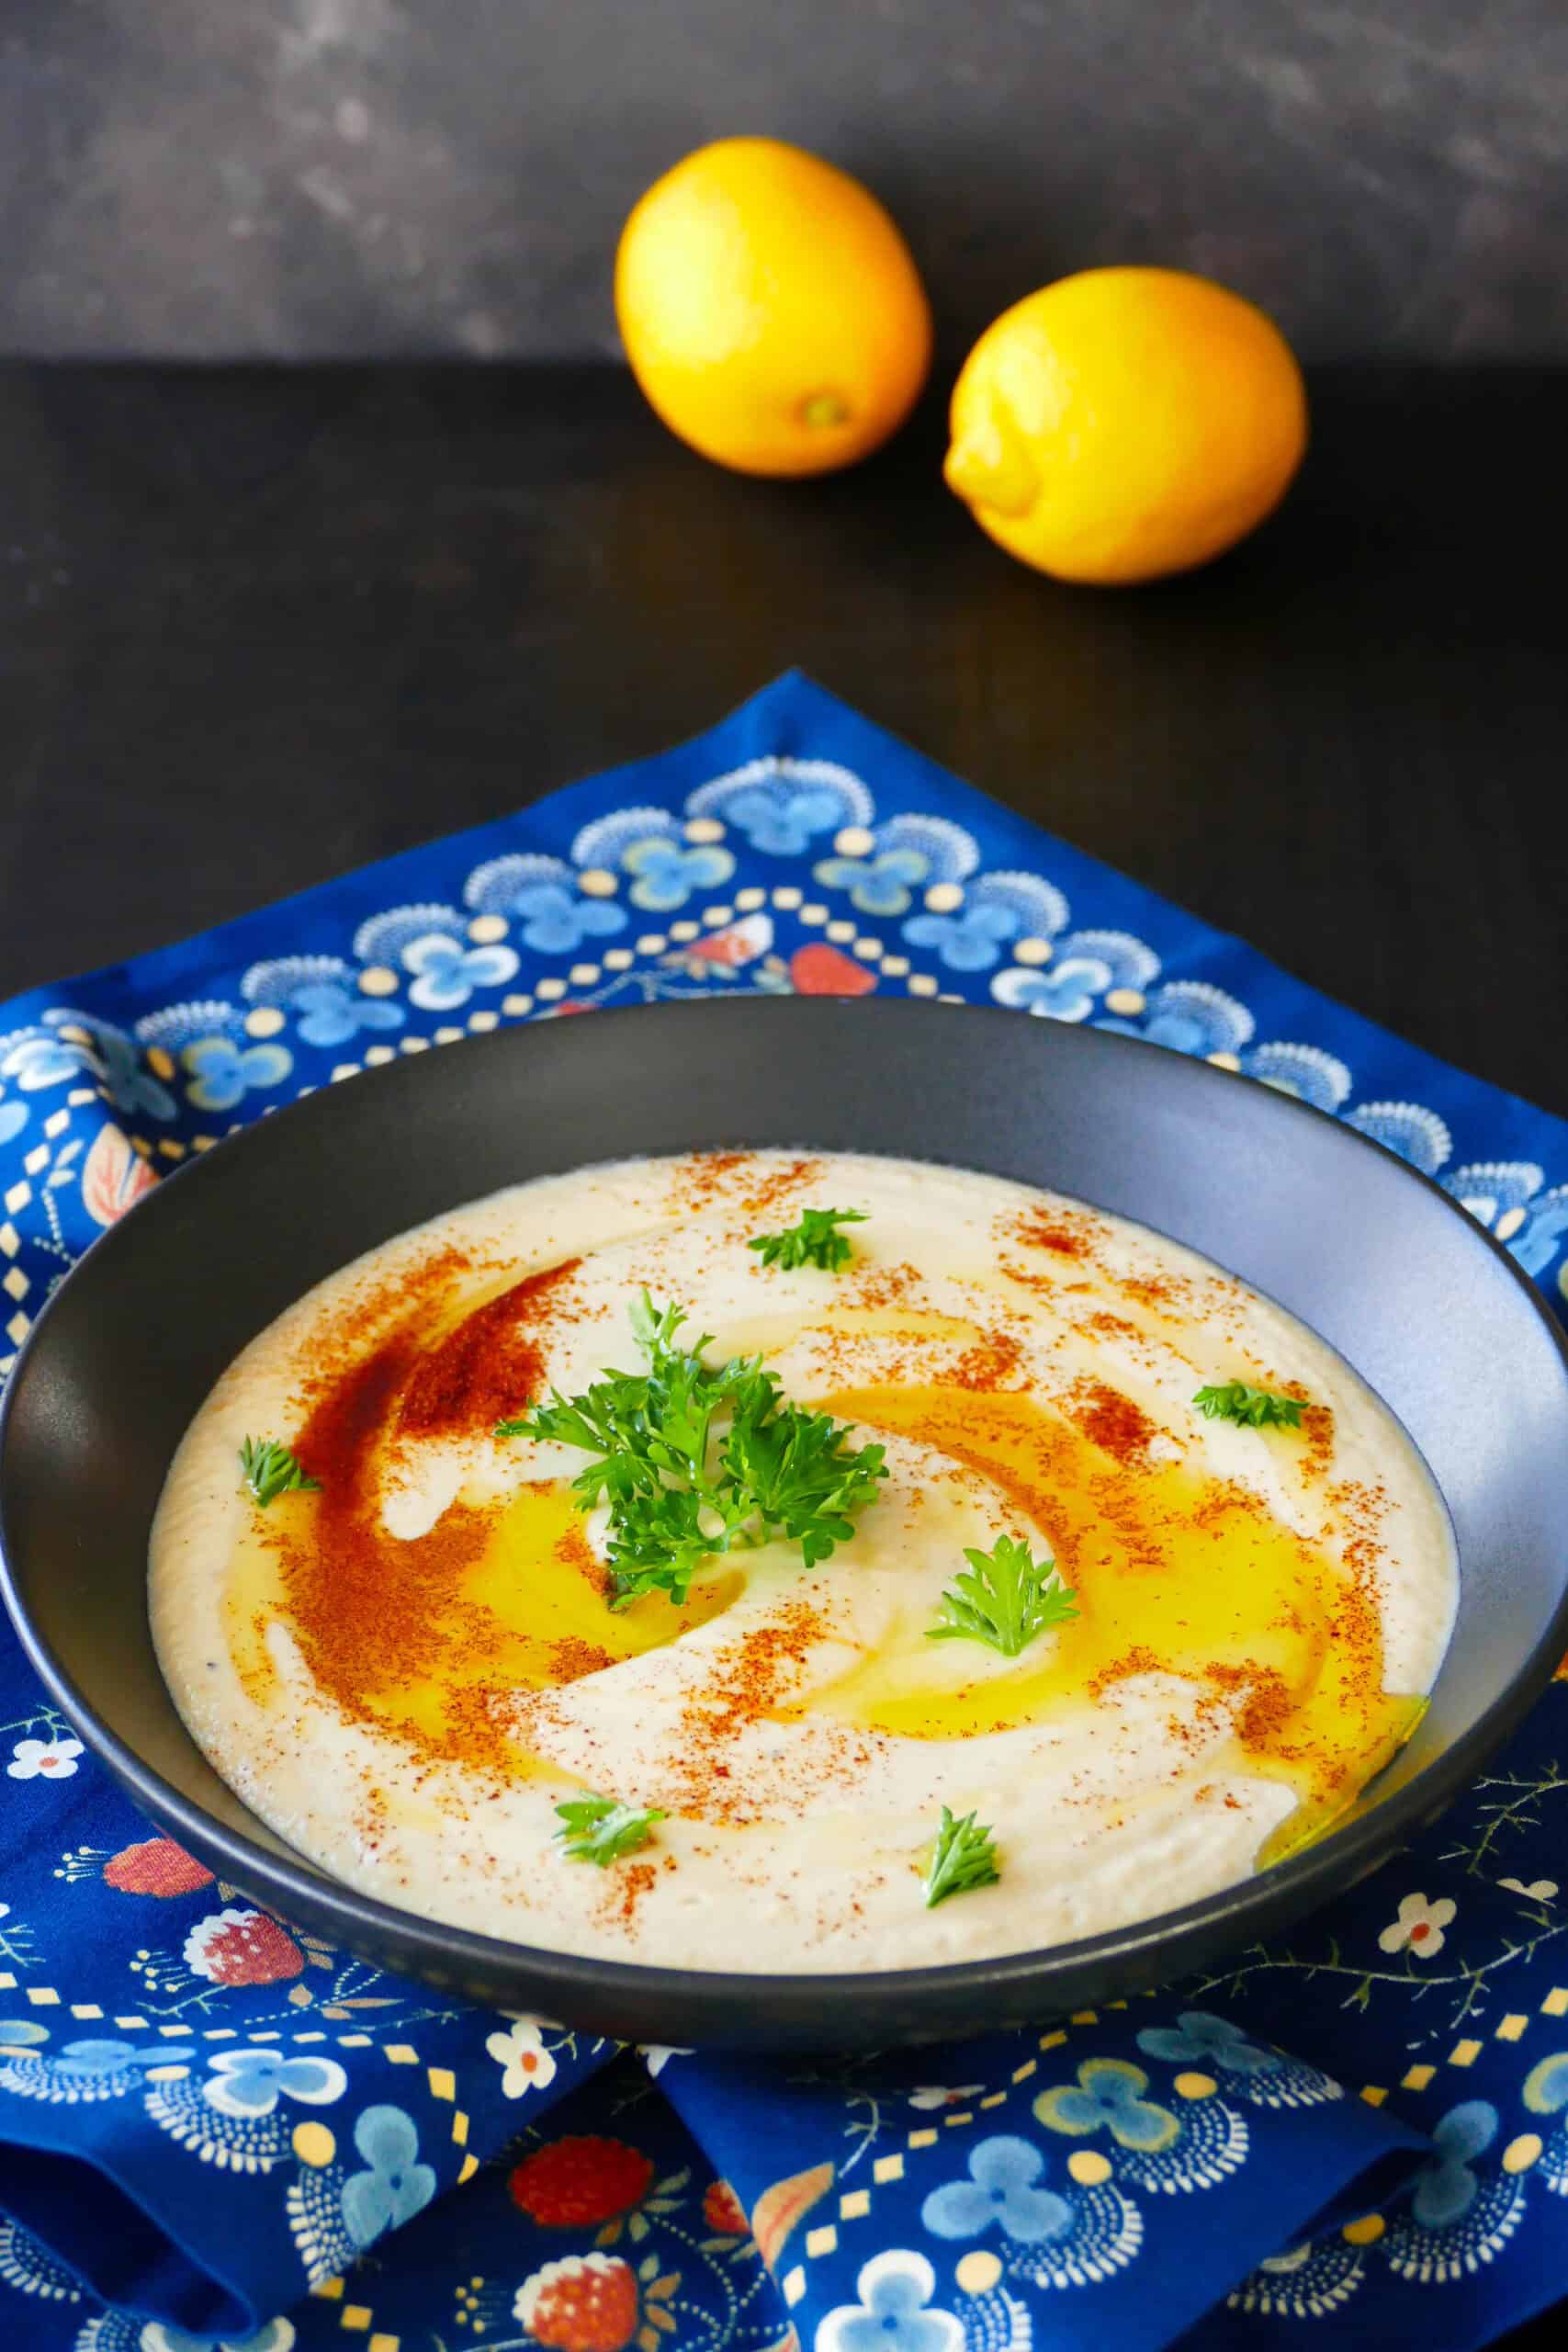
This creamy mutabal is an Arabic eggplant dip, also known as baba ganoush. Smoky roasted eggplant is blended with tahini, lemon juice, and olive oil to create a delicious addition to your mezze platter. This Lebanese recipe is delightful as a dip when served with warm pita or fresh vegetables.

Bowl with mutabal or baba ganoush with parsley and olive oil on top.

This post contains affiliate links. As an Amazon Associate, I earn from qualifying purchases. Please read the disclosure.

Baba ganoush (mutabal or moutabal in some regions) is a rich and creamy Middle Eastern dip made from roasted eggplants (aubergines), tahini, garlic, and lemon juice. These ingredients give the dip a smoky, tangy flavor.

Eggplant provides fiber and nutrients, while tahini adds protein, making this a healthier alternative to cream-based dips!

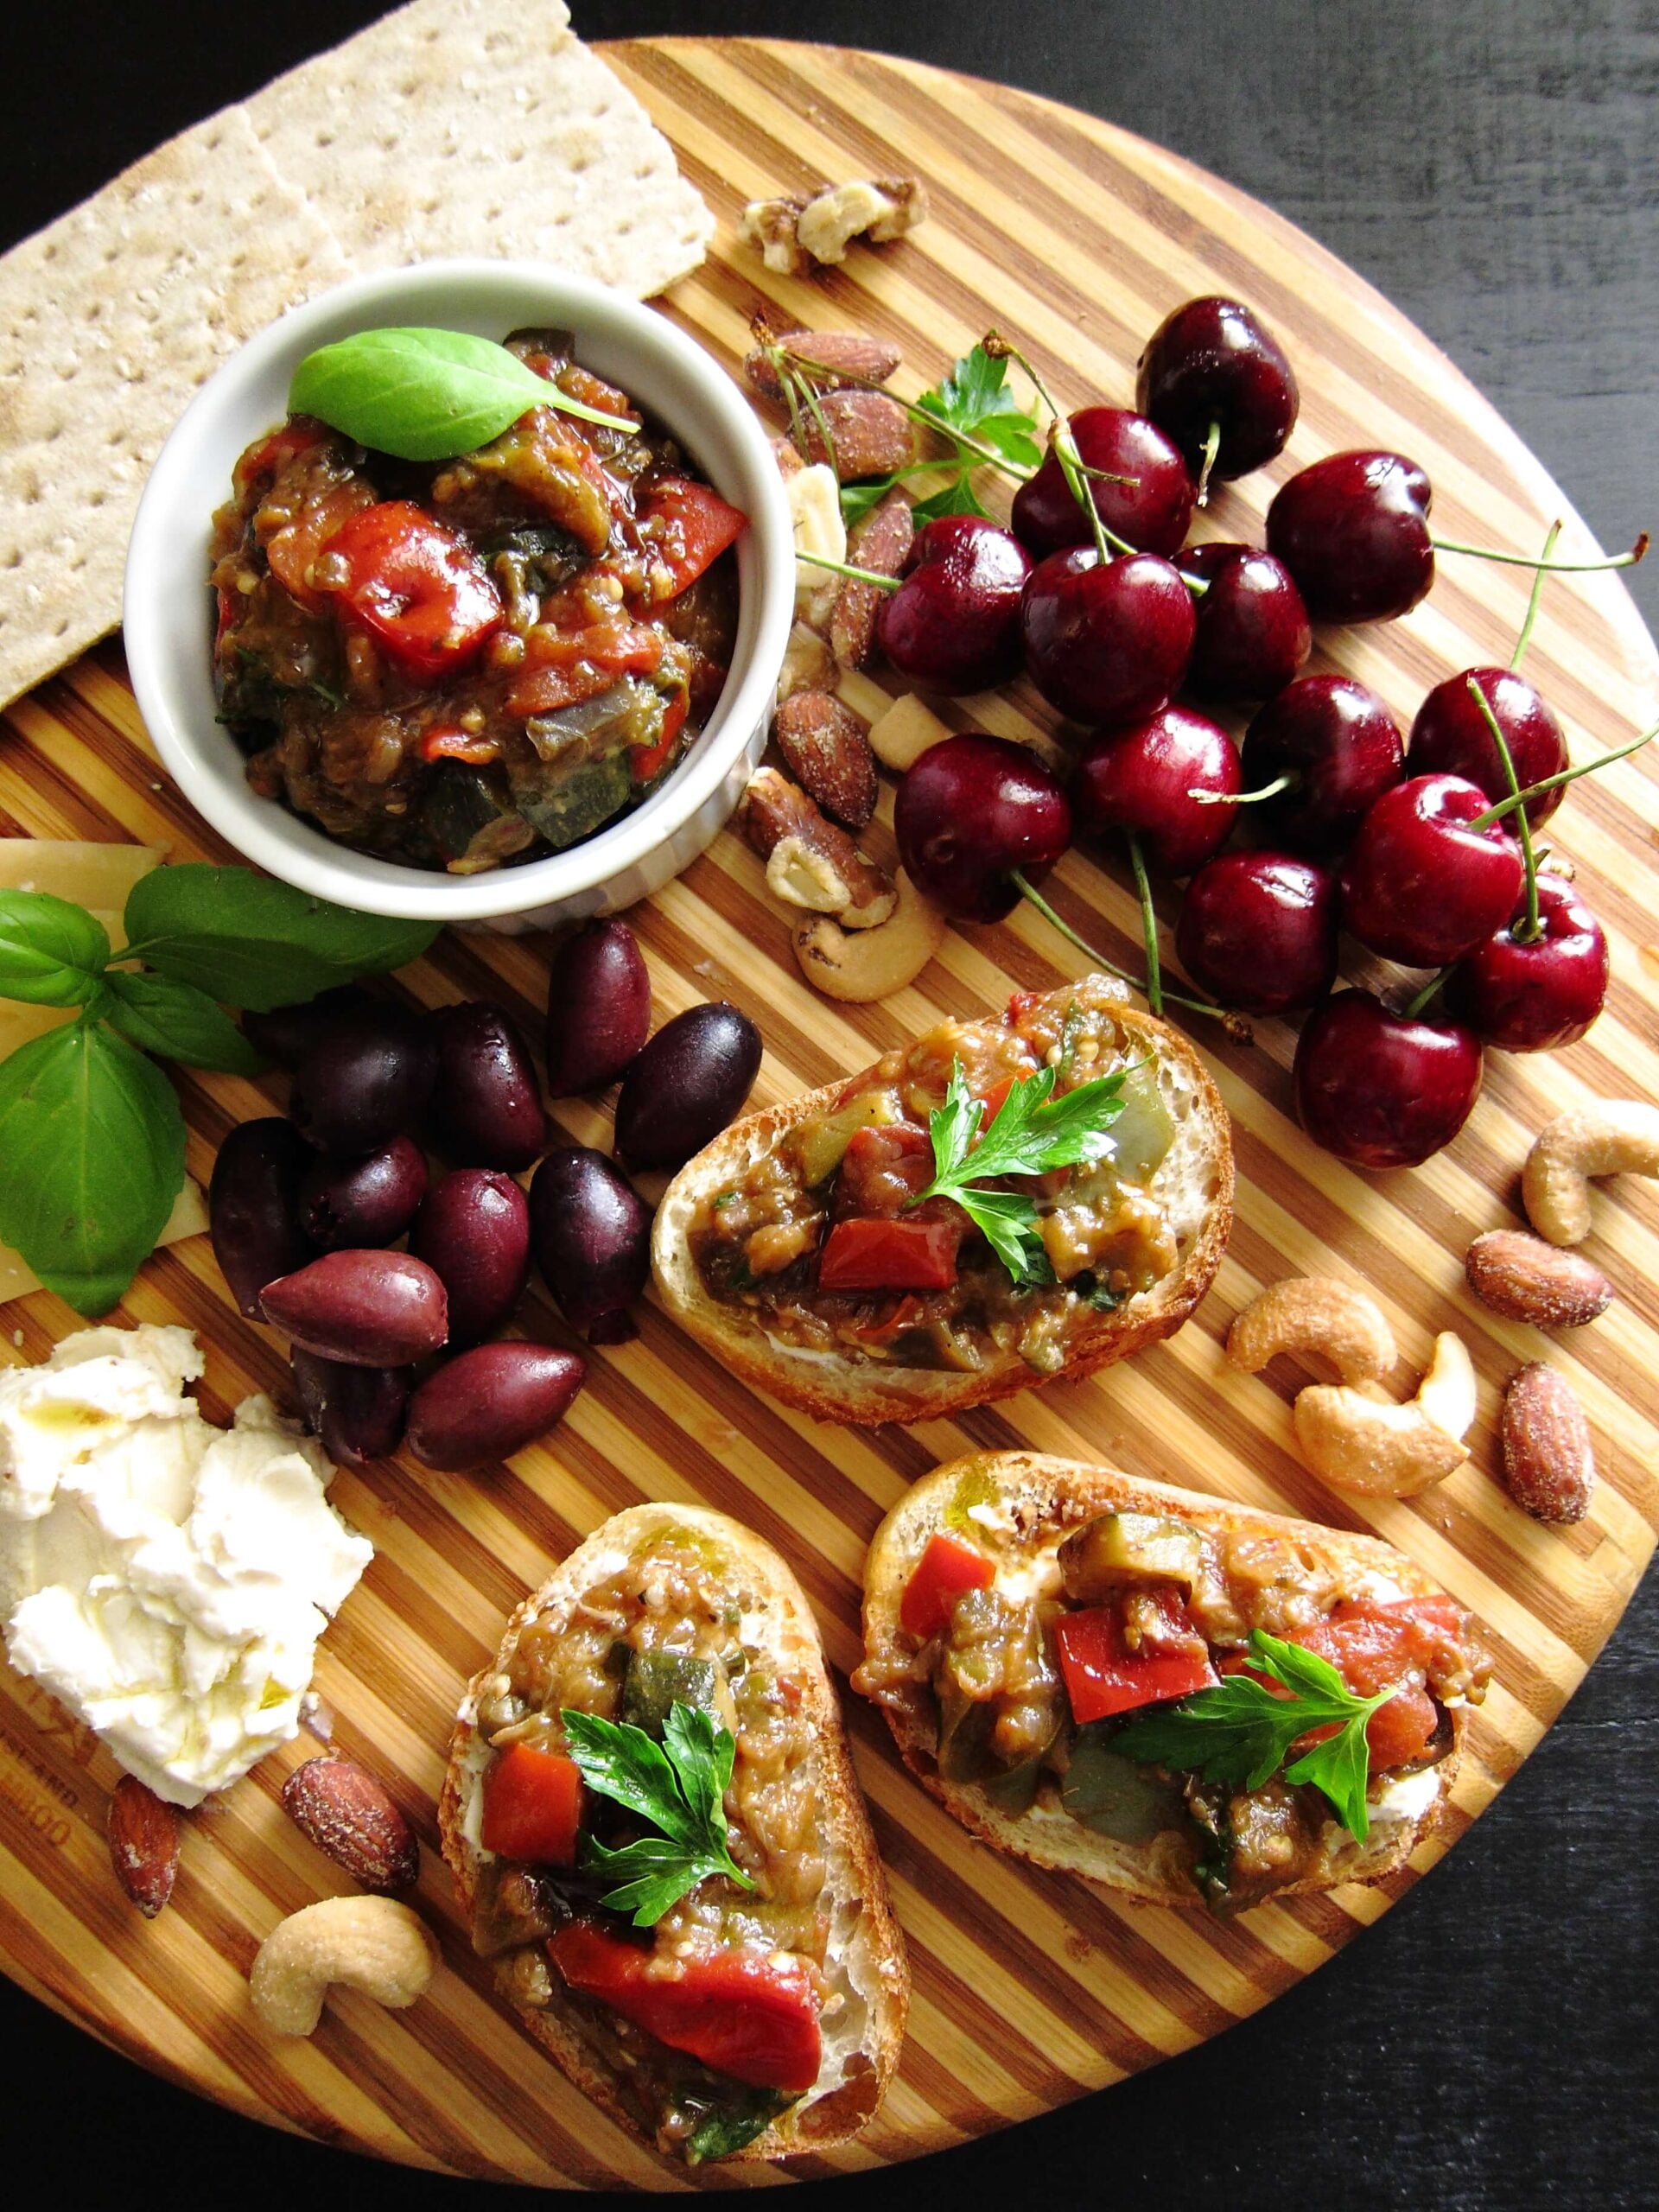
If I’m making an Arabic meal for friends, I like to serve this versatile dip as part of a mezze platter. It’s also great as a nutritious everyday dip for vegetables, pita bread, or sandwiches. It can be stored in the refrigerator for several days.

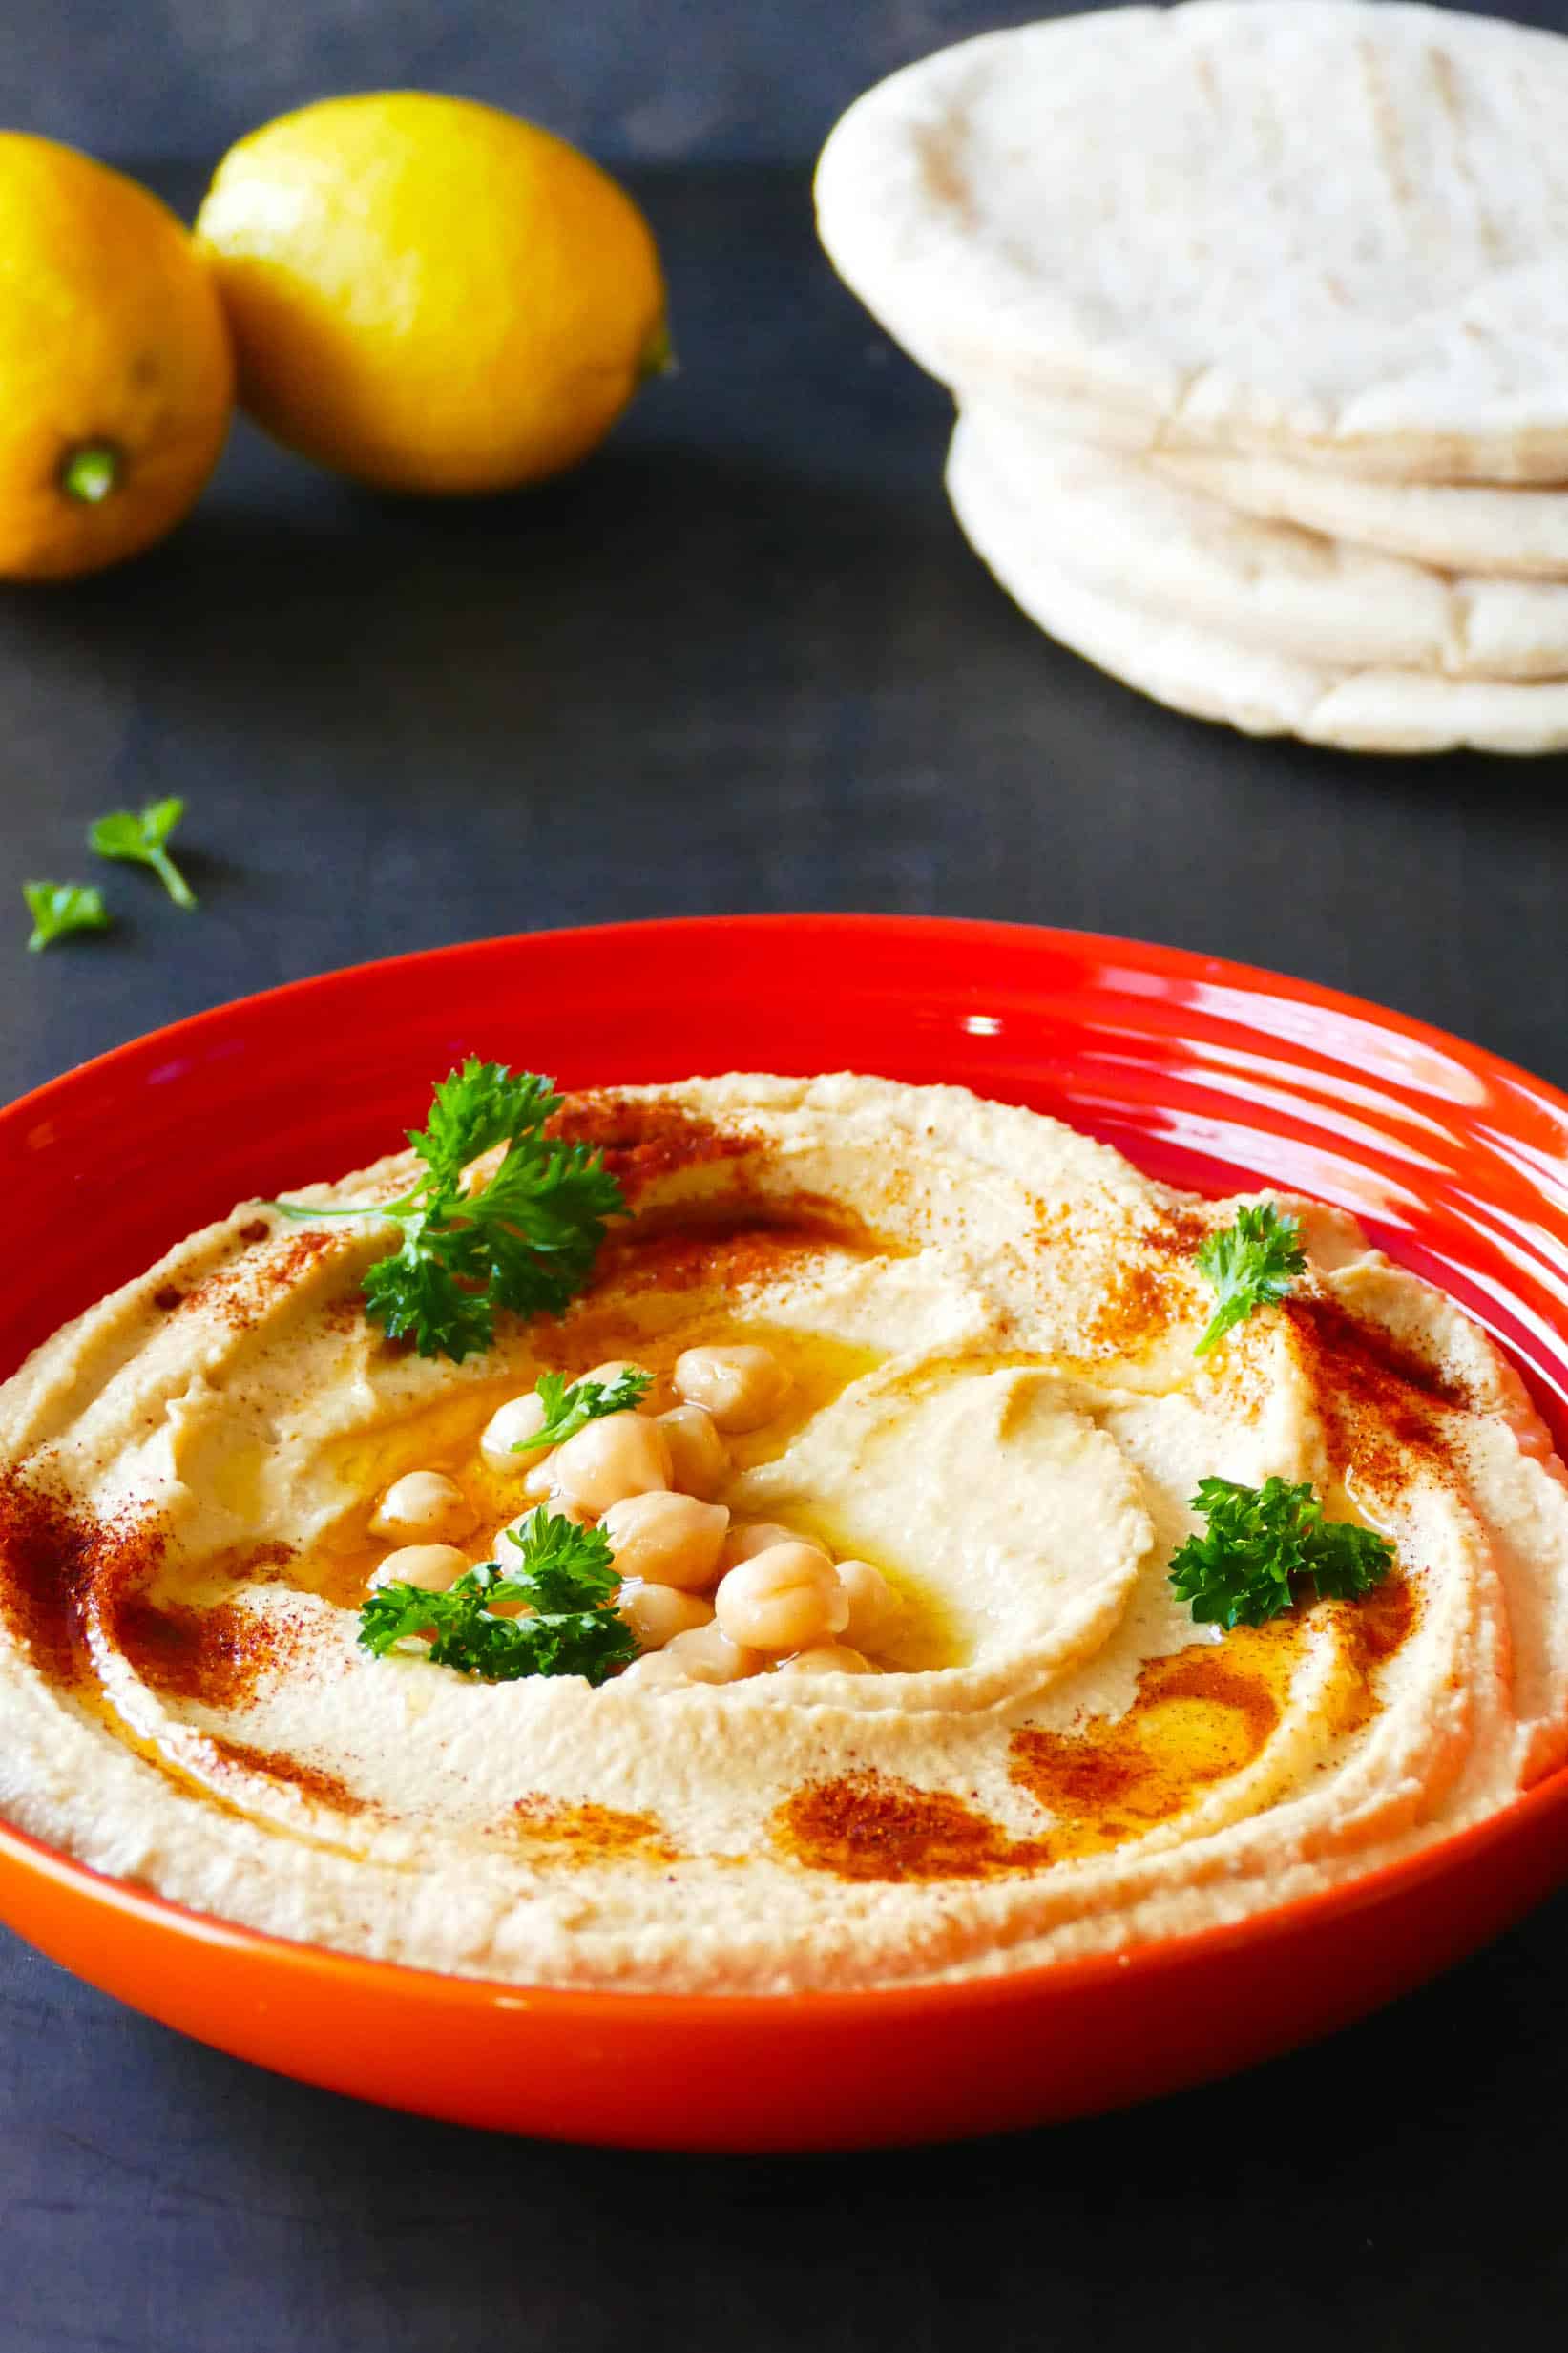
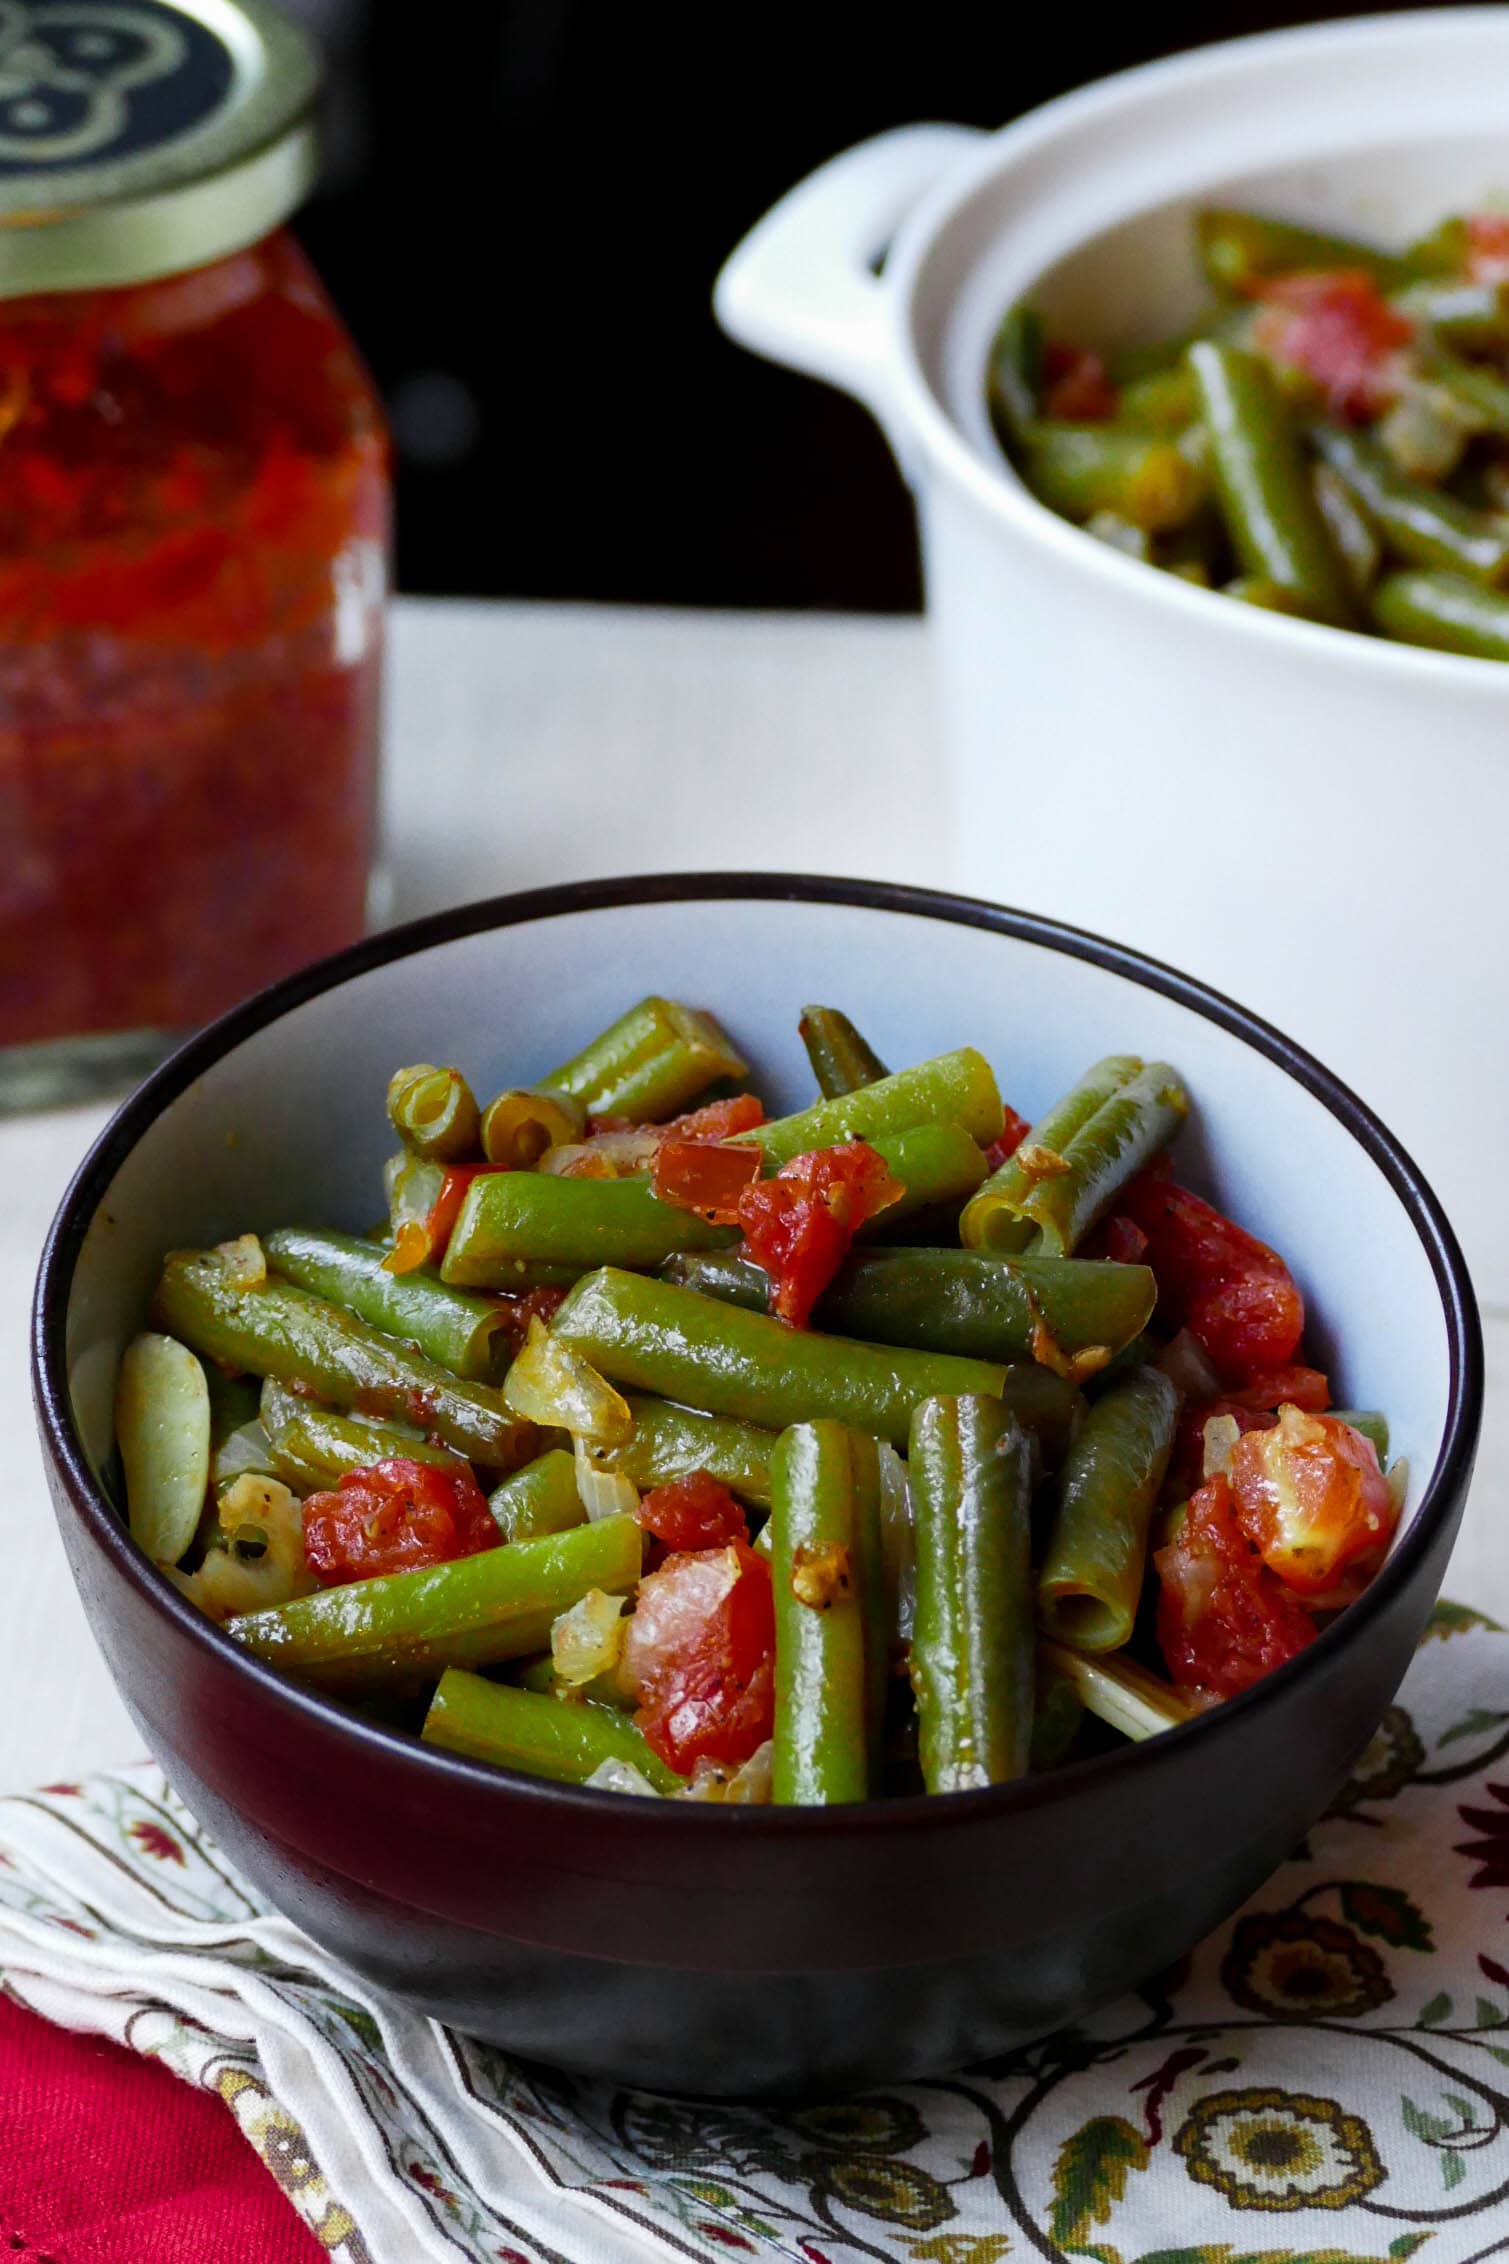
➡ If you enjoy Lebanese and Arabic food, try some of my other recipes, such as hummus, muhammara, mujadara, batata harra, Turkish green beans, or chicken shawarma.

Ingredients and Tips

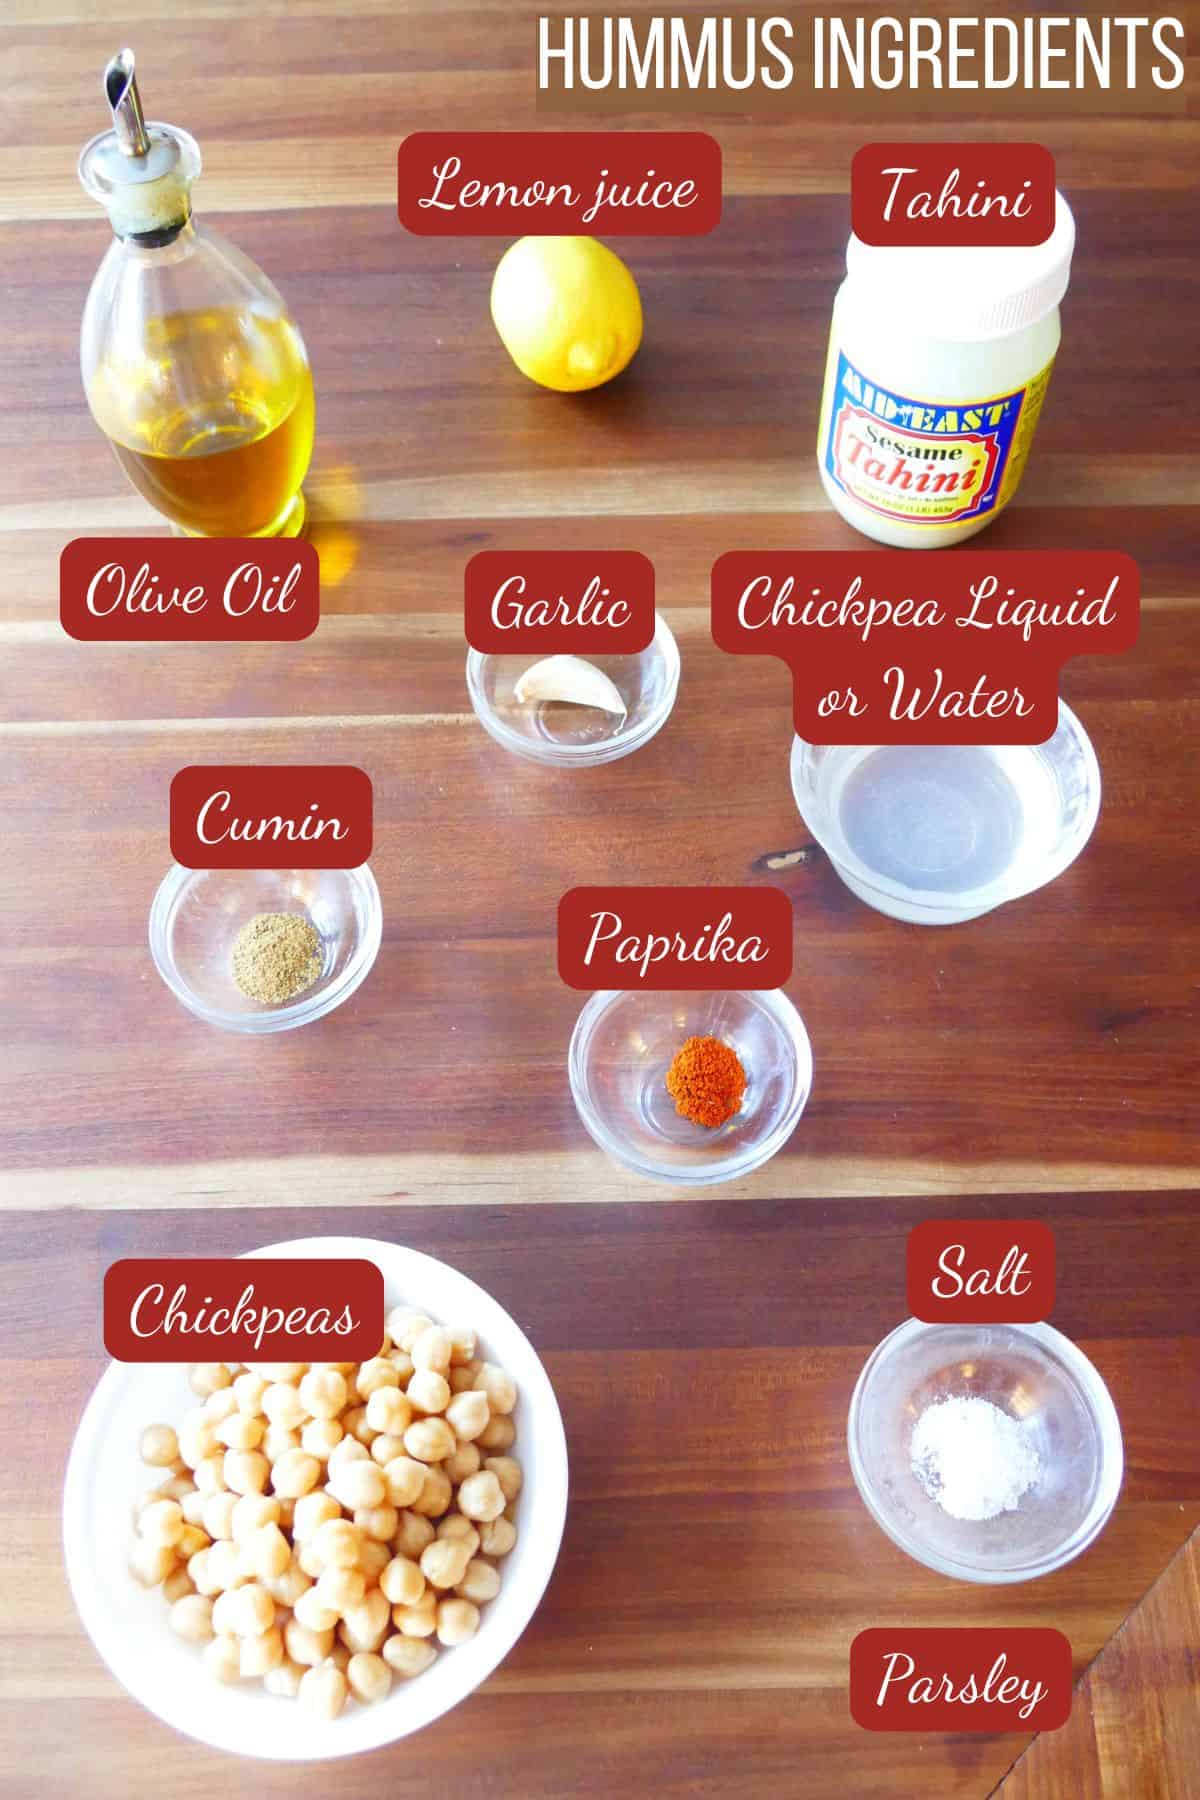
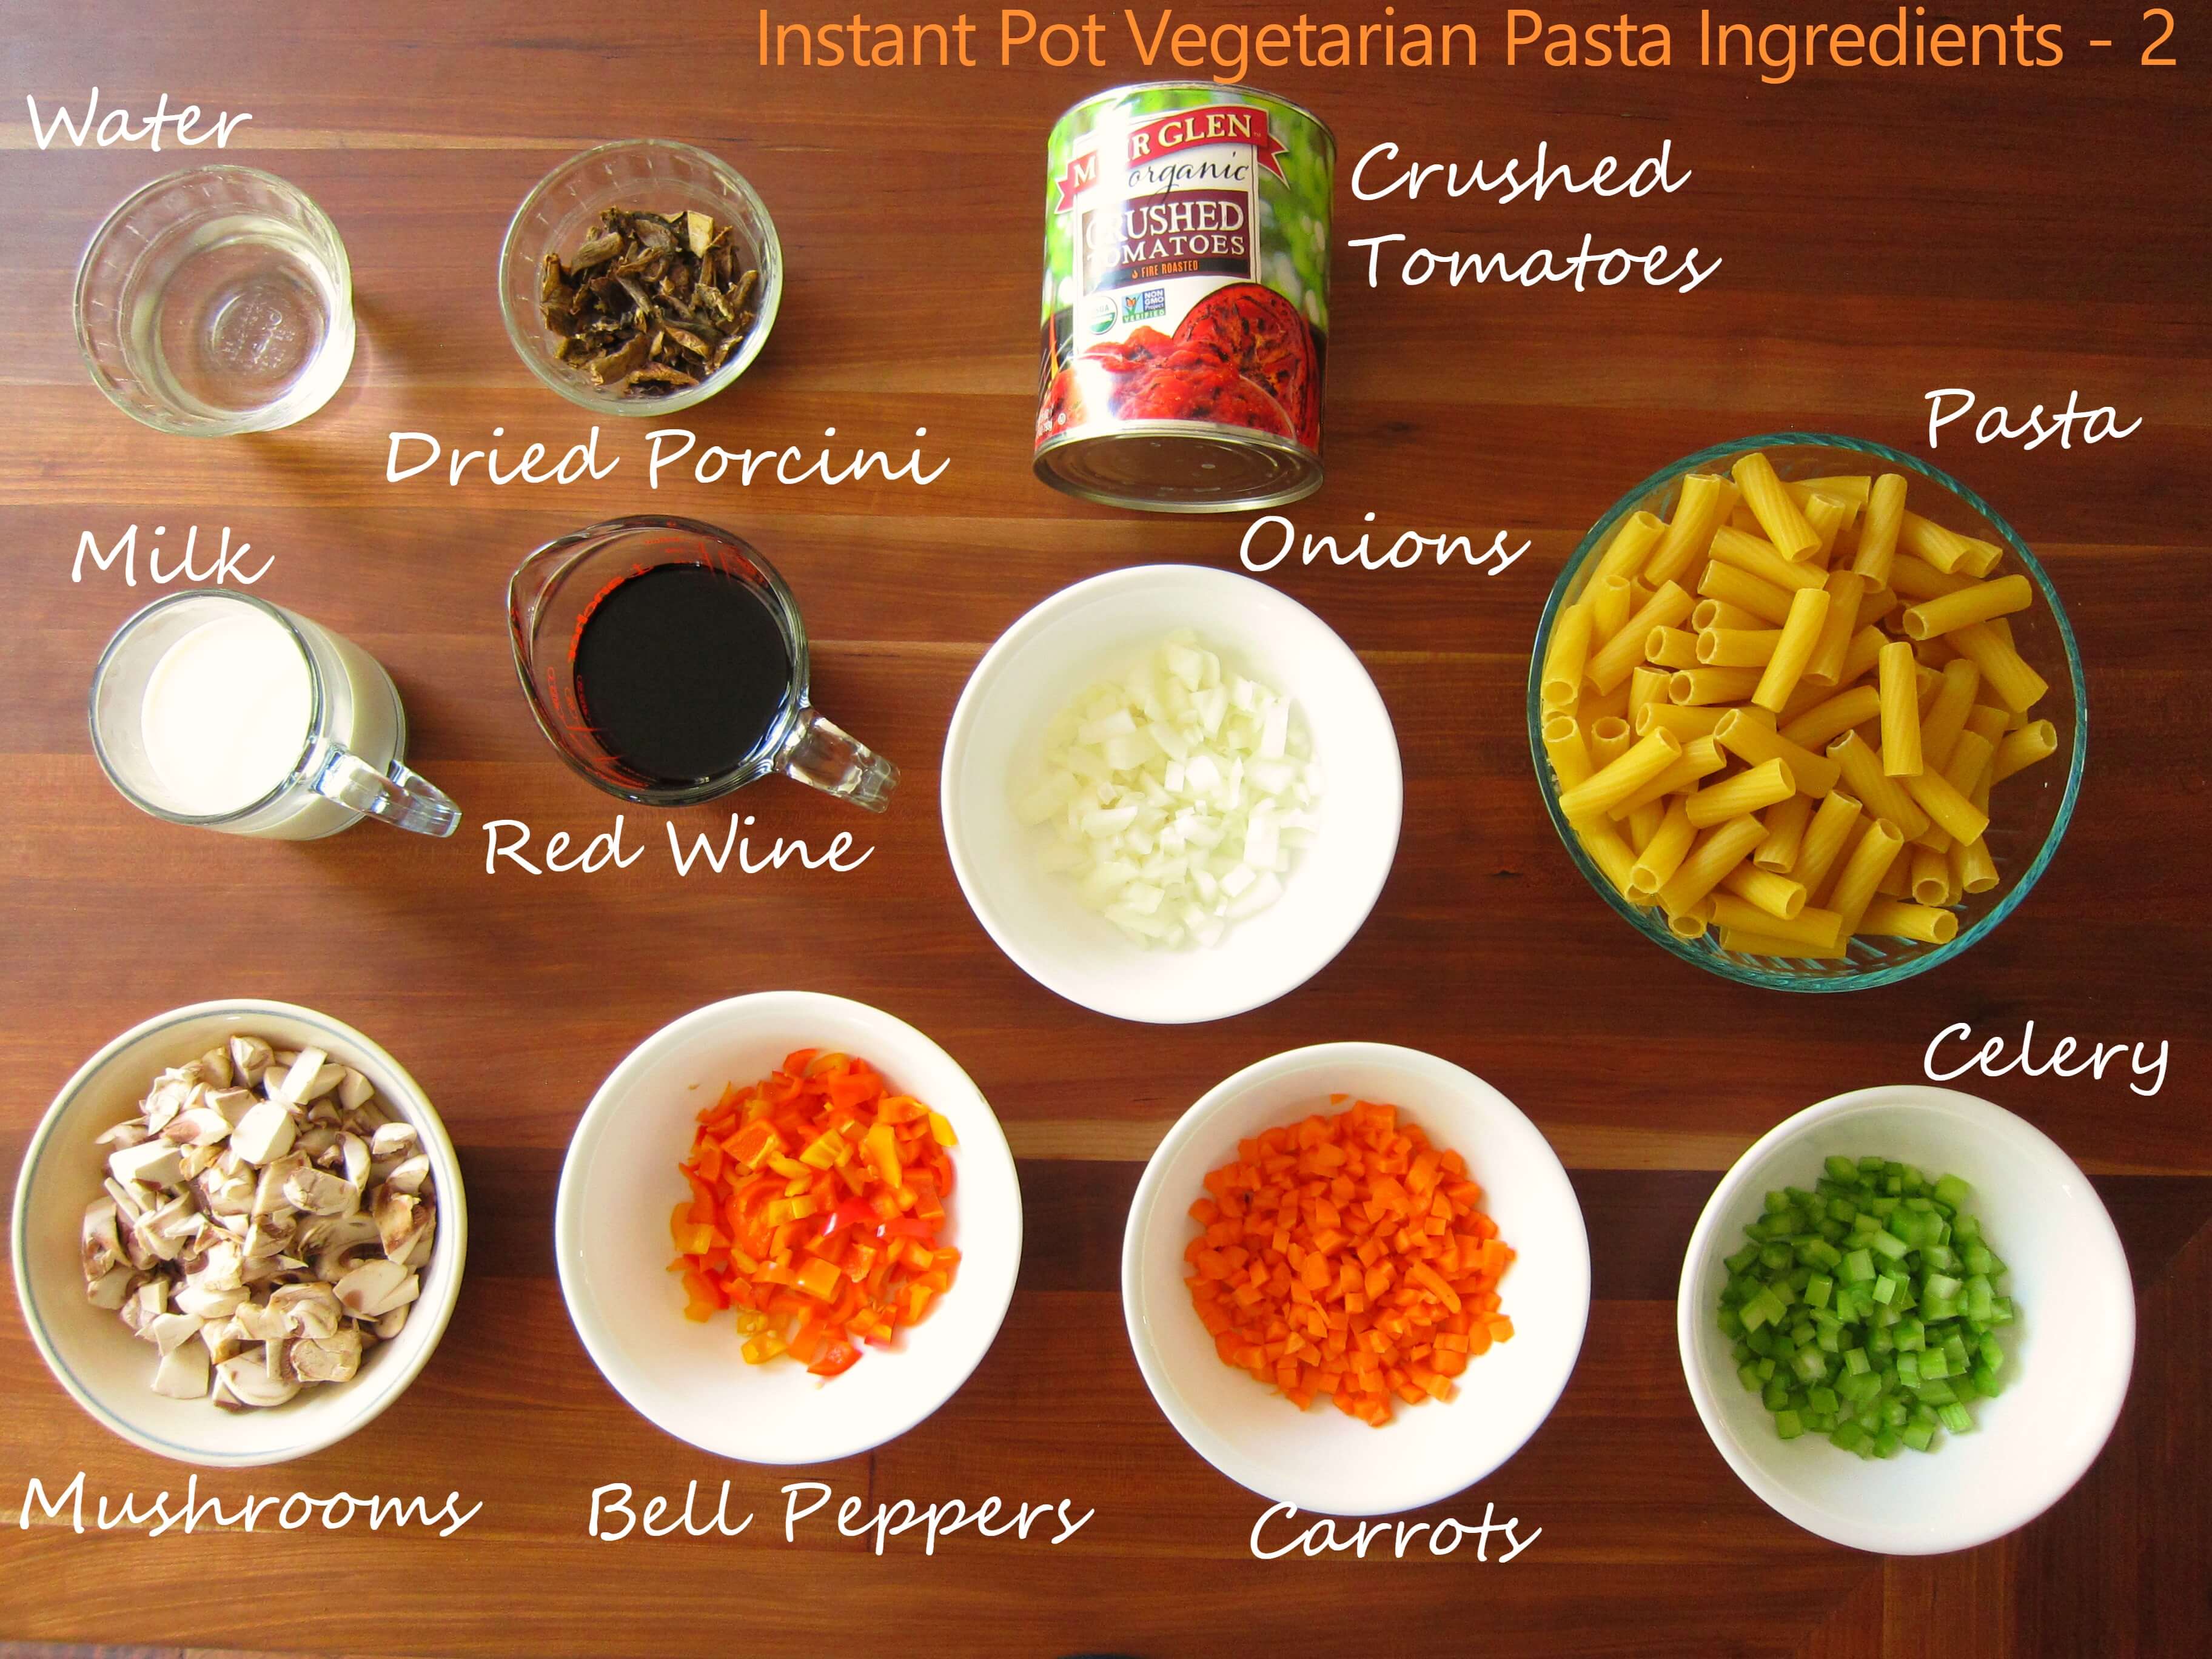
🧂 Ingredients You’ll Need for Middle Eastern Eggplant Dip

Mutabal Baba Ganoush ingredients - Eggplant dip ingredients - Olive oil, tahini, lemon, garlic, eggplant, cumin, salt, parsley.

💡 Ingredient and Recipe Tips for Baba Ganoush

🫒 Olive Oil: Use the best quality extra virgin olive oil.

🍋 Lemon Juice: Try using freshly squeezed lemon juice for this recipe. It makes a big difference. You can also add some lemon zest for extra flavor. You can use lime juice instead.

🍶 Tahini: Tahini is a sesame paste available at many grocery stores. Get a brand that doesn’t have any additives or fillers. I like to get it at my local Middle Eastern store. You can also order it on Amazon.

🥣 Cumin: I like to lightly toast whole cumin seeds and grind them in a spice grinder or using a mortar and pestle.

🍆 Eggplant: Use small, firm eggplants if you can find them. You can also purchase roasted eggplant in a jar at Arabic supermarkets. Drain it first before using.

🔥 Smoky Flavor: To add a smoky flavor, as you would get from eggplant grilled over an open fire, add a few drops of liquid smoke. A little goes a long way, so you don’t need a lot. About ⅛ to ¼ teaspoon will do. Add it when you’re mixing everything together.

♨️ How To Make This Arabic Eggplant Recipe

Mutabal Baba Ganoush instructions collage - eggplant pulp, all ingredients, blended, in bowl with garnish.
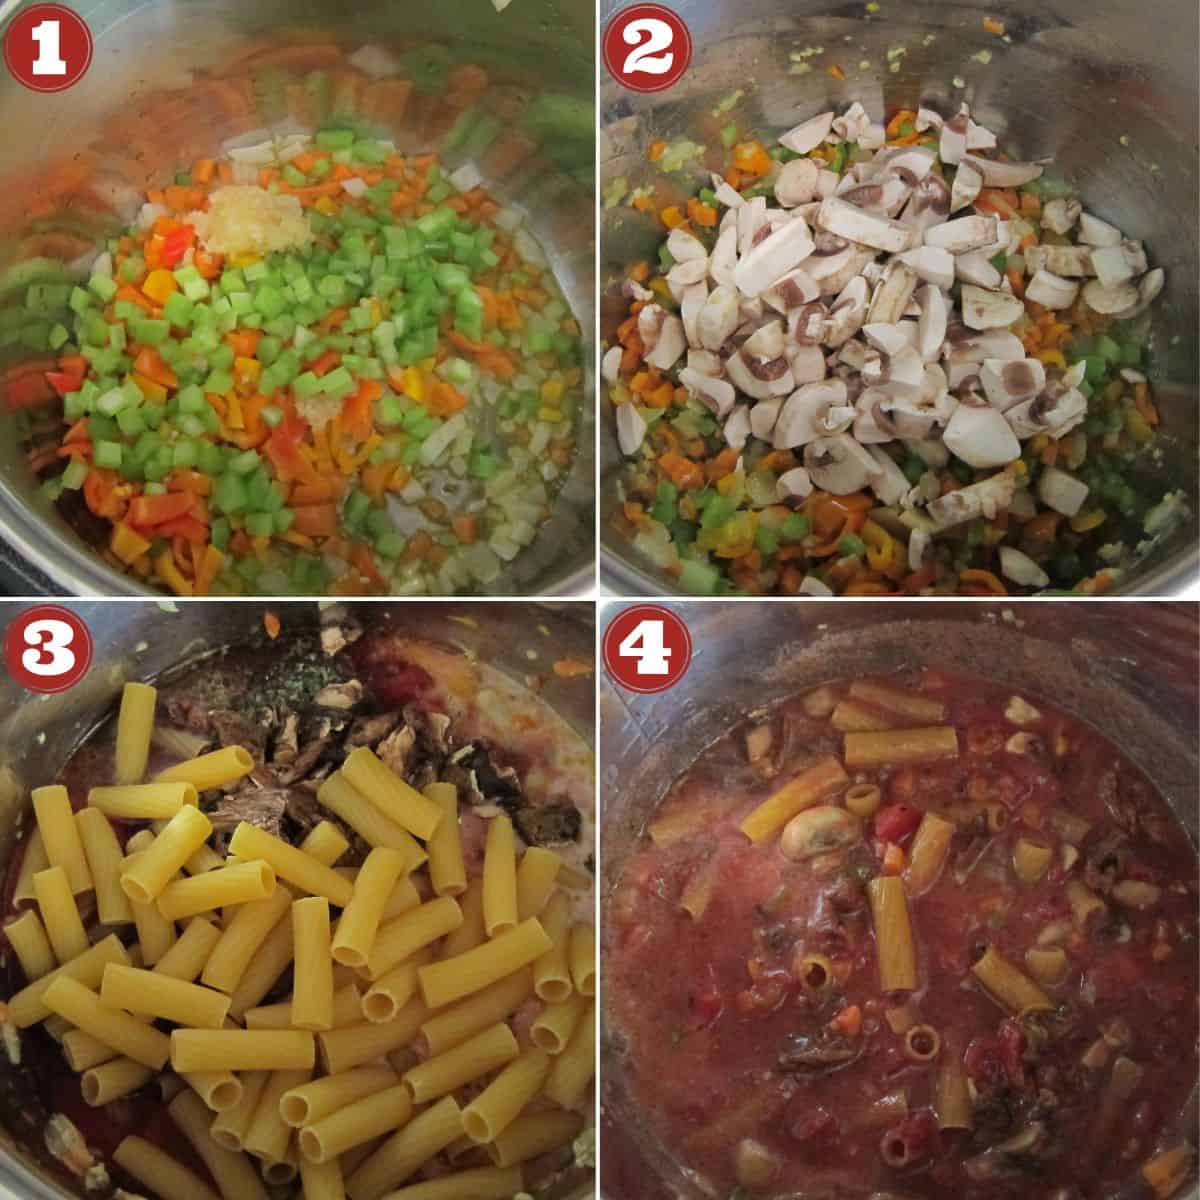
  1. Grill the aubergines in the oven or over an open flame. Remove the skin, scoop out the pulp, and drain for 10 minutes. Transfer the pulp to a food processor. For a choppy texture, you can also just use a fork.
  2. Add tahini, garlic, lemon juice, and salt.
  3. Process in 1-second pulses until the dip has a coarse or smooth texture, according to your preference. I like it smooth.
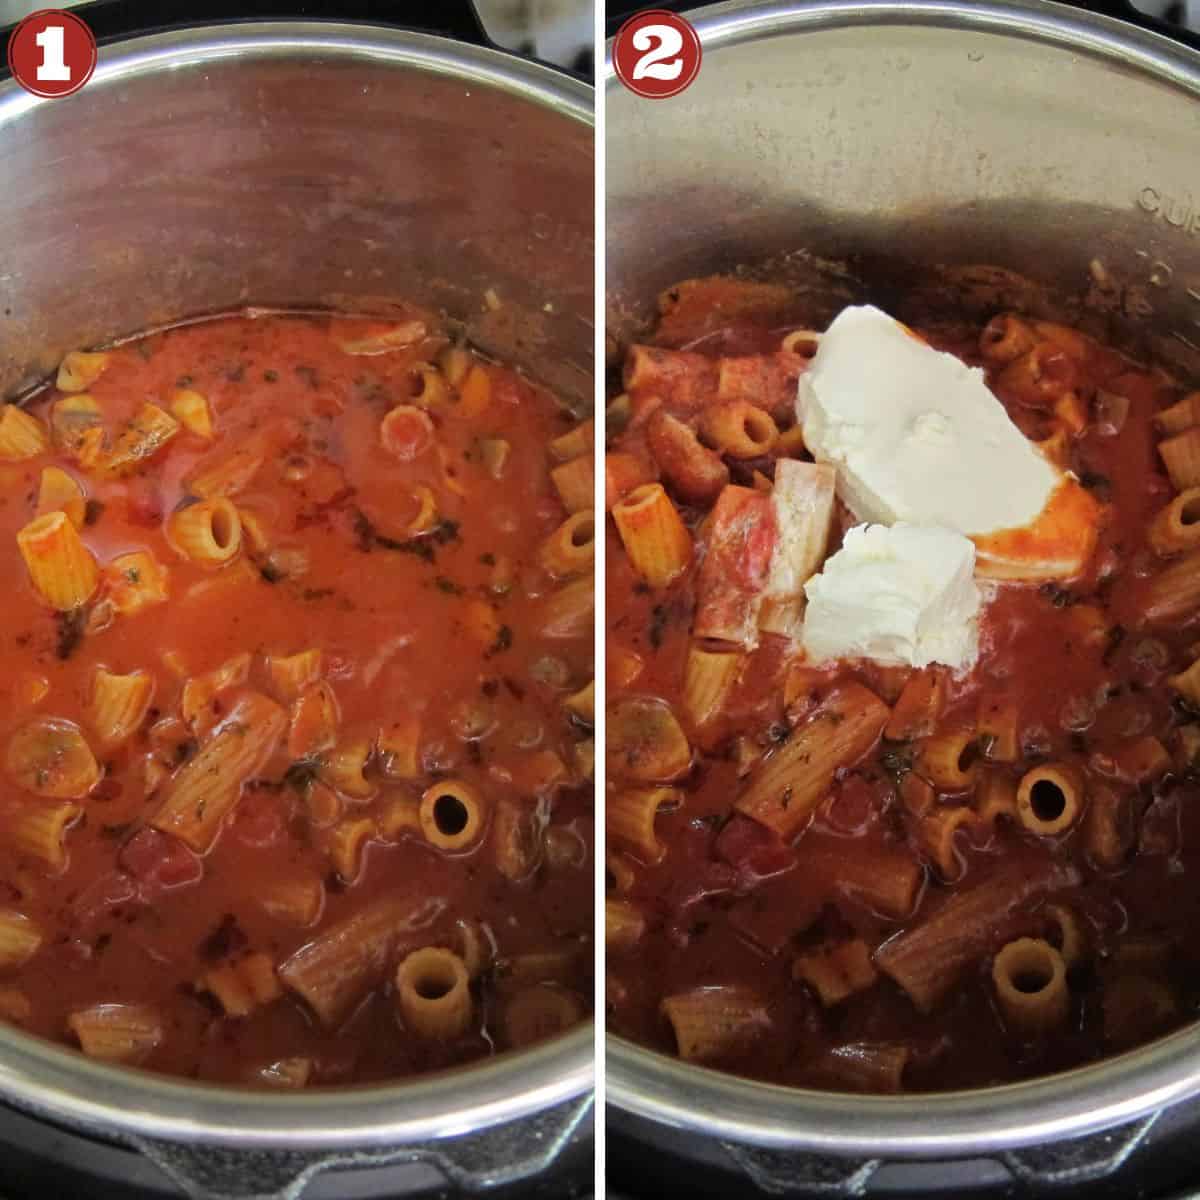
  4. Transfer to a shallow serving dish and spread it almost to the edge. With a spoon, make a trough in the center. Pour in some extra virgin olive oil. Garnish with paprika, olive oil, and/or chopped parsley.
Bowl with mutabal or baba ganoush with parsley and olive oil on top.
Print Recipe
5 from 1 vote

Mutabal / Baba Ganoush Eggplant Dip Recipe

This authentic homemade mutabal recipe is also known as baba ganoush. It has the rich flavors of traditional Lebanese and Arabic cuisine. This easy Middle Eastern eggplant dip combines creamy tahini, zesty lemon, and premium olive oil for a versatile Mediterranean dip or spread that's terrific as part of a mezze platter.
Prep Time15 minutes mins
Cook Time30 minutes mins
Total Time15 minutes mins
Course: Sides
Cuisine: Middle Eastern
Main Ingredient: vegetarian
Method: Non Instant Pot
Servings: 8 servings
Calories: 73kcal
Author: Paint the Kitchen Red

Ingredients

  • 2 lbs eggplant 1 kg
  • ¼ cup tahini
  • ½ teaspoon garlic minced
  • 2 tablespoon lemon juice
  • ½ teaspoon salt
  • parsley for garnish
  • ⅛ teaspoon liquid smoke [See Note 2]

Instructions

Grill the Eggplant in the Oven

  • Line a baking sheet with foil and grease lightly.
  • Pierce the eggplant all over with a fork and place it on the greased foil.
  • Grill the 2 lbs eggplant under the broiler until the skin darkens and wrinkles on all sides, about 30 to 40 minutes, turning every 5 minutes.
  • The eggplant will be soft and begin to collapse when pressed with a spoon. Remove from heat.
  • When cool enough to handle, trim off the top and bottom of the eggplant and slit lengthwise.
  • Scoop out the hot pulp from the skins and place the pulp in a colander. Let it drain for 10 minutes. You should have about 2 cups of pulp. Transfer to a bowl and mash with a fork or potato masher.

Make the dip

  • Transfer the pulp to a food processor. Add the ¼ cup tahini, ½ teaspoon garlic, 2 tablespoon lemon juice, and ½ teaspoon salt.
  • Process in 1-second pulses until the dip has desired texture. [See Note 1].
  • Taste and adjust seasonings as desired. Add the ⅛ teaspoon liquid smoke (or more), if using.
  • Transfer to a shallow serving dish and spread it almost to the edge if the dish. Make a trough in the center with a spoon. Pour in some extra virgin olive oil. Garnish with paprika, olive oil, and/or chopped parsley.

Video

Notes

  • Use high-quality olive oil and tahini.
  • Note 1: Baba ganoush can be smooth or course with some texture. It’s up to individual taste.
  • Note 2: Authentic baba ganoush or mutabal is made with eggplant grilled over an open fire. When mixing the ingredients, add a few drops of liquid smoke (about ⅛ to ¼ tsp) to get the smoky flavor.

Nutrition

Serving: 4tablespoon | Calories: 73kcal | Carbohydrates: 6g | Protein: 8g | Fat: 5g | Saturated Fat: 1g | Sodium: 100mg | Fiber: 2g

I am not a certified nutritionist.  I provide my best estimate of nutritional information merely as a courtesy to my readers.  If you depend on nutritional information for dietary or health reasons,  I suggest using your favorite online nutrition calculator to confirm the nutritional value of this recipe based on the actual ingredients that you use.

Did you know that the best way to support your favorite bloggers is to comment and rate recipes, and share on social media? If you loved this recipe, please comment and give it a five ⭐ rating in the comment section below. If you’re a pinner, pin this post using the Pin buttons at the top and bottom of this post and in the recipe card above. Thank you for your support!

BACK TO TOP

Lebanese Hummus Recipe

February 26, 2025 by Neena Panicker 2 Comments

Hummus in bowl with chickpeas and parsley.

This traditional Lebanese hummus is a creamy chickpea dip that is an essential part of Middle Eastern cuisine. This Mediterranean dip combines smooth tahini, fresh lemon juice, and rich olive oil for an irresistibly delicious flavor. Serve homemade hummus as part of a Lebanese mezze platter, use it as a dip for veggies, or spread it on a bagel.

Hummus in bowl with chickpeas and parsley.

This post contains affiliate links. As an Amazon Associate, I earn from qualifying purchases. Please read the disclosure.

There is such a difference between making hummus at home and buying it at the grocery store! Once you learn how to make hummus chickpea dip at home, you’ll never want to buy store-bought hummus again!

Homemade Arabic hummus has a smooth texture and fresh flavor, and you can customize the flavor to suit your tastes.

If you love garlic, add more garlic! Or add more lemon juice if you want it to be more like Lebanese hummus. It’s a versatile and nutritious recipe.

Serve hummus traditionally with warm pita bread, spread it on sandwiches or bagels, or use it as a dip for vegetables like carrots, celery, cucumbers, or bell peppers.

This authentic hummus recipe is a budget-friendly dish that can be eaten over several days. It stays fresh for days in the refrigerator.

➡ If you enjoy this easy hummus recipe, try my recipes for mutabal (baba ganoush), muhammara, batata harra, Turkish green beans, or chicken shawarma.

Ingredients and Tips

🧂 Lebanese Hummus Ingredients

Hummus ingredients: olive oil, lemon juice, tahini, cumin, garlic, chickpea liquid, paprika, chickpeas, salt, parsley.

💡 Ingredient and Recipe Tips for Homemade Chickpea Dip

🫒 Olive Oil: Use the best quality extra virgin olive oil.

🍋 Lemon Juice: Try using freshly squeezed lemon juice for this recipe. It makes a big difference. You can also add some lemon zest for extra flavor.

🍶 Tahini: Tahini is a roasted sesame seed paste. A good quality tahini is the secret to great hummus. Al Kanater and Soom are good brands and may be available at your local Middle Eastern grocery store. Trader Joe’s and Whole Foods/Amazon tahini are also good. Mid-East brand is fine, too.

🌶️ Spices: If you can get it, use Aleppo pepper, which has a medium spice level and a smoky flavor. You can also use smoked paprika (with a pinch of cayenne).

🫘 Chickpeas or garbanzo beans: Cook dry chickpeas in the Instant Pot for at least one hour, adding a pinch of baking soda. Reserve some cooking liquid. If using canned chickpeas, drain them and reserve some of the liquid (aquafaba). For an extra creamy hummus, boil the canned chickpeas with a pinch of baking soda until fall-apart tender. Rinse and drain before using them in the recipe.

💦 Water: Add ice-cold water or ice cubes to the blender or food processor to thin out the hummus. This makes the hummus extra smooth.

❓ FAQs


Why is my hummus bitter?

If you use too much tahini, the hummus can become bitter. If you use inferior quality tahini, it can be bitter. Use fresh, high-quality tahini, starting with a smaller amount and adding more to taste. Also, rancid olive oil can taste bitter. See tips above for good brands.

How long will it keep in the fridge?

If stored in an airtight container, homemade hummus will stay fresh for about a week in the refrigerator. Hummus tastes better after resting overnight. Drizzle a thin layer of olive oil on top before storing it to preserve freshness and prevent it from drying out.

How can I enhance the flavor? What add-ins can I use?

To make your hummus more flavorful, add roasted red peppers, harissa paste, or roasted garlic. Remember that good quality ingredients, especially fresh lemon juice and premium tahini, will significantly enhance the base flavor.

♨️ How To Make Hummus

Hummus collage - olive oil and tahini, chickpeas, spices, all blended, spread in a bowl.
  1. In a food processor or blender, puree tahini and olive oil. Doing this first ensures a smooth and creamy hummus.
  2. Reserve a handful of cooked chickpeas for garnish. Add remaining ingredients (except garnishes).
  3. Puree until smooth (or desired texture).
  4. Transfer to a shallow bowl and garnish with chickpeas and paprika. Top with a drizzle of olive oil. Serve hummus with warm pita bread or pita chips.
Hummus in bowl with chickpeas and parsley.
Print Recipe
5 from 1 vote

Lebanese Hummus

This authentic homemade hummus recipe has the rich flavors of traditional Lebanese and Arabic cuisine. This easy Middle Eastern chickpea dip combines creamy tahini, zesty lemon, and premium olive oil for a versatile Mediterranean dip or spread that's terrific as part of a mezze platter.
Prep Time15 minutes mins
Total Time15 minutes mins
Course: Sides
Cuisine: Middle Eastern
Main Ingredient: vegetarian
Method: Non Instant Pot
Servings: 4 servings
Calories: 222kcal
Author: Paint the Kitchen Red

Ingredients

  • ¼ cup tahini
  • 3 tablespoon olive oil + more for garnish
  • 1 ½ cups chickpeas 1 can of 15.5 oz, 286 g [See Note 1]
  • 3 tablespoon aquafaba liquid drained from canned canned chickpeas or cold water
  • 2 teaspoon garlic minced
  • ¼ cup lemon juice
  • ¼ teaspoon cumin
  • ¼ teaspoon Aleppo pepper or paprika with a pinch of cayenne
  • ½ teaspoon sea salt
  • paprika for garnish
  • fresh parsley chopped, for garnish

Instructions

  • Reserve a handful of chickpeas for garnish.
  • In a food processor, puree ¼ cup tahini and 3 tablespoon olive oil until smooth. [See Note 2]
  • Add 1 ½ cups chickpeas, 3 tablespoon aquafaba, 2 teaspoon garlic, ¼ cup lemon juice, ¼ teaspoon cumin, ¼ teaspoon Aleppo pepper, and ½ teaspoon sea salt. Puree until smooth or your desired texture. [See Note 3]
  • Transfer to a shallow bowl and spread the hummus in concentric circles to the edge of the bowl. Make a groove in the middle with a spoon. Drizzle some olive oil into the groove and all over. Garnish with reserved chickpeas, a sprinkle of paprika, and fresh parsley. [See Note 4]

Video

Notes

  • Use high-quality olive oil and tahini.
  • Note 1: You can cook dry chickpeas in the Instant Pot or use canned chickpeas. For extra smooth hummus, boil the canned chickpeas for 20 minutes with ½ teaspoon of baking soda.
  • Note 2: Blend the tahini and lemon juice before adding other ingredients for the smoothest result. This creates an emulsion that helps achieve the perfect texture. I usually use my Vitamix blender when I’m making a larger quantity, and it produces a very smooth hummus.
  • Note 3: If the hummus is too thick, add ice-cold water or ice cubes to the blender or food processor to thin it out. This makes the hummus smooth!
  • Note 4: For maximum flavor, allow the hummus to rest for 30 minutes or overnight before serving to let the flavors meld. 

Nutrition

Serving: 4tablespoon | Calories: 222kcal | Carbohydrates: 20g | Protein: 8g | Fat: 14g | Saturated Fat: 2g | Sodium: 295mg | Fiber: 6g | Sugar: 3g

I am not a certified nutritionist.  I provide my best estimate of nutritional information merely as a courtesy to my readers.  If you depend on nutritional information for dietary or health reasons,  I suggest using your favorite online nutrition calculator to confirm the nutritional value of this recipe based on the actual ingredients that you use.

Did you know that the best way to support your favorite bloggers is to comment and rate recipes, and share on social media? If you loved this recipe, please comment and give it a five ⭐ rating in the comment section below. If you’re a pinner, pin this post using the Pin buttons at the top and bottom of this post and in the recipe card above. Thank you for your support!

BACK TO TOP

Chicken and Beef Cannelloni

February 21, 2025 by Neena Panicker 4 Comments

Cannelloni in baking dish

This Ground Chicken and Beef Cannelloni combines two types of meat for a rich and flavorful Italian pasta dish. Tender pasta sheets are filled with a savory blend of ground beef and chicken, then smothered in marinara sauce and melted cheese, which delivers terrific flavor. This homemade cannelloni recipe rivals any restaurant version and can be made ahead for busy weeknights.

Chicken and beef cannelloni in baking dish.

This post contains affiliate links. As an Amazon Associate, I earn from qualifying purchases. Please read the disclosure.

This delicious beef and chicken cannelloni is a perfect Sunday dinner pasta recipe or special occasion pasta dish that goes beyond the usual lasagna or stuffed shells.

If you think that cannelloni is a dish best left to restaurants, I beg to disagree! it’s actually as approachable as making lasagna.

While traditional cannelloni often uses only beef, I like to use a mix of meat and chicken. Prosciutto, marsala wine, and Parmesan add complexity to the filling.

I used to avoid making cannelloni because I had to use pastry bags to stuff the cannelloni shells, which was messy. Learning how to make Italian beef cannelloni with lasagna sheets was a game-changer!

I like to prepare the filling in advance and refrigerate it. It makes assembly that much easier, making it perfect for a make-ahead classic Italian dinner for the family or entertaining!

➡ If you enjoy pasta recipes, try some of my other recipes like shrimp broccoli mushroom pasta, Cajun chicken pasta, and chicken curry pasta.

Ingredients and Tips

🧂 Ingredients You’ll Need for Baked Cannelloni

Ingredients for cannelloni - ground meat, prosciutto, onion, garlic, oil, eggs, parmesan, tomato sauce, parsley, lasagna sheets, mozzarella

💡 Tips for this Chicken and Ground Beef Cannelloni Recipe

🍅 Tomato Sauce: I prefer to make my sauce from scratch but you can use a store-bought pasta sauce. Rao’s is my preferred brand. You can also use your favorite bolognese sauce or meat sauce.

🍗 Meat: I like to use a mix of ground beef and ground chicken, not just because it’s a leaner option but because I like the flavor. You can substitute the chicken with beef.

🥣 Filling: Grinding the meat mixture in a food processor makes the filling airy. Although this isn’t a required step, I highly recommend it if you have the time. Add just enough sauce to the filling so it isn’t too dry but still sticks together.

🧀 Cheese: Try and use freshly grated parmesan cheese and mozzarella cheese. They are much more flavorful. You could also use fresh mozzarella. Tear the ball into small pieces and spread it over the sauce.

🍝 No Boil Lasagna: I find it way easier to use oven ready lasagna sheets (no boil) and roll them up with the meat mixture. It cuts out all the mess! You’ll need to blanch them first. Don’t overcook them or they’ll fall apart. Cook them until they’re just pliable.

If you can find fresh pasta sheets, that cuts down on some time because they don’t need to be blanched. You could also use cannelloni tubes or manicotti pasta tubes. Cook them as directed and use a piping bag to fill them.

🥄 Bechamel Sauce: Many recipes for cannelloni use bechamel sauce. I don’t use it because I prefer a tomato-forward flavor but feel free to add bechamel white sauce over the pasta sauce in the final step.

❓ FAQs


Can I make this cannelloni ahead of time?

For make ahead easy beef cannelloni, assemble it up to 24 hours in advance and store it covered in the refrigerator before baking. You can also prepare only the filling ahead of time, and that cuts down on some time when preparing a weeknight meal.

What if I can’t find no-boil lasagna sheets?

You can use manicotti or cannelloni tubes. To make this cannelloni without tubes, regular lasagna noodles will work – cook them according to package directions until al dente.

What can I substitute for marsala wine?

Dry white wine or chicken broth can be used instead of marsala. While you’ll lose some unique marsala flavor, it’ll still be delicious.

Can I add vegetables to the filling?

You can add finely chopped spinach, mushrooms, or grated zucchini. Be sure to remove any excess moisture before adding to the filling.

What should I serve with this?

A simple green salad and garlic bread make great sides for this recipe.

♨️ How To Make Easy Cannelloni

Cannelloni collage of meat, prosciutto, onions, and being cooled.
  1. Heat a saute pan over medium heat. Add oil and when heated, add beef and chicken. Saute until they lose their pink color.
  2. Add prosciutto and saute briefly.
  3. Add onion, and garlic, and cook until the onions are soft, about 3 to 5 minutes. Deglaze with the marsala wine and simmer until the liquid evaporates, scraping the bottom of the pan so the brown bits are incorporated.
  4. Set aside to cool so the eggs don’t scramble in a subsequent step!
Cannelloni collage of boiling pasta, meat mixture, and pasta filled and rolled.
  1. Bring a large pot of salted water to a boil. Line a couple of baking sheets with aluminum foil. Lightly grease the foil. Cook the pasta for about 2 to 3 minutes, working with three lasagna sheets at a time until they’re pliable. Be sure not to overcook them! Lay the lasagna sheets on the foil. Set aside.
  2. Once the beef mixture has cooled, add eggs, parmesan, some pasta sauce, and parsley. Mix well. Use a food processor to mince the meat mixture, which makes it airy. This step is optional but recommended.
  3. Spread some chicken and beef mince at the short edge of a blanched lasagna sheet. 
  4. Roll it up into a cylinder and place it seam-side down on the sauce. Repeat with remaining lasagna sheets.
Cannelloni collage of dish with sauce, cannelloni rolls, sauce, cheese on top.
  1. Preheat the oven to 425 degrees F (220 degrees C). Spread some tomato sauce in a 9 x 13 baking dish. (Note: the picture above is for half the recipe)
  2. Arrange the cannelloni on top of the sauce.
  3. Top the cannelloni with the remaining sauce, making sure the cannelloni is wholly covered.
  4. Sprinkle your no-boil lasagna cannelloni with cheese and cover with foil. Bake for 25 minutes, then remove the foil and bake until browned and bubbling.
Cannelloni in baking dish
Print Recipe
5 from 1 vote

Ground Beef and Chicken Cannelloni Recipe

This homemade beef and chicken cannelloni uses no-boil lasagna noodles for a foolproof way to make an Italian pasta bake for Sunday dinner. The rich meat filling combines ground beef and chicken with prosciutto and marsala wine, all wrapped in tender pasta and smothered in marinara and two types of cheese. This recipe can be made ahead and creates restaurant-quality stuffed pasta that's easier than you think and guaranteed to become a new family favorite.
Prep Time45 minutes mins
Cook Time30 minutes mins
Total Time1 hour hr 15 minutes mins
Course: Main Dishes
Cuisine: Italian
Main Ingredient: beef
Method: Non Instant Pot
Servings: 8 servings
Calories: 473kcal
Author: Paint the Kitchen Red

Ingredients

  • water to blanch lasagna sheets
  • salt to blanch lasagna sheets
  • 16 no boil lasagna sheets
  • 2 teaspoon olive oil
  • ½ lb ground beef (500 grams)
  • ½ lb ground chicken (500 grams)
  • 4 oz prosciutto diced (113 grams)
  • ½ cup onion diced
  • 1 tablespoon garlic minced
  • ½ teaspoon crushed red pepper optional
  • ¼ cup marsala wine or sherry
  • 2 eggs
  • 1 cup parmesan cheese grated [See Note 1]
  • ¼ cup fresh parsley chopped
  • 3 cups marinara sauce [See Note 2]
  • 1¼ cups mozzarella cheese shredded [See Note 1]
  • ¼ cup parmesan cheese grated [See Note 1]

Instructions

Prepare the Lasagna Sheets

  • Bring a large pot of water with salt to a boil.
  • Line a couple of baking sheets with aluminum foil and lightly grease the foil.
  • Blanch the lasagna sheets for about 2 to 3 minutes, or until pliable. Don't overcook them or they will fall apart. Work with 3 sheets at a time.
  • Lay the 16 no boil lasagna sheets on the foil and let them dry thoroughly.

Make the Filling

  • Heat a saute pan over medium heat. Add 2 teaspoon olive oil and saute ½ lb ground beef and ½ lb ground chicken until browned.
  • Add 4 oz prosciutto, ½ cup onion, and 1 tablespoon garlic and ½ teaspoon crushed red pepper (if using) and cook until the onions are soft, about 3 to 5 minutes.
  • Deglaze with the ¼ cup marsala wine and simmer until the liquid evaporates.
  • Allow to cool slightly or the eggs will scramble in the next step!
  • Add 2 eggs, 1 cup parmesan cheese, 2 tablespoon marinara sauce [See Note 3], and ¼ cup fresh parsley.
  • Transfer mixture to a food processor and mince. [See Note 4]

Assemble the Dish

  • Spread 2 cups of marinara sauce in a 9 x 13 baking dish.
  • Spread 2 tablespoon of the filling at the short edge of a blanched lasagna sheet.
  • Roll it up into a cylinder and place it seam-side down on the sauce. Repeat with remaining lasagna sheets.
  • Top the cannelloni with remaining marinara sauce, making sure the cannelloni is covered.
  • Sprinkle with 1¼ cups mozzarella cheese and ¼ cup parmesan cheese and cover with foil.
  • Bake for 25 minutes, then remove the foil and bake until browned and bubbling.

Video

Notes

Note 1: Try to use freshly grated cheese. It has so much more flavor!
Note 2: I prefer to use homemade sauce. Try my quick and easy San Marzano tomato sauce. 
Note 3: Add just enough sauce so that the filling isn’t too dry, but it shouldn’t be so wet that the filling falls apart.
Note 4: Using a food processor makes the filling lighter and airier. This isn’t a required step, but I recommend it if you have the time.
Note 5: The filling can be made ahead and refrigerated. The whole dish can be assembled and refrigerated for 24 hours. Bake before serving.
 

Nutrition

Serving: 2g | Calories: 473kcal | Carbohydrates: 33g | Protein: 32g | Fat: 23g | Sodium: 1089mg | Fiber: 3g

I am not a certified nutritionist.  I provide my best estimate of nutritional information merely as a courtesy to my readers.  If you depend on nutritional information for dietary or health reasons,  I suggest using your favorite online nutrition calculator to confirm the nutritional value of this recipe based on the actual ingredients that you use.

Did you know that the best way to support your favorite bloggers is to comment and rate recipes, and share on social media? If you loved this recipe, please comment and give it a five ⭐ rating in the comment section below. If you’re a pinner, pin this post using the Pin buttons at the top and bottom of this post and in the recipe card above. Thank you for your support!

BACK TO TOP

Simple San Marzano Tomato Sauce

January 30, 2025 by Neena Panicker 11 Comments

Marinara sauce in a large pot.

A pasta sauce is an Italian kitchen’s most crucial recipe! Make the perfect homemade San Marzano tomato sauce with this easy, restaurant-quality recipe with authentic Italian flavors. Bursting with flavor, this is a simple Italian pasta sauce made from scratch in minutes!

Marinara sauce in a large pot.

This post contains affiliate links. As an Amazon Associate, I earn from qualifying purchases. Please read the disclosure.

Whether preparing a quick weeknight Italian meal or hosting an Italian-themed dinner party, a homemade tomato sauce recipe is at the heart of Italian cuisine. My Italian Pomodoro sauce is a vibrant, timeless sauce that is so versatile.

It can be tempting to buy a jar of pasta sauce when you’re making an Italian dish. But I want to tell you that it’s so easy to make it from scratch that you’ll want to make this sauce a part of your weekly meal rotation!

I like to make a double batch and freeze the sauce for future use. It’s so easy! I use this sauce to make lasagna, pizza, eggplant parmesan, cannelloni, and simple dishes like penne pomodoro.

By using canned whole San Marzano tomatoes and pantry ingredients, you can create a marinara sauce that’s DIY, homemade, and healthy!

➡ This sauce works well with homemade cannelloni or eggplant parmesan. If you enjoy Italian food, try some of my other recipes, such as Instant Pot spaghetti and meat sauce and Instant Pot penne with sausage!

Ingredients and Tips

🧂 Ingredients You’ll Need for this Simple San Marzano Tomato Sauce Recipe

san marzano tomato sauce ingredients on a wood background - tomatoes, onion, garlic, oil, pepper, salt, basil, crushed red pepper.

💡 Ingredient and Recipe Tips for Italian Pasta Sauce

🍅 Tomato: The recipe calls for San Marzano peeled tomatoes, which have excellent flavor and rival fresh tomatoes. Cento brand is available at most American grocery stores. Buy whatever brand of San Marzano plum tomato you can afford to buy.

🍯 Sugar: The ingredients image does not have sugar, but I like adding it! I find that sugar enhances flavor and balances tartness. You can reduce or omit. You can add ½ cup shredded carrots to give it some sweetness.

🌶️ Spices: Add more crushed red pepper if you like spicy sauce.

🌿 Herbs: Fresh herbs taste great when in season. If using fresh basil, add ¼ cup fresh basil (minced) to the sauce during the last minute of simmering. Or add ¼ cup of chopped fresh parsley or a tablespoon of fresh oregano (1 teaspoon dried).

❓ FAQs


Do I need to drain the tomatoes?

The San Marzano whole tomatoes are added with the liquid. No draining required.

Can I make the sauce with fresh tomatoes?

To make the sauce with fresh San Marzanos, you’ll need to blanch and peel the tomatoes.

Can I use another form of canned tomatoes?

Yes, you can use crushed tomatoes. You will get a smoother sauce with less texture and flavor. Authentic San Marzano tomatoes are grown in a specific region of Italy and are especially suited for making Italian tomato sauce.

How can I make the sauce smoother?

Once it’s done cooking, use an immersion blender to smooth the sauce. Once the sauce has cooled, you can also use a regular blender.

Can I freeze the sauce?

First, cool the sauce completely. Pour the sauce in 1-cup portions into a freezer bag (I like to set the bag in a large mug). Squeeze out as much air as possible and lay the bag flat on a baking sheet. The frozen bags can then be stacked.

♨️ How To Make San Marzano Tomato Sauce

Collage of cooking steps for san marzano sauce pasta sauce.
  1. Heat oil in a large saucepan over medium-high heat.
  2. Saute onions and garlic.
  3. Add San Marzanos and spices and simmer.
  4. If desired, cool the sauce and blend lightly to make it smooth. Serve over your favorite pasta or as a pizza sauce.
Marinara sauce in a large pot.
Print Recipe
5 from 1 vote

San Marzano Sauce – Homemade Pasta Sauce

 A quick and easy tomato sauce that goes with all kinds of Italian dishes.
Prep Time10 minutes mins
Cook Time35 minutes mins
Total Time45 minutes mins
Course: Sides
Cuisine: Italian
Main Ingredient: vegetarian
Method: Non Instant Pot
Servings: 10 servings
Calories: 81kcal
Author: Paint the Kitchen Red

Ingredients

  • ¼ cup olive oil
  • 1 cup onion diced
  • 2 tablespoon garlic minced
  • 2 cans San Marzano tomatoes (peeled whole) – each can is 28 oz. or 794 grams
  • 2 tablespoon granulated sugar optional [See Note 1]
  • 2 teaspoon dried basil leaves
  • ½ teaspoon crushed red pepper or to taste
  • ½ teaspoon black pepper powder
  • 1 teaspoon salt or to taste

Instructions

  • Heat oil in a large saucepan over medium-high heat.
  • Add onions and saute until translucent.
  • Add garlic and saute for 1 minute, stirring constantly.
  • Stir in tomatoes (with juice) and simmer for 10 minutes.
  • Using a potato masher, crush the tomatoes until broken up into smaller pieces.
  • Simmer for another 10 minutes.
  • Add sugar, basil, crushed red pepper, black pepper and salt. [See Note 2]
  • Simmer for 15 minutes.
  • Use San Marzano tomato sauce in all your favorite Italian recipes, or serve over plain pasta! [See Note 3]

Video

Notes

Note 1: I like the balance the sugar provides! For natural sweetness, you can omit it or replace it with ¼ cup of shredded carrots.
Note 2: Use fresh herbs when they are in season. Add ¼ cup of chopped fresh basil during the final minute of simmering (omit dried basil).
Note 3: The sauce has a rustic, coarse texture. If you prefer a smoother sauce, use an immersion blender. Alternatively, let the sauce cool and use a regular blender. 

Nutrition

Serving: 0.5cup | Calories: 81kcal | Carbohydrates: 9g | Protein: 1g | Fat: 5g | Saturated Fat: 1g | Monounsaturated Fat: 4g | Fiber: 2g

I am not a certified nutritionist.  I provide my best estimate of nutritional information merely as a courtesy to my readers.  If you depend on nutritional information for dietary or health reasons,  I suggest using your favorite online nutrition calculator to confirm the nutritional value of this recipe based on the actual ingredients that you use.

Did you know that the best way to support your favorite bloggers is to comment and rate recipes, and share on social media? If you loved this recipe, please comment and give it a five ⭐ rating in the comment section below. If you’re a pinner, pin this post using the Pin buttons at the top and bottom of this post and in the recipe card above. Thank you for your support!

BACK TO TOP

Authentic Thai Recipes

January 23, 2025 by Neena Panicker Leave a Comment

Thai Recipes collage with text easy Thai Recipes for beginners!

Thai Recipes that are restaurant quality! From chicken curries like Thai massaman curry and yellow curry and chicken coconut soup to Thai peanut noodles, this collection of spicy, aromatic, and easy Thai Recipes are perfect one-pot meals for a busy weeknight or to serve at a dinner party! Note: All recipes have Instant Pot and Stovetop directions!

Thai Recipes collage with text 8+ easy Thai Recipes for beginners!

This post contains affiliate links. As an Amazon Associate, I earn from qualifying purchases. Please read the disclosure.

Thai cuisine blends sweet, sour, salty, and spicy flavors into amazingly flavorful dishes. Homemade Thai food is much easier to make than you might think. If I can do it, you can too!

The iconic Thai red curry chicken perfectly embodies the essence of Thai cooking, combining creamy coconut milk with aromatic spices. These easy Thai recipes make it simple for home cooks to create restaurant-quality Asian dinner recipes with minimal effort.

The versatility of Thai recipes allows cooks of all skill levels to expand their cooking repertoire. Fresh herbs, bold spices, and innovative techniques come together to create meals that are both accessible and exciting.

From quick weeknight dinners to family gatherings or dinner parties, Thai recipes offer a wide variety of options. By mastering these homemade Thai foods, you’ll be able to wow everyone at the dinner table.

Thai Recipes

1
Instant Pot Thai Red Curry with colorful vegetables in white bowl with spoon on rich red napkin.
Instant Pot Thai Red Curry with Chicken
This Instant Pot Thai Red Curry with Chicken is delightful (and addicting!) It makes a perfect meal when paired with Jasmine Rice, and comes together so quickly in the Instant Pot. Perfect for a busy weeknight meal.
Thai Red Curry
2
Instant Pot Thai Green Curry with Chicken with colorful green curry in white bowl on three colorful napkins. With lime slice and chilies on a black background- Paint the Kitchen Red
Instant Pot Thai Green Curry with Chicken
Instant Pot Thai Green Curry is a creamy coconut curry with the flavors of green chilies, Thai Basil, lime, coriander, cumin. This spicy curry will rival your favorite Thai takeout green curry but is so easy that it can be ready in less than 20 minutes.
Green Curry
3
Instant Pot Panang Curry with chicken, green beans, red and green peppers, Thai basil in a white bowl on a light wood background
Thai Instant Pot Panang Curry with Chicken
This Instant Pot Thai Panang Curry with Chicken tastes amazing!  It’s quick and easy enough to make on a weeknight and tastes like you got if from a Thai restaurant.  Creamy coconut milk, Panang curry paste, chicken, vegetables, and spices come together to make a delicious curry that tastes great with jasmine rice.
Panang Curry
4
Instant Pot Thai Yellow Curry with Chicken in white bowl on blue napkin, with fried rice in another bowl
Thai Instant Pot Yellow Curry with Chicken
This Instant Pot Thai Yellow Curry with Chicken has the perfect combination of flavors: creamy coconut milk, Thai yellow curry paste, chicken, and vegetables. To top it off, curry powder gives this Thai yellow curry its unique taste.  This curry is soul-satisfying comfort food perfect for any time of year.
Yellow Curry
5
Instant Pot Beef Massaman Curry, golden colored and rich, in white bowl with bowl of peanuts and white rice on red and gold napkin on black background.
Thai Instant Pot Massaman Curry with Beef
Fragrant and Flavorful Instant Pot Thai Massaman Curry with Beef has creamy coconut, tender beef, potatoes and crunchy peanuts that combine to make this a highly satisfying dish that can be put together quickly for a delicious weeknight meal.
Massaman Curry
6
Instant Pot Fish Curry in blue bowl on blue napkin garnished with chili and red chili
Thai Fish Curry – Choo Chee Curry
Thai Coconut Fish Curry is one of the quickest dinner recipes you’ll make. It requires almost no prep but delivers amazing flavor. Flaky cod is gently cooked in a vibrant sauce with flavors of red chilies, lime leaves, and coconut. Creamy coconut milk perfectly balances the spice of the sauce, which tastes best when absorbed by a bowl full of jasmine rice.
Thai Fish Curry
7
2 Asian-print bowls of Instant Pot Thai coconut soup with herbs in the background
Instant Pot Thai Coconut Soup (Tom Kha Gai)
This authentic Instant Pot Thai Coconut Soup with Chicken (Tom Kha Gai) is so easy, yet so flavorful. Galangal, lemongrass, and lime leaves combined with coconut milk and other spices give this soup a special flavor that's the perfect combination of sour, salty, sweet and spicy! A guaranteed crowd-pleaser.

Thai Coconut Soup
8
Instant Pot Thai Peanut Noodles in black bowl garnished with cilantro - Paint the Kitchen Red
Instant Pot Thai Peanut Noodles
Instant Pot Thai Peanut noodles is my take on a Thai restaurant favorite. In this flavorful dish, plain spaghetti is elevated to a different level with a vibrant peanut sauce. Rice wine vinegar, brown sugar, and chili garlic sauce give the dish its distinct tangy, sweet, spicy flavor.  This dish can be made vegetarian by omitting the chicken and substituting fish sauce with soy sauce.
Thai Peanut Noodles
9
Instant Pot Thai Grilled Chicken Thighs on dark background with sprinkled cilantro and green onions
Thai Grilled Chicken Thighs
Thai Grilled Chicken (Gai Yang) is a popular Thai street food.  This Thai barbecue chicken recipe uses chicken thighs, which are meaty and perfect for cooking in the Instant Pot, because they stay moist.  Finishing on the grill and glazing with Thai sweet chili sauce gives the chicken a spicy-sweet barbecue flavor that’s irresistible! The Thai Chicken thighs are made in the Instant Pot and finished on the grill. [Grill-only instructions also included.]
Thai BBQ Chicken

If you loved this recipe collection, please share it on social media using the social media share buttons at the top and bottom of this post. Thank you so much!

BACK TO TOP

Instant Pot Error Codes Complete Guide

January 6, 2025 by Neena Panicker Leave a Comment

Instant Pot Error Codes A Complete Guide with image of Instant Pot display panel.

When your Instant Pot starts flashing an error message, it can be concerning – especially if you’re in the middle of preparing dinner! But don’t panic – this is just a way of alerting you to issues that can be usually be resolved quickly. This comprehensive guide covers Instant Pot error codes you might encounter, from common lid warnings to more complex sensor issues, with clear solutions to get you back to cooking.

Instant Pot Error Codes A Complete Guide with image of Instant Pot display panel.

This post contains affiliate links. As an Amazon Associate, I earn from qualifying purchases. Please read the disclosure.

Table of Contents


  1. Understanding Instant Pot Error Messages
  2. Common Operational Error Codes
    1. Lid Error
    2. OvHt, Burn or Food Burn Notice
    3. POT Error
  3. Pressure-Related Errors
    1. PrSE (Pressure Steam Error)
    2. noPr (No Pressure)
  4. Sensor Error Codes
    1. Temperature Sensor Errors (C1, C2)
    2. C5 (High Temperature Error)
    3. Pressure Sensor Errors (C6, C6L, C6H)
    4. C7 (Heating Element Error)
    5. C9 (Sensor Connection Error)
  5. Preventing Common Errors
  6. When to Contact Customer Service
  7. Quick Reference Chart

Understanding Instant Pot Error Messages

Your Instant Pot has multiple safety features and sensors that constantly monitor its operation.

Numerous safety features help reduce common errors. Safety features include pressure sensor technology, lid close detection, lid lock technology, overheat protection, and automatic temperature and pressure controls.

When something isn’t right, the display screen will show an error code to help you identify and fix the problem.

While these pressure cooker error codes might seem cryptic at first, they’re straightforward once you know what they mean.

Before doing anything else, turn the unit off, let it cool down a bit, and turn it back on.

Common Instant Pot Error Codes

Lid Error

Problem: Your Instant Pot’s lid isn’t correctly positioned for the selected cooking program.

Solution:

  • For pressure cooking: Turn the lid clockwise until it’s fully secured
  • For sautéing: Remove the lid altogether – this function is used without a lid
  • Double-check that the lid is clean and not damaged

OvHt, Burn, or Food Burn Notice

Problem: The Instant Pot has detected that food might be burning on the bottom of the pot.

Solution:

  1. Press Cancel and release pressure according to recipe instructions
  2. Once safe, open the lid and check the food
  3. Make sure there’s enough liquid in the pot
  4. Check for burnt food stuck to the bottom
  5. If needed, clean the pot and start again with more liquid
  6. Get more detailed information about the Instant Pot burn message.

POT Error

Problem: The Instant Pot can’t detect the inner pot.

Solution:

  1. Turn the unit off and then on
  2. Ensure the stainless steel inner pot is placed correctly inside the cooker base unit
  3. Remove and reinsert the pot to reset the sensor
  4. Check that the heating element and sensors are clean and dry

Pressure-Related Errors

PrSE (Pressure Steam Error)

Problem: Pressure has built up during a non-pressure cooking program. This is usually because you are sauteing with the lid on.

Solution:

  1. For Sauté mode: Keep the lid off
  2. Some models allow you to customize the Saute level: lower to Medium temperature setting
  3. Clean the lid thoroughly, checking:
    – Steam release valve
    – Float valve
    – Sealing ring
    – Anti-block shield
  4. Clean the heating element
  5. Ensure the steam release is in the “Vent” position

noPr (No Pressure)

Problem: The pot isn’t building pressure during the pre-heating cycle.

Solution:

  1. Check for steam leaks around the lid
  2. If cooking frozen food, try restarting the program
  3. Ensure the sealing ring is installed correctly
  4. Add more liquid if needed
  5. Get more detailed information on why your Instant Pot is not sealing

Learn more about your Instant Pot…

  • Natural or Quick Release: What is Instant Pot natural release vs quick release and when should you use them?
  • Instant Pot Tips and FAQs: What are Instant Pot frequently asked questions?
  • Instant Pot Not Sealing: Why is your Instant Pot not sealing and what can you do to fix it?
  • Common Instant Pot Problems: This Instant Pot troubleshooting guide explains common problems and errors and how to solve them.
  • Sous Vide Button: How to use sous vide Instant Pot function for perfectly cooked foods.

Sensor Error Codes

Temperature Sensor Errors (C1, C2, C3, C4)

Problem: The temperature sensors aren’t working properly.
Solution: These are hardware issues requiring professional attention. Contact Instant Pot customer service.

C5 (High Temperature Error)

Problem: The pot has detected excessive heat.

Solution:

  1. Verify the inner pot is correctly placed
  2. Add appropriate amount of liquid
  3. Let the unit cool down before restarting

Pressure Sensor Errors (C3, C6, C6L, C6H)

Problem:

  • C3: General pressure sensor error
  • C6/EC: General pressure sensor failure
  • C6L: Low-pressure sensor issue
  • C6H: High-pressure sensor problem

Solution: While you can try removing and reinserting the pot, these typically require customer service intervention. If you are handy at electronics, read about how to fix these sensor errors.

C7 (Heating Element Error)

Problem: The heating element isn’t functioning correctly. This is a common error and has many potential causes.

Solution:

  1. Make sure the steam release valve is set to Sealing
  2. Clean the area that the sealing ring sits in
  3. Check and replace the sealing ring if necessary
  4. Use the recommended minimum amount of liquid
  5. Clean the float valve and steam release valve
  6. Clean around the heating element once cooled
  7. If problems persist, contact customer service

C8 (Wrong Pot Error)

Problem: The heating element isn’t functioning correctly. This is a common error and has many potential causes.

Solution:

  1. Make sure you’re using the correct inner pot (liner) for your unit
  2. Make sure the metal disk in the base unit (that the pot sits on) is completely clean
  3. Wiggle the pot a bit and rotate it 180°
  4. If you have the Duo Evo Plus model and you’re getting this error in Saute mode, set the saute temperature level to 3 (medium) or lower.

Instant Pot Tips and Tricks

Delay Start
Learn about how to use the Instant Pot Delay Start feature, which allows you to begin pressure cooking at a future time.

Pot in Pot
Find out how to use the Instant Pot pot in pot cooking method, which allows you to cook multiple foods together.

Cooking Times
Find out Instant Pot Cooking Times and what method of pressure release to use.

C9 (Sensor Connection Error)

Problem: There is an issue with the male/female sensor connection on models with the air fryer lid.

Solution:

  1. Press Cancel
  2. Make sure there is no debris on the pronged connectors
  3. Make sure there are no loose screws on the lid
  4. Push down on the lid so the pronged connector on the lid makes contact with the connector on the pot.
  5. If problems persist, contact customer service

Preventing Common Errors

To avoid these error codes and ensure smooth operation:

  1. Always use sufficient liquid (minimum amounts by pot size):
    – 3 Qt: 1 cup (8 oz / 250 mL)
    – 6 Qt: 1½ cups (12 oz / 375 mL)
    – 8 Qt: 2 cups (16 oz / 500 mL)
  2. Keep all components clean and free of food debris
  3. Regularly inspect the sealing ring for damage
  4. Use only the correct inner pot for your model
  5. Follow recipe instructions for release methods

When to Contact Customer Service

While many errors can be resolved at home, contact Instant Pot support if you:

  • Keep getting the same error despite trying the above solutions
  • Experience any C1, C2, C6, or C9 errors
  • Notice physical damage to any components
  • Have safety concerns

Make sure you have your receipt and know what model you have when contacting customer service for warranty-related issues.

Quick Reference Chart

Error CodeProblemSolution
LidLid is not in the correct position for the selected programMake sure the lid has been turned clockwise all the way when pressure cooking, and make sure the lid is NOT on for the Saute function.
OvHt, Burn
or Food Burn
Instant Pot is overheatingClean the sealing ring and float valve.
Add the minimum quantity of liquid for your model.
Deglaze the inner pot and make sure that there’s nothing stuck on the bottom.
Get more detailed information about Instant Pot food burn error.
PotThe inner pot is not being detectedMake sure the inner pot is in place. If it’s already in place, take it out and put it back in. The sensor may not have detected it.
PrSEPressure has accumulated during a non-pressure cooking program
Clean the lid and ensure no food is stuck in the areas around the steam release, float valve, sealing ring, and anti-block shield.
Clean around the heating element.
Make sure the steam release is in the Vent position.
If you’re using Saute mode, make sure the lid is not on.
Lower the temperature to Medium setting if you have a model that allows the Saute temperature to be adjusted (e.g., Duo Evo Plus).
noPrWorking pressure is not reached during the pre-heating cycle.Make sure the sealing ring and float valve are clean and not damaged.
See reasons why Instant Pot not sealing.
C1Faulty temperature sensorCreate a support ticket with Instant Pot customer service.
C2Faulty temperature sensorCreate a support ticket with Instant Pot customer service.
C3Faulty sensorCreate a support ticket with Instant Pot customer service.
C4Faulty temperature sensorCreate a support ticket with Instant Pot customer service.
C5The temperature is too highUnplug the Instant Pot and plug it back in. Ensure the stainless steel inner pot is placed correctly in the base unit.
Make sure there’s enough liquid in the Instant Pot.
If all else fails, saute the food on the stovetop and add it back into the Instant Pot to pressure cook.
C6 or ECFaulty pressure sensorPress Cancel, take the pot out, put it back in, and try again.
Create a support ticket with Instant Pot customer service.
C6LFaulty low-pressure sensorCreate a support ticket with Instant Pot customer service.
C6HFaulty high-pressure sensorCreate a support ticket with Instant Pot customer service.
C7The heating element has failedMake sure the steam release mechanism is in the Sealing position.
Check the sealing ring and replace it if needed.
Add enough thin, water-based liquid to the inner pot based on size:
— 3 Qt – 1 cup (8 oz / 250 mL)
— 6 Qt – 1 ½ cups (12 oz / 375 mL)
— 8 Qt – 2 cups (16 oz / 500 mL)
Thoroughly clean the float valve and steam release valve with a brush.
Once cool, clean the area around the heating element.
Create a support ticket with Instant Pot customer service.
C8The wrong inner pot is being usedMake sure you’re using the stainless steel inner pot/liner meant for your model.
Press Cancel, lift the liner up, turn it 180 degrees, put it back in, and restart.
Use the custom temperature setting for Saute mode and set it to Medium
C9Sensor connection problemPress down on hard to ensure the air fryer lid and the pot connect correctly.

Best Instant Pot Chicken Tinga

November 13, 2024 by Neena Panicker 12 Comments

Instant Pot Chicken Tinga rice bowl in orange bowl with chicken tinga tacos and nachos in the background - Paint the Kitchen Red

This Authentic Instant Pot Chicken Tinga recipe is a flavor-packed delight!  Bone-in chicken cooked with a vibrant combination of spices results in a delicious chicken filling that you can use to make chicken tinga tacos, chalupas, burritos, nachos, enchiladas, or a rice bowl or burrito bowl. 

Instant Pot Chicken Tinga rice bowl in orange bowl with chicken tinga tacos and nachos in the background

This post contains affiliate links. As an Amazon Associate, I earn from qualifying purchases. Please read the disclosure.

This chicken tinga Instant Pot recipe was adapted from an authentic recipe (known as tinga de pollo) from the state of Puebla in Mexico, which is best known for mole. 

Tinga de pollo is a shredded chicken recipe that’s cooked with smoky chipotle peppers, spices, onions, and tomatoes.

This Instant Pot chipotle chicken recipe can be made with pork or beef too. Serve the chipotle flavored meat in tacos, burritos, enchiladas, on a tostada or nachos, or as part of a rice bowl.

My two favorites are chicken and pork tinga.  When I make Instant Pot pork tinga, I fry up some chorizo to combine with the pork – it’s pretty delicious!  But today’s recipe is for the chicken version.

I love the burrito bowls you get at the Chipotle restaurant chain and this chicken tinga recipe is perfect to make those. Burrito bowls are a great entertaining idea. Make the Instant Pot tinga a day ahead, which allows the chicken to become even more flavorful.

➡ Looking for more Latin recipes? Try my Instant Pot carne asada, arroz con Pollo, or carnitas. Easy recipes you’re going to love!

Ingredients and Tips

🧂 Chicken Tinga Ingredients

Instant Pot Chicken Tinga Ingredients 1 - chicken, onion, tomato, vinegar, chipotle, garlic, broth - Paint the Kitchen Red
Instant Pot Chicken Tinga Ingredients 2 - oregano, salt, cumin, thyme, marjoram, brown sugar (optional) - Paint the Kitchen Red

💡 Recipe and Ingredient Tips


⏲️ Pressure Cooking Time:

  • Bone-in thighs/drumsticks are ideal. Add 1-2 minutes for larger pieces.
  • For boneless thighs, reduce to 8-9 minutes.
  • Using pork shoulder? Cook 70 minutes
  • Trying beef chuck? Cook 55 minutes Pro tip: Cut pork or beef into 3 large chunks!

🥣 Garlic Sauce: Here’s my shortcut secret sauce recipe I use with all kinds of cuisines including Middle Eastern and Latin:

  • ¼ cup Greek/whole milk yogurt
  • 1 tablespoon mayo
  • ⅛ teaspoon salt
  • 1 tablespoon lemon juice
  • ½ teaspoon minced garlic
  • Optional: ½ jalapeño, finely chopped

🍬 Brown Sugar: Sugar balances all the flavors – salty, sour, spicy, and sweet come together perfectly. Feel free to skip it if you prefer.

🌶️ Chipotle Chiles: Skip the canned chipotles and grab a jar of diced chipotle peppers instead. They’re super convenient and last much longer in your fridge.

🔪 Making the Marinade: Blending delivers the best flavor, but fine chopping works too. I use a Vitamix blender with mini blender attachment.

🎛️ Reducing Sauce & Sautéing Chicken: Use a splatter screen when reducing the sauce – it gets bubbly! Don’t skip the final sauté step for extra flavor! Try a frying pan or broiler to crisp up the chicken.

🌮 Serving Ideas: Perfect for taco bars! Top chicken tinga tacos with:

  • chopped avocados or guacamole
  • pico de gallo
  • salsa
  • crema
  • queso fresco or cotija cheese
  • cilantro
  • caramelized onions, chopped onions or pickled onions
  • chopped serrano chiles, jalapenos or pickled jalapeno
  • thinly sliced radishes
  • fresh lime

🍗 Make ahead: Cook the chicken and refrigerate. Sauté just before guests arrive!

How to Make Chicken Tinga

See full instructions in the recipe card at the bottom.

⏲️ Instant Pot Method

  1. Make the marinade.
  2. Add chicken and marinade to the inner pot.
  3. Pressure cook.
  4. Release pressure.
  5. Reduce to thicken.
  6. Shred the chicken.
  7. Saute the chicken.
Instant Pot chicken tinga instruction collage - marinade ingredients in blended, chicken in sauce.
  1. Add onions, tomatoes, vinegar, garlic, chipotle chiles, oregano, marjoram, salt, thyme, cumin, and brown sugar to a blender jar.
  2. Blend until it forms a smooth paste.
  3. Add broth, chicken, and blended sauce.
  4. Stir to combine.
Instant Pot pressure cook instructions collage: close lid, program, float valve up, float valve down
  1. Close the lid.
  2. Select Pressure Cook mode and cook on high pressure for 12 minutes.
  3. The display will go from On to 12:00. The float valve will go up after a few minutes. The display will count down to 00:00.
  4. Do a natural release of pressure or a 15-minute natural release. Once the float valve goes down, the lid can be opened.
Instant Pot chicken tinga instruction collage - remove chicken, reduce sauce, shred and saute chicken.
  1. Using a slotted spoon, transfer the chicken from the inner pot into a large bowl and set aside.
  2. Select Saute mode and reduce the sauce until thickened, about 7 to 10 minutes, stirring occasionally. To prevent splatter from the bubbling sauce, use a splatter screen to protect your countertops.
  3. Shred the chicken using two forks. Add in desired quantity of sauce, about ¼ to ½ cup. Mix the chicken and sauce.
  4. Heat a large frying pan over medium-high heat and add vegetable oil. Spread out the shredded chicken on the frying pan and add more sauce if desired. Saute the chicken until brown bits form on the bottom, stirring gently occasionally. Serve pressure cooker chicken tinga in tacos, enchiladas, burritos, on nachos or as part of a rice bowl with any of the toppings described in the tips section above.

♨️ Stovetop Method

  1. Make the sauce: Blend onions, tomatoes, vinegar, garlic, chipotle chiles, oregano, marjoram, salt, thyme, cumin, and brown sugar into a smooth paste.
  2. Bring chicken, broth, and sauce to a boil. Reduce heat to medium-low, cover and cook.
  3. Remove the chicken pieces and set aside.
  4. Continue cooking sauce until reduced.
  5. Once the chicken has cooled down a bit, shred the chicken and add some sauce to it.
  6. Saute the chicken in a large frying pan over medium-high heat. Add the sauce a few tablespoons at a time, until incorporated and the chicken is browned but also saucy.
Instant Pot Chicken Tinga rice bowl in orange bowl with chicken tinga tacos and nachos in the background - Paint the Kitchen Red
Print Recipe
5 from 6 votes

Chicken Tinga

This chicken tinga recipe is perfect for tacos, tostadas, enchiladas, nachos, a rice bowl or taco salad. Packed with flavor, the recipe is adapted from an authentic Mexican recipe made in the slow cooker. Perfect for meal prepping, the chicken can be pressure cooked or made on the stovetop.
Prep Time15 minutes mins
Cook Time45 minutes mins
Total Time1 hour hr
Course: Main Dishes
Cuisine: Mexican/Latin
Main Ingredient: chicken
Servings: 6 servings
Calories: 338kcal
Author: Paint the Kitchen Red

Equipment

  • Instant Pot Pressure Cooker
  • Large Nonstick Frying Pan
  • Splatter Screen
  • Slotted Spoon
  • Large Bowl
  • Meat shredder

Ingredients

  • 1 ½ cup onions coarsely chopped
  • 1 can fire roasted tomatoes 14.5 oz (411 grams)
  • 2 tablespoon apple cider vinegar
  • 2 tablespoon garlic coarsely chopped
  • 2 tablespoon chipotle chiles in adobo sauce chopped (more to taste)
  • 1 tablespoon Mexican oregano
  • 1 ½ teaspoon dried marjoram
  • 1 ½ teaspoon salt or to taste
  • 1 teaspoon dried thyme
  • 1 tablespoon cumin powder
  • 1 teaspoon brown sugar
  • ¼ cup low sodium chicken broth
  • 2 ½ to 3 lbs chicken thighs or drumsticks bone-in skinless (1.2 to 1.4 kg)
  • 2 teaspoon vegetable oil if using

For serving, your choice of:

  • chopped avocados
  • guacamole
  • pico de gallo
  • salsa
  • crema
  • queso fresco
  • cotija cheese
  • cilantro
  • caramelized onions chopped onions or pickled onions
  • chopped jalapeno or serrano chiles
  • fresh lime

Instructions

Instant Pot Instructions

  • Combine onions, tomatoes, vinegar, garlic, chipotle chiles, oregano, marjoram, salt, thyme, cumin, and brown sugar in a blender and blend until smooth.
  • Combine chicken broth, chicken, and blended sauce in the inner pot.
  • Close the lid and pressure cook on High Pressure for 12 minutes.
  • Do a Natural Pressure Release (NPR). If you're short on time, you can do a 15 minute Natural Pressure Release (NPR 15). [Read More: The Different Pressure Release Methods]
  • Using a slotted spoon, transfer the chicken from the inner pot into a large bowl and reserve.
  • Select Saute mode and reduce the sauce until thickened, about 7 to 10 minutes, stirring intermittently. To prevent splatter from the bubbling sauce, use a splatter screen to protect your countertops.
  • Shred the reserved chicken using a meat shredder or two forks. Add in desired quantity of sauce (about ¼ to ½ cup) and stir together the chicken and sauce.
  • Heat a large nonstick frying pan over medium-high heat and 2 teaspoons of vegetable oil. [See Note 1].
  • Spread out the shredded chicken on the frying pan without overcrowding. Add more sauce if desired.
  • Saute the chicken until brown bits form on the bottom, stirring gently occasionally. Add more sauce as needed.
  • Transfer chicken to a serving bowl. Serve with tortillas, rice or salad and your choice of toppings.

Stovetop Instructions

  • Combine onions, tomatoes, vinegar, garlic, chipotle chiles, oregano, marjoram, salt, thyme, cumin, and brown sugar in a blender and blend until smooth.
  • Heat a large saucepan over medium-high heat. Add chicken broth, chicken, and blended sauce to the saucepan and bring to a boil. Reduce heat to medium-low and simmer until the chicken is cooked through, stirring occasionally, about 30 minutes. Transfer chicken pieces to a large bowl and set aside.
  • Reduce the remaining sauce until thickened.
  • Once the chicken is cool enough to handle shred the reserved chicken using a meat shredder or two forks. Add in desired quantity of sauce (about ¼ to ½ cup) and stir together the chicken and sauce.
  • Heat a large nonstick frying pan over medium-high heat and 2 teaspoons of vegetable oil. [See Note 1].
  • Spread out the shredded chicken on the frying pan without overcrowding. Add more sauce if desired.
  • Saute the chicken until brown bits form on the bottom, stirring gently occasionally. Add more sauce as needed.
  • Transfer chicken to a serving bowl. Serve with tortillas, rice or salad and your choice of toppings.

Video

Notes

  • Prep time does not include steps that are already accounted for in the ingredient list, e.g. skinned chicken, chopped onions, minced garlic, etc.
  • Note 1: Sauteing of chicken is optional, but I recommend it!

Nutrition

Serving: 1serving | Calories: 338kcal | Carbohydrates: 9g | Protein: 47g | Fat: 19g | Saturated Fat: 6g | Polyunsaturated Fat: 4g | Monounsaturated Fat: 9g | Cholesterol: 165mg | Sodium: 311mg | Potassium: 243mg | Fiber: 2g | Sugar: 4g

I am not a certified nutritionist.  I provide my best estimate of nutritional information merely as a courtesy to my readers.  If you depend on nutritional information for dietary or health reasons,  I suggest using your favorite online nutrition calculator to confirm the nutritional value of this recipe based on the actual ingredients that you use.

Did you know that the best way to support your favorite bloggers is to comment and rate recipes, and share on social media? If you loved this recipe, please comment and give it a five ⭐ rating in the comment section below. If you’re a pinner, pin this post using the Pin buttons at the top and bottom of this post and in the recipe card above. Thank you for your support!

BACK TO TOP

Shrimp Broccoli Mushroom Pasta

October 23, 2024 by Neena Panicker 9 Comments

Garlic Shrimp Pasta front view

This Shrimp Broccoli Mushroom Pasta recipe features plump shrimp with garden-fresh broccoli, bright bell peppers, and earthy mushrooms in a light, lemony sauce. The dish is topped with grated parmesan, which melts into the sauce and coats the medley of vegetables and seafood.

Garlic Shrimp Pasta front view

This post contains affiliate links. As an Amazon Associate, I earn from qualifying purchases. Please read the disclosure.

This easy garlic shrimp pasta recipe is perfect for when you’re craving Italian food but don’t want to spend hours in the kitchen.

I created this recipe by combining elements from my favorite Italian recipes – garlic shrimp, pasta primavera, and pasta with broccoli. Somehow, the combination turned out even better than each dish.

While I love hearty Italian classics like lasagna and manicotti, sometimes you want something lighter but still satisfying. This shrimp and peppers pasta with broccoli and mushrooms hits that sweet spot, and paired with a crisp side salad and some crusty bread, it makes an incredible meal.

My cooking style comes from years of kitchen experiments, from my early days of easy casseroles to an ambitious attempt at going vegetarian (which lasted about as long as my willpower to resist pasta carbonara!)

These days, I believe in the power of simple, quality ingredients – and yes, that includes a generous pat of butter, which makes the shrimp mushroom pasta silky and irresistable.

While you can make it with just olive oil, trust me on the butter – it is worth the guilt! I hope this recipe becomes a favorite in your kitchen like it is in mine.

➡ If you’re looking for other shrimp recipes, try shrimp etouffee, shrimp and grits, or chipotle shrimp soup! For a pasta recipe, try my one-pot Instant Pot spaghetti and meat sauce from scratch or my San Marzano Tomato Sauce recipe.

Ingredients and Tips

🧂 Ingredients You’ll Need

Ingredients for Shrimp and Broccoli Pasta

💡 Ingredient and Recipe Tips for Shrimp Bell Pepper Pasta with Mushroom and Broccoli

🦐 Shrimp: The recipe uses medium shrimp. Keep a bag of frozen shrimp in your freezer. Defrost easily under running water.

🍝 Pasta: I prefer angel hair pasta for this shrimp and mushroom pasta recipe, but fettuccine or spaghetti work well.

🫒 Olive Oil: I prefer to use ½ olive oil and ½ butter. Use any ratio, or omit.

🥦 Vegetables: Broccoli, bell pepper, and mushrooms are a nice combination. Omit or substitute as needed.

🌶️ Spices: Add more crushed red pepper for a spicier dish.

🍅 Sundried Tomato: These tomatoes add a perfect tang to the dish. The oil from the bottle add tons of flavor!

🍋 Lemon: Finish the dish with lemon zest and a squeeze of lemon juice.

♨️ How To Make Garlic Shrimp Pasta

Shrimp Broccoli Mushroom Pasta collage - vegetables sauteed, set aside, butter and garlic.
  1. Heat a heavy-bottomed pot or Dutch oven over medium heat. Add oil, and once the oil is hot, add the broccoli and bell peppers. Set aside.
  2. Saute mushrooms until cooked.
  3. Transfer to a bowl with the other vegetables.
  4. Heat butter and olive oil. Briefly saute garlic till fragrant.
Shrimp Broccoli Mushroom Pasta collage - shrimp in butter, sundried tomatoes, cooked spaghetti, and all ingredients stirred.
  1. Saute green onions, shrimp, and spices.
  2. Stir in sundried tomatoes.
  3. Drain the pasta and reserve a cup of pasta water.
  4. Add the pasta and vegetables to the shrimp. Add pasta water as needed. Stir in parsley, lemon zest, and lemon juice. Drizzle with olive oil, and sprinkle Parmesan cheese.
Garlic Shrimp Pasta top view
Print Recipe
5 from 3 votes

Garlic Shrimp Pasta with Broccoli, Mushroom, and Bell Peppers.

A quick Italian garlic butter shrimp and broccoli pasta bursting with sautéed mushrooms, bell peppers, and broccoli in a lemony garlic-butter sauce, finished with Parmesan cheese. Perfect for weeknight dinners!
Prep Time10 minutes mins
Cook Time20 minutes mins
Total Time30 minutes mins
Course: Main Dishes
Cuisine: Italian
Main Ingredient: pasta, seafood
Method: Non Instant Pot
Servings: 6 servings
Calories: 616kcal
Author: Paint the Kitchen Red

Ingredients

  • 1 lb shrimp peeled and deveined (500 grams)
  • Salt and pepper to taste
  • 8 oz spaghetti (225 grams)
  • 4 tablespoon olive oil divided
  • ½ cup sliced mushrooms
  • 1 cup broccoli florets
  • ½ cup sliced bell peppers
  • 4 tablespoon butter
  • 2 tablespoon minced garlic
  • 4 green onions sliced
  • 1 teaspoon salt
  • ½ teaspoon black pepper powder
  • ½ teaspoon hot red pepper flakes or to taste
  • ¼ cup chopped sun dried tomatoes
  • ½ cup chopped fresh parsley
  • Grated zest of 1 lemon
  • 2 tablespoon lemon juice
  • ¼ cup grated Parmesan cheese

Instructions

  • Season shrimp with salt and pepper and set aside.
  • Cook pasta according to package directions; drain and set aside.
  • Heat 2 tablespoon olive oil in a large pot over medium heat.
  • Saute the mushrooms, broccoli and bell peppers. (I prefer to saute each vegetable separately so as not to crowd the pan.) Set aside.
  • Melt butter and remaining olive oil over medium heat.
  • Add garlic and saute for 1 minute. Make sure not to burn the garlic.
  • Add the green onions and saute for 1 minute.
  • Add shrimp, salt, black pepper and red pepper to the pot. Saute until shrimp turns pink, about 3 minutes.
  • Add sun dried tomatoes, pasta, and vegetables and toss carefully till heated through, about 2 minutes.
  • Stir in parsley, lemon zest, lemon juice.
  • Transfer to serving dish, drizzle with olive oil and sprinkle Parmesan cheese on top.

Nutrition

Calories: 616kcal | Carbohydrates: 53g | Protein: 37g | Fat: 29g | Saturated Fat: 10g | Polyunsaturated Fat: 3g | Monounsaturated Fat: 14g | Cholesterol: 262mg | Sodium: 1015mg | Fiber: 6g | Sugar: 3g

I am not a certified nutritionist.  I provide my best estimate of nutritional information merely as a courtesy to my readers.  If you depend on nutritional information for dietary or health reasons,  I suggest using your favorite online nutrition calculator to confirm the nutritional value of this recipe based on the actual ingredients that you use.

Did you know that the best way to support your favorite bloggers is to comment and rate recipes, and share on social media? If you loved this recipe, please comment and give it a five ⭐ rating in the comment section below. If you’re a pinner, pin this post using the Pin buttons at the top and bottom of this post and in the recipe card above. Thank you for your support!

BACK TO TOP

Turkish Green Beans – Taze Fasulye

October 22, 2024 by Neena Panicker 8 Comments

Instant Pot Green Beans Middle Eastern Style in brown bowl with tomatoes on top - Paint the Kitchen Red

This Turkish green beans recipe proves you don’t need elaborate ingredients to make a delicious vegetarian side dish. Made with simple ingredients, this tomato and olive oil-soaked braised taze fasulye recipe can be served as part of a mezze platter or as an easy accompaniment to any main dish.

Taze fasulye green beans in brown bowl with tomatoes on top

I visited Turkey for the first time about 10 years ago, and fell in love with the country, and especially loved the cuisine.

One recipe that stood out to me for its simplicity and incredible flavor was this taze fasulye tarifi (recipe).

Taze fasulye translates to ‘green beans‘; this dish is also known as zeytinyagli fasulye which means ‘green beans in olive oil‘. It’s pronounced tah-zay fah-sool-yay.

Mediterranean green beans and tomatoes is a popular recipe and there are different variations of this dish all over the region and Middle East.

This tomato and olive oil green beans recipe is known by other names, including Loubieh Bi Zeit (Arabic) or Fasolia (Armenian). The Greeks make a similar version of this recipe with potatoes called Fasolakia Lathera.

The stewed green beans recipe is a comforting, almost stew-like dish that tastes great served the next day. The beans are cooked very soft and tender, not crisp-tender as you may be used to.

Although you could serve these green beans warm, they taste best when served at room temperature.

➡ This recipe would be a great side dish to chicken shawarma, lamb biryani, or mujadara. It would also be great served with hummus, baba ganoush, and batata harra as part of a mezze platter.

Ingredients and Tips

🧂 Ingredients You’ll Need for Turkish Green Beans

Taze Fasulye ingredients - green beans, garlic, sugar, salt, onion, tomatoes, olive oil, water, pepper.

💡 Ingredient and Recipe Tips for Taze Fasulye

🌱 Beans: Use regular green beans, French beans, flat beans, or runner beans. Runner beans are traditionally used. Trim ends and remove strings along seams. Fresh beans are best.

🧄 Garlic: I like to use a generous quantity of garlic. Use whole or sliced cloves or both.

🫒 Olive Oil: ¼ cup of olive oil adds authentic flavor to this recipe. If you need to reduce the quantity, use two tablespoons.

🍯 Sugar: 1 to 2 teaspoons of sugar enhances flavor. You can reduce or omit.

🍅 Tomato: Use fresh tomatoes when in season. If using canned tomatoes, add two teaspoons of tomato paste. I like to add tomato paste either way.

🌶️ Spices: Simple seasoning works well. Optional: add cinnamon, allspice, paprika, or baharat. These are used in some recipes for Mediterranean and Middle Eastern green beans.

🫐 Pomegranate Molasses: Add a teaspoon of pomegranate molasses for some variety. It adds a sweet-sour taste and is a great condiment!

⏲️ Cooking: Cook beans until very tender. Adjust cooking time for your preferred texture.

🍽️ Serving: Middle Eastern green beans are best at room temperature or cold. Pairs with crusty bread and mezze dishes. Optional: top with yogurt, parsley, mint.

How To Make Green Beans in Olive Oil

♨️ Stovetop Method

Taze fasulye Turkish green beans Instruction collage - onions and garlic, beans and tomatoes, stirred, cooked.
  1. Heat a heavy-bottomed pot or Dutch oven over medium heat. Add oil, and once the oil is hot, add the onions and garlic. Saute until onions are soft and translucent. Add tomato paste (if using) and saute for one minute. Lower heat if needed. Add salt and pepper and stir briefly.
  2. Stir in tomatoes, green beans, and sugar. Saute for one minute.
  3. Add hot water and bring the beans to a boil. Lower the heat and cover the pot.
  4. Simmer for 30 to 40 minutes or until the beans are very soft. Add more hot water as needed. Add a squeeze of lemon to finish.

⏲️ Instant Pot Method

  1. For Instant Pot taze fasulye, turn on Saute mode. Once the inner pot has preheated, add oil to the inner pot and let it heat up.
  2. Add onions and garlic and stir until onion is translucent, about 2 to 3 minutes. Add green beans.
  3. Stir in tomatoes and spices.
  4. Pressure cook and quick-release pressure.
  5. Stir beans and allow to cool.
Instant Pot Green Beans Middle Eastern Style in brown bowl with tomatoes on top - Paint the Kitchen Red
Print Recipe
5 from 5 votes

Turkish Green Beans – Taze Fasulye

This Turkish green beans recipe proves that you don’t need elaborate ingredients to make a delicious vegetarian side dish. Made with simple ingredients, these Turkish Green Beans in Olive Oil are an excellent accompaniment to any main dish. Can be made on the stovetop or Instant Pot.
Prep Time10 minutes mins
Cook Time12 minutes mins
Total Time22 minutes mins
Course: Sides
Cuisine: Middle Eastern
Main Ingredient: vegetarian
Method: Non Instant Pot
Servings: 6 servings
Calories: 119kcal
Author: Paint the Kitchen Red

Ingredients

  • ¼ cup olive oil
  • 1 cup onion diced
  • 8 cloves garlic sliced (or whole) [See Note 1]
  • ¾ teaspoon salt or to taste
  • ½ teaspoon black pepper powder
  • 2 teaspoon tomato paste optional
  • ¼ cup hot water Use 2 tablespoon for Instant Pot version
  • 2 large tomatoes diced – about 1 lb. (500 grams) or 1 can diced tomatoes (411 grams)
  • 1 lb. green beans trimmed, cut into 2-inch pieces (about 4 cups) – 500 grams
  • 1 teaspoon granulated sugar or to taste [See Note 2]
  • lemon Fresh – to drizzle on top [See Note 2]

Instructions

Stovetop Instructions

  • Heat a large heavy-bottomed pot or Dutch oven over medium heat. Add olive oil and once hot, add the onions and garlic. Saute until onions are soft and translucent.
  • Mix the tomato paste with a tablespoon of hot water. Add the salt, pepper, and tomato paste mixture to the onions. Saute briefly, about 1 to 2 minutes.
  • Stir in the water, tomatoes, beans, and sugar. Bring to a boil and lower the heat. Cover and simmer the beans for 30 to 40 minutes, or until the beans are very tender. Add more hot water as needed if the beans stick to the bottom.
  • Cool to room temperature before serving. Squeeze some lemon juice over each serving.

Instant Pot Instructions

  • Press 'Saute' and add olive oil to inner pot of the Instant Pot.
  • Once the oil is hot, add onion and garlic. Stir until onion is translucent, about 2 minutes. Stir in green beans, tomatoes, salt, pepper, sugar, and 2 tablespoons of water. Add the tomato paste on top (optional). [See Note 3]
  • Close the lid and pressure cook on High Pressure for 5 minutes. Do a Quick Release and open the Instant Pot. [Read More: The Different Pressure Release Methods]
  • Carefully stir everything together. Cool to room temperature before serving. Squeeze some lemon juice over top.

Video

Notes

  • Note 1: Turkish recipes use less garlic than I do. Reduce to 4 cloves of garlic if you wish.
  • Note 2: You can substitute the sugar and lemon juice with 1 to 2 teaspoon of pomegranate molasses for a sweet and sour flavor.
  • Note 3: The Instant Pot recipe uses 2 tablespoons of water because the vegetables will release enough liquid to bring it to pressure.

Nutrition

Serving: 1serving | Calories: 119kcal | Carbohydrates: 14g | Protein: 3g | Fat: 7g | Saturated Fat: 1g | Polyunsaturated Fat: 5g | Monounsaturated Fat: 1g | Sodium: 204mg | Fiber: 3g | Sugar: 5g

I am not a certified nutritionist.  I provide my best estimate of nutritional information merely as a courtesy to my readers.  If you depend on nutritional information for dietary or health reasons,  I suggest using your favorite online nutrition calculator to confirm the nutritional value of this recipe based on the actual ingredients that you use.

Did you know that the best way to support your favorite bloggers is to comment and rate recipes, and share on social media? If you loved this recipe, please comment and give it a five ⭐ rating in the comment section below. If you’re a pinner, pin this post using the Pin buttons at the top and bottom of this post and in the recipe card above. Thank you for your support!

BACK TO TOP

Instant Pot Vegetarian Pasta | Rigatoni Bolognese

October 17, 2024 by Neena Panicker 56 Comments

Blue bowl with pasta, sauce and shredded cheese and parsley.

Instant Pot Vegetarian Pasta – Rigatoni Bolognese – is a healthy, filling pasta dish that’s worthy to be in your regular meal rotation, and you won’t miss the meat! All the vegetables in this hearty vegetarian pasta recipe give the dish a meaty texture. The pasta and sauce are cooked together, making it a delicious one-pot meal. 

Instant Pot vegetarian pasta in blue and green bowl with sauce and shredded cheese

This post contains affiliate links. As an Amazon Associate, I earn from qualifying purchases. Please read the disclosure.

Every time I make this Instant Pot bolognese, the aroma of the mushrooms and herbs fills my kitchen, and I’m instantly reminded of why I love this recipe.

My family (who sometimes act like they’re are allergic to vegetables!) clean their plates every time. It’s become our go-to for Meatless Mondays and those evenings when we’re craving comfort food without the guilt.

I cook the pasta and sauce together for this healthy Instant Pot bolognese recipe. The bolognese-style vegetarian sauce is made with many vegetables – onion, celery, carrots, bell peppers, and mushrooms – giving it a thick, meaty texture.

The leftovers make a perfect vegetarian lunch the next day.  You can make this vegetarian bolognese for a crowd by doubling the recipe.

If you’re in the mood for a tasty Instant Pot pasta recipe with meat, check out my Instant Pot Penne with Sausage and Tomato Cream Sauce or Instant Pot spaghetti and meat sauce from scratch. Both are one-pot pressure cooker pasta dishes that are quick and easy. Or try a quick and easy San Marzano Tomato Sauce!

📍Why Choose Vegetarian Rigatoni Bolognese?

  • It’s packed with vegetables, and high in fiber, vitamins, and minerals. It’s lower in saturated fat than meat-based sauces, making it heart-friendly.
  • Vegetables are less expensive than meat, making this a budget-friendly option without sacrificing flavor.
  • Perfect for entertaining, this dish caters to vegetarians and meat-eaters alike. It’s so hearty and flavorful that even carnivores won’t miss the meat.
  • Unlike traditional bolognese, which often requires hours of simmering, this Instant Pot version is ready in under 30 minutes.

Ingredients and Tips

🧂 Instant Pot Vegetarian Pasta Ingredients List

Instant Pot Vegetarian pasta ingredients in individual bowls
Instant Pot vegetarian pasta ingredients in bowls

More details in the printable recipe card at the bottom of this post

💡 Ingredient and Recipe Tips


Here are some tips that will help you make a perfect Instant Pot vegetarian rigatoni recipe:

🍄 Mushrooms: Use dried porcini for earthy, meaty texture. Skip soaking; add directly to pasta because they will rehydrate in the Instant Pot. Substitute with dried shiitake or mixed mushrooms if porcini are pricey.

🧀 Mascarpone: It’s an Italian cream cheese, softer than the regular kind. Alternatives: heavy cream, cream cheese, creamy goat cheese, or boursin.

🌿 Seasonings: Swap oregano and basil for 2 teaspoons of Italian seasoning. You can also garnish with fresh basil at the end before serving.

🔥 Avoiding the Burn Notice:

  • Deglaze thoroughly after sauteing.
  • Cool the Instant Pot briefly after sauteing.
  • Layer the ingredients: Add liquid first, then the rest. Add tomatoes and pasta last; submerge the pasta but don’t stir.
  • If needed, add up to ½ cup extra water.

❓ FAQs


Can I double this recipe?

Double all ingredients but keep the cooking time.

Can I use broth instead of wine?

Yes, broth can be substituted for wine, although wine does add flavor to bolognese sauce.

What can I use instead of dried porcini mushrooms?

If you can find a ‘meaty’ mushroom, like portobello, shiitake, or baby bella, use those. Otherwise, use regular button mushrooms.

How much is 12 ounces of pasta?

12 ounces is about ¾ of a 16 oz. box of pasta.

Can I use a jar marinara sauce instead of crushed tomatoes?

You can substitute an equal quantity of jar sauce. Just make sure you adjust the seasonings, especially salt, since jar sauce already has a lot of sodium.

✏️ Important Tips for Making Pasta in the Instant Pot

  • To avoid the Instant Pot food burn message, add the dry pasta at the end right before pressure cooking, and don’t stir it. Just push down on it with a spatula until the pasta is submerged in the liquid.
  • Any type of pasta shape (shells, spiral, penne, farfalle, ziti, rigatoni) will work for this recipe, but you may need to change the cooking time. I use the Barilla brand of pasta.
  • The general rule of thumb for cooking pasta in the Instant Pot is to take the time that the pasta box says, divide by 2 and add 1. e.g. if the stovetop cooking time on the pasta box is listed as 8 minutes, you would pressure cook for 5 minutes (8 divided by 2 = 4; 4 + 1 = 5).
  • For al dente pasta, pressure cook for half the time recommended on the box.
  • The longer the pasta sits in the Instant Pot, the more it cooks. So, it’s important to release pressure as soon as cooking is complete. To avoid a mess, release the pressure in bursts, as detailed in how to natural release Instant Pot.

⏲️ How to Make Vegetarian Pasta in Instant Pot

  1. Saute onions and other vegetables
  2. Saute mushrooms
  3. Add liquids, spices, pasta and tomatoes
  4. Add remaining ingredients
  5. Pressure cook and release pressure
  6. Add cheese and heat through
Instant Pot Vegetarian Pasta collage - vegetables, mushrooms, pasta, stirred.
  1. Select Saute function and add olive oil to Instant Pot. Add onions, celery, carrots, bell peppers and fresh garlic and saute for 3 minutes, stirring frequently.
  2. Add mushrooms and saute for 2 minutes. Turn off Instant Pot by pressing Cancel. If there’s food stuck to the bottom, deglaze the inner pot with two tablespoons of water.
  3. Stir in balsamic vinegar, milk, wine, water or vegetable broth, dried porcini mushrooms, black pepper, salt, thyme, oregano, basil, sugar, and red pepper flakes.
  4. Add tomato paste, crushed tomatoes, and pasta on top. Don’t stir, but push down gently with a spatula until pasta is submerged in the liquid.

Program the Instant Pot and release pressure

Instant Pot pressure cook instructions collage: close lid, program, float valve up, float valve down
  1. Close the lid.
  2. Select Pressure Cook mode and cook on high pressure for 7 minutes.
  3. The display will go from On to 07:00. The float valve will go up after a few minutes. The display will count down to 00:00.
  4. Do a quick release of pressure. Release the pressure in bursts, to avoid a mess. Once the float valve goes down, the lid can be opened.
Instant Pot Vegetarian Pasta collage - cooked pasta, cheese added.
  1. There might seem to be more liquid than you’d like, but don’t worry; the pasta will absorb the liquid.
  2. Stir in mascarpone cheese. Let the creamy pasta rest for a few minutes, and it will thicken up. Sprinkle each serving with parmesan and fresh parsley.
Instant Pot vegetarian pasta in blue and green bowl with sauce and shredded cheese
Print Recipe
4.82 from 16 votes

Instant Pot Vegetarian Pasta | Rigatoni Bolognese

Instant Pot Vegetarian Pasta – Rigatoni Bolognese – is a healthy, filling pasta dish that’s worthy to be in your regular meal rotation, and you won’t miss the meat!
Prep Time15 minutes mins
Cook Time20 minutes mins
Total Time35 minutes mins
Course: Main Dishes
Cuisine: American, Italian
Main Ingredient: pasta, vegetarian
Servings: 6
Calories: 293kcal
Author: Paint the Kitchen Red

Equipment

  • Instant Pot Pressure Cooker

Ingredients

  • 3 Tbsp  olive oil
  • ½ cup onion chopped fine
  • ½ cup celery chopped fine
  • ½ cup carrots chopped fine
  • ½ cup bell peppers chopped fine
  • 1 tablespoon garlic minced
  • 2 cups fresh mushrooms chopped
  • 1 cup whole milk
  • 1 cup red wine
  • 1 cup water
  • 1 oz.  dried porcini mushrooms chopped
  • ½ teaspoon black pepper powder
  • 1 tsp  salt or to taste
  • ¼ tsp  dried thyme
  • 1 tsp  dried oregano
  • 1 tsp  dried basil
  • ½ tsp  crushed red pepper or to taste
  • 1 tsp  granulated sugar
  • 1 Tbsp  balsamic vinegar
  • 28 oz. crushed tomatoes (794 grams)
  • 1 tablespoon tomato paste
  • 12 oz. rigatoni pasta (340 grams)
  • 4 oz. mascarpone cheese (113 grams)
  • ¼ cup Parmesan cheese finely grated
  • 3 tablespoon fresh parsley chopped

Instructions

  • Select Saute and add olive oil to inner pot of Instant Pot.
  • Add onions, celery, carrots, bell peppers and garlic and saute for 3 minutes, stirring frequently.
  • Add fresh mushrooms and saute for 2 minutes.
  • Turn off Instant Pot by pressing Cancel.
  • If there’s food stuck to the bottom, deglaze pot with 2 tablespoons of water.
  • Stir in milk, wine, water, dried porcini mushrooms, black pepper, salt, thyme, oregano, basil, crushed red pepper, sugar and balsamic vinegar. Add crushed tomatoes, tomato paste, pasta, but don't stir. Just push down with a spatula so the pasta is submerged.
  • Stir to combine.
  • Close Instant Pot lid and pressure cook on High Pressure for 7 minutes.
  • Do a quick release of pressure.  [Read More: The Different Pressure Release Methods]
  • There might seem to be more liquid than you’d like, but don’t worry, the liquid will get absorbed by the pasta.
  • Stir in mascarpone cheese.
  • Let the pasta rest for a few minutes and it will thicken up.
  • Sprinkle each serving with Parmesan and fresh parsley.

Notes

  • Prep time does not include steps that are already accounted for in the ingredient list, e.g. chopped onions, minced garlic, diced chicken, etc. 
Adapted from Giada De Laurentiis Vegetarian Pasta Bolognese.

Nutrition

Serving: 1serving | Calories: 293kcal | Carbohydrates: 27g | Protein: 10g | Fat: 14g | Saturated Fat: 5g | Polyunsaturated Fat: 6g | Cholesterol: 22mg | Sodium: 513mg | Fiber: 4g | Sugar: 9g

I am not a certified nutritionist.  I provide my best estimate of nutritional information merely as a courtesy to my readers.  If you depend on nutritional information for dietary or health reasons,  I suggest using your favorite online nutrition calculator to confirm the nutritional value of this recipe based on the actual ingredients that you use.

Did you know that the best way to support your favorite bloggers is to comment and rate recipes, and share on social media? If you loved this recipe, please comment and give it a five ⭐ rating in the comment section below. If you’re a pinner, pin this post using the Pin buttons at the top and bottom of this post and in the recipe card above. Thank you for your support!

BACK TO TOP

More Instant Pot Pasta Recipes

1
Instant Pot Pasta - Penne Sausage with Tomato Cream sauce in a white bowl- Paint the Kitchen Red
Instant Pot Sausage Pasta in a Tomato Cream Sauce
Instant Pot penne pasta with sausage and peppers is a delicious one pot dinner. This pressure cooker pasta recipe is perfect for busy weeknights! This Instant Pot Pasta with tomato cream sauce can be ready in 30 minutes with just 10 minutes hands-on time.
GET RECIPE
2
Instant Pot Shrimp Pasta with Garlic, parmesan, broccoli with lemon wedges in orange bowl - Paint the Kitchen Red
Instant Pot Shrimp Pasta with Garlic
Instant Pot Shrimp Pasta with Garlic is an easy one-pot meal that is perfect for a quick dinner idea. The angel hair pasta, shrimp, garlic and all the ingredients are cooked in the Instant Pot together. Make the recipe spicy by adding some extra crushed red pepper!

GET RECIPE
3
Instant Pot Ratatouille in a bowl and on crusty bread, all on a round wooden board with cherries, cheese, nuts
Instant Pot Ratatouille
Instant Pot Ratatouille is a deliciously satisfying vegetarian dish made with summer’s bounty of zucchini, bell pepper, eggplant, tomato and fresh herbs.
GET RECIPE
  • « Previous Page
  • 1
  • 2
  • 3
  • 4
  • 5
  • 6
  • …
  • 27
  • Next Page »
Neena in red sweater head tilted

Hi, I'm Neena Panicker, and welcome! I am the creator, photographer, and author of recipes and tips at Paint the Kitchen Red. I live in the glorious west in Salt Lake City, Utah with my family.

More about me →

Popular

  • Reasons Why Instant Pot is Not Sealing or Pressurizing
    Reasons For Your Instant Pot Not Sealing
  • Instant Pot Thai Red Curry with colorful vegetables in white bowl with spoon on rich red napkin.
    Instant Pot Thai Red Curry with Chicken
  • 4 Instant pots - 3, 6, 8 and 10 quart - what size instant pot should i buy?!
    Sizes of Instant Pot – What Size do you Need?
  • Instant Pot Chili in white bowl on green cloth with cornbread; topped with cheese, sour cream and green onions - Paint the Kitchen Red
    Homemade Instant Pot Chili (using Dried Beans)
  • Natural Release vs Quick Release
    How To Natural Release Instant Pot vs Quick Release
  • Instant Pot Panang Curry with chicken, green beans, red and green peppers, Thai basil in a white bowl on a light wood background
    Thai Instant Pot Panang Curry with Chicken
  • Beginner's Manual and User's Guide Instant Pot Duo Crisp Air Fryer
    How to Use the Instant Pot Duo Crisp + Air Fryer | Beginner’s Manual

Seasonal

  • 4 ears of corn sitting on husks on a white plate
    Instant Pot Corn on the Cob
  • Wasabi Instant Pot Deviled Eggs with wasabi and pickled ginger on colorful blue plate - Paint the Kitchen Red
    Wasabi Deviled Eggs Recipe – Delicious Appetizer
  • Instant Pot Korean Chicken two thighs and four drumsticks on a dark background, garnished with sesame seeds
    Instant Pot Korean Chicken with Gochujang
  • Instant Pot Thai Grilled Chicken Thighs on dark background with sprinkled cilantro and green onions
    Thai BBQ Chicken
  • Instant Pot Banh Mi sandwich on black background, with meat, daikon, carrots and cilantro; cilantro and green onions sprinkled on surface - Paint the Kitchen Red
    Instant Pot Banh Mi | Vietnamese Sandwich
  • Instant Pot Jamaican Jerk Chicken L1 - Paint the Kitchen Red
    Grilled Instant Pot Jamaican Jerk Chicken
  • Instant Pot beet, arugula, candied walnut salad on white plate with fork or dark background
    Arugula Goat Cheese Beet Salad
  • Instant Pot Ratatouille - round wooden board with cheeses, basil, olives, crostini, cherries, nuts, crackers
    Instant Pot Ratatouille | Braised Summer Vegetables with Fresh Herbs

Featured In

Media that have featured Paintthekitchenred.com including cnet, nbc news, cnbc, instant pot, the huffington post.

Social Media

Footer

↑ back to top

About

  • About Me
  • Contact

Disclosures

  • Privacy Policy
  • Accessibility Statement

Shop

  • Amazon

As an Amazon Associate I earn from qualifying purchases.

Copyright © 2016 - 2026 Paint the Kitchen Red

Rate This Recipe

Your vote:


A rating is required
A name is required
An email is required