
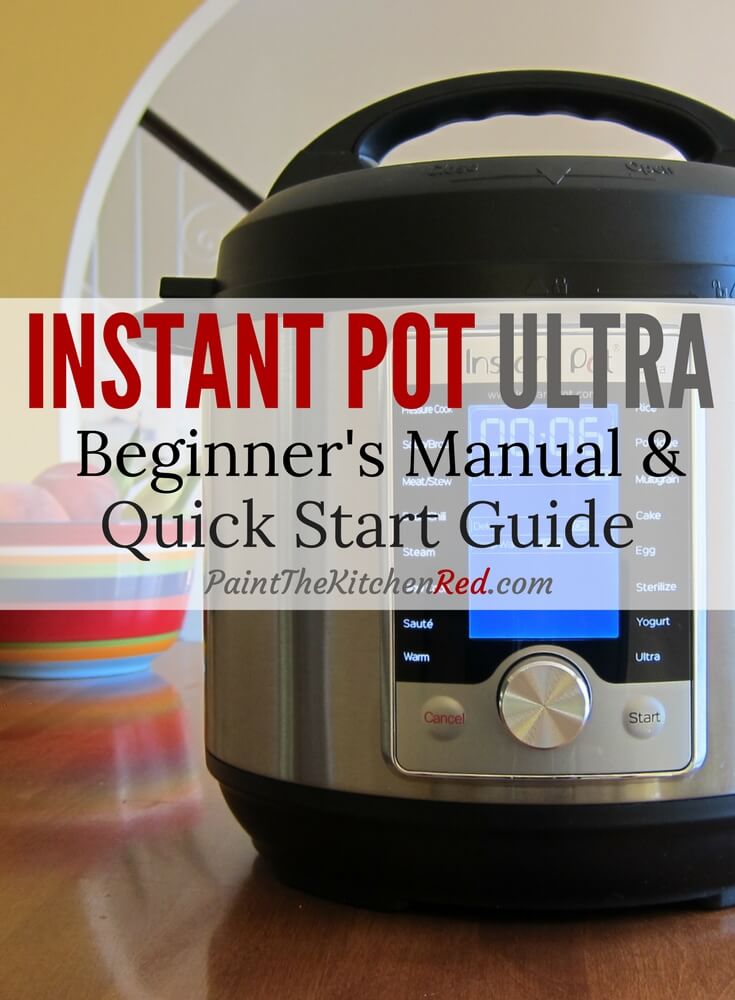
If you’ve just received your new Instant Pot Ultra multi cooker, but don’t know what to do next, this Instant Pot Ultra manual is going to help you get started. It gives you instructions on the various parts of the Ultra 10 in 1 and also gives directions on how to complete the Water Test (Initial Test Run).
This post contains affiliate links. As an Amazon Associate, I earn from qualifying purchases. Please read the disclosure.
Table of Contents
- Introduction
- What is an Instant Pot?
- How does Pressure Cooking Work?
- Is the Instant Pot Safe to Use?
- Safety Precautions
- First Thing You Need to Do: Open the Box!
- Parts
- Lid
- Sealing Ring
- Float Valve
- Anti-Block Shield
- Assembly
- Open and Close the Lid
- How to Release Pressure
- Initial Test Run/Water Test
- Instant Pot Duo vs. Ultra
- Recipes to Try
Introduction
I’ve owned my Instant Pot Duo 6-Quart multi cooker for about a year. Before that, I used a stove-top pressure cooker for many years. Growing up in an Indian household, the sound of the pressure cooker in the kitchen, with its hissing and steaming and loud noises, was a regular part of my day.
When my children were little , I would have to warn them when I was getting ready to use the pressure cooker and they would run out of the kitchen! Well, times have changed. The Instant Pot ain’t your momma’s pressure cooker. It’s safe, easy, quiet, and can be left alone unattended. What a change that was for me!
Even though I’ve loved my Instant Pot Duo, I was very intrigued by this new Instant Pot 10 in 1 multi-cooker. The Instant Pot Ultra definitely lives up to its name and I love it.
Since I was already using an Instant Pot Duo (6 quart), I’ve found the transition to the Instant Pot Ultra 6 qt 10-in-1 very easy. But if this were my first Instant Pot, I can see how it would be pretty overwhelming, with even more functions and features than the Instant Pot Duo.
Soon after I got my Instant Pot Duo last year, I wrote an Instant Pot Duo Beginner’s Quick Start Manual which gives detailed directions on how to use the Instant Pot.
I love getting comments and emails from people who find it helpful, especially because of its step-by-step instructions and photos. So I wanted to do that same type of instruction manual for the Instant Pot Ultra 60.
If you’ve just received your Instant Pot Ultra, and don’t know what to do next, you’ve come to the right place. I’m going to give you directions on how to use this Instant Pot 10 in 1 for the first time.
This instruction guide assumes you have no prior experience with the Instant Pot. We’ll go over the parts, important features, how to assemble the Instant Pot Ultra and we’ll do the initial test run (what is also referred to as the ‘Water Test’).
There are many new/different features on the Instant Pot Ultra but I’m not going to detail them here. For example:
- Instant Pot Ultra sous vide cooking function.
- Egg setting allows you a quick one-touch way to cook eggs.
- The Instant Pot Ultra allows you to adjust the cooking settings while cooking is in progress.
- Instant Pot Ultra setting allows you to customize temperature and pressure levels.
I’ll give you enough directions to get you started and become comfortable making your first recipe in the Instant Pot Ultra 10-in-1. You can read about all the features of the different models of Instant Pots at this guide I put together on which Instant Pot to buy.
If you need even more information, please visit the Instant Pot website.
Recipes for the Ultra
If you think you need to get special Instant Pot Ultra recipes or Instant Pot Ultra cookbooks, you’ll be happy to hear that you don’t need to do that – all Instant Pot recipes can easily be made in the Ultra with no changes.
The only difference is how to operate the Ultra (what buttons to press, how to natural release pressure, how to quick-release pressure, etc), which you’re going to learn here. At the bottom of this article is a chart showing you some differences between the Ultra and the Duo models.
UPDATE: I now own both the Ultra 6 qt (Ultra 60) and Ultra 8 qt (Ultra 80).
Note: All my recipes include step-by-step photos and instructions for the Ultra model.
Here are some Instant Pot articles that may be helpful to you if you’re a beginner:
– Reasons the Instant Pot is not Sealing
– Instant Pot Tips and FAQs
– Common Instant Pot Problems
– How to Use an Instant Pot DUO – Beginner’s Manual
– Instant Pot DUO EVO PLUS Beginner’s Manual and Quick Start Guide
– Instant Pot DUO EVO PLUS Advanced User Guide
What is an Instant Pot?
Sometimes incorrectly referred to as Instapot, the Instant Pot has become so popular in recent years that Instant Pot is being used by some as a generic name for pressure cookers of any brand.
In reality, Instant Pot is the brand name of a multicooker that serves as a pressure cooker, slow cooker, rice cooker, yogurt maker, sauté/searing pan, steamer, and warming pot all in one convenient appliance.
The Instant Pot Company (Instant Brands) started out with one product – the Instant Pot multicooker – and now makes a wide range of kitchen appliances including air fryers, blenders, and toaster ovens.
Although the Instant Pot pressure multicooker has many different functions, the most commonly used is the Pressure Cook function. Pressure cooking allows you to cook foods at a fraction of the time it would take in a pan or in an oven.
Although I’ve used a stovetop pressure cooker for decades, I much prefer the Instant Pot for three main reasons:
- There’s no need to babysit it
- It’s not loud like my old pressure cooker
- It is versatile
How Does Pressure Cooking Work?
Pressure cookers create a closed environment where steam builds up in a tightly sealed pot. This, in turn, causes the internal temperature to rise and pressure to increase.
Under high pressure, the fiber in the food is tenderized and flavors develop in a very short time. Nutrient-rich steam condenses in the pot instead of evaporating and nutritional value is retained because of the speed of cooking.
Is the Instant Pot Safe to Use?
According to the Instant Pot Safety Description, most pressure cooker disasters in the past could be attributed to user error. Instant Pot pressure multicookers are carefully designed to eliminate and avoid most of these potential problems.
There are lots of safety features that help reduce common errors. Safety features include pressure sensor technology, lid close detection, lid lock technology, overheat protection, and automatic temperature and pressure controls.
Bottom line: the Instant Pot is very safe to use!
Safety Precautions
Although there are many built-in safety features as explained above, as a user you need to follow common-sense precautions:
- Don’t touch the hot surfaces, particularly the stainless steel parts. Use the handles to move the Instant Pot and use gloves to remove the inner pot.
- Don’t place the Instant Pot on or close to an electric or gas burner.
- Don’t move the Instant Pot when it’s under pressure.
- Don’t fill over ⅔ full.
- When cooking foods that expand e.g. rice, beans, and pasta don’t fill over ½ full.
- Ensure sealing ring, anti-block shield, float valve, and steam release pipe are clean and not clogged.
- Don’t open the lid until the float valve is down i.e. the Instant Pot is depressurized.
- Keep hands and face away from the steam release mechanism.
- Don’t obstruct the steam release mechanism when pressure is being released.
- When quick-releasing frothy foods such as applesauce, oatmeal, pasta, etc. take extra care. It’s best to release pressure is short bursts for these types of foods.
- Don’t use a different Instant Pot model’s lid on your model.
- Don’t use the lid when using the Saute program. It’s okay to use a tempered glass lid with a venting hole, sold separately.
If you want more technical and detailed information about the Instant Pot, you can also visit the Instant Pot website. In this post, I’ll just be going over the basics of how to use the Instant Pot: assembling the Instant Pot and doing the water test. I’ll get you going and make you comfortable enough to explore its features!
PURCHASE THE ULTRA ON AMAZON!
First Thing You Need to Do: Open the Box!
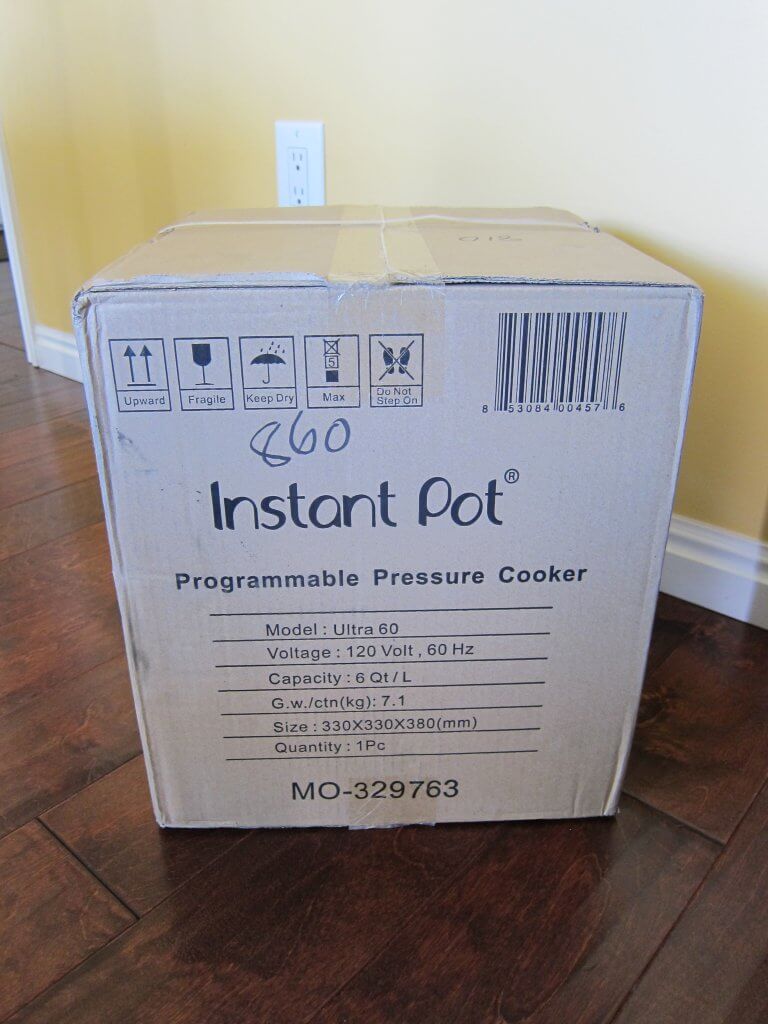
I know that many people order the Instant Pot, and then let it sit around for months because they feel intimidated using it. If you’ve been reluctant to take the Instant Pot Ultra out of its box, know that you’re not alone.
So don’t wait another minute! Open the box and remove the Instant Pot and its parts. We’re going to do this together, it’ll be a breeze!
Take everything out of the box and discard the packaging. If the lid is on the base unit, open the lid by turning it counter-clockwise.
Instant Pot Parts and Accessories
The Instant Pot comes with the following main parts and accessories:
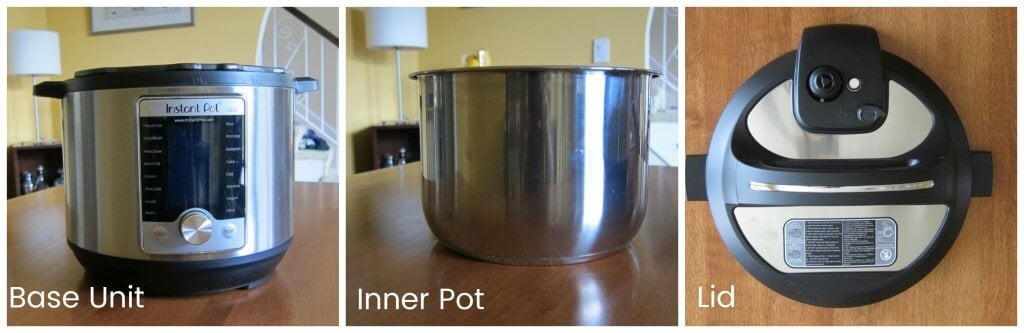
- Base unit/Outer Pot – stainless steel exterior that houses the heating element, control panel, and detachable power cord.
- Inner pot – removable stainless steel pot that is also stove-friendly, so you can use it on your stovetop as you would a regular pot. It can be washed in the dishwasher or by hand.
- Lid – closes the Instant Pot and seals it under pressure. The lid can be washed in the top rack of the dishwasher or by hand with soap and water.
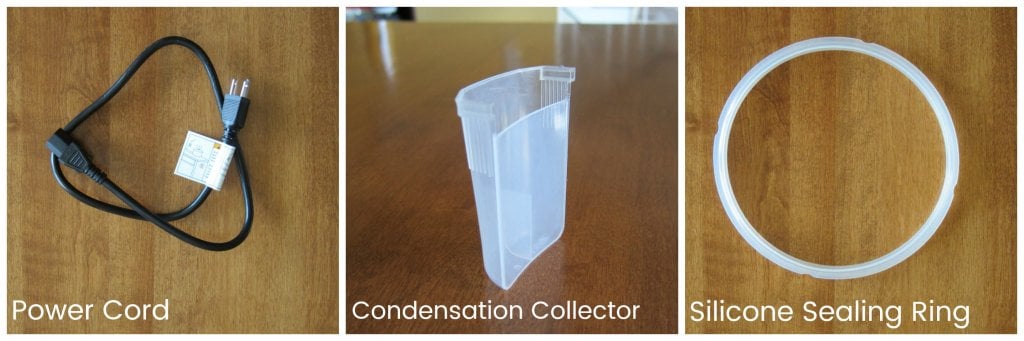
- Power cord – the 3-prong detachable power cord is plugged into the back of the Instant Pot Duo. (Note: some models have attached power cords.)
- Condensation Collector – catches drips from condensation on the lid; attaches onto the back of the base unit. Can be washed in the top rack of the dishwasher or by hand.
- Silicone Sealing Ring – creates a tight seal between the lid and the base unit in order for the Instant Pot Ultra to pressurize.
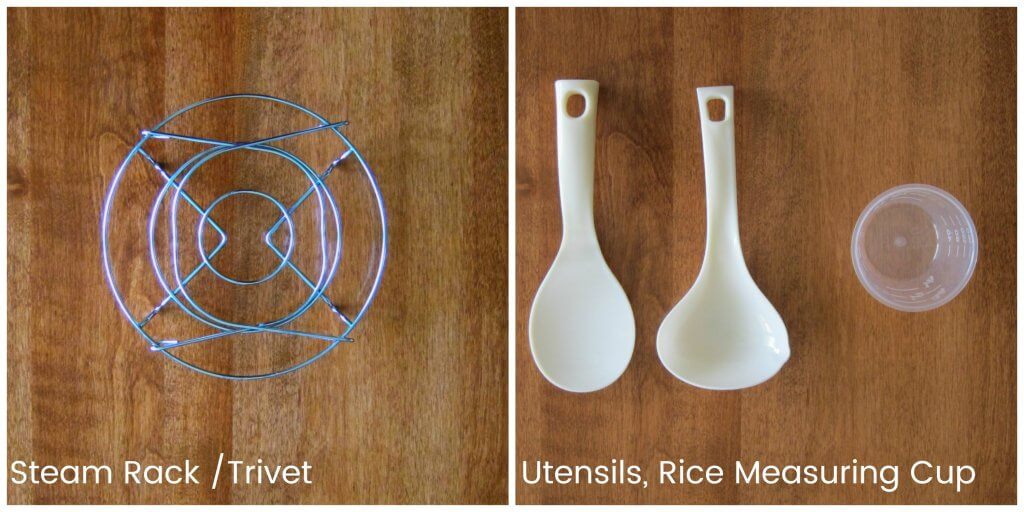
- Accessories – steam rack/trivet, utensils, rice measuring cup. The trivet is useful for elevating food above the liquid and for Pot in Pot cooking. (Note: some models don’t come with the spoons and measuring cup.) The trivet can be washed in the dishwasher or by hand.
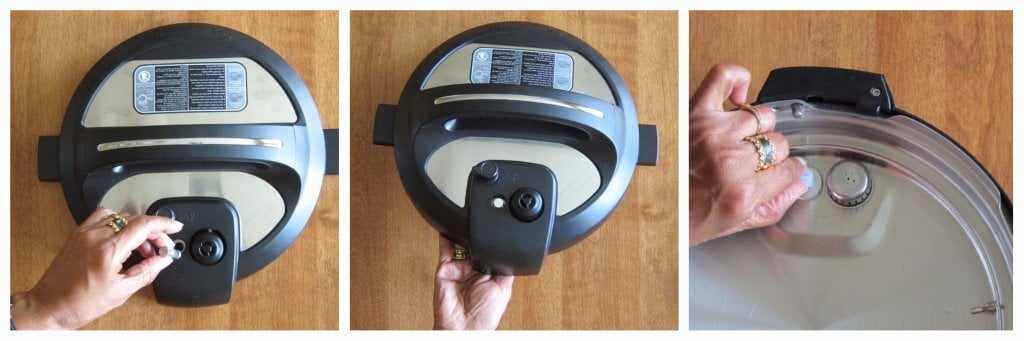
Instant Pot Lid
Instant Pot Lid Exterior Parts

The outside of the Instant Pot lid has these features:
- The Steam Release Valve is a safety mechanism that allows steam to escape and maintains the correct pressure level. It sits loosely on the lid and can be removed to be cleaned.
- The Float Valve is a safety feature that pops up when the Instant Pot reaches pressure and engages the lid’s locking mechanism so the Instant Pot cannot be opened.
- The Steam Release (Reset) Button (also referred to as Pressure Release Button) allows you to manually release pressure from the Instant Pot Ultra. Press down to manually release pressure, and turn counter-clockwise to stop pressure release. The Steam Release Reset Button automatically pops up when the Instant Pot Ultra lid is opened or closed.
Steam Release Parts
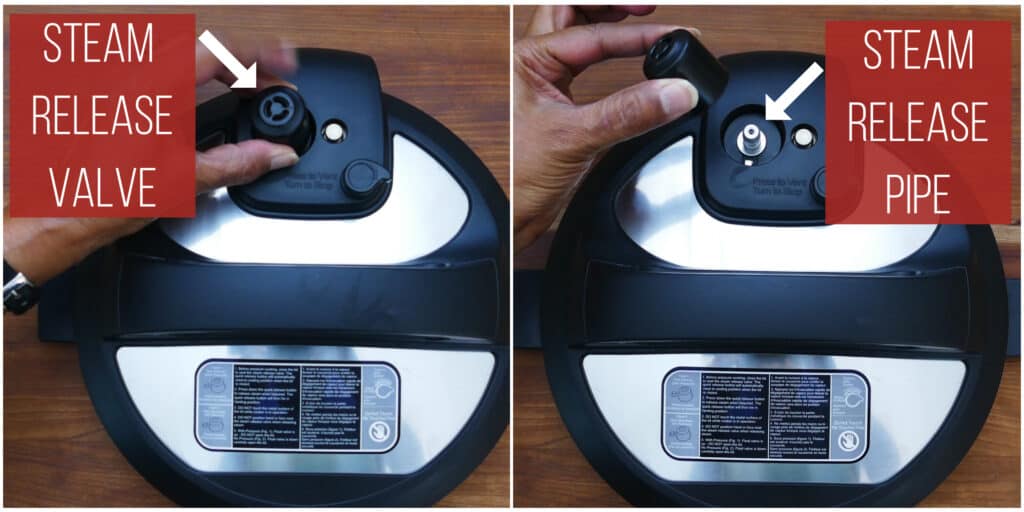
The steam release consists of:
- Steam release valve – regulates the internal temperature. It is supposed to be wobbly but must be pushed in all the way.
- Steam release pipe – steam travels from the inner pot through the pipe during steam release.
Instant Pot Lid Interior Parts

These parts on the inside of the lid need to be thoroughly cleaned occasionally, especially when you cook foamy foods like pasta or rice. So it’s good to know how to remove and replace them:
- The Sealing Ring is made out of silicone and it tightly seals the lid, and it prevents steam from escaping from the Instant Pot Ultra during cooking, which allows it to reach pressure. The sealing ring can retain odors, so I recommend that you buy a second sealing ring if you’re going to be making desserts in the Instant Pot Ultra.
- The Float Valve is a safety feature that pops up when the Instant Pot Ultra reaches pressure. It engages the lid’s locking mechanism so the Instant Pot can’t be opened.
- The Anti-Block Shield prevents food particles from interfering with the Steam Release Valve, especially when cooking foamy foods like pasta or grains.
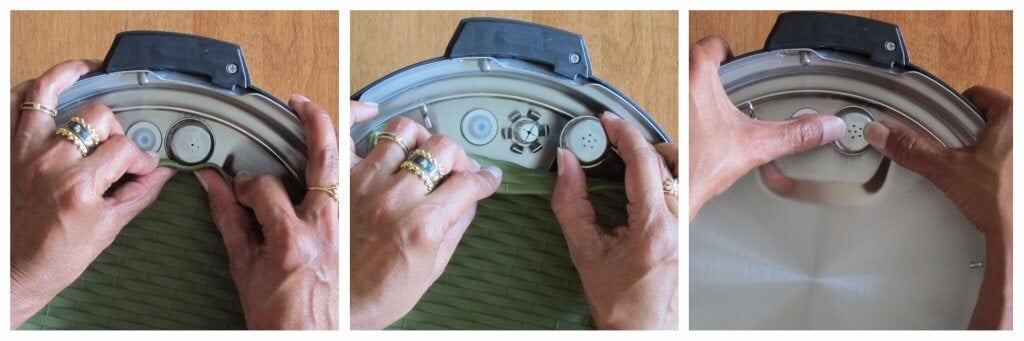
Sealing Ring
The silicone sealing ring should be washed after each use. I wash it in the top rack of the dishwasher. You can also wash it with soap and water.
How to Remove the Sealing Ring
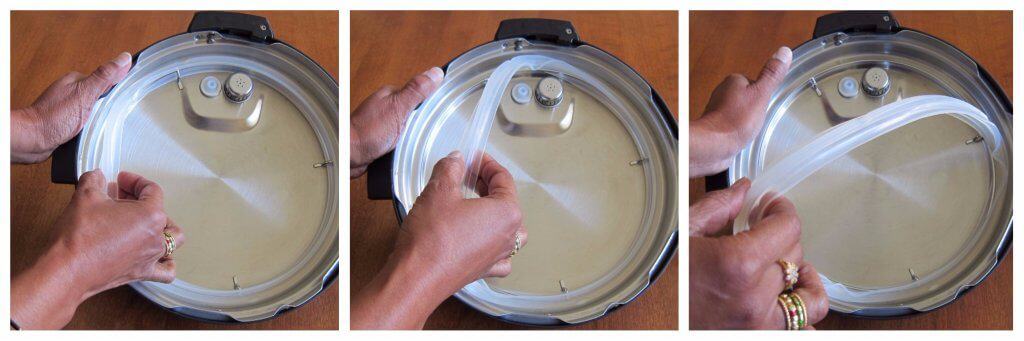
The Sealing Ring sits in the sealing ring rack and can be removed for cleaning. To remove the Sealing Ring:
- Pull up on the Sealing Ring and gently pry it out of sealing ring rack.
- Don’t pull on it with too much force, or it can be stretched.
How to Replace the Sealing Ring
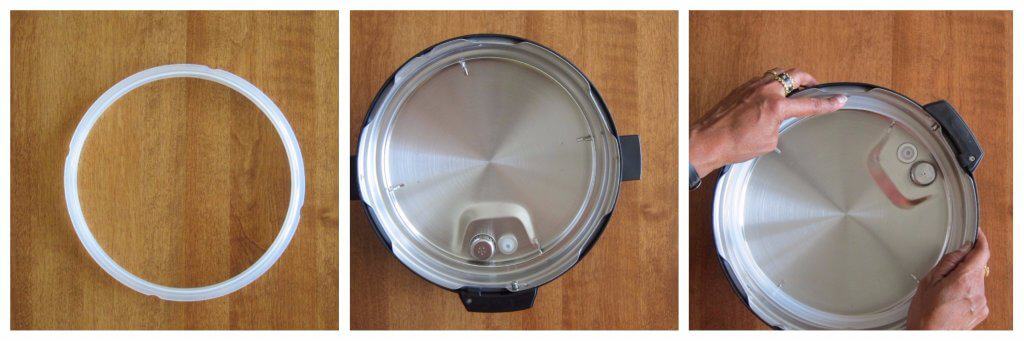
- To replace the sealing ring, return it to the sealing ring rack.
- Push it back in, a little at a time until it’s securely seated in the sealing ring rack.
- You’ll know it’s seated properly if you can turn/rotate it in the sealing ring rack, with a bit of effort. If you don’t put it back correctly, the Instant Pot won’t seal and your food won’t cook and you’ll probably get the Food Burn / Burn Message.
- The first few times, you may find it difficult to remove the sealing ring but after a few uses, it should stretch out a bit.
Float Valve
The float valve needs to be cleaned periodically, especially after cooking frothy or starchy foods. I use a bottle brush to clean the float valve opening.
How to Remove the Float Valve
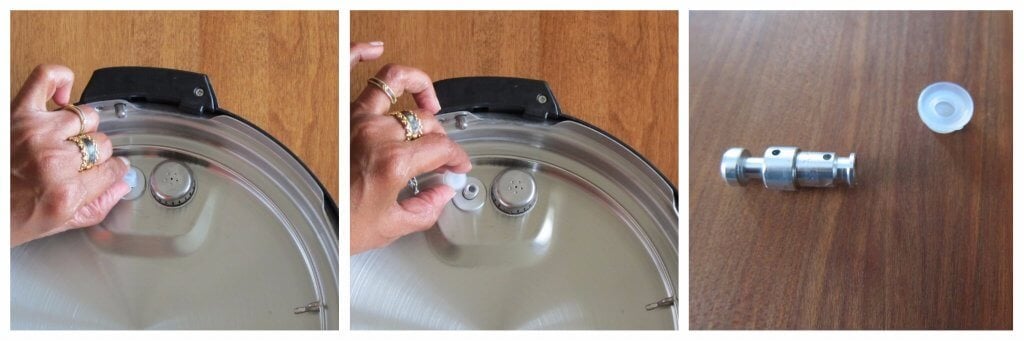
To remove the Float Valve:
- Pull up on the silicone cover of the Float Valve.
- Both parts of the Float Valve (metal part and silicone cover) can be removed.
- Be careful not to misplace the silicone cap.
How to Replace the Float Valve
To replace the Float Valve:
- Re-insert the metal part of the Float Valve back into the slot from the outside of the lid.
- While holding the metal part in place, replace the silicone cover on the inside of the lid.
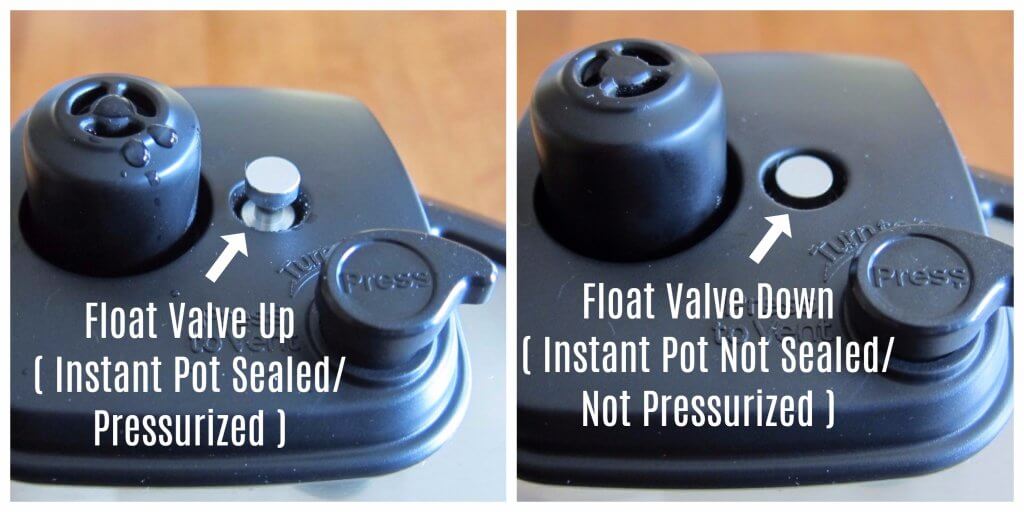
Float Valve Position
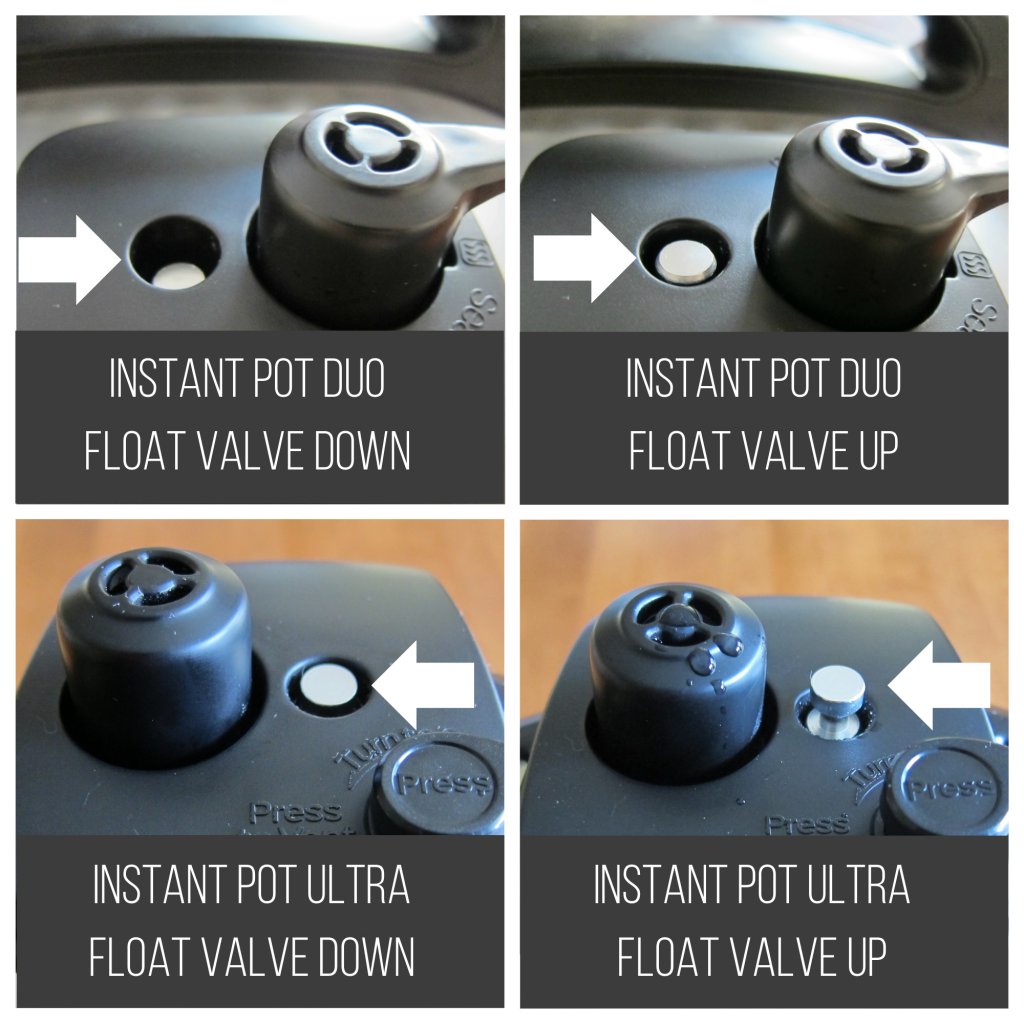
- There are some models such as the Duo, where the float valve is below the lid level when not under pressure and at the lid level when under pressure.
- On the Ultra, the float valve is at the lid level when not under pressure and above lid level when under pressure.
- When the float valve is in the Up position (under pressure), the lid cannot be opened. Don’t try to force the lid open when the float valve is up. Once the float valve drops, the pressure will have released and it’s safe to open the Instant Pot lid.
Anti-Block Shield
The anti-block shield should be cleaned periodically, especially after cooking frothy or starchy foods. Pay particular attention to the holes.
How to Remove and Replace the Anti-block Shield
To remove the Anti-Block Shield:
- Removing the cover of the Anti-Block Shield can be tricky. Using a silicone/rubber trivet or jar opener makes it much easier.
- Push against the Anti-Block Shield in an upward motion.
- To replace, push the cover back on.
Instant Pot Assembly
Base Unit and Inner Pot
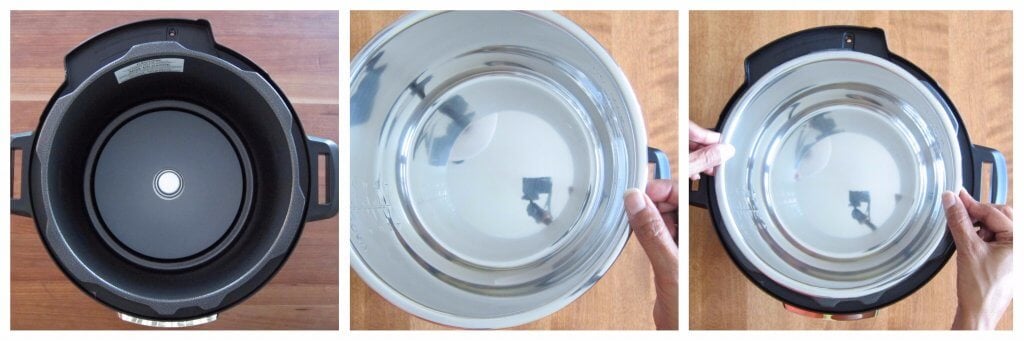
- Make sure the base unit is empty and clean.
- Place the stainless steel inner pot into the base unit.
Condensation Collector
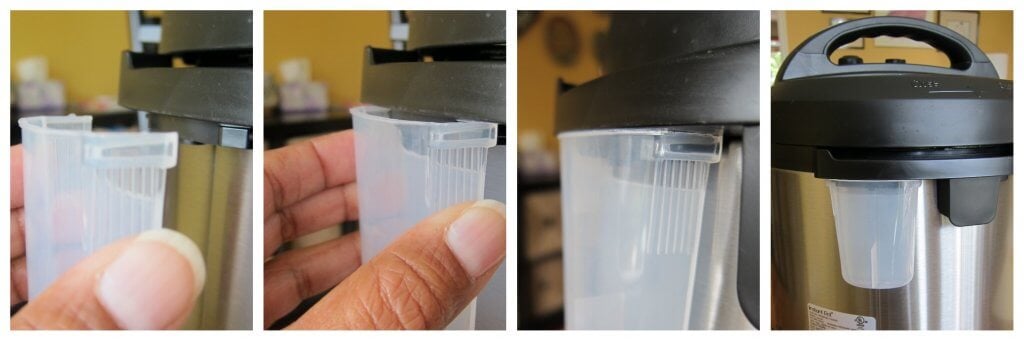
The condensation collector catches any moisture that builds up on the rim. This usually comes from moisture dripping from inside the lid into the rim of the Instant Pot base, when the lid is propped open.
In my experience, the condensation collector rarely fills up but I have found that when I cook pasta, in particular, liquid tends to collect and it can get messy! Get into the habit of checking for liquid in the condensation collector after every use.
To attach the condensation collector:
- Slide the condensation collector onto the back of the Instant Pot Ultra.
- It will sit snugly against the base unit.
- To clean it, slide it out, empty it out, rinse and slide back in place.
Power Cord
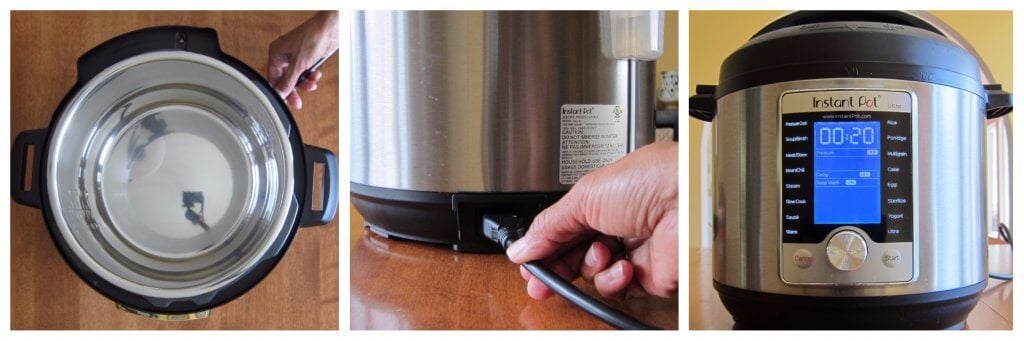
- Insert the power cord into the back of the Instant Pot and plug the power cord into an electrical outlet.
- The display will turn on.
Open and Close the Lid
How to Close the Lid
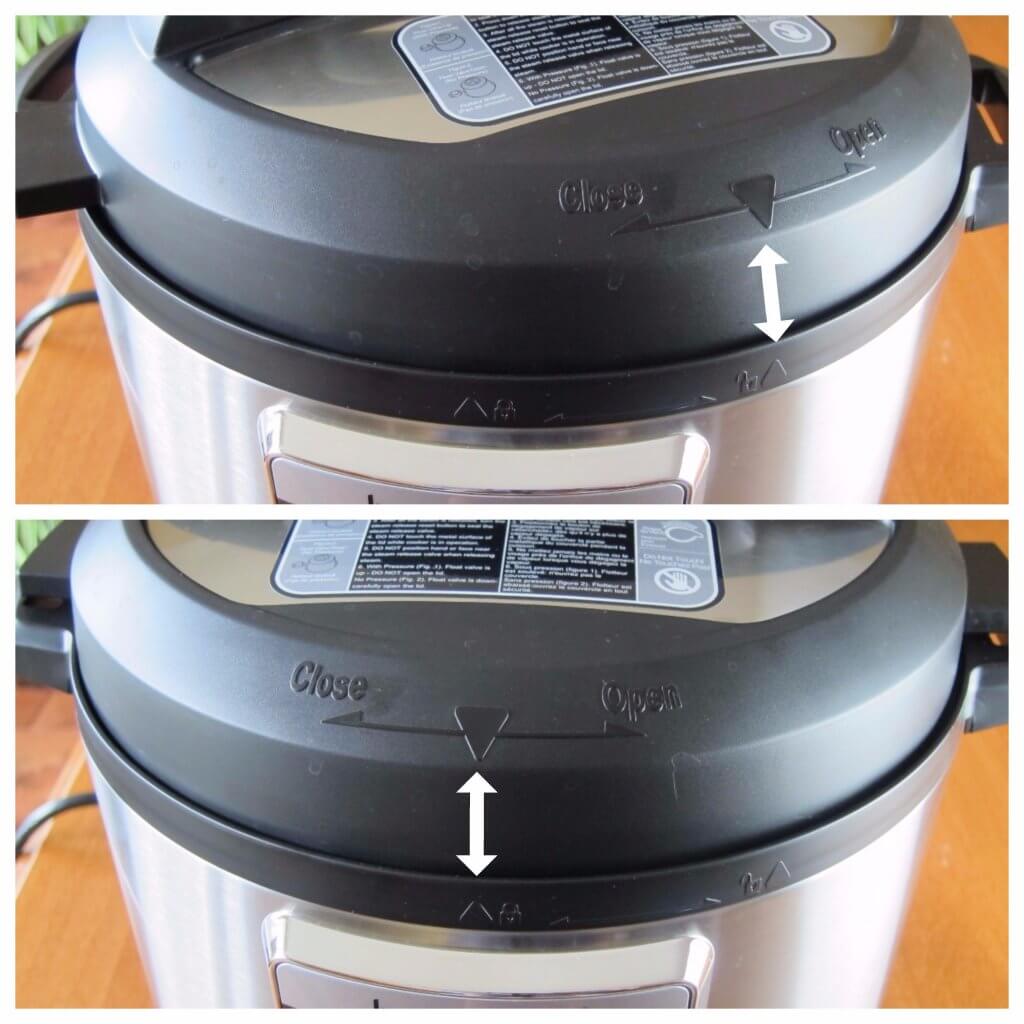
- To close the lid, place the lid on the Instant Pot base unit and line up the arrow on the lid with the “Open” (image of an open lock with an arrow) on the base unit.
- Turn the lid clockwise until the lid arrow lines up with the “Close” (an image of a closed lock with an arrow) on the base. You’ll hear a chime (if the Instant Pot Ultra is plugged in).
How to Open the Lid
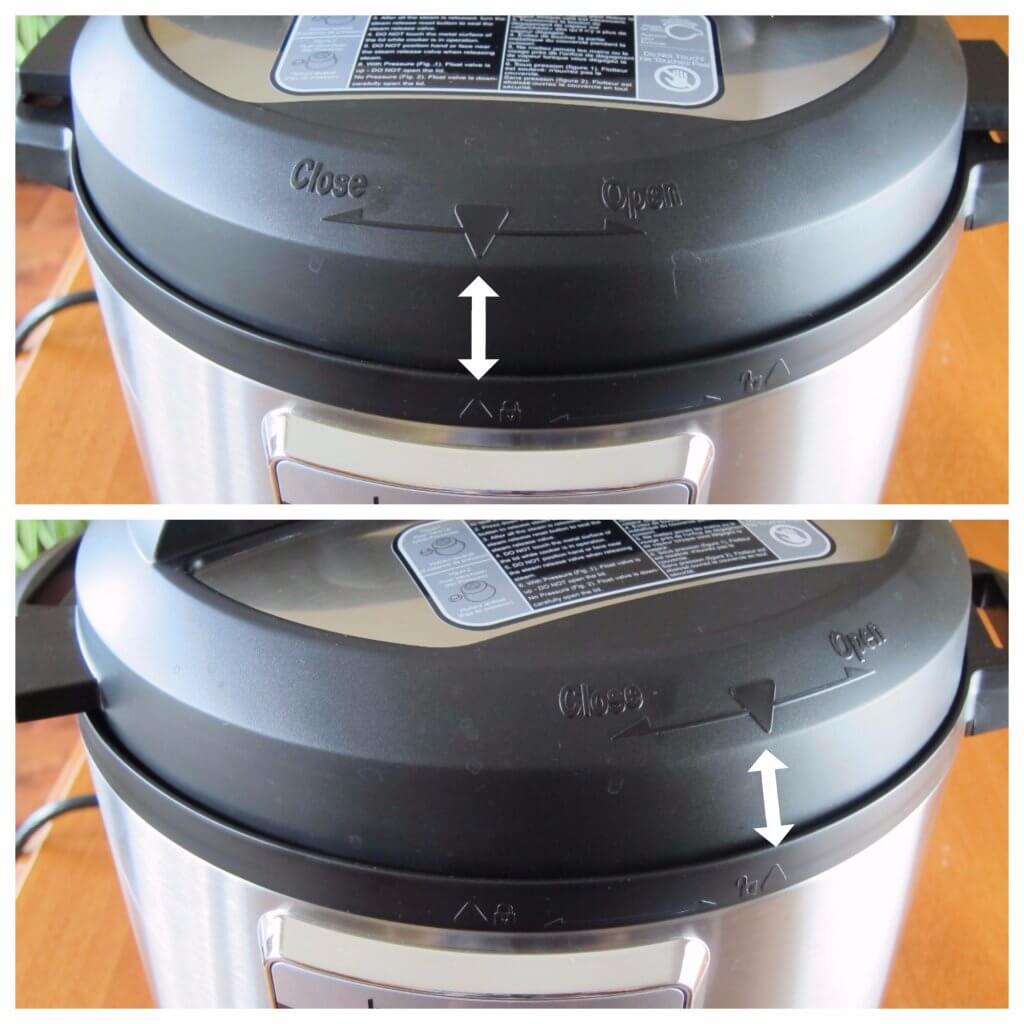
- To open the lid, turn the lid counter-clockwise until the lid arrow lines up with the “Open” (an image of an open lock with an arrow) on the base.
- You’ll hear a chime (if the Instant Pot Ultra is plugged in). This feature can be turned off
How to Prop Open the Lid
Propping open the lid keeps it out of the way and allows you to use the Instant Pot hands-free.
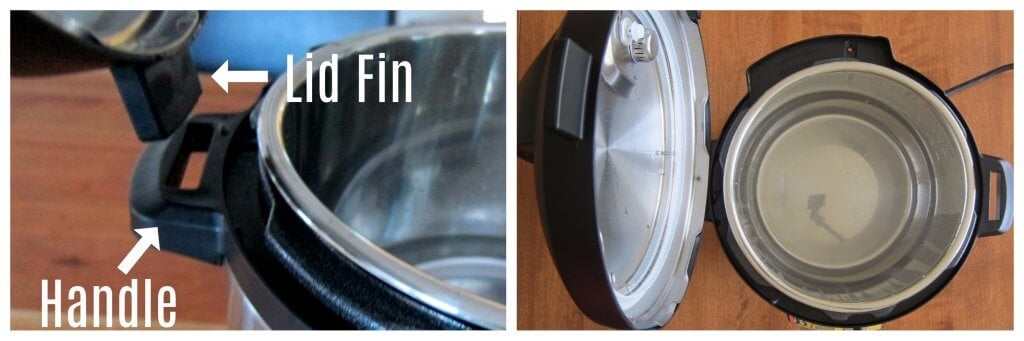
- To prop open the lid, insert the Lid Fin into the notch in the handle of the Instant Pot Ultra.
How to Release Pressure
- When the Instant Pot Ultra is under pressure, the Float Valve goes up and the Instant Pot is sealed. It cannot be opened. Don’t try to force it open!
- When the Instant Pot Ultra isn’t under pressure, the Float Valve goes back down and is level with the lid.
There are a few ways you can release pressure once the Instant Pot Ultra has finished pressure cooking. The recipe you’re following will tell you what method to use.
In this article, I discuss the two most common pressure release methods:
- Quick Release (QR)
- Natural Pressure Release or Natural Release (NPR or NR).
[Find out more details about all the different pressure release methods.]
How to Quick Release (QR) Instant Pot Ultra
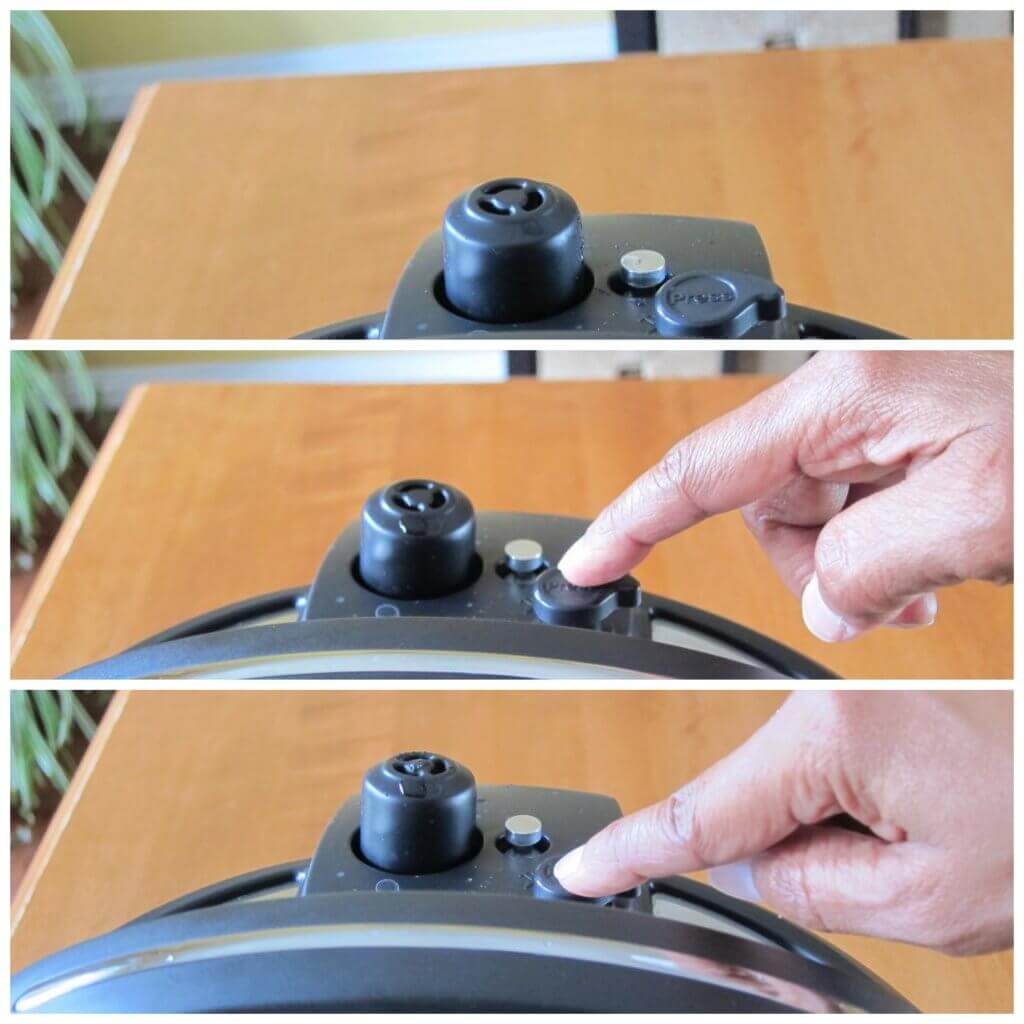
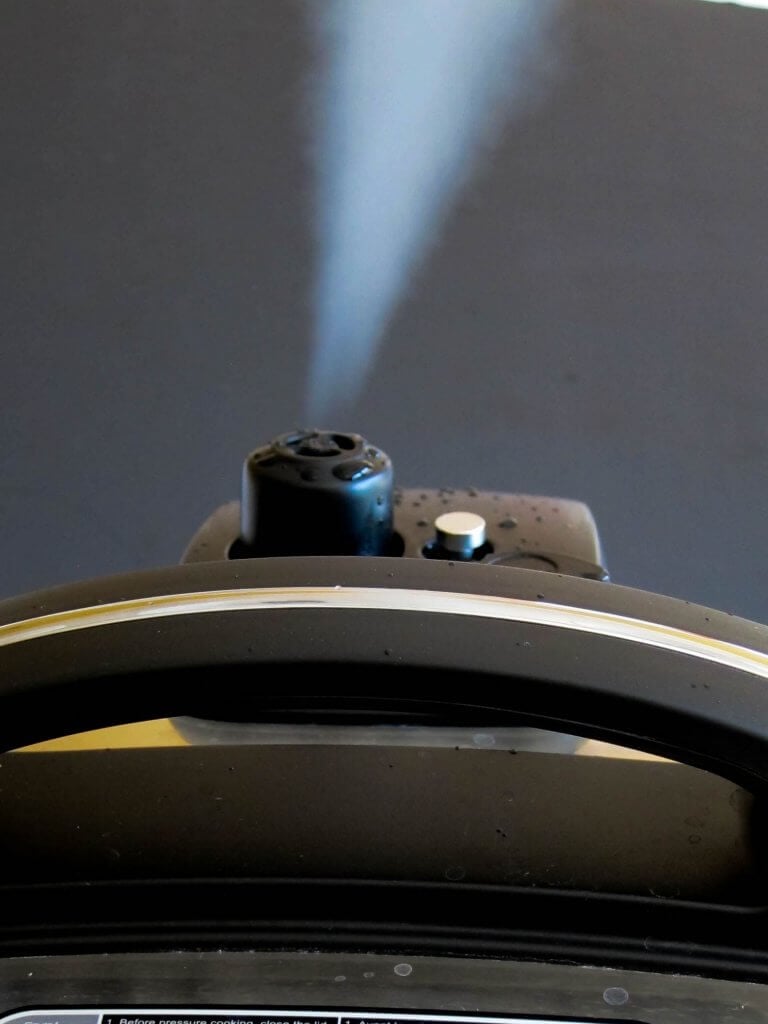
- To do a Quick Release of pressure (QR), press down on the Steam Release Button until it locks into place, and steam begins to come out of the Steam Release Valve.
- Be sure your hand is not above the Steam Release Valve while the pressure is being released.
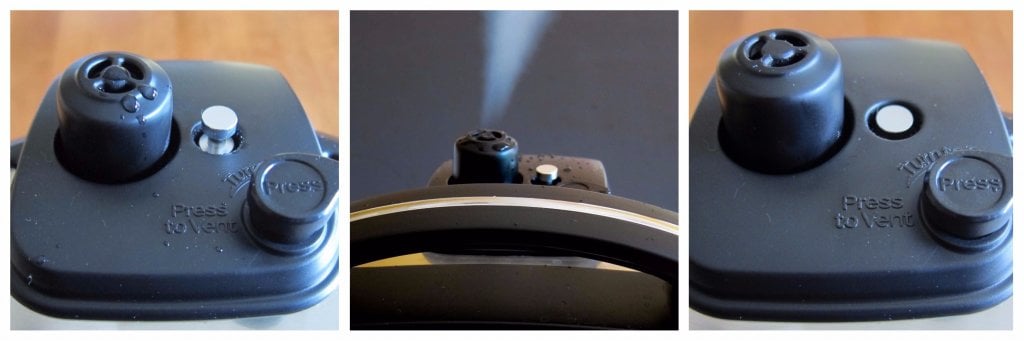
- The Float Valve will go from the up position to the down position once the Instant Pot Ultra has de-pressurized and all the steam has been released.
- It is now safe to open the Instant Pot Ultra.
How to Natural Release (NR) / Natural Pressure Release (NPR) Instant Pot Ultra
- To do an Instant Pot Natural Release of Pressure (NPR), wait for the Float Valve to go down on its own.
- This can take anywhere from 5 minutes to 30 minutes, depending on how much liquid is in the Instant Pot. The more liquid there is, the longer it takes for the Instant Pot to release pressure on its own.
- If you’re in a hurry, you can wait for 15 minutes for the Instant Pot natural release, and then release the remaining pressure using the quick-release method.
Instant Pot Initial Test Run / Water Test
What is the Water Test?
A water test is done by pressure cooking water for a few minutes. According to the Instant Pot manual you need to use 3 cups of water, but I’ve found that using 2 cups of water is adequate. The advantage of using 2 cups is that it takes less time for the Instant Pot to come to pressure.
Why You Should do the Water Test
The initial test run or water test serves two purposes: it familiarizes you with using your new Instant Pot and it allows you to establish that your Instant Pot is working properly. If you have a defective unit, the water test will identify that and you can get a replacement unit.
You should do a water test before the first use but you can also do it when you’re having problems with the Instant Pot pressurizing. Doing the water test will pinpoint whether there’s something about the recipe that’s causing your sealing issues.
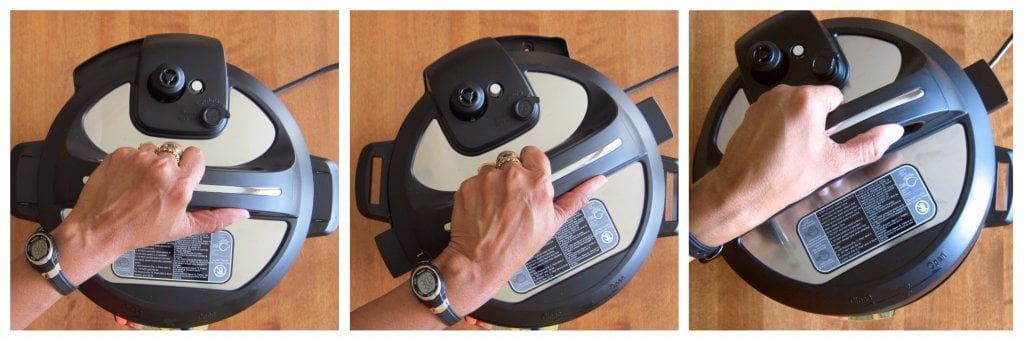
How to do the Initial Test Run / Water Test
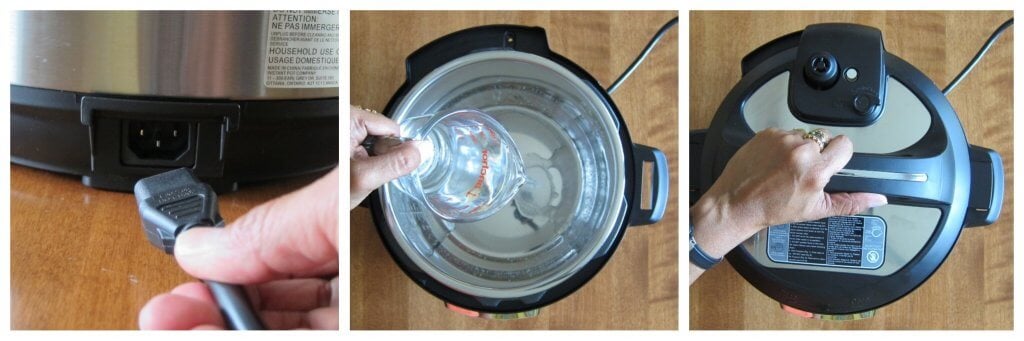
- Attach the power cord to the Instant Pot Ultra, and plug it into an outlet.
- Pour 2 cups water into inner pot. The Instant Pot manual suggests 3 cups but I’ve found 2 cups works just fine. You can add more water, but your Instant Pot will take a bit longer to come to pressure.
- Close the Lid.
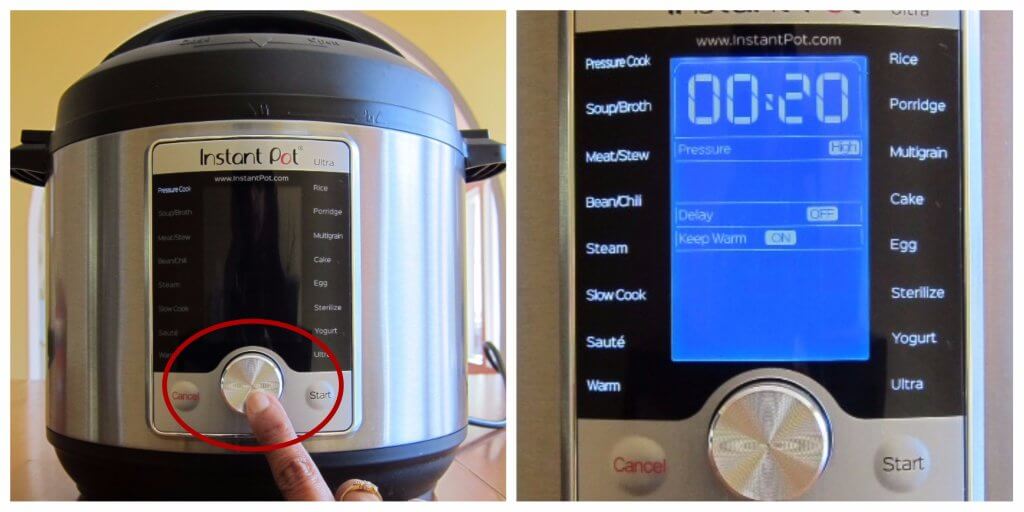
- If the display is off, press the knob/dial to turn on the display.
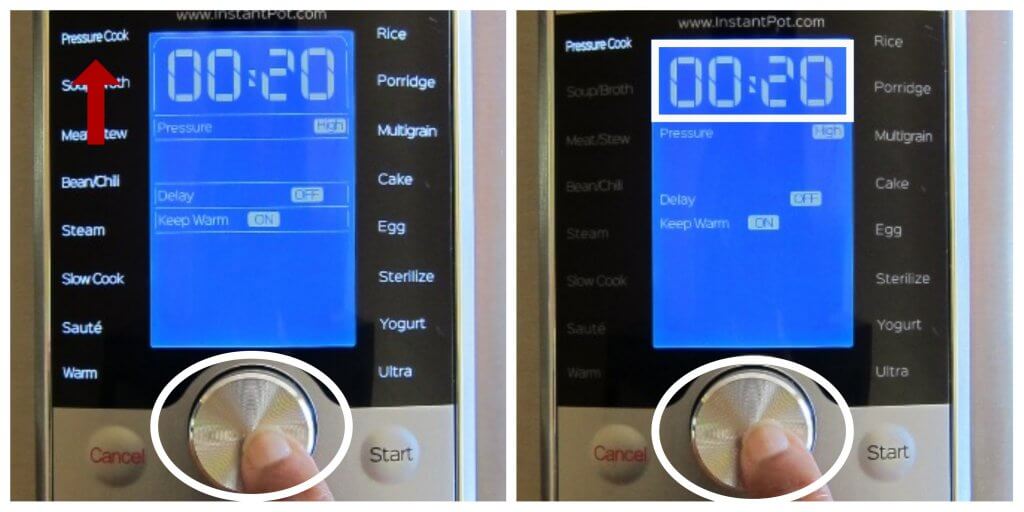
- The Pressure Cook option will be blinking.
- Press the dial to select the Pressure Cook option.
- The cooking time will have a box around it that’s blinking. In my case it’s 00:20 i.e. 20 minutes. Your display may have a different time because it defaults to whatever you set it to the last time you used the function.
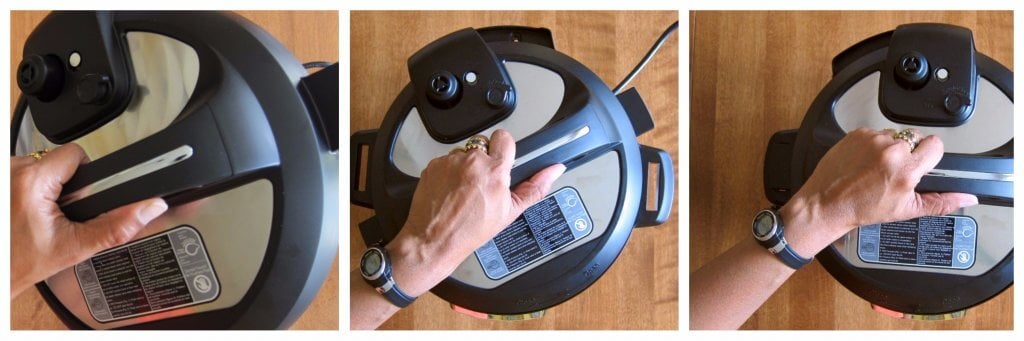
- Press the dial to select the cooking time.
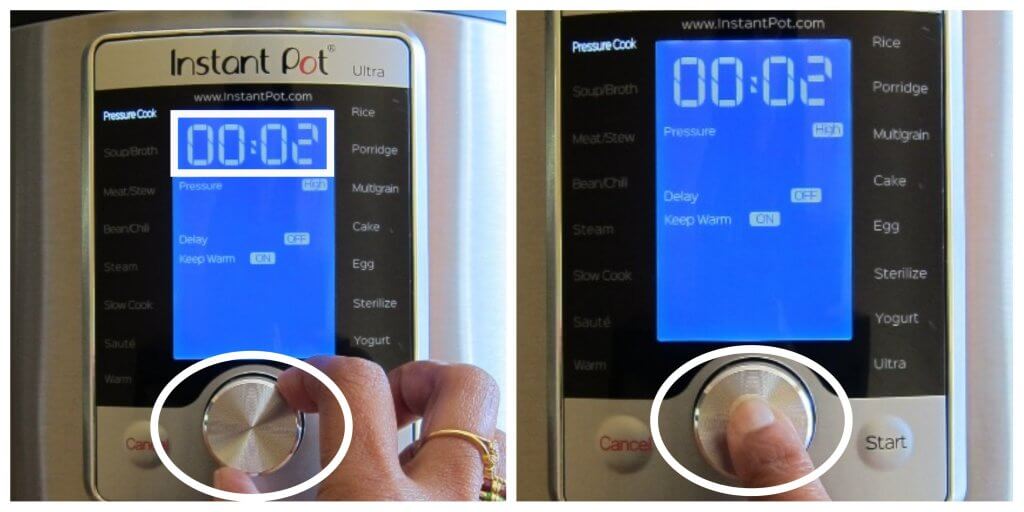
- Now, the time will be blinking.
- Turn the dial until the time changes to 00:02 (2 minutes).
- Press the dial to confirm the time.

- We’ll keep the default settings for Pressure level (High), Delay Start (Off), and Keep Warm mode (On).
- Press Start to begin the pressure cooking.
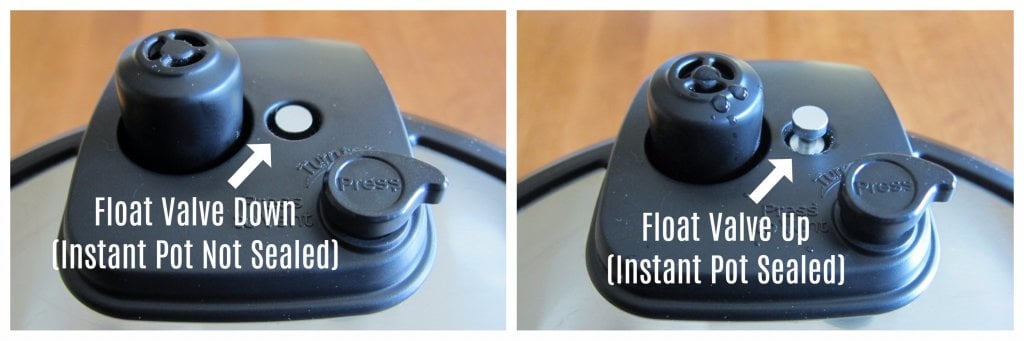
- The Instant Pot Float Valve will go from the Down position to the Up position once the Instant Pot has sealed. This can take up to 10 minutes for 1 cup of liquid.
- There will be some hissing and steaming, and all sorts of noises coming from the Pressure Release Valve and the Float Valve while the Instant Pot is coming to pressure. There is nothing to worry about!
- You might also notice a plastic-like odor. This can happen during first use, and shouldn’t happen again.
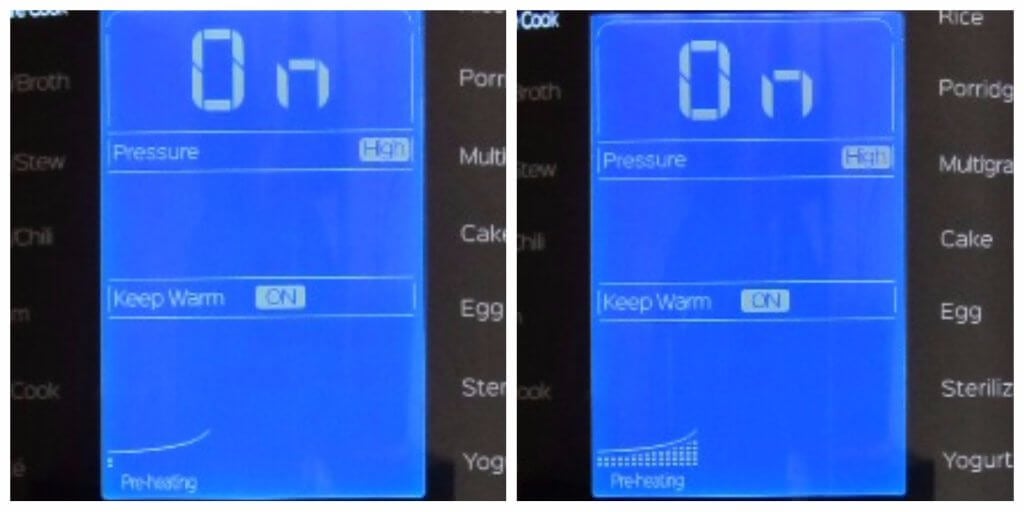
- The display with change to On and will remain On until the Instant Pot reaches pressure.
- Notice that the graph on the bottom of the display will show that the pre-heating is complete.
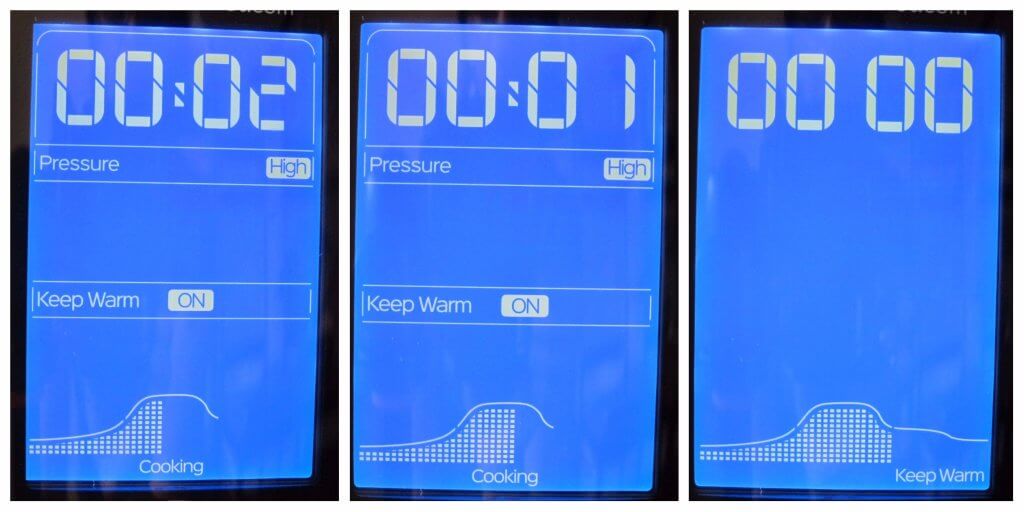
- The Display will change from On to 2 minutes (00:02) and will count down from 00:02 to 00 00.
- Notice that the graph on the bottom tells you the cooking progress.
- Once the Instant Pot Ultra is in Keep Warm mode (as seen on bottom right of the display), it will begin to count UP from 00 00.
- Do a Quick Release of pressure (QR) or a Natural Pressure Release (NPR) as described above in the section about how to release pressure.
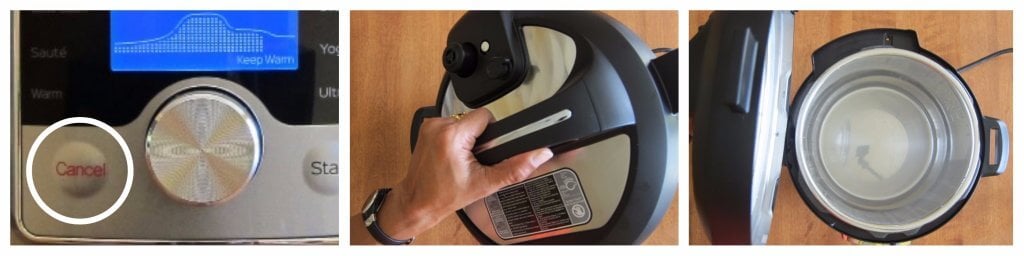
- Press Cancel.
- Open the Instant Pot. Be careful and keep your hands and face away from the steam.
- Prop the lid open.
- The initial test run is now complete!
What to do if the water test fails
If the water test fails and you’re not able to get the Instant Pot to come to pressure, use the following articles to troubleshoot the issue:
If you still can’t resolve your problem, open a support ticket with Instant Pot.
Instant Pot Duo vs. Ultra
If you’re an Instant Pot Duo user, here are the most important differences between the Instant Pot Ultra vs Instant Pot Duo that you need to know about as a beginner:
| Instant Pot DUO | Instant Pot ULTRA | |
|---|---|---|
| Function Selection | There are separate buttons for each cooking function. | Use the knob/dial to toggle between functions and to select options. |
| Pressurizing and Steam Release | The Steam Release Handle moves between the Sealing and Venting positions. The Steam Release Handle has to be manually moved to the Sealing position when the Instant Pot is closed. | The Steam Release Button is pushed down to lock into venting mode and turned counter-clockwise to seal again. The Steam Release Button automatically resets to the Sealing position when the lid is opened or closed. |
| Float Valve | On some Duo models, the Float valve is at the level of lid when the Instant Pot Duo is sealed and below the level of the lid when it’s not sealed. | The Float valve is above the level of lid when the Instant Pot Ultra is sealed and at the level of the lid when it’s not sealed. |
| Start | When a cooking function (e.g. Pressure Cook) is selected and programmed, the cooking starts automatically after a few seconds. | When a cooking function (e.g. Pressure Cook) is selected and programmed, the Start button needs to be pressed to begin cooking. |
First Recipes to Try
Now that you’ve completed the initial test run / water test, you’re ready to cook your first dish. Instant Pot Rice or Instant Pot Hard Boiled Eggs would be a great choice for your first attempt.
Whatever recipe you choose to make first, I strongly recommend that you follow the recipe exactly the first few times – don’t substitute ingredients and change quantities. Once you’re more comfortable with cooking in your Instant Pot Ultra, you can modify the recipes to suit your needs.
If you’re looking for Instant Pot Ultra recipes, my recipes are written with step by step photos of the Ultra. Even if you don’t want to make a recipe, looking at the step-by-step photos and instructions might help you when you’re making another recipe.
Here are some of my favorite easy recipes!
- Instant Pot Arroz Con Pollo (Rice with Chicken)
- Instant Pot Thai Panang Curry
- Instant Pot Penne with Sausage
- Instant Pot Chipotle Shrimp Soup
- Instant Pot Vegetarian Moroccan Stew
- Instant Pot Chicken Korma
Search for recipes by cuisine, course, or cooking method!
If you found this article to be helpful, please share it on social media using the social media share buttons at the top and bottom of this post. Thank you so much!
Related Articles


Hope says
I have had my Ultra since Christmas and I am having problems with it sealing. It only seals about half the time and I end up having to redo the process. Every time I check to make sure there is enough water and that the sealing ring is fully on, but it still never comes to pressure and sits at the preheating step. The lid is always fully on and I check the steam release button. But again, about every other time there is a lot of steam coming from the valve. When I realize that something is wrong I find I can easily open the lid. Am I doing something wrong or do you think I have a defective machine?
Paint the Kitchen Red says
Hi Hope – sorry to hear about your troubles. So I have to ask the requisite questions first:
– Have you cleaned it thoroughly – i.e. take out float valve, anti-block shield and sealing ring and clean the holes in the lid too?
– Have you tried with just water, so you can eliminate ingredients as the variable?
– Have you tried putting the sealing ring in the freezer?
– Are you waiting long enough? i.e. do you have a lot of liquid in the pot?
You might need to submit a ticket at https://support.instantpot.com
Deb says
Thank you so much for this detailed instruction. I just got my Instant Pot Ultra but was so terrified to use it. Thanks to this instruction, I finally mustered up the courage to use it.
Paint the Kitchen Red says
Deb – I love comments like yours! I hope you enjoy your new Ultra!
Christa Cox says
Could you clarify the minimum amount of liquid required for the 6 qt IP Ultra 60? In the manual I read 2 cups, but I see several recipes instructing only 1 cup of liquid. I’m confused and don’t want to break it but using 2 cups left my food quite soggy. Thanks!
Paint the Kitchen Red says
Hi Christa, officially the minimum quantity of liquid is 1 1/2 to 2 cups. However, depending on the type of food being cooked, I have been able to get away with using less liquid. If I don’t have a dense sauce (especially tomato based or flour based, etc) I have been able to use as little as 1/2 cup. Many foods (especially vegetables) release liquid upon being pressure cooked, and that counts. If you’re up for experimenting with recipes once you’re comfortable with the Instant Pot, you can reduce the quantity of liquid. The worst that can happen is you’ll have burnt and possibly wasted food – not a great thing, but surmountable. The more you cook with the IP, the more you’ll feel comfortable changing things and even making your own recipes. That being said, all my recipes work well as written, especially for the 6 quart Instant Pot. Read my latest post for another cooking method called PIP. That is really handy for foods that you don’t want to add a lot of liquid too.
Christa says
Thank you! Very helpful information.
Paint the Kitchen Red says
You’re welcome, Christa – enjoy!
Ann-Marie Brown says
Thanks so very much for this manual. Extremely helpful!! I just opened my ultra yesterday, but was pretty intimidated even before I opened it. I opened it up, and the user manual that comes with the instant pot was really not good at all. It left so many things out. I now have successfully done the water test, as well as hard boiled eggs. Thanks again so much!!
Paint the Kitchen Red says
Thanks for the kind words, Ann-Marie! I’m glad it all went well for you – you’re ready to cook some fun stuff now!
Michele says
Thank you for doing a great job explaining how to use the Insta Pot Ultra- of course we go big – so our first attempt is a pot roast- with your detailed instructions I am pretty sure we will have no problems. We are going to stop it 1/2 to add the potatoes,( that makes me a bit nervous- but will be very careful) I heard they tend to get mushy if they are cooked to long.
I will save your instructions to read over and over again.
Paint the Kitchen Red says
Hi Michele – glad to be of help! Don’t worry, you’ll get the hang of it and don’t be discouraged if you have a miss or two – we all went through it. When you’re doing the potatoes part-way through, you’ll be using a quick release. This can take a while based on how much liquid is in the pot. Then when you restart, it will come to pressure much quicker than when you initially brought the meat to pressure. Feel free to ask me further questions, and thank you for commenting.
ashira says
What a beautiful job! Thank you for doing this.
Paint the Kitchen Red says
You’re so welcome, Ashira. And thank you for the kind words.
Shawn says
Hi, thanks so much for the info. So much clearer than the manual for sure!
Just wondering how to set the altitude properly? I followed all the steps but when I enter my altitude in metres(400m) the display jumps from 0 to 600. Is this because from 0(sea level) to 600m is negligible or am I doing something wrong?
Thanks in advance!
Paint the Kitchen Red says
Hi Shawn, your instinct is correct. You should just leave it at the default. The minimum is 2000 feet which is appx 600 meters. Thanks for your question – and all the best!
Mary says
Performed 3 water tests on my Instant Pot Ultra 60 that I received last week. First test steam escaped constantly from steam release valve (float valve raised in normal position for pressure) for 15 minutes at which time I cancelled the test. After letting it cool and checking sealing ring and valves, tried again. This time it reached pressure in 3 minutes with steam escaping for about 2 minutes while reaching pressure wile in “on” function and steam stopped escaping when “cooking” function started. However, reaching pressure so quickly surprised me so I repeated the test the next day. This time reached pressure in 2 minutes in “on” function and then steam escaped from steam release valve during the entire “cooking” phase. Do I have a defective heating element meaning it is too hot? Defective steam release valve? Is this to be normal? I am not new to pressure cooking but never had an electric one before..
Paint the Kitchen Red says
Hi Mary, the reason it can seal so quickly could be lesser quantity liquid or if the liquid is hot, so that may not be an issue. And steam escaping BEFORE the float valve is up is pretty normal. However, after it’s sealed, you shouldn’t see steam escaping consistently. You might have a defective unit – have you tried to contact the company? Let me know how it turns out. Sorry for your trouble 🙁
Gail says
Thanks to your encouraging manner & good advice I opened the box, did the water test, hard boiled 4 eggs perfectly and am now cooking rice for lunch. Thanks for being there. 😉
Paint the Kitchen Red says
Gail, excellent! Thank you for your kind words. I’m always happy to help! All the best….
SUSAN says
THANK YOU VERY MUCH. THE ORIGINAL MANUAL DOES COMMUNICATE AS CLEARLY AS YOU DO. INSTANT POT OWES YOU. YOU SHOULD BE THEIR NEW TECHNICAL WRITER! Thanks for explaining it so that I was not afraid of blowing the kitchen up.
Paint the Kitchen Red says
Hi Susan – aww, thank you for the compliment 🙂 I’m glad to be of help and I hope you enjoy your new Instant Pot. Let us know what your first dish was!
Thomas O'Brien says
Excellent instructions! I received the Ultra 60 at xmas and continue to ‘learn’. I do have a question around the ‘Rice’ setting. I’m not able to change the cooking time setting when rice is selected. Should I be able too? Instead I’ve been selecting ‘Pressure Cook’ to cook rice. Any insight is greatly appreciated.
Paint the Kitchen Red says
Hi Thomas, I’m glad you found the instructions helpful. The rice setting is pre-programmed for 12 minutes at low pressure on most models. On the Ultra, it does allow you to change the pressure level from low to high but not the time (which makes no sense, since cooking rice at 12 minutes on high pressure would make it mushy unless it’s brown rice which needs 20+ minutes.) I generally stick to Pressure Cook, because I have more control 🙂 Thanks for your comment and all the best to you!
Debbie says
I had saved this bc I was pretty sure I was going to get the Ultra. And now I have, and your efforts on this beginner’s guide are sooooooo appreciated!! Thank you!!! -db
Paint the Kitchen Red says
Hi Debbie – I’m glad you found the instructions helpful. I hope you enjoy your new IP Ultra!
Frank Forbes says
I purchased both the Instant Pot Ultra and the Instant Pot Lux 60 V3. Sad to say, I’m sitting on the fence on which unit to keep. I have high hopes for the Instant Pot Ultra, but often worry that it’s hype doesn’t out weigh the benefits.
My goal is to make tasty everyday meals – nothing fancy with a lot of ingredients that I won’t ever use.
Paint the Kitchen Red says
Hi Frank, I really enjoy my Ultra, but I use it almost every day. I also have a DUO, but like the interface of the Ultra a little better. If you just want to make basic meals and don’t need to ever cook seafood or vegetables at low pressure or make yogurt, proof dough, etc then the Instant Pot LUX would work just fine for you and you save some money 🙂 For me personally, it wouldn’t work because I do need some of those features I mentioned. There are many people with the LUX who are perfectly satisfied with it.
Tessa says
My IP has been sitting on my countertop for a week! Your instructions made the process less intimidating, thank you. I was excited to receive the IP as a gift, but soon discovered, there aren’t many pins geared to the Ultra 60 model.
Paint the Kitchen Red says
Hi Tessa, thank you for taking the time to comment! I received my Ultra a couple months ago and ever since then, my newer recipes give step-by-step photos for the Ultra too. That being said, you can adapt any pressure cooker or Instant Pot recipe for your Ultra. It’s just a matter of pressing/selecting the button for your model. I hope that makes sense! If you want to look at one of my more recent recipes e.g. Instant Indian Chicken Curry Soup, the step by step with photos will give you an idea of what you need to do on your Ultra model.
P says
This was enormously helpful. Thank you!
Paint the Kitchen Red says
You’re so welcome – thanks for commenting and enjoy your new Ultra!
Betsy says
Thank you so much for this beginner’s manual! I was terrified of my mother’s pressure cooker when I was a child and that has carried over into my adult years. I think I can use this Instant Pot now without being afraid I’ll blow the house up. I’ve also ordered a couple of cookbooks, so wish me luck!
Paint the Kitchen Red says
Hi Betsy. When I was young, my mom made a pressure cooker dal (which has turmeric) and the pressure cooker valve blew off and all the curry was splattered on the walls and ceiling! Horrible cleanup job 🙂 Thankfully, there are no such worries with the Instant Pot! Enjoy your new Instant Pot. Remember to start out following tried and true recipes, and start simple the first few times to get the hang of it. Then you’ll be ready to adapt your own recipes!
Kim J Lewis says
Priceless information! Many thanks!
Paint the Kitchen Red says
You’re welcome Kim – glad you found it useful.
Tara says
I LOVE your site. I just got an Instant Pot for Christmas and like you wrote, I am very intimated by it. I have never used one, so this site is amazing to me Thank you so much for sharing your time to inform us!! Plus it’s a bonus for my family and I because we love Indian food and I am always trying to find the right Indian recipe. ???
Paint the Kitchen Red says
Hi Tara – congrats on your new Instant Pot! You’ll probably really like the Instant Pot Chicken Curry recipe – it’s a family recipe. Let me know if you try it out and hope you enjoy your new Instant Pot.
Linda Anderson says
When it says to preheat, is that with all ingredients in the pot so the lid stays on TIL cooking is complete? I’m scared to death to try a recipe!! Thanks
Paint the Kitchen Red says
You don’t have to preheat when making recipes but you may have read a recipe that calls for it so that the coming-to-pressure part takes less time. I’d need to see the recipe, but it is probably telling you to press ‘Saute’ and let the ingredients heat up before pressure cooking. Don’t be nervous about trying a recipe, but if you look at my recipes, I give step my step instructions and you can use them as a guide. Good luck!
Brenda Gracie says
Awaiting receipt of my Boxing Day special IPU. So glad I found your manual! I, too, love kitchen gadgets and I tend to try every feature. I am intrigued by the possibilities this gadget opens up, especially the opportunity to sous vide to a certain extent. Thanks so much for thinking of your fellow users.
Paint the Kitchen Red says
Thanks for taking the time to comment, Brenda. I’m sure you’ll enjoy your new Instant Pot! Let us know how you like the sous vide functionality!