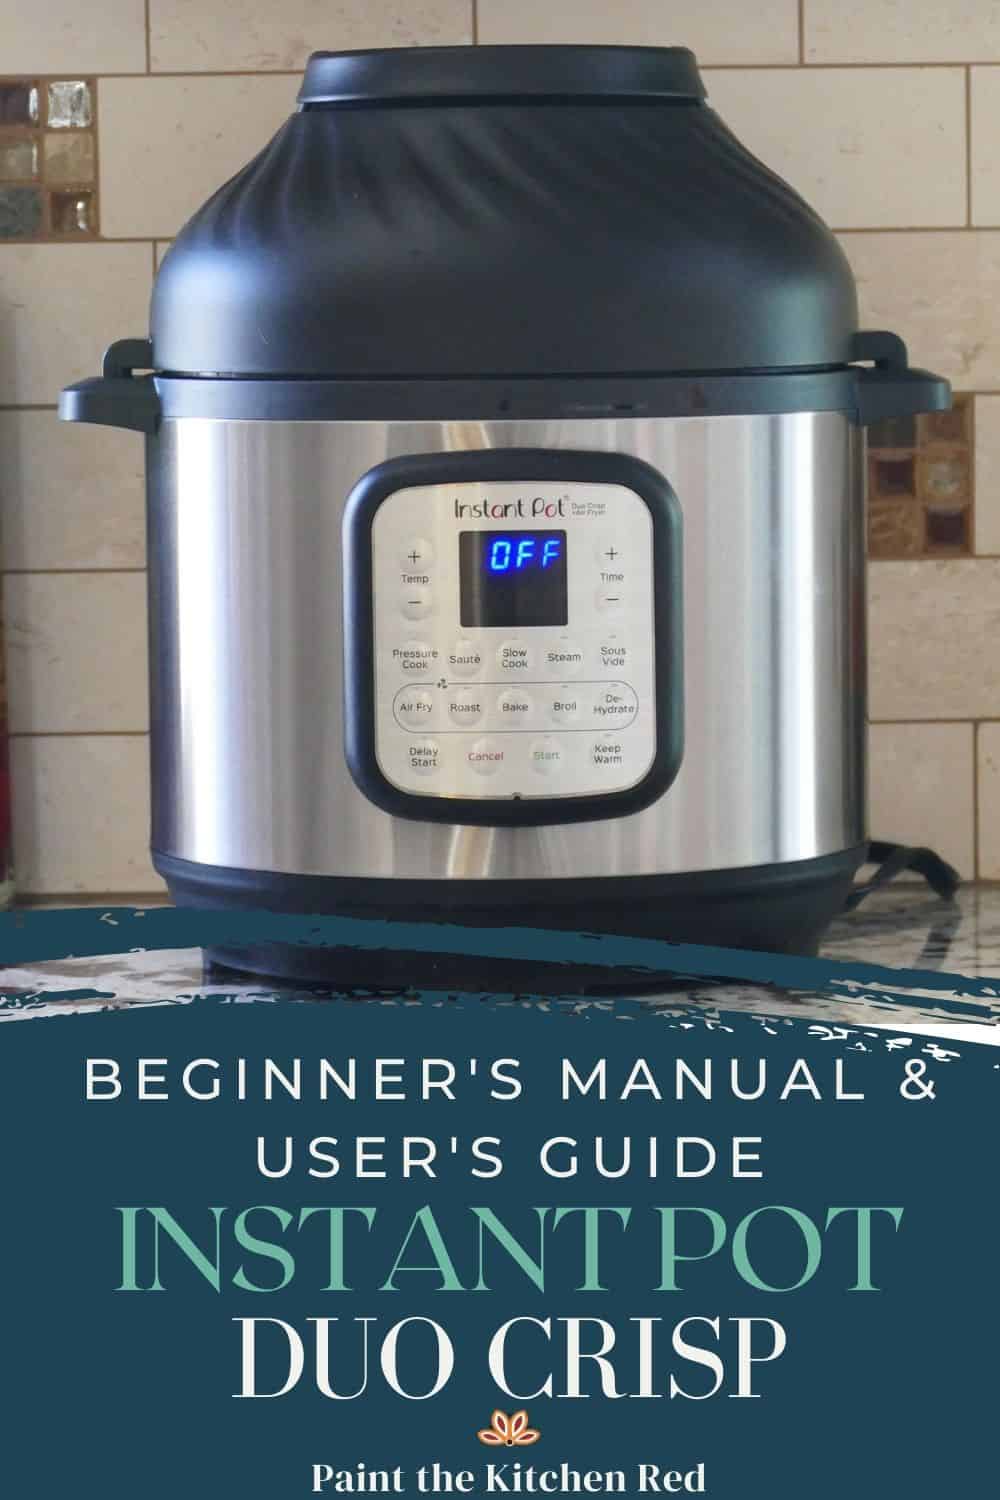
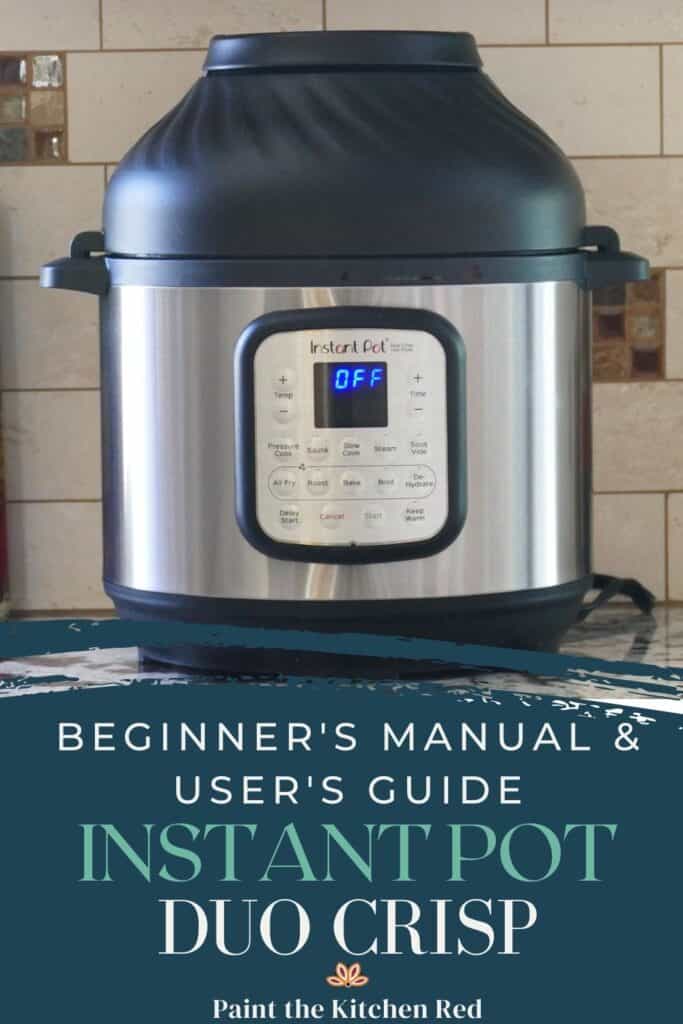
If you’ve just purchased the Instant Pot Duo Crisp + Air Fryer, this beginner’s manual will help you get started. This user manual tells you about all the parts, the most important buttons, and functions, and gives you instructions on how to use the Instant Pot Duo Crisp for the first time by doing the water test (initial test run). And you’ll also learn how to use air fryer functions using the air fryer lid.
This post contains affiliate links. As an Amazon Associate, I earn from qualifying purchases. Please read the disclosure.
Table of Contents
- Introduction with video
- What is an Instant Pot?
- Safety Precautions
- First Thing You Need to Do!
- Parts
- HOW TO USE INSTANT POT DUO CRISP PRESSURE COOKER
- INSTANT POT DUO CRISP | HOW TO USE AIR FRYER
- What is an Air Fryer?
- Introduction to the Duo Crisp Air Fryer Lid
- Duo Crisp Air Fryer Lid vs. Traditional Air Fryers
- Air Fryer Accessories
- Air Fryer Lid Parts
- Open and Close Air Fryer Lid
- Ways to use Air Fryer Lid
- Air Fryer Basket Assembly
- How to Store Air Fryer Lid
- Commonly Used Instant Pot Air Fryer Buttons
- Air Fryer Tips
- Instant Pot Duo Crisp Error Codes
Introduction with Video
Is the Duo Crisp the same as an air fryer? Well, it’s more than an air fryer because the Instant Pot Duo Crisp is a pressure cooker and air fryer all-in-one. It has a simple display panel, a pressure cooker lid that auto-seals, and a separate lid that allows it to be converted to an air fryer.
If you’ve just purchased the Instant Pot Pro Crisp, follow my Instant Pot Pro Crisp Beginner’s Manual and User Guide. The Pro Crisp has similar features and display panel to the Instant Pot Pro, one of my favorites, and the air fryer capabilities are very similar to this model, the Duo Crisp.
I’ve written a detailed post about what the differences are between the Pro Crisp vs Duo Crisp.
I’ve been using the Duo Crisp a lot and I’ve made Instant Pot air fryer roasted potatoes, brussel sprouts, chicken wings, frozen fries, and even a pound cake. They’ve all turned out excellent. Not a single miss!
If you have trouble seeing the instructional video below, disable your adblocker temporarily and refresh the browser.
Here are some of my other user guides:
- Instant Pot DUO Beginner’s Manual
- Instant Pot ULTRA Beginner’s Manual
- Instant Pot DUO EVO PLUS Beginner’s Manual
- Instant Pot DUO NOVA Beginner’s Manual
- Instant Pot DUO GOURMET Beginner’s Manual
- Instant Pot DUO CRISP Beginner’s Manual
- Instant Pot PRO Beginner’s Manual
What is an Instant Pot?
The Instant Pot has become so popular in recent years that Instant Pot is being used by some as a generic name for pressure cookers of any brand.
In reality, Instant Pot is the brand name of a multicooker that serves as a pressure cooker, slow cooker, rice cooker, yogurt maker, sauté/searing pan, steamer, and warming pot all in one convenient appliance.
Some people use the name Instapot, but the correct name is Instant Pot.
The Instant Pot Company (Instant Brands) started out with one product – the Instant Pot multicooker – and now makes a wide range of kitchen appliances including air fryers, blenders, and toaster ovens.
Although the Instant Pot multicooker has many different functions (aka smart programs), the most commonly used is the Pressure Cook function. Pressure cooking allows you to cook foods at a fraction of the time it would take on the stovetop.
The Instant Pot Duo Crisp model differs from other models in that it comes with an additional lid that allows you to use the Instant Pot as an air fryer.
Safety Precautions
Most old-style pressure cooker disasters in the past could be attributed to user error. Instant Pot pressure multicookers are carefully designed to eliminate and avoid most of the potential problems.
Numerous safety features help reduce common errors. Safety features include pressure sensor technology, lid close detection, lid lock technology, overheat protection and automatic temperature and pressure controls.
Although there are many built-in safety features as explained above, as a user you need to follow common-sense precautions:
- Don’t touch the hot surfaces, particularly the stainless steel parts. Use the handles to move the Instant Pot or the inner pot.
- Don’t place the Instant Pot on or close to an electric or gas burner.
- Don’t move the Instant Pot when it’s under pressure.
- Don’t fill over ⅔ full.
- When cooking foods that expand e.g. rice, beans, pasta don’t fill over ½ full.
- Ensure anti-block shield, float valve, and steam release pipe are clean and not clogged.
- Don’t open the lid until the float valve is down i.e. the Instant Pot is depressurized.
- Keep hands and face away from the steam release mechanism.
- Don’t obstruct the steam release valve when pressure is being released.
- When quick-releasing frothy foods such as applesauce, oatmeal, pasta, etc. take extra care. It’s best to release pressure in short bursts for these types of foods.
- Don’t use another Instant Pot model’s lid on the Duo Crisp Instant Pot and vice versa.
- Don’t cover vents when the air fryer is in use.
- Only use the original stainless steel inner pot (do not use a ceramic–coated inner pot) when using the air fryer lid.
- Don’t overfill the air fryer basket and don’t cook oversized foods.
- Only place the air fryer lid on the enclosed protective pad, when hot. Do not place directly on the countertop.
- When the air fryer lid is in use, keep hands and face at a safe distance from the air vents due to hot air.
For more information about safety precautions, please read the Instant Pot Duo Crisp + Air Fryer user manual.
First Thing You Need to Do is Open the Box!
I frequently hear from people who either got the Instant Pot as a gift, or they bought it and are too scared to use it. So let me just say there’s nothing to worry about. The Instant Pot has many layers of built-in safety features!
Learn more about your Instant Pot…
- Natural or Quick Release: What is Instant Pot natural release vs quick release and when should you use them?
- Instant Pot Tips and FAQs: What are Instant Pot frequently asked questions?
- Instant Pot Not Sealing: Why is your Instant Pot not sealing and what can you do to fix it?
- Common Instant Pot Problems: This Instant Pot troubleshooting guide explains common problems and errors and how to solve them.
- Sous Vide Button: How to use sous vide Instant Pot function for perfectly cooked foods.
Besides, if you don’t get it out of the box and try it out, in the event you have a defective unit you might miss the warranty period and be stuck with another useless appliance!
In this guide, I’m going to (virtually) hold your hand and help you get going to the point where you’ll pressure cook your first recipe: water. You’ll also learn how to use air fryer functions with step-by-step instructions. You’ve got this!
Parts
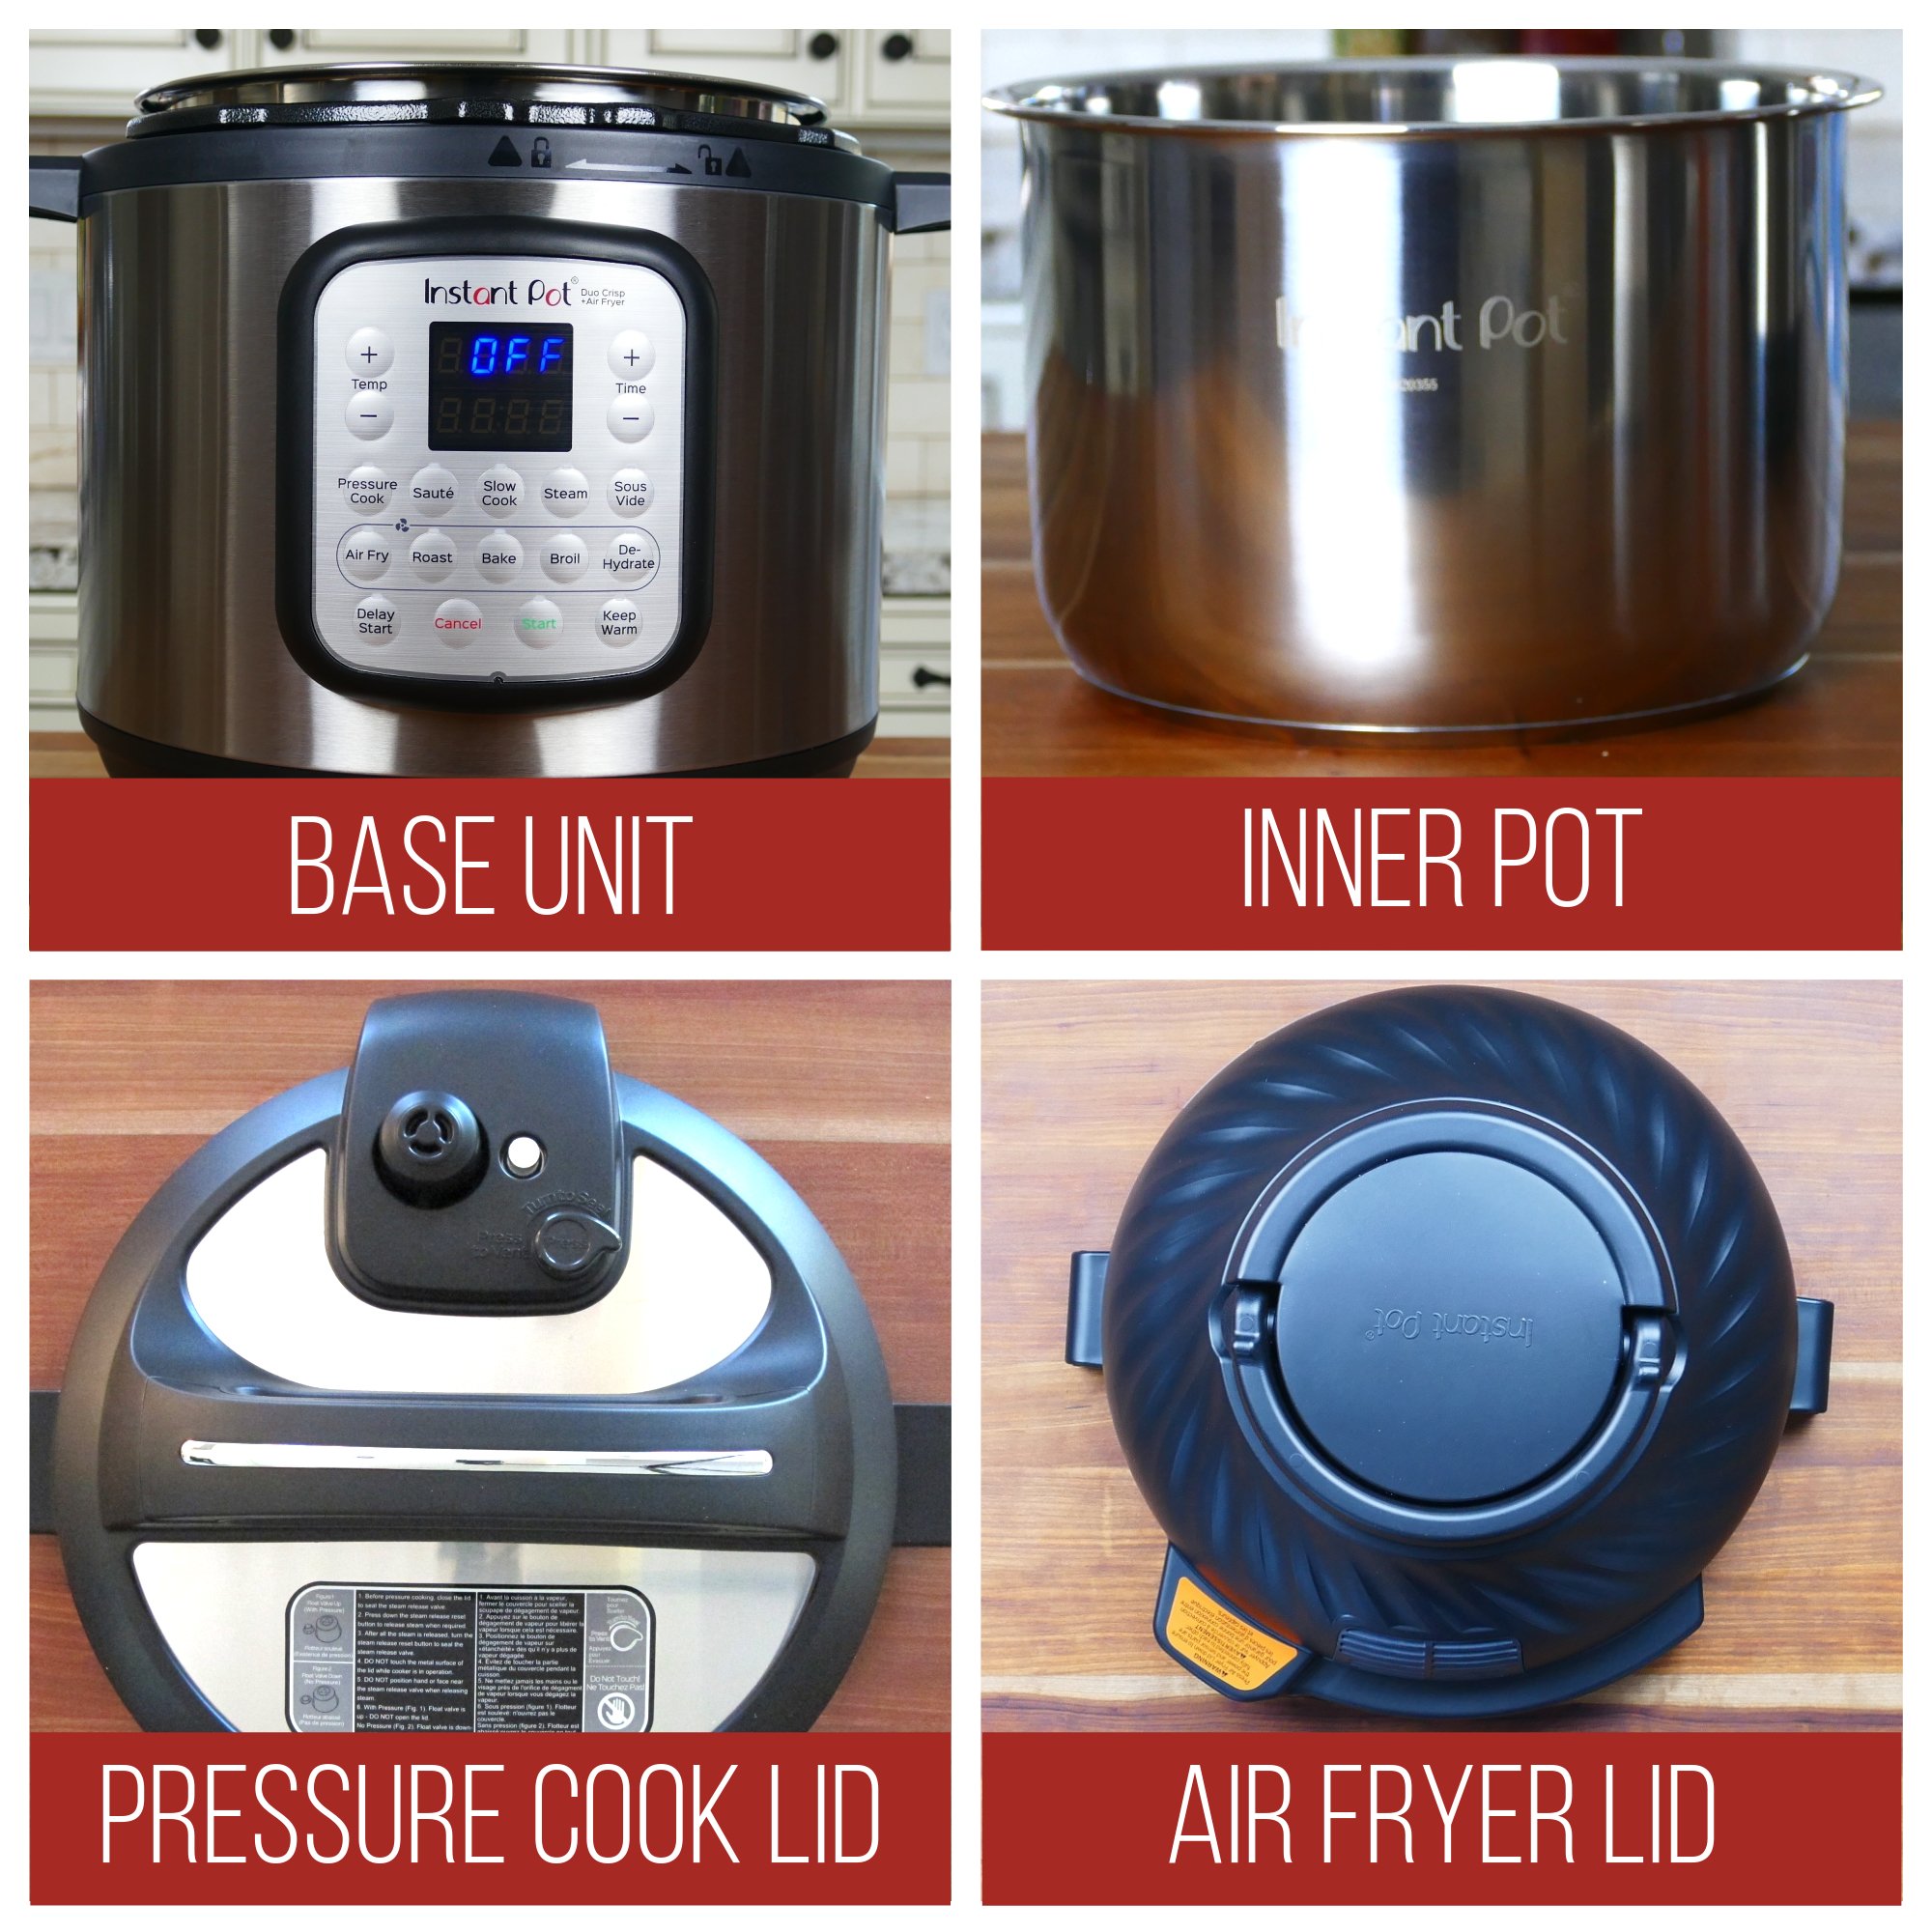
Here are all the parts of the Instant Pot Duo Crisp + Air Fryer. It comes with two lids. The first lid is the pressure cooker lid and the second lid is the air fryer lid:
- Base Unit/Outer Pot – stainless steel exterior that houses the heating element, control panel, and attached power cord.
- Inner Pot – removable stainless steel pot. The inner pot is stove-friendly, so you can use it on your stovetop as you would a regular pot. It can be washed in the dishwasher or by hand.
- Pressure Cook Lid – closes the Instant Pot and seals it under pressure. The lid can be washed in the dishwasher or by hand.
- Air Fryer Lid – closes the Instant Pot and converts it into an air fryer. The lid should not be washed. Remove all food debris and grease splatter once cool, by cleaning the heating element cover and surrounding area with a soft, damp cloth or sponge.
How to Use Instant Pot Duo Crisp Pressure Cooker
How Does Pressure Cooking Work?
The Instant Pot Duo Crisp pressure cooker creates a closed environment where steam builds up in a tightly sealed pot. This, in turn, causes the internal temperature to rise and pressure to increase.
Under high pressure, the fiber in the food is tenderized and flavors develop in a very short time. Nutrient-rich steam condenses in the pot instead of evaporating and nutritional value is retained because of the speed of cooking.
Duo Crisp Pressure Cooker Accessories
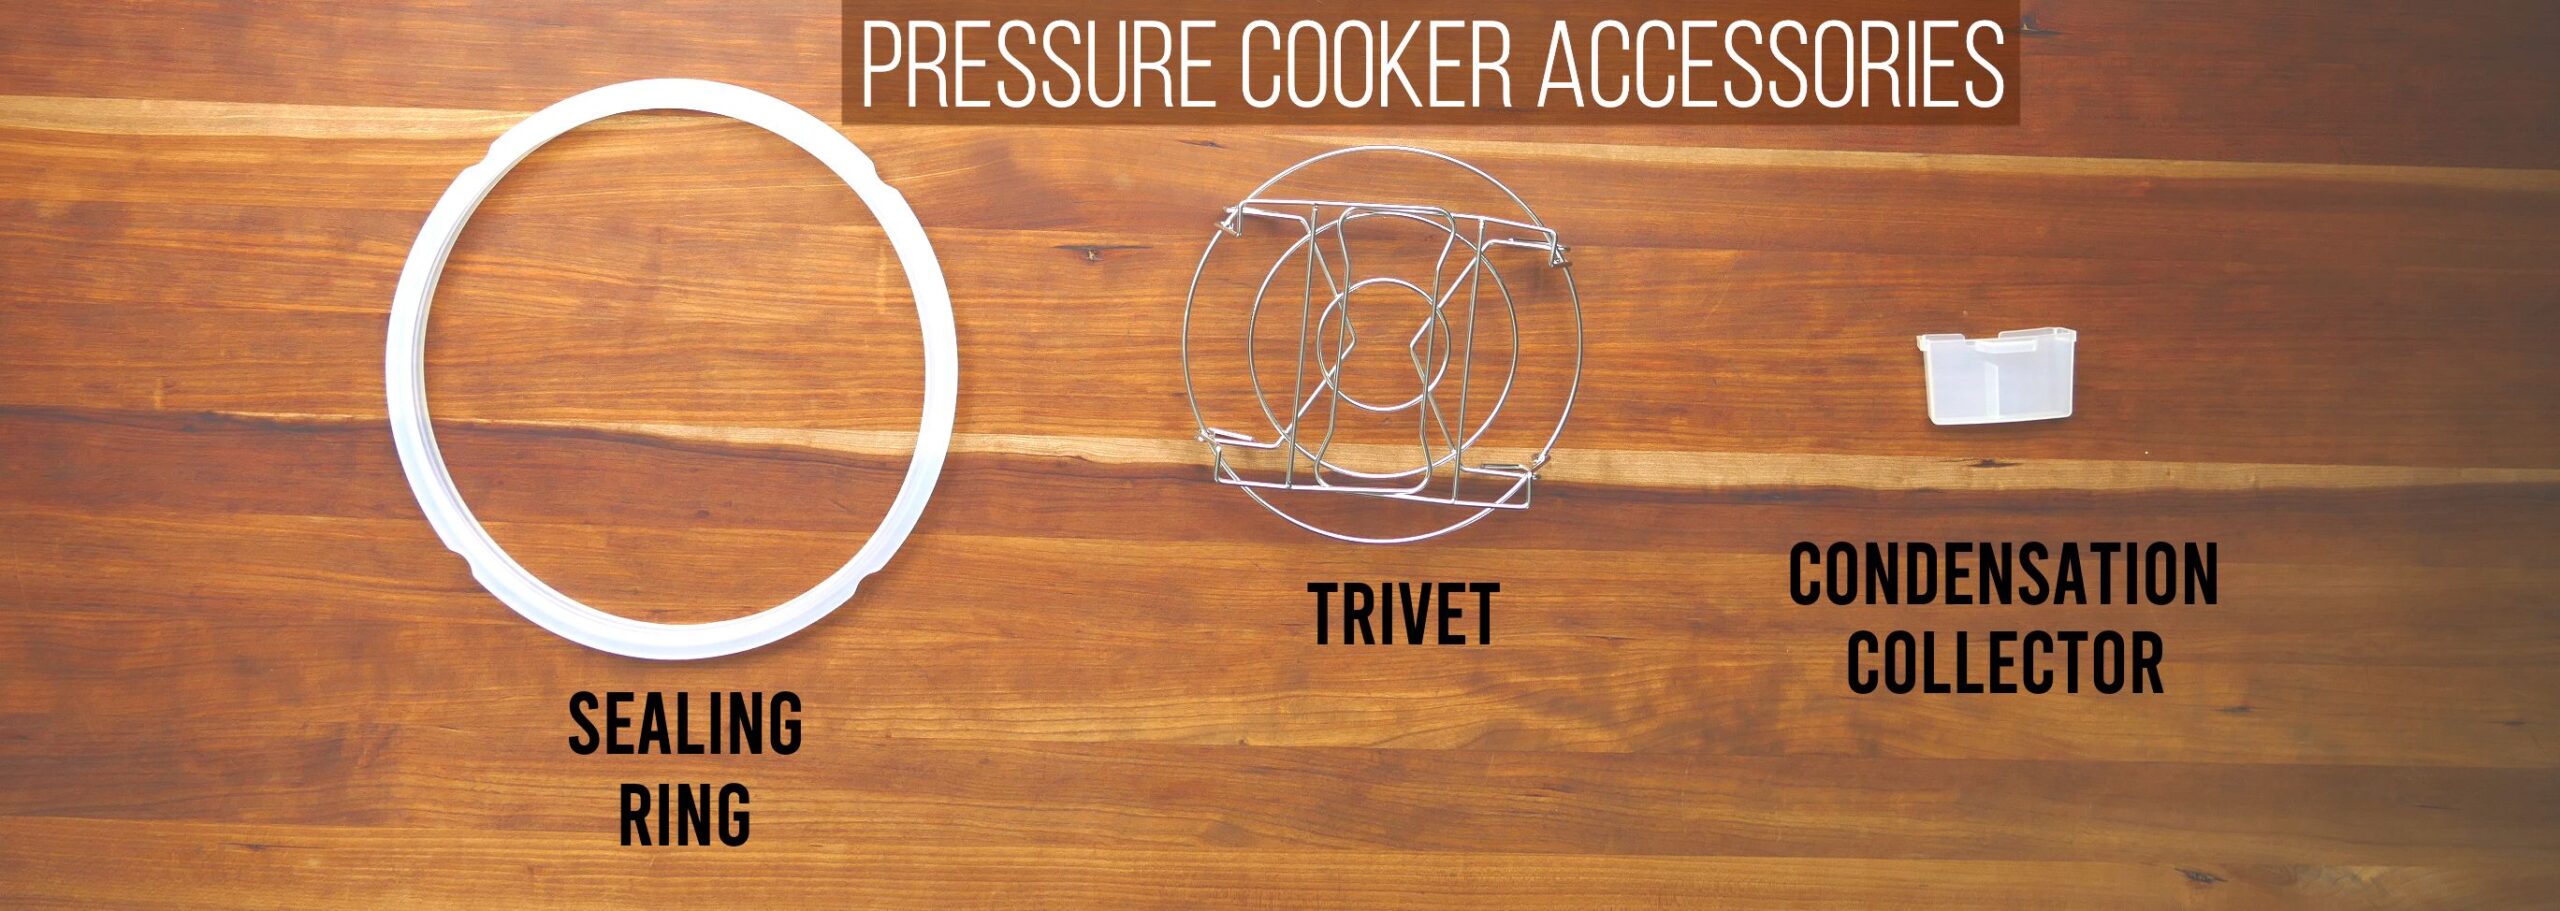
The Instant Pot Duo Crisp pressure cooker comes with the following accessories for pressure cooking:
- Sealing Ring – allows the Instant Pot to build pressure by creating a tight seal when the contents are heated to a high temperature. It can be washed in the top rack of the dishwasher or by hand.
- Trivet / Steam Rack – useful for elevating food above the liquid and for Pot in Pot cooking. The trivet can be washed in the dishwasher or by hand.
- Condensation Collector – catches drips from condensation on the lid; attaches onto the back of the base unit. The condensation collector can be washed in the top rack of the dishwasher or by hand.
- Note: some models come with spoons and a measuring cup. The Duo Crisp currently does not ship with these accessories.
Duo Crisp Pressure Cooker Lid Parts
Pressure Cooker Lid Exterior Parts
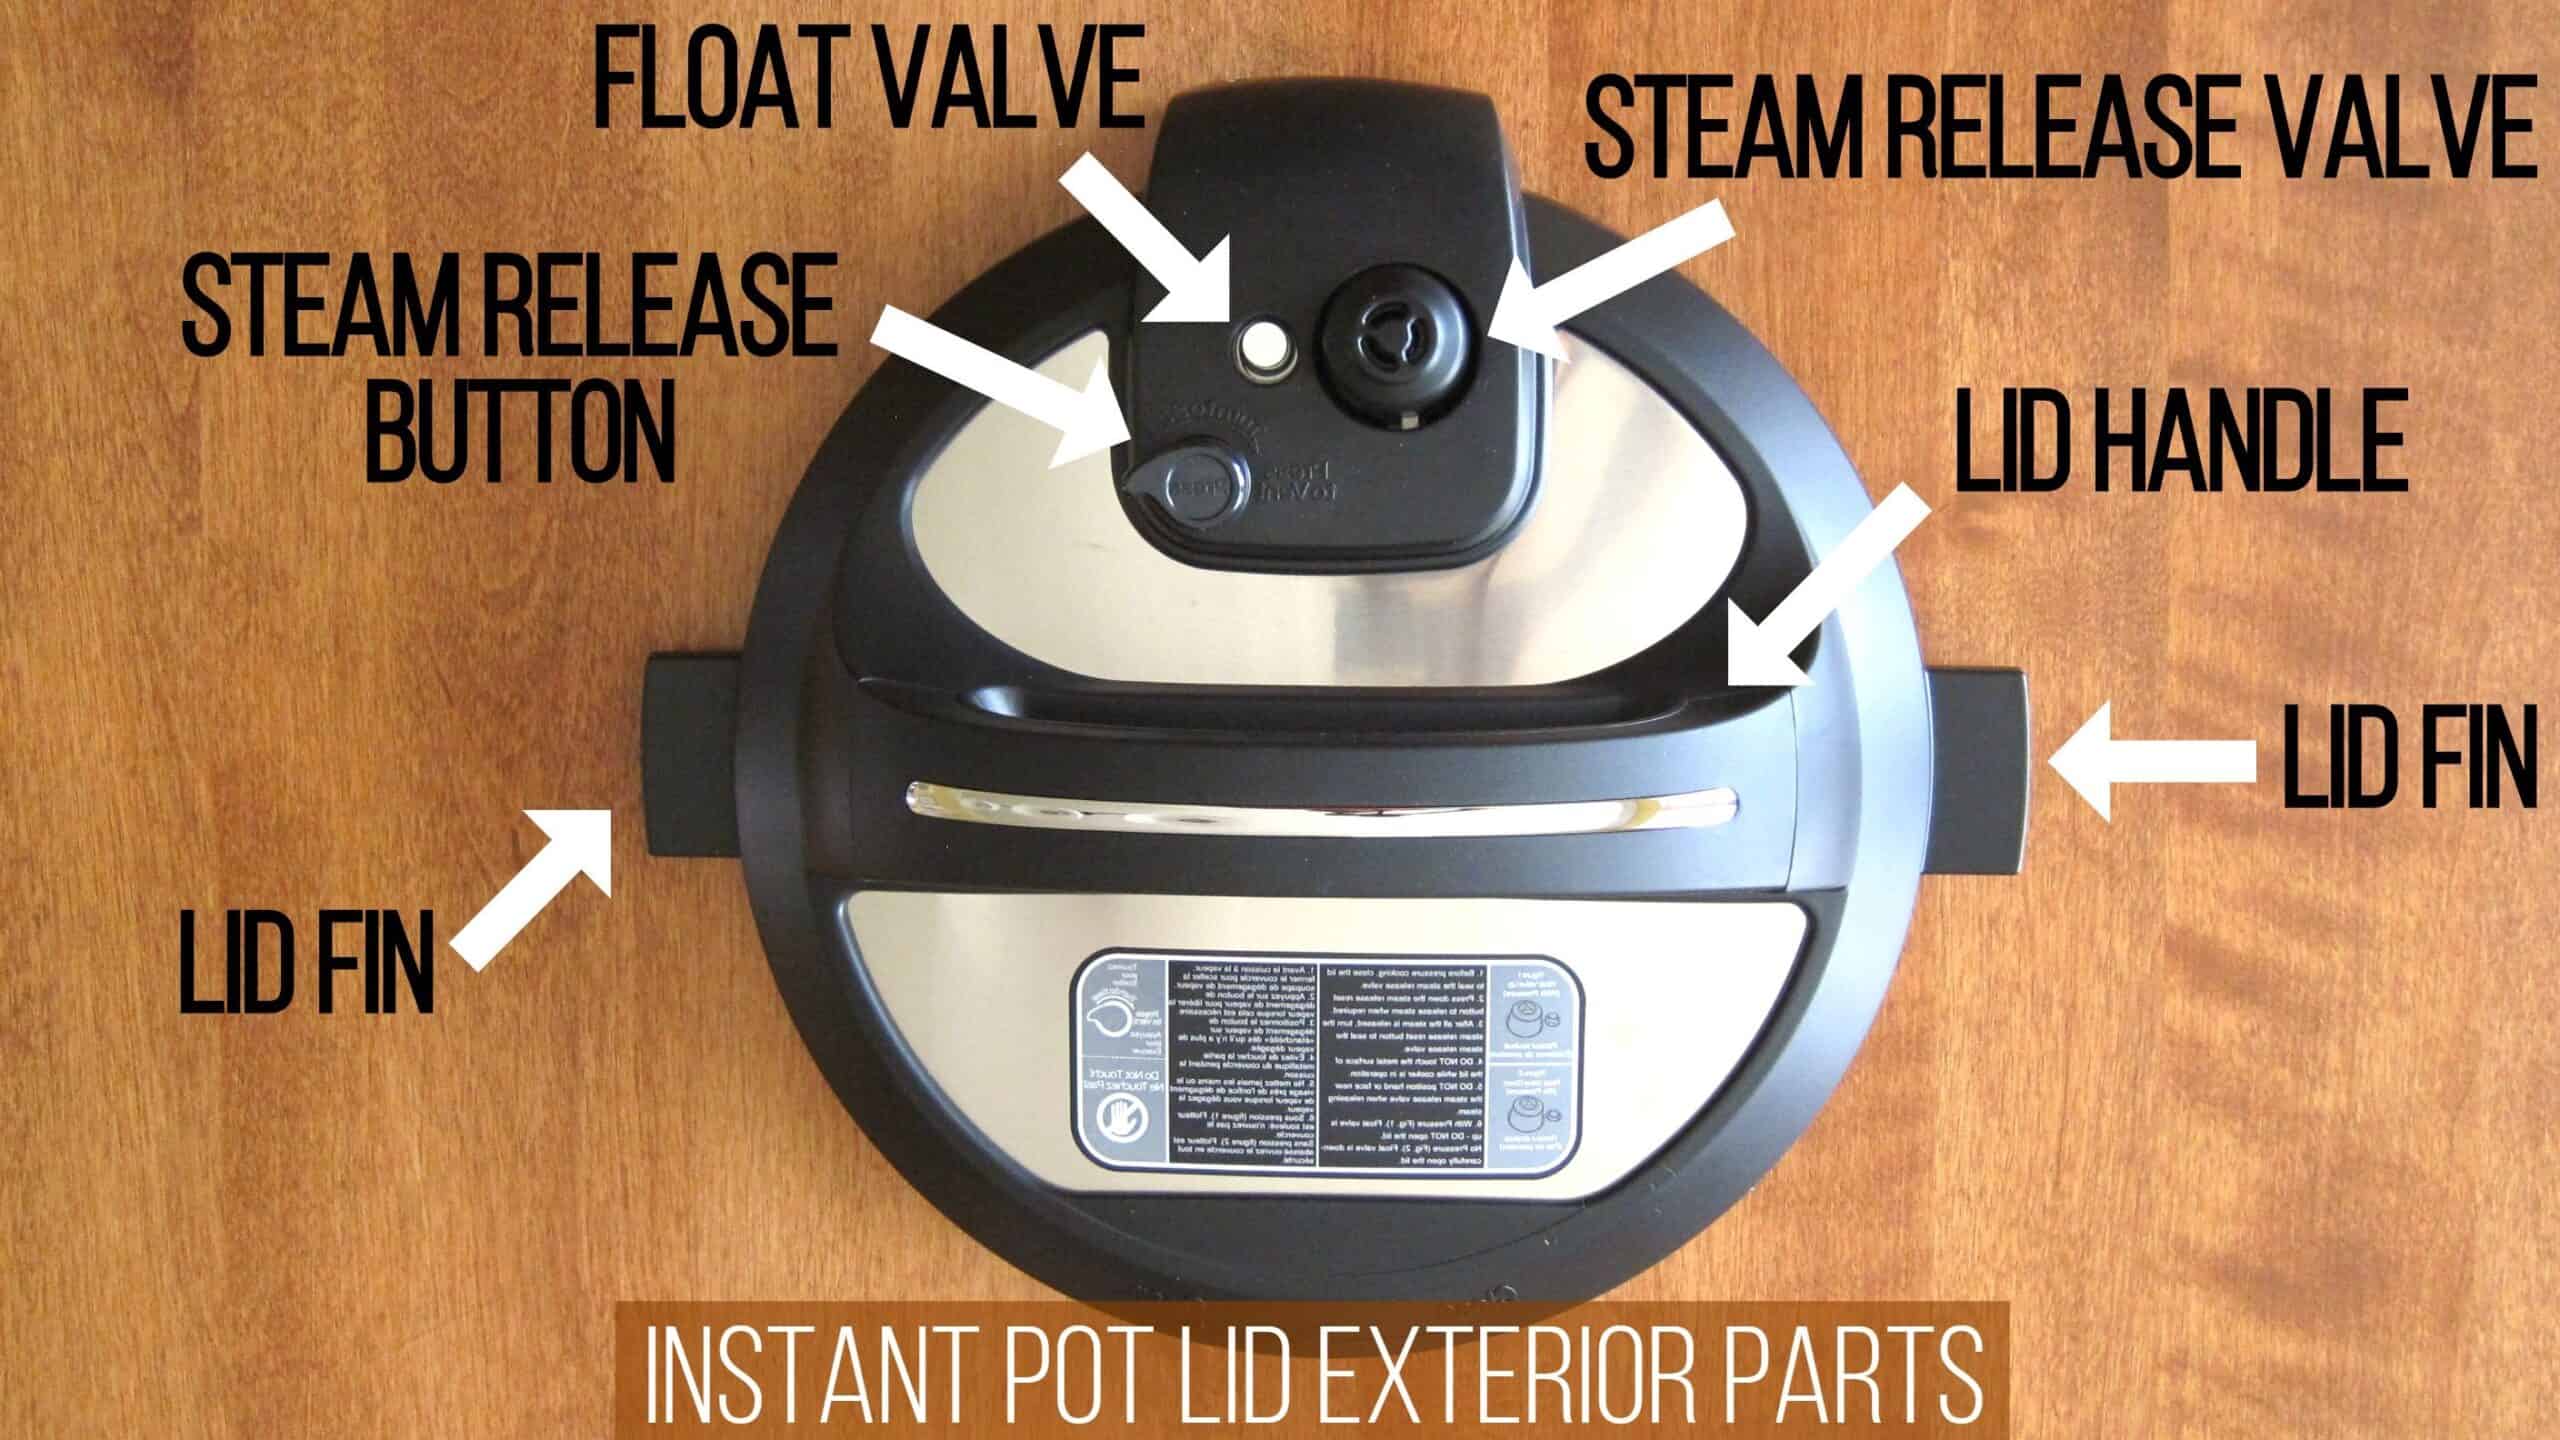
- Lid Fins – placed in the lid fin slot of the base unit to prop the lid open
- Steam Release Button (also referred to as Pressure Release Button or Steam Release Reset Button) – allows a manual release of pressure from the Instant Pot Duo Crisp. The Steam Release Button automatically pops up when the Instant Pot Duo Crisp lid is opened or closed.
- Float Valve – seals in the steam, allowing the Instant Pot to be pressurized
- The Steam Release Valve – a safety mechanism that allows steam to escape and maintains the correct pressure level. It sits loosely on the lid and can be removed to be cleaned.
- Lid Handle – used to put on and take off the lid.
Steam Release Parts
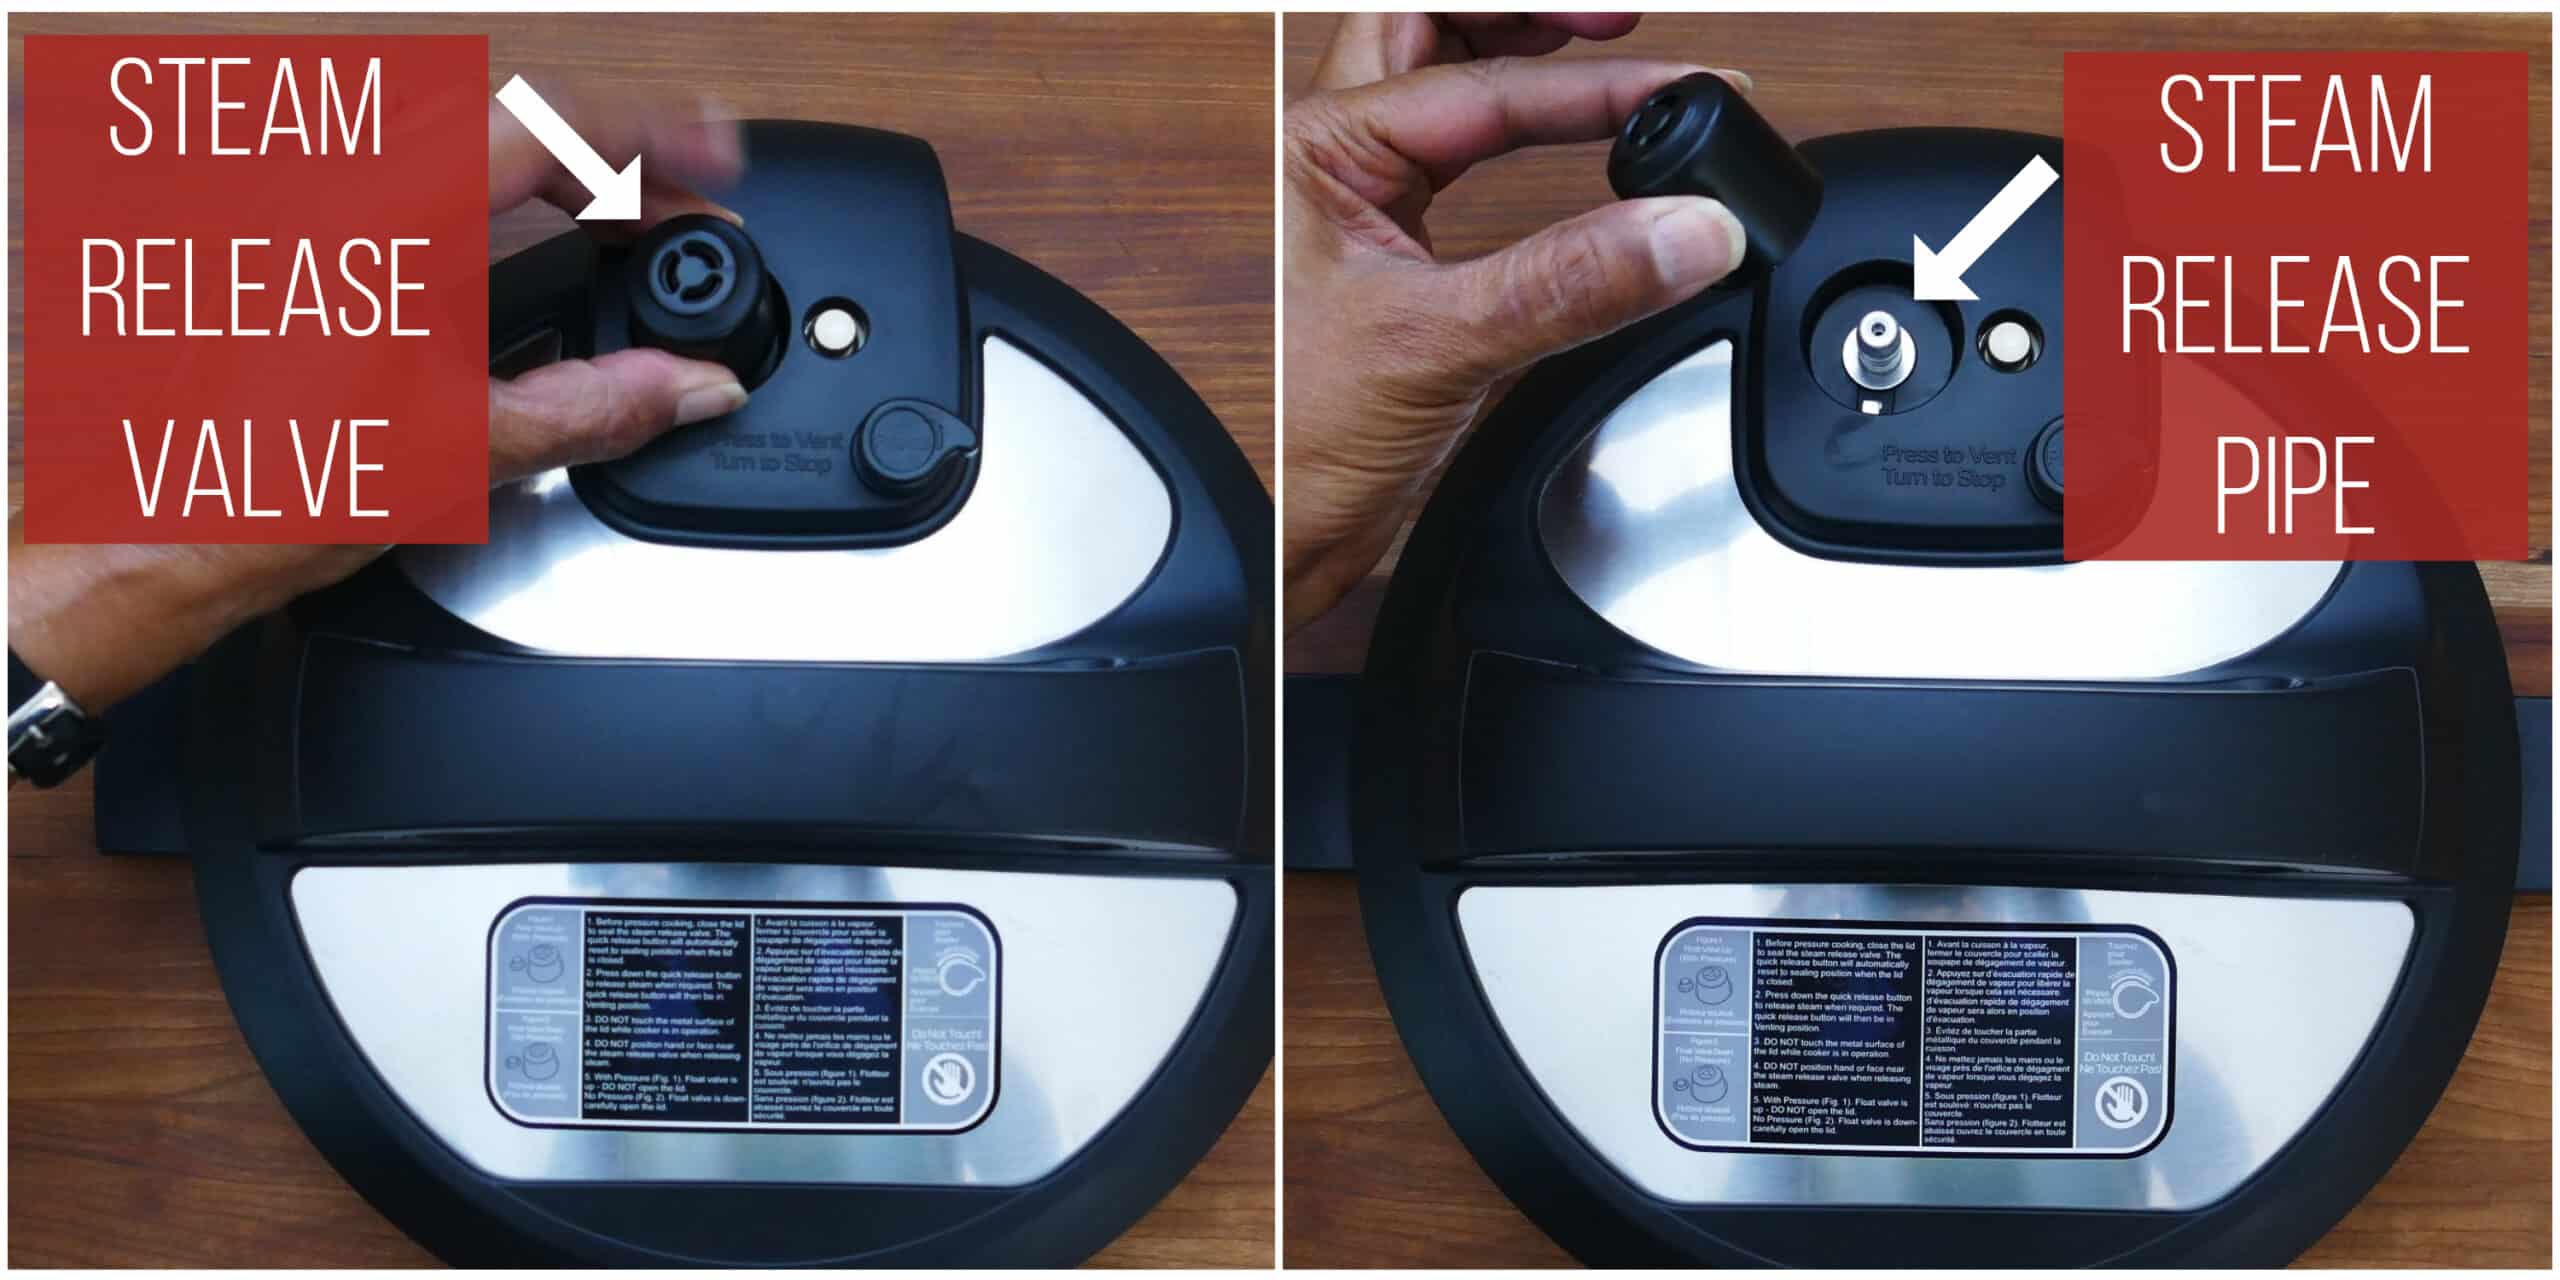
The steam release consists of:
- Steam release valve – regulates the internal temperature. It is supposed to be wobbly but must be pushed in all the way.
- Steam release pipe – steam travels from the inner pot through the pipe during steam release.
Pressure Cooker Lid Interior Parts
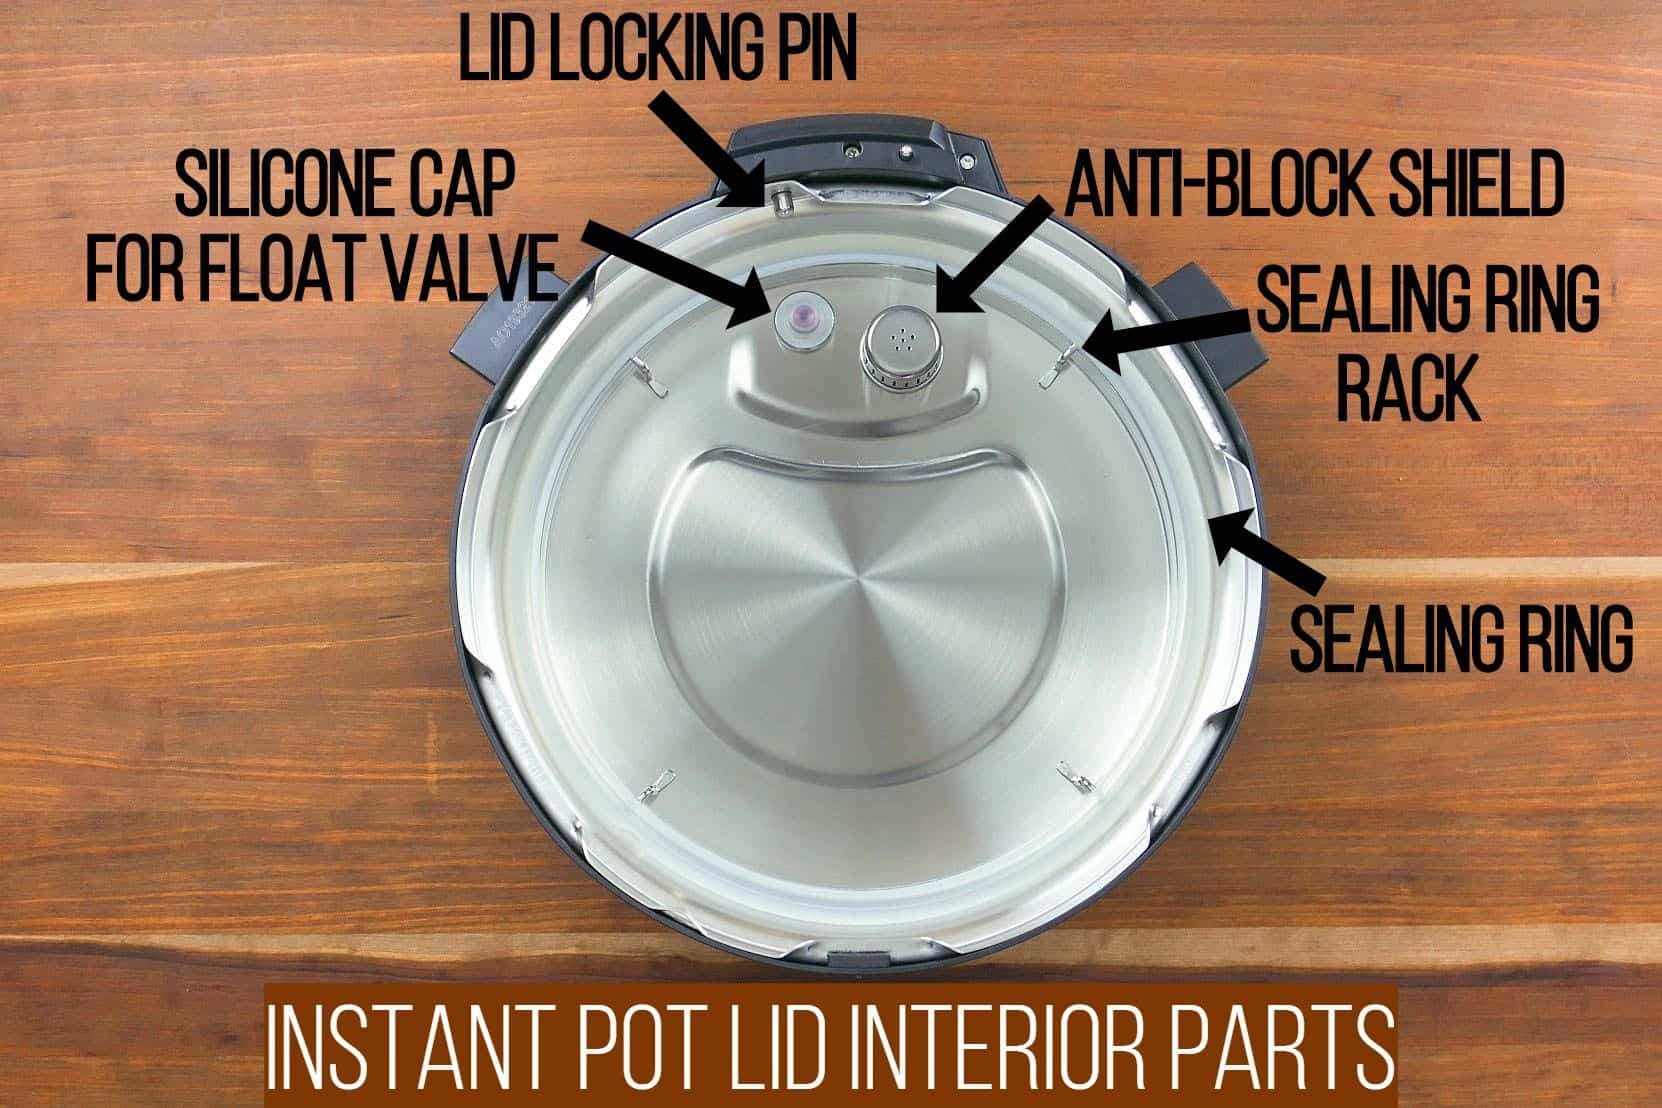
The inside of the Instant Pot lid consists of the following parts:
- Silicone Cap for Float Valve – covers the float valve and keeps it in place
- Lid Locking Pin – safety mechanism that prevents the lid from opening under pressure
- Anti-Block Shield – prevents food from coming out of the inner pot through the steam release pipe
- Sealing Ring Rack – holds the sealing ring in place
- Sealing Ring – silicone sealing ring allows the Instant Pot to seal
Sealing Ring
How to Remove the Sealing Ring
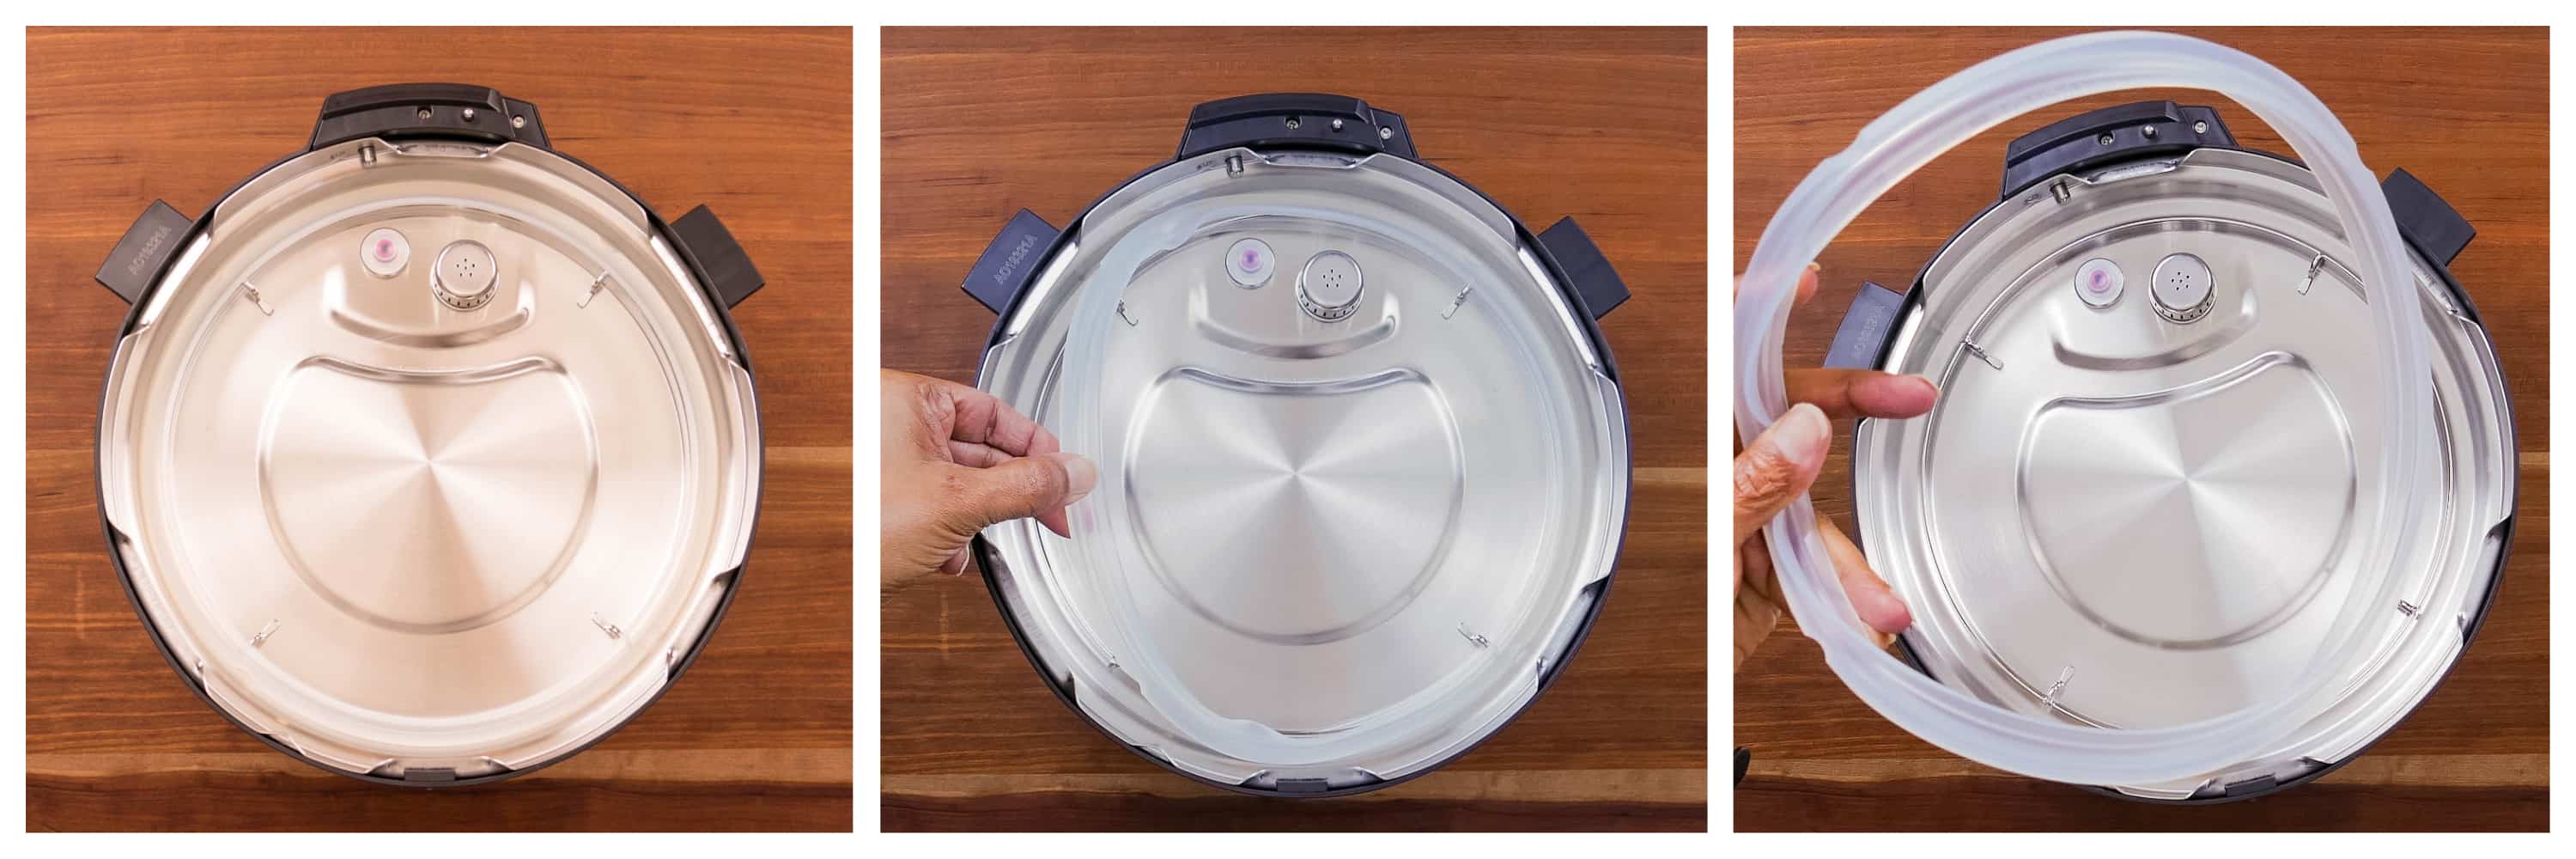
- Pull gently on the silicone ring until it detaches from the sealing ring rack.
- Continue to pull the silicone sealing ring out until it is completely separated.
How to Replace the Sealing Ring
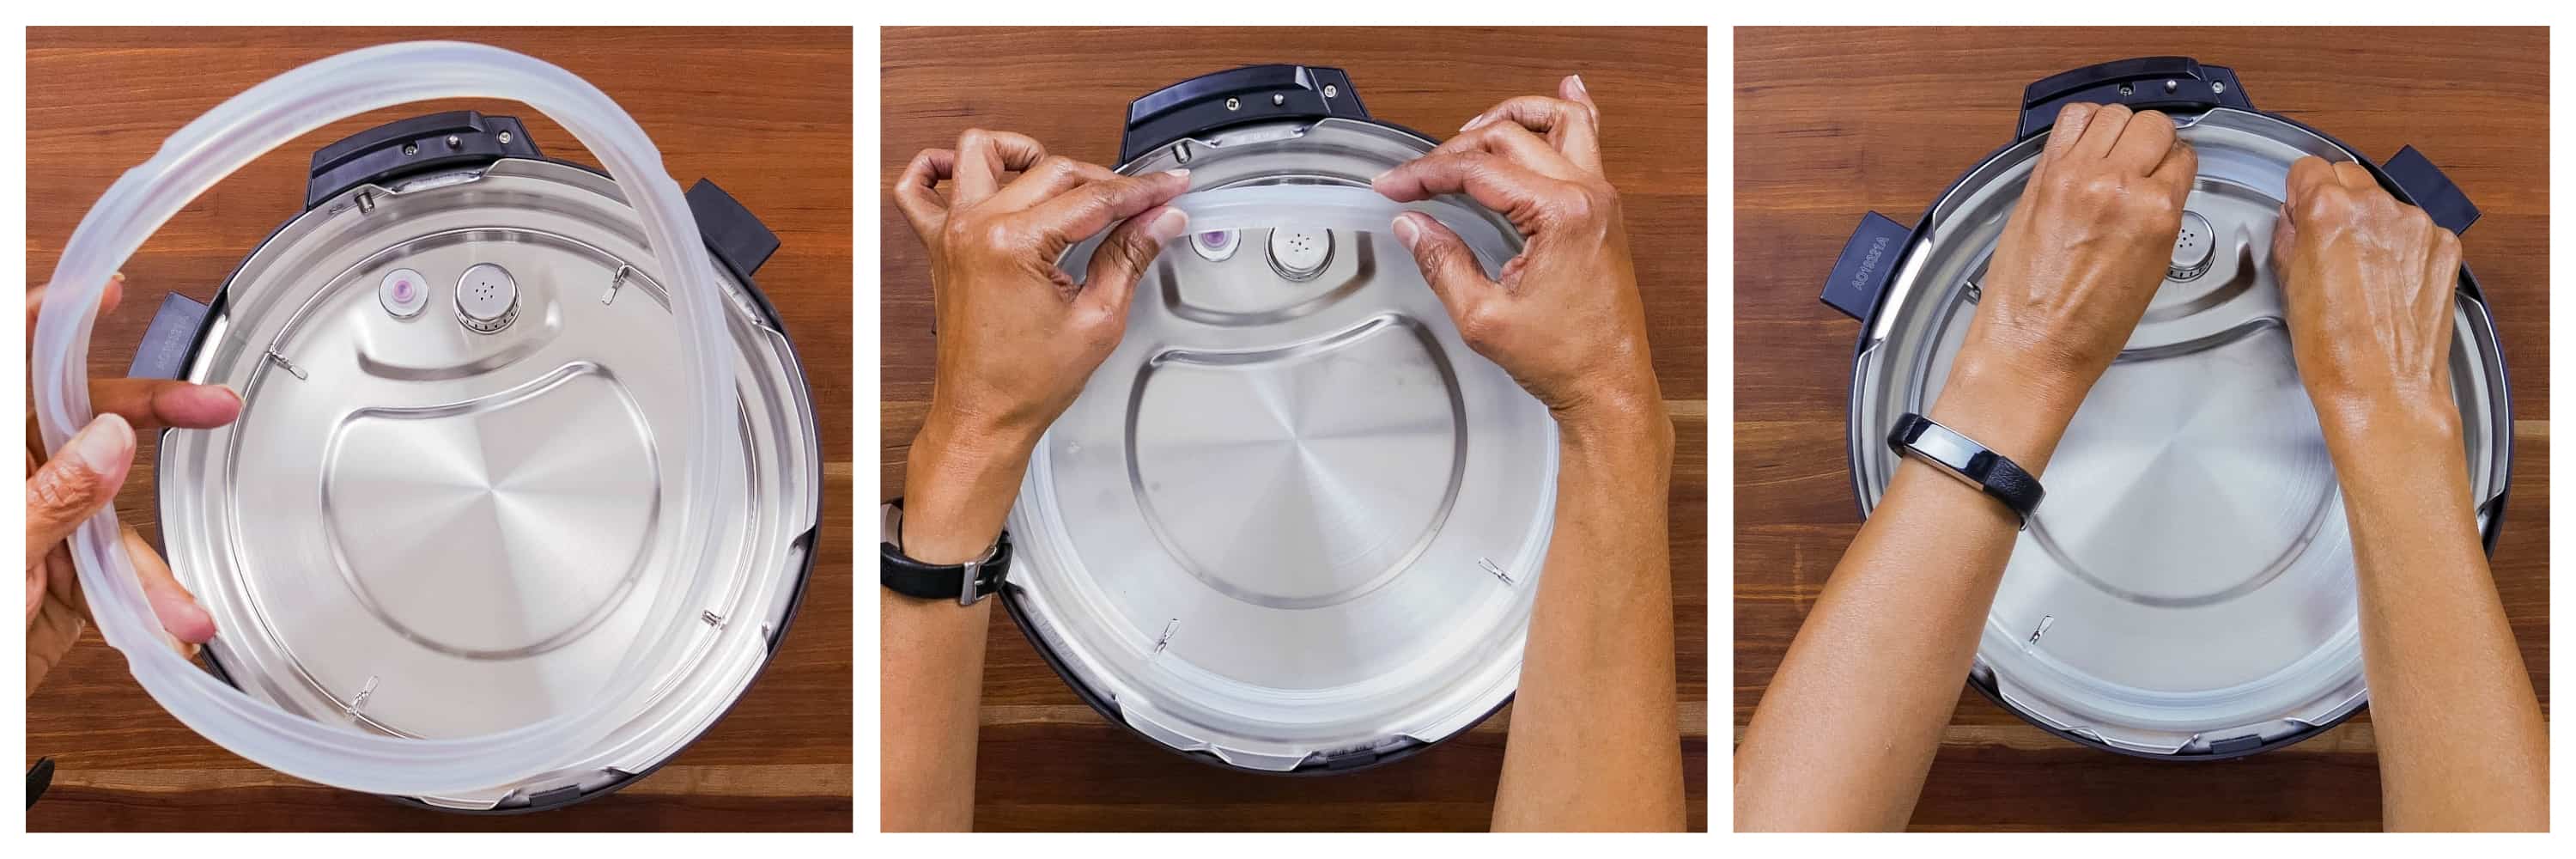
- Place the silicone sealing ring on the sealing ring rack.
- Working your way all around, push the sealing ring until it’s firmly seated in the sealing ring rack.
- Make sure no part of the sealing ring is sticking out, or you may have sealing issues and get the Burn Message.
- The first few times, you may find it difficult to remove the sealing ring but after a few uses, it should stretch out a bit.
Float Valve
You should clean the float valve periodically, especially after cooking frothy or starchy foods.
How to Remove the Float Valve
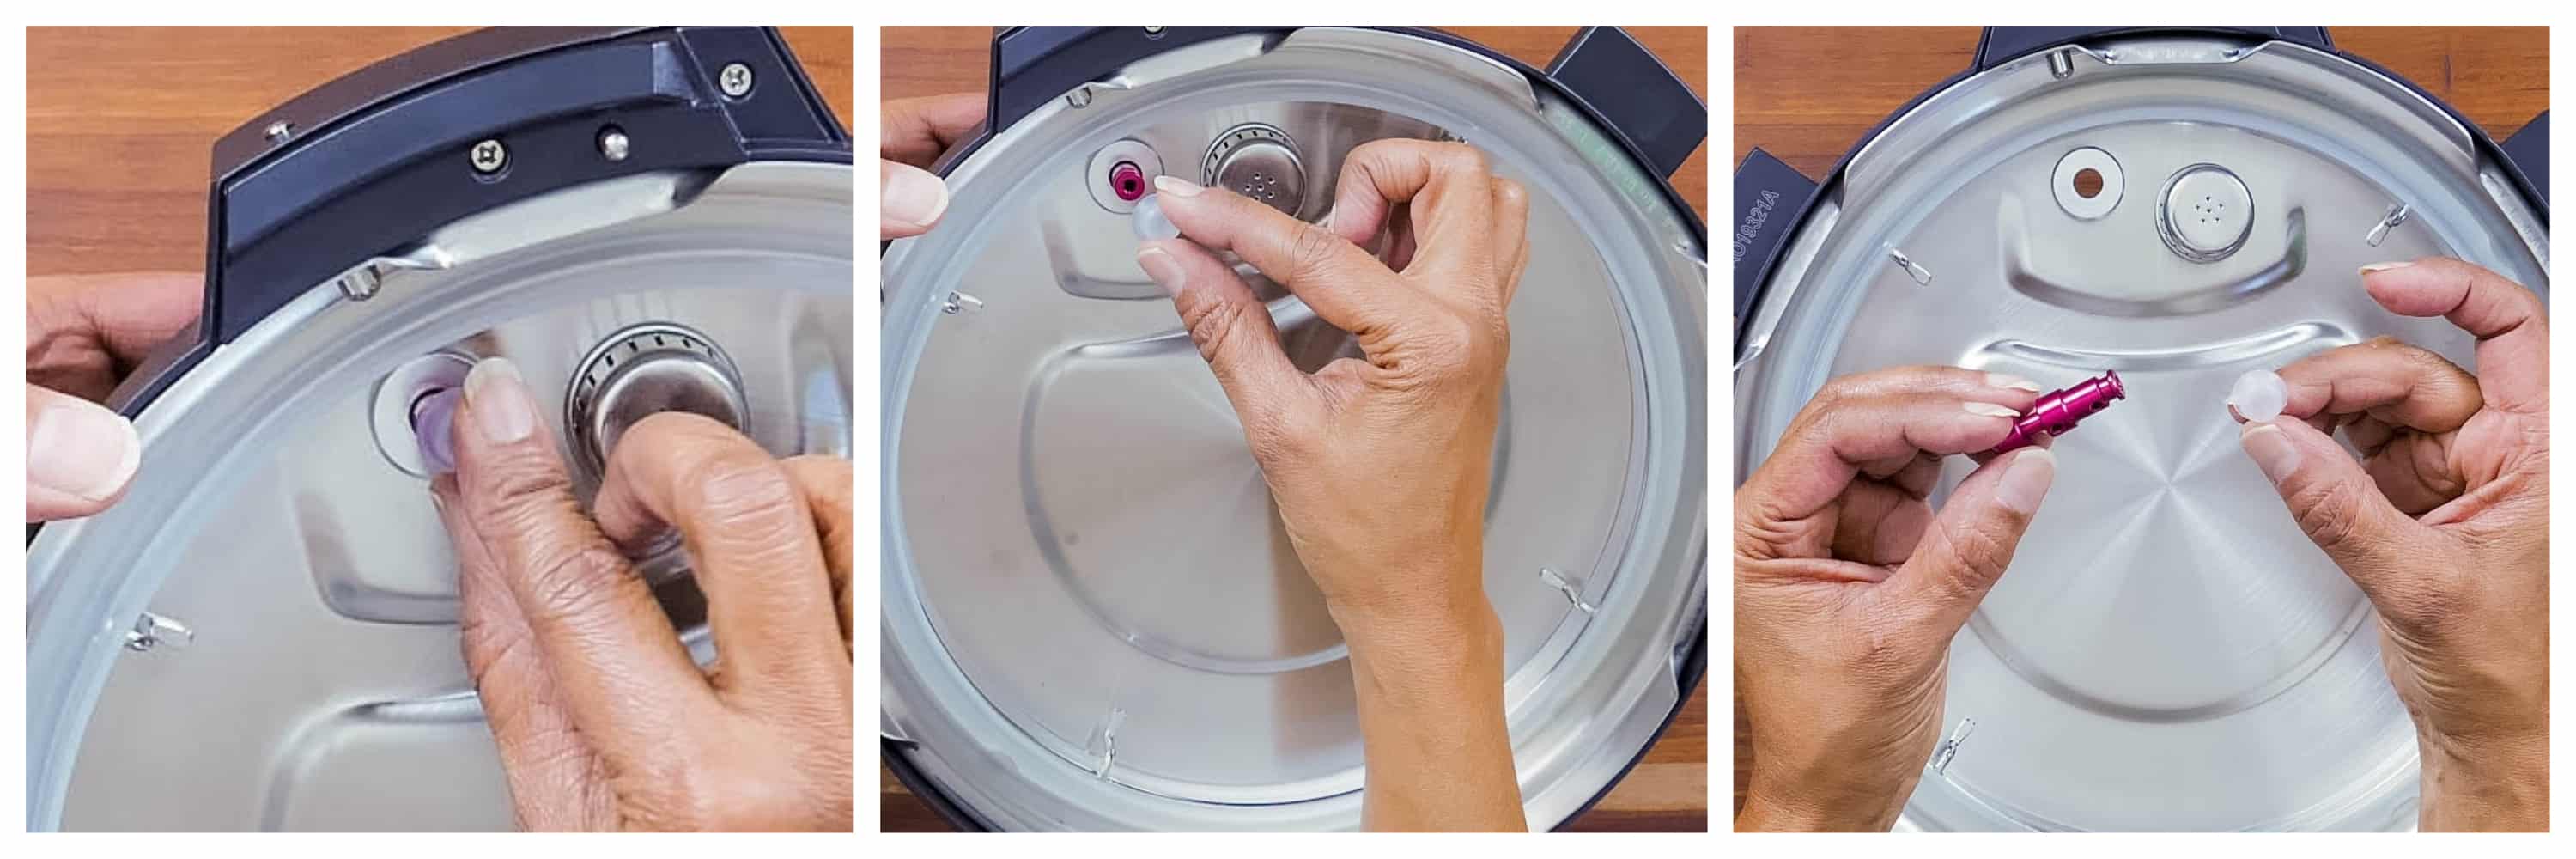
- While holding the float valve in place on the outside of the lid, remove the float valve’s silicone cap.
- Allow the float valve to fall out from the bottom.
- Be careful not to misplace the silicone cap.
How to Replace the Float Valve
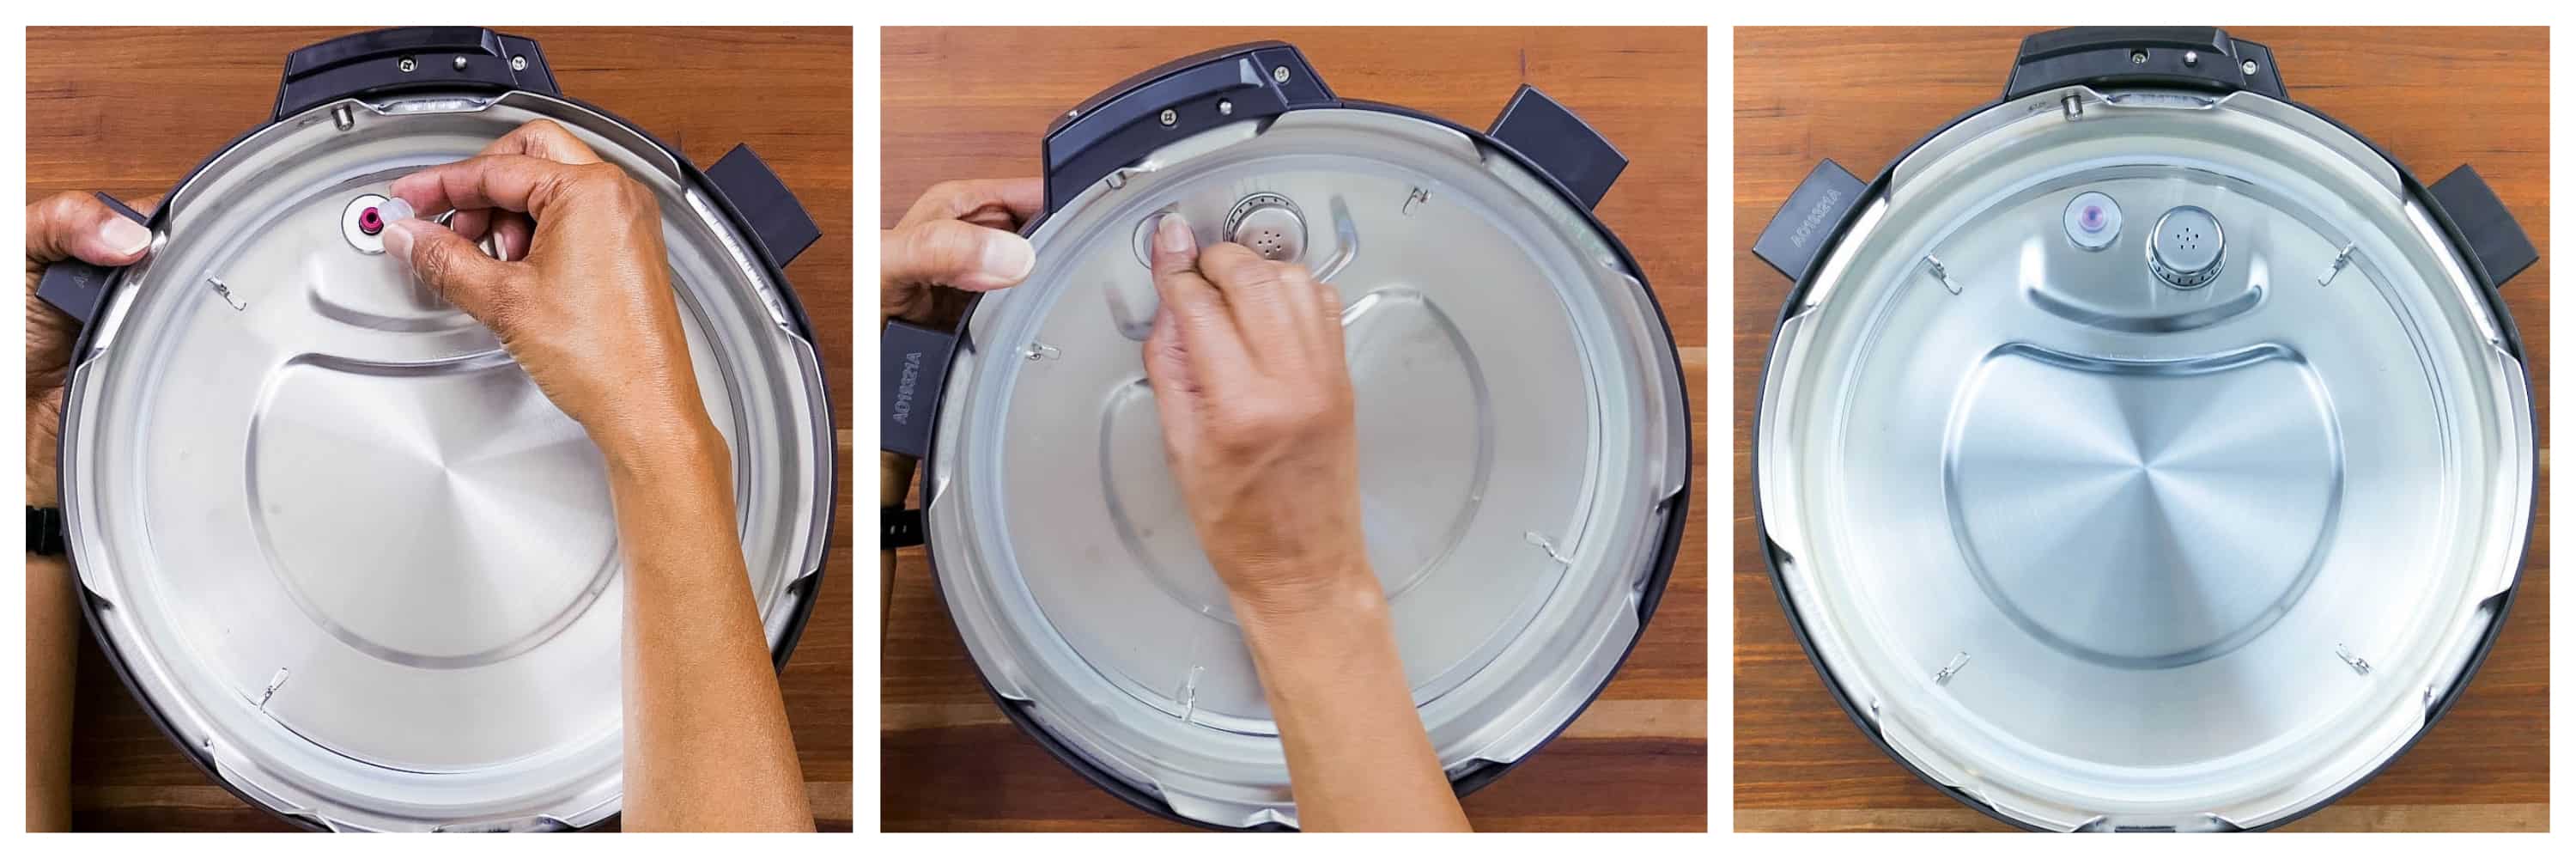
- Thread the float valve through the float valve hole.
- While holding it in place on the exterior of the lid, replace the silicone cover by pushing it onto the float valve on the interior of the lid.
Anti-Block Shield
You need to clean the anti-block shield periodically, especially after you’ve cooked frothy or starchy foods.
How to Remove and Replace the Anti-block Shield
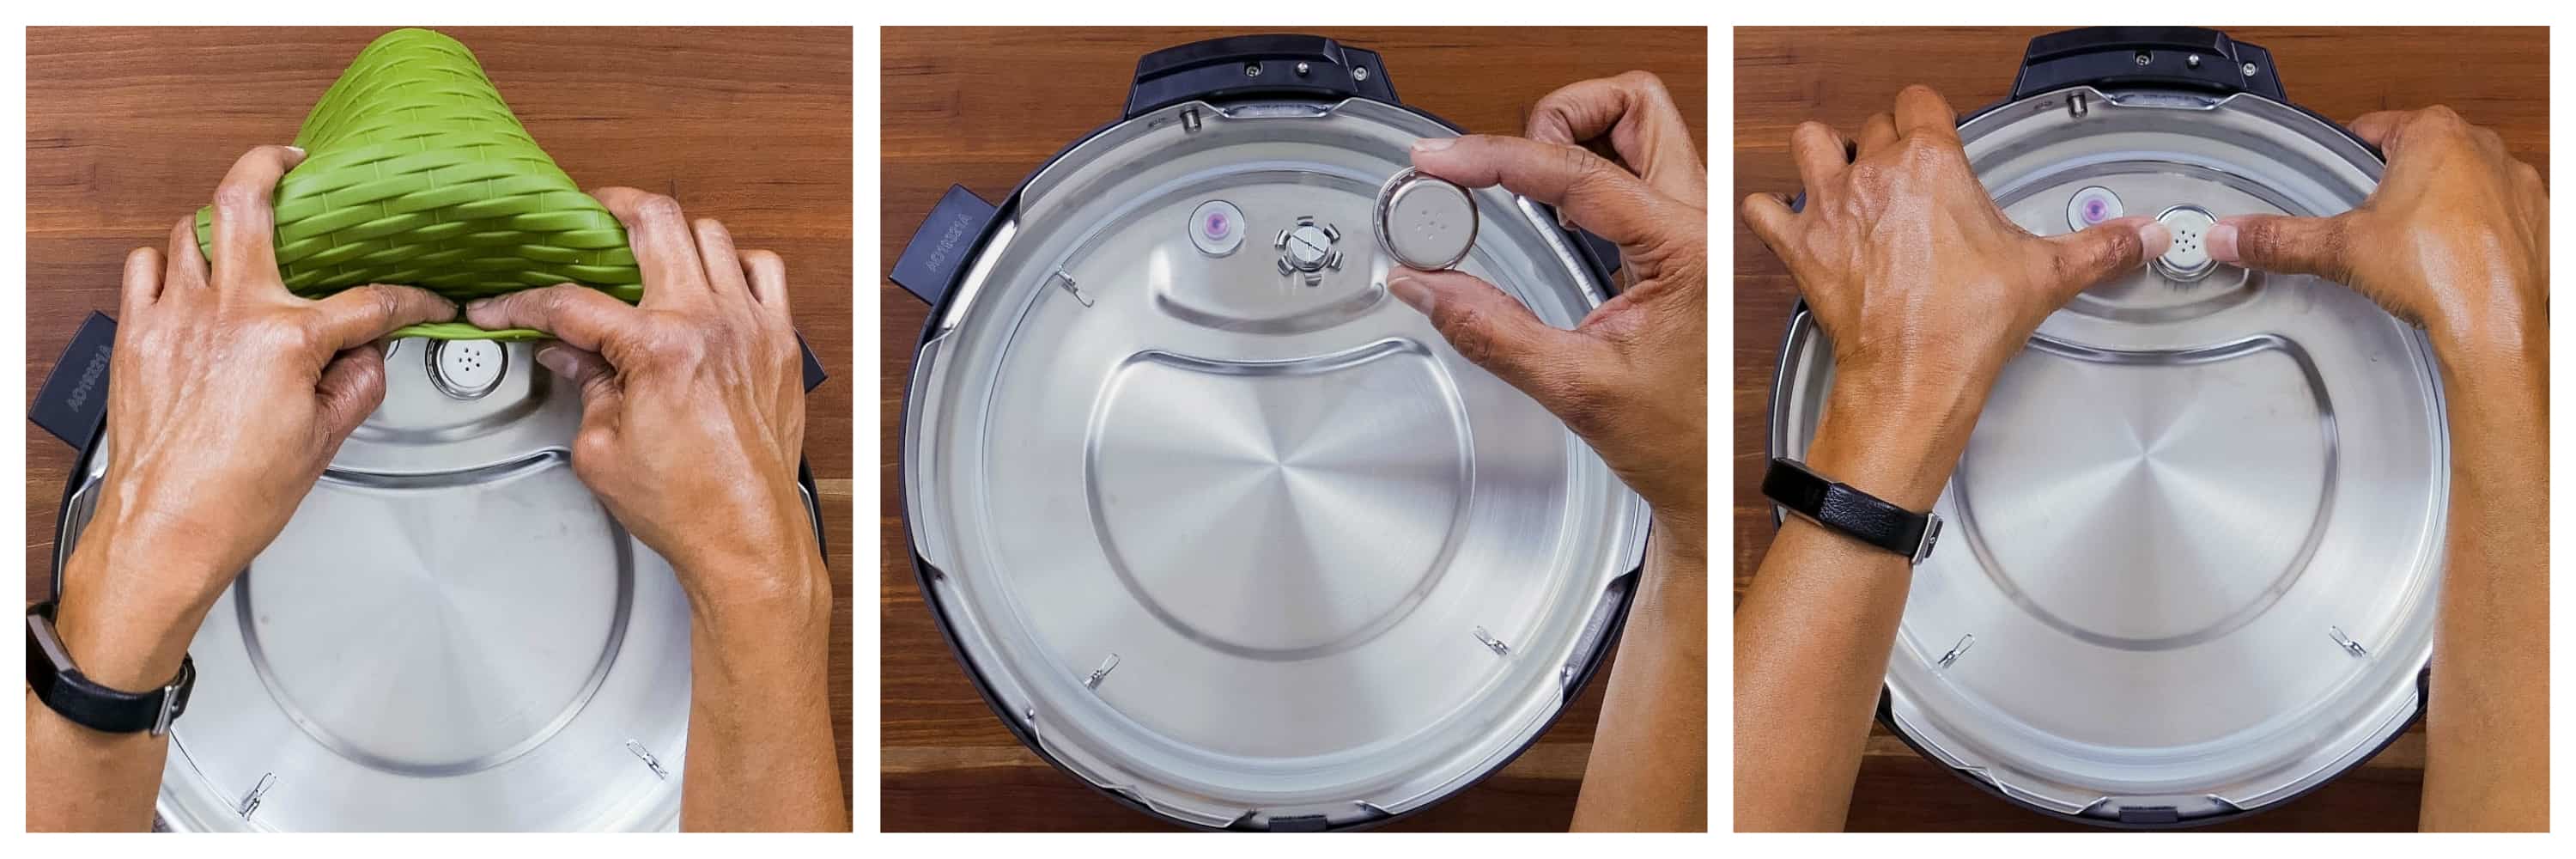
- The anti-block shield can be hard to remove with your bare hands.
- Use a silicone trivet or a dish towel to push the anti-block shield in an upwards motion.
- Try it from the front or from behind (as shown above in the first image)
- To replace the anti-block shield, push it in until it clicks into place.
Instant Pot Assembly
Here are the Instant Pot Duo Crisp directions to assemble the base unit, inner pot, condensation collector, and power cord:
Base Unit and Inner Pot

- Make sure the base unit is empty and clean.
- Place the stainless steel inner pot into the base unit.
Condensation Collector

The condensation collector catches any moisture that builds up on the rim. This usually comes from moisture dripping from inside the lid into the rim of the Instant Pot base, when the lid is propped open.
In my experience, the condensation collector rarely fills up but I have found that when I cook pasta, in particular, liquid tends to collect and it can get messy! Get into the habit of checking for liquid in the condensation collector after every use.
To attach the condensation collector:
- Slide the condensation collector onto the back of the Instant Pot.
- It will sit snugly against the base unit.
- To clean it, slide it out, empty it out, rinse and slide back in place. It can also be washed in the top rack of the dishwasher.
Open and Close the Pressure Cooker Lid
How to Close the Lid

- Place the lid onto the Instant Pot base unit with the arrow mark on the lid lined up with the open lock icon that is above the right corner of the control panel.
- You’ll hear a chime (if the volume is turned on).
- Turn the lid clockwise until the arrow mark on the lid is lined up with the closed lock icon and you’ll hear another chime.
- The lid will be closed.
How to Open the Pressure Cooker Lid

- The lid will not open until all pressure has been released.
- Once the float valve is down, turn the lid counter-clockwise until you hear a chime.
- The arrow on the lid will be lined up with the open lock icon on the base unit.
- Lift the lid to remove it.
- If you feel a slight resistance, wiggle the lid back and forth and the suction should release.
How to Prop Open the Pressure Cooker Lid
Propping open the lid keeps it out of the way and allows you to use the Instant Pot hands-free.

- Locate the two lid fins on the lid.
- Locate the lid fin slots on the base unit.
- Insert either lid fin into either slot to prop the lid open.
How to Release Pressure
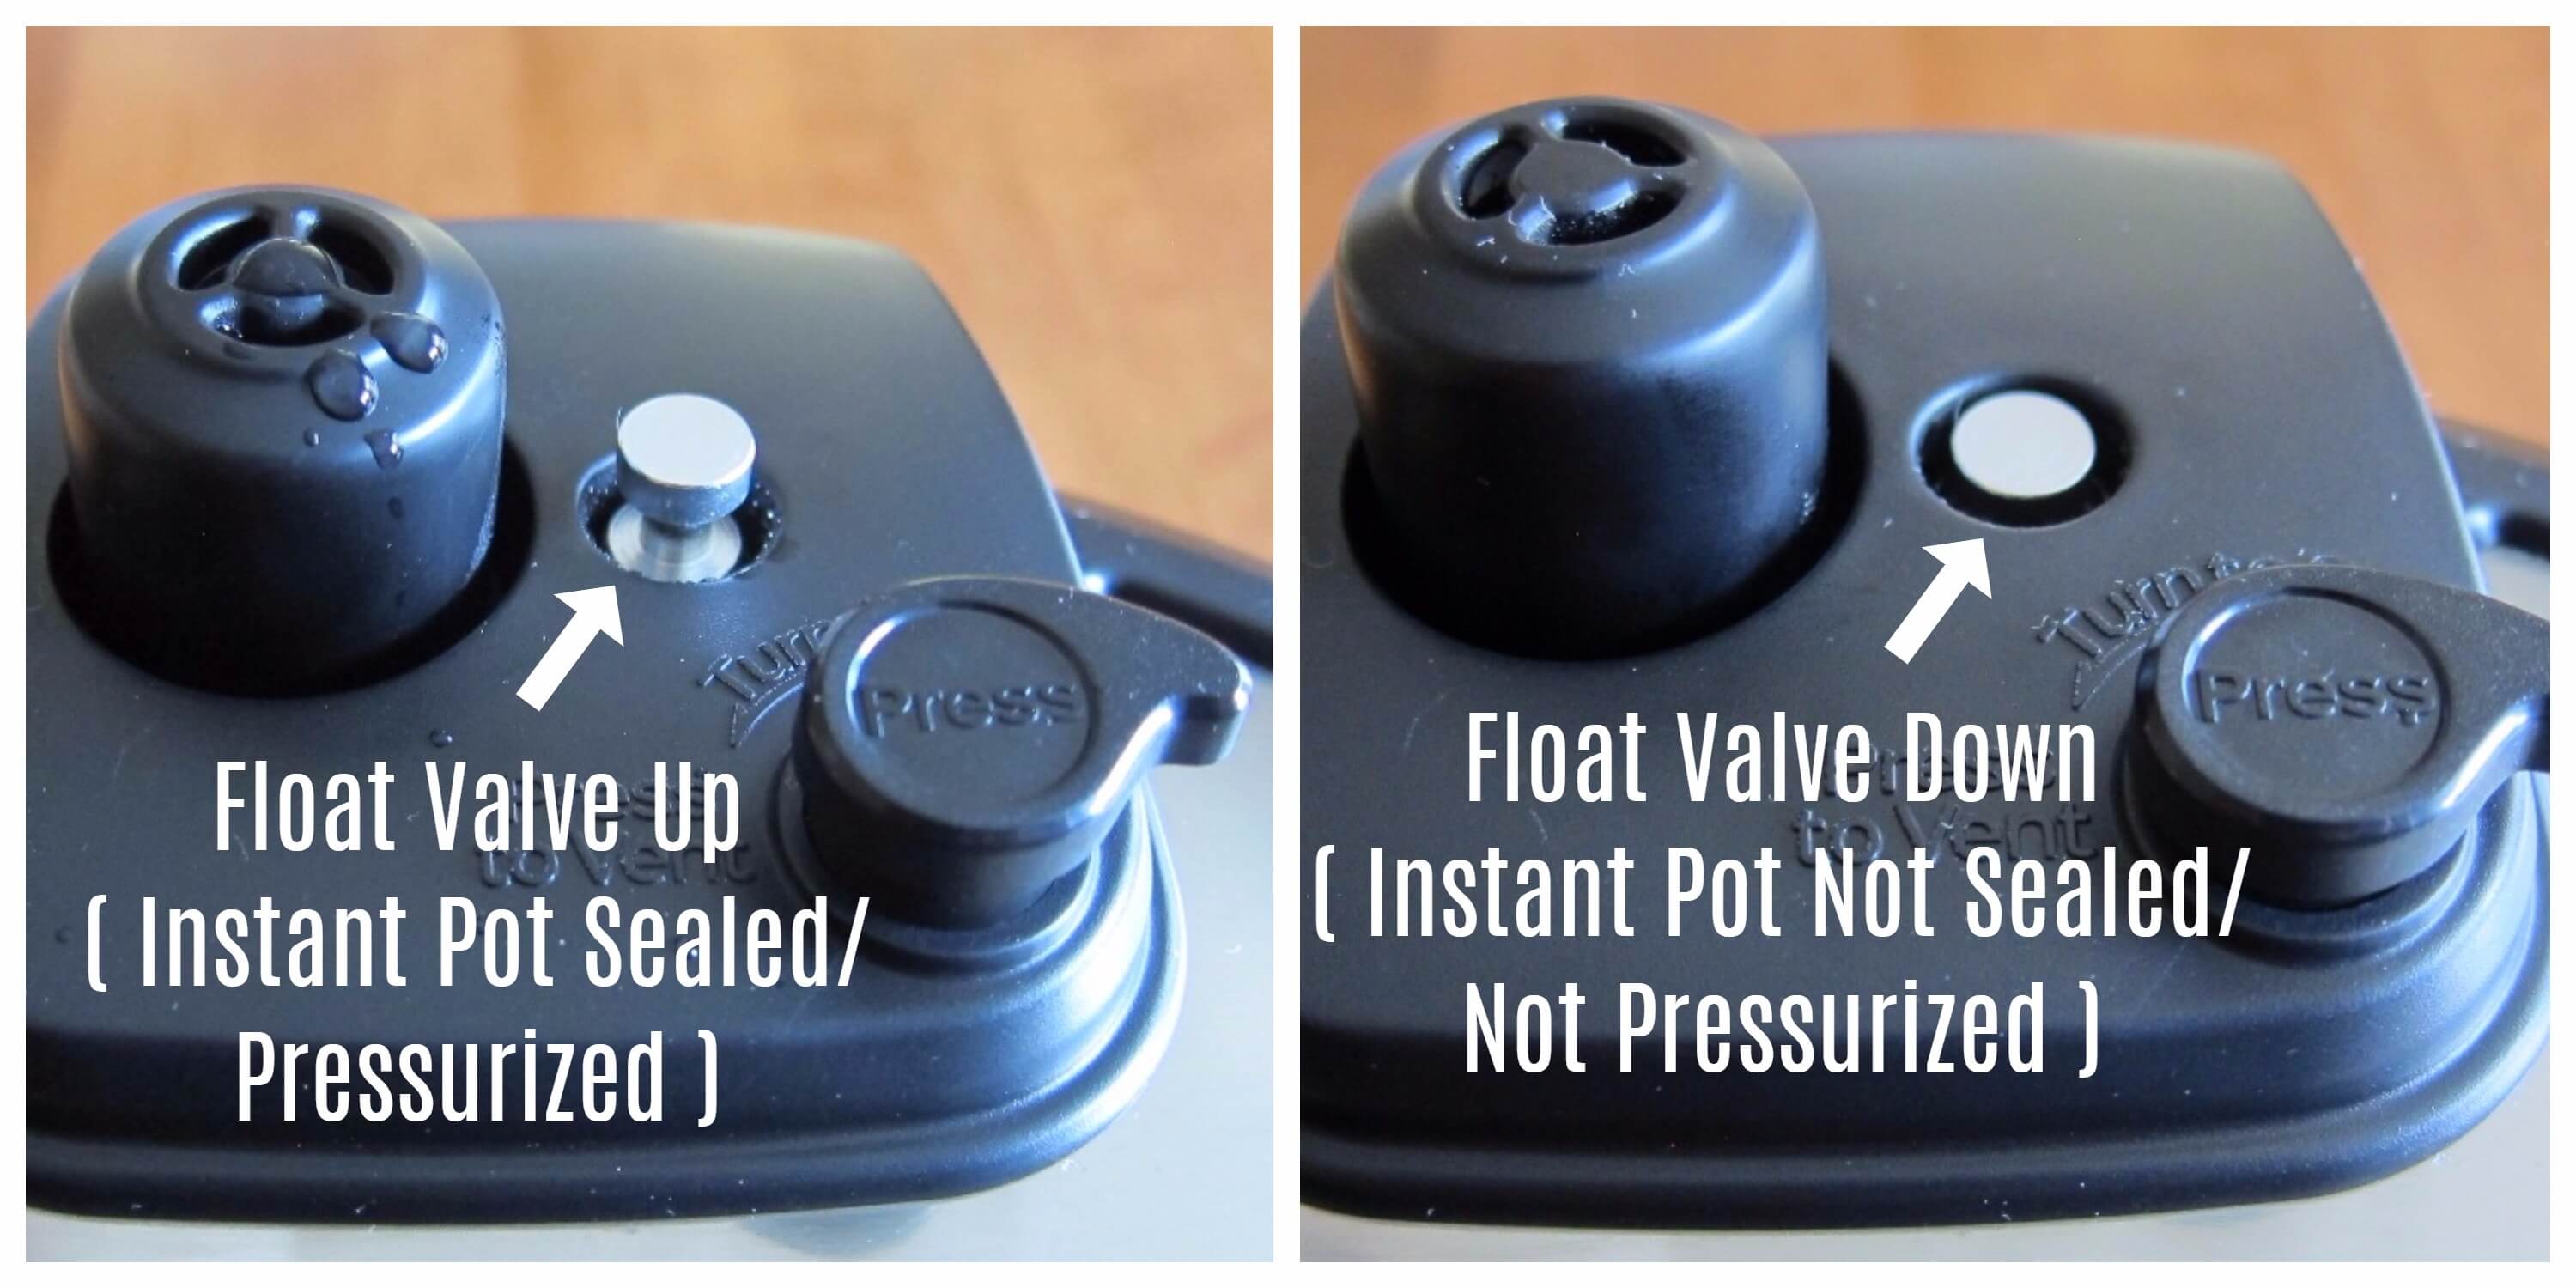
- When the Instant Pot Duo Crisp is under pressure, the float valve goes up and the Instant Pot is sealed. It cannot be opened. Don’t try to force it open!
- When the Instant Pot Duo Crisp isn’t under pressure, the float valve goes back down and is level with the lid.
There are a few ways you can release pressure once the Instant Pot Duo Crisp has finished pressure cooking. The recipe you’re following will give you directions on what method to use.
In this article, I discuss the two most common pressure release methods:
- Quick Release (QR)
- Natural Pressure Release or Natural Release (NPR or NR).
[Find out more details about all the different pressure release methods.]
How to Quick Release (QR) Instant Pot Duo Crisp
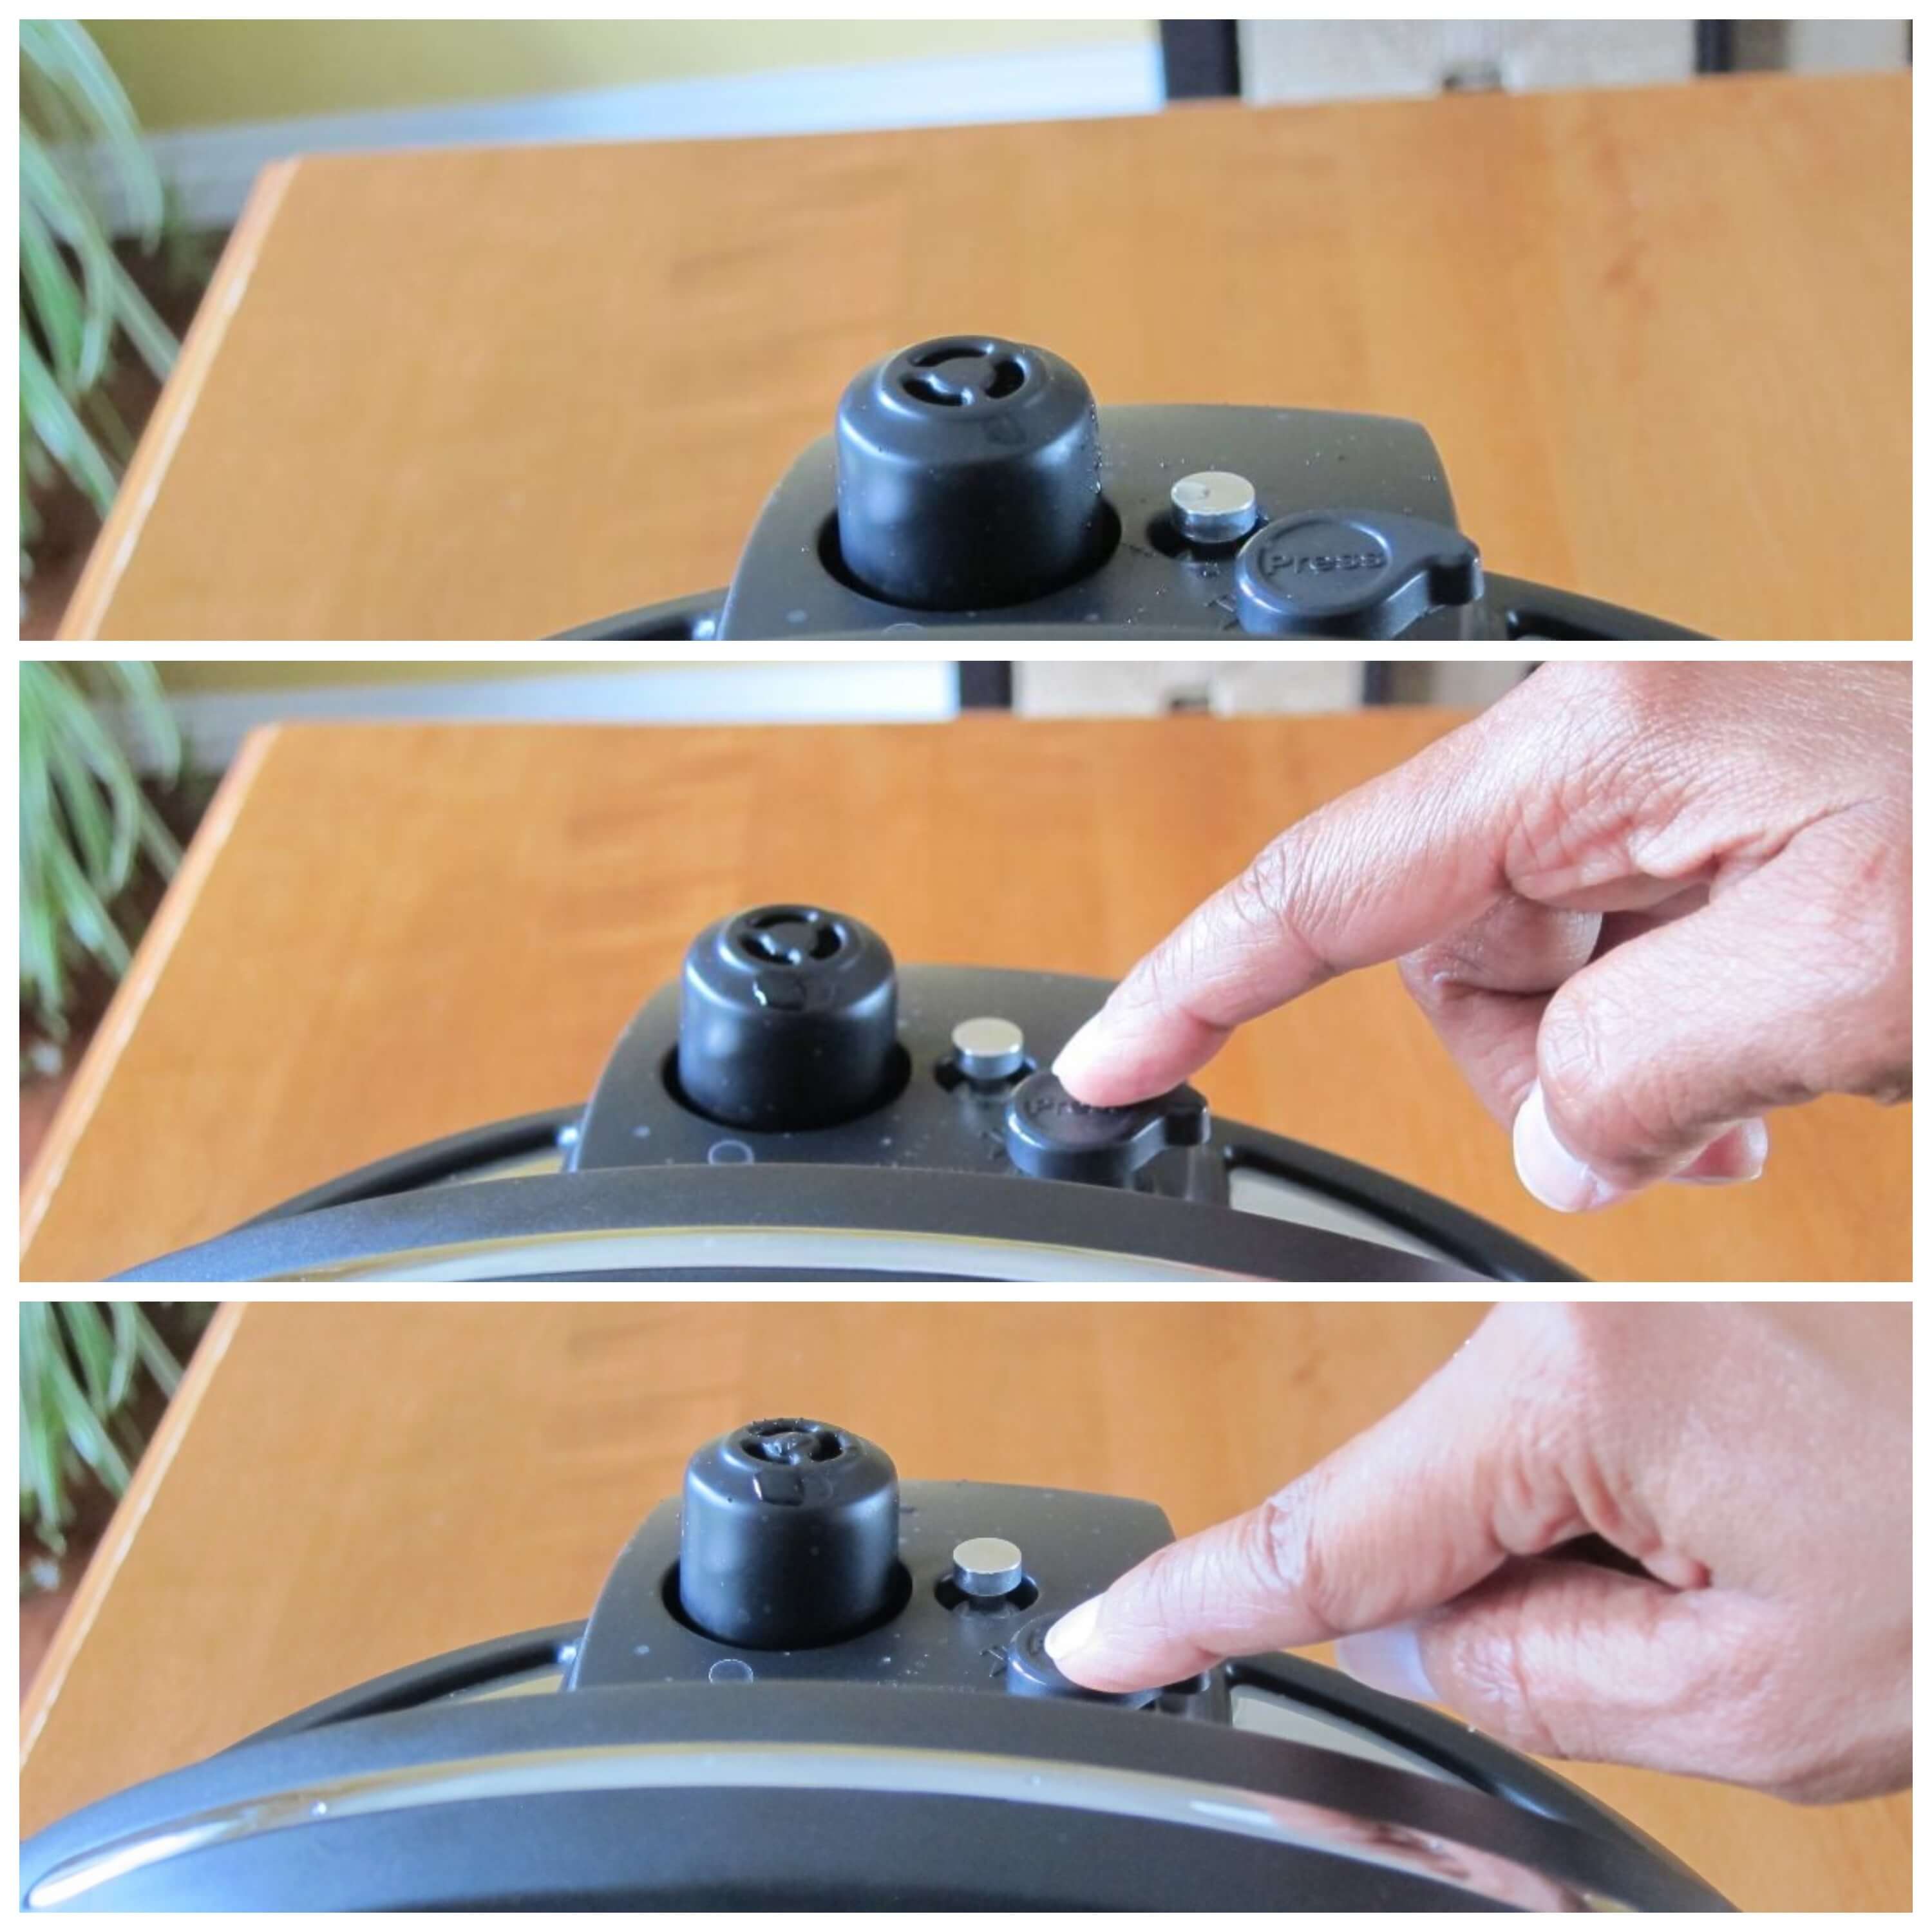
- To do a Quick Release of pressure (QR), press down on the Steam Release Button until it locks into place, and steam begins to come out of the Steam Release Valve.
- Be sure your hand is not above the Steam Release Valve while the pressure is being released.

- The Float Valve will go from the up position to the down position once the Instant Pot Duo Crisp has de-pressurized and all the steam has been released.
- It is now safe to open the Instant Pot Duo Crisp.
How to Natural Release (NR) / Natural Pressure Release (NPR) Instant Pot Duo Crisp
- To do an Instant Pot Natural Release of Pressure (NPR), wait for the Float Valve to go down on its own.
- This can take anywhere from 5 minutes to 30 minutes, depending on how much liquid is in the Instant Pot. The more liquid there is, the longer it takes for the Instant Pot to release pressure on its own.
- If you’re in a hurry, you can wait for 15 minutes for the Instant Pot natural release, and then release the remaining pressure using the quick-release method.
Commonly Used Instant Pot Duo Crisp Pressure Cook Buttons
The Instant Pot Duo Crisp has many buttons that may appear confusing and complicated, but they aren’t. Some of the buttons are used with the pressure cooker lid, and some are used with the air fryer lid and some are used with both.
In this section, I’ll go over directions for the most commonly used buttons and functions (smart programs) used with the pressure cooker lid. This will allow you to get going and be able to use most of this Instant Pot’s pressure cooking capabilities.
Pressure Cook
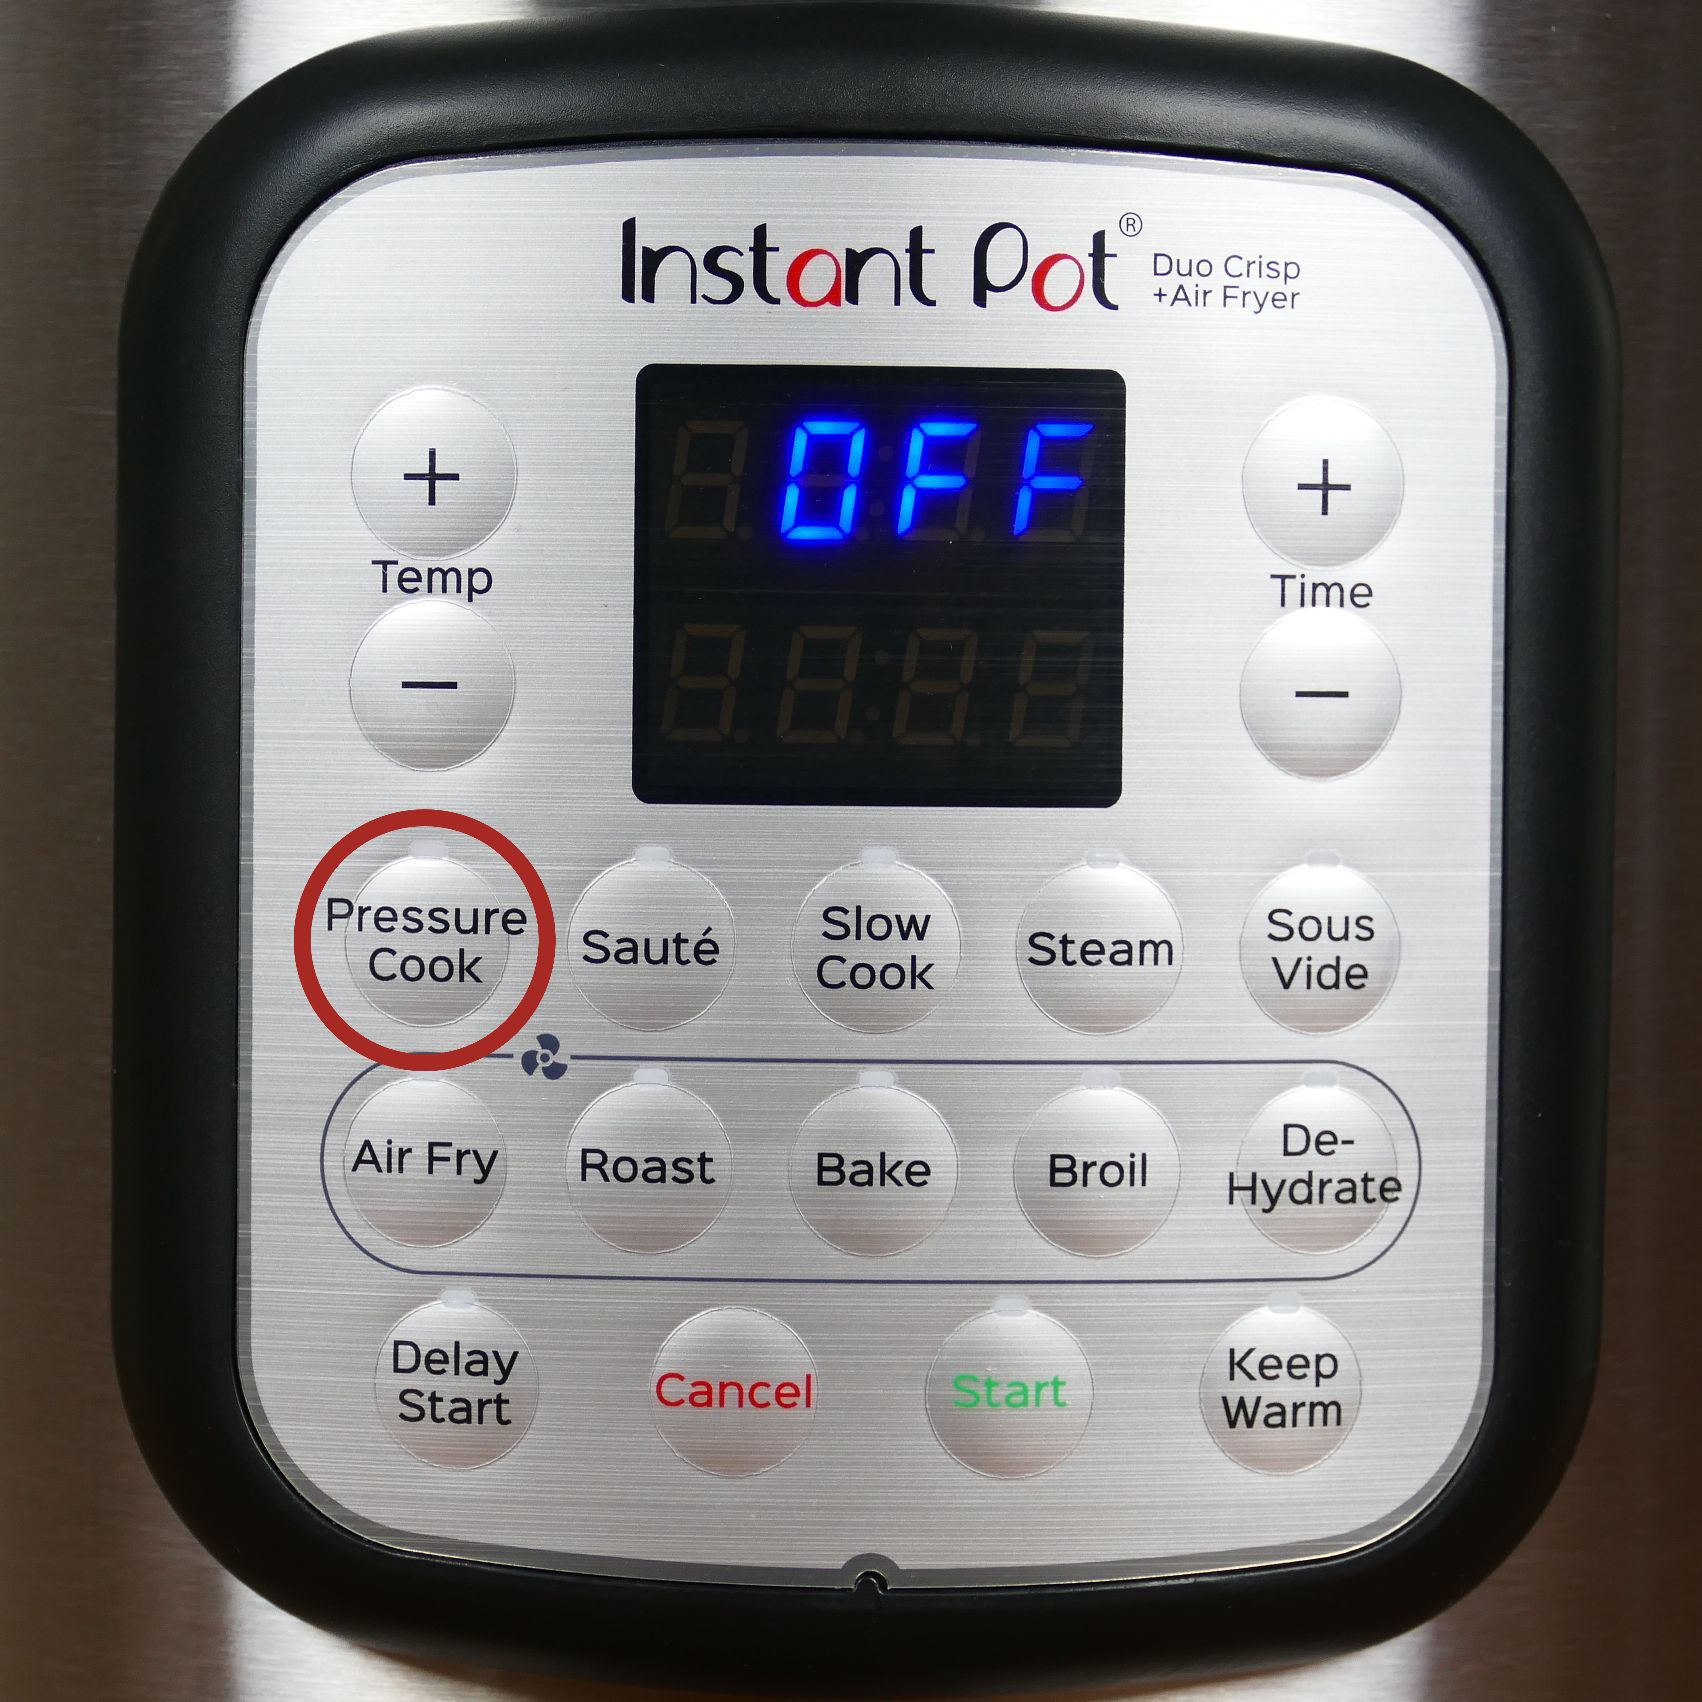
Pressure Cook is one of the most useful features of the Instant Pot. It’s only used with the presssure cooker lid.
Pro Tips
You might see some recipes tell you to press Manual. Manual and Pressure Cook are the same thing. Manual was replaced with Pressure Cook in newer versions of the Instant Pot.
To change the pressure level on this model – the Instant Pot Duo Crisp – press the Pressure Cook button multiple times to toggle between Lo (low pressure) and Hi (high pressure). On some other models, there’s a button Pressure Level or Pressure that allows you to change the pressure from Low to High.

- Press the Pressure Cook button.
- Press the Time + or – buttons to set the pressure cooking time.
- Once the pressure cooking time has been set (e.g. 00:05 for 5 minutes), press the Start button.
- Wait a couple of seconds and the display will change to On.

- The float valve will go from the Down position to the Up position.
- This can take anywhere from 5 to 30 minutes, depending on the amount of food you’re cooking and the temperature of the ingredients.
Saute
The Saute function allows you to saute food in the Instant Pot before pressure cooking, and to reduce the liquid after pressure cooking. I love this function because I don’t need to get out another pan and that helps keep cleanup to a minimum.
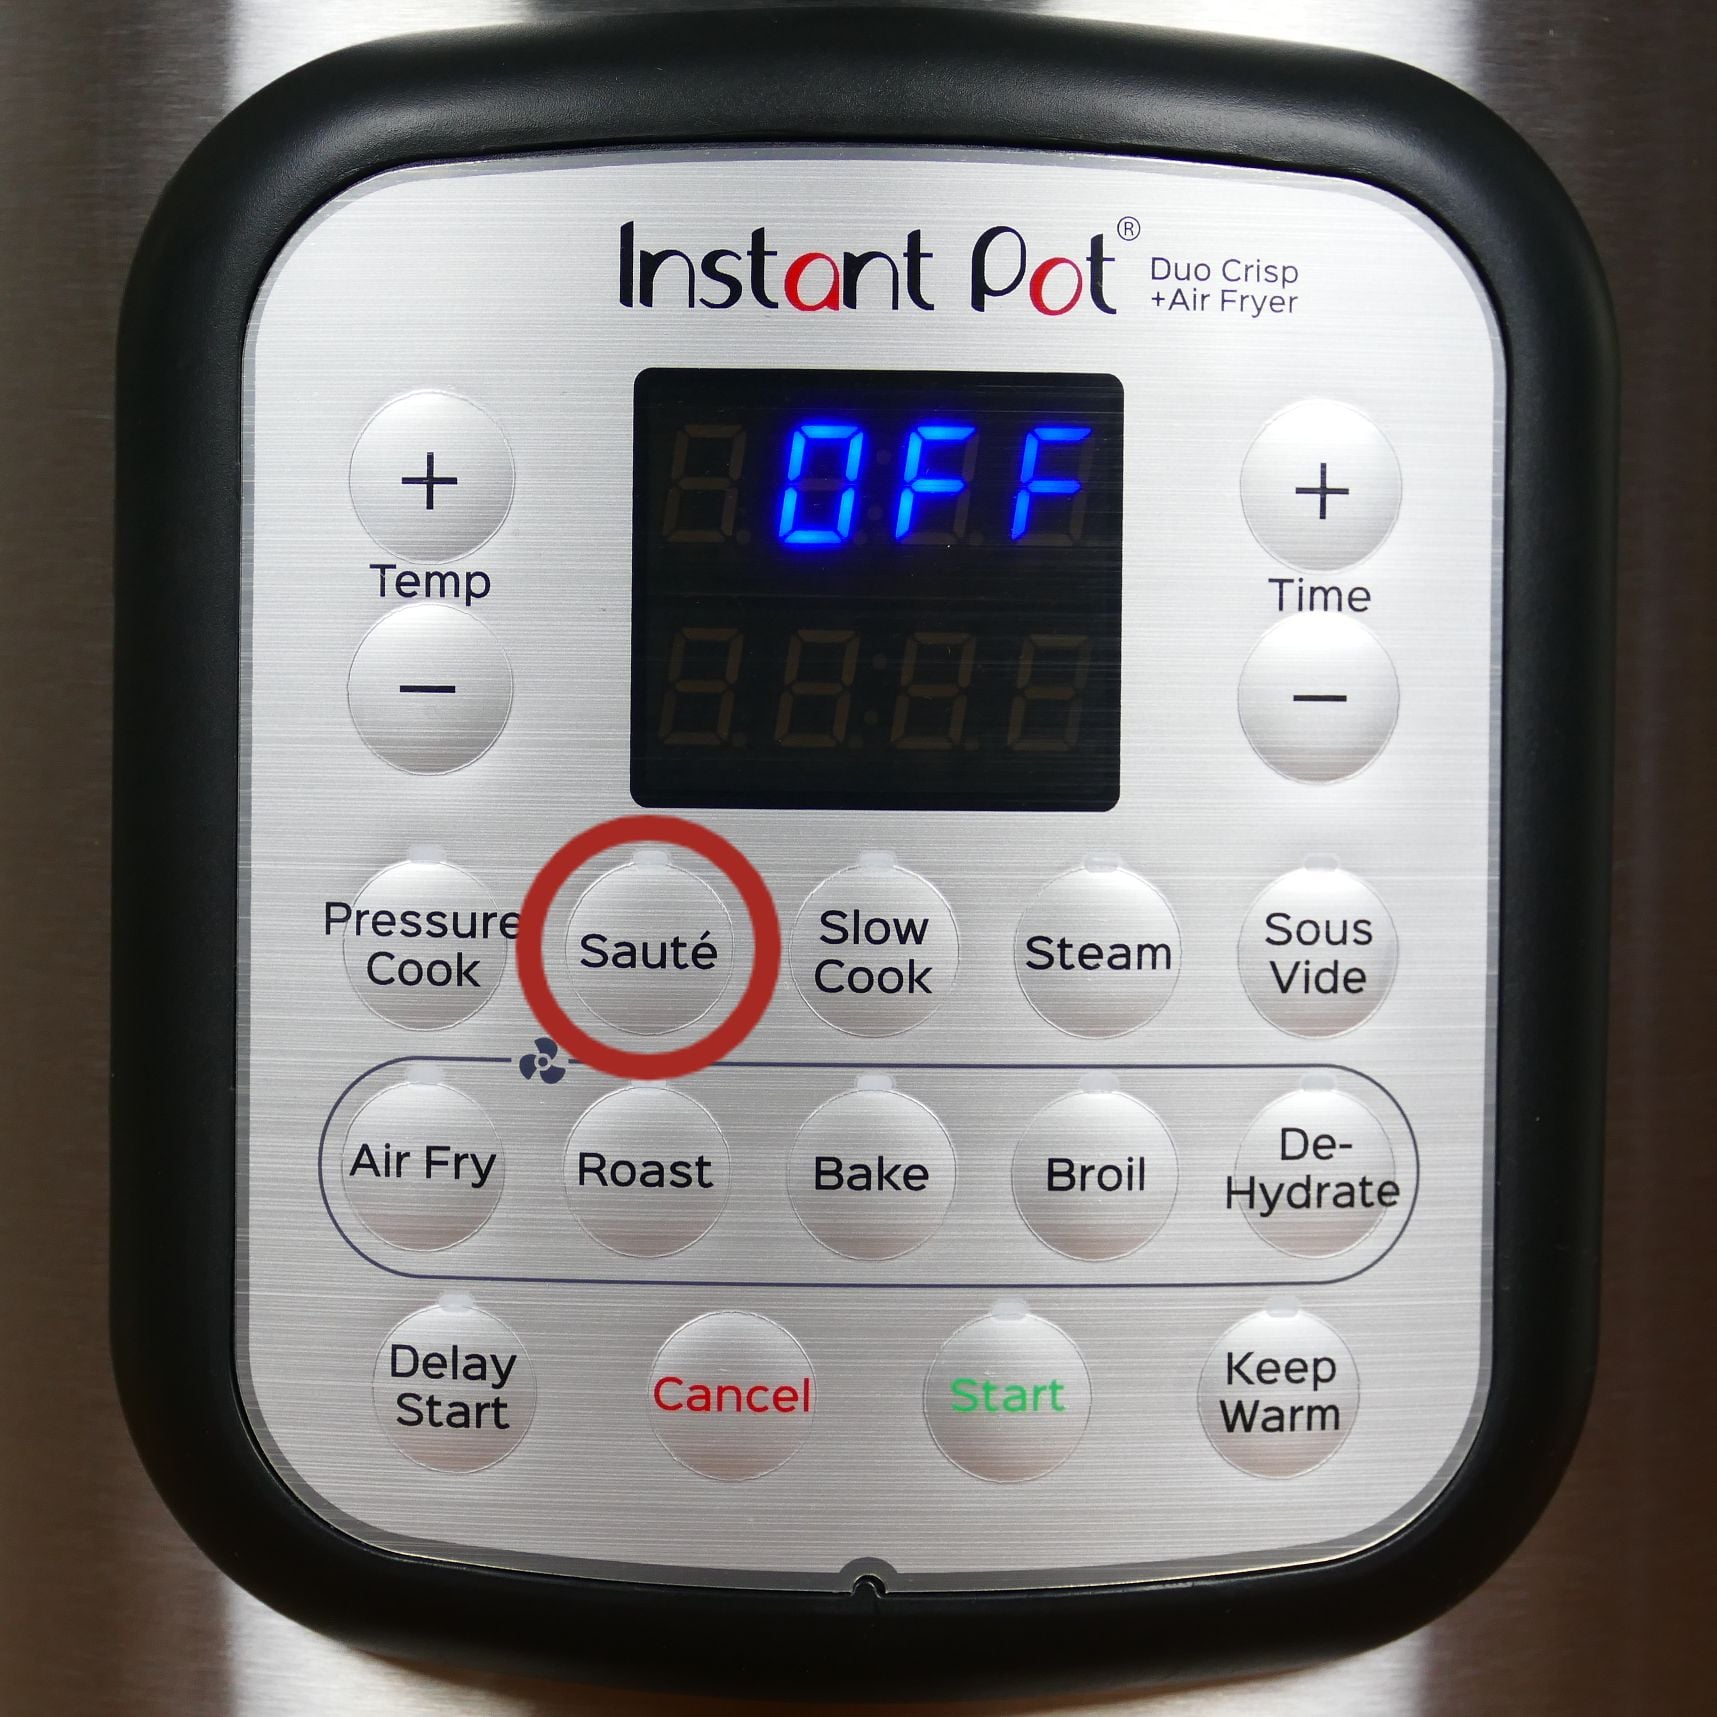
- Select the Saute button and press Start.
- The Instant Pot chimes and the display says On.
- Once the desired saute temperature has been reached, the display says Hot.
- Add your food to the inner pot and saute.
To change the Saute temperature:
- Press the Saute button repeatedly to toggle between Lo (low temperature) and Hi (high temperature).
Safety Tip
Don’t use the Instant Pot pressure cooking lid while sauteing or you will get a Lid error. A glass lid with a venting hole or a splatter screen (both purchased separately) may be used. As a safety precaution, the cooker automatically enters Standby mode (display says OFF) after 30 minutes if you have not pressed Cancel.
Cancel
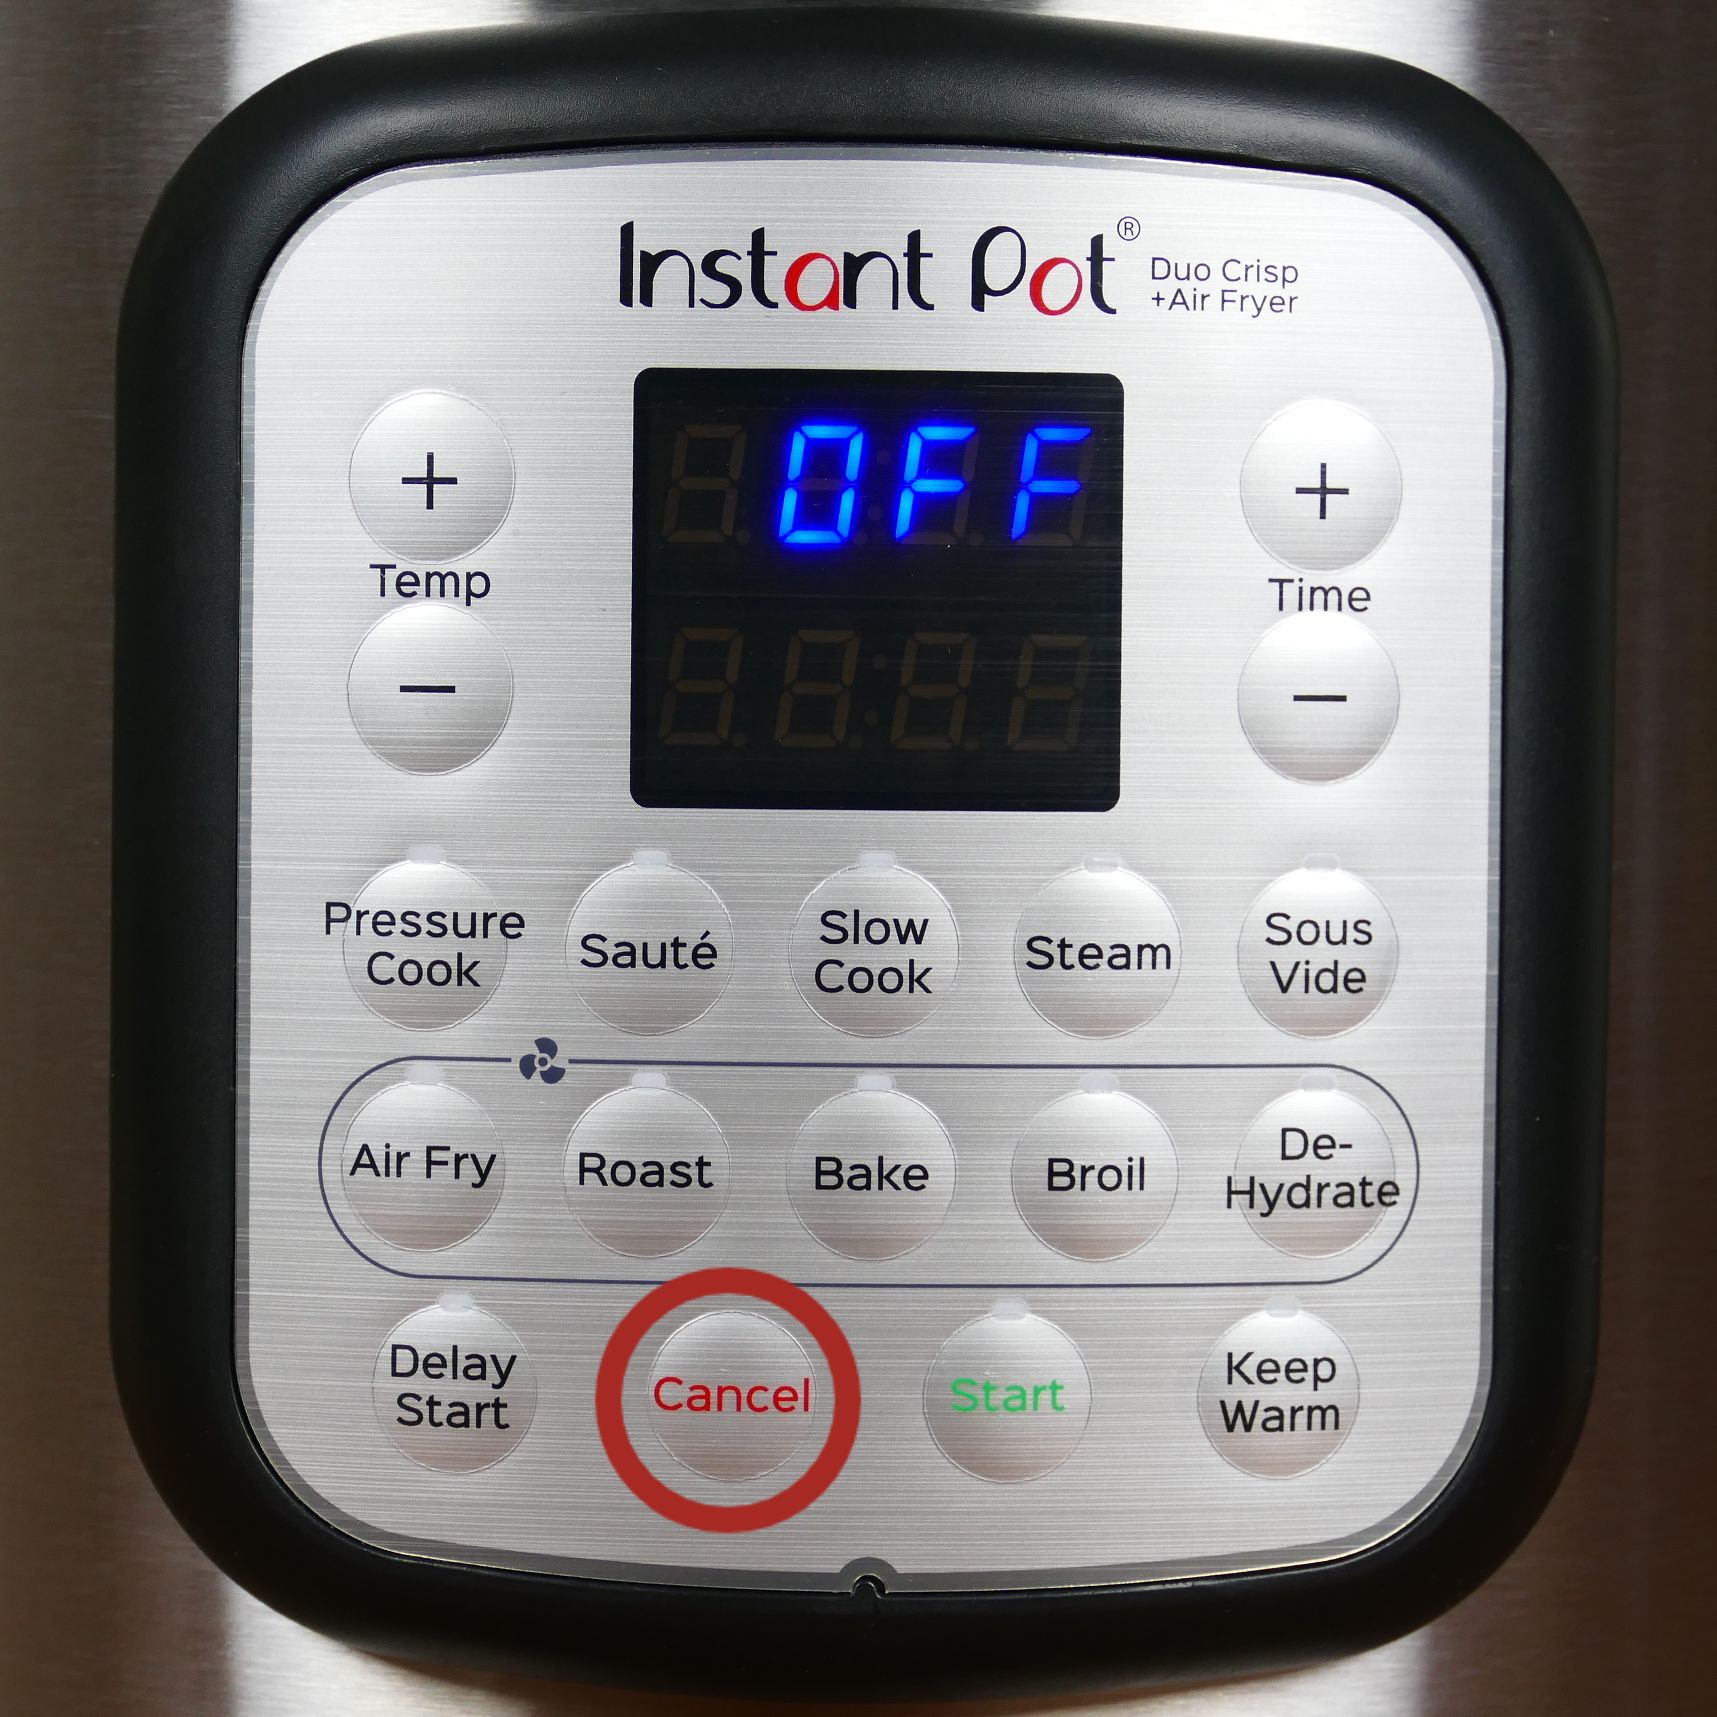
- Press the Cancel button to end any selected function. The Instant Pot display will say OFF.
- This button is used with both the pressure cooker lid and the air fryer lid.
Start
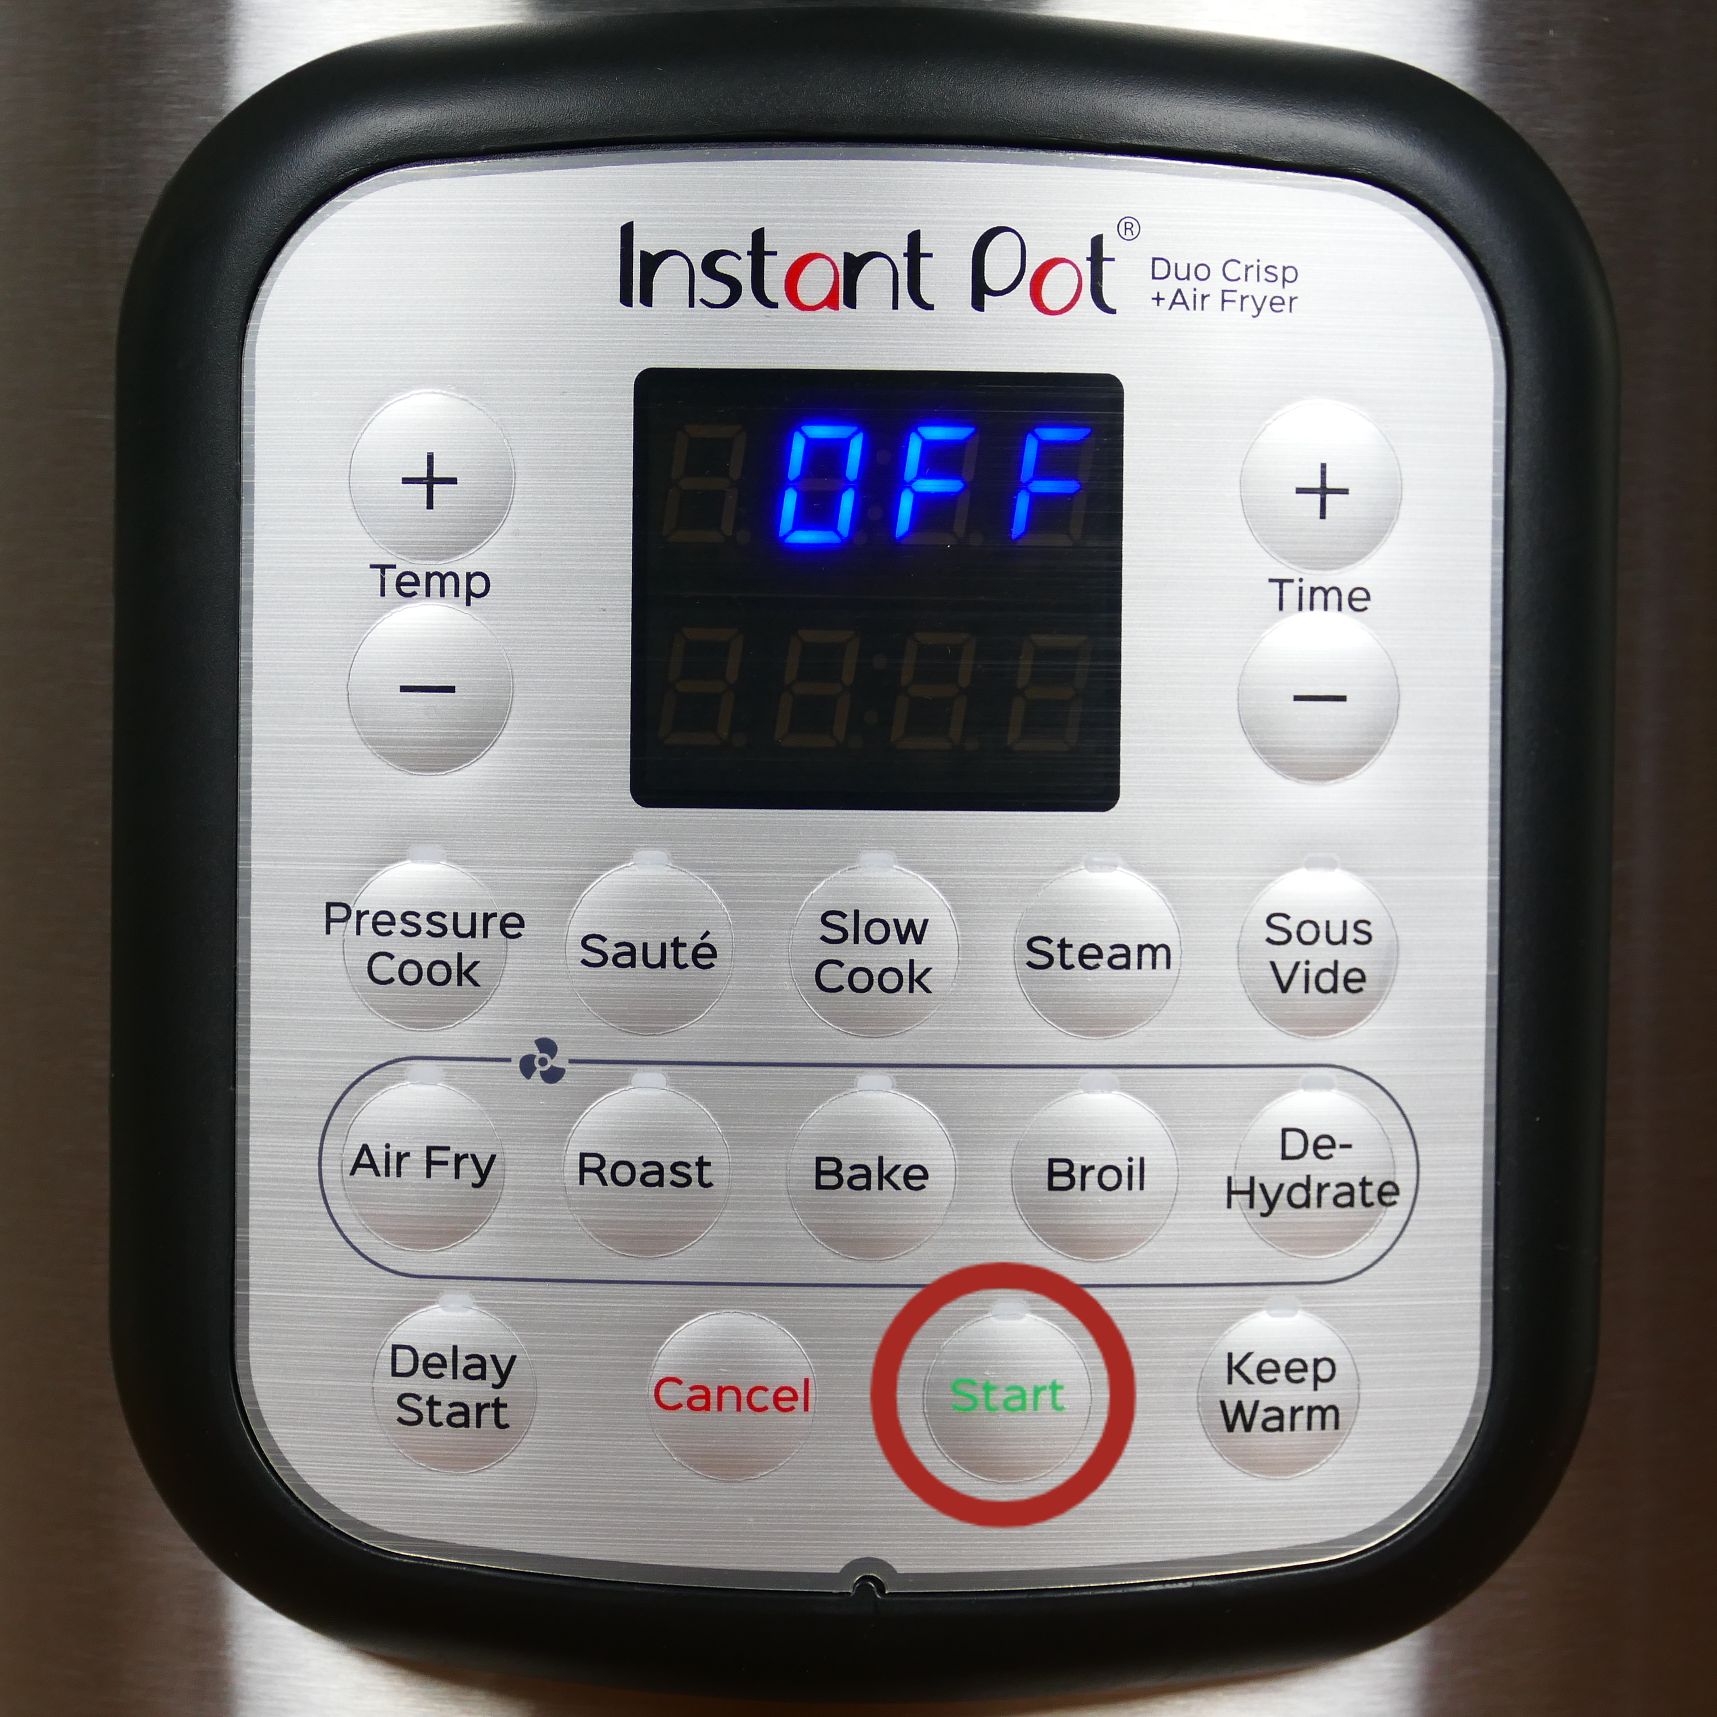
- Press the Start button to begin any selected smart program.
- This button is used with all the smart programs, whether pressure cooking or not.
Note: Some Instant Pot models don’t have a Start button. Instead, the selected smart program automatically begins a few seconds after it’s selected.
Keep Warm
The Keep Warm function is useful when you want your food to stay warm after being pressure cooked. Turning on the Keep Warm function allows you keep track of the amount of time since pressure cooking completed. This is useful when you’re doing a natural release.
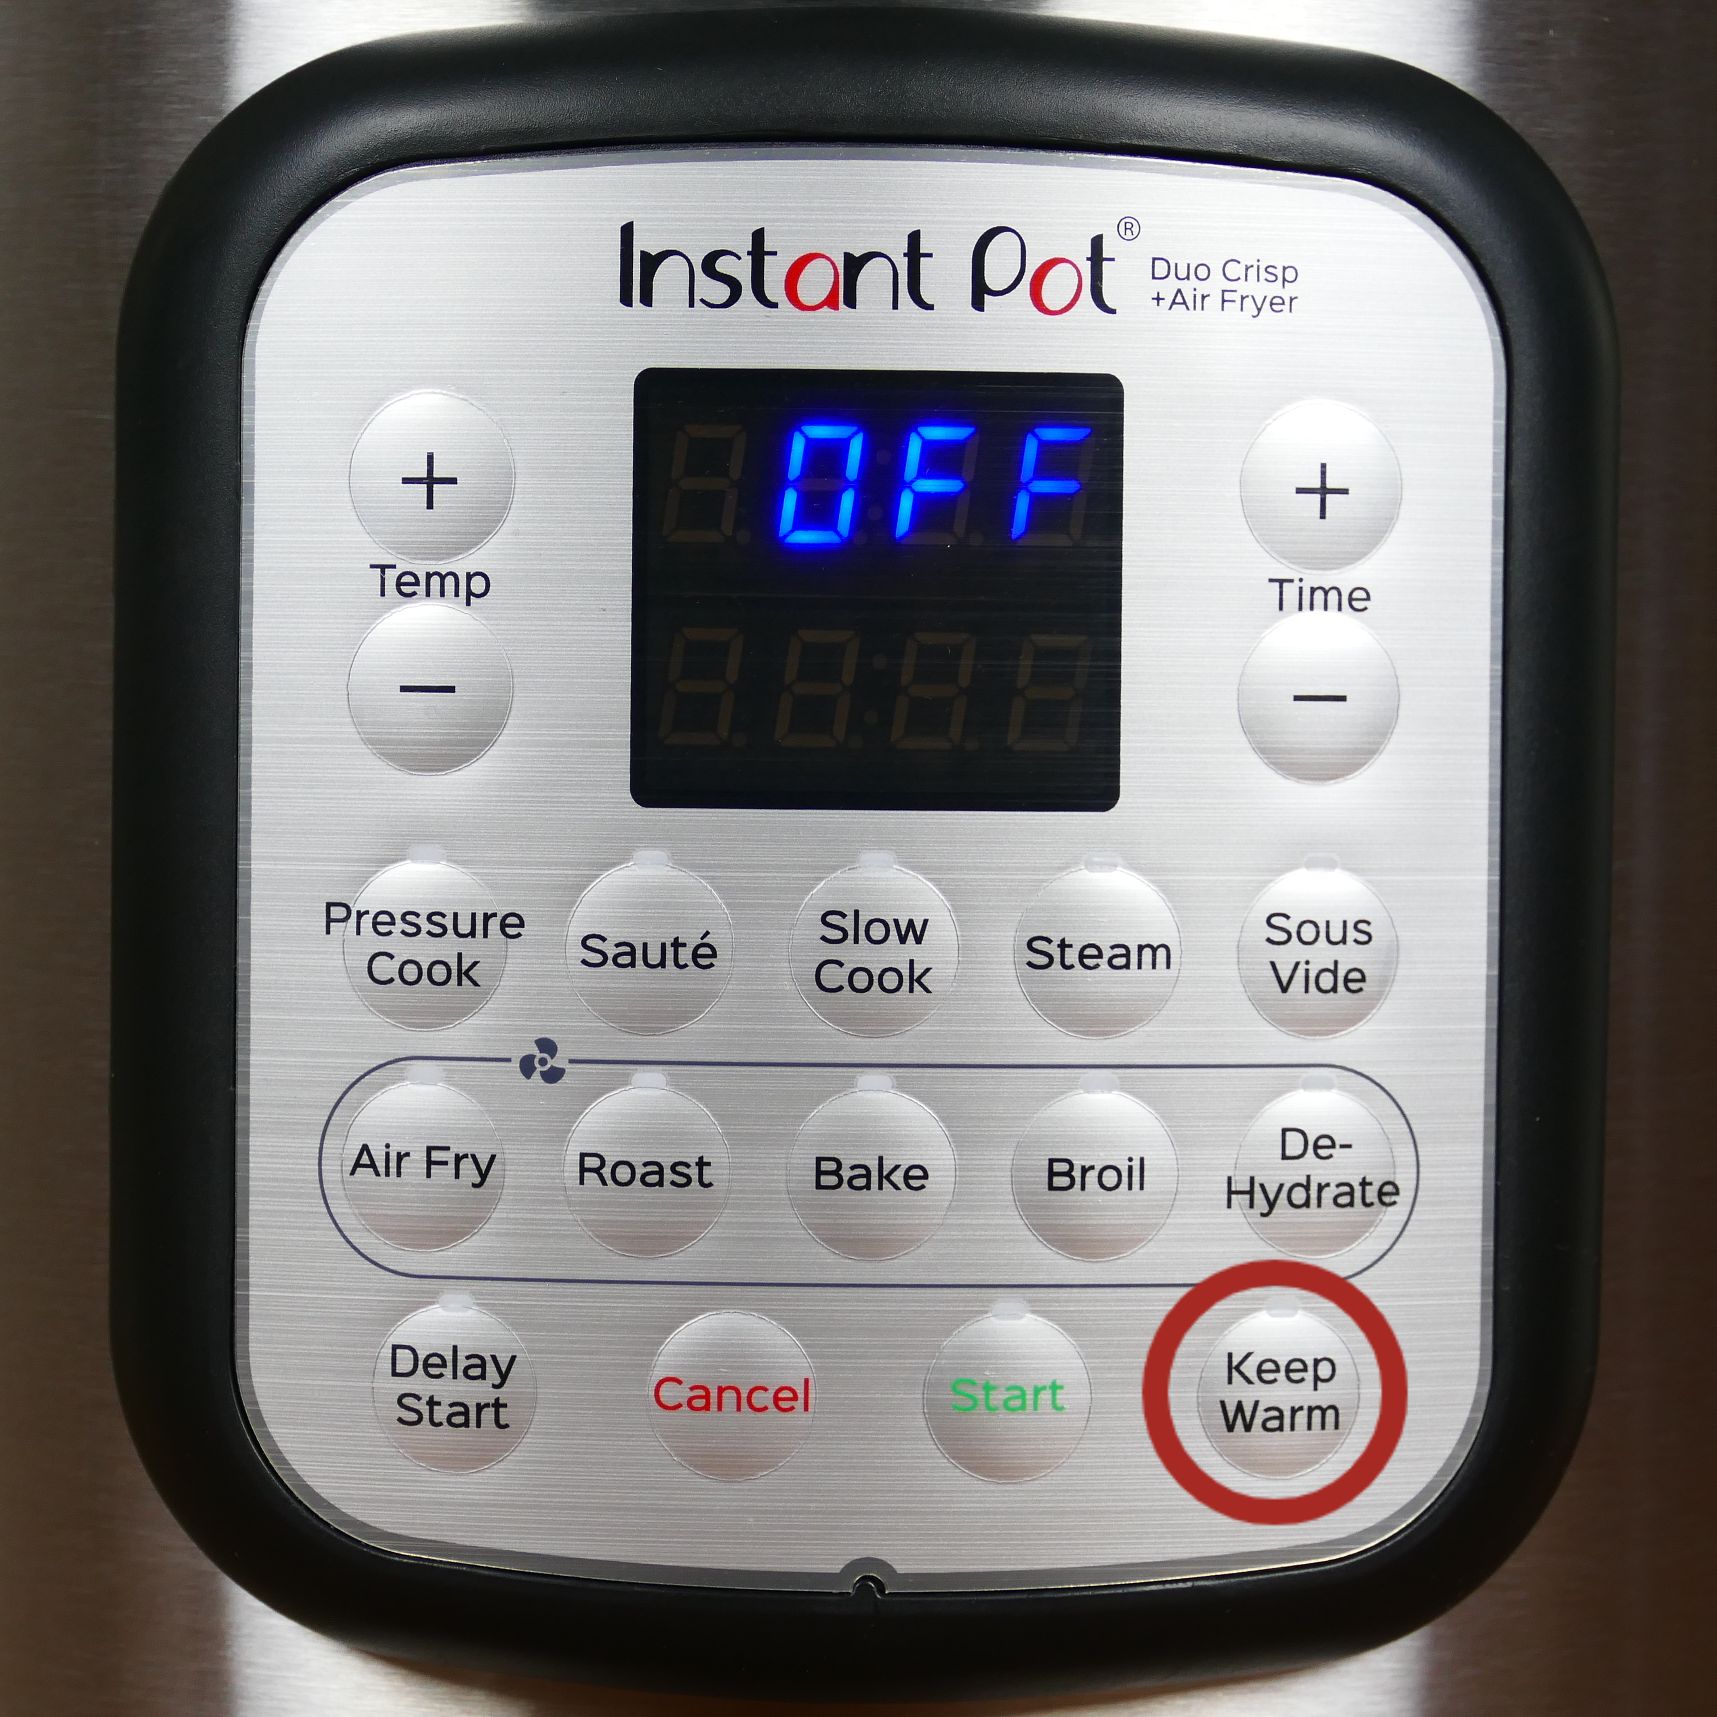
- Press the Keep Warm button to turn the Keep Warm function on and off.
- After pressing the Keep Warm button, press the Time + and – buttons to change the time you want the Instant Pot to be in Keep Warm mode.
- After pressure cooking is complete, the Keep Warm function starts and the time counts UP by minutes. The display panel shows the elapsed time since the Keep Warm mode began (e.g. 00:02 for 2 minutes or 00:15 for 15 minutes.) If the Cancel button is not pressed, the Instant Pot will turn OFF after 10 hours.
- The Keep Warm function can be used with or without the lid closed. You can also use an optional glass lid for this function. When the Keep Warm function finishes, the cooker beeps and goes into standby mode.
- This button is used only with the pressure cooker lid.
Other Functions
If you’re interested in the Sous Vide functionality, please read my article on how to use the Instant Pot Sous Vide function.
Steam works very similarly to Pressure Cook. You can steam foods with or without pressure. If you want to steam without pressure, either use a glass lid or set the steam release button to Venting i.e. push down on the stream release knob until it’s locked into place.
Slow Cook allows you to use a glass lid or you can use the pressure cooker lid set to Venting. For this model, the Slow Cook button allows you to set the temperature to Low or High.
Instant Pot Duo Crisp Pressure Cooker Water Test / Initial Test Run
What is the Water Test?
A water test is done by pressure cooking water for a few minutes. The amount of time varies based on how much water you use.
Why You Should do the Water Test
The initial test run or water test serves two purposes: it familiarizes you with using your new Instant Pot Duo Crisp and it allows you to establish that your Instant Pot is working properly. If you have a defective unit, the water test will identify that and you can get a replacement unit.
You should do a water test before the first use but you can also do it when you’re having problems with the Instant Pot pressurizing. Doing the water test will pinpoint whether there’s something about the recipe that’s causing your sealing issues.
How to do the Initial Test Run / Water Test
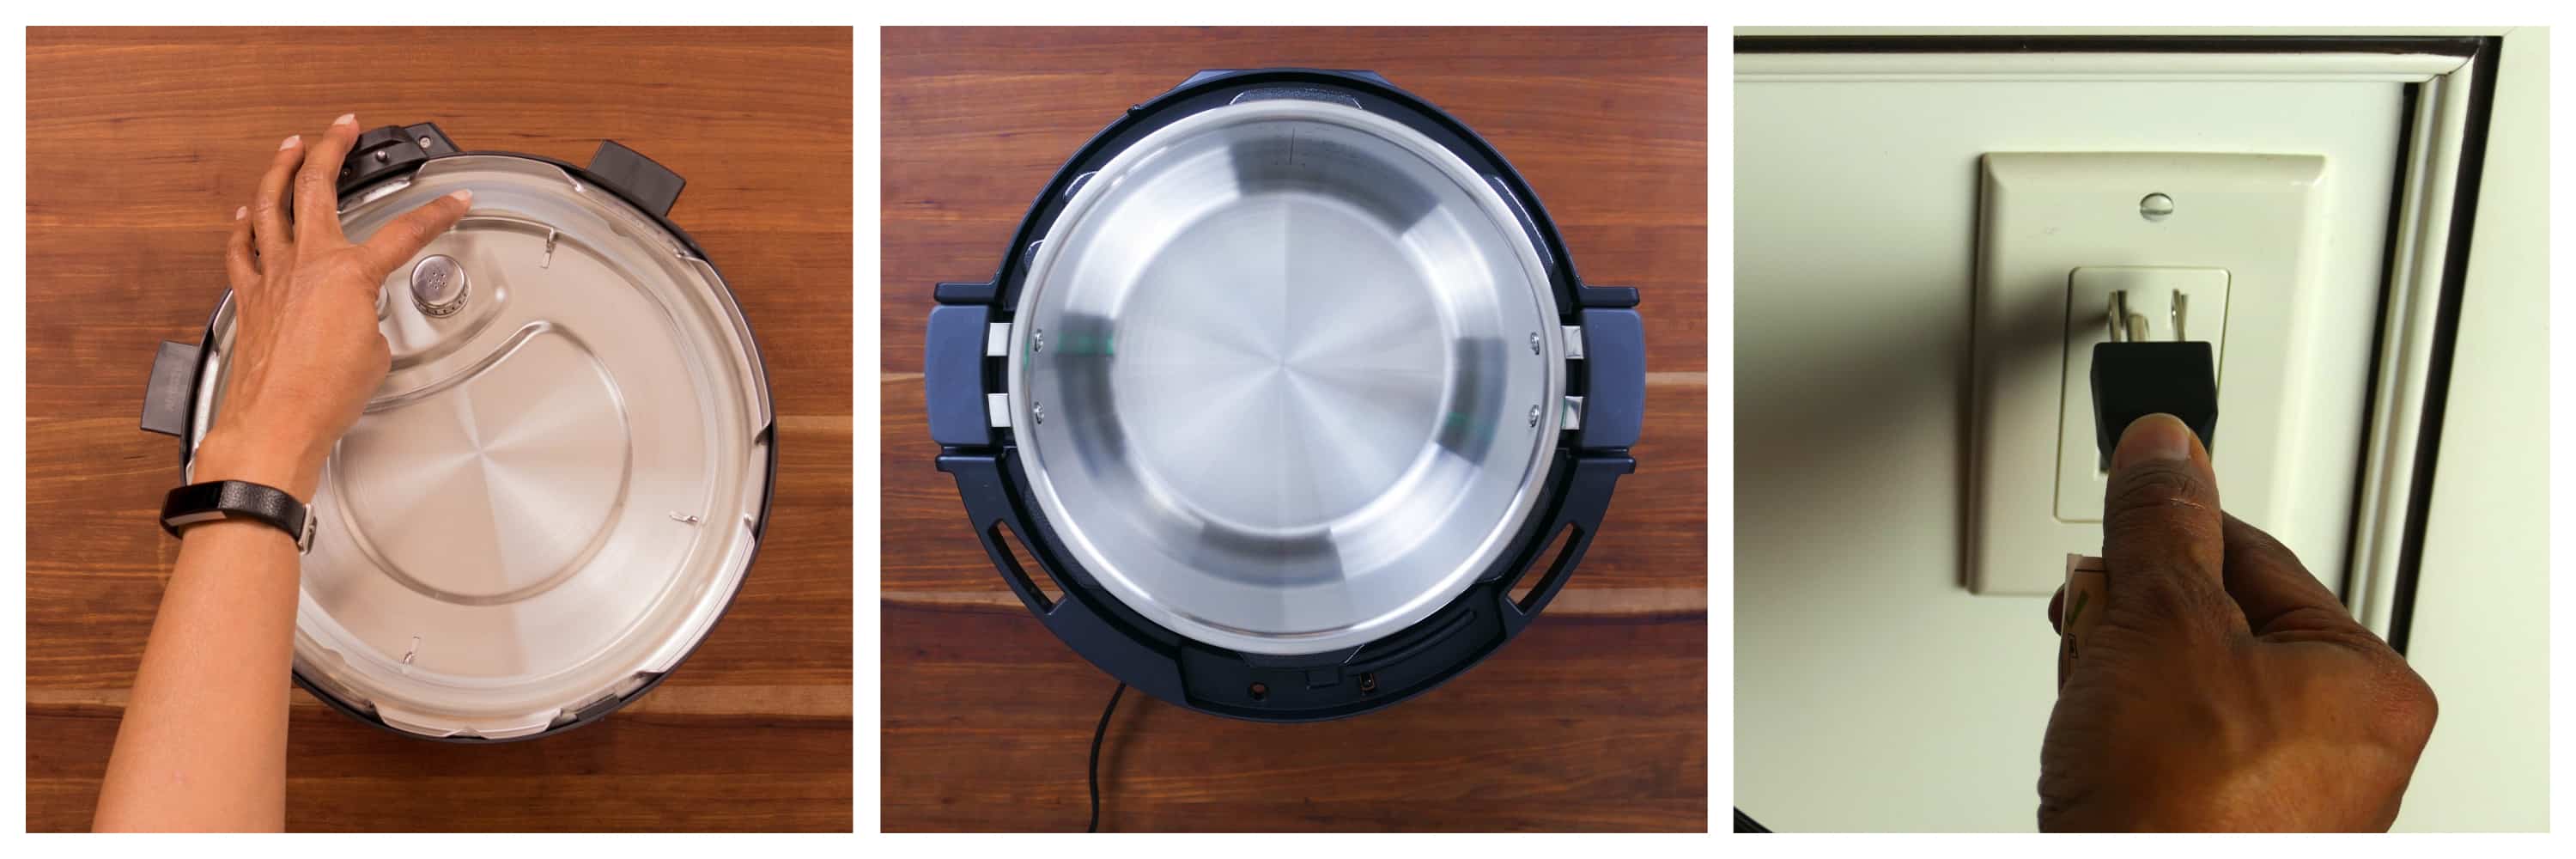
- Make sure the sealing ring is properly seated.
- Place the inner pot into the base unit.
- Plug the power cord into an outlet.

- Pour 3 cups of water into the inner pot.
- Close the lid.
- Make sure the steam release button is up. If it isn’t, turn it counter-clockwise to snap it back up.

- Press the Pressure Cook button.
- Press the + or – buttons until the time goes to 00:05 (5 minutes).
- Press the Start button.

- After a couple of seconds, the display will change to On.
- Soon, you’ll hear and see small amounts of steam coming from the top of the lid. This is normal and safe! Just keep your hands and face away from the steam. You might also notice a funny, plastic smell. Don’t worry – it should go away and it shouldn’t happen again after the first use.
- Once pressure has built up, the float valve will come up.
- After the float valve comes up, the display will change from On to 00:05. This can take a few minutes.
- The display will count down from 00:05 to 00:00.

- When pressure cooking is complete, you’ll hear a series of beeps and the display will show L0:00, which means it’s in Keep Warm mode (if the Keep Warm function is turned on.)
- You can either do a quick release or a natural release. To do a natural release, wait for the float valve to fall on its own. This can take 10 to 30 minutes. [Learn more about all the pressure release methods.]
- In this case, you’ll do a quick release.
- Press the Cancel button. The display will say OFF.
- Press the steam release button until it locks into place. Steam will gush out of the steam release cover. Keep your hands and face away from the steam.

- Once all the steam has been released, the float valve goes down and the Instant Pot is de-pressurized.
- This can take a few minutes.
- Open the lid and prop the lid open.
What to do if the water test fails
If the water test fails and you’re not able to get the Instant Pot to come to pressure, use the following articles to troubleshoot the issue:
- Reasons why your Instant Pot is not Sealing
- Instant Pot Burn Message
- Common Instant Pot Problems
- Instant Pot Tips and FAQs
If you can’t solve your problem, open a support ticket with the Instant Pot company.
Instant Pot Tips and Tricks
Delay Start
Learn about how to use the Instant Pot Delay Start feature, which allows you to begin pressure cooking at a future time.
Pot in Pot
Find out how to use the Instant Pot pot in pot cooking method, which allows you to cook multiple foods together.
Cooking Times
Find out Instant Pot Cooking Times and what method of pressure release to use.
Instant Pot Duo Crisp | How to Use Air Fryer
What is an Air Fryer?
Although it’s called an air fryer, an air fryer does not fry. It does precisely the opposite. It crisps food with little to no oil. And that is what has made air fryers so popular in recent years.
The air fryer was introduced by Philips in 2010 under the trademark AirFryer (one word). Air fryer, on the other hand, has become a generic term for a class of appliances.
How does an air fryer work? The air fryer has a powerful fan that blows hot air all around the food similar to how a convection oven works. Due to the small enclosed space and concentrated heat, the food heats up and cooks very fast.
The advantages of air frying are:
- Very little oil needs to be used
- Food comes out crisp
- Food cooks fast
- Because of the size, air fryers give off less heat
Introduction to the Instant Pot Air Fryer Lid
One of the downsides to using an Instant Pot pressure cooker used to be that you couldn’t get foods to crisp or brown. Well, no more!
Instant Pot has joined the party by introducing an air fryer lid that can be used in conjunction with the Instant Pot, and it’s a game-changer. Now you can pressure cook food in the Instant Pot and use the air fryer lid to crisp up the top.
Or you can use the air fryer lid without having pressure cooked the food, similar to how you would use a traditional air fryer.
Food is placed in a mesh basket, which in turn, is inserted into the inner pot. The air fryer lid is placed on top and it blows superheated air to cook and crisp food. You can cook food from fresh or frozen.
You can also use the air fryer lid to broil food directly in the inner pot i.e. without using a basket, which is akin to broiling the food in the oven. More on that later.
Instant Pot Air Fryer Lid vs Traditional Air Fryer
The Instant Pot air fryer lid differs from traditional air fryers in a few ways:
| INSTANT POT AIR FRYER LID | TRADITIONAL AIR FRYER |
|---|---|
| • Capacity is limited and larger quantities of food need to be cooked in batches. It’s great for smaller families, singles or couples. | • Many models have a larger capacity than the Instant Pot inner pot, allowing you to cook larger quantities of food. |
| • Chimes and tells you to turn food halfway through cooking. | • In general, air fryers don’t remind you to turn the food. |
| • If you plan to purchase an Instant Pot and air fryer in the future, the Instant Pot Duo Crisp with Air Fryer Lid is a good choice. | • If you don’t have and don’t plan to get an Instant Pot, a standalone air fryer might be a better choice. • If you’re cooking for a large family, a larger capacity air fryer may be your best bet. |
| • The air fryer lid is heavy, so you need to be careful when you move it, especially when it’s hot. • It’s not suitable for children to operate. | • Since a standalone air fryer sits on your counter, you only need to remove the basket and that makes it easier to take the food out. • Older kids could use some models with supervision. |
| • The highest temperature you can program is 400 degrees Fahrenheit, which serves most purposes. However, if you have a recipe that calls for a higher temperature, you’ll need to adjust the recipe. | • Many air fryers can go up to a maximum temperature of 450 to 480 degrees Fahrenheit. |
Air Fryer Accessories
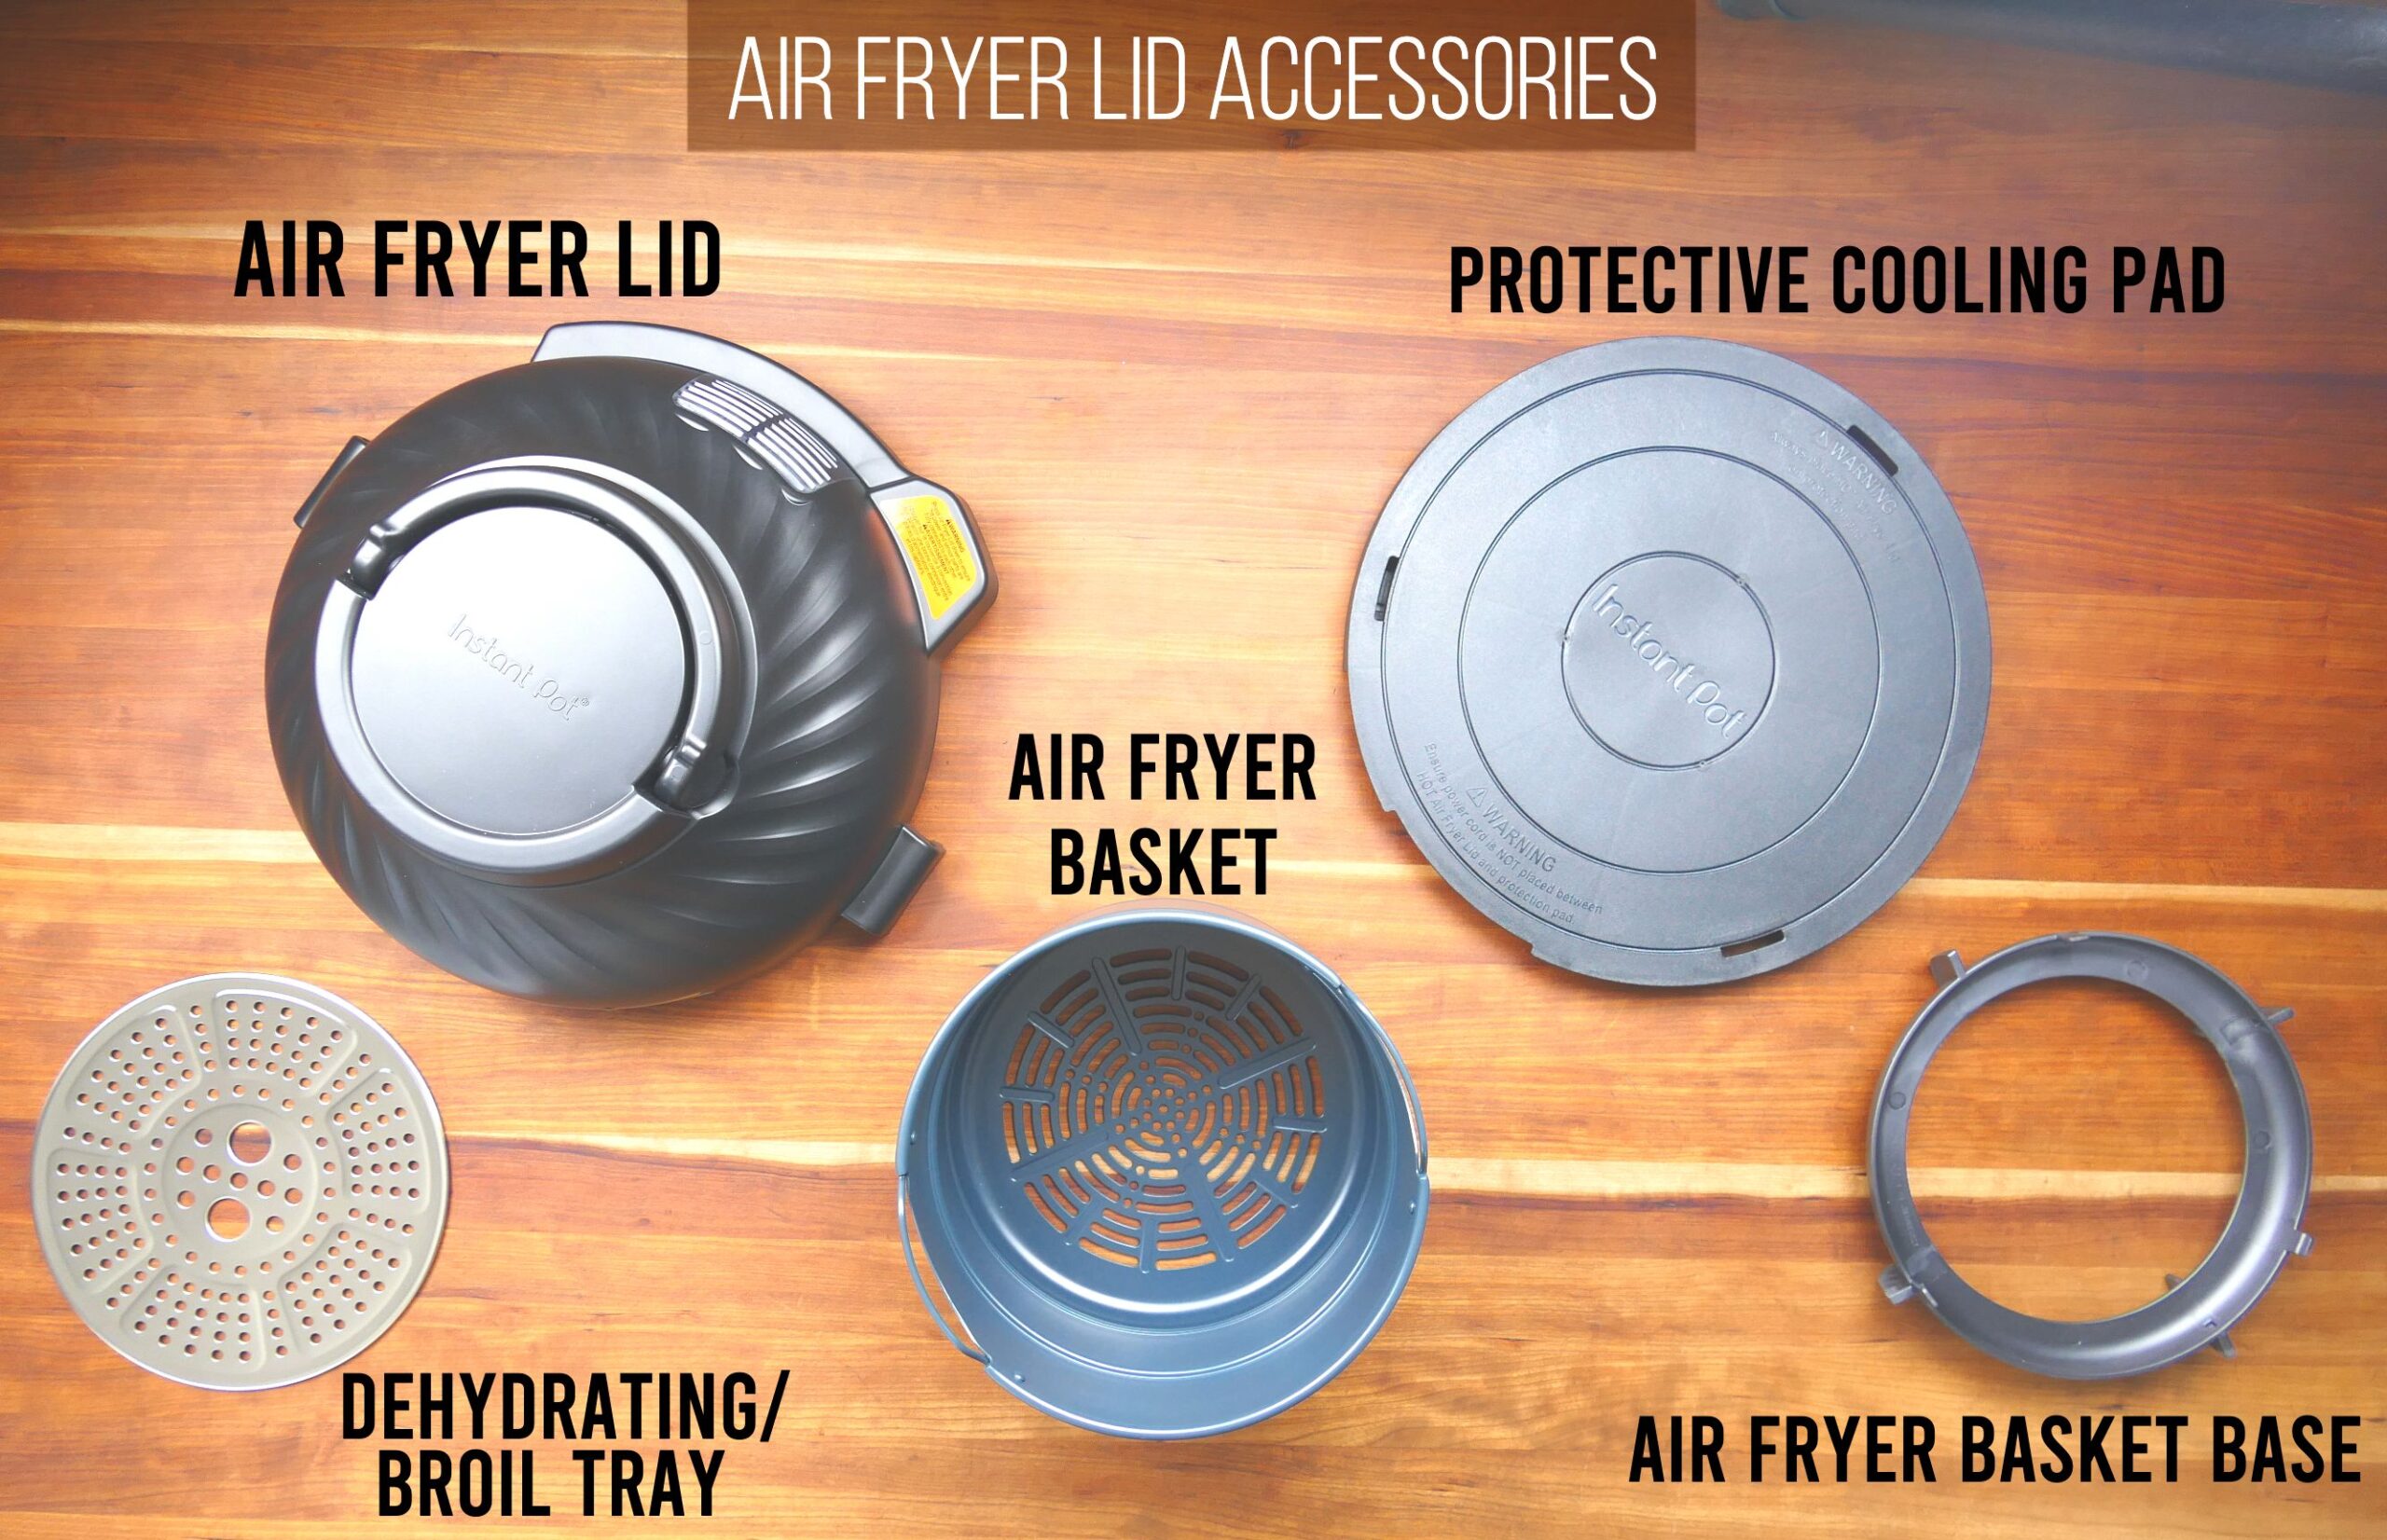
The Instant Pot Duo Crisp air fryer lid comes with the following accessories:
- Air Fryer Lid – allows the Instant Pot to be used as an air fryer.
- Protective Cooling Pad – used to protect the countertop from the hot heating element of the air fryer lid. Always place the air fryer lid on this base.
- Dehydrating/Broil Tray – used when you’re air frying two levels of food. The tray is placed in the air fryer basket and it sits on a ridge, about halfway up.
- Air Fryer Basket – the basket has vents on the bottom and a ridge on which the dehydrating/broil tray can be placed.
- Air Fryer Basket Base – a raised base that clips onto the air fryer basket.
Air Fryer Lid Parts
Duo Crisp Air Fryer Lid Exterior Parts
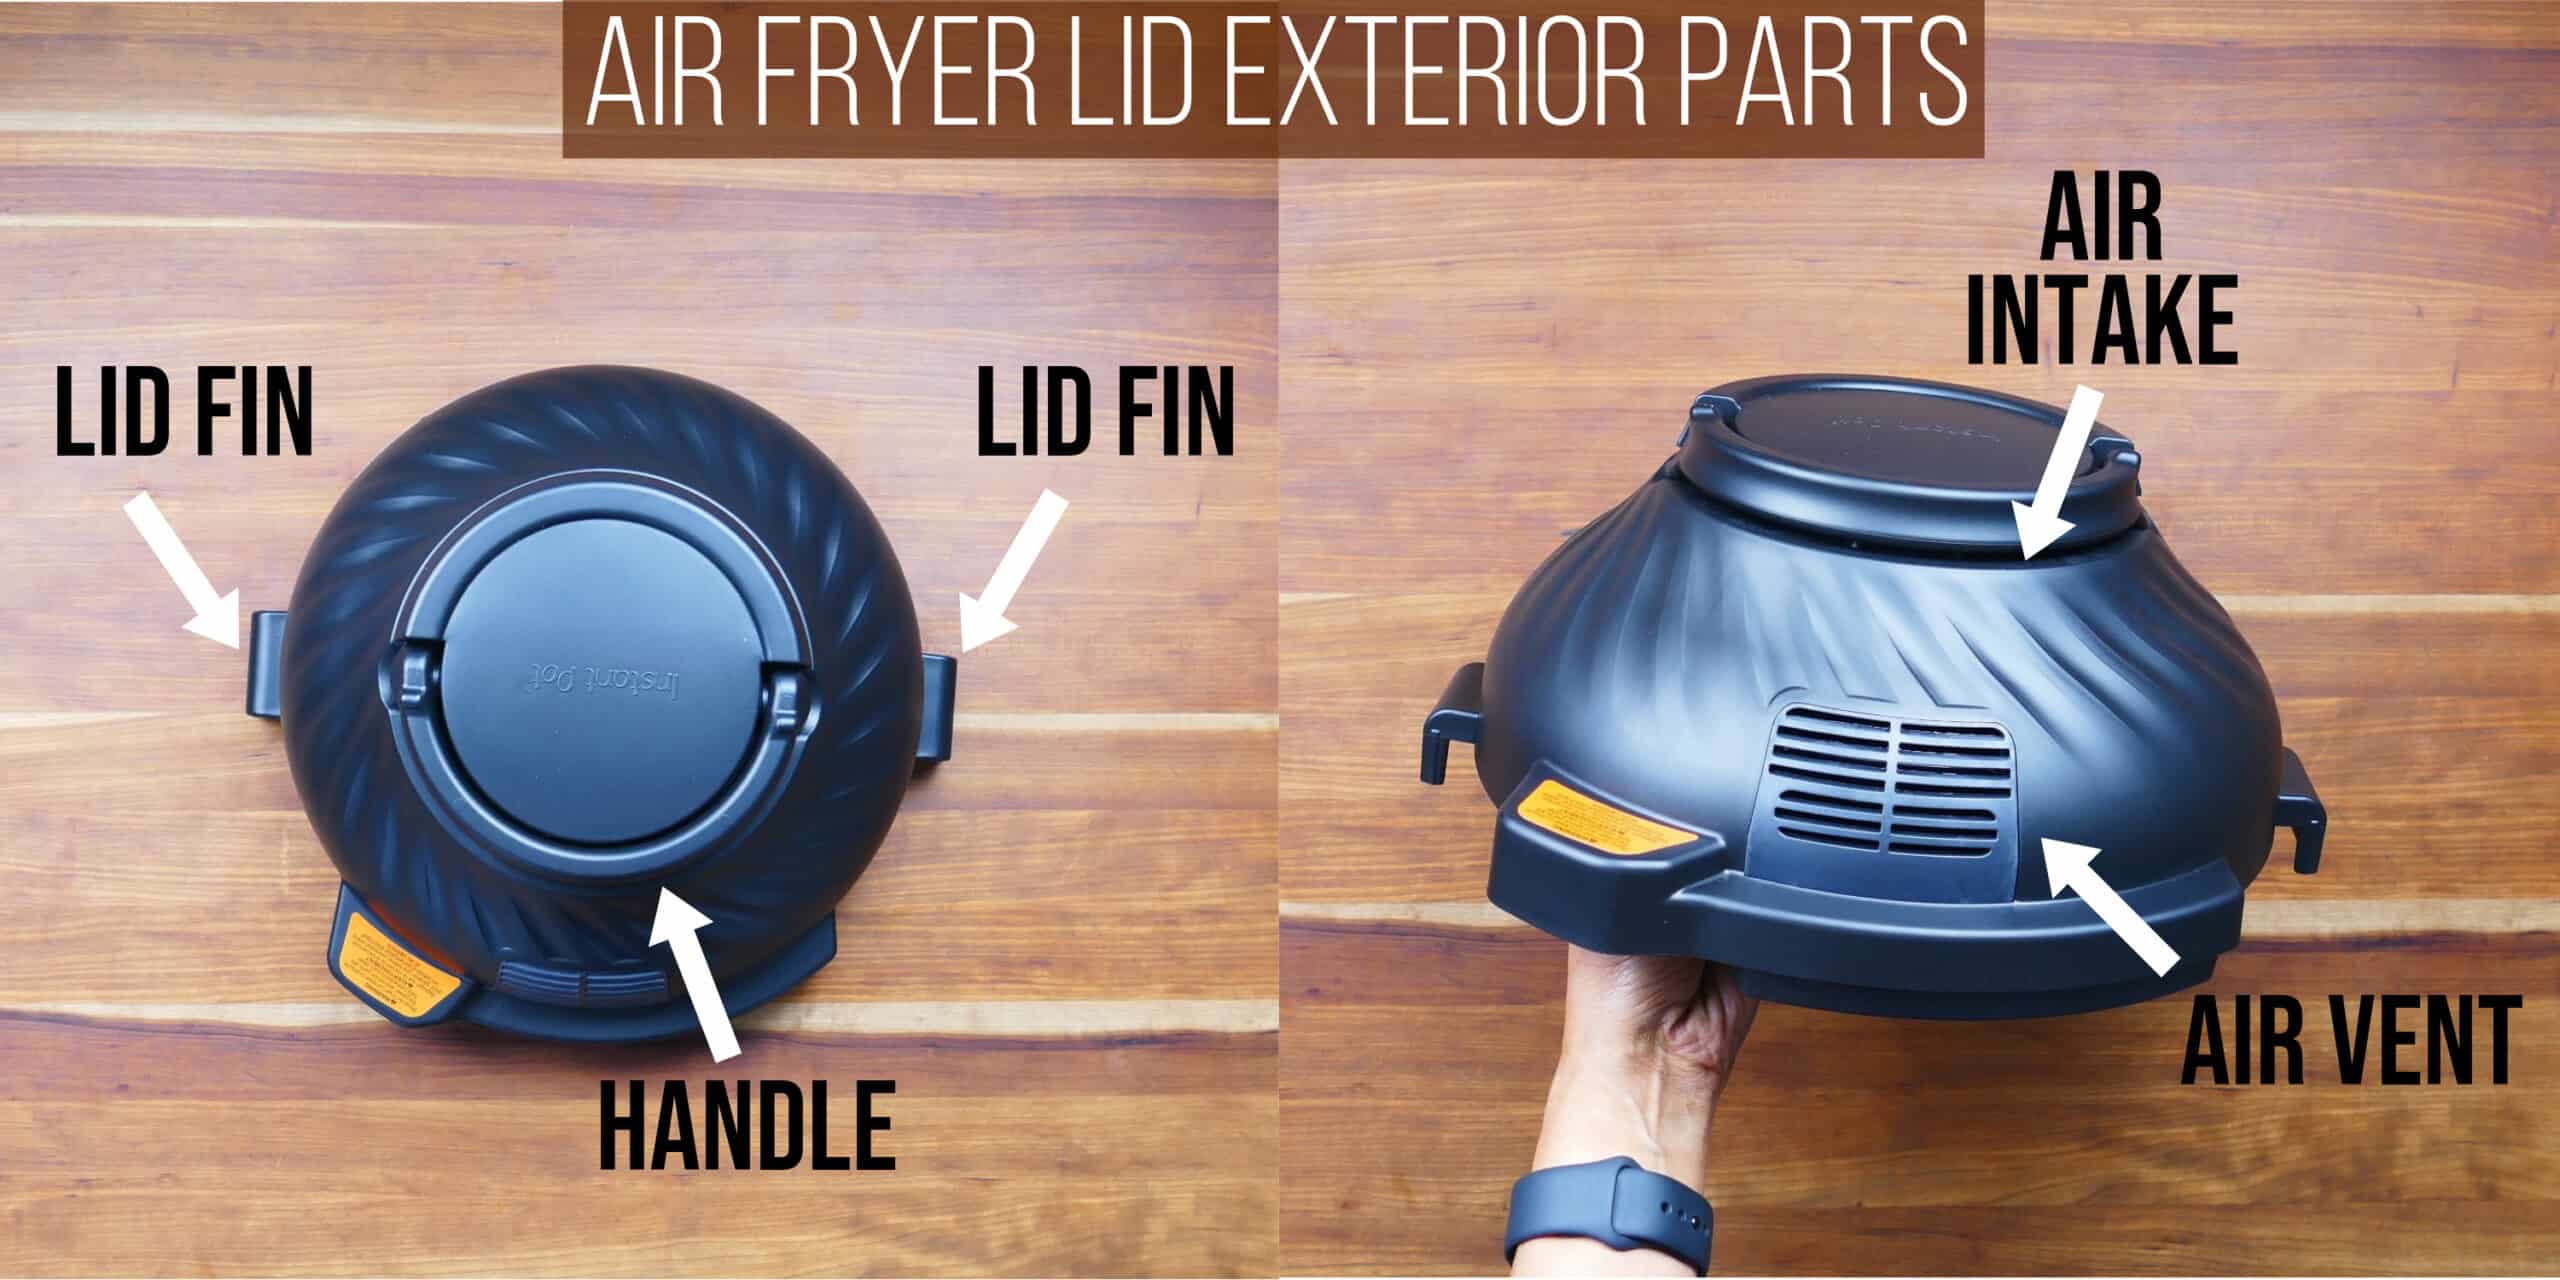
The outside of the Duo Crisp Air Fryer Lid consists of the following parts:
- Lid Fins – fit in the lid fin slot of the base unit for air frying.
- Handle – lifts up and is used to move the lid.
- Air Intake – allows the air to circulate by taking air in.
- Air Vent – allows the air to circulate by pushing air out.
Air Fryer Lid Interior Parts
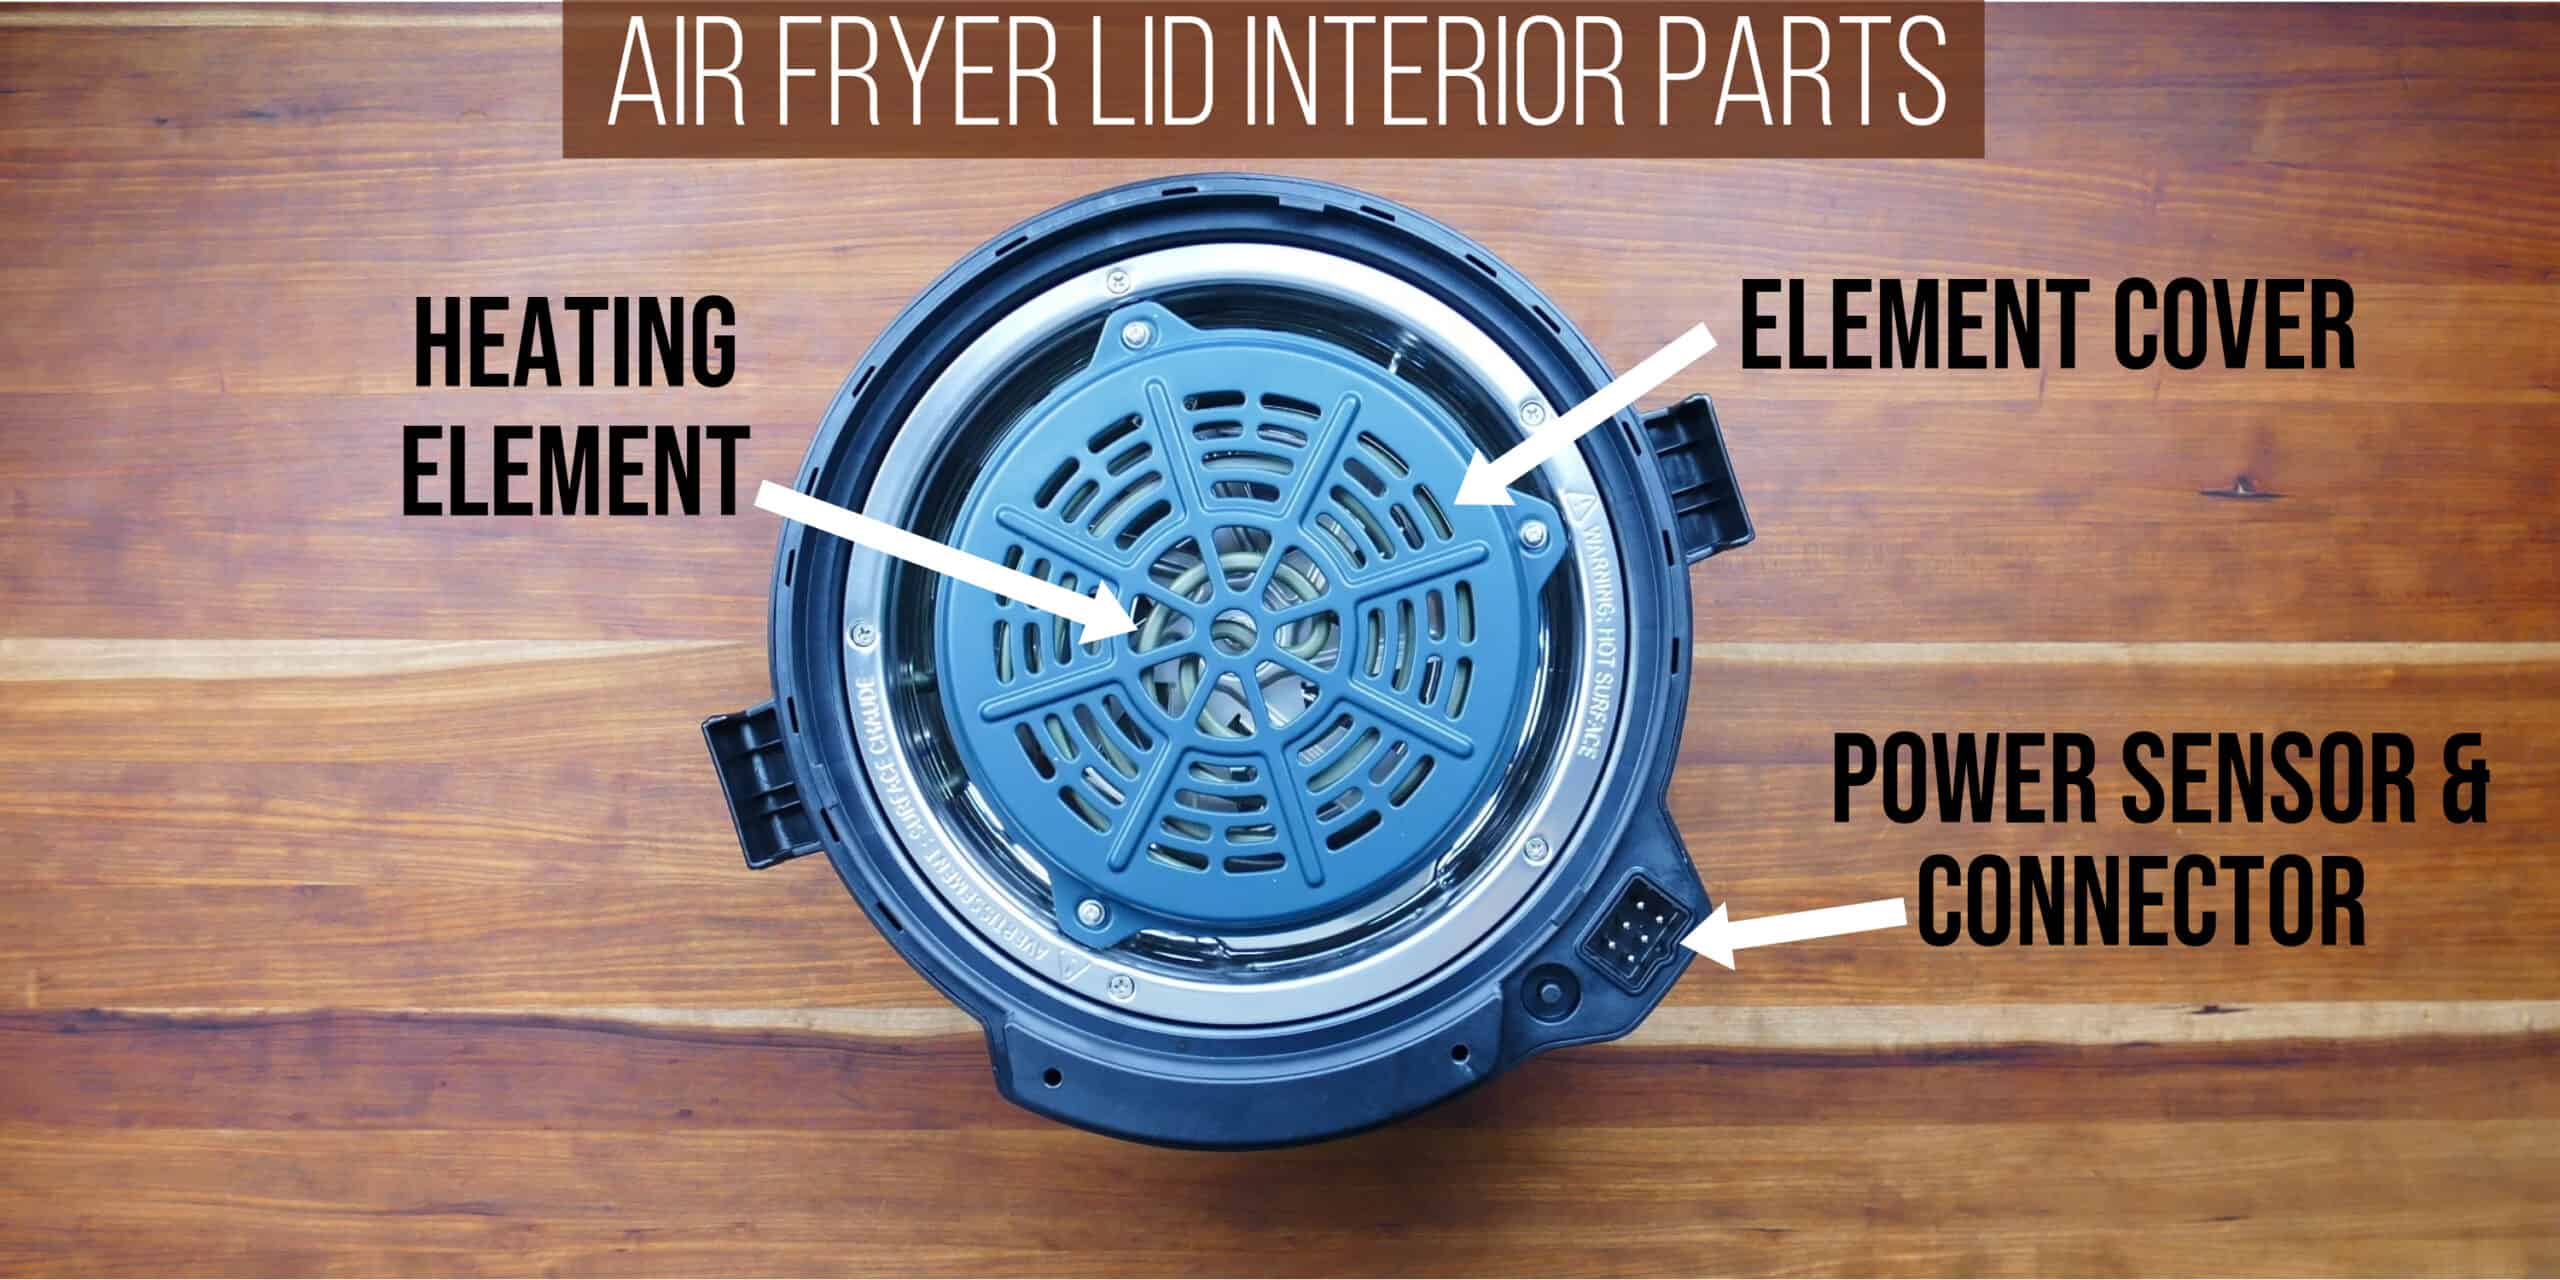
The inside of the Air Fryer lid consists of the following parts:
- Heating Element – heating coil creates the heat necessary to cook food. Sits below the element cover.
- Element Cover – Protects you from directly coming into contact with the heating element.
- Power Sensor and Connector – makes contact with the base unit to activate the air fryer lid.
Open and Close the Air Fryer Lid
How to Close the Lid

- Place the lid so that the air fryer lid fins go into the base unit lid fin slots.
- Push down firmly so that the power sensor on the base unit makes contact with the power sensor on the air fryer lid.
- You will hear a chime when the proper connection is made.
How to Open the Air Fryer Lid

- To open the air fryer lid, lift it straight up.
- Place the protective pad, flat side up, on a countertop.
- Always place the hot air fryer lid on the provided protective pad until completely cooled down.
Ways to Use the Air Fryer Lid
There are three ways in which you can cook using the air fryer lid on your Instant Pot.

- Directly in the inner pot
- Using the pot-in-pot method (where food is in an oven-safe dish)
- Air fryer basket
Directly in the Inner Pot
If you’re cooking something in the Instant Pot directly and want to crisp up the top, you can use the air fryer lid to do that.
e.g. I make Instant Pot macaroni and cheese and once pressure cooking is done, I add a breadcrumb topping and use the air fryer Broil button to brown the top. If I cook a lasagna using the pot-in-pot method, I use the air fryer lid to make it golden-brown and bubbly.
Pot in Pot
If you would like to bake something in a separate oven-proof container, you can place it on a trivet and air fry it or bake it.
e.g. I bake cakes using the air fryer Bake button. They come out really great.
Air Fryer Basket
If you wish to use a traditional air fryer recipe to make crispy foods, you can use the air fryer basket to air fry the foods.
e.g. I make air fryer French fries, chicken wings, and roasted vegetables using the air fryer basket.
Air Fryer Basket Assembly
Air Fryer Basket Parts
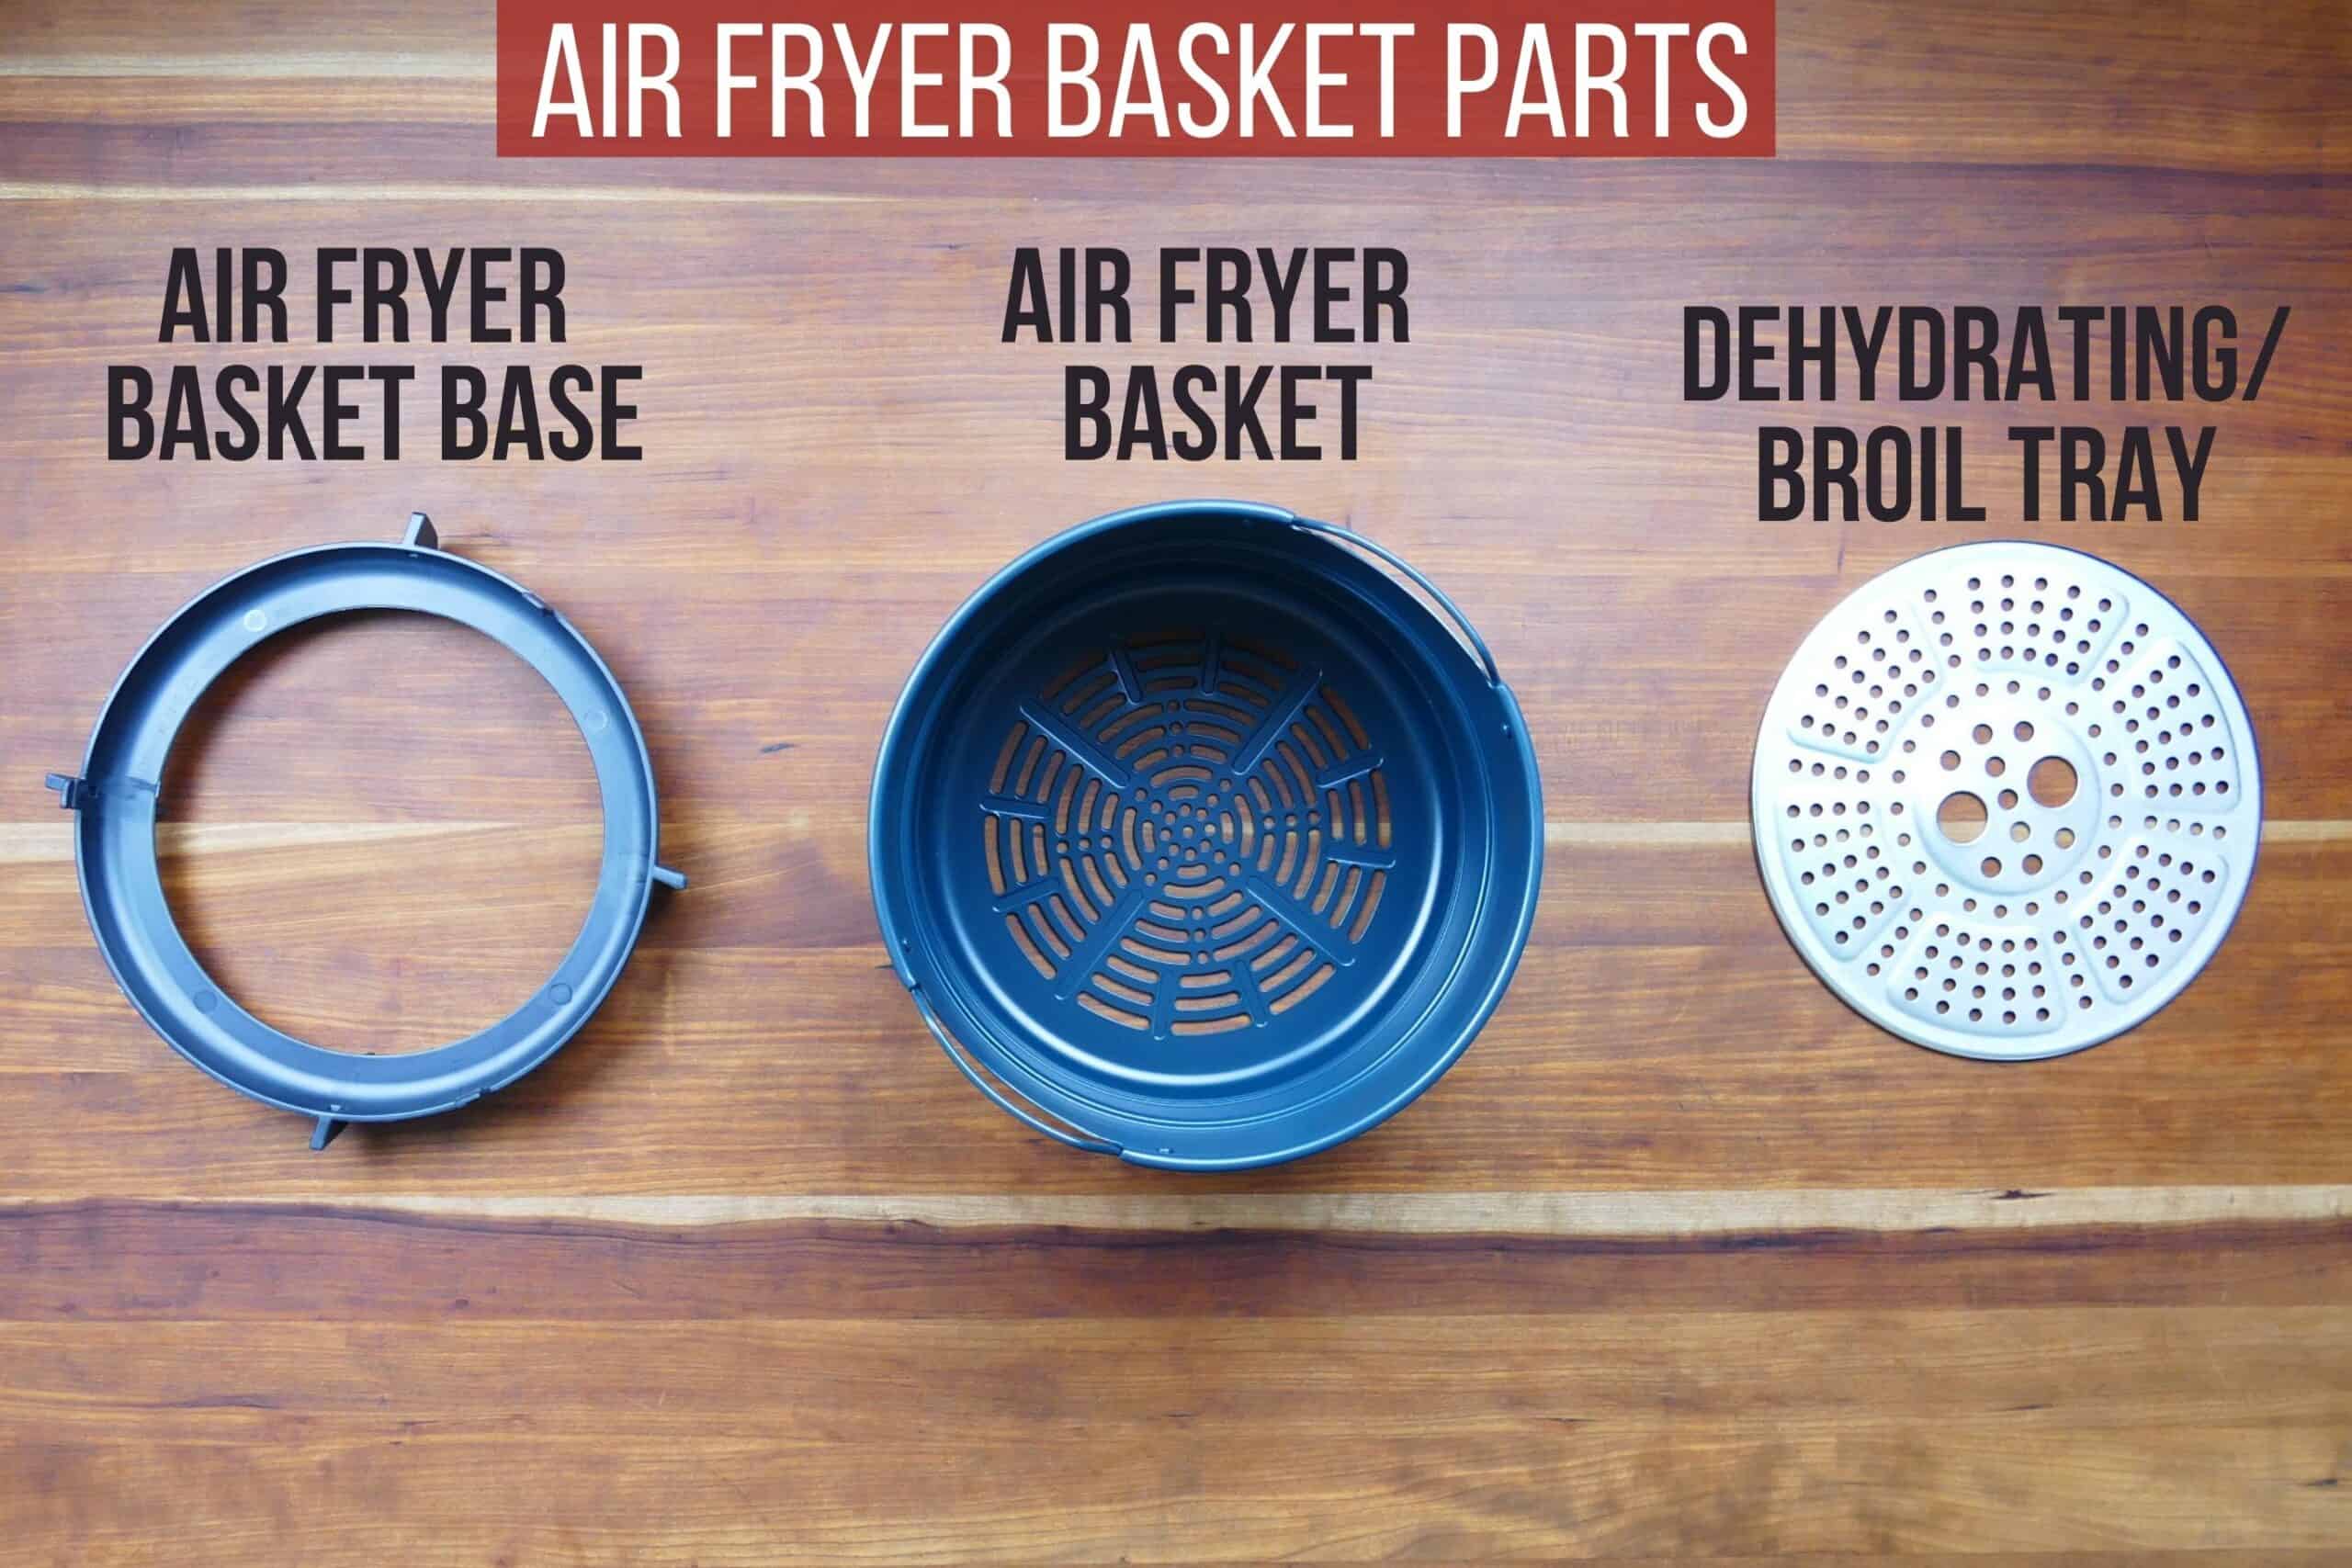
The air fryer basket is composed of the following parts:
- Air fryer basket base
- Air fryer basket
- Dehydrating / Broil tray
How to Assemble the Basket

- Place the air fryer basket upside down on a stable surface.
- Press the air fryer basket base firmly onto the basket. The teeth on the base should click into the groove on the outside of the basket.
How to Put in the Broil Tray

- Turn the basket right side up.
- Hold the broil tray by the two large holes in the middle and lower the tray into the basket. The broil tray can be used to air fry food on multiple levels.
NOTE: If you put food into the lower level and want to turn it halfway through cooking, removing the broil tray is not easy when there’s food in it.
One hack is to use a pair of bamboo tongs that are used to remove toast from the toaster. Using the tongs allows me to easily remove the tray from the basket.
Some people use a couple of wooden chopsticks to poke into the smaller holes. The size of the holes is perfect for chopsticks to sort of wedge into.
How to Store the Air Fryer Lid
How to Store the Lid While Hot

- Place the protective pad on a stable uncrowded surface, flat side up.
- Remove the air fryer lid by lifting it up. Avoid direct contact with the heating element.
- Place the lid on the protective pad till it cools down completely.
How to Store the Lid Once Cool

- Once the lid has cooled down, flip the protective pad over so the grooved side is up.
- Line up the back of the air fryer lid with the OPEN on the protective pad and turn the air fryer lid clockwise to the LOCK position.
Commonly Used Instant Pot Air Fryer Buttons
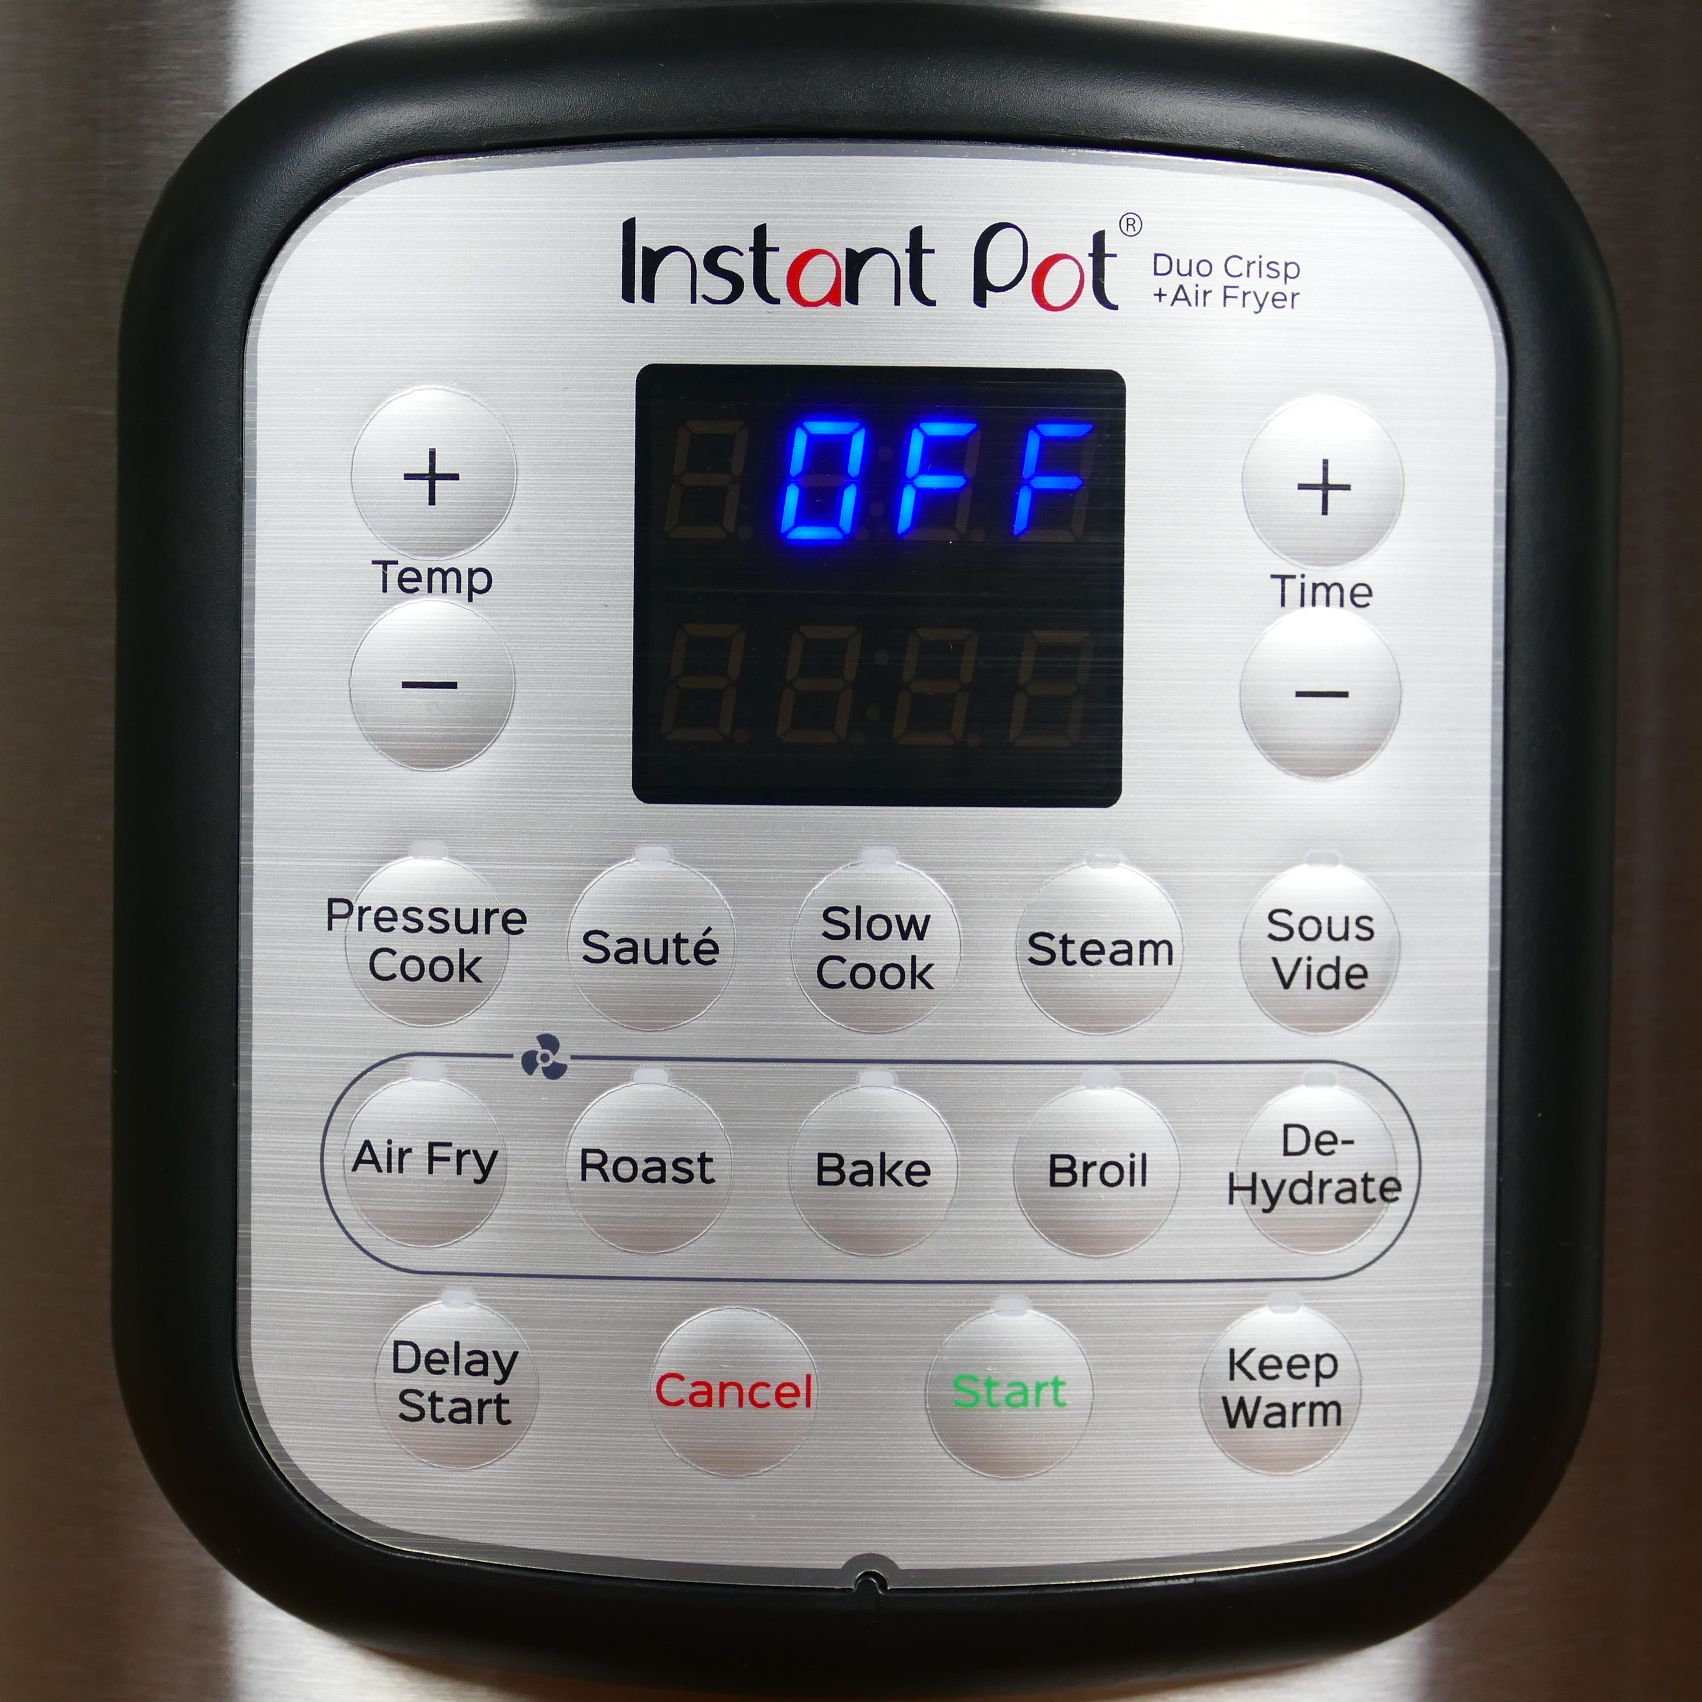
The air fryer smart programs are circled with a fan icon. They are Air Fry, Roast, Bake, Broil and Dehydrate.
One thing that’s important to understand is that the smart programs/buttons are all just presets as you have on a microwave. They are preset with optimal times and temperatures. You can use the Air Fry button to accomplish the same thing as the Bake or Broil function.
e.g. the Bake smart program is preset to 365 degrees Fahrenheit and 30 minutes. You can change these settings by using the + and – buttons. Once you change the presets, the Instant Pot will remember the new setting the next time you use that preset.
I will go over the most commonly used air fryer buttons that will allow you to get going and be able to use most of this Instant Pot’s air frying capabilities.
Cancel

Press the Cancel button to stop air frying.
Start

The Start button needs to be pressed in order to kick off the air fryer.
Temp
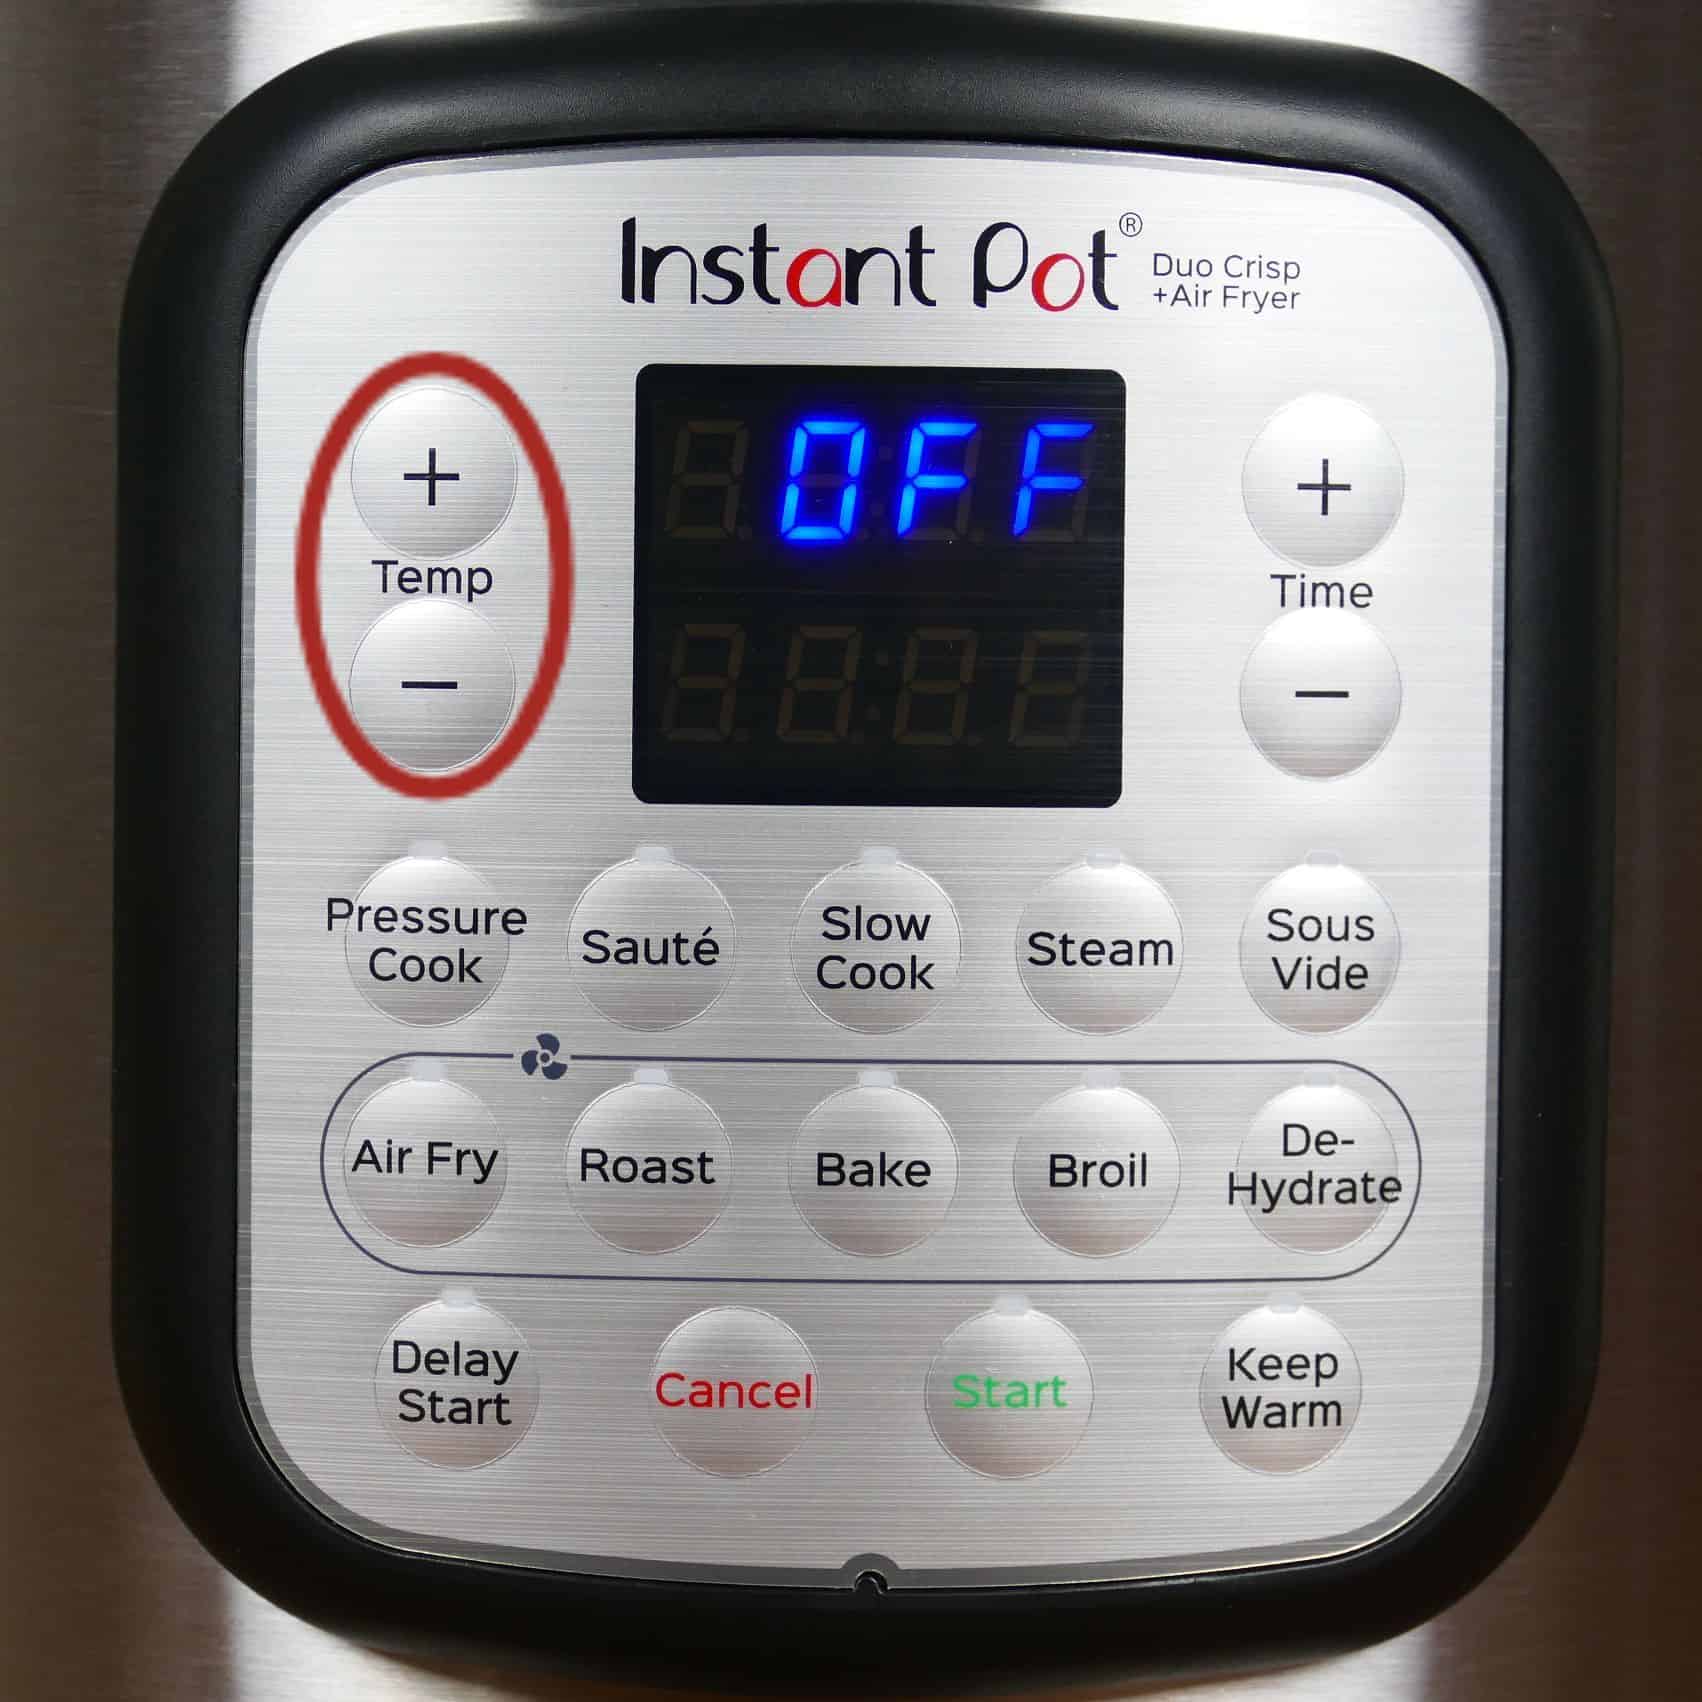
Use the Temp + and – buttons to adjust to the desired temperature. These buttons are pressed once you’ve selected the Air Fry button or one of the other smart functions (e.g. Bake, Broil, etc.)
Time
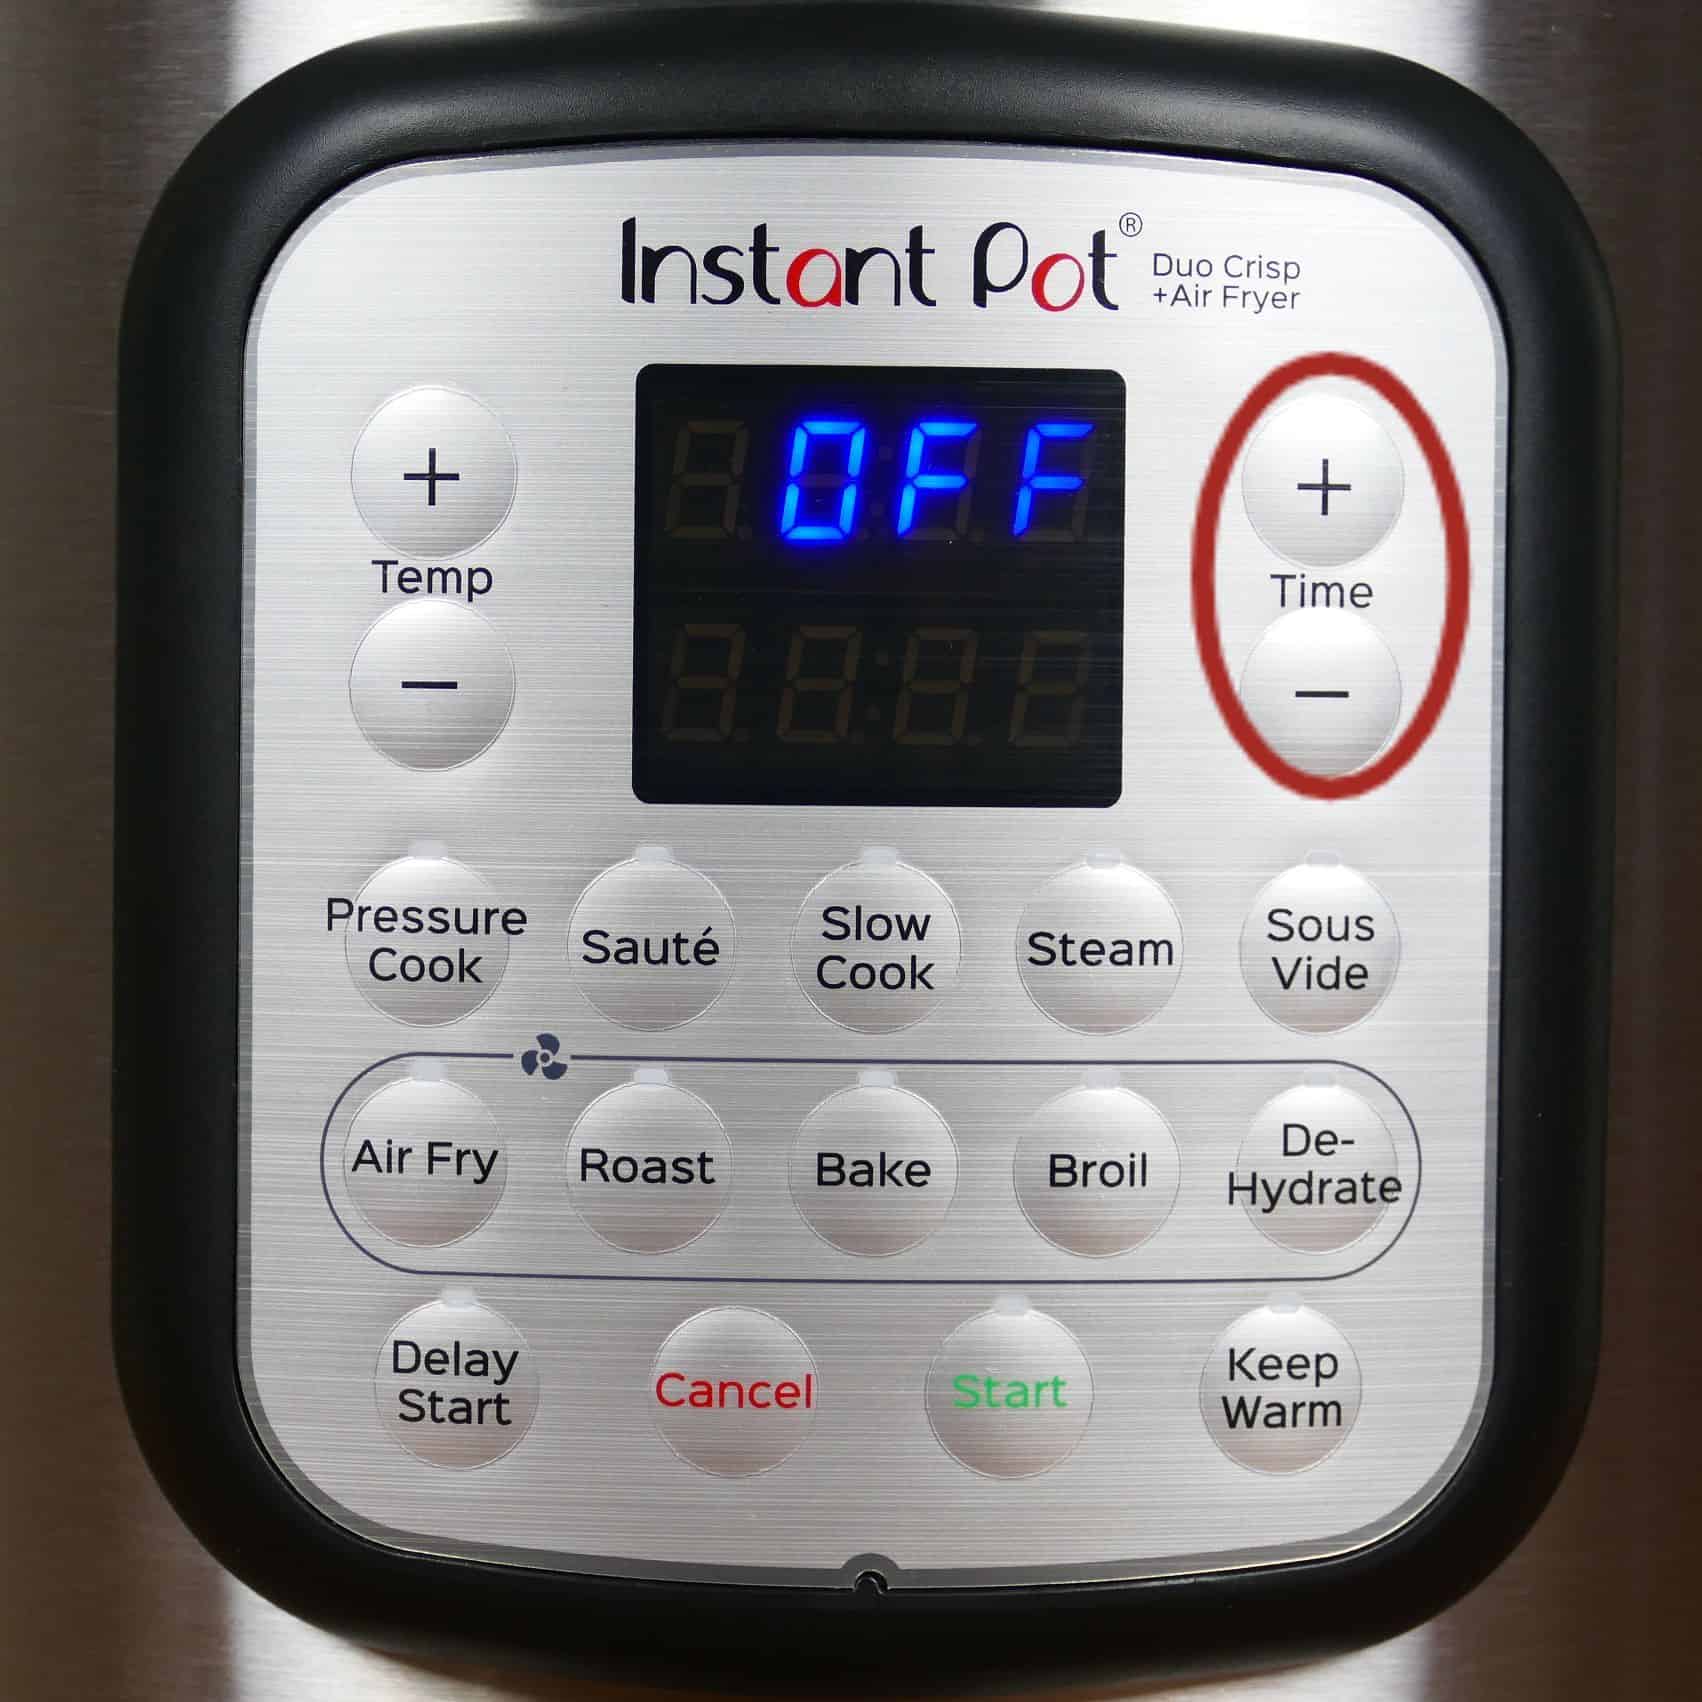
Use the Time + and – buttons to adjust to the desired cook time. These buttons are pressed once you’ve selected the Air Fry button or one of the other smart functions (e.g. Bake, Broil, etc.)
Air Fry
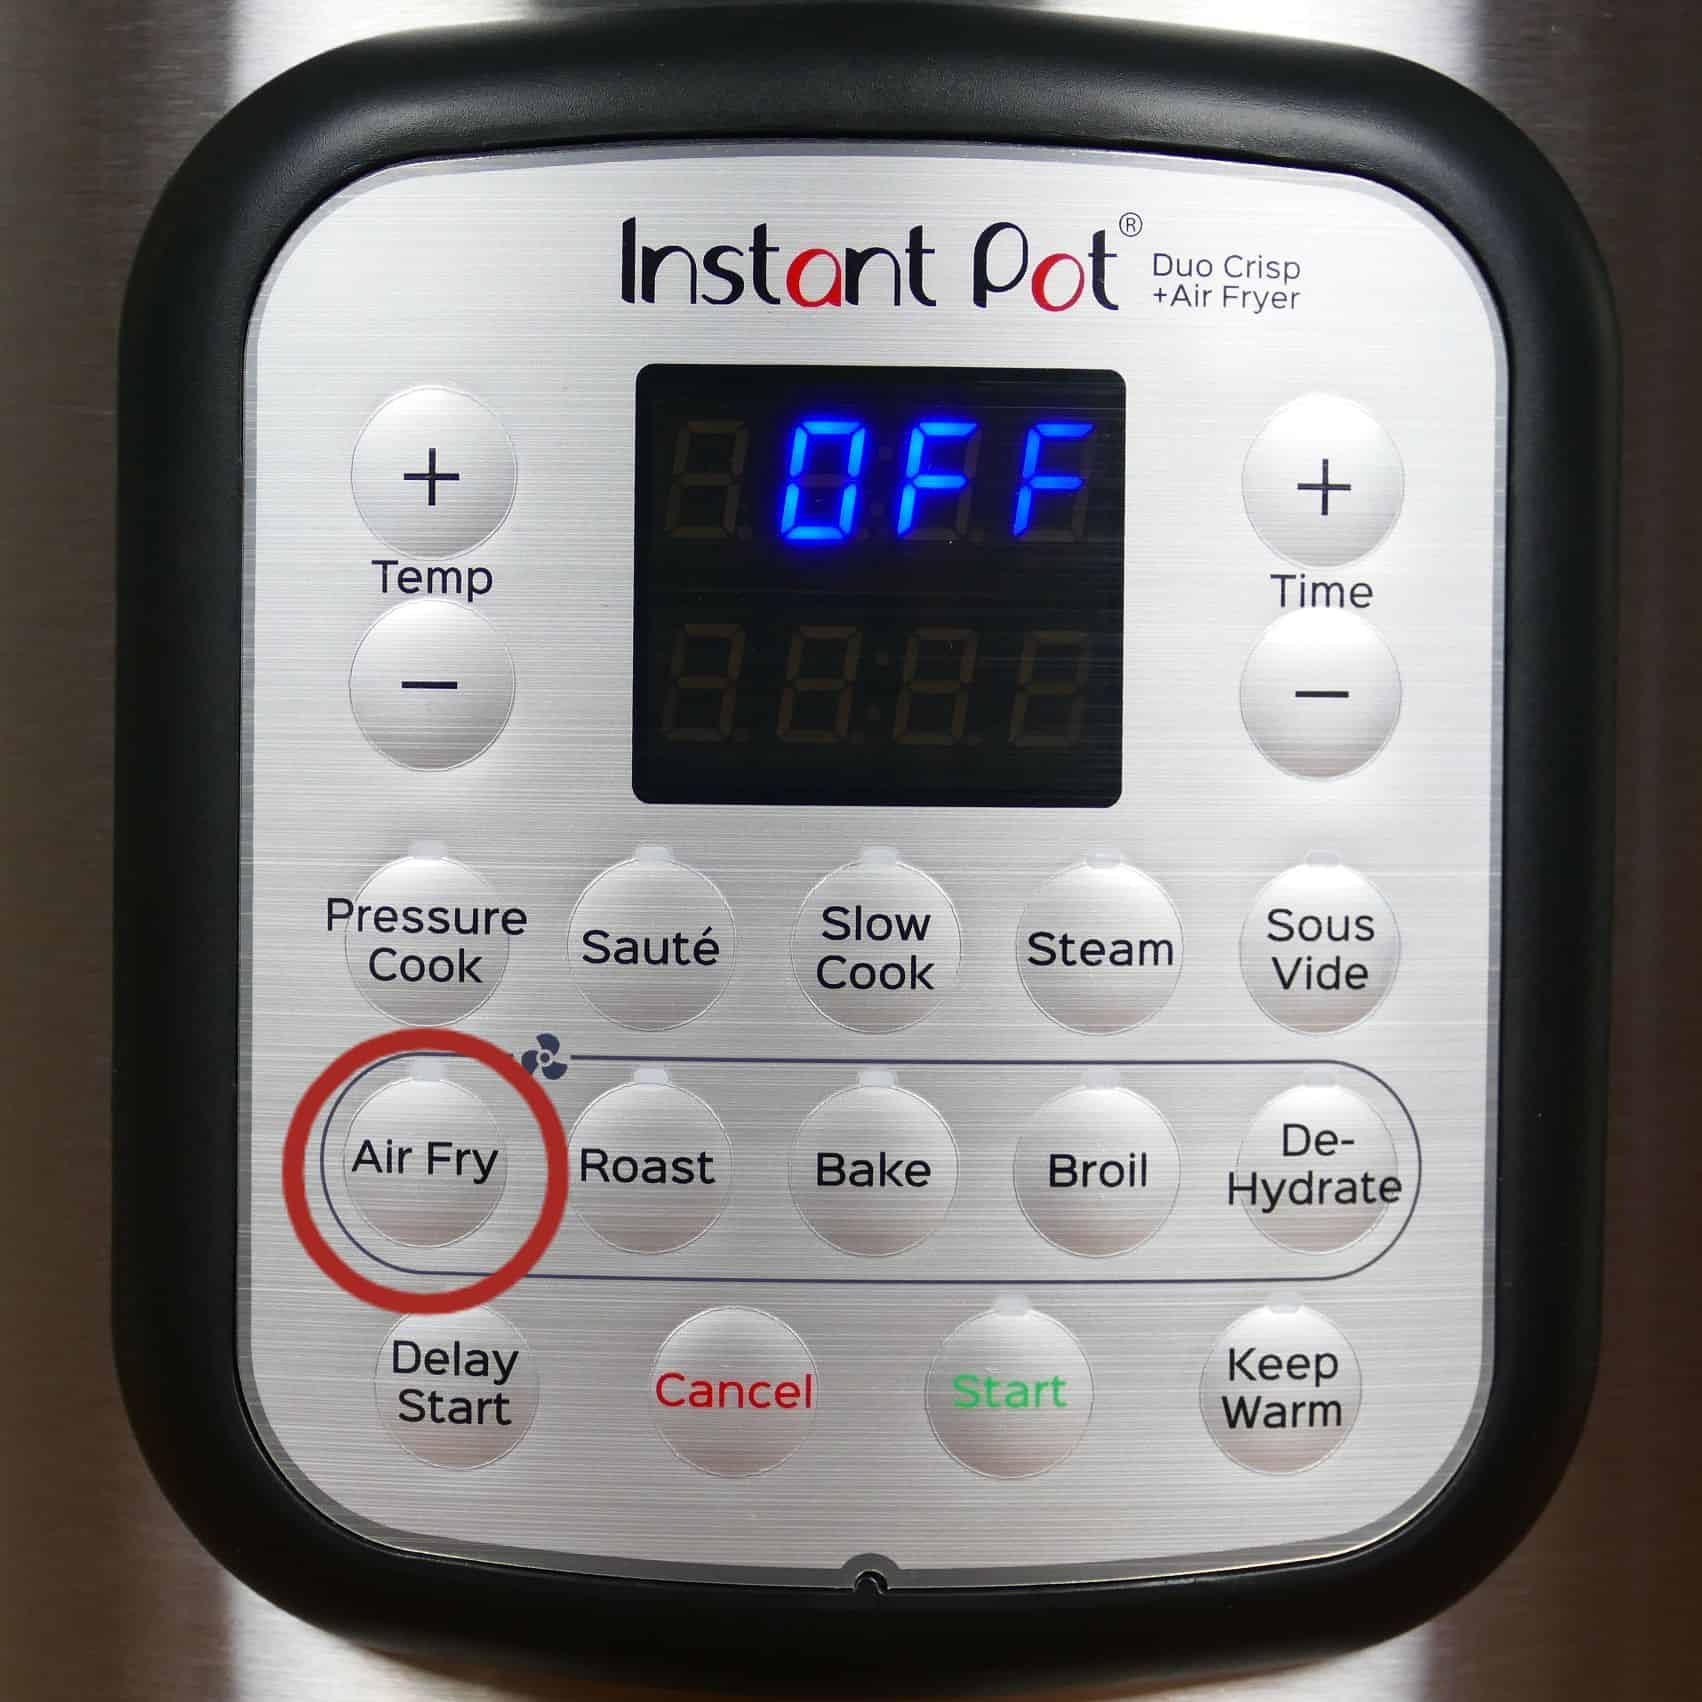
Air Fry smart program defaults to 18 minutes at 400 degrees Fahrenheit but you can change the settings.
Use Air Fry to cook frozen French fries, tater tots, vegetables, mozzarella sticks, etc.. I’ll walk you through with step-by-step instructions on using the Air Fry smart program. All the other smart programs work in a similar way. In this example, we’re cooking French fries.

- Before getting started, make sure the inner pot is in the base unit.
- Liberally coat the broil tray with vegetable oil, to prevent food from sticking. You can also use a refillable oil mister.
- Place food in the inner pot (either directly, in the air fryer basket, or in an oven-safe dish on a trivet).
- Place the air fryer lid on the base unit. You’ll know it’s correctly placed when you hear a chime.

- Press the Air Fry button.
- The display will go from OFF to the default Air Fry time and temperature. This is usually whatever the last programmed settings were.
- Set the desired Temperature and Time by pressing the associated + and – buttons.

- Once the air frying time and temperature have been set (e.g. 00:10 for 10 minutes and 400F for 400 degrees Fahrenheit), press the Start button.
- The air fryer fan will come on and the display will change to On.
- Once the Instant Pot has reached the desired temperature, the display will change from On to the temperature and time you programmed it for (e.g. 00:10 and 400F)

- The time will count down and partway through cooking (in this case 00:05), the air fryer will chime and the display will say Turn Food.
- At any point during the cooking process, you can lift the lid to check on the food, which will temporarily pause the timer and the display will say Lid.

- If you wish to turn the food, lift the air fryer lid and place it on the protective pad. **
- Turn the food using tongs or a spatula.
- Put the lid back on. The air fryer will chime and the timer will continue counting down.
** Lifting the lid pauses the timer for 3 minutes. If within that time, you don’t resume cooking, the air fryer program will be canceled. If you don’t lift the lid when the Turn Food message shows, cooking will automatically continue after 10 seconds.

- The time will continue to count down.
- When there’s 1 minute left, the time will count down in seconds.

- When the time reaches 00:00, the display will say End and you’ll hear a chime.
- Lift the lid and place it on the protective pad. The display will say OFF.
- Use silicone gloves to remove the food.
Roast, Bake, Broil, and Dehydrate
The Roast, Bake, Broil, and Dehydrate smart programs all work in the same way as the Air Fry smart program. Press the button, program the temperature and time (if you wish to change the default), and press Start.
Roast – (default 40 minutes, 380 degrees Fahrenheit). Use to roast chicken, steak, or other meats.
Bake – (default 30 minutes, 365 degrees Fahrenheit). Use to bake cakes and anything that you would normally bake in the oven. Check out my air fryer pound cake recipe – it’s so good!
Broil – (default 10 minutes, 400 degrees Fahrenheit). Use to crisp up the top of foods. I use this function to crisp up Teriyaki Chicken Wings, Jamaican Jerk Chicken or Thai Chicken (Gai Yang) after pressure cooking.
Dehydrate – (default 6 hours, 125 degrees Fahrenheit). Use to dehydrate foods to make fruit leather, beef jerky, or veggie chips.
The Air Fry and Roast buttons give you the message Turn Food halfway through the cooking cycle. The other functions don’t have that message.
Tips for Success with Air Frying
- Avoid foods dipped in batter. If you want to coat the food, use an egg wash and breadcrumb coating.
- Make sure there’s enough space around the food to allow the air to circulate. Avoid overcrowding.
- Place food in a single layer. You can use the multi-level air fryer basket to have two layers of food. Note that the broil tray is cumbersome to remove, especially when hot. So avoid putting food that needs to be turned over, in the lower tier.
- Pat food dry before air frying. This is especially applicable to vegetables – it gets them crisp.
- Coat the air fryer basket with vegetable oil before adding food.
- Spray the food with a spritz of vegetable oil. Be liberal – this keeps it from sticking! No matter how much you spray, it won’t come close to how much you’d use to fry the food. But there is such a thing as too much oil – you don’t want the oil to drip into the inner pot.
- Spray the food halfway through cooking, if needed. This ensures crispness.
- Don’t use canned nonstick cooking spray because it has ingredients that can damage the coating of the air fryer basket. Instead, use a refillable oil spray bottle.
- You can also use parchment paper rounds to line the air fryer basket. This helps prevent sticking. I like to use the kind with precut holes that allow the air to circulate. You can also cut up parchment paper into rounds and poke some holes in them.
- Make sure food isn’t piled so high that it touches the heating element.
- For best results, preheat the air fryer lid before adding food. This isn’t absolutely essential but recommended.
- Don’t be afraid to check on the food by lifting the lid up any time during the cooking process. The timer will pause for up to 3 minutes.
- Depending on the type of food, turning the food partway through air frying cooks it evenly.
- Don’t use a nonstick ceramic-coated inner pot; use only stainless steel.
- Purchase some small baking pans and oven-safe dishes to be able to make your favorite oven recipes in the air fryer.
- Cook frozen foods at 400 degrees Fahrenheit, but keep an eye to make sure they don’t burn.
- Reheat foods at 350 degrees Fahrenheit (preheating is recommended). The amount of time will vary depending on the food but start with 3 to 5 minutes. The air fryer does a great job reheating fries, pizza, nuggets, etc. It’s much better than microwaving them.
- Clean the inner pot and air fryer basket after use. This prevents stuck food particles from getting charred the next time you use the air fryer lid.
- If you’re trying to decrease your intake of desserts and sweets, use the air fryer to make smaller quantities of your favorite desserts e.g. you can bake just a few cookies – less temptation!
- Finally, use trusted recipes. I plan to share recipes for the Instant Pot air fryer lid, so stay tuned! For now, check out this recipe for Instant Pot Air Fryer Chicken Wings!
Instant Pot Duo Crisp Error Codes
If your Instant Pot Duo Crisp display screen starts blinking with an error code, here are the common codes and how to troubleshoot them.
Instant Pot Error Codes:
| ERROR CODE | PROBLEM | SOLUTION |
|---|---|---|
| Lid | Lid is not in the correct position for the selected program | Make sure the lid has been turned clockwise all the way when pressure cooking, and make sure the lid is NOT on for Saute function |
| The wrong lid is being used for the selected program. | Make sure the air fryer lid is being used for the air fryer smart program and the pressure cooking lid is being used for pressure cooking smart programs. | |
| Food Burn | High temperature detected at bottom of inner pot | Find out why you’re getting the Food Burn message and follow the directions on how to fix it. |
| PrSE | Pressure has accumulated during a non-pressure cooking program | Press the steam release button until it clicks into place and allows steam to be released. |
| noPr | Working pressure is not reached during the pre-heating cycle. | If the lid is leaking steam, find out why the Instant Pot is not sealing. If there is no steam leaking and you have frozen food in the Instant Pot, try restarting the current program. |
| C1 | Faulty temperature sensor | Create a support ticket with Instant Pot customer service. |
| C2 | Faulty temperature sensor | Create a support ticket with Instant Pot customer service. |
| C5 | Temperature is too high either because the inner pot is missing or there’s not enough liquid in the inner pot | Make sure the inner pot is placed properly in the base unit and make sure there is enough liquid in the inner pot – the recommended amount is a minimum of 2 cups. |
| C6 | Faulty pressure sensor | Create a support ticket with Instant Pot customer service. |
| C6L | Faulty low-pressure sensor | Create a support ticket with Instant Pot customer service. |
| C6H | Faulty high-pressure sensor | Create a support ticket with Instant Pot customer service. |
| C7 | Not enough liquid | Add 2 cups of thin, water-based liquid to the inner pot. |
| Steam release is in Vent position | Flick the steam release button/knob clockwise to Seal. | |
| Saute function is too hot | Change the Saute temperature level to Low or press Cancel every so often to cool the Instant Pot down while sauteing. |
✅ Why Trust Neena at Paint the Kitchen Red?

I’m Neena, and I have a lifetime of experience working with pressure cookers. I know how to maximize the potential of a pressure cooker to consistently produce delicious and easy meals. With my Instant Pot expertise, I can provide valuable insights, troubleshooting advice, and innovative recipe ideas so you can trust me on all things Instant Pot!
➡ New to the Instant Pot? Get my Instant Pot instructions for beginners.
Duo Crisp Air Fryer Recipes to Try


If you found this article to be helpful, please share it on social media using the social media share buttons at the top and bottom of this post. Thank you so much!




Leni says
Hallo Neena,
Instant Pot should employ you to write their manuals; you do a much better job!!
Just a small question: can the lid(pressure cooker) be washed in the dishwasher? The safety, maintenance and warranty book is not very clear! It seems like you can remove all the parts and then it can be washed in the dishwasher, but I’m a little afraid to do that without making sure.
Thanks so much for your help!
Paint the Kitchen Red says
Hi Leni, thank you for the kind words. Yes, you can wash the lid in the dishwasher. I also put the small parts into a small compartment in the dishwasher and wash them and the sealing ring too in the top rack.
Beverley Donald says
Hi.
Thanks so much for your beginners manual and video. Very informative and helpful.
Could you please post a pic of the cheat sheet as I didn’t get one in the box.
Paint the Kitchen Red says
Beverley, I don’t think the Instant Pot cooking time cheat sheet with pictures is shipped with the Duo Crisp. However, you can look at my post on Instant Pot cooking times.
Chris says
I try to use my air fry top. It’s securely fit but when I press start it keeps flashing POT ??? I refit the top several times securely I pressed it down to make sure it was secure and it is as secure as I can get it. Please help?
Paint the Kitchen Red says
Hi Chris, make sure you have the inner pot in place. You cannot operate the air fryer without it. If it’s in place, then I’m sorry to say that your only option is to contact the company.
Anne Albano says
There’s a black kind of ledge thing on the back bottom of my Duo Crisp. It looks like it has something to do with storing the cord, but I can’t quite figure it out. What is it for? (This is not the white condensation collector!)
Paint the Kitchen Red says
Anne, as far as I can figure out that’s to guide the cord to get it out of the way.
Archana says
Hi Neena,
Thank you for this information.
I have a query though. I have recently purchased an instant pot duo crisp which has an air fryer lid as well.
Can I use the ceramic non-stick inner pot with Instant pot duo crisp model? (I understand that it is not compatible with the air fryer lid). But is it ok if I use it with the other lid for pressure cooking?
Thanks for your this useful post ,
Best regards,
Archana
Paint the Kitchen Red says
Hi Archana, thanks for your question. Yes, you can use the ceramic pot to pressure cook but not air fry.
Melody says
Just bookmarked this, I feel more confident after reading it and I know I’ll want to refer back. Can’t wait to check out some of your recipes! Thanks so much🙂
Paint the Kitchen Red says
Good luck and hope you enjoy my recipes!
Gwen Lindsey says
I’m considering purchasing the IP Duo Crisp Fryer, but I’m concerned about the Fryer Basket Base. It’s made of some kind of plastic, I believe. Do you know the actual material name? Silicone, or plastic X, or – other? And as I would rather not put a plastic piece in the IP during cooking, is this base part really necessary? Could I substitute something else for the same purpose (whatever that is!)? Thanks.
Paint the Kitchen Red says
Hi Gwen, that’s a great question. The base on mine is made out of plastic indeed but I don’t know the exact material. Maybe the company could give you more information. The base is meant to lift the basket above the bottom of the inner pot to allow for air to circulate. I think you could use a metal rack instead.
Gwen Lindsey says
Thank you so much. The IP site has a user comment; that person says it’s “PET” plastic. A quick Wikipedia check and I find “Polyethylene terephthalate”, which is a complicated substance, to say the least. I can’t find an IP-specific description. I’m disappointed in the lack of transparency by IP. Thank you for the metal rack idea!
Lisa says
Thank you so much- this is the best set of instructions I’ve found to date and way better than what comes with the appliance!
Paint the Kitchen Red says
Thank you, Lisa – I’m glad to help!
Lynne says
Thank you for your wonderful and clear instructions. You gave me enough confidence to try the air fryer. I made chicken tenders and they were moist and crispy. I will try different seasoning in my flyer next time. I only used salt & pepper. My 2 questions are how do I clean the sticky residue inside the air fryer basket after I used it? I have it soaking in soapy water for a second time. And second, I did not get the rack that fits into the air fryer basket. Does that come separately? Thank you for your advice and great instructions!
Paint the Kitchen Red says
Hi Lynne, glad you found it helpful. I do what you do and soak it for a bit and it comes clean pretty easily. It’s supposed to be dishwasher safe (top rack) but I just hand wash. The metal rack with holes that forms the second layer of the basket comes with the IP. I would contact the company to see if they can send you one.
Lynne says
Thank you for getting back to me. I will attempt to get in touch with the company for the rack.
Helen says
You saved the day! I just got the Duo Crisp for Christmas, and have been trying new recipes. After a saute, it was time to pressure cook. I couldn’t figure out how to turn pressure cook to low! I was so glad to find this tutorial at the crucial time! After dinner, I read the whole thing. So, so helpful!! Thank you! Like others, I found the manual only minimally helpful.
Paint the Kitchen Red says
Helen, thank you for taking the time to comment – happy to help!
Jacqui says
Thank you. As above comments, best tutorial I’ve found. Actually feel I can start to use my instant pot duo crisp + air fryer now. Very grateful
Paint the Kitchen Red says
Jacqui – thank you for your comment – happy to help!
K.J. says
Never mind – when I plugged it in, it beeped as it should. K.J.
K.J. says
Absolutely clear and well written post. Makes it seem so much easier – can’t wait to get stared with mine.
One issue I am having is with the power and sensor connector not making a solid connection. Is that some kind of cover on the female connector on the base? Maybe I just need a bit more muscle?? Any advice?
Thanks again for the great post.
Paint the Kitchen Red says
You’re very welcome – glad to hear that you figured out the issue.
Marty says
awesome tutorial. Like others i found the manual it came with fairly useless. I really appreciate you doing this!
Paint the Kitchen Red says
Thanks for commenting – I’m happy to help out!
Emily Dowal says
Thank goodness I found this post! I was one of those people who has been too intimidated to use mine. The instruction manual it comes with does not go into enough detail and almost makes things more confusing! Your details and instructions are so much clearer and easier to follow so I’m ready to give this a whirl! Thank you!
Paint the Kitchen Red says
So glad to hear this, Emily! Thank you for taking a moment to comment. Hope you enjoy your duo crisp as much as I do.
Davina says
The best write-up I have found on the internet for the Instant Pot Duo Crisp + Air Fryer. Thank you for taking the time and making the effort to provide such a clear and detailed write-up.
Paint the Kitchen Red says
Thank you so much, Davina, for taking the time to provide this wonderful feedback. It’s my pleasure to provide this detailed info!
Elena says
Bună seara! Am primit cadou de la fiul meu aceasta oala de 8 litri si sincer nu am incercat foarte multe la ea deoarece nu eram sigura cum functioneaza. Cu ajutorul dvs voi sti de acum . Însă am o intrebare: cum se foloseste acel grătar simplu sau pus direct în oala (este vorba de cel de sârmă) nu de sita si la ce il pot folosi? Multumesc
Paint the Kitchen Red says
Translation of original message: “Good evening! I received this 8 liter pot as a gift from my son and honestly I didn’t try much on it because I wasn’t sure how it works. With your help I will know by now. But I have a question: how to use that simple grill or put directly in the pot (it is the wire one) not the sieve and what can I use it for? Thanks”
My answer: Bună ziua, acest mesaj este tradus de Google Translate. Rack-ul se numește rack de aburi sau trivet. O folosești pentru a crește mâncarea atunci când vrei să o aburi. Îl puteți folosi pentru a face ouă (am o rețetă pe site-ul meu: Ouă Instant Pot) sau dacă doriți să preparați orez în ghiveci sau alte rețete folosind metoda: Instant Pot Pot-in-Pot). Sper că asta ajută.
“Hi there, this message is being translated by Google Translate. The rack is called a steam rack or trivet. You use it to raise up food when you want to steam it. You can use it to make eggs (I have a recipe on my site: Instant Pot Eggs) or if you want to make pot-in-pot rice or other recipes using the method: Instant Pot Pot-in-Pot Cooking). Hope that helps.”
Susan says
Does the air fryer basket base go into the inner pot also?
Paint the Kitchen Red says
Susan, yes you attach the base to the basket and put the whole thing in.
Amina says
Wonderfully clear post! I have recently purchased this and was a bit hesitant to start–you have got me excited and experimenting! My two sons are also planning what to cook and have now got designated cooking days–what a win!
Paint the Kitchen Red says
Thanks for your comment, Amina. Hope you enjoy using it. I LOVE that I can use it in the summer without heating up the house like an oven does. It’s so wonderful that you have the family involved with cooking!
Sandy says
I bought this because I can air fry and pressure cook. In my haste to purchase, I did not realize it does NOT have all the options of my 6 qt Instart pot. Mostly yogurt and polenta making. Any suggestions on how to do these with the Duo Crisp + Air fryer
Paint the Kitchen Red says
Sandy, use the sous vide function to incubate yogurt. See my recipe https://www.paintthekitchenred.com/instant-pot-cold-start-yogurt-fairlife-yogurt/ and go to the step by step instructions from the table of contents. You’ll see specific instructions for the Duo Crisp. If you have further questions, let me know. Which function do you use in your 6-quart for polenta? I can suggest an alternative if you let me know.