

This Instant Pot Cold Start Yogurt is the easiest homemade yogurt recipe ever! Use the Instant Pot cold start or no boil method to make thick and creamy yogurt using ultra-pasteurized milk; Fairlife brand is best. There’s no need to heat or boil the milk. Just add the yogurt starter to the milk and let it incubate (ferment).

Table of Contents
Introduction
I grew up in a household where yogurt was made fresh every single day and still is. The yogurt starter culture my mom uses has been passed down through generations and yogurt is part of every lunch and dinner.
So, how does yogurt form? Yogurt is formed when the bacteria (in yogurt starter) feed on the milk sugar in the milk to form lactic acid, and that causes the proteins in the milk to thicken. The lactic acid gives yogurt its tang.
You only need two ingredients to make yogurt: milk and yogurt culture. The yogurt culture or starter provides the spark to get the milk to change into yogurt. The starter can be commercial store-bought yogurt or freeze-dried yogurt culture.
There are a few ways to make yogurt in the Instant Pot. The traditional way to make yogurt is to boil the milk, let it cool, stir in yogurt starter and let it ferment. I’ve shared this method, with a twist, when I showed you how to make Instant Pot yogurt in individual jars.
Another way to make yogurt is to skip the boiling and cooling, and add yogurt starter directly into cold milk.

In this recipe, I’ll be sharing with you the second method, which I discovered through the Instant Pot Facebook group. It’s known as Instant Pot Cold Start Yogurt and I love making Instant Pot yogurt using cold start because the yogurt is so thick and creamy and the recipe is easy and fool-proof.
Pasteurized vs Ultra Pasteurized Milk
The regular Instant Pot yogurt recipe (the boil method) uses pasteurized milk. However, with the cold start Instant Pot yogurt method, you’ll be making yogurt with ultra pasteurized milk (preferably also ultra filtered.)
So why does making Instant Pot yogurt the no boil way require ultra pasteurized milk? It’s because pasteurized milk has native cultures (bacteria) and since you’re not boiling the milk, the native cultures would compete with the yogurt cultures, resulting in thin or runny yogurt.
If you’re wondering what the difference is between pasteurized, ultra pasteurized, and ultra filtered milk, here’s a quick summary:
Pasteurized Milk
Pasteurized milk undergoes a High Temperature Short Time (HTST) pasteurization process. HTST pasteurization heats the milk to 161 degrees Fahrenheit for 15 seconds and then rapidly cools it to 39 degrees.
This pasteurization or sterilization process removes contamination and eliminates common bacteria that are harmful to humans such as salmonella, listeria and E. Coli. But it doesn’t remove all (non-pathogenic) bacteria.
Ultra Pasteurized Milk
Ultra-High Temperature (UHT) pasteurized milk is heated to about 280 degrees Fahrenheit for just 2 seconds and is then quickly chilled back to 39 degrees.
This process removes the remaining non-pathogenic bacteria, which gives the milk a later sell-by date and lasts longer in the fridge before you open the carton. Once you open the container, the life of the milk is the same as pasteurized milk.
Ultra Filtered Milk
Ultra-filtered milk goes through a very fine filtration system that concentrates the milk. Lactose is filtered out, leaving behind lactose-free milk that has more concentrated protein and lower sugar.
Tips and Substitutions
Fairlife vs other brands
This cold start yogurt recipe requires ultra pasteurized milk. Although not essential, if the milk is also ultra filtered, you’ll get thicker yogurt. Fairlife milk is the brand that I use because it’s ultra pasteurized AND ultra filtered, which gives it a high protein content. The higher protein makes the Fairlife yogurt thicker and creamier.
There are three kinds of Fairlife milk: the red bottle is whole milk, the blue bottle is 2% milk and the light blue bottle is 1% milk. All three have high protein levels but due to the fat content, whole milk will give you the thickest yogurt, and 1% milk will be slightly thinner.
You can use other brands of ultra pasteurized ultra filtered milk. Try and find one with a protein content like Fairlife (13 grams per cup).
If the brand you’re using (e.g. Horizon Organic, Organic Valley, Costco Kirkland, etc.) has a lower protein content, there are a few things you can do to ensure success:
- Incubate the yogurt for a longer period of time (about 12 hours).
- Add in about ¼ to ⅓ cup of nonfat dried milk (powdered milk).
- Strain the yogurt through a cheesecloth or cheescloth bags after the incubation period.
Yogurt Starter
Yogurt starter is the catalyst that converts the milk to yogurt. I like to use plain yogurt as my starter. Vanilla yogurt also works fine.
Some flavored yogurts can have fewer active live cultures and may contain ingredients that can interfere with the fermentation, so I avoid using them as a starter. Besides, using flavored yogurt as your starter won’t yield a flavored yogurt.
The different brands of yogurt produce different levels of tartness when used as a starter. My advice is to use the brand of yogurt that you like the taste of.
Some are acidic, while others are sweet or mild. I find Fage, Yoplait Oui and Noosa to be on the milder side. Siggi’s and Chobani are a bit more tart.
Once opened, the yogurt starter should be used up within 7 days. Beyond that, the effectiveness of the culture diminishes. The fresher the yogurt, the better the results.
Once you’ve made your first batch successfully, you can set aside a few tablespoons of that yogurt as your starter for the next batch. You can successfully keep this going for a few generations. Some people keep it going for years and others have to restart after 3, 5 or 10 generations.
Yogurt can be frozen by the tablespoon in an ice cube tray. So you can make many copies of that first generation and get quite a few batches of yogurt from it. Just be sure to fully thaw the yogurt before using it as a starter.
You can also purchase powdered yogurt cultures, which are just freeze-dried yogurt. These yogurt starters can be stored in the freezer. Although I’ve not used them to make no-boil or cold start yogurt, I know people are successful with them.
Here are some more tips on how to care for your yogurt culture.
Covering the Inner Pot
You can cover the inner pot with any of the following:
- The Instant Pot lid *
- Instant Pot silicone cover
- Instant Pot tempered glass lid
* If you’re concerned about the smell of the sealing ring transferring to the yogurt, you can remove the sealing ring. The Instant Pot doesn’t reach pressure, so the sealing ring isn’t necessary. The steam release can be on Sealing or Venting. It doesn’t matter.
Some people like to put a clean paper towel below the lid to capture condensation:
Making Greek Yogurt
To make a thick Greek-style yogurt, refrigerate the yogurt until set. Transfer the yogurt to a fine-mesh strainer, cheesecloth bag, or colander lined with cheesecloth, and let the whey drain into a bowl for several hours. The whey is full of probiotics and healthy nutrients. Here are some ideas on what to do with the whey.
Additions
Any of the following ingredients can be added to the milk before the incubation process. However, for your first time, try and keep it simple.
- Nonfat dried milk
Add ¼ to ⅓ cup of nonfat dried milk to the liquid milk to get thicker yogurt. This is especially useful if the protein content of your milk is lower than Fairlife’s. - Heavy cream
Add ½ cup of heavy whipping cream to the milk to get a thicker consistency of yogurt. - Sweetened condensed milk (SCM)
Sweetened condensed milk added to the Fairlife milk makes for such a delicious treat! I use Carnation or Eagle brand SCM. Thoroughly stir the SCM into the milk to get thick and creamy sweet yogurt. - Vanilla extract
I add one teaspoon of vanilla extract to the milk for a dash of extra flavor. - Spices
For added flavor, stir in ½ teaspoon of your favorite spices such as cinnamon or cardamom to the milk. The spices may rise to the top upon fermentation, but they can be stirred back in. - Dairy creamer
Add about 1 cup of milk-based creamers such as Chobani or Natural Bliss coffee creamer to the milk for additional flavor. Don’t use a non-dairy creamer.
FAQS
Needs More Time
Proper fermentation requires time. Yogurt takes anywhere from 6 to 12 hours to set. You may just need to let it ferment (incubate) for a bit longer. If you’re using a brand other than Fairlife or if you’re using organic milk, you might need to add a few hours to the fermentation time e.g. 12 hours of fermentation.
Starter Too Old
If you’re using an opened container of commercial yogurt, it could be too old. The longer an open container of yogurt sits in the fridge, the weaker the live cultures.
Starter Not Potent
If you’re using yogurt set aside from a previous batch (recultured yogurt) it can start to be less effective after a few generations. At that point, you should buy a fresh container of starter yogurt.
Using the Less Setting
The Instant Pot Yogurt smart program has multiple settings. Some models have three settings: Less, Normal and More. The Less setting is for Jiu Niang (fermented glutinous rice) and won’t work for yogurt. The More setting is for boiling the milk (used with regular milk). For this Instant Pot yogurt with Fairlife, you need to use the Normal setting which is for fermentation. If you’ve accidentally used the Less mode, switch it to Normal and start the fermentation again.
Quantity of Starter Too Little
You may have added too little of the yogurt starter. You’ll probably end up with a good result if you let it ferment for a bit longer.
Quantity of Starter Too Much
You may have added too much starter. A heaping tablespoon of yogurt per quart (4 cups) of milk is enough. Although you might think that more is better, this isn’t quite true. In fact, less is more. If you add too much starter, you’ll crowd out the bacteria and it will run out of food to ferment. You can end up with runny yogurt.
Wrong type of milk
You may have used regular pasteurized milk and not ultra pasteurized milk. If you want to use pasteurized milk, you need to use the method used in my Instant Pot yogurt recipe where you boil the milk first.
Inner Pot isn’t Clean
The Instant Pot inner pot could be contaminated. Always make sure that you start the fermentation in a clean and sterilized inner pot. Also make sure that any utensils you use are clean and dry. And watch out for soap residue.
Instant Pot is Running too Warm or too Cold
Measure the temperature of the milk/yogurt in the Instant Pot and make sure it’s at approximately 110 degrees Fahrenheit. If it’s much higher or lower, you may be using the Less or More setting or there may be an issue with the Instant Pot.
Artificial Thickeners
Purchased yogurt can have artificial thickeners, so it may not be a fair comparison. Next time you make cold start yogurt, add nonfat dried milk to the milk.
Less Protein in the Milk
Fairlife milk produces fairly thick yogurt due to the protein content. The higher the protein and fat content of the milk, the thicker the yogurt. If you’re using a brand other than Fairlife, the protein content might be too low. You can strain the yogurt through a cheesecloth to get thicker yogurt. Or add nonfat dried milk to the milk next time.
Less Fat in the Milk
If you’re using lowfat or skim milk, the fat content may be causing the issue. Try adding nonfat dried milk to thicken the yogurt in your next batch.
Needs to Chill
Yogurt also thickens up quite a bit once it’s chilled. So if the yogurt is set but still jiggly, putting it in the refrigerator might make it thicker.
Whey Has Formed
Whey is the thin liquid the rises to the top of yogurt. Whey formation is normal. Whey has probiotics and nutritional benefits. Lower fat milk can cause more whey and some yogurt cultures form more whey. You can either stir it in, drain it off, or strain it.
Generally, the type of starter you use contributes to the flavor of the yogurt. If you’re using a tart starter, the resulting yogurt will also be tart. Try and buy a starter yogurt that you like the taste of.
The longer you ferment the yogurt, the tarter it gets. Next time, try and remove the yogurt an hour or two earlier.
After about 9 hours of fermentation, use a clean spoon to remove some yogurt (without disturbing the yogurt) to see if it’s tart enough and thick enough.
If it’s not quite ready, program the Instant Pot to ferment for a few more hours. The longer the yogurt incubates (ferments), the tarter it gets. If it’s been fermenting for less than 12 hours, it might thicken up with more time.
If the yogurt is too tart or sour, you can reduce the fermentation time in your next batch by an hour or two.
Using commercial yogurt that has additives can cause the resulting yogurt to be grainy. Try and stick to plain yogurt without any flavorings.
I’ve found that add-ins such as vanilla or spices can sometimes make the yogurt grainy. Fully incorporating these ingredients into the milk with a whisk can help reduce graininess.
Yogurt can be stored in the refrigerator for 2 to 3 weeks. You can store it in the freezer for up to 3 months.
If your Instant Pot has a Sous Vide button, use it to set the temperature to 110 degrees Fahrenheit.
If you’re new to the Instant Pot and aren’t familiar with how to use it, you might find it helpful to first read one of the following guides and then come back here to learn how to make this recipe.
- General Instant Pot Instructions for Beginners
- Instant Pot ULTRA Beginner’s Manual
- Instant Pot DUO EVO PLUS Beginner’s Manual
- Instant Pot DUO NOVA Beginner’s Manual
- Instant Pot DUO GOURMET Beginner’s Manual
- Instant Pot DUO CRISP Beginner’s Manual
- Instant Pot PRO Beginner’s Manual
- Instant Pot PRO CRISP Beginner’s Manual
Instant Pot No Boil Yogurt – Ingredients

- Ultra pasteurized milk (Fairlife)
- Plain yogurt
More details in the recipe card at the bottom of this post
How to Make Yogurt in the Instant Pot (Step by Step Instructions)
- Add milk to clean the inner pot.
- Stir in the yogurt starter and close the lid.
- Program the Instant Pot Yogurt function.
- Check to see if the yogurt is set.
Add Milk to Inner Pot

- Make sure the inner pot is very clean.
- Add the milk to the inner pot.
Stir in Yogurt Starter and Close the Lid

- Whisk in the yogurt culture.
- Close with the Instant Pot lid, glass lid, or silicone lid. Place a paper towel below the lid, if desired, to catch condensation.
How to Program the Instant Pot Yogurt Function For Every Model
If your Instant Pot has no Yogurt button, you can still make yogurt if it has the Sous Vide button. If you don’t see your model below, it’s because it has neither the Yogurt nor the Sous Vide smart program e.g. the Instant Pot Lux does not have a Yogurt or Sous Vide smart program.
Instant Pot Duo
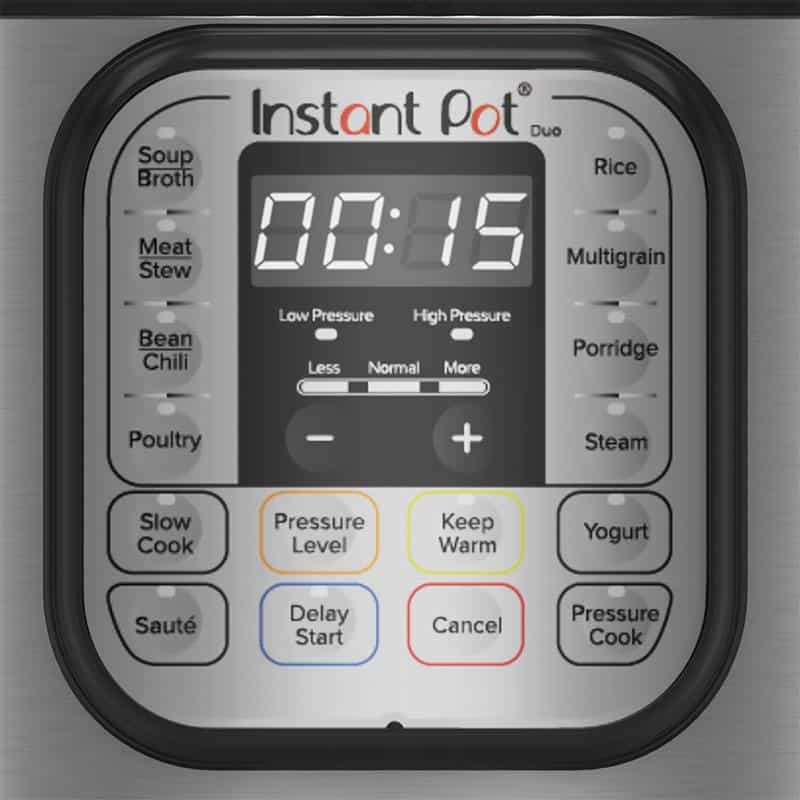
- Press the Yogurt button multiple times to toggle between Less, Normal and More till Normal is selected. *
- Press + or – to set the time to 09:00 (9 hours).
- The Instant Pot display will go to On.
- Once the Instant Pot has reached the fermentation temperature (approximately 110 degrees Fahrenheit), the display will change to 09:00 and begin counting down.
- After 9 hours the display will go to 00:00 and beep.
* Some models have an Adjust button. If that applies to your model, press Adjust repeatedly to toggle between Less, Normal and More.
Instant Pot Duo Gourmet

- Press the Yogurt button multiple times to toggle between Less, Normal and More till Normal is selected.
- Press + or – to set the time to 09:00 (9 hours).
- The Instant Pot display will go to On.
- Once the Instant Pot has reached the fermentation temperature (approximately 110 degrees Fahrenheit), the display will change to 09:00 and begin counting down.
- After 9 hours the display will go to 00:00 and beep.
Instant Pot Duo Nova

- Press the Yogurt button multiple times to toggle between Less, Normal and More till Normal is selected.
- Press + or – to set the time to 09:00 (9 hours).
- The Instant Pot display will go to On.
- Once the Instant Pot has reached the fermentation temperature (approximately 110 degrees Fahrenheit), the display will change to 09:00 and begin counting down.
- After 9 hours the display will go to 00:00 and beep.
Instant Pot Duo Plus
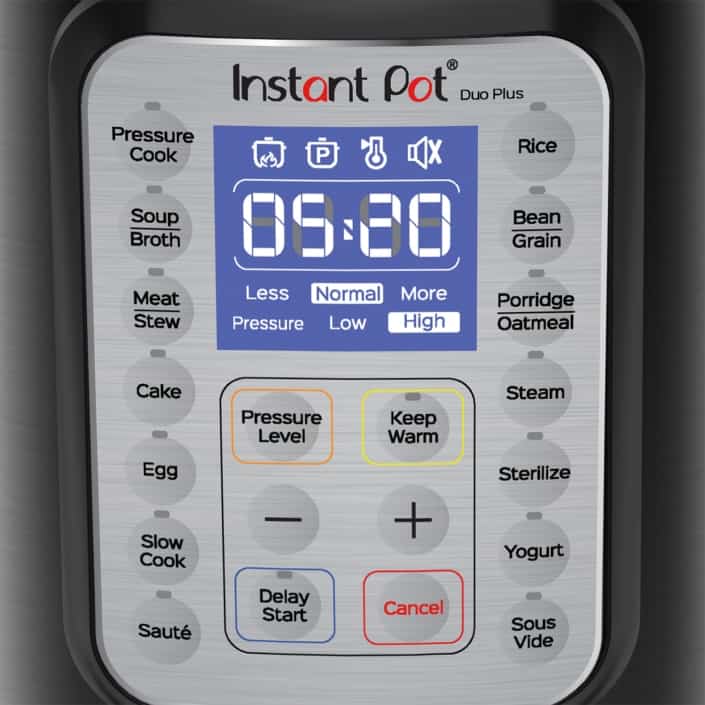
- Press the Yogurt button multiple times to toggle between Less, Normal and More till Normal is selected.
- Press + or – to set the time to 09:00 (9 hours).
- The Instant Pot display will go to On.
- Once the Instant Pot has reached the fermentation temperature (approximately 110 degrees Fahrenheit), the display will change to 09:00 and begin counting down.
- After 9 hours the display will go to 00:00 and beep.
Instant Pot Duo Evo Plus

- Press the Yogurt button.
- Turn the knob to toggle between Custom, Pasteurize and Ferment. When Ferment is blinking, press the knob to select it.
- The time will be blinking.
- Turn the knob to change the time to 09:00.
- Press the knob to confirm.
- The temperature will be blinking. If Low is blinking, turn the knob to change it to High and press the knob to confirm. If High is blinking, don’t change it.
- Press Start.
- The Instant Pot display will go to On.
- Once the Instant Pot has reached the fermentation temperature (approximately 110 degrees Fahrenheit), the display will change to 09:00 and begin counting down.
- After 9 hours the display will go to 00:00 and beep.
Instant Pot Duo Crisp

- Press Sous Vide.
- Press Time + or – to change the time to 09:00.
- Press Temperature + or – to change the temperature to 110 degrees Fahrenheit.
- Press Start.
- Once the Instant Pot has reached the fermentation temperature (approximately 110 degrees Fahrenheit), the display will change to 09:00 and begin counting down.
- After 9 hours the display will go to 00:00 and beep.
Instant Pot Pro Crisp
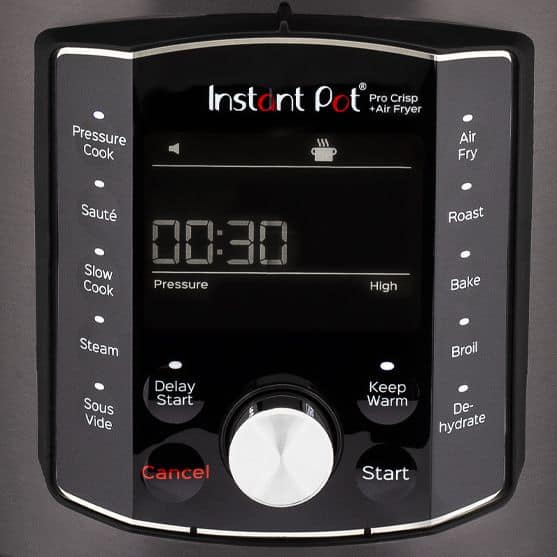
- Press the Sous Vide button.
- The time will be blinking. Turn the knob to change the time to 09:00.
- Press the knob to confirm.
- The temperature will be blinking. Turn the knob to change the temperature to 110 degrees Fahrenheit.
- Press Start.
- The Instant Pot display will go to On.
- Once the Instant Pot has reached the fermentation temperature, the display will change to 09:00 and begin counting down.
- After 9 hours the display will go to 00:00 and beep.
Instant Pot Max
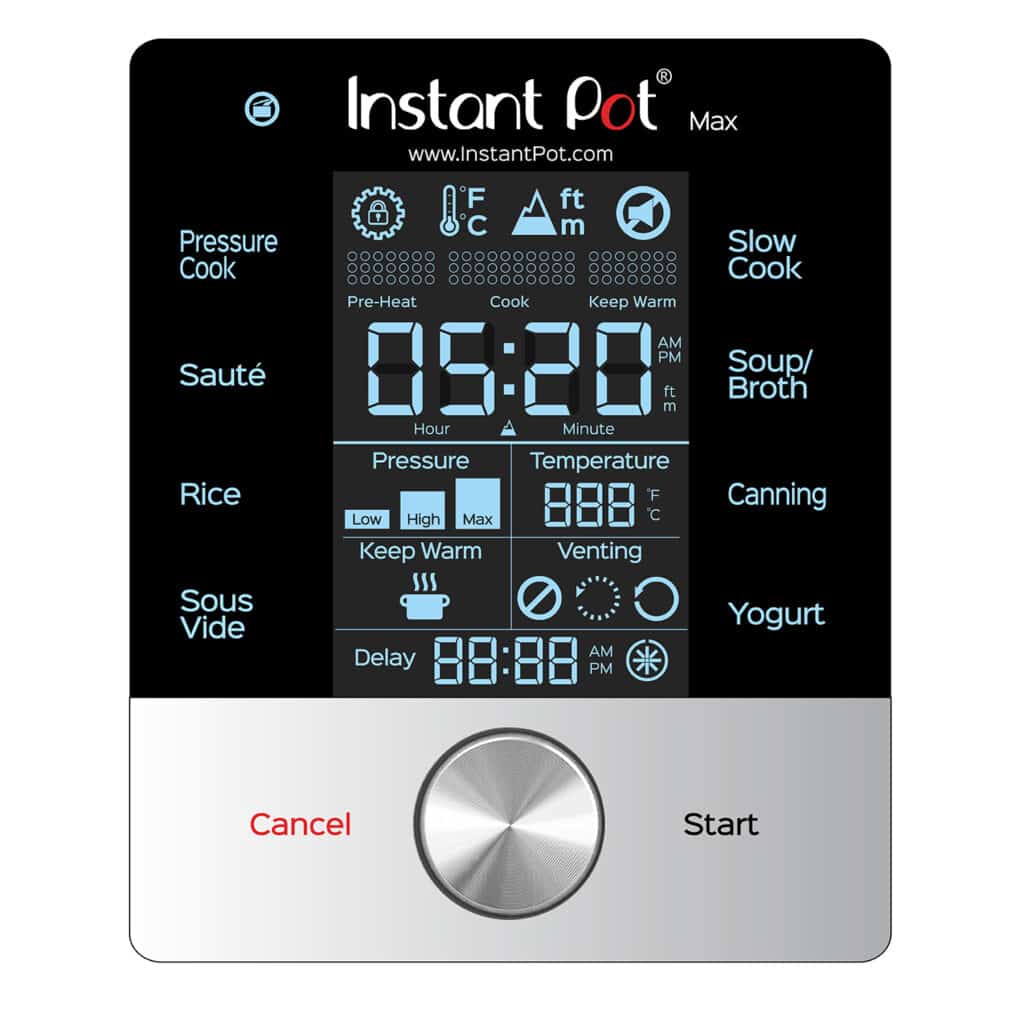
- Touch Yogurt.
- Touch the Hour in the Time field and turn the knob to 09 for 9 hours.
- Touch Temperature.
- Turn the knob to set the temperature to 110 degrees Fahrenheit.
- Touch Start.
- Once the Instant Pot has reached the fermentation temperature (110 degrees Fahrenheit), the display will change to 09:00 and begin counting down.
- After 9 hours the display will go to 00:00 and beep.
Instant Pot Ultra
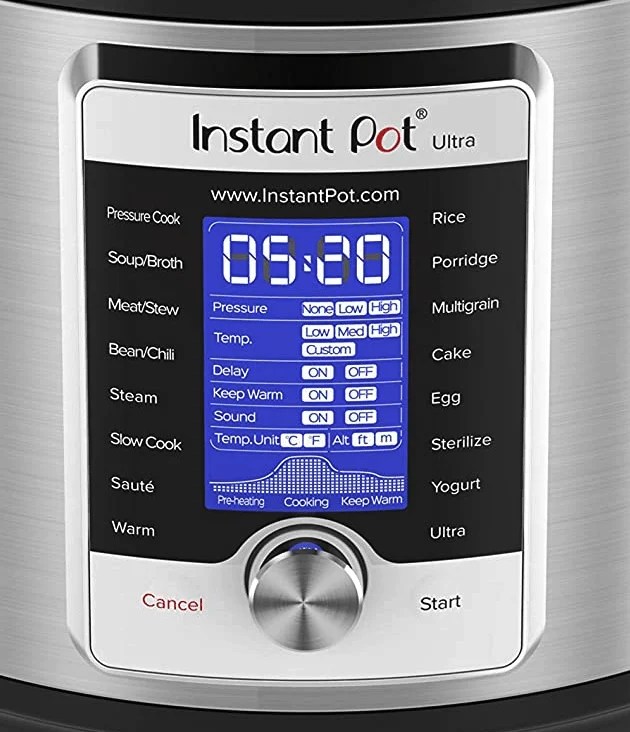
- Turn the knob till the Yogurt smart program is blinking.
- Press the knob to select Yogurt.
- The time will have a box around it that’s blinking. Press the knob to choose it. Now, the time will be blinking.
- Turn the knob to change the time to 09:00 (9 hours) and press the knob to confirm it.
- Turn the knob to go to Temp and press the knob to choose it.
- Turn the knob to toggle between Low, Medium, High and Custom. When Custom is blinking, press the knob to select it.
- The temperature will be blinking.
- Turn the knob to select 110 degrees Fahrenheit.
- Press Start.
- Once the Instant Pot has reached the fermentation temperature (approximately 110 degrees Fahrenheit), the display will change to 09:00 and begin counting down.
- After 9 hours the display will go to 00:00 and beep.
Instant Pot Smart WiFi
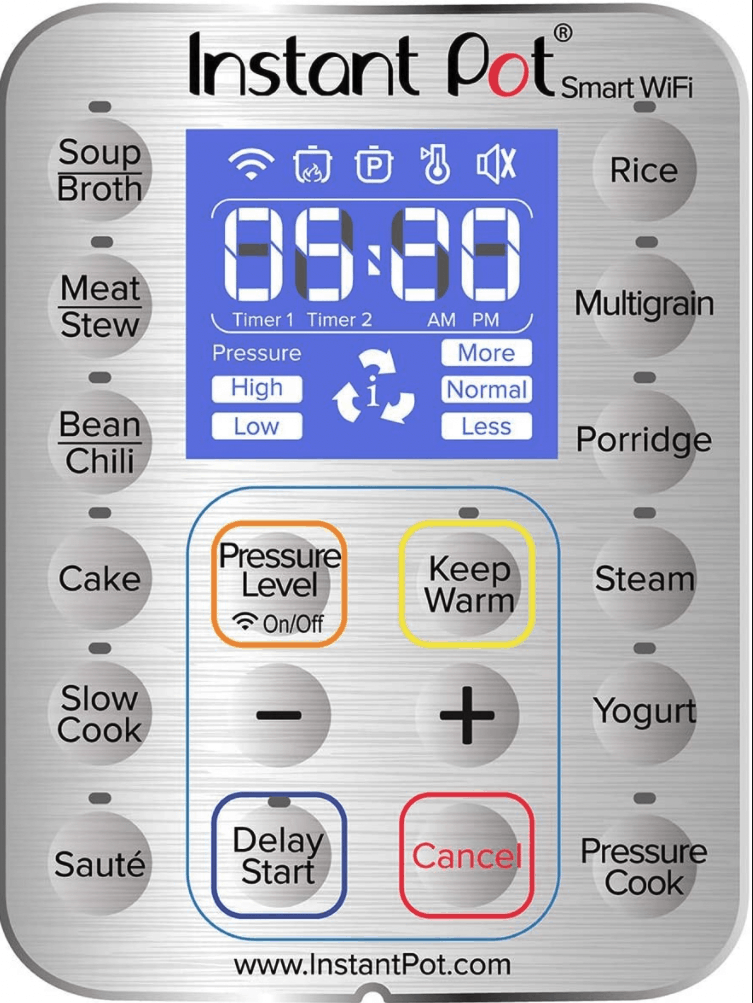
- Press the Yogurt button multiple times to toggle between Less, Normal and More till Normal is selected.
- Press + or – to set the time to 09:00 (9 hours).
- The Instant Pot display will go to On.
- Once the Instant Pot has reached the fermentation temperature (approximately 110 degrees Fahrenheit), the display will change to 09:00 and begin counting down.
- After 9 hours the display will go to 00:00 and beep.
Check to see if Yogurt is Set

- Remove the lid.
- Taking care not to disturb the yogurt too much, use a clean spoon to remove a teaspoon of yogurt. Check to make sure the yogurt is set: taste to make sure it is thick enough and tart enough.
- If it’s still too thin or not tart enough, cover again and set the Yogurt program for another 2 hours.
- If it is ready, take the inner pot out of the base unit, cover and refrigerate immediately.
- Be careful not to disturb the yogurt too much. The yogurt will thicken some more in the refrigerator.

Instant Pot Yogurt
Equipment
Ingredients
- 1 tablespoon plain yogurt preferably full fat
- 4 cups ultra pasteurized, ultra filtered milk preferably Fairlife brand
Optional Ingredients
- ½ cup sweetened condensed milk
- 1 teaspoon vanilla extract
Instructions
- Make sure the inner pot is completely clean.
- Pour milk into inner pot.
- Add the yogurt and optional ingredients to the milk and use a clean whisk to incorporate the ingredients into the milk.
- Close the Instant Pot lid and set to Yogurt mode for 9 hours. See blog post for instructions on each model.
- Press Cancel and open the Instant Pot. If the yogurt appears to be thickened, use a clean teaspoon to take out a small amount of yogurt and see if it's thick enough and tart enough for you. If it isn't, put the lid back on and let it run through the Yogurt program for another 2 hours.
- When the yogurt is set, transfer the inner pot to the refrigerator for a minimum of 4 hours. Don't disturb it until it's fully chilled.
Notes
- I used the full-fat variety of Fage brand of yogurt.
- Remember to save a few teaspoons of your plain yogurt for the next batch.
Nutrition
Thank you for visiting Paint the Kitchen Red. All photos and content are copyright protected. Please don’t use any content without prior written permission. If you’ve made this recipe and would like to share it with your friends, please link back to this recipe. Thank you!
I am not a certified nutritionist. I provide my best estimate of nutritional information merely as a courtesy to my readers. If you depend on nutritional information for dietary or health reasons, I suggest using your favorite online nutrition calculator to confirm the nutritional value of this recipe based on the actual ingredients that you use.
Did you know that the best way to support your favorite bloggers is to comment and rate recipes, and share on social media? If you loved this recipe, please comment and give it a five ⭐ rating in the comment section below. If you’re a pinner, pin this post using the Pin buttons at the top and bottom of this post and in the recipe card above. Thank you for your support!
Recipes That Use Yogurt


Alyk says
I would like to make the cold start Fairlife yogurt in jars. Can I put water in the pot then set the instant pot to yogurt and set my jars on a trivet inside the pot?
Neena Panicker says
Hi Alyk, You can make it in jars. You don’t really need water in the pot since you’re not pressure cooking. You can just place the jars on a rack just to elevate the jars a bit from the heat source. Let me know how it goes!
Dawn says
I tried this in my Instantpot on 9 hours. It was totally liquid when I opened it. I just it for another 8, when I got up the next morning it was solid. I used a yogurt starter, Bulgarian variety. Not sure what’s up with the longer time. I’ll try it again when I need more.
Neena Panicker says
Hi Dawn, that’s so interesting. I wonder why that happened. Please do share if you find that it’s different next time.
denise altimari says
just one question…do I the add the fair life and yogurt starter (Chobani) straight from the refrigerator or do I need to warm it up before putting it in the instant pot?
Neena Panicker says
You can add them from the fridge or bring them to room temperature.
Melony Proctor says
Could I use vanilla yogurt instead?
Neena Panicker says
Melony, thanks for your question, it will work but I find that plain works better.
Renee says
Hi Neena,
I realized that I only have full fat Greek yogurt (Cabot) as a starter along with the Fairlife 2% milk. Will it work if I use Greek yogurt as a starter?
Thanks so much.
Neena Panicker says
Hi Renee, yes that will work. Just make sure it’s plain yogurt and not flavored. Thanks for trying out the cold start yogurt recipe.
Renee says
Thank you for the quick reply Neena and nice to know that plain Greek yogurt will work, too. I’ve tried your recipe, as written, several times and it turns out great!
MJ says
Hi, I’ve tried to proof bread from my Instant Pot Ultra (Yogurt button) with no success. I suspected that the temperature was too high for proofing. I’d like to try to use my Duo Crisp with the Sous Vide button. Please advise how. Any help would be greatly appreciated.
Neena Panicker says
Hi MJ, thank you for your question. On your Ultra, you can also use the “Ultra” setting to set the temperature to room temperature (approximately 80 degrees F). You could use the sous vide setting and do the same thing.
MJ says
Hi Neena, Thank you for you prompt reply. I tried the Ultra button and gone to Temp – Custom. But the lowest I can go is 104 F, then it gone to 208 F? Would you let me know how to set it to 80 F?
Also the Sous Vide button from the Duo Crisp, do I need to put water in the inner pot? I’ve heard that I shouldn’t use the Instant Pot lid (but would it work without the Lid on?), just in case the dough rise too high and I can never open the Lid again?
Thanks again for all your help from the past as well! You’ve been a great help when I needed! Cheers!
Neena Panicker says
Hi MJ, sorry it’s been so long since I used my ultra; I had to fish it out of the basement! You’re right – the Ultra setting only goes down to 104F. The yogurt “low” setting goes down to 90 I think – is that too warm for you? So if you use the sous vide setting, you don’t need water in it. You can either put the dough in a smaller container and put it on the bottom of the inner pot or you can grease the inner pot and put the dough in there directly. To cover it, you could use a towel, plastic wrap, large plate or glass lid. Hope that helps.
Judy says
I’ve made yogurt in my IP using regular milk (not ultrafiltered or ultrapasteurized), incubating it for 24 hours to use up ALL the lactose (as for SCD yogurt). I’d like to try making yogurt with the Fairlife brand to save time on prep and cleanup, but still incubate it for 24 hours. Do you know if it will work with Fairlife milk?
Neena Panicker says
Judy, I’m sorry to say I don’t know how that would turn out.
Amber says
My husband loves this recipe so much. Could this recipe be doubled? Would it effect time?
Neena Panicker says
Amber, yes, you should be able to double it with no other changes required.