
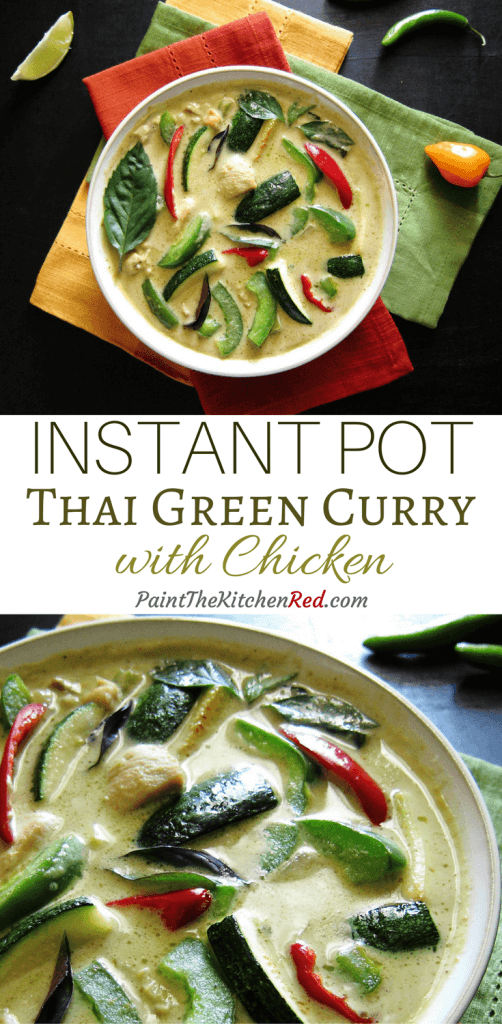
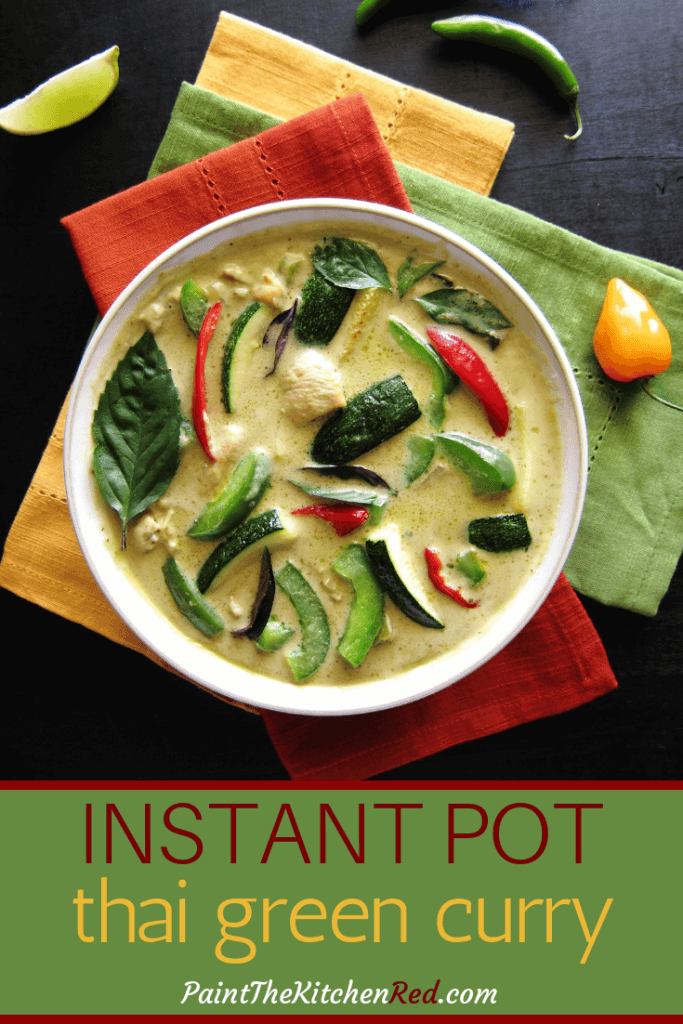
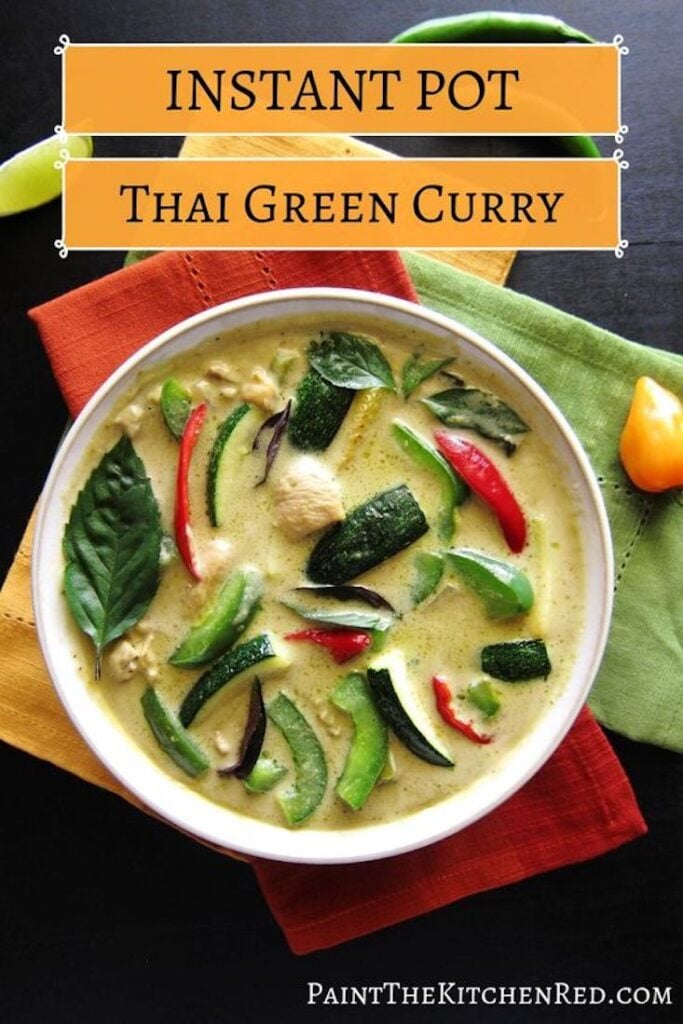
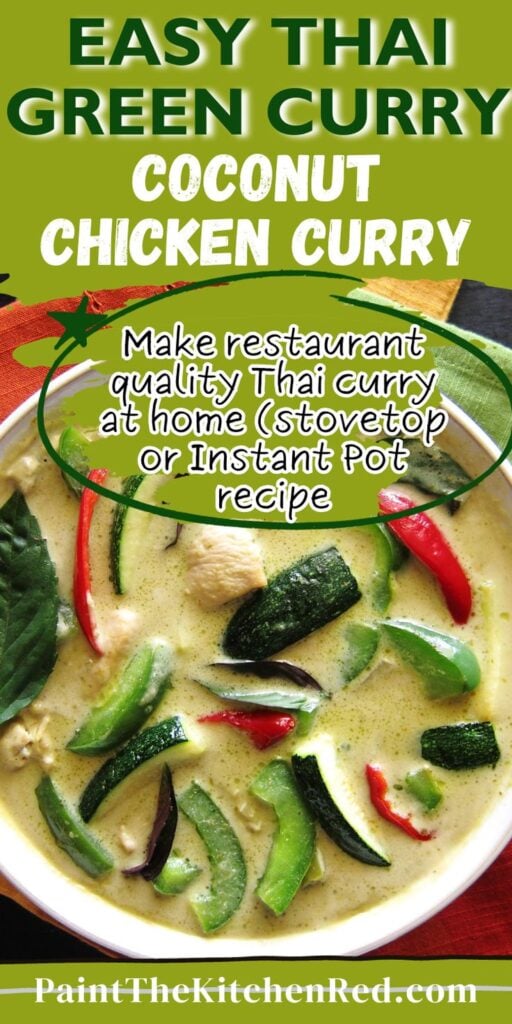
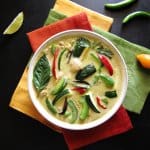
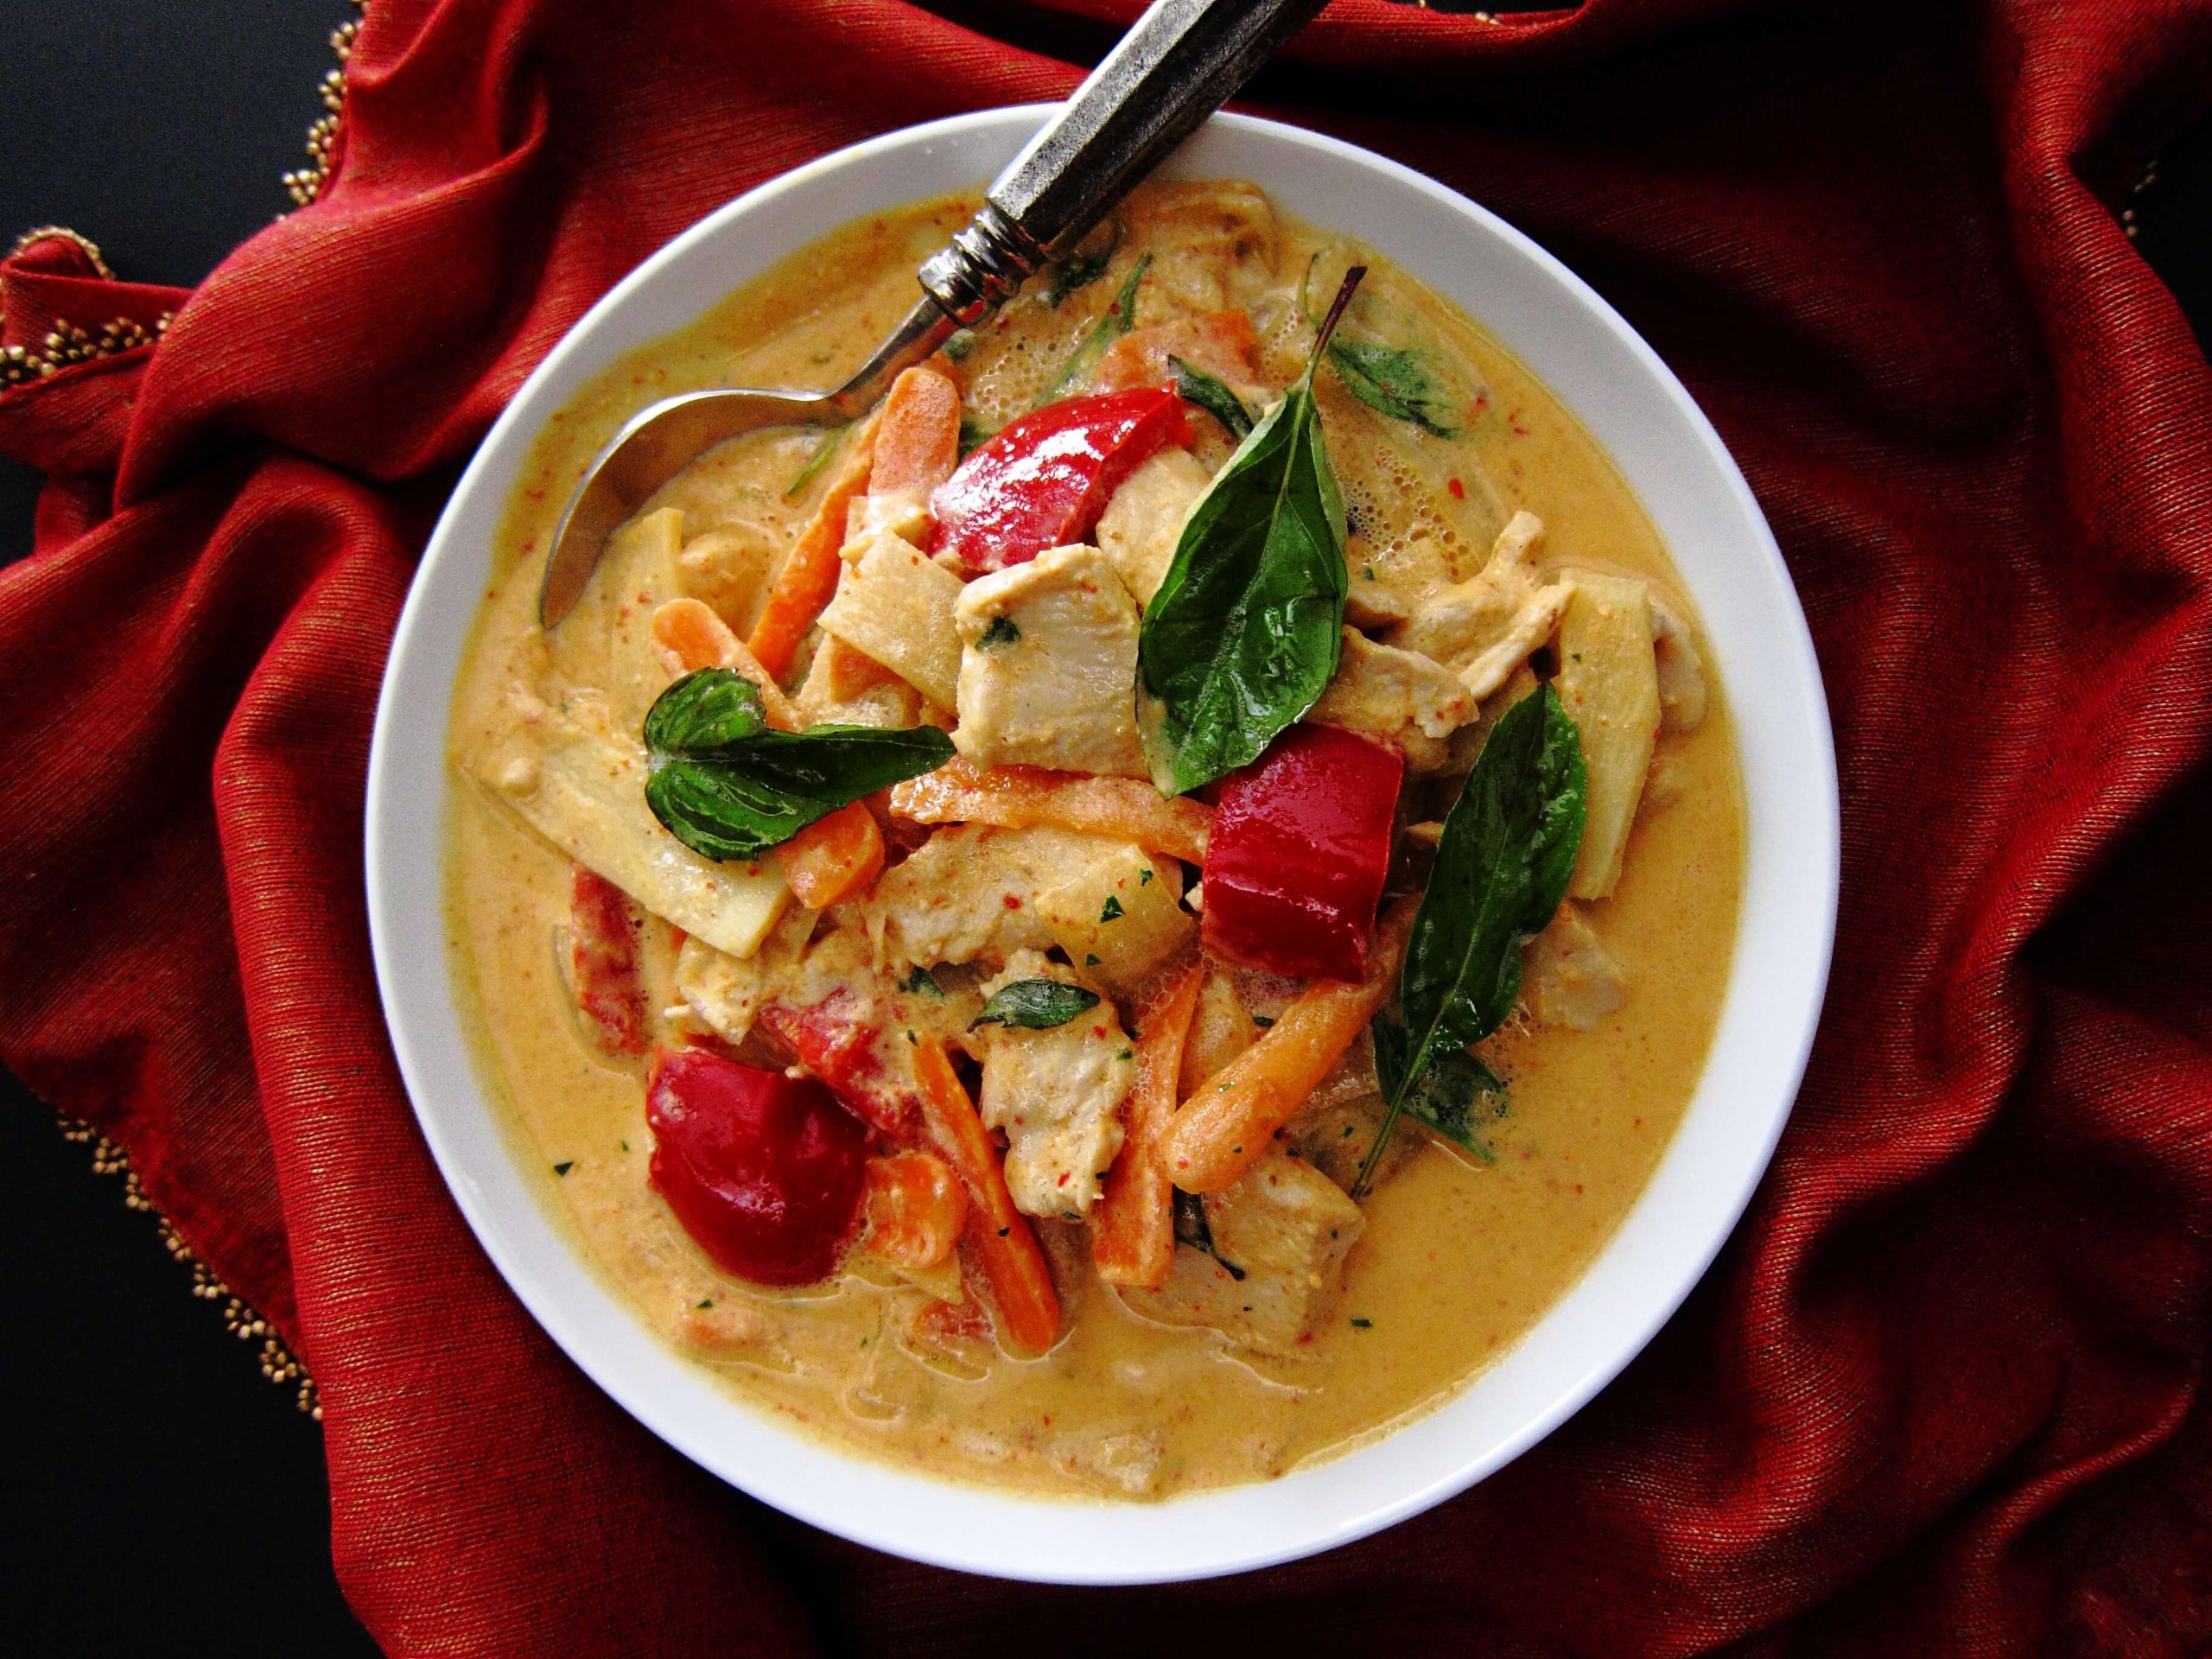
Instant Pot Thai Green Curry is a creamy coconut curry with the flavors of green chilies, Thai Basil, lime, coriander, and cumin. This spicy curry is as good as your favorite restaurant Thai green curry but is so quick and easy that it can be ready in less than 30 minutes. Serve it with Instant Pot Jasmine Rice for an amazing flavor combination!

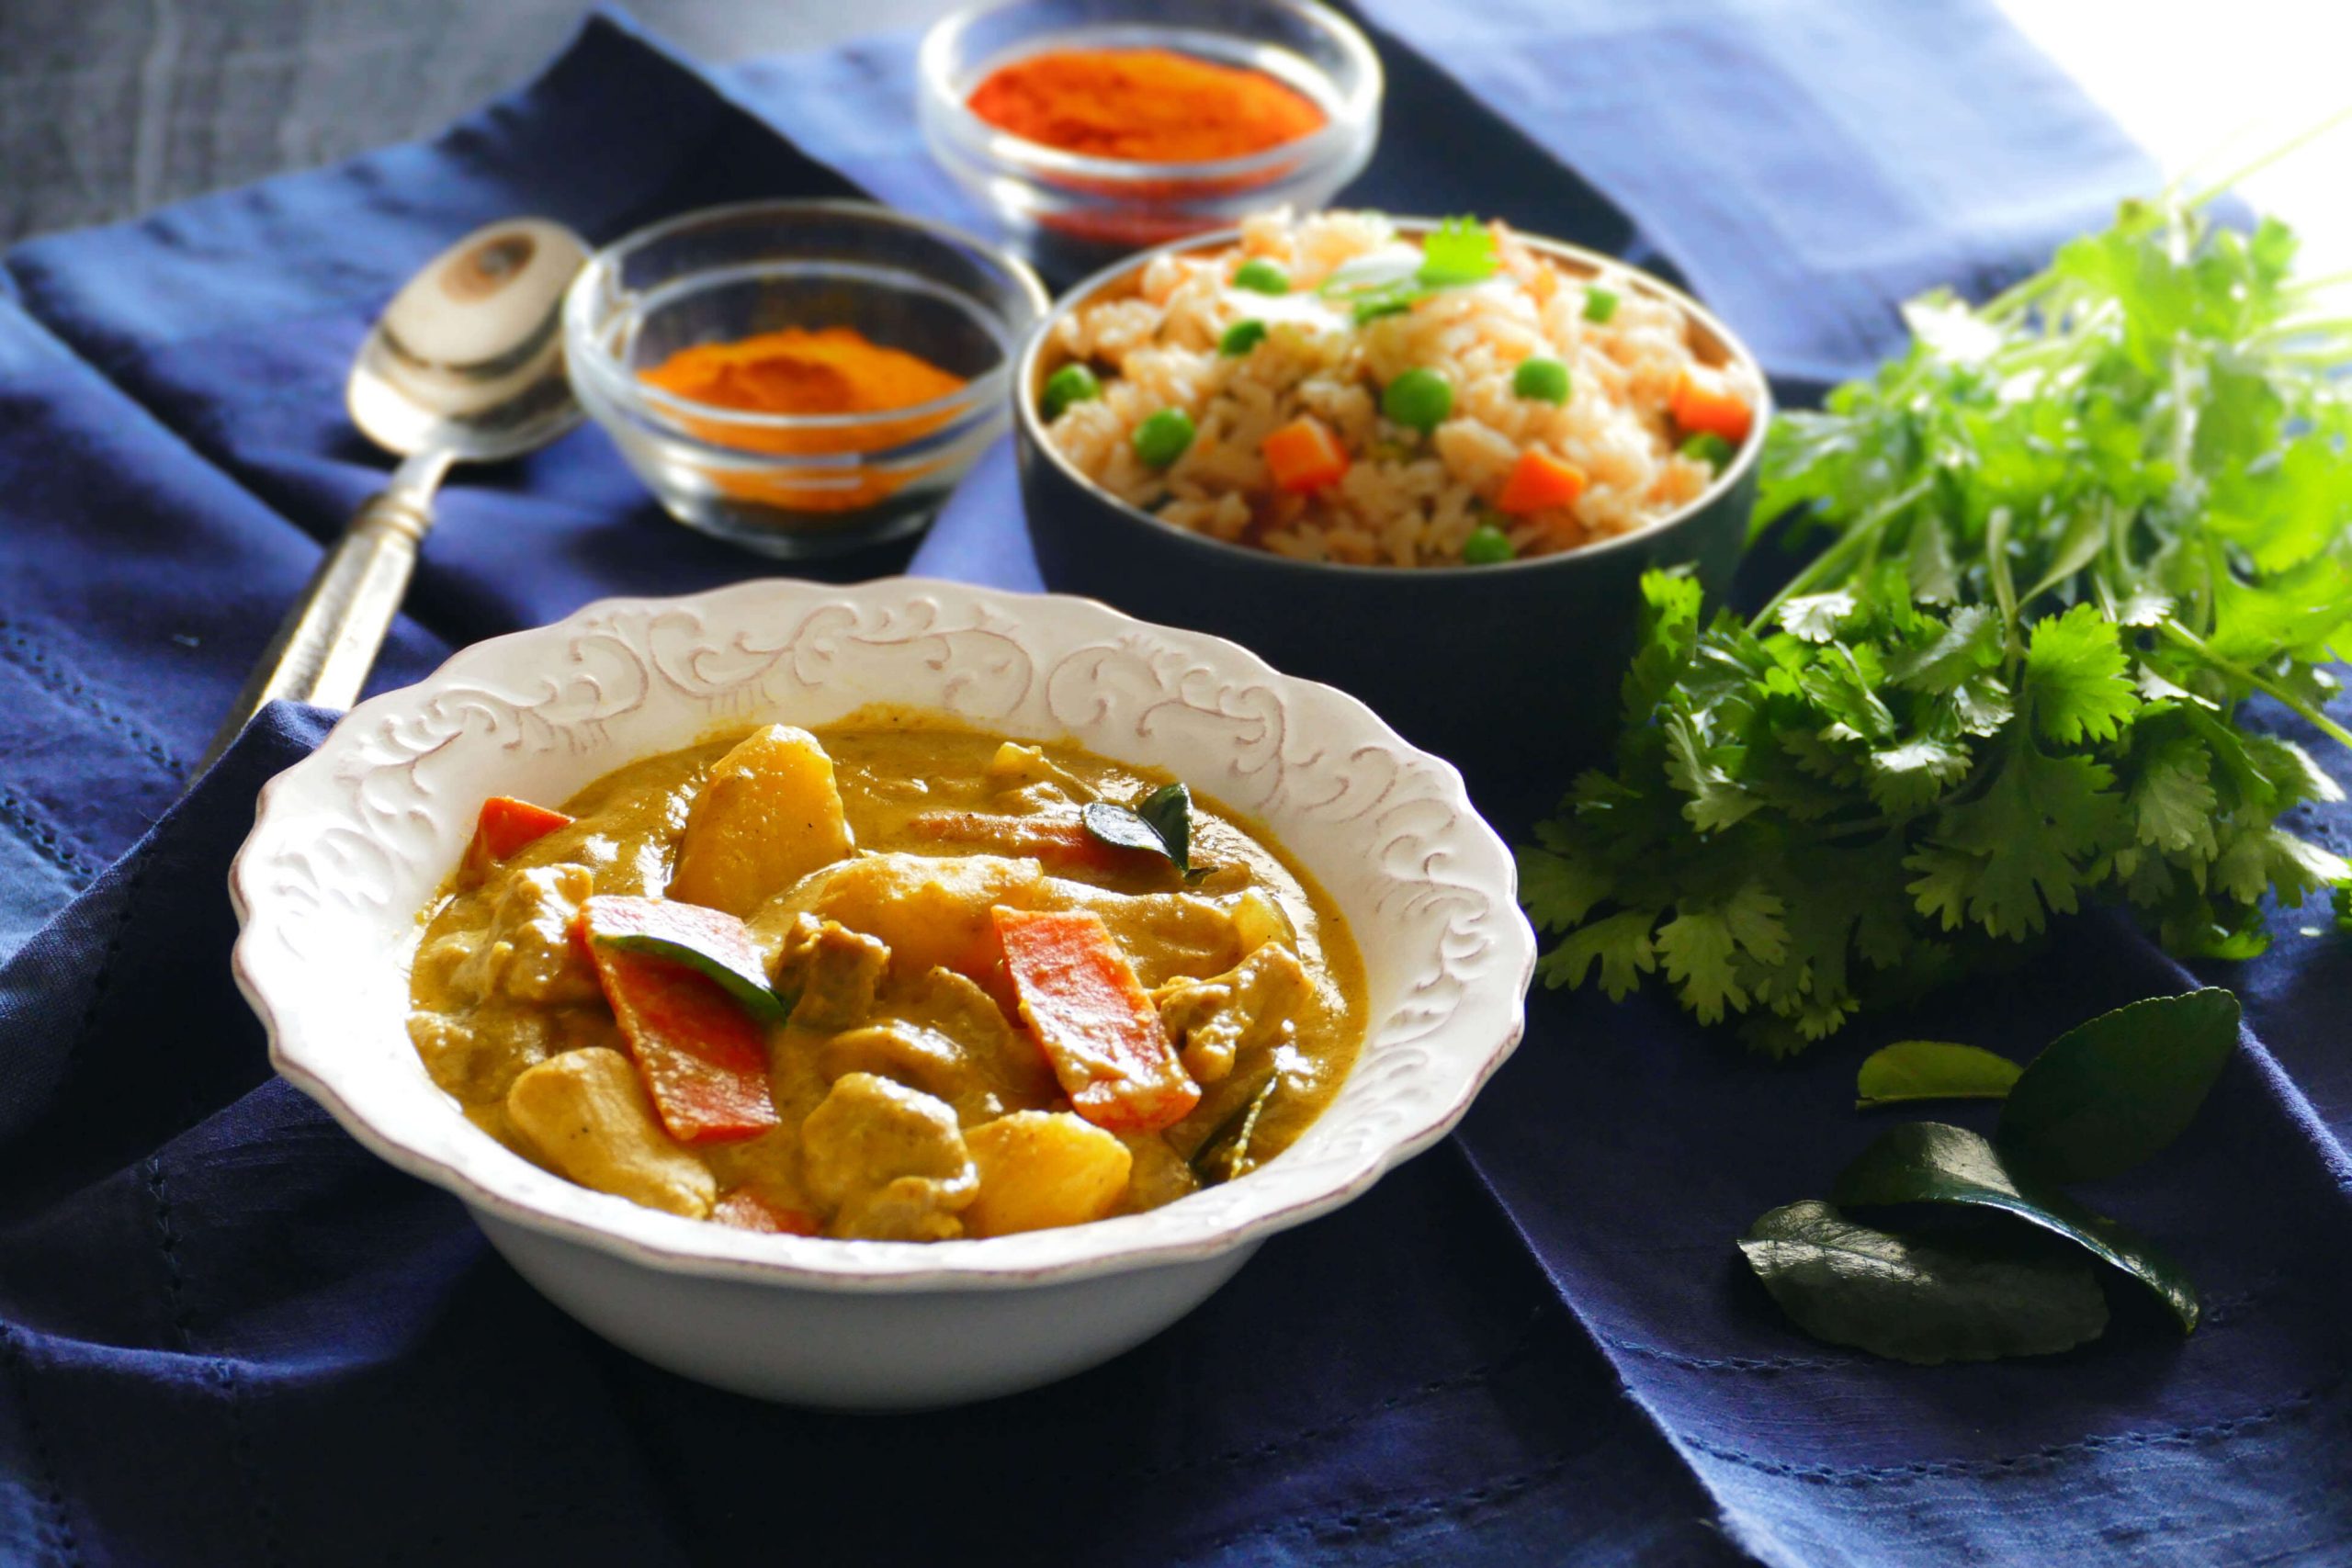
Serve this green curry over Instant Pot jasmine rice or Instant Pot brown basmati rice, or Instant Pot brown jasmine rice.
This post contains affiliate links. As an Amazon Associate, I earn from qualifying purchases. Please read the disclosure.
Table of Contents
Introduction
My family loves Thai food and we used to go out to Thai restaurants all the time, but now we hardly ever do. I’m usually my own worst critic, and for me to say this is not easy: I think the Thai curries that I make at home are as good as restaurant Thai curries.
Best of all, they are so quick and easy that I can have dinner on the table in 20 minutes if I prep the ingredients ahead of time and cook the Jasmine rice and curry in the Instant Pot at the same time (together!) using the pot-in-pot method.
If you want to find out more about my quest to create the best Thai curries at home, please read my Instant Pot Thai Red Curry with Chicken. The bottom line is that ingredients make a big difference.
I usually like to use Thai eggplants in my Instant Pot green curry but I visited the Asian store three times in the past week and they were all out! So I made the curry with zucchini and bell peppers.
Find out the difference between red curry vs green curry.
I like to use green vegetables just for aesthetics, but you can substitute any vegetables of your choice.
Thai green curry paste has a wonderful combination of flavors including green chilies, garlic, galangal ginger, shallots, lemongrass, lime leaves, coriander, cumin, cardamom, turmeric, and black pepper.
Out of all the Thai curries, massaman curry is the mildest and green curry is the hottest/spiciest. Even at Thai restaurants, I get the other curries medium or spicy, but I like to order mild green curry because it’s still pretty spicy!
If you enjoy Thai food, you’ll love my spicier recipes like Instant Pot Red Curry or Instant Pot Yellow Curry. For milder dishes, try Instant Pot Panang Curry, Instant Pot Massaman Curry or Instant Pot Thai Peanut Noodles. Another great noodle dish that’s not Instant Pot is drunken noodles (pad Kee mao).
TIPS AND SUBSTITUTIONS
Green Curry Paste
Maesri and Mae Ploy are my two favorite Thai curry paste brands. I can’t emphasize enough how much of a difference the brand makes. You can find them at Southeast Asian grocery stores or on amazon.
In my experience, getting the brand of Thai green curry paste available at regular grocery stores does not produce great flavor.
If the curry is too spicy at the end, add some more coconut milk when you’re cooking the vegetables.
Lime Leaves
Lime leaves (also known as k-lime, makrut or kaffir lime leaves) add unique flavor to Thai curries.
You can find them at Asian grocery stores. I highly recommend using them. They keep very well in the freezer!
I like to either scrunch up the lime leaves and bruise them before adding them to the curry or chiffonade them by cutting them into very thin strips. This releases the oils from the leaves and adds a stronger flavor.
If you can’t find lime leaves, add an extra teaspoon or two of lime juice. Taste as you go.
Thai Basil
Thai basil is another ingredient you can find at an Asian grocery store. It, too, adds a unique flavor to Thai recipes and I recommend trying to find it. But if you can’t locate Thai basil, substitute with regular Italian basil.
Fish Sauce
I really like the quality of Red Boat fish sauce which you can find at Asian grocery stores or on amazon. But it is more expensive than other fish sauce brands. Tiparos is another brand of fish sauce I’ve used – it’s more affordably priced.
There’s no substitute for fish sauce. It adds that depth of flavor, the umami, to dishes. I’ve had vegetarian readers recommend the Fysh brand of sauce. But I haven’t tried it. You may need to add a little extra.
Soy sauce is also a substitute for fish sauce, but there is a flavor difference.
Also note that Thai curries are generally eaten with rice. If you’re not planning on eating the curry with rice, you might need to adjust the salt by reducing the quantity of fish sauce.
Palm Sugar
Palm sugar is more authentic to a Thai curry than brown sugar is. However, I frequently use brown sugar without sacrificing taste.
Coconut Milk
I use full-fat coconut milk. I find some coconut milk brands don’t do well during pressure cooking, including some brands that are widely available at grocery stores. My two favorite brands are Aroy-D and Chaokoh. Some readers recommend Trader Joe’s brand coconut milk.
I frequently get questions about the coconut milk curdling after being pressure cooked in the Instant Pot. Yes, it will appear to be curdled when you open the Instant Pot. But once you stir it up and cook the vegetables in the curry sauce, the curry should be very smooth.
Meats and Tofu
You can easily substitute other meats or tofu for the chicken, but you’ll have to adjust the cooking time – here are some approximate times. Note: the timing for meat is for bite-size strips!
- Pork shoulder: 8 minutes Natural Pressure Release (NPR)
- Beef chuck: 12 minutes NPR
- Extra-firm tofu, cubed: 2 minutes, Quick Release (QR)
Vegetables
I sometimes choose to decrease the quantity of chicken and double the quantity of vegetables, so we eat less meat and more veggies.
Spiciness
This recipe makes a green curry that’s fairly spicy, but not extreme. If you’re unsure, start with just 1 ½ to 2 tablespoons of the green curry paste, and next time you can adjust the heat.
Doubling the Recipe
You can double all the ingredients in the recipe and pressure cook for the same amount of time. Just make sure your ingredients don’t go past the ⅔-full mark.
Splatter Screen
When you’re sauteing ingredients in the Instant Pot, the bubbling mixture can splatter. I like to use a splatter screen to cover the inner pot during this saute process.
Burn Message
If you regularly encounter the ‘burn’ message, feel free to add ¼ cup of chicken broth when pressure cooking the coconut milk.
[Read more: Instant Pot Burn Message]
If you’re new to the Instant Pot and aren’t familiar with how to use it, you might find it helpful to first read one of the following guides and then come back here to learn how to make this recipe.
- General Instant Pot Instructions for Beginners
- Instant Pot ULTRA Beginner’s Manual
- Instant Pot DUO EVO PLUS Beginner’s Manual
- Instant Pot DUO NOVA Beginner’s Manual
- Instant Pot DUO GOURMET Beginner’s Manual
- Instant Pot DUO CRISP Beginner’s Manual
- Instant Pot PRO Beginner’s Manual
- Instant Pot PRO CRISP Beginner’s Manual
Instant Pot Thai Green Curry – Ingredients
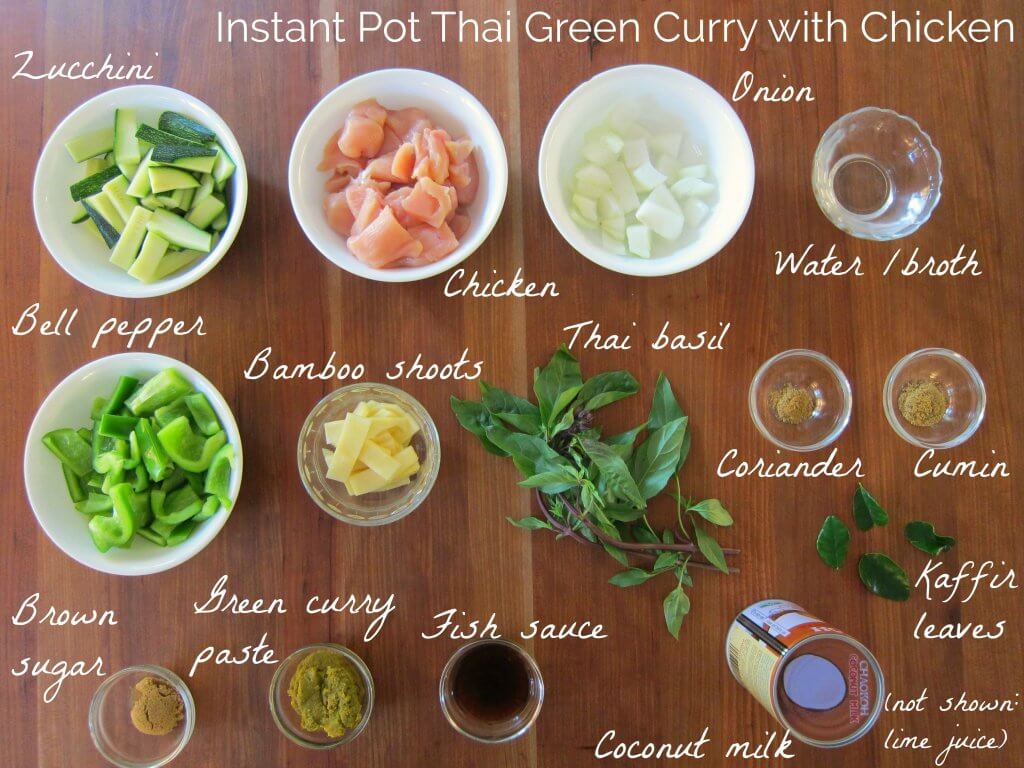
- Zucchini
- Chicken
- Onion
- Water/broth
- Bell pepper
- Bamboo shoots
- Thai basil
- Coriander
- Cumin
- Brown sugar
- Green curry paste
- Fish sauce
- Coconut milk
- Lime juice (missing from photo)
How to Make Green Curry in the Instant Pot (Step by Step Instructions)
- Turn on Saute Mode
- Saute spices and coconut milk
- Add remaining coconut milk and chicken
- Pressure cook
- Quick-release pressure
- Add vegetables and seasonings and saute
How to Turn on Saute Mode
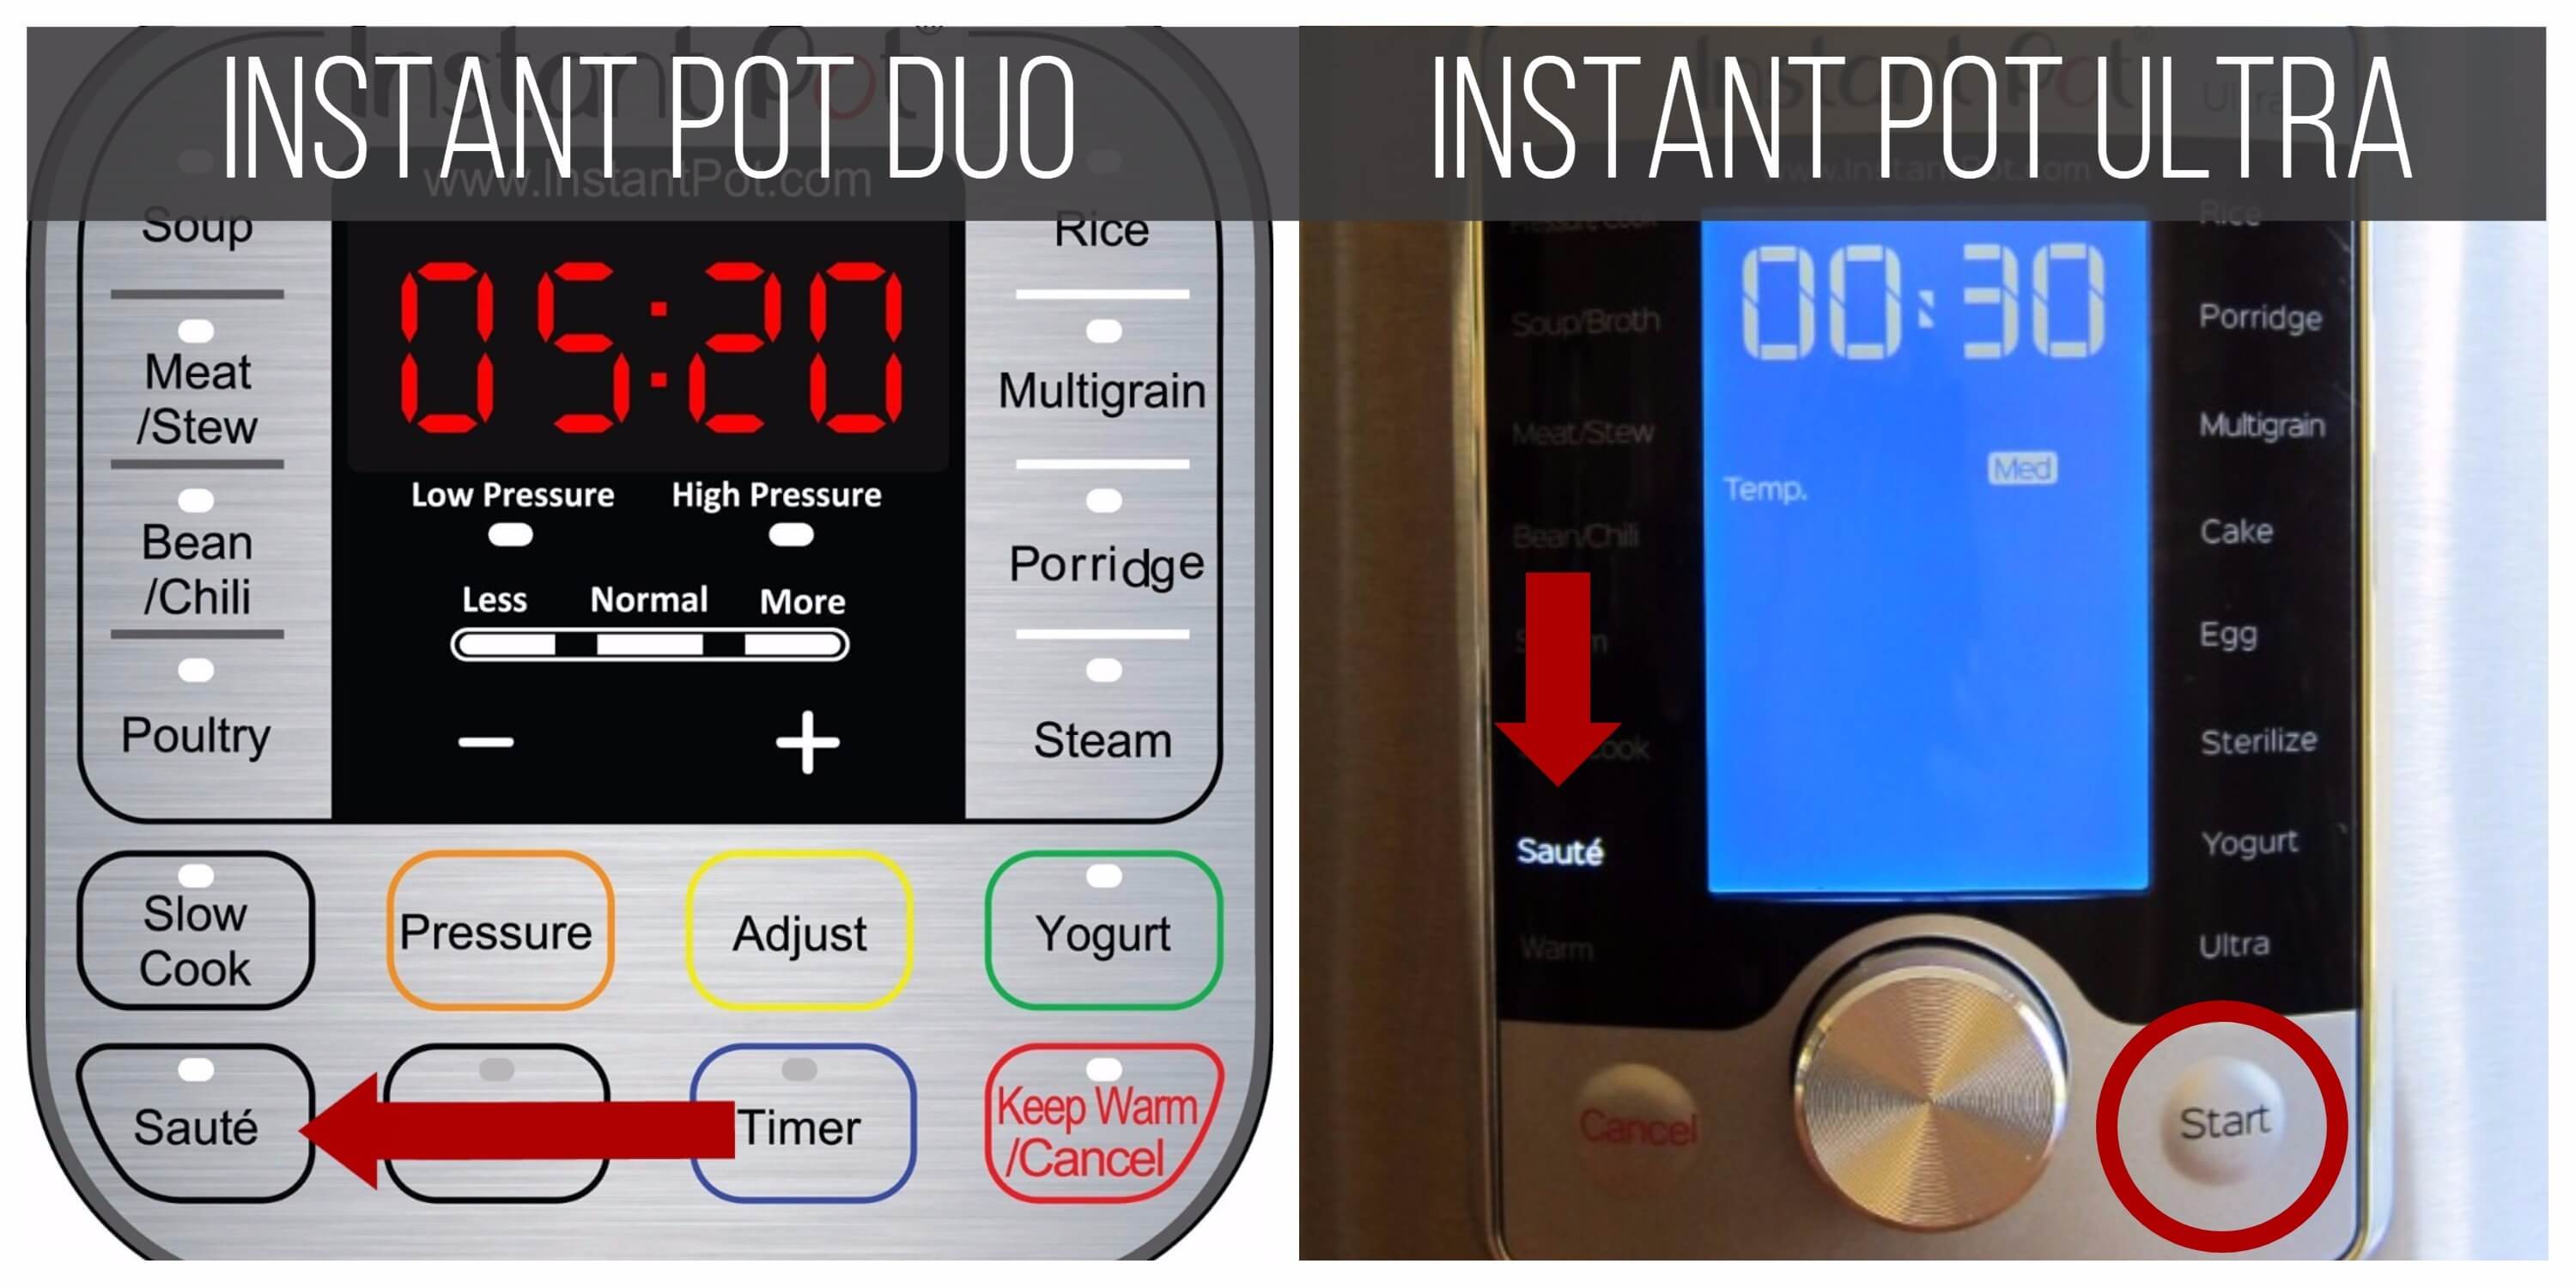
- Instant Pot DUO: Select the Saute function.
- Instant Pot ULTRA: Select the Saute function and press Start.
Saute Spices and Coconut Milk
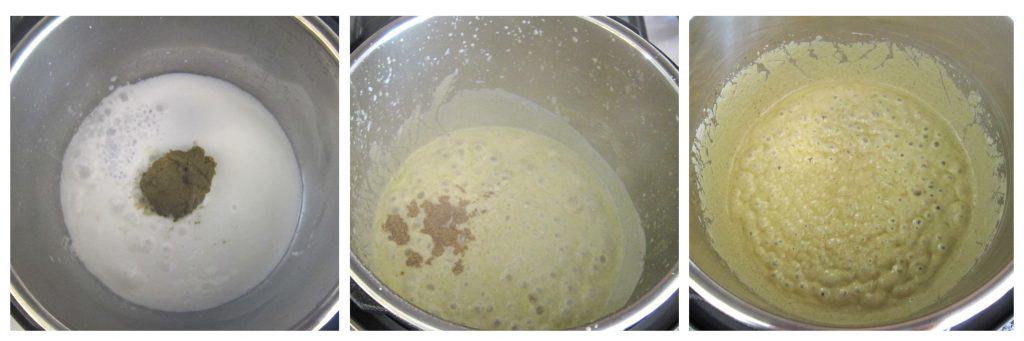
- Stir together green curry paste and ½ can of coconut milk and saute until mixture is bubbly, a minute or two. Use a splatter screen if necessary, to guard against splatters from the coconut milk.
- Stir in coriander and cumin and cook for 30 seconds.
Add Remaining Coconut Milk and Chicken
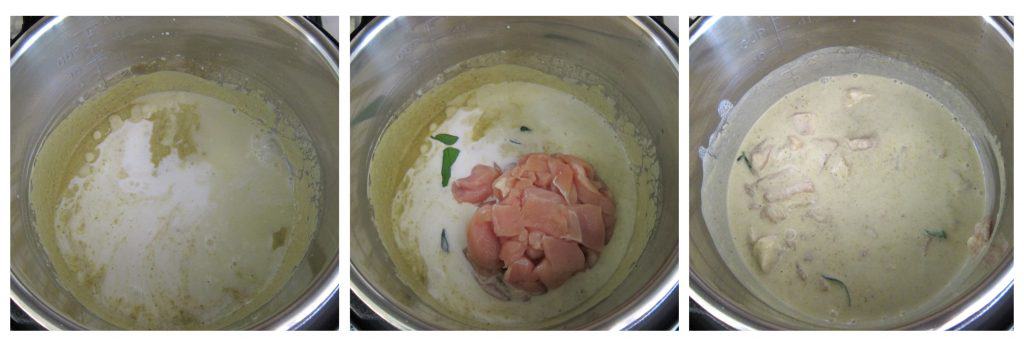
- Press Cancel to turn off Instant Pot.
- Stir in chicken, remaining coconut milk, and chicken broth or water.
Instant Pot Duo Pressure Cook 4 minutes
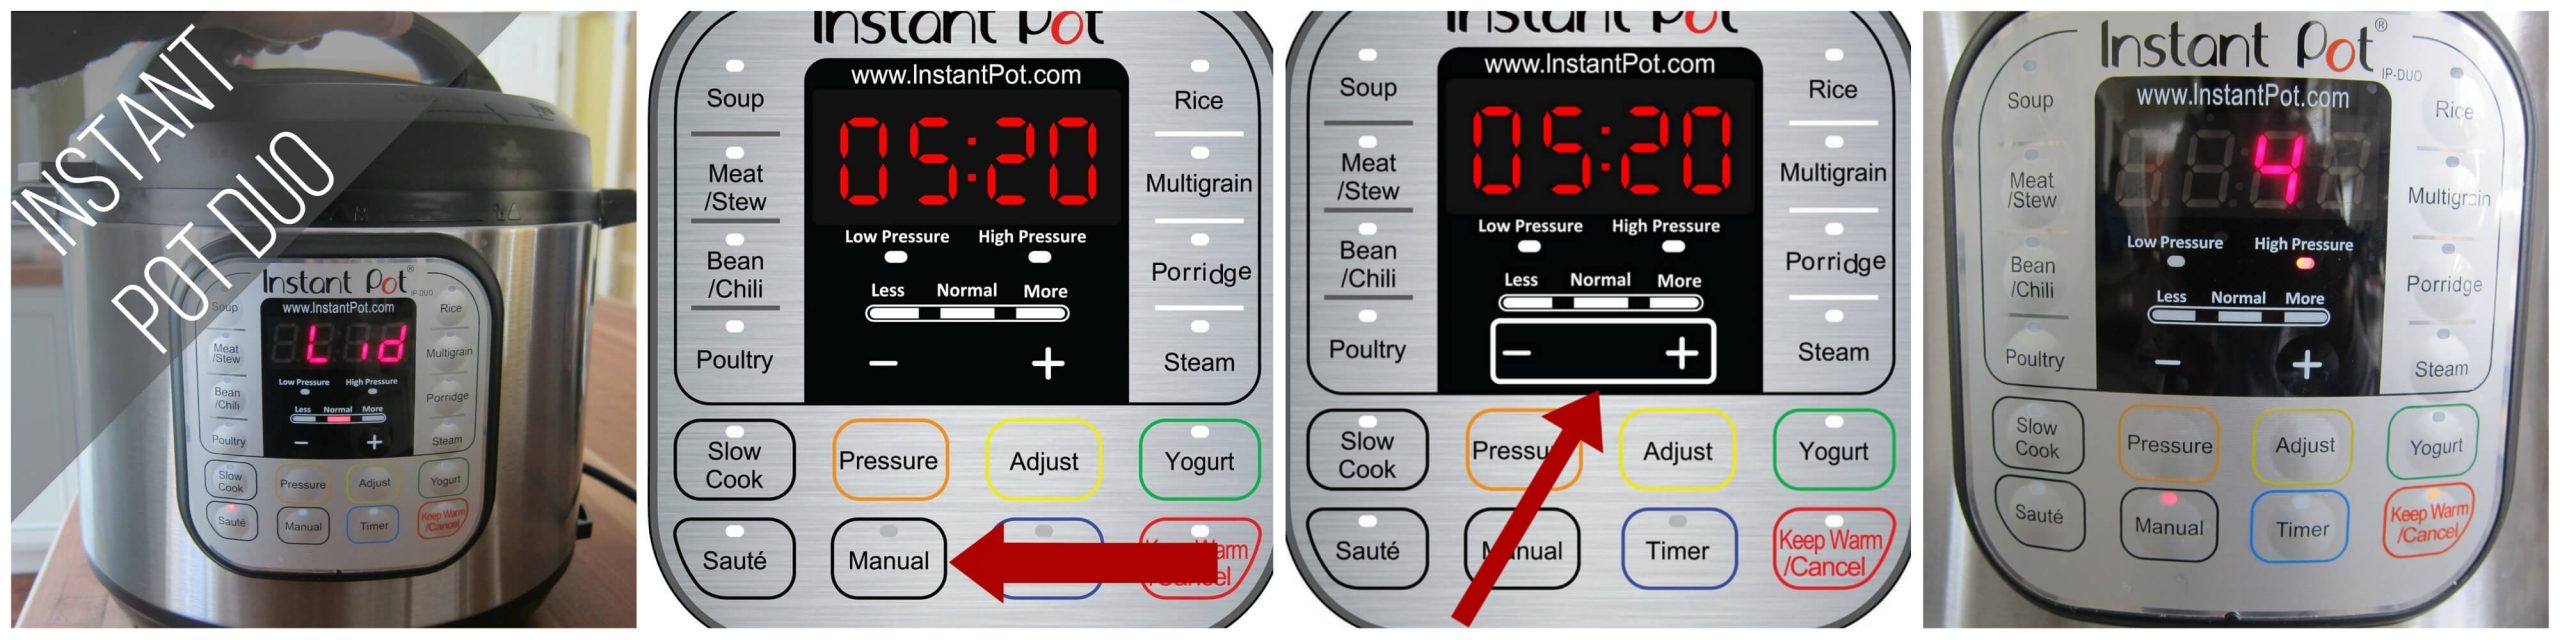
- Close the lid and make sure steam release handle is in Sealing position
- Press Manual (or Pressure Cook) and + or – until the display reads 4 (4 minutes).
Instant Pot Ultra Pressure Cook 4 minutes
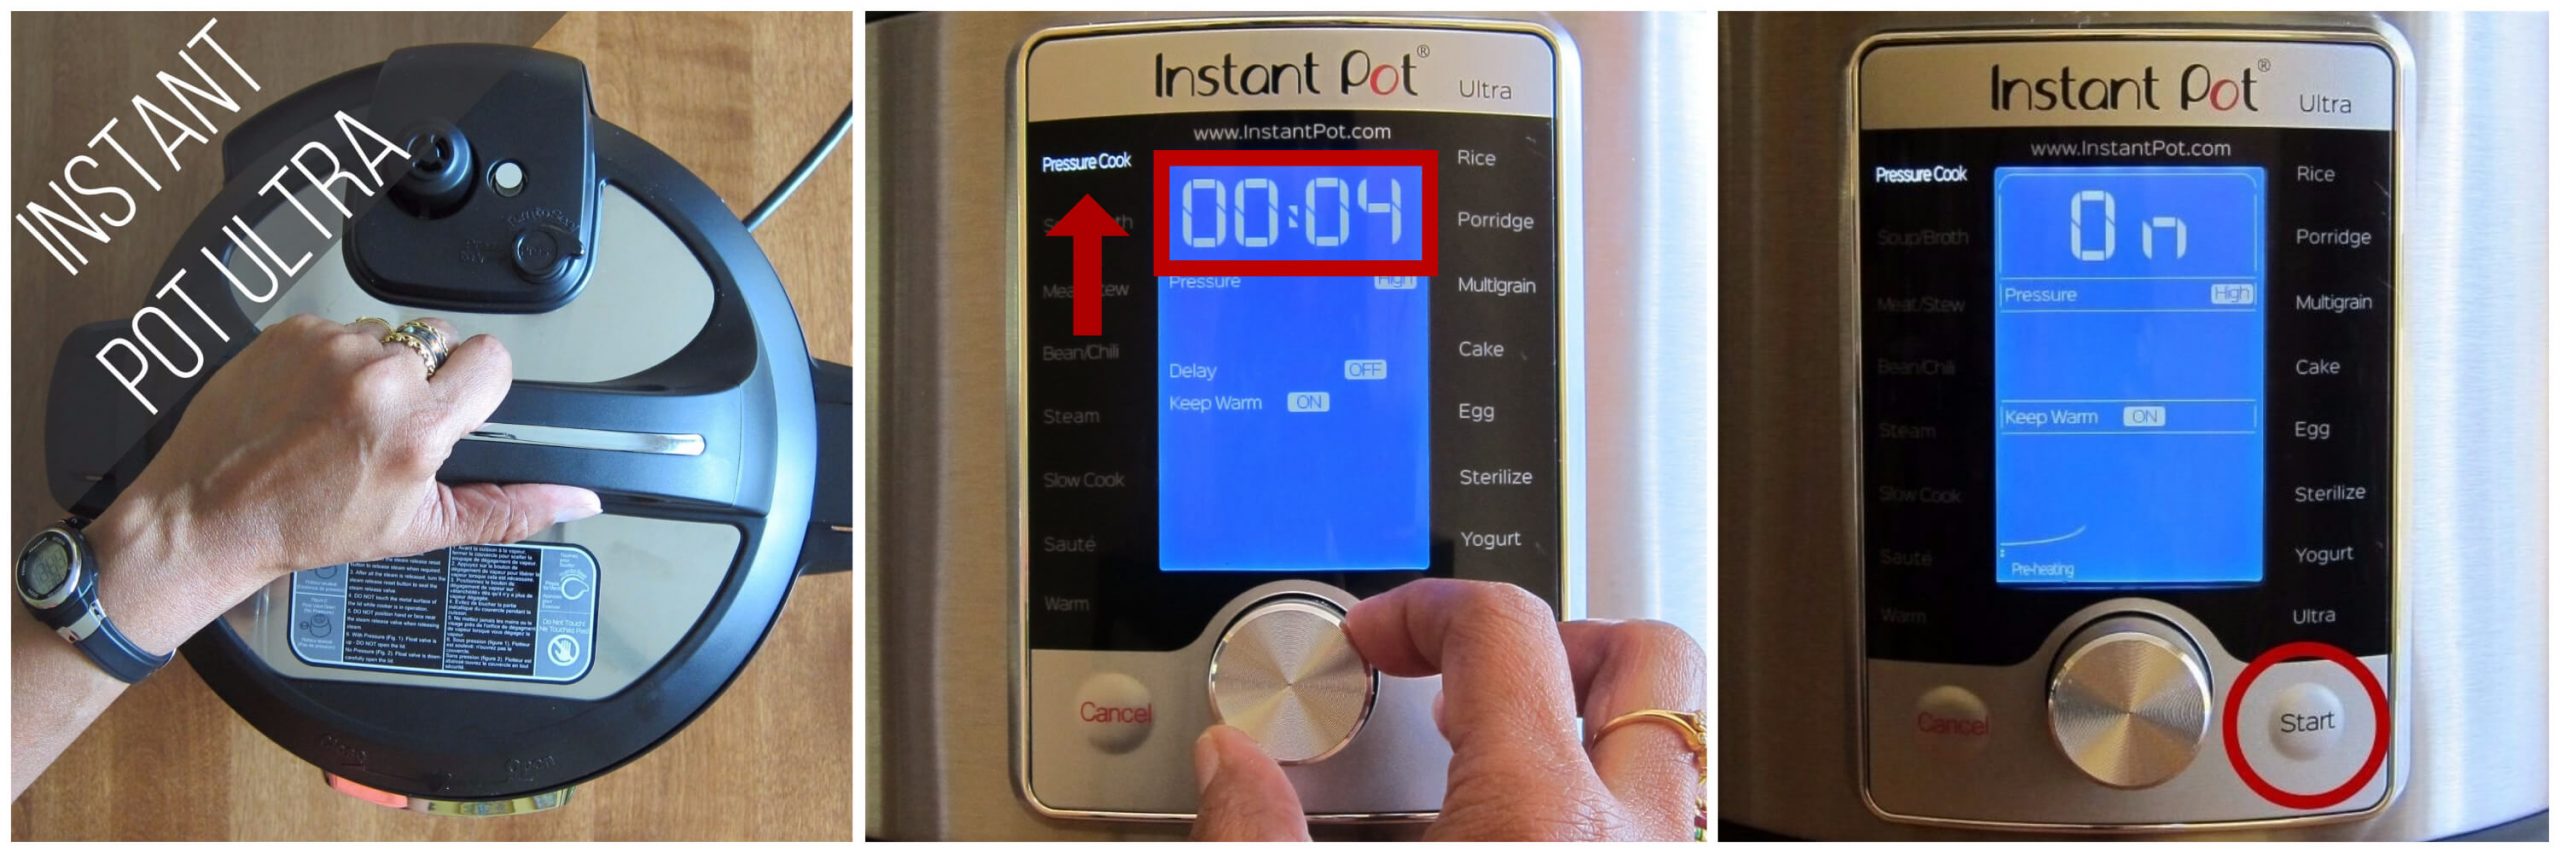
- Close the lid.
- Select Pressure Cook mode and adjust the time to 4 minutes (00:04).
- Press ‘Start’.
Pressure Cooking Process (Duo and Ultra)
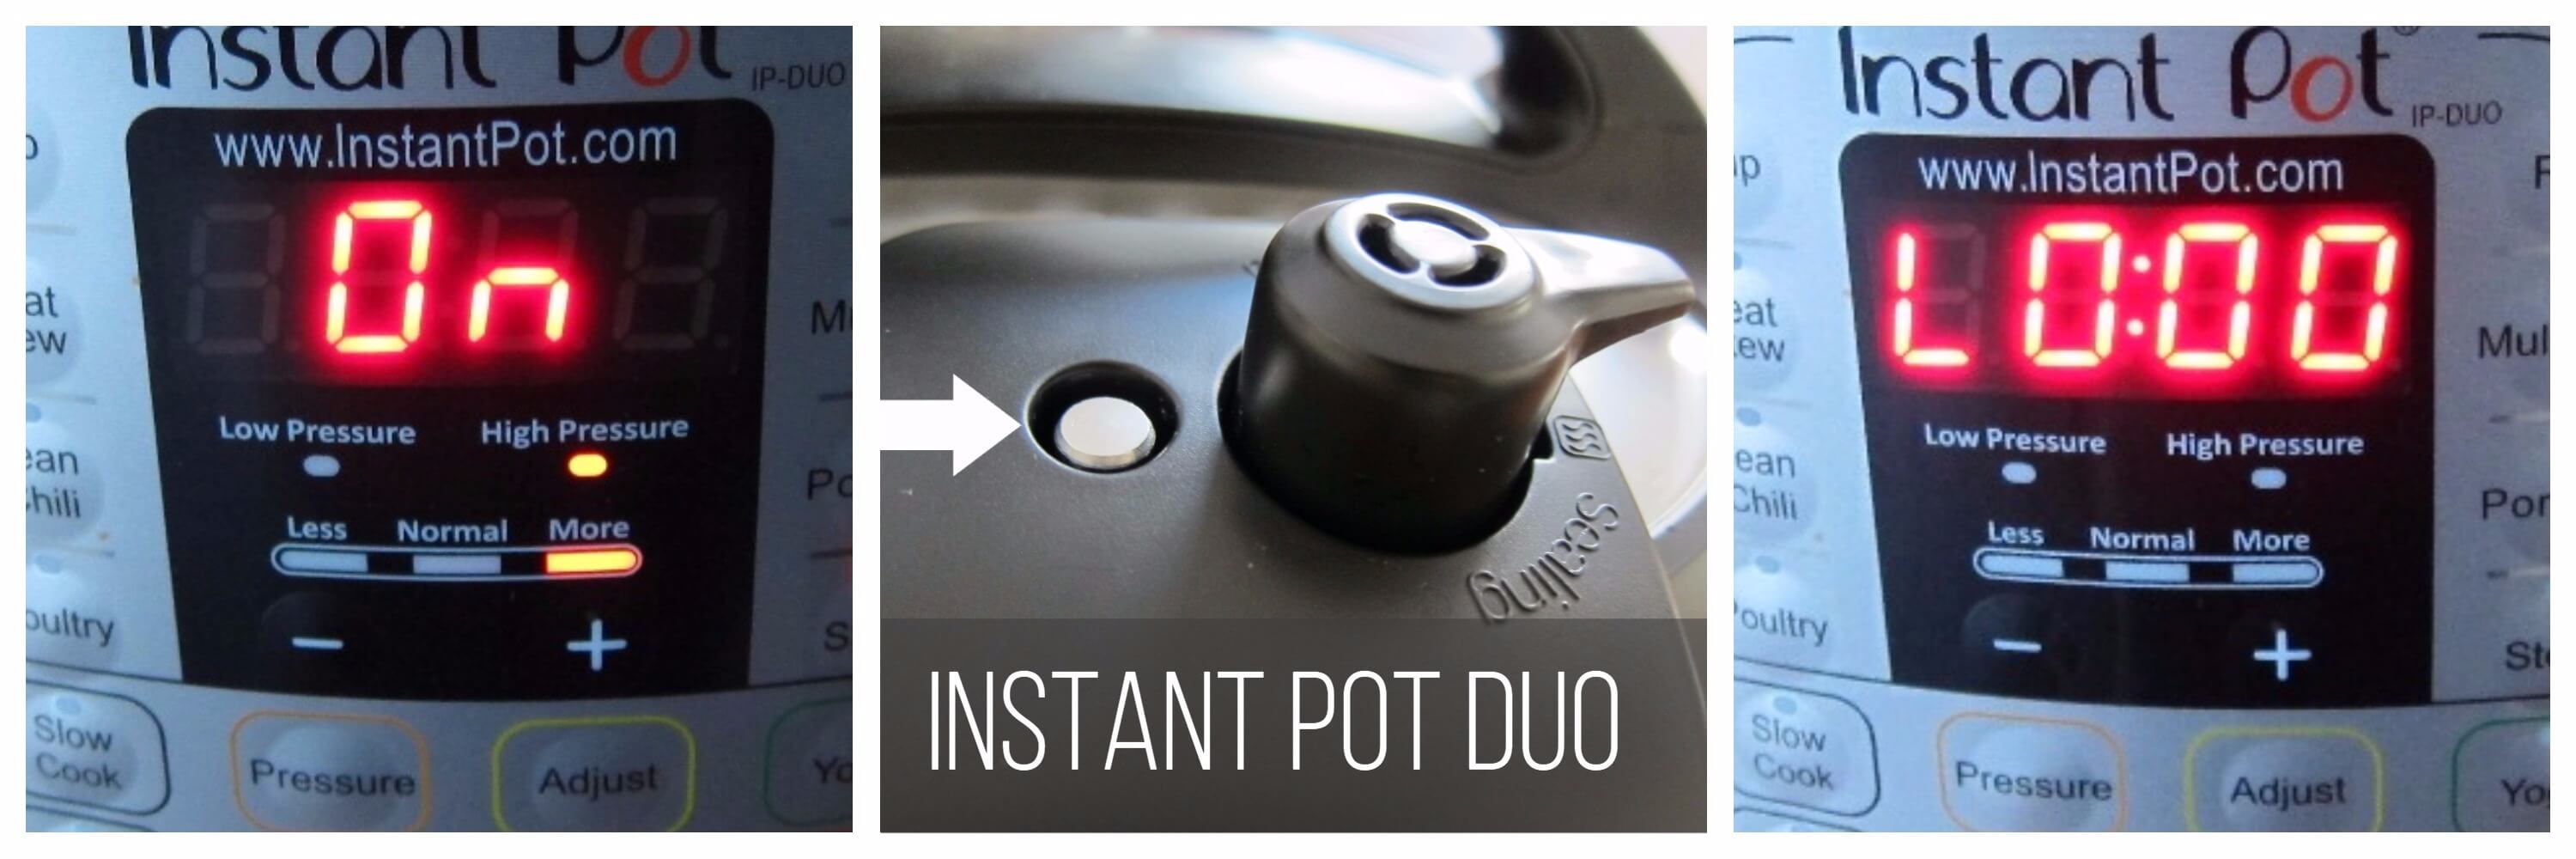
- Instant Pot display will change to On.
- Once the Instant Pot is pressurized, the float valve will go up.
- The display will count down to 0; it will then switch to Keep Warm mode and display L0:00 or 00 00 and begin to count up the number of minutes since pressure cooking completed.
How to Quick Release Pressure (QR) on the DUO

- Move the steam release handle to Venting. Steam will come out of the steam release handle.
- When your Instant Pot is depressurized, the float valve will be in the down position.
- Press Cancel and open the Instant Pot.
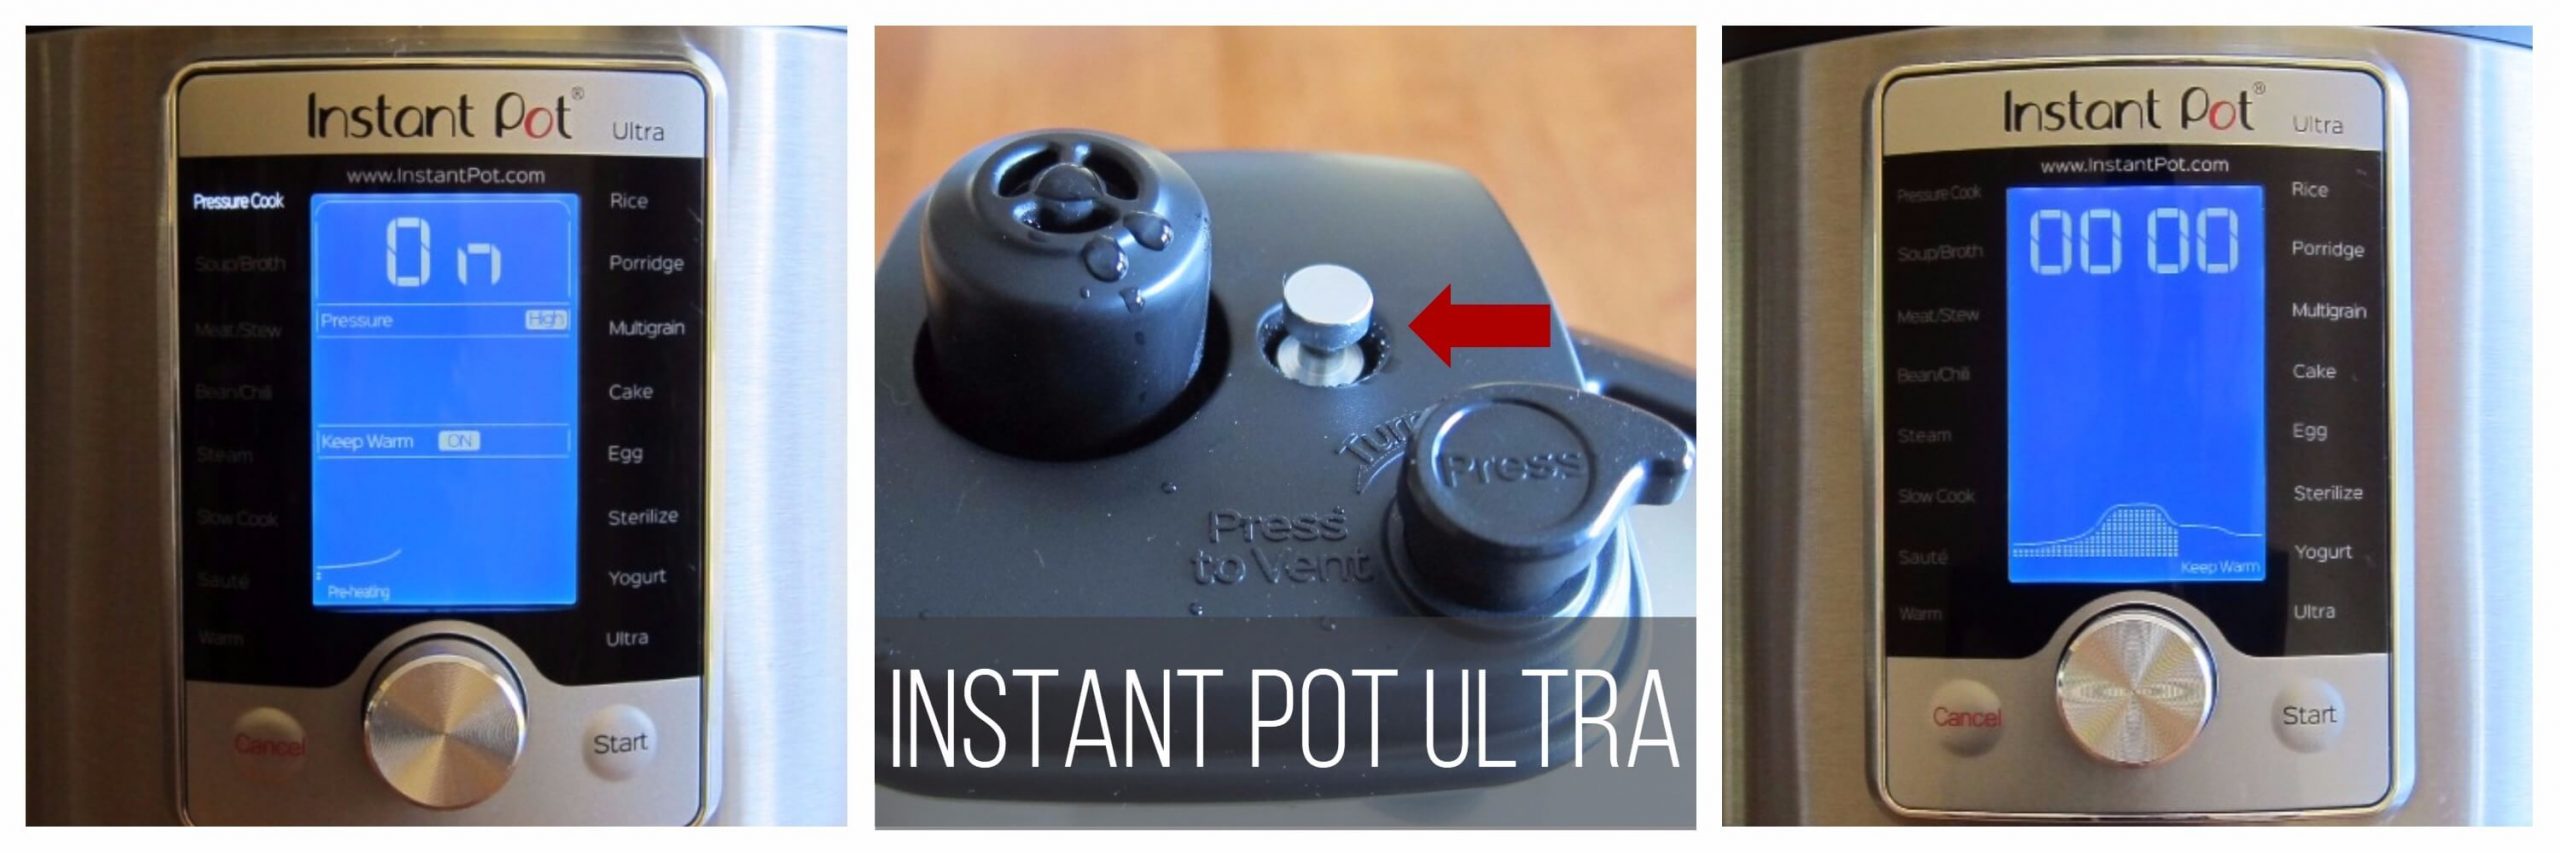
How to Quick Release Pressure (QR) on the ULTRA
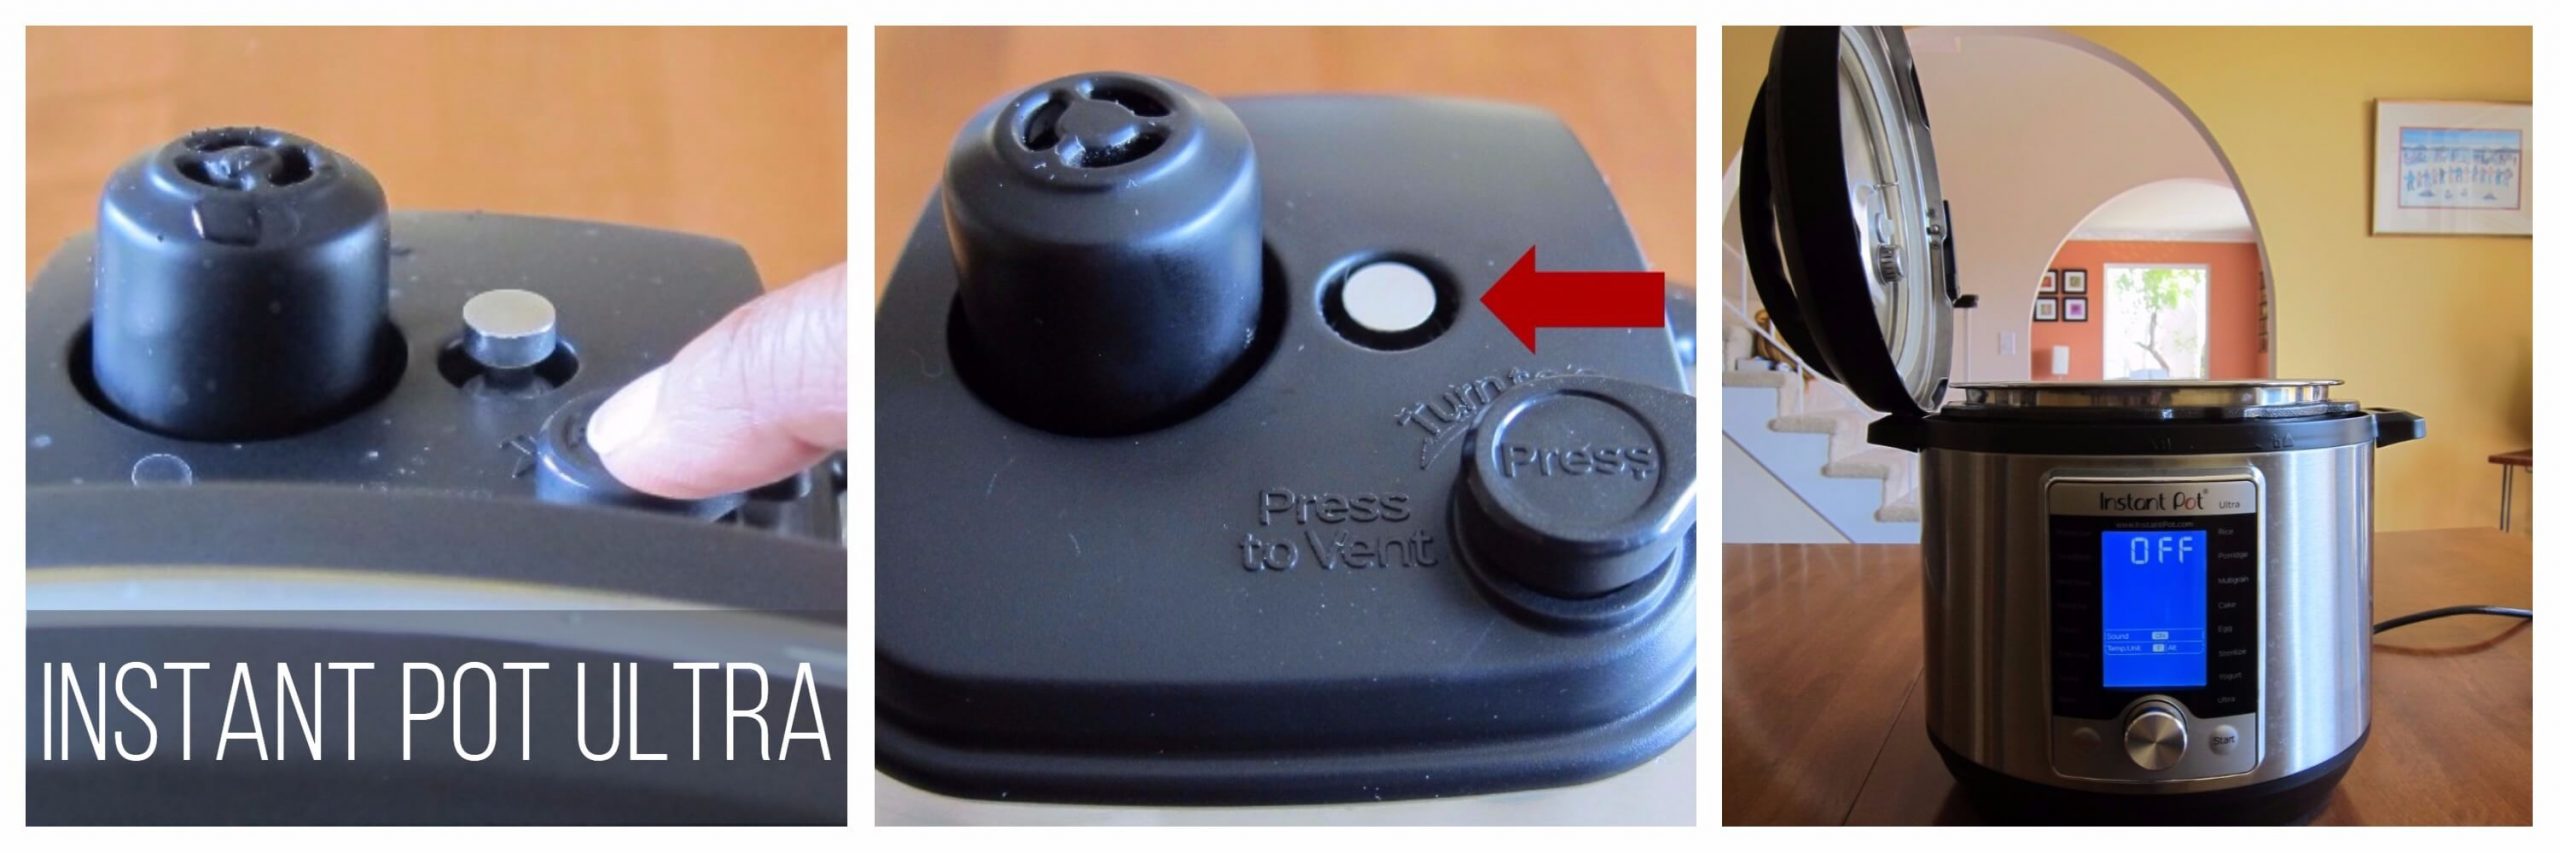
- Press down on the Steam Release Button until it locks into place, and steam begins to come out of the Steam Release Valve.
- When your Instant Pot is depressurized, the float valve will be in the down position.
- Press Cancel and open the Instant Pot.
[Find out more about the pressure release methods and how and when to use them. ]
Add Vegetables and Seasonings and Saute

- Select Saute mode.
- Stir in fish sauce, brown sugar, lime juice, bell pepper, zucchini, onion, bamboo shoots, and lime leaves.
- Cook until vegetables are crisp-tender, about 3 to 5 minutes. Don’t overcook, as the vegetables will continue to cook in the residual heat.
- Taste and adjust with more fish sauce, brown sugar or lime juice.
- Stir in the Thai basil leaves.
More Chicken Favorites
Love cooking chicken in the Instant Pot but looking for new recipes? Here are a few of my favorite Instant Pot chicken recipes that are easy, delicious, and fast to make.
- Instant Pot chicken shawarma
- Instant Pot Jamaican jerk chicken
- Instant Pot Korean chicken
- Instant Pot chicken tikka masala
For more chicken recipes, be sure to head over to my list of amazing Instant Pot Chicken Recipes you need to try!
Instant Pot Thai Green Curry with Chicken
Ingredients
- 3 tablespoon Thai Green curry paste preferably Maesri or Mae Ploy brand
- 13.5 oz. coconut milk (1 can), preferably Aroy D or Chaokoh brand – 400 ml
- 1 teaspoon coriander powder
- ½ teaspoon cumin powder
- 1 lb boneless skinless chicken thighs (500 grams) sliced into thin bite-size pieces
- ¼ cup low sodium chicken broth or water
- 2 Tbsp fish sauce more to taste
- 1 Tbsp brown sugar or to taste
- 1 Tbsp lime juice
- 1 cup green bell pepper cubed or strips
- 1 cup zucchini sliced or strips
- ½ cup onion cubed
- ½ cup bamboo shoots canned, sliced
- 4 lime leaves slightly bruised *
- ¼ cup Thai Basil leaves
Instructions
- Select Saute mode and stir in green curry paste and ½ can of coconut milk until mixture is bubbly, about a minute or two.
- Stir in coriander and cumin and cook for 30 seconds.
- Press Cancel.
- Stir in chicken, remaining coconut milk, and chicken broth.
- Close Instant Pot and pressure cook on High Pressure for 4 minutes.
- Do a Quick Release of pressure (QR) and open the Instant Pot. [Read More: The Different Pressure Release Methods]
- Add in fish sauce, brown sugar, lime juice, bell pepper, zucchini, onions, bamboo shoots, and lime leaves.
- Select Saute and cook until vegetables are crisp-tender, 3 to 5 minutes. (Be sure not to overcook. Vegetables will continue to cook in the residual heat.)
- Taste and adjust with more fish sauce, brown sugar or lime juice.
- Stir in the Thai basil leaves.
- Serve with Instant Pot Jasmine Rice.
Notes
- Prep time does not include steps that are already accounted for in the ingredient list, e.g. chopped vegetables, diced chicken, etc.
- Use a splatter screen if necessary, in the first step, to guard against coconut milk splatters.
- You can choose to substitute the vegetables with your choice e.g. green beans, Thai eggplant, peas.
- You can also increase the quantity of vegetables to suit your tastes.
- My chicken was thinly sliced. If your pieces of chicken are larger, you’ll need to add on a few more minutes of cooking or just do a natural release of pressure.
- * Lime leaves are also referred to as k-lime, makrut or kaffir lime leaves.
Nutrition
Thank you for visiting Paint the Kitchen Red. All photos and content are copyright protected. Please don’t use any content without prior written permission. If you’ve made this recipe and would like to share it with your friends, please link back to this recipe. Thank you!
I am not a certified nutritionist. I provide my best estimate of nutritional information merely as a courtesy to my readers. If you depend on nutritional information for dietary or health reasons, I suggest using your favorite online nutrition calculator to confirm the nutritional value of this recipe based on the actual ingredients that you use.
Did you know that the best way to support your favorite bloggers is to comment and rate recipes, and share on social media? If you loved this recipe, please comment and give it a five ⭐ rating in the comment section below. If you’re a pinner, pin this post using the Pin buttons at the top and bottom of this post and in the recipe card above. Thank you for your support!
Recipes you Might Also Like!


Merion says
Hi, just made this and it smells so good! (Haven’t tasted yet). Is there a reason the chicken only needs to cook for 4 minutes even though the cheat sheet said 10? (I used boneless thighs)
Paint the Kitchen Red says
Hi there Merion, they may be referring to a whole boneless thigh, whereas this recipe uses bite-size pieces. Keep in mind that cooking time stated in recipes doesn’t usually need to change with larger quantities of a particular food, but will need to be changed with larger sizes e.g. A larger piece of meat, or a whole potato vs pieces. Hope that makes sense!
Reva says
Nina, made this last night and just delish–ur instructions are spot on, easy to follow and we loved it–was not spicy for me at all–keep your recipes coming
Paint the Kitchen Red says
Hi Reva – thanks for letting me know! I’m really glad you enjoyed the recipe. I will be posting a couple more Thai recipes, hoping for the end of summer or early fall 🙂
Reva says
Nina, I can’t wait–post them earlier–I went and bought so many of those curry pastes and coconut milk cans much to my hubby’s chagrin and so i am under pressure 🙂
Paint the Kitchen Red says
That’s me too – perfect for when you have a really busy evening and don’t know what to cook 🙂
David says
Hi there, just found your website and all the recipes look amazing. Planning to trial this one tomorrow… and whilst I’ve seen some recipes where they add the fish sauce, brown sugar, lime juice and even the lime leaves alongside with the chicken before it gets up to pressure, YOU add them after the chicken is cooked. Does it make a major difference?
Many thanks and keep going, your work is amazing!
Paint the Kitchen Red says
Hi David – you could add it all in if you wanted to, but in my experience the flavors become mellow with pressure cooking – you could try it out both ways and see what you think. Thanks for visiting the site and for your kind words!
David says
Made it last week, it was fantastic, THANK YOU so much, it was exactly like in my memories…. made me travel to Thailand from the confort of my home. Will try other recipes of yours! 😉
Paint the Kitchen Red says
You’re welcome – thank you for the great compliment!
Kat says
I made this tonight and it is the best curry I have ever made at home. It’s one of the best curries I’ve ever tasted. This recipe is amazing. Thank you so much!
Paint the Kitchen Red says
Thanks so much, Kat! That’s a great compliment – you made my day!
Cara says
This was delicious! I left my cumin at work so I substituted curry powder and it worked fine. I think the kaffir lime leaves makes all the difference in the world and I did 3 tbsp of fish sauce because it’s flavor is spectacular. Thanks for another great use for my pressure cooker!!
Paint the Kitchen Red says
Hi Cara – I’m really glad you like the curry! Thanks for commenting.
Bill says
I have tried nearly a dozen thai curry recipes and just about gave up as none could come close to recreating the real deal, but this recipe is perfect. Comes out with rich flavor and consistency and doesn’t take much more than 45 minutes beginning to end. For next time I will up the lime and sugar and cut back on the fish sauce (just a tad too salty).
Paint the Kitchen Red says
Hi Bill – great to hear! I know what you mean; I had the same journey, even going so far as to create my own curry paste which ended up taking me about the whole day! I’m so happy to share with others, and thank you for taking the time to comment.
Bree says
Hi! I made this recipe and it was very good! I found it to be less sweet than I usually taste at the restaurant. I was wondering if I should add more sugar into the recipe to sweeten it up, or will that ruin it? Or, have you tried palm sugar in this recipe? Also, I found dried lime leaves to use the next time I make it, should I use the same amount of they are dried? Thank you!
Paint the Kitchen Red says
Hi Bree – thanks for your question! I always say you should eat what you like and change the recipe to suit your tastes. Some restaurants do serve Thai curries sweeter than others. I would add another one teaspoon of brown sugar, and then more after cooking and after tasting. Palm sugar is actually more authentic so that would work too. Yes, you can add the same quantity of dried leaves, and maybe a few more. Another option is to rehydrate them or crumble them to get more flavor.
Jay Ewert says
Thank you so much for your post. We just made this in our instant pot and it is fantastic.
Paint the Kitchen Red says
Hi Jay, thanks for letting me know! I’m really glad you liked it, it’s one of my favorites too – nice and spicy!
Natalia says
Made this tonight! It was sooo delicious but was too spicy for my family. Is there a way to make it less spicy? A little less curry paste?
Paint the Kitchen Red says
Natalia – green curry is actually the spiciest of the Thai curries. I would suggest adding less paste (say, 2 Tbsp) if you want the same quantity as the recipe. Alternatively, if you like gravy like I do, just add another half to whole can of coconut milk to mellow it out. If you like milder spice, try the Massaman curry – I just made it last week, very yummy. You can even use chicken instead of the beef.
Selina says
are the line leaves supposed to be removed before serving? Or do those just get dishes out and eaten too?
Paint the Kitchen Red says
Hi Selina, the lime leaves are a bit tough, so the only time I eat them is if I julienne them or cut them into tiny pieces (which I sometimes do to get a stronger flavor). You can just remove them either before serving, or set them aside when you encounter them.
Chris Beloni says
I have made this recipe and really enjoyed the flavors! How long would you cook if you doubled the recipe?
Paint the Kitchen Red says
Hi Chris – you can cook for the same amount of time as stated on the recipe. In general, for Instant Pot recipes, you don’t change cooking time if you change quantity. There are exceptions, for frozen food, thicker cuts of meat, etc. I love this recipe too!
Pallavi says
This was great! I made it tonight and it tasted really authentic. I don’t eat chicken so I replaced the chicken with Tofu and threw the tofu in with the veggies and then did 4 mins of Manual mode.
Paint the Kitchen Red says
Hi Pallavi, thanks for your comment. Did the veggies overcook with the 4 min manual mode? I usually do the tofu for 4 min and then just use saute for the veggies. Glad you liked it. Hope you get to try out the other curries too!
Grumpy Old Man says
This came out really well even with one or two ingredients missing. I think, like most stews, it’s a fairly forgiving recipe.
Paint the Kitchen Red says
I’m so glad you tried it out and liked it! Thank you for commenting, Grumpy Old Man!
Malin says
We found some Thai eggplant in a local Asian market over the weekend and plan to try them in the green curry tonight. Does the cook time need to be adjusted? It feels like a rather dense vegetable. Thanks for the great recipes!
Paint the Kitchen Red says
Malin – they do take a bit longer to cook, but I don’t know if they might overcook if you add them with the chicken and pressure cook. I would cut them a little bigger if you’re going to cook with the chicken. You could do half and half: add some with the chicken and see how it does and the rest with other veggies and boil. That way you’ll know for next time. They discolor quickly, so cut them right before you’re adding them. Good luck!
Malin says
We tried this last night as you recommended with some Thai eggplant cooked under pressure and some added with the rest of the vegetables. The eggplant added at the end had a nice crunch to it and really took on the flavor of the curry. They were delicious. Unfortunately, the only evidence of the eggplant cooked under pressure were the seeds and the rolled up skins of the eggplant. I guess the pressure destroyed the meat of the eggplant which resulted in a much thinner sauce. Despite the thinner sauce the recipe was still awesome. For future recipes I think we will add the eggplant as soon as the chicken is done then add the remaining vegetables once the sauce comes to a simmer. Thanks for posting your curries! We’ve loved Thai food for years and love that we can now cook restaurant quality curry at home. We’ve had curry at least twice a week for the last month. Keep the Thai recipes coming!
Paint the Kitchen Red says
Oh! Good to know. I had a feeling it would be too much but wasn’t sure. Thanks for the update. I’m so glad you’re enjoying the curries. I love them too, especially because I can make them sooo quickly on a weekday.
Emma says
This looks great! I would like to cook the rice at the same time as the curry, would that still be 4 minutes on manual, just using the PIP method?
Paint the Kitchen Red says
Hi Emma – thanks for your comment. I pressure cook jasmine rice (in a separate dish on a trivet) and chicken for the 4 minutes – since Jasmine rice cooks in 4 minutes; then remove the rice and continue with the recipe. If you’re cooking a different kind of rice that takes 6 minutes or so, you might still be okay with chicken thighs and maybe cut them a bit bigger. Enjoy!
Malin Tate says
When you generate your nutritional values do you also calculate a serving size? We’ve made your red curry and Massaman and both are incredibly delicious. Can’t wait to try this one.
Paint the Kitchen Red says
Hi Malin – I’m so glad you like the recipes. I use the website http://www.myfitnesspal.com to calculate the nutritional information. At the top of the recipe card, you’ll see the number of servings (e.g. “yield: 6”). The nutritional information is for 1/6 of the recipe. Hope that helps.
Cheryl says
We enjoyed this green curry just as we did the red curry. Thanks!
Tanu says
This looks awesome and I am gonna try it soon..Can I substitute chicken with tofu? What type of tofu should I use? Firm or extra firm? Any suggested brand?
Paint the Kitchen Red says
Hi Tanu, I would use extra firm tofu and drain completely with a weight on top. Cook as you would the chicken, but for about 3 minutes and proceed with the rest of the recipe. If you get a chance, let us know how it worked for you!
Barbara Schieving says
What a gorgeous color!
Paint the Kitchen Red says
Thank you Barbara!
Diane says
This looks so good! Can I come to dinner? 🙂
Paint the Kitchen Red says
Yes, come on over, Diane!