
Whether you’re brand new to the Instant Pot or have been using it for a while, you may have questions about how to use it. In this comprehensive Instant Pot FAQ guide, I’ll address the most common questions and concerns.

This post contains affiliate links. As an Amazon Associate, I earn from qualifying purchases. Please read the disclosure.
➡ Are you getting an error code like C7 or PrSe? Head over to my post about Instant Pot error codes and how to solve them!
The Instant Pot is a programmable pressure cooker that allows you to cook foods faster than traditional cooking methods. In addition to pressure cooking, Instant Pots can be used for sautéing, slow cooking, steaming, and more.
The Instant Pot is truly a marvel with its versatile functionality. But this also makes it somewhat complex and confusing for new owners.
I’ve been using an Instant Pot for almost ten years, and I’ve encountered pretty much any problem you can think of!
That’s why so many Instant Pot owners turn to me for help. I hope this list of FAQs and tips will help you make the most of your new appliance.
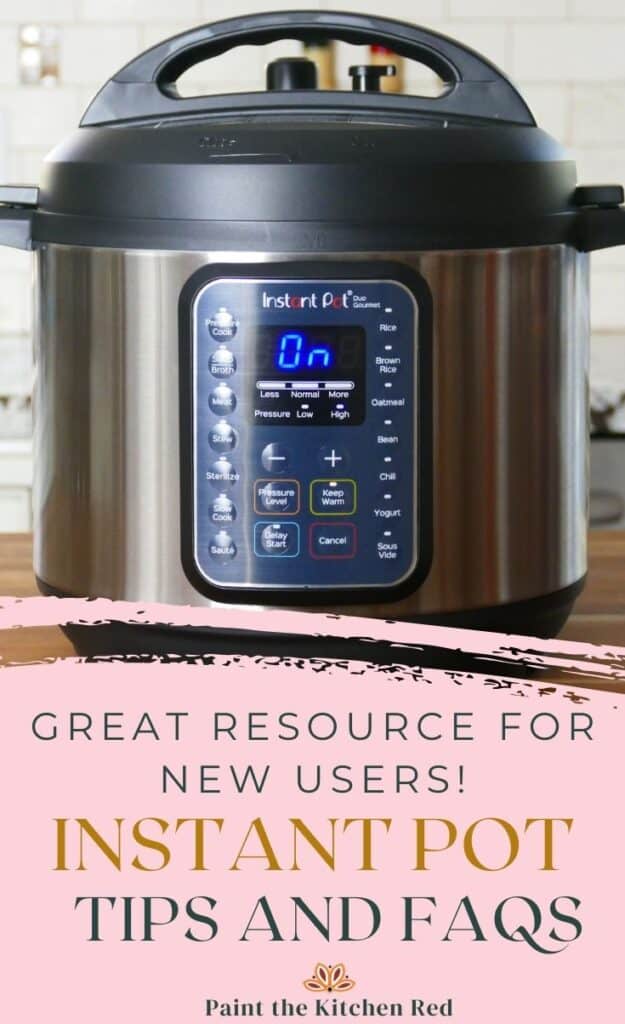
1. My Instant Pot just says On. What is the meaning of On?
If your Instant Pot says On but no time is showing on the display, that’s normal.
Once you program the Instant Pot to begin pressure cooking, the display panel will say On. It will remain On until the Instant Pot is pressurized.
Once the float valve comes up, the Instant Pot display may take a few minutes to change from On to counting down the pressure cooking time.
For example, to pressure cook for 10 minutes, select Pressure Cook and set the pressure cooking time to 00:10 (Press Start on some models.) The Instant Pot will say On, and once the float valve comes up, it will eventually begin counting down from 00:10 to 00:00.
2. Why is my Instant Pot clicking?
The Instant Pot making a clicking noise is pretty normal.
- The clicking sounds can happen when the Instant Pot is internally regulating power through power switching. This is perfectly normal, and you don’t need to worry.
- The inner pot (liner) may be wet on the outside. This can cause the Instant Pot to make a popping sound. There isn’t anything to worry about. Avoid this issue by ensuring the Instant Pot liner is dry before putting it in the Instant Pot base unit.
- Expansion and contraction of the lid and the base unit can cause a popping noise.
Instant Pot Resources
- How to Use Pot in Pot Instant Pot Cooking Method
- Instant Pot Troubleshooting – Common Problems and How to Fix Them
- How To Natural Release Instant Pot vs Quick Release
- What is a Trivet for the Instant Pot?
- Instant Pot Symbols | Display Panel Icons
- Reasons For Your Instant Pot Not Sealing
- How to Use Instant Pot Delay Start
- Instant Pot Cooking Times – A Complete Guide
- How to Use the Instant Pot Sous Vide Smart Program
- What to do When the Instant Pot Says Burn
- How to Deglaze Your Instant Pot Pressure Cooker
- Instant Pot Directions


3. Why is my Instant Pot hissing? Is it normal for it to hiss?
It is pretty normal for the Instant Pot to make a hissing noise when coming to pressure. You may see some steam coming out of the steam release mechanism or the float valve in addition to the hissing sound.
This happens because the temperature is rising within the pot.
Once enough pressure has built up in the pot, the float valve will rise, and this hissing should stop. You might continue to see a few tiny wisps of steam escaping from the float valve.
The more liquid you have or the colder the ingredients in the Instant Pot (e.g. frozen meat), the longer it takes to come to pressure.
If you find steam leaking from the sides of the lid (where the sealing ring sits), the sealing ring has probably been installed incorrectly.
If the Instant Pot won’t stop hissing, you can troubleshoot the problem by reading the following posts:
– Instant Pot Not Sealing
– Instant Pot Burn Message
If you still can’t solve the problem, it’s possible you have a defective unit, and you might need to contact the Instant Pot company.
4. Is the Instant Pot timer minutes or hours?
The Instant Pot time display is hours and minutes (HH:MM). So if you see 05:00, that means it’s 5 hours, not 5 minutes.
5. How do I set the Instant Pot Timer?
The Instant Pot has three different timers:
Cooking Timer
- Counts down the pressure cooking time.
- After the Instant Pot has pressurized, the display goes from On to the programmed cook time (e.g. 10 minutes or 00:10).
- The timer then counts down from the programmed cook time (e.g. 00:10) to 00:00.
- Once the countdown is complete, the Instant Pot goes into Keep Warm mode if the Keep Warm function is on.
Keep Warm Timer
- Shows the amount of time the contents of the Instant Pot are being kept warm.
- The keep warm timer only comes on if the Keep Warm function has been turned on.
- After the cooking timer reaches 00:00, the keep warm timer counts up from 00:00 until you press Cancel.
- Keep Warm function can be used to keep food warm even if you’re not pressure cooking.
Delay start timer
- Allows cooking to begin at a future time. Shows the number of hours and minutes until cooking begins.
- Begins counting down once the delay start functionality has been enabled.
- Enabling Delay Start function is different for each model. For most models, you select the cooking program, time and pressure level and then select Delay Start and enter the amount of time you want to delay the start of cooking. Finally, you press Start.
- Note: some older models have a Timer button which is the same as Delay Start.
[Read more: How to use the Instant Pot Delay Start]
6. Why is the Instant Pot Counting Up?
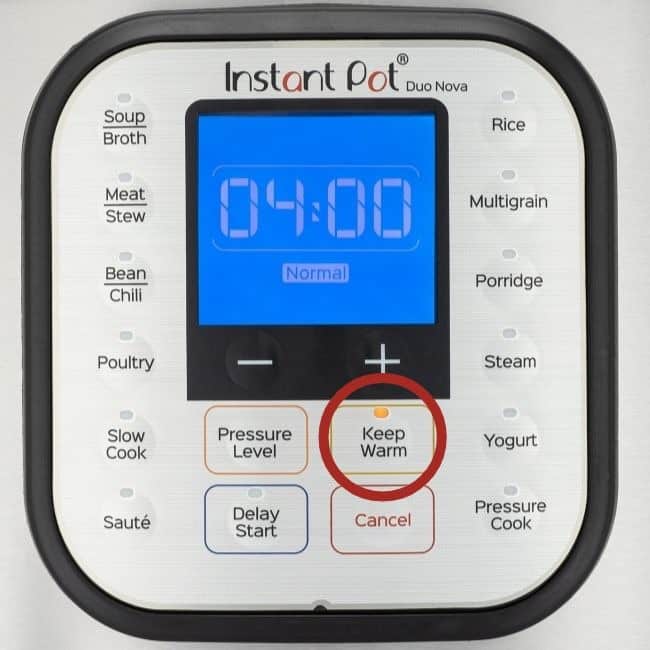
If your Instant Pot is counting up, it’s because pressure cooking is complete and you have turned on Keep Warm mode. The time shown on the display is how long it’s been since cooking was completed.
So how do you steam in an Instant Pot without the Steam button? If you don’t have a Steam button, you can follow the above instructions but use the Pressure Cook button instead. It might take a tiny bit longer to heat up, but it will work the same way.
7. Can I adjust Instant Pot timer while cooking?
If you’ve programmed the Instant Pot and cooking has begun, you can adjust the cooking time by pressing the function and navigating to the cooking time. Press Start after you’ve changed the time.
8. Why is my Instant Pot counting up?
The Instant Pot counts up once pressure cooking is complete, and it’s in Keep Warm mode.
9. How long does it take Instant Pot to pressurize?
The quantity and temperature of the food and liquid will determine how long the Instant Pot takes to preheat. This can be anywhere from 10 to 30 minutes.
If you’re cooking soup and have added cold water to the Instant Pot, or if you’re using frozen meat or vegetables, it can take 20 to 30 minutes for the liquid to heat up.
You can reduce the time it takes for the Instant Pot to pressurize by adding warm liquid and thawed ingredients.
After pressure cooking is complete, if the recipe calls for natural pressure release (NPR), that can also take from 5 to 30 minutes, depending on the quantity of liquid in the Instant Pot.
10. If I want to double a recipe, do I need to double the pressure cooking time?

Doubling a recipe doesn’t require changing the cooking time. Cooking times are more dependent on the density and thickness of the ingredients rather than the weight.
So, if you’re cooking 8 chicken thighs instead of the 4 thighs that a recipe calls for, you won’t need to change the cooking time in the recipe (so long as you’re not overcrowding the pot and the liquid has room to circulate).
Keep in mind that even though you are not increasing the cooking time, the Instant Pot will take longer to build pressure due to the increased quantity of ingredients.
On the other hand, if the recipe calls for 2-inch thick pieces of meat and you’re cooking 3-inch thick pieces, or if you’ve cut the vegetables into larger pieces than a recipe recommends, you might have to increase the cooking time.
11. Can I use the Instant Pot as slow cooker?
If you’re using the Slow Cooker setting, be aware that Less (or Low on some models) setting is too low to slow cook anything; it’s more like the Warm setting on a slow cooker.
| Slow Cooker/Crock Pot | Instant Pot |
|---|---|
| Warm | Less (or Low on some models) |
| Low | Normal (or Medium) |
| High | More (or High) |
12. Will my Instant Pot automatically turn off?
If the Keep Warm function is off, the Instant Pot will turn off automatically after the pressure cooking timer has counted down. If the Keep Warm is on, it will turn off once the Keep Warm timer has finished.
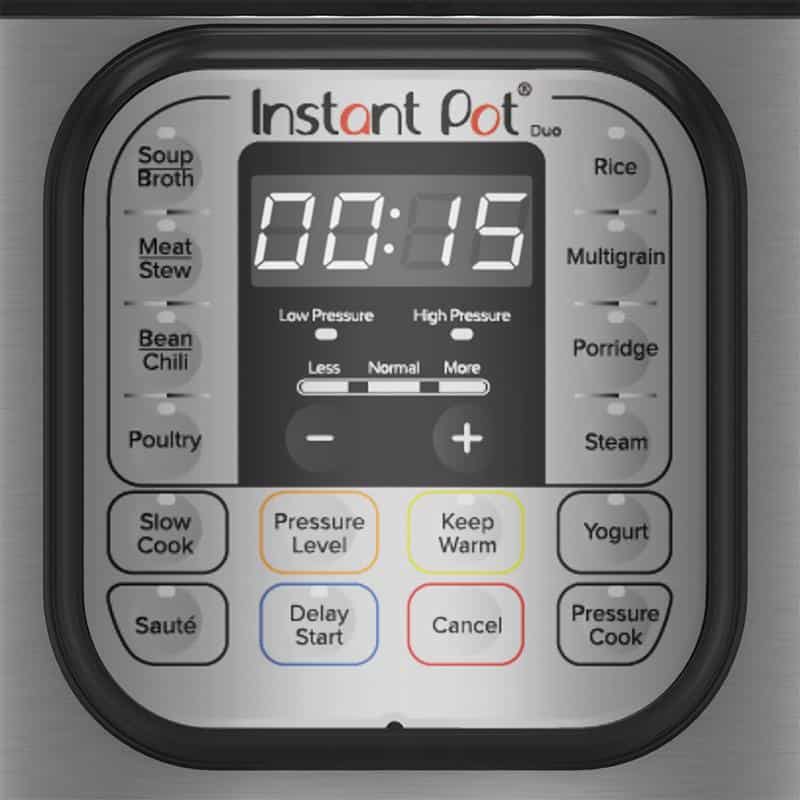
13. How can I switch between High and Low pressure?
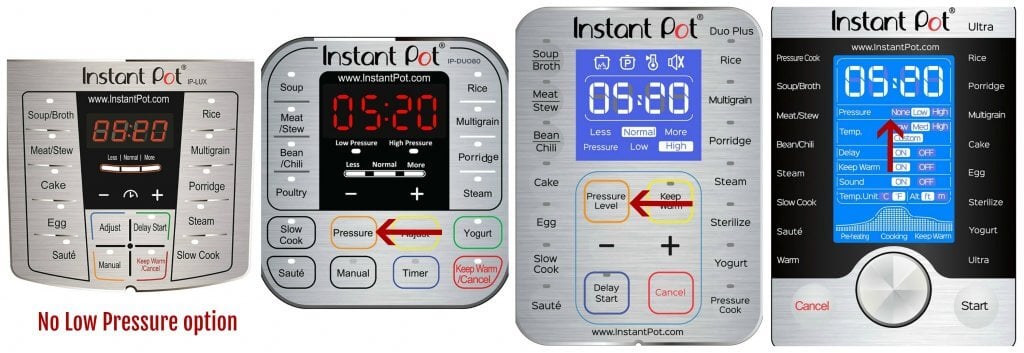
Not all Instant Pots have the Low setting. The Instant Pot Lux model only has a High-pressure setting. For most other models, use either the Pressure or Pressure Level button to switch between Low and High pressure.
For the Instant Pot Ultra model or the Instant Pot Duo Evo Plus, you’ll use the knob to change the Pressure setting.
14. The sealing ring always smells like whatever I cooked last. How do I remove the smell from the sealing ring?
The sealing ring is made of silicone. Silicone retains odors, and these odors are hard to remove. I solve this problem by having two sealing rings: one for savory dishes and one for mild dishes and desserts.
I also store my lid upside down on the Instant Pot which allows the sealing ring to air out. That being said, I rarely find that the lingering odors in the sealing ring transfer to what I’m cooking.
Some people have different colored sealing rings so they can keep them straight.
Here are some ways to reduce odors in the sealing ring:
- Wash the lid and sealing ring in the top rack of the dishwasher.
- Put the sealing ring out in full sun for a few hours.
- Pressure cook water and lemon juice or vinegar for a few minutes and let the pressure release naturally.
- Soak the sealing ring in hot water dissolved with a denture cleaner tablet.
15. Instant Pot Steam function
Some Instant Pots have a Steam smart program/function or button. The Steam function is very similar to the Pressure Cook function, except that it heats up the liquid at full force and therefore it’s faster. The assumption is that you would be using the Steam function with water, and therefore there’s no chance of burning anything. To use the Steam function:
- Add about 2 to 3 cups of water to the inner pot.
- Place a trivet or steam rack in the water. The trivet should sit above the water level.
- Place the food to be steamed directly on the rack or in an oven-safe dish that can be placed on the rack without it touching the sides of the inner pot. The dish should also be short enough that the Instant Pot lid can be put on such that the dish and food don’t touch the lid.
- Select Steam and program for the appropriate number of minutes. Quick-cooking vegetables take 0 to 1 minute, whole potatoes can take 10 to 20 minutes depending on their size.
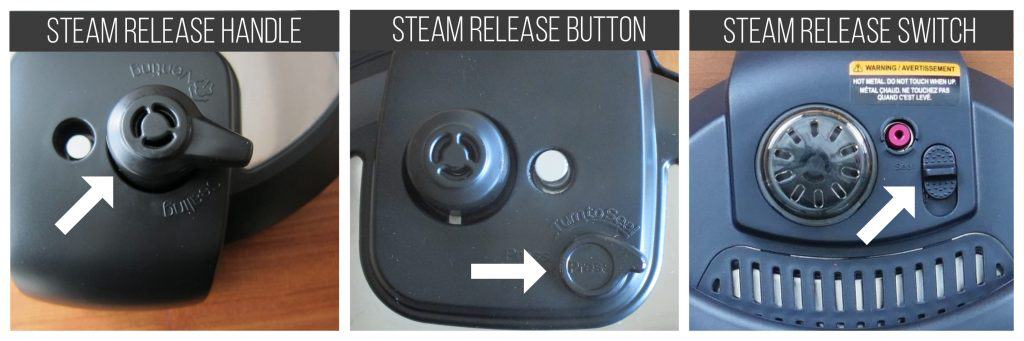
The above directions are for pressure-steaming. The Instant Pot comes to pressure and steams the food very quickly. To steam in the traditional way, put the steam release handle/valve in the Venting position. I use this method to steam idlis (South Indian rice cakes).
So how do you steam in an Instant Pot without the Steam button? If you don’t have a Steam button, you can follow the above instrutions but use the Pressure Cook button instead. It might take a tiny bit longer to heat up but it will work the same way.
16. How to Turn on Instant Pot?
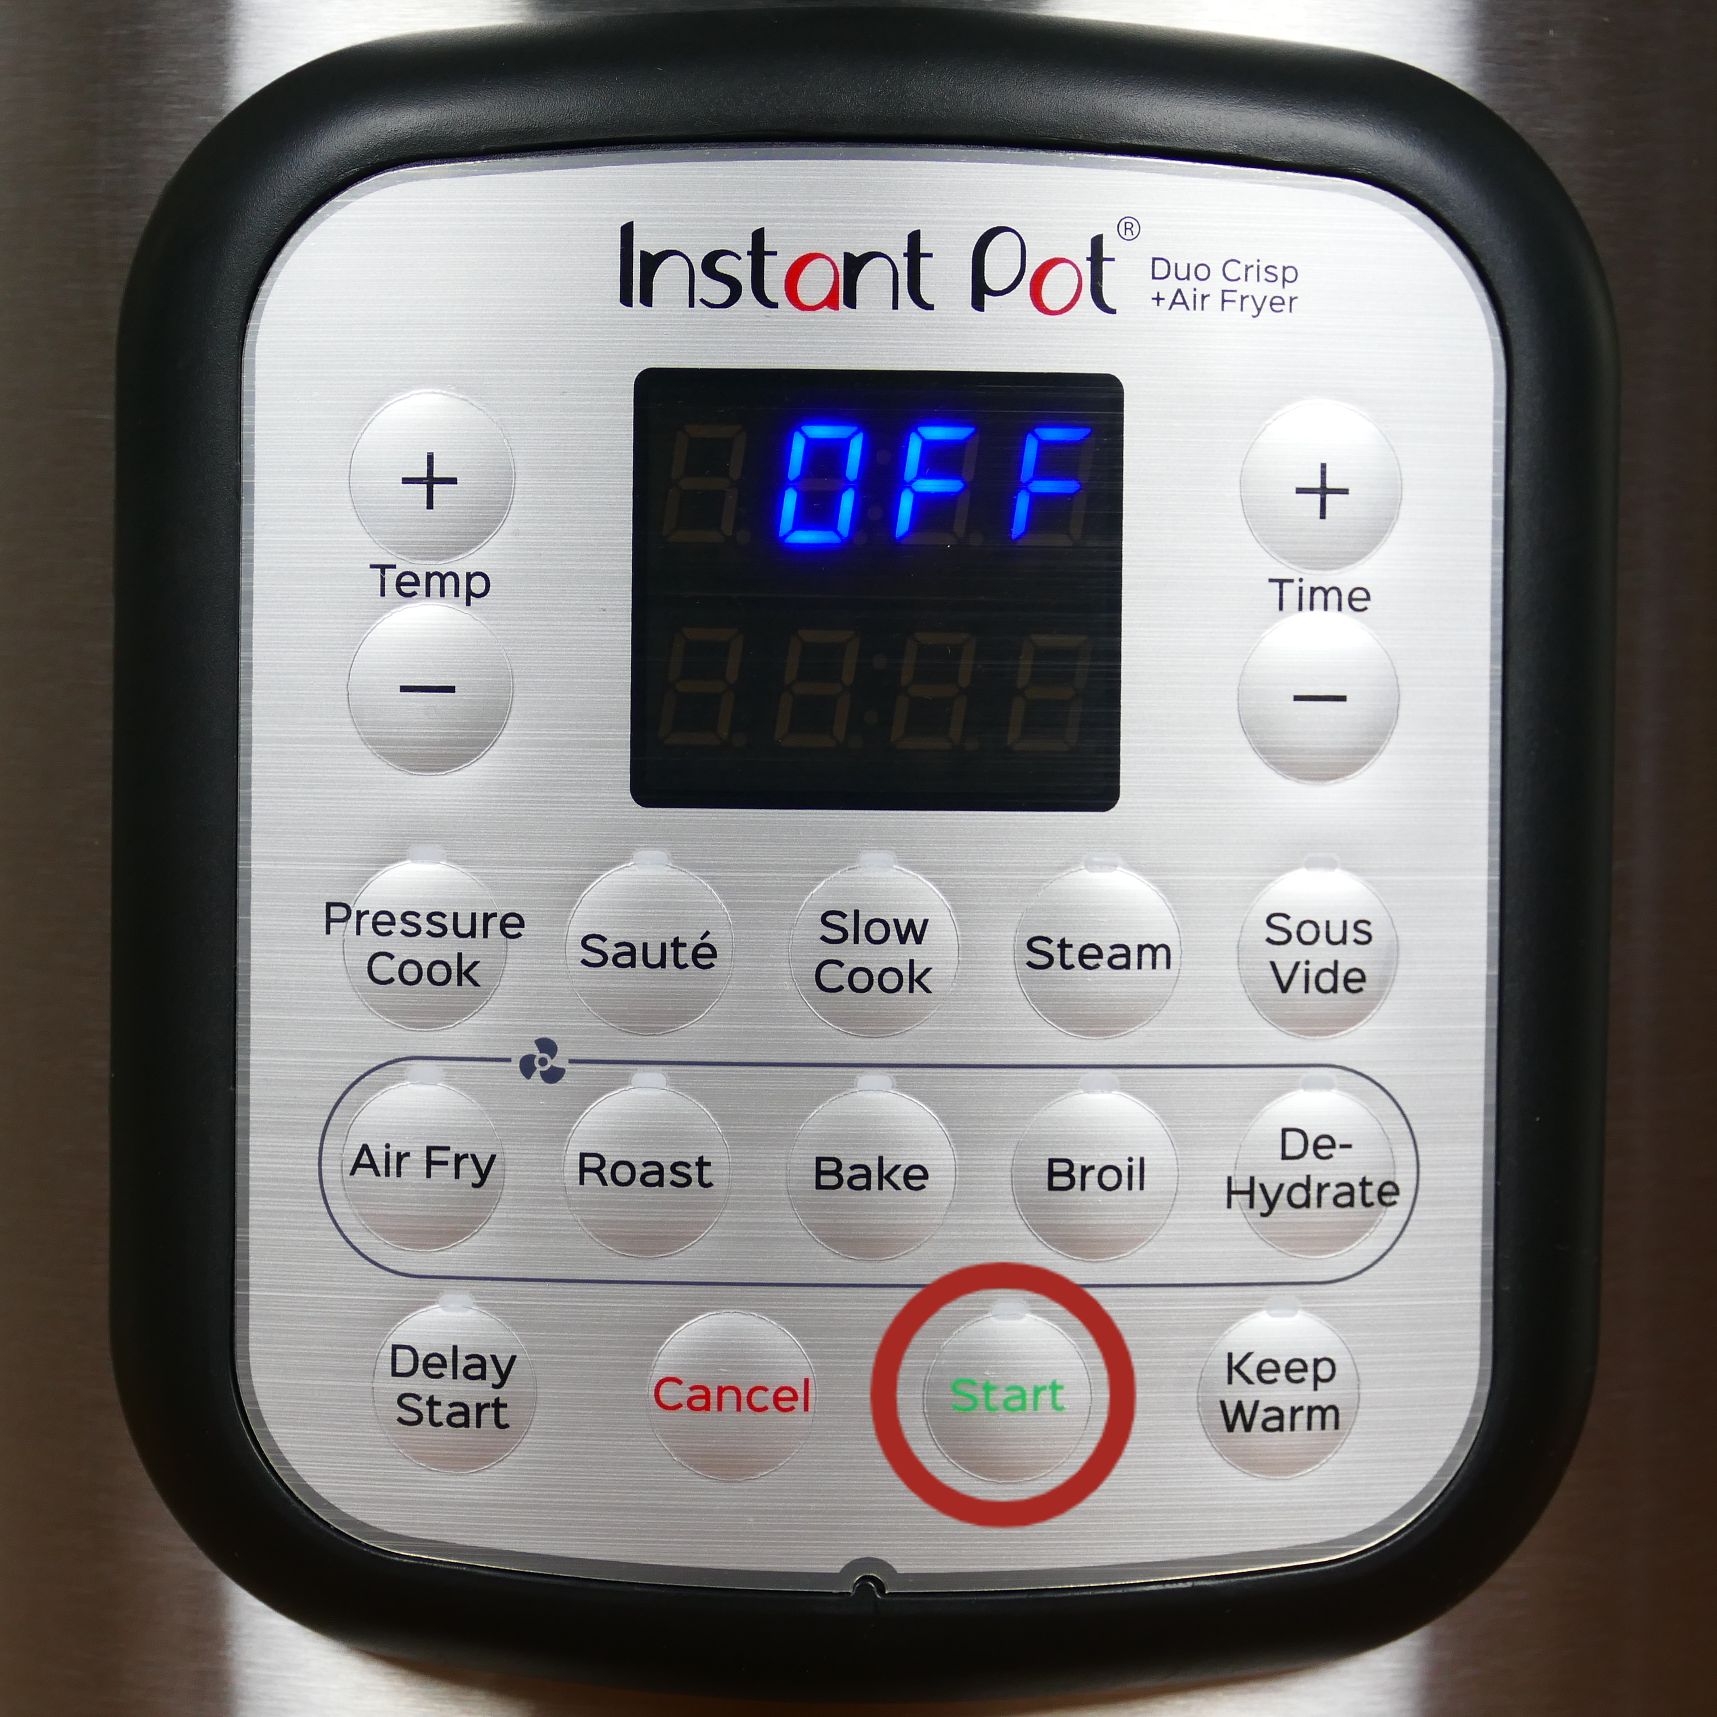
There are two ways to turn on the Instant Pot, depending on the model:
- If your Instant Pot has a Start button, program the Instant Pot by setting the pressure cooking time and pressure level and press Start. The display panel will change to On, and that means the Instant Pot has started the cooking process.
- If your Instant Pot does not have a Start button, program the Instant Pot and just wait about 5 seconds. The display panel will change to On, and that means the Instant Pot has started the cooking process.
I hope these Instant Pot tips and FAQs have answered some of the questions you may have about the Instant Pot and made you feel more comfortable with it. If you have further questions, feel free to comment below, or contact me through my Contact Page, or through social media.
If you found this article to be helpful, please share it on social media using the social media share buttons at the top and bottom of this post. Thank you so much!


Michael Edmunds says
We purchased an Instant Pot IP-Lux. When trying to set the timer we are confused because the display shows numbers from 1-24 on the left of the : which we would understand to be hours. To the right of the : we only get 90 to 00 on the display in increments of 10.
For example, tonight I set the pot to 00:20 in hopes that it will go for 20 minutes. The recipe I am following said for 15 minutes but that is not an option for us.
Is this normal?
Paint the Kitchen Red says
Hi Michael, if you have the version that says ‘Timer’, that button is actually allowing you to delay the start time for cooking. You can set the delay start (timer) for up to 24 hours on that version of the Instant Pot. But to (pressure) cook food, you need to press ‘Manual’ and then use the + or – buttons to change the cooking time to 20 minutes. Hope that helps.
Margaret says
Made beef stroganoff. Recipe stated 10 minutes to cook. All was sauted prior to the 10 minutes. H. I set the IP to 10 minutes. After 40 minutes on the clock the IP stated 5 minutes left. The time on the IP vs real time are so different. I thought this would be done in 10 minutes. I was perfect at tasted great. But the times are so off. One minute in the instant pot world is more like 5 minutes in real time. What am I doing wrong??
Paint the Kitchen Red says
Hi Margaret, the amount of elapsed time for pressure cooking = time to come to pressure + time to pressure cook (10 min). Since it took 45 minutes total, that means that your time to come to pressure was 35 minutes. That time depends on the quantity of liquid and temperature of ingredients. If you want to, you could speed up this process by pre-heating your ingredients in saute mode, and then begin pressure cooking. Be aware that during that saute stage you shouldn’t get anything stuck to the bottom, or you’ll have trouble with your Instant Pot Sealing. Feel free to ask me any followup questions, or you can email me through my contact page.
Melanie says
I have a similar but different question from Tara. Instead of wanting to use 6QT recipes for 8QT, I want to use 6QT recipes cut in half for a 3QT. Are there any differences to cooking time in the smaller pot? I understand the 3 qt needs at least 3/4 C liquid to come to pressure.
Secondly, I have tried two recipes so far, and the meat is cooked but not tender. Does this indicate I need to use high instead of med pressure? Or does it indicate I need a longer cooking time?
Thank you!
Paint the Kitchen Red says
Hi Melanie – I have heard from a few readers that recipes take longer in the 3 quart than the 6 quart. So although officially there’s no increased time required, you might need to add a few more minutes. There are only two pressure levels – low and high. Low, Med and high can be set for saute temperatures. I think you probably need to keep the meat in for a few minutes longer.
john mcnelly says
Why couldn’t the Instant Port be used utilizing saute, pressure and slow cook modes in succession (if appropriate for the dish being cooked) to avoid having to depressurize, remove lid, add new ingredients, and re-pressurize (possibly having to go through this procedure more than one time). I could see this technique being used for stews, soups, chili, etc.
Roselee says
I cooked a beef pot roast. When it was done and i released the steam it wasn’t just steam but some of the juices from the meat. Made quite a mess. What did I do wrong?
Paint the Kitchen Red says
Hi Roselee, thanks for your question. When pressure cooking time has completed, the Instant Pot is still cooking the food at very high temperatures in the IP. You should probably have done either a Natural Pressure Release (NPR) and let the float valve go down on its own, or at the very least waited about 10 minutes to let the pressure go down a bit before doing a Quick Release (QR). Next time you have to do a QR of a messy food, do it in spurts ie. release the pressure for a second and stop, repeating after 5 seconds, until the steam being released is less forceful and then you can do a full QR. Hope that helps.
D says
I too had a problem with my slow cooker setting on my instant pot duo8. I cooked it at the high setting and still didn’t cook the meal in a reasonable timeframe. Would you suggest sautéing the food prior to slow cooking to help soften and cook the food?
Paint the Kitchen Red says
The slow cook function does seem to take longer on the Instant Pot. You might give that a try and see if there’s a difference. To be honest, I don’t use the slow cook function very often and I just adapt my slow cook recipes to pressure cook. Have you given that a try?
Darleen says
Thank you! How much liquid do you need for an 8
Quart pot to come to pressure? Also, can you cook meats and sides at the same time or together? Thank you!
Paint the Kitchen Red says
Hi Darleen. The official word from the IP company is 1 1/2 to 2 cups, but in my experience it depends. What I suggest is that you experiment – you could possibly get away with as little as 3/4 to 1 cup. I can bring my 6 quart to pressure with 1/2 cup!
Paula says
Can you put a cold metal bowl into the pot for cooking? Ex: mix up egg recipes the night before and leave in refrigerator overnight to cook in the morning. Thank you!
Paint the Kitchen Red says
Hi Paula – yes, you can use a cold metal bowl, but of course, you need to make sure there’s water in the bottom of the pot. See my Pot in Pot article if you need more information on using that cooking method. And because the bowl is cold and the contents are cold, you will find that the Instant Pot takes longer to come to pressure.
Candie says
Hi! Thank you so much for taking the time to share this info with your readers. I was curious, as I just got the IP-6 Lux. I kept seeing manual in all the recipes I have visited. Thanks to you, I now understand the difference in choosing meat or pressure cooking. I did, however, make BBQ country ribs using rhe meat setting and upped the time to 45 min. It did work for me. But next time, I will choose pressure cook. My question is, would I still need 45 minutes? Most recipes and the guide book says 20+25 minutes (cooking time). Is it because it is country style ribs opposed to regular pork ribs?
Again, thanks so much for the advice, awesome recipes and conversions!
Also, do you have a newsletter or Instagram blog to follow?
Paint the Kitchen Red says
Hi there, Candie. Thanks for your question. The Meat and Pressure Cook settings both allow for High Pressure and adjustment of time, so you can definitely continue to use the Meat setting if you wish – it’s really the same thing as Pressure Cook. Regarding the times, if 45 minutes worked fine for you, you can continue using that. I think that you could experiment with reducing the time because you probably do not NEED to cook it that long. I’ve cooked boneless country style ribs that are cut into smaller pieces for as little as 15 minutes. So I think the 20 to 25 minutes on Meat or PC setting would work for you. If you find it’s undercooked, just put it back in for another 5 to 10 minutes.
Feri says
I have an 8 qt. Instant Pot and I have made hard boiled eggs, rice, and vegetables, and they come out perfectly. However when I tried a frozen chicken and a meatloaf with potatoes in the bottom of the pot, and the meat was not cooked. Do I need to add more water? Obviously I need to cook things longer, but I am not sure why these weren’t close to cooked. Thanks much.
Paint the Kitchen Red says
Hi Feri – the time required for cooking is directly related to the size and density of the ingredients. Was your frozen chicken in a large chunk? I always take my chicken when I buy it from the store and freeze the pieces separately on a tray and then put them in a ziploc. Your meatloaf size may have been larger i.e. thicker in the middle than what the recipe developer used. The thing about the Instant Pot is you just need to become familiar with each type of food you cook. The recipe may have been tested with a different size of Instant Pot, and there are variations in ingredients that can cause the recipe to not work as stated. So, give it time and with experience you’ll figure out what works for you. Good luck!
Charlene Coomer says
I am new to the Instant Pot way of cooking. I want to cook a big batch of chicken tenderloins for salads. The recipe calls for “poultry “ setting. My new Instant Pot doesn’t have that setting. What setting should I use?
Paint the Kitchen Red says
Charlene – thanks for your question. You would use the Pressure Cook or Manual setting depending on your model. The Duo model has a Poultry setting which defaults to 15 minutes, if I recall.
Tara Hammer says
Thank you so much for your quick response! Your advice was so sensible and helpful, I wish you could solve all the other problems in my life so easily. I very much appreciate your help, and will do as you say. Thanks again!!
Tara Hammer says
Really need your help! I think your site is wonderful and appreciate all the information you give to Instant Pot owners. This is my question: I have read a ton of stuff regarding the difference between the 6 qt. duo and the 8 qt. duo. But I’ve only seen two bits of information about my question, and the answers were opposite of one another! So can you please tell me if all the recipes for the 6 qt. IP would need to be adjusted in any way if using the exact recipe in an 8 qt. duo. I am asking (1) Regarding time to come to pressure. (2) Any difference in the amount of time while ON pressure? (3) Any difference in the amount of liquid? I am not a natural cook, and follow recipes exactly. There are SO many recipes for a six quart and I want to use those recipes. I have an unopened 8 qt. which I could return. Please help me solve this dilemma. THANK YOU!
Paint the Kitchen Red says
Hi Tara, thanks for your question. So *theoretically* you should be able to make any 6 quart recipe in the 8 quart with no changes. And I have a friend who has an 8 quart who makes my recipes and others with no modifications. She got her 8 quart IP about a year ago. That being said, I’m seeing newer IP owners showing the ‘burn’ notice more often than even 6 months ago. I don’t always know if they have an 8 quart or 6 quart, but I suspect many of them have an 8 quart. This is just conjecture on my part. These people probably need to be adding more liquid to the recipes. And that comes from experimenting.
If you don’t need the 8 quart (I have a 6 quart and cook for 5 of us regularly with no issues, not a ton of leftovers but enough) you may want to get the 6 quart, especially since you would like to follow recipes exactly. If you’re in a frame of mind to experiment, you could open up your 8 quart and see how it works for you with a few recipes. In that case, I would suggest that you open it up, do the water test and make something simple like boiled eggs. Then, try out a recipe or two from my site and I can help you out if they don’t turn out when you follow the recipe. If after that, you find that it’s not working for you, you could return it (if that’s even an option). All the best, and stay in touch!
Katie says
Help! Can’t figure out why IP counts up after regular cooking time. What’s this?
Paint the Kitchen Red says
Hi Katie – that’s for the ‘Keep Warm’ mode. Once it’s done cooking and the timer goes down to zero, it counts up the number of minutes after it’s done. This is especially useful for when you want to do natural pressure release (NPR) but for a specified period of time. e.g. NPR 10 minutes means you let the count up timer to go to 10 minutes and you release the remaining pressure using the quick release (QR) method. I hope that answers your question!
Lyndsey says
I am so glad I found your site you have some great recipes and lots of very helpful information thank you
Paint the Kitchen Red says
You’re welcome Lyndsey – thank you for taking the time to comment. I hope you enjoy your new Instant Pot!
Colleen says
I just got my Instant Pot for Christmas and today decided to make my own recipe for navy bean soup. Inusually soak the beans overnight and slow cook all day. The similar IP cookbook recipe said use SOUP setting. It defaults to 30 min. That can’t be enough time for dried beans . The manual says 20-25 min. for beans.
I have added 10 min but really wish for guidance as the books don’t really describe my situation.
Thanks
Paint the Kitchen Red says
Colleen – did you figure it out? I think what you did should have worked out just fine. What I do when a recipe calls for soaked beans is to do a ‘quick soak’ for 5 minutes, natural release. See this Instant Pot Chili post for details. But if you don’t do that, you can just cook the recipe for about 10 minutes longer just like you did.
Len says
All great tips. BUT, as with anything you’ll gain experience (and confidence) by just doing! Thanks for taking the time to write this up for us new-to-the-game cooks.
Paint the Kitchen Red says
You’re welcome Len – you’re so right about experience and confidence!
Monica I. says
I received an instant pot for Christmas this year and am excited to try it. My husband brought home a frozen turkey breast. Is it ok to do still frozen turkey?
Paint the Kitchen Red says
Monica, I prefer to thaw it but yes, you can cook it from frozen. Place it on a trivet and use broth for the liquid. Good luck!
Peggy Brough says
I just bought an Instant Pot. I found your blog on Pinterest and, seriously, it’s the best one I’ve read! My first cooking experience was hard boiled eggs. They were perfect! Thank you so much!
So, here is a question that is bugging me – why is the measuring cup that came with it not 1 cup? It’s more like 3/4 cup. When a recipe calls for 1 cup of something I’m pretty sure I should use 1 cup not 3/4. Seems kind of silly to provide a measuring cup that isn’t accurate. That’s my rant for today. Thanks for listening.?
Paint the Kitchen Red says
Thanks so much for your kind comment, Peggy! So that’s a great question. That measuring cup is an Asian rice measuring cup. I believe the IP company has a big Asian influence. The Asian rice cup is 180 ml and American measuring cup is 250 ml. I have two IPs and now have 2 of these measuring cups sitting in a drawer 🙂
Mins says
Could you please give me step by step instructions for how to use “delay” function in IP Ultra ?? I am totally new a user for IP Ultra
Thx
Paint the Kitchen Red says
Hi Mins, for the Ultra you will select ‘Pressure Cook’ and set the time as detailed in my Ultra beginner’s guide: https://www.paintthekitchenred.com/instant-pot-ultra-beginners-quick-start-manual/. Then instead of pressing start, you will turn the knob twice until the ‘Delay’ option has a rectangle around it that’s blinking. Press the dial to select the ‘Delay’. Turn the dial until the ‘On’ is blinking. Press the dial to select ‘On’. And then press ‘Start’. (Basically when an option has a rectangle around it that’s blinking you can select that option to change it by pressing the dial.) Hope that helps, it’s hard to explain in words – I hope to post a video soon!
Renee says
These are fantastic tips, thank you! Can’t wait to try out my new pot!
Paint the Kitchen Red says
Renee – You’re welcome and congrats on your Instant Pot. I think you’re going to love it!