
Whether you’re brand new to the Instant Pot or have been using it for a while, you may have questions about how to use it. In this comprehensive Instant Pot FAQ guide, I’ll address the most common questions and concerns.

This post contains affiliate links. As an Amazon Associate, I earn from qualifying purchases. Please read the disclosure.
➡ Are you getting an error code like C7 or PrSe? Head over to my post about Instant Pot error codes and how to solve them!
The Instant Pot is a programmable pressure cooker that allows you to cook foods faster than traditional cooking methods. In addition to pressure cooking, Instant Pots can be used for sautéing, slow cooking, steaming, and more.
The Instant Pot is truly a marvel with its versatile functionality. But this also makes it somewhat complex and confusing for new owners.
I’ve been using an Instant Pot for almost ten years, and I’ve encountered pretty much any problem you can think of!
That’s why so many Instant Pot owners turn to me for help. I hope this list of FAQs and tips will help you make the most of your new appliance.
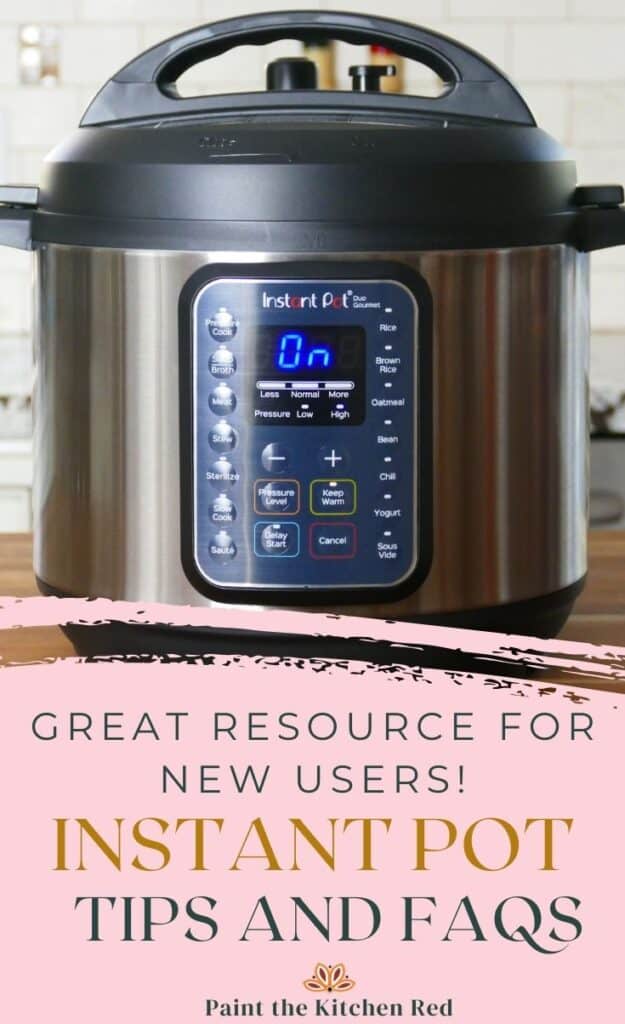
1. My Instant Pot just says On. What is the meaning of On?
If your Instant Pot says On but no time is showing on the display, that’s normal.
Once you program the Instant Pot to begin pressure cooking, the display panel will say On. It will remain On until the Instant Pot is pressurized.
Once the float valve comes up, the Instant Pot display may take a few minutes to change from On to counting down the pressure cooking time.
For example, to pressure cook for 10 minutes, select Pressure Cook and set the pressure cooking time to 00:10 (Press Start on some models.) The Instant Pot will say On, and once the float valve comes up, it will eventually begin counting down from 00:10 to 00:00.
2. Why is my Instant Pot clicking?
The Instant Pot making a clicking noise is pretty normal.
- The clicking sounds can happen when the Instant Pot is internally regulating power through power switching. This is perfectly normal, and you don’t need to worry.
- The inner pot (liner) may be wet on the outside. This can cause the Instant Pot to make a popping sound. There isn’t anything to worry about. Avoid this issue by ensuring the Instant Pot liner is dry before putting it in the Instant Pot base unit.
- Expansion and contraction of the lid and the base unit can cause a popping noise.
Instant Pot Resources
- How to Use Pot in Pot Instant Pot Cooking Method
- Instant Pot Troubleshooting – Common Problems and How to Fix Them
- How To Natural Release Instant Pot vs Quick Release
- What is a Trivet for the Instant Pot?
- Instant Pot Symbols | Display Panel Icons
- Reasons For Your Instant Pot Not Sealing
- How to Use Instant Pot Delay Start
- Instant Pot Cooking Times – A Complete Guide
- How to Use the Instant Pot Sous Vide Smart Program
- What to do When the Instant Pot Says Burn
- How to Deglaze Your Instant Pot Pressure Cooker
- Instant Pot Directions


3. Why is my Instant Pot hissing? Is it normal for it to hiss?
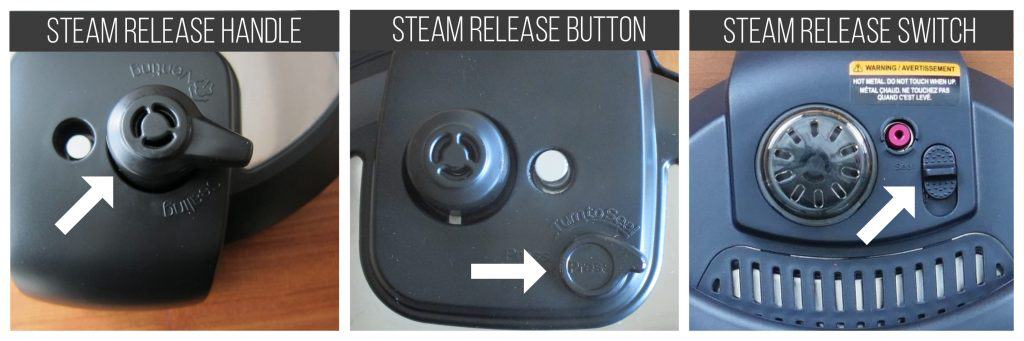
It is pretty normal for the Instant Pot to make a hissing noise when coming to pressure. You may see some steam coming out of the steam release mechanism or the float valve in addition to the hissing sound.
This happens because the temperature is rising within the pot.
Once enough pressure has built up in the pot, the float valve will rise, and this hissing should stop. You might continue to see a few tiny wisps of steam escaping from the float valve.
The more liquid you have or the colder the ingredients in the Instant Pot (e.g. frozen meat), the longer it takes to come to pressure.
If you find steam leaking from the sides of the lid (where the sealing ring sits), the sealing ring has probably been installed incorrectly.
If the Instant Pot won’t stop hissing, you can troubleshoot the problem by reading the following posts:
– Instant Pot Not Sealing
– Instant Pot Burn Message
If you still can’t solve the problem, it’s possible you have a defective unit, and you might need to contact the Instant Pot company.
4. Is the Instant Pot timer minutes or hours?
The Instant Pot time display is hours and minutes (HH:MM). So if you see 05:00, that means it’s 5 hours, not 5 minutes.
5. How do I set the Instant Pot Timer?
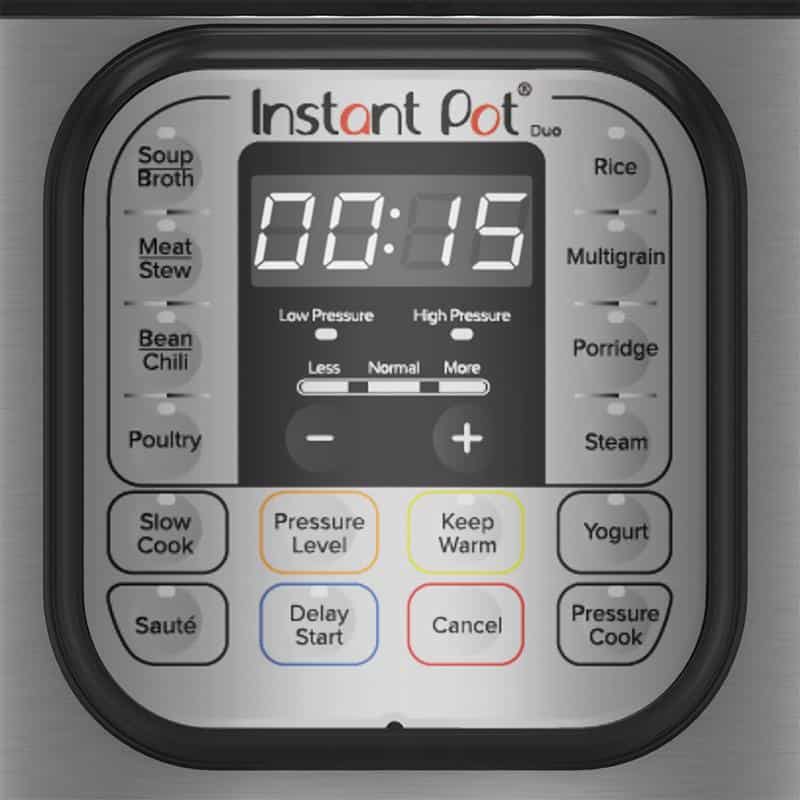
The Instant Pot has three different timers:
Cooking Timer
- Counts down the pressure cooking time.
- After the Instant Pot has pressurized, the display goes from On to the programmed cook time (e.g. 10 minutes or 00:10).
- The timer then counts down from the programmed cook time (e.g. 00:10) to 00:00.
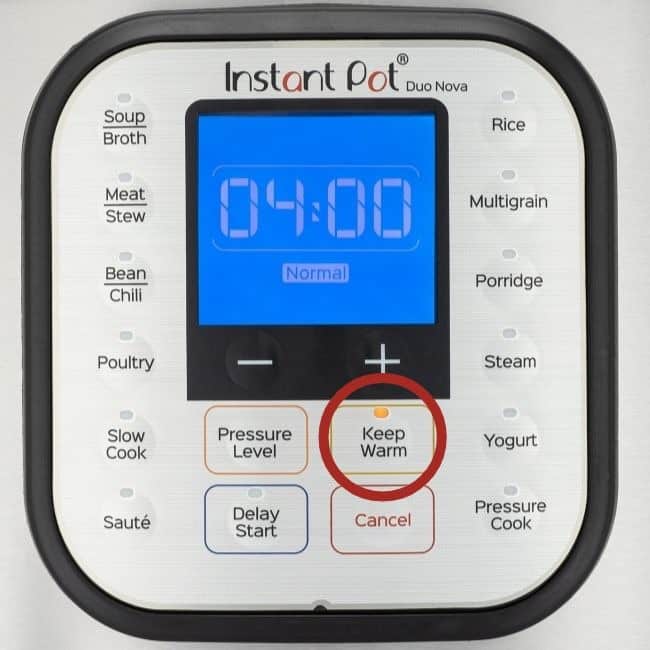
- Once the countdown is complete, the Instant Pot goes into Keep Warm mode if the Keep Warm function is on.
Keep Warm Timer
- Shows the amount of time the contents of the Instant Pot are being kept warm.
- The keep warm timer only comes on if the Keep Warm function has been turned on.
- After the cooking timer reaches 00:00, the keep warm timer counts up from 00:00 until you press Cancel.
- Keep Warm function can be used to keep food warm even if you’re not pressure cooking.
Delay start timer
- Allows cooking to begin at a future time. Shows the number of hours and minutes until cooking begins.
- Begins counting down once the delay start functionality has been enabled.
- Enabling Delay Start function is different for each model. For most models, you select the cooking program, time and pressure level and then select Delay Start and enter the amount of time you want to delay the start of cooking. Finally, you press Start.
- Note: some older models have a Timer button which is the same as Delay Start.
[Read more: How to use the Instant Pot Delay Start]
6. Why is the Instant Pot Counting Up?
If your Instant Pot is counting up, it’s because pressure cooking is complete and you have turned on Keep Warm mode. The time shown on the display is how long it’s been since cooking was completed.
So how do you steam in an Instant Pot without the Steam button? If you don’t have a Steam button, you can follow the above instructions but use the Pressure Cook button instead. It might take a tiny bit longer to heat up, but it will work the same way.
7. Can I adjust Instant Pot timer while cooking?
If you’ve programmed the Instant Pot and cooking has begun, you can adjust the cooking time by pressing the function and navigating to the cooking time. Press Start after you’ve changed the time.
8. Why is my Instant Pot counting up?
The Instant Pot counts up once pressure cooking is complete, and it’s in Keep Warm mode.
9. How long does it take Instant Pot to pressurize?
The quantity and temperature of the food and liquid will determine how long the Instant Pot takes to preheat. This can be anywhere from 10 to 30 minutes.
If you’re cooking soup and have added cold water to the Instant Pot, or if you’re using frozen meat or vegetables, it can take 20 to 30 minutes for the liquid to heat up.
You can reduce the time it takes for the Instant Pot to pressurize by adding warm liquid and thawed ingredients.
After pressure cooking is complete, if the recipe calls for natural pressure release (NPR), that can also take from 5 to 30 minutes, depending on the quantity of liquid in the Instant Pot.
10. If I want to double a recipe, do I need to double the pressure cooking time?

Doubling a recipe doesn’t require changing the cooking time. Cooking times are more dependent on the density and thickness of the ingredients rather than the weight.
So, if you’re cooking 8 chicken thighs instead of the 4 thighs that a recipe calls for, you won’t need to change the cooking time in the recipe (so long as you’re not overcrowding the pot and the liquid has room to circulate).
Keep in mind that even though you are not increasing the cooking time, the Instant Pot will take longer to build pressure due to the increased quantity of ingredients.
On the other hand, if the recipe calls for 2-inch thick pieces of meat and you’re cooking 3-inch thick pieces, or if you’ve cut the vegetables into larger pieces than a recipe recommends, you might have to increase the cooking time.
11. Can I use the Instant Pot as slow cooker?
If you’re using the Slow Cooker setting, be aware that Less (or Low on some models) setting is too low to slow cook anything; it’s more like the Warm setting on a slow cooker.
| Slow Cooker/Crock Pot | Instant Pot |
|---|---|
| Warm | Less (or Low on some models) |
| Low | Normal (or Medium) |
| High | More (or High) |
12. Will my Instant Pot automatically turn off?
If the Keep Warm function is off, the Instant Pot will turn off automatically after the pressure cooking timer has counted down. If the Keep Warm is on, it will turn off once the Keep Warm timer has finished.
13. How can I switch between High and Low pressure?
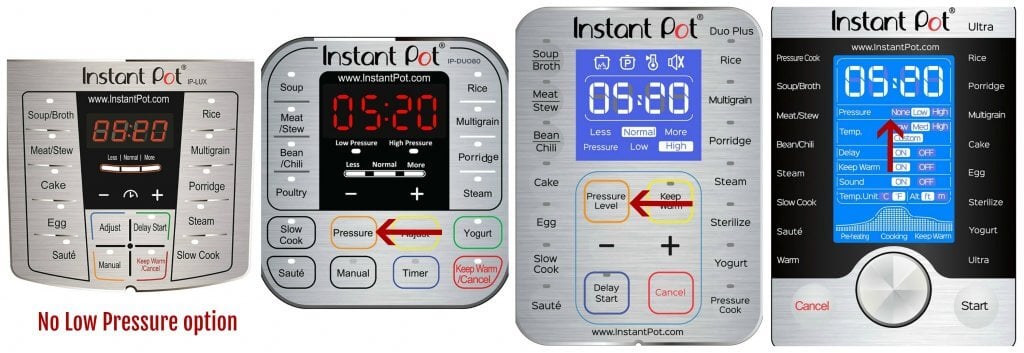
Not all Instant Pots have the Low setting. The Instant Pot Lux model only has a High-pressure setting. For most other models, use either the Pressure or Pressure Level button to switch between Low and High pressure.
For the Instant Pot Ultra model or the Instant Pot Duo Evo Plus, you’ll use the knob to change the Pressure setting.
14. The sealing ring always smells like whatever I cooked last. How do I remove the smell from the sealing ring?
The sealing ring is made of silicone. Silicone retains odors, and these odors are hard to remove. I solve this problem by having two sealing rings: one for savory dishes and one for mild dishes and desserts.
I also store my lid upside down on the Instant Pot which allows the sealing ring to air out. That being said, I rarely find that the lingering odors in the sealing ring transfer to what I’m cooking.
Some people have different colored sealing rings so they can keep them straight.
Here are some ways to reduce odors in the sealing ring:
- Wash the lid and sealing ring in the top rack of the dishwasher.
- Put the sealing ring out in full sun for a few hours.
- Pressure cook water and lemon juice or vinegar for a few minutes and let the pressure release naturally.
- Soak the sealing ring in hot water dissolved with a denture cleaner tablet.
15. Instant Pot Steam function
Some Instant Pots have a Steam smart program/function or button. The Steam function is very similar to the Pressure Cook function, except that it heats up the liquid at full force and therefore it’s faster. The assumption is that you would be using the Steam function with water, and therefore there’s no chance of burning anything. To use the Steam function:
- Add about 2 to 3 cups of water to the inner pot.
- Place a trivet or steam rack in the water. The trivet should sit above the water level.
- Place the food to be steamed directly on the rack or in an oven-safe dish that can be placed on the rack without it touching the sides of the inner pot. The dish should also be short enough that the Instant Pot lid can be put on such that the dish and food don’t touch the lid.
- Select Steam and program for the appropriate number of minutes. Quick-cooking vegetables take 0 to 1 minute, whole potatoes can take 10 to 20 minutes depending on their size.
The above directions are for pressure-steaming. The Instant Pot comes to pressure and steams the food very quickly. To steam in the traditional way, put the steam release handle/valve in the Venting position. I use this method to steam idlis (South Indian rice cakes).
So how do you steam in an Instant Pot without the Steam button? If you don’t have a Steam button, you can follow the above instrutions but use the Pressure Cook button instead. It might take a tiny bit longer to heat up but it will work the same way.
16. How to Turn on Instant Pot?
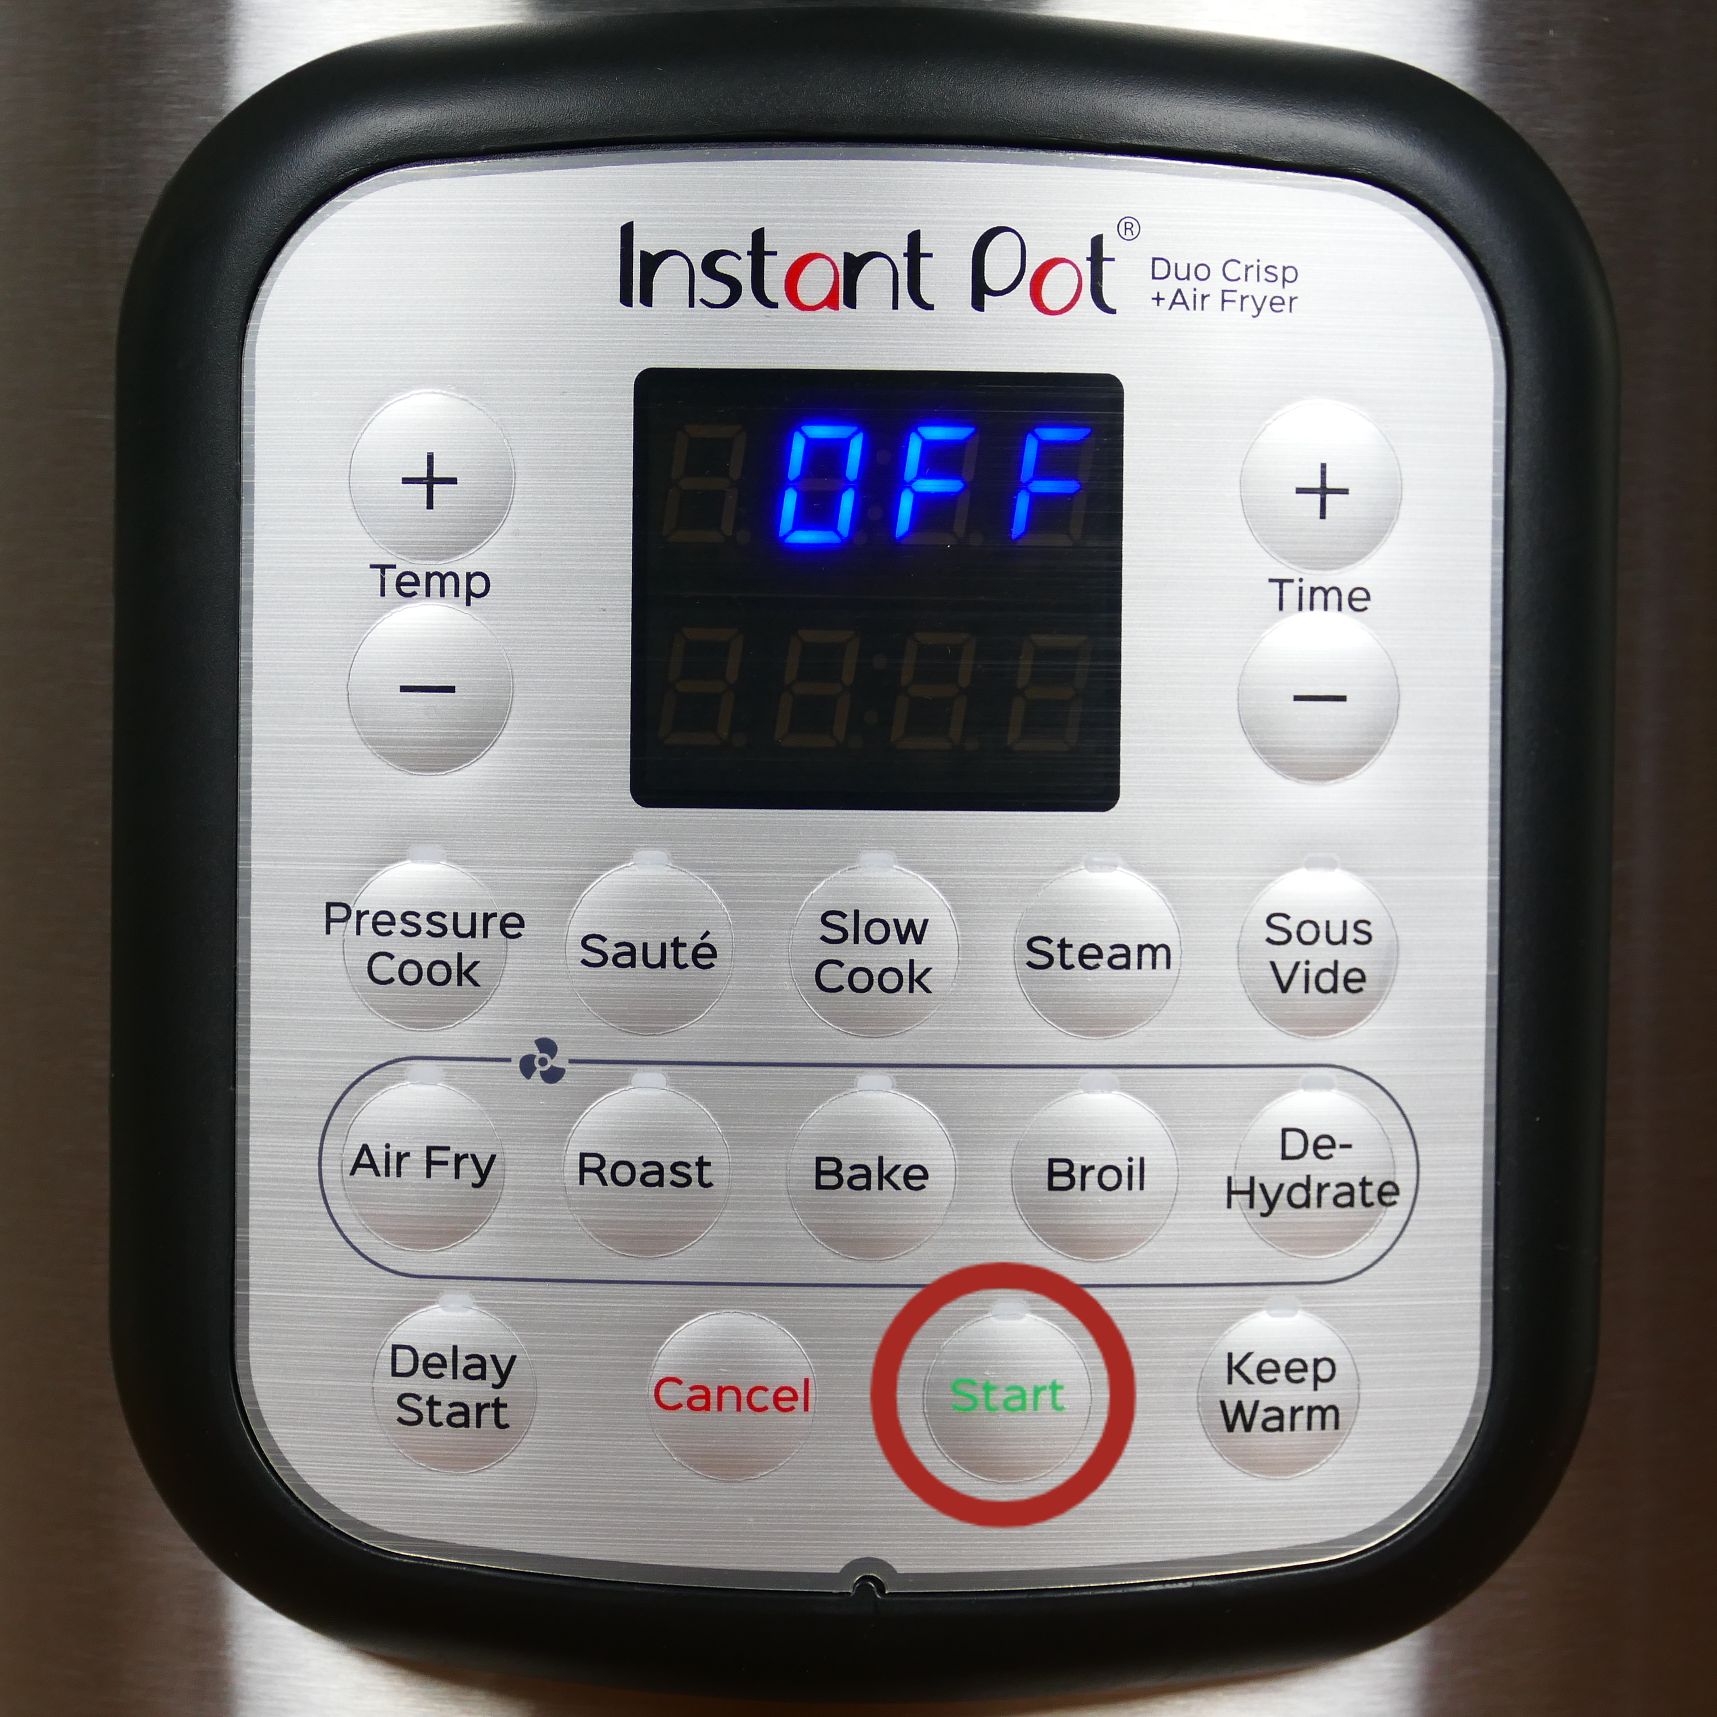
There are two ways to turn on the Instant Pot, depending on the model:
- If your Instant Pot has a Start button, program the Instant Pot by setting the pressure cooking time and pressure level and press Start. The display panel will change to On, and that means the Instant Pot has started the cooking process.
- If your Instant Pot does not have a Start button, program the Instant Pot and just wait about 5 seconds. The display panel will change to On, and that means the Instant Pot has started the cooking process.
I hope these Instant Pot tips and FAQs have answered some of the questions you may have about the Instant Pot and made you feel more comfortable with it. If you have further questions, feel free to comment below, or contact me through my Contact Page, or through social media.
If you found this article to be helpful, please share it on social media using the social media share buttons at the top and bottom of this post. Thank you so much!


Malini says
Hello,
I bought the nova plus from Costco. Can I set this to cook before I get home from work so once I get home I have food ready to be eaten? I thought this was the main perk of the instant pot .. :/.
Thanks!
Paint the Kitchen Red says
Malini – yes you should be able to do a delay start timer. Select the cooking mode and use + or – to select the number of minutes cook time, then select delay start and again use + or – to select how long you want to delay the cooking time e.g. 8:00 if 8 hours from now. Hope that helps.
Kelly browning says
How come I cannot adjust time after I push the Manuel button? How do I know when it has come to pressure? Do I try to adjust time then? I am so confused and frustrated
Paint the Kitchen Red says
Kelly, after pressing the Manual button, press + or – to adjust the time. Your display will go to ‘On’ and then when it comes to pressure, it will show the number of minutes it’s set to cook for. Hope that helps. You may want to read this Instant Pot Beginner Manual. It also has videos that will help you.
Pratyusha says
Hi
I have a dout on instapot delay timer,
Do instapot consume power when it is in delay timer set.
Paint the Kitchen Red says
Pratyusha, I don’t think you need to worry about the delay timer consuming a lot of power because the Instant Pot is not cooking anything at that stage.
Heather says
Hello, I’m so glad I found your blog! I recently bought an Instant pot and made a recipe today that called for frozen popcorn chicken ingredients for the sauce and a half cup of water. I put the setting on manual and cooked it for the required seven minutes. It took a little while to pressurize then starting the time. There was quite a bit of steam coming out the float valve so I made sure it was on sealing and it was. When the time went off I went to do a quick release and no steam came out? Does this sometimes happen? The food came out ok with some burnt sauce on the bottom which others already mentioned happened to them. I didn’t want to add too much water because I didn’t want my sauce to be watered down. I guess I’m asking if it’s normal for steam to come out the valve during the whole cooking time and normal for there not to be any steam on the quick release? Sorry for the long question. Thank you for any help.
Paint the Kitchen Red says
Hi Heather, it sounds like your Instant Pot, in fact, did NOT seal. When you do a quick release, you should see steam come out. And the fact that there was steam coming out the whole time, means it didn’t come to pressure. You need to build up steam in order for the IP to come to pressure, and you build up steam by having enough liquid. Please read this post about the burn error. Even though you didn’t get the burn error, it will help you. This post about the Instant Pot not sealing will also be helpful to you. Feel free to ask me any followup questions after reading those.
Shelly says
If I wanted to make this on a regular stove what would I do differently anything?
Paint the Kitchen Red says
Shelly, I’m not sure which recipe you’re talking about. But with my recipes, I do change up the quantities of liquid and spices when I adapt them for the Instant Pot. If you let me know which recipe you’d like to cook on the stovetop, I can give you some tips.
Jules says
Why is everything I make ending up so watery…. It is like a soup every time I follow a recipe. Any thoughts?
Paint the Kitchen Red says
Hi Jules, can you give an example of a recipe that’s come out too watery?
Delys says
I have used my IP twice. The first time I cooked chicken breast, and it said “burn” on the display. I added more water, and in the end, it was fine. But last night I tried a Chicken Tikka Masala recipe. The IP NEVER changed from “ON” to the countdown, even after 30 minutes (the contents were already warm from sautéing). I opened it up, added more liquid (in the form of diced tomatoes in their liquid), and reset. Still stayed on “on” for 25 more minutes, then read “burn” again. This time I depressurized it with the quick release knob for quite some time (so it WAS pressuring). The food was cooked, but it was VERY soupy. I added the butter and half and half after I opened it, and it was still just as soupy as could be. With it being that soupy, why would it not be getting to pressure, and then burning?
Paint the Kitchen Red says
Delys, the first thing I ask people to do in these situations is to do a water test. If you can’t boil water in the IP without getting a burn then there’s something wrong. It’s possible you might have a defective unit. If your water test fails, go to support.instantpot.com and create a ticket. Sorry for your troubles.
Paula says
Hi! I just cooked pinto beans in my insta pot. Hers my question. I’d like to cook them about 5 more minutes. Is it ok to add more water and turn my pot back on with hot food inside?
Paint the Kitchen Red says
Paula, thanks for your question. Yes, I frequently do this with all kinds of foods. Just close the lid and set it to cook some more. And good point: you need to make sure there’s enough water.
Beth says
Can you prep all ingredients for a recipe the day prior, put them into the instant pot inner pot and then store that pot in the fridge or does the pot need to stay at room temperature before placing it into the instant pot to pressure cook?
Paint the Kitchen Red says
Hi Beth – if the dish is a ‘dump and go’ type of dish, I see no reason why not. Just wipe down any condensation on the outside of the inner pot, otherwise you might get some sizzle noises and crackles (normal, not dangerous)
Bi says
Thank you for the info, I now understand why it takes a long time for the countdown to begin. That being said, should i do a water test first everytime i cook a meal? So that the IP is already “preheated” and the food that i want to cook gets cooked right away instead of waiting for it to heat up?
Paint the Kitchen Red says
Hi Bi, no you don’t need to do a water test each time. Some people do preheat the contents of the Instant Pot (if it’s a dump-and-go type of recipe) in Saute mode so that the contents are already warm or hot before they begin pressure cooking. I don’t usually do that. Enjoy your new Instant Pot.
Eileen Beadle says
I have the ip-Lux60V3 Model. I have followed the instructions to move the heat from medium to high and it will not move. Does this model not have this feature and I have to settle for medium?
Paint the Kitchen Red says
Eileen – I’m not sure which instructions you’re referring to. The Instant Pot allows you to set the heat level for Saute mode by toggling between Less, Normal and More. For pressure cooking functions (like Meat, Soup, etc), the Less, Normal and More are presets for cooking time (with a few exceptions). The DUO and Ultra models have high and low pressure but the Lux only has low pressure. If you need more help, just reach out again.
Sheri says
I am a newbie, so on the timer,are you saying that there are NO SECONDS? So the numbers on the right of the : those are the minutes…so :10 is ten minutes?
And to the right of the timer those are hours?
Cause when I try to keep pressing it rverts to 0
Paint the Kitchen Red says
Sheri, yes it’s hours:minutes. 00:10 is 10 minutes.
Bonnie Richter says
Hello! Wonderful info and you are awesome😊. I am confused with the timing. I did read one comment which addresses this, but want to make sure I understand. My .recipe called for 10 mins. I put in 1000 or tried to. (My microwave and oven use this for 10 minutes). But instead my IP cooked way too long. So for 10 minutes, do I just put in 10? Seems too simple.
Paint the Kitchen Red says
Aww, thank you Bonnie. Yes, you enter 10 for 10 minutes, because there are no ‘seconds’. Yes, very simple 🙂
Cheryl says
We have a 6-quart InstantPot but don’t always want to make the quantities that the cookbooks call for. We’d prefer not to buy a 3-quart version and wonder if we can adjust the cooking times downward to make smaller portions. If we use half the amounts, for example, how much do we reduce the cooking times?
Paint the Kitchen Red says
Cheryl, if you were to halve the quantity, you would generally keep the same cooking time. Just make sure you have the minimum quantity of liquid required for the recipe. e.g. some recipes I publish may have the bare minimum liquid needed for the Instant Pot to come to pressure, so if you were to halve the ingredients including liquid and vegetables (which release liquid) your Instant Pot may not seal. That’s the only caveat. So most soups and liquidy dishes would be just fine.
Francine says
Love your blog!! Would like to find a good all around cookbook. Any recommendation?
Paint the Kitchen Red says
I like Barbara Schieving’s Electric Pressure Cooker book. Lorna Sass has a good basic cookbook too. Thanks for your comment.
Bobbie says
I am trying to cook a pot roast for the first time. I have a 2lb roast, cooked it for 45 min, did 10 npr and then quick release. Although a meat thermometer says it is done, it is still tough. Should I try 10 more minutes? Also I think I used too much liquid….would that make a difference?
Paint the Kitchen Red says
Hi Bobbie – thanks for your question. What cut of beef did you use? Was it a chuck roast? If you used a less fatty cut, that might be the reason. I think 45 minutes should have been enough. Maybe you could have let the pressure release naturally. No, I don’t think the quantity of liquid would make a difference.
Pat Whalen says
Just purchased today and cooked a couple of steaks since I didn’t have a roast. Added after 50 minutes vegetables potatoes and carrots. Tasted great. I’ll reduce meat time to 40 min. next time and vegetables to 8 minutes.
Olive by myself so 3 quart is perfect.
Paint the Kitchen Red says
Hi Pat, glad you enjoyed your first meal in the Instant Pot. Vegetables cook in fraction of time. I cook 1 1/2 inch cubed potatoes in 1 minute! Also, it’s best to use fattier and cheaper cuts of meat for pressure cooking. Enjoy your new IP.
Kasey says
I am wondering if my Instant Pot is defective and hope you can help. Once I select “Manual” and it reaches pressure and defaults to a set time, I am unable to adjust the time up or down by pressing the + or – button or hitting the Adjust then + or – button. Am I doing something wrong or is my cooker broken? Any help you can provide would be appreciated! Getting frustrated but want this thing to work:)
Paint the Kitchen Red says
Hi Kasey, I’ve loaned my Duo to someone, so cannot test out but I’m pretty sure that you’ll need to press cancel and re-enter the new time. It should be a quick process, since it’s already under pressure.
Alene says
I cannot get my timer to go below a set time that I never set. So now my steel cut oats have finished cooking, but the timer leaves me with 9 more minutes. I hit the cancel button, but now it wouldn’t release pressure on a cancel command. I just cannot get that timer to go down in time, to end the cooking but set up a slow release. I am so confused!!
Paint the Kitchen Red says
1. What model Instant Pot do you have? 2. Are you saying that the cooking time counts down and then just stops at 9 minutes?
Regarding the cancel button, it does not release pressure. It just cancels/stops the current function. To release pressure, you either need to wait for the float valve to go down (natural pressure release) or you need to do a quick release of pressure by turning the steam release handle to ‘venting’ (press steam release button on the Ultra model). I strongly recommend that you go through one of my quick start guides and do the water test to make sure that you are familiar with how the Instant Pot works and to make sure you don’t have a faulty product. Here’s the Duo Guide and here’s the Ultra Guide.
Phil Tomaskovic says
The cook book (4th edition) that came with my Ultra has a recipe for corn on the cob around the middle. It says use steam for 12 minutes. The cooking table at the very end has a bit much of times for different vegetables. Corn on the cob there says 3 minutes! Why such a difference? I did do 12 and it was fine.
Paint the Kitchen Red says
Hi Phil, is the recipe for corn being cooked with something else? Then maybe it was for convenience to cook both together without taking one item out? I cook corn on the cob very often – 2 minutes High Pressure, quick release. Perfect. 12 minutes is way too much!
Lauren says
Hi! I have the InstantPot IP Duo and I just put in a batch of bone broth for 180 minutes. I’m now realizing this might be too long! Is there a way I can change the time after the IP has come up to pressure and started counting down? After it cooks for 120 minutes, can I press “Cancel/Keep Warm” and then just let it release the pressure naturally as usual? If neither of those things are an option, will cooking this bone broth for 3 hours instead of 2 completely ruin it?! Haha any help is appreciated! Thanks!
Paint the Kitchen Red says
Lauren, just press cancel at 120 minutes; that will definitely work. OR you can try and press cancel now, and then press Manual or Pressure Cook and set to 120 minutes or however much time you want it to cook for. I’m pretty sure I’ve done that before. Good luck. I usually cook bone broth for 2 hours, haven’t done 3 🙂
Lauren says
Thanks so much for the quick reply! Your speediness may just have saved this batch of broth 🙂 I don’t know why I decided to cook it for 3 hours instead of 2! I guess I thought the longer the better?? I will press cancel after 120 mins has elapsed and then let the pressure release naturally. I’ll keep you posted on the outcome, but again, thanks for the help!
Deb Zebill says
I love reading through your tips; thanks for taking time to post questions and answers. I am new to the Instant Pot and not certain how to get started. We are trying a recipe for rice pilaf. After we sautéed, it said to change the setting to manual. We could not change it from saute to manual, we had to unplug it and wait awhile, then plug it back in to press the manual button. What are we doing wrong? Thanks, Deb
Paint the Kitchen Red says
Hi there Deb, always happy to help newcomers to the Instant Pot! When you’re done with the SAUTE function, you should be able to press CANCEL. Then press MANUAL or PRESSURE COOK and + or – to adjust the cook time. The display will change to ON, and then after a minute or two will change to the time you set it to cook. I hope that works for you. Feel free to ask any more questions – all the best!
Anna says
Hi! This is a great post! What is your advice on using dairy (cheese, cream) in the IP? (specifically in something like a casserole)I’ve read conflicting information and don’t want to ruin a meal experimenting. Thanks in advance!
Paint the Kitchen Red says
Hi Anna, I always add cheese after my dish is completed cooking. Open up and add cheese while the pasta or whatever is still hot, and then stir it up in saute mode. Thanks for your comment!