
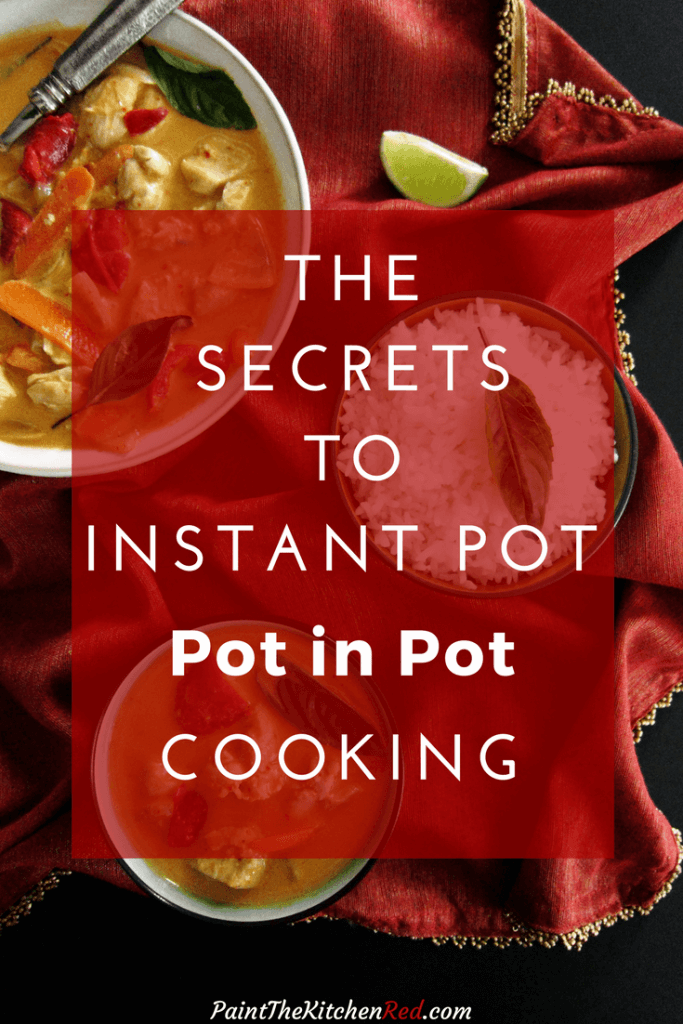
Pot in pot Instant Pot cooking method is a pressure cooking technique that allows you to pressure cook cheesecake, lasagna, and other foods that don’t contain liquid. Pot in Pot cooking is useful for making smaller quantities of food. The PIP method also allows you to pressure cook recipes that tend to scorch and to cook multiple dishes at the same time using Instant Pot stackable containers.
This post contains affiliate links. As an Amazon Associate, I earn from qualifying purchases. Please read the disclosure.
Table of Contents
If you’re familiar with the Instant Pot, maybe you’ve heard the term Pot in Pot and wondered what it is. Pot in Pot cooking (also referred to as PIP) is a really useful stovetop pressure cooker technique that can be used with the Instant Pot pressure cooker.
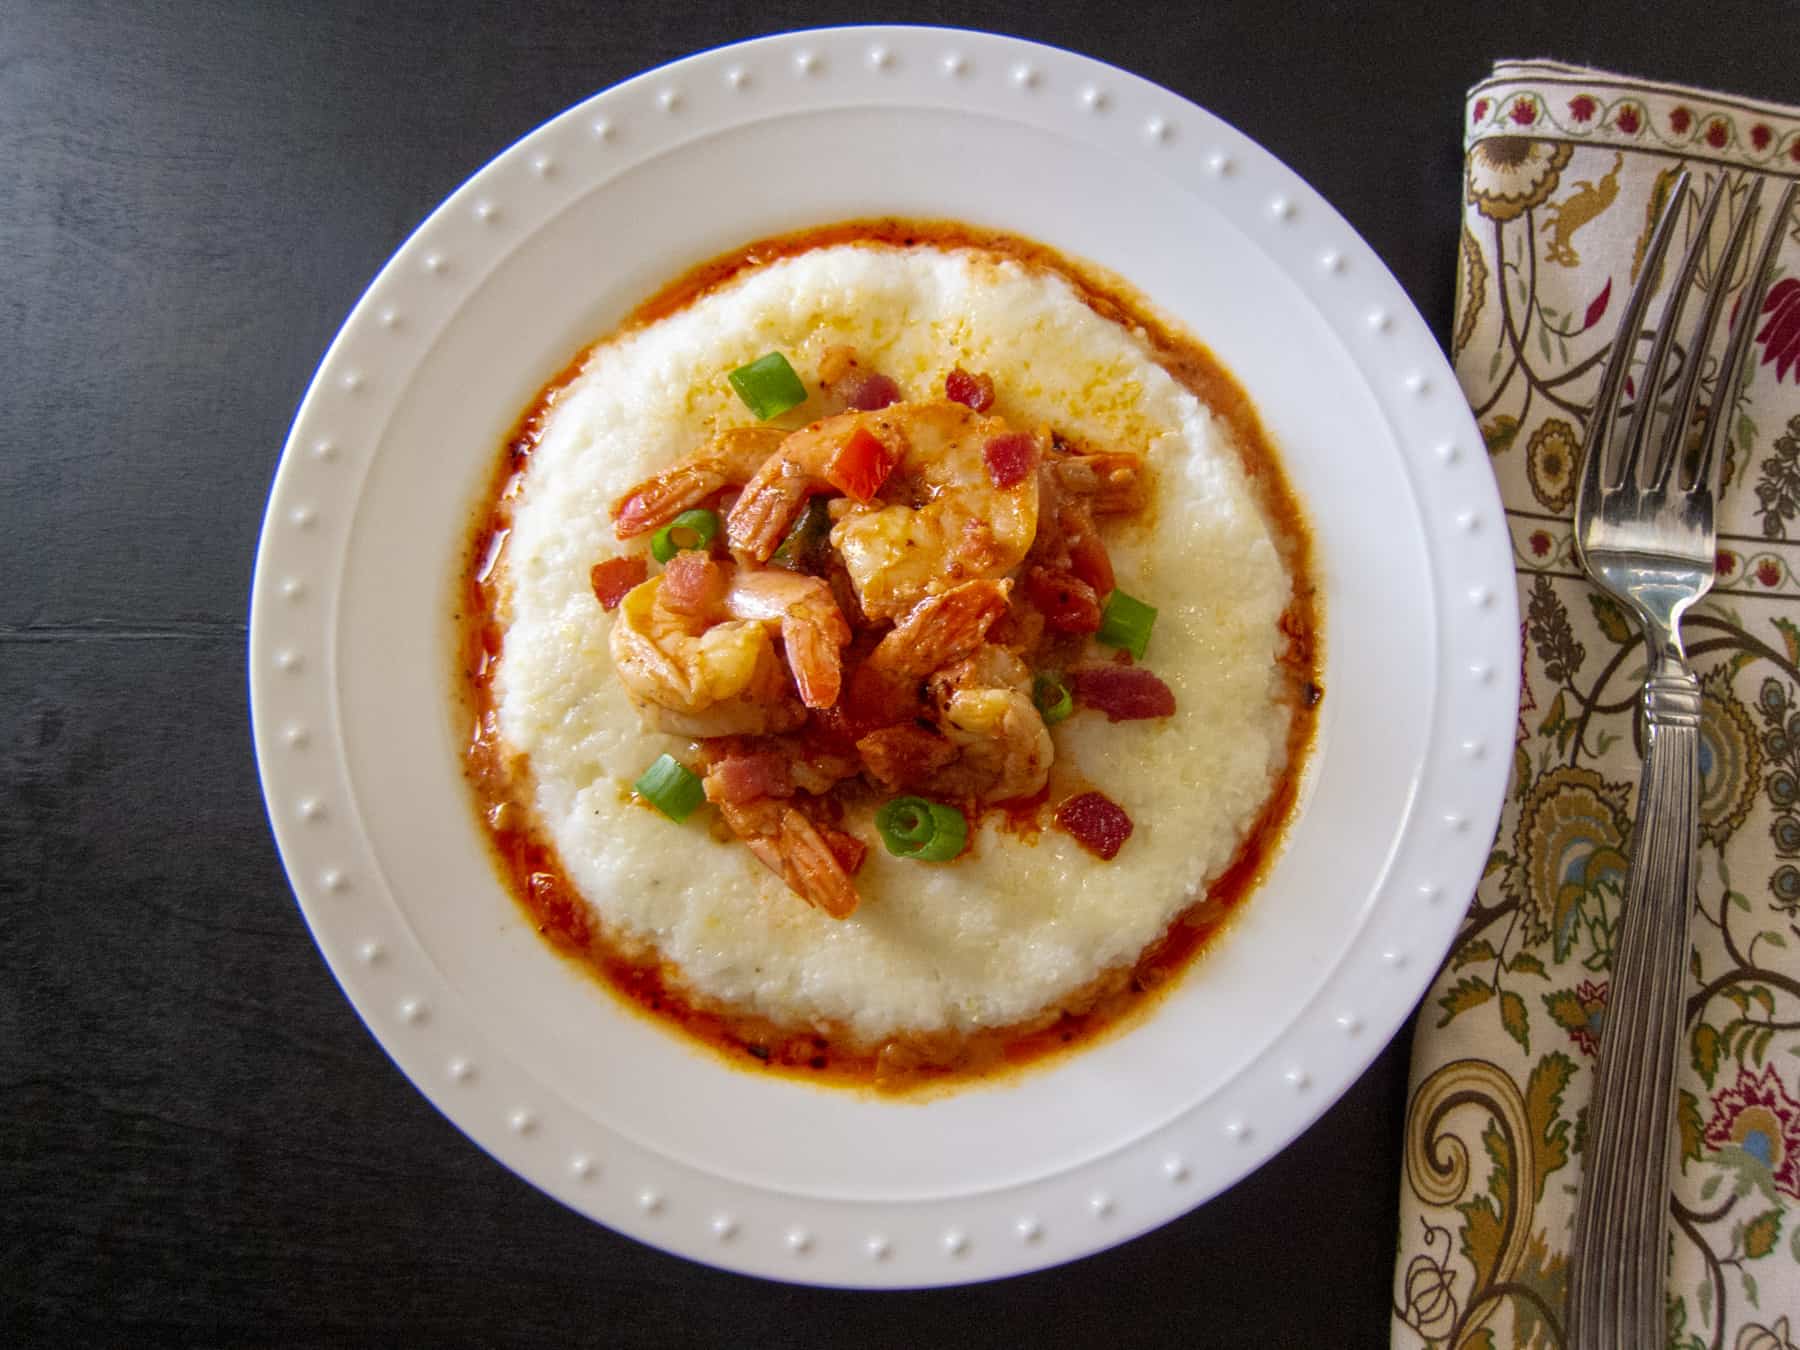
I’ll give you a summary of why you’d want to use this technique and walk you through the steps to combine two recipes that you can cook together. By the way, if you’ve made my Instant Pot Shrimp and Grits recipe, then you’ve already used the Pot in Pot technique!
Get Started with the Instant Pot with these guides:
– Instant Pot Duo Quick Start Guide
– Instant Pot Ultra Quick Start Guide
– Instant Pot Duo Evo Plus Beginners Manual
What is Pot in Pot Pressure Cooking?
The Instant Pot pot in pot method of cooking allows food to cook in a separate smaller pot that’s placed on a steam rack in the Instant Pot. Steam generated from liquid below the steam rack is used to build pressure and cook the food.

Pot in Pot has many uses and I’ll outline them in the sections below, but in its simplest form, here’s how you can cook something using the Pot in Pot cooking technique. If you’ve ever wondered how to use the Instant Pot steam rack or trivet, this is how:
- Add 1 cup of water to the bottom of the Instant Pot’s inner pot.
- Place a metal trivet or steam rack in the bottom of the pot.
- Put food in an oven-safe container. This container does not require liquid.
- Place the container on the steam rack and close the Instant Pot lid.
- Pressure cook the food and do a Natural Pressure Release (NPR) or Quick Release (QR). (You might need to add some additional time to the regular Instant Pot cooking time)
Note: The quantity of food you can cook in a ‘Pot in Pot’ container will be less than what you can cook directly in the Instant Pot liner (inner pot). You might need to adjust recipe quantities.
[Read all about the Instant Pot trivet types and how to use them.]
What Accessories are Used for Pot in Pot Cooking?
1. Essential Instant Pot Accessories
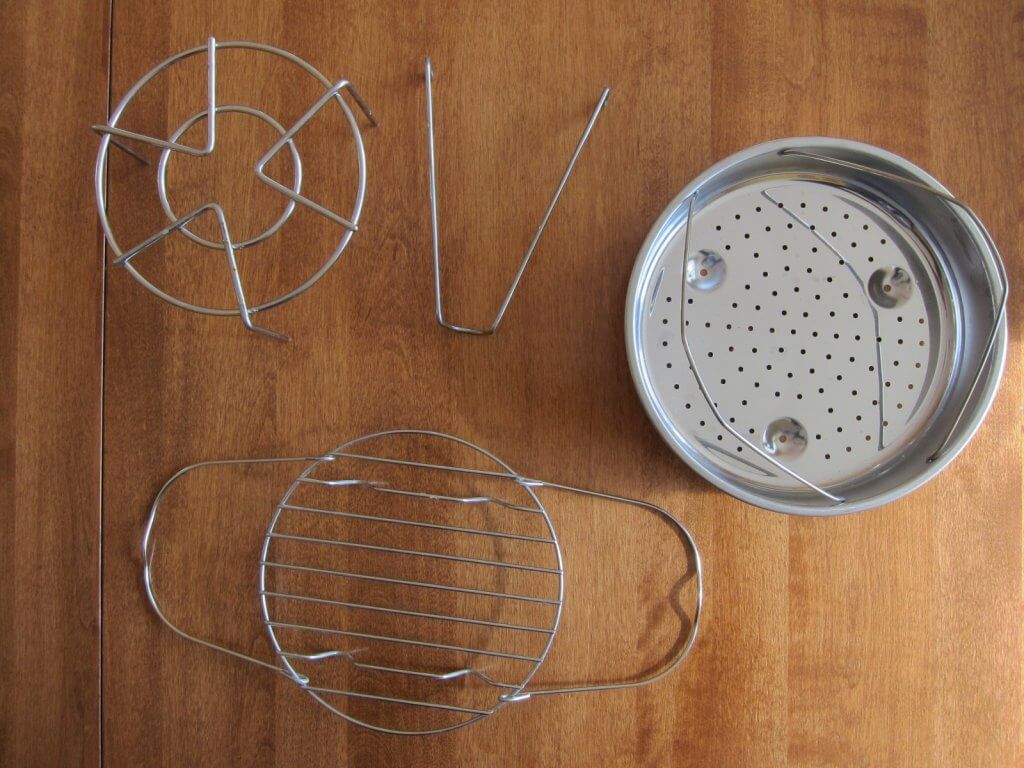
- Raised steam rack that is placed in the Instant Pot inner pot. The Instant Pot is shipped with a steam rack, and that works perfectly well. There are many types of racks – as you can see from my collection! Note: the container being used for PIP cooking must be placed on a rack, and not directly in the inner pot.
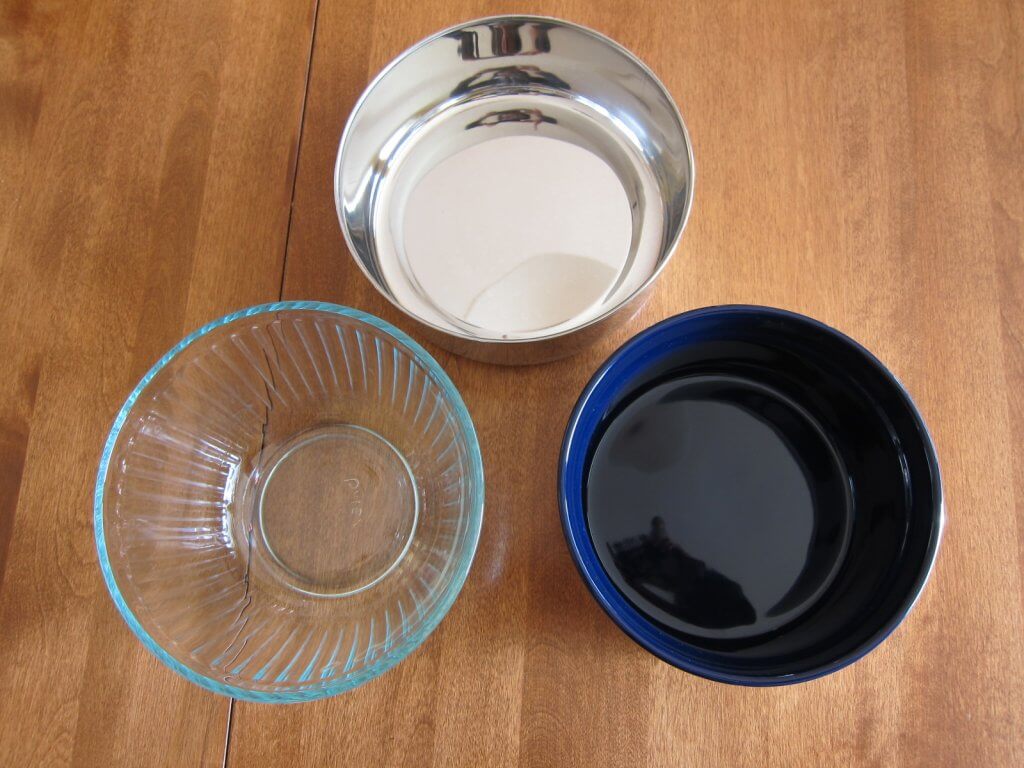
- Oven-safe dish made of stainless steel, oven-safe glass, silicone, or ceramic/porcelain. The container shouldn’t touch the walls of the inner pot and should allow the Instant Pot lid to be closed easily.
- A springform cake pan or push pan works great for pot in pot cooking.
- Pro Tip: the inner pot of the 3 quart Instant Pot fits the 6 quart and 8 quart Instant Pots. It’s a very handy container to have for pot in pot cooking.
Important Note
I have used Pyrex oven-safe glass dishes in my multiple Instant Pots with no problems. However, I suggest you read the manufacturer’s directions for the Instant Pot and the glassware and decide for yourself whether to use a glass dish in the Instant Pot.
2. Optional Instant Pot Accessories
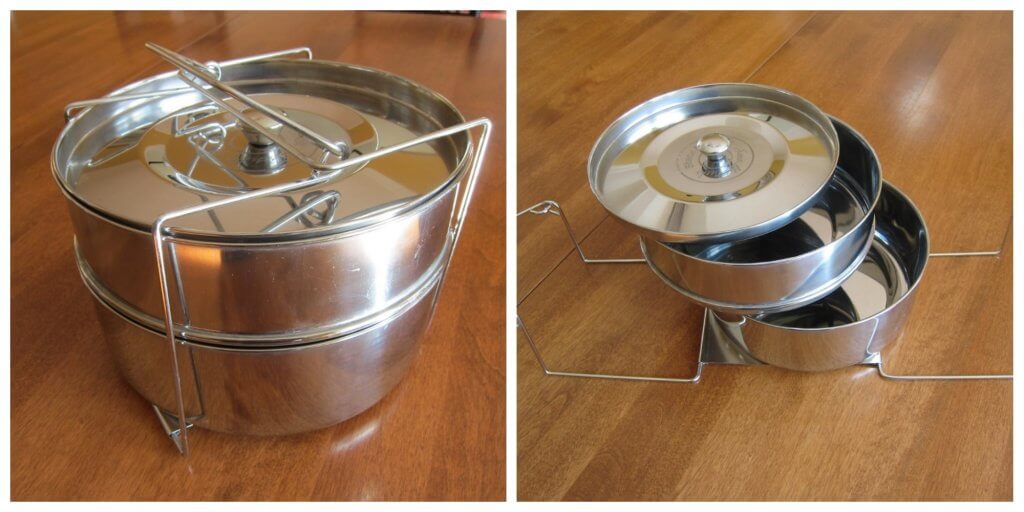
- Multi-tiered stackable containers used to cook different foods in separate containers.

- Flat wire rack so you can have separate layers of food by stacking multiple containers if not using the stackable inserts described in the PIP Accessories section above.

- Silicone gloves to handle the hot dishes
- If you don’t have a steam rack with handles to lift the container out, you can make an aluminum foil sling to remove your container from the Instant Pot. Some models of Instant Pot are shipped with the rack that has handles.
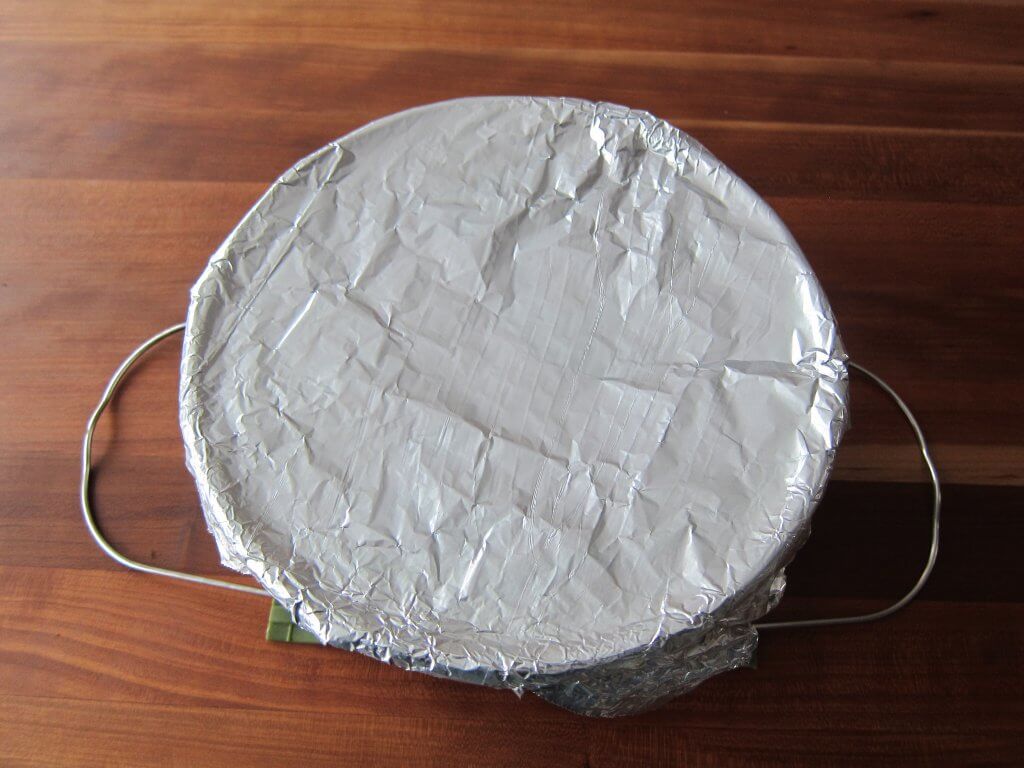
- Aluminum foil to cover the container and prevent condensation from dripping in.
What are the different uses of PIP Cooking?
1. Recipes that don’t require liquid
The Instant Pot requires a cup of liquid or more to build pressure. Casseroles and desserts don’t have that minimum quantity of liquid to bring the Instant Pot to pressure. But the Pot in Pot technique is a great choice for these recipes that would normally be baked in the oven.
A springform pan works great for this use. Here are some examples of Pot in Pot recipes from different blogs:
2. Prevent scorching from heavy and dense sauces
I’ve used the Pot in Pot method to salvage a meal when I get the dreaded burn error and food is scorched on the bottom of the Instant Pot. I empty out the contents of the Instant Pot, clean out the inner pot, and use the Pot in Pot technique to finish up the cooking.
If you’re using canned tomato sauces or purchased sauces with ingredients like corn starch or tapioca starch, you can have problems with scorching. And scorching prevents the Instant Pot from reaching pressure. This is when you see the burn notice.
Or you may have a recipe with a thick gravy. Pot in Pot cooking is a great way to cook these types of foods without having to thin the sauce with water or broth.
Another example is oatmeal. Oatmeal cooked directly in the inner pot can be difficult to cook properly and it can also be pretty messy. Pot in Pot works really well for oatmeal.
3. Recipes that require a bain marie
A bain-marie (pronounced ‘bahn ma-ree’) is a water-bath cooking technique used for delicate desserts that are baked in the oven and serves to slow down cooking by using steam to evenly cook the dish. These recipes are perfect for the Instant Pot!
4. Reheat foods without using the microwave or stovetop
Do you heat up leftovers in the microwave? At our house, by the time five people heat up their food, the first person’s food is already cold!
A great solution is to reheat food in the Instant Pot, using the Pot in Pot method. Just store the leftovers in the fridge in oven-safe bowl, and reheat in the Instant Pot using the Pot in Pot technique. Note: Going directly from the freezer to the pressure cooker can cause a glass bowl to crack.
You can stack multiple containers separated by a wire rack, or use the stackable inserts, described in the Pot in Pot Accessories section, that work great in the Instant Pot. Then just use the ‘Steam’ or ‘Pressure Cook’ function for 3 to 5 minutes, depending on the type and density of your food.
5. Steam vegetables, seafood, and other delicate foods
I like to pressure cook delicate vegetables (cauliflower, broccoli, peas, etc) or seafood on low pressure. However, your Instant Pot model may not have the low-pressure option, or you may be using a recipe that calls for high pressure.
Cooking these delicate foods directly in the inner pot, even in a steamer basket, can cause them to overcook.
Cooking them in a separate container using PIP helps to slow down the cooking process. Add a few cups of water to the inner pot and place the food in a container on the rack.
I’ve found that covering the container with a double layer of foil or a lid, also slows down cooking.
6. Quick cleanup, easy storage for smaller quantities of food
I love the fact that the Instant Pot makes cleanup really easy – only one pot to clean!
If you have a smaller quantity of food to cook, you can make cleanup even easier. Use the Pot in Pot method to cook your food, and serve and store it in the same container.
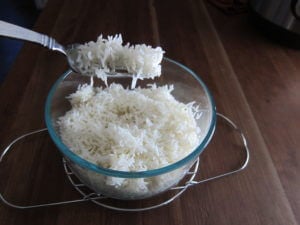
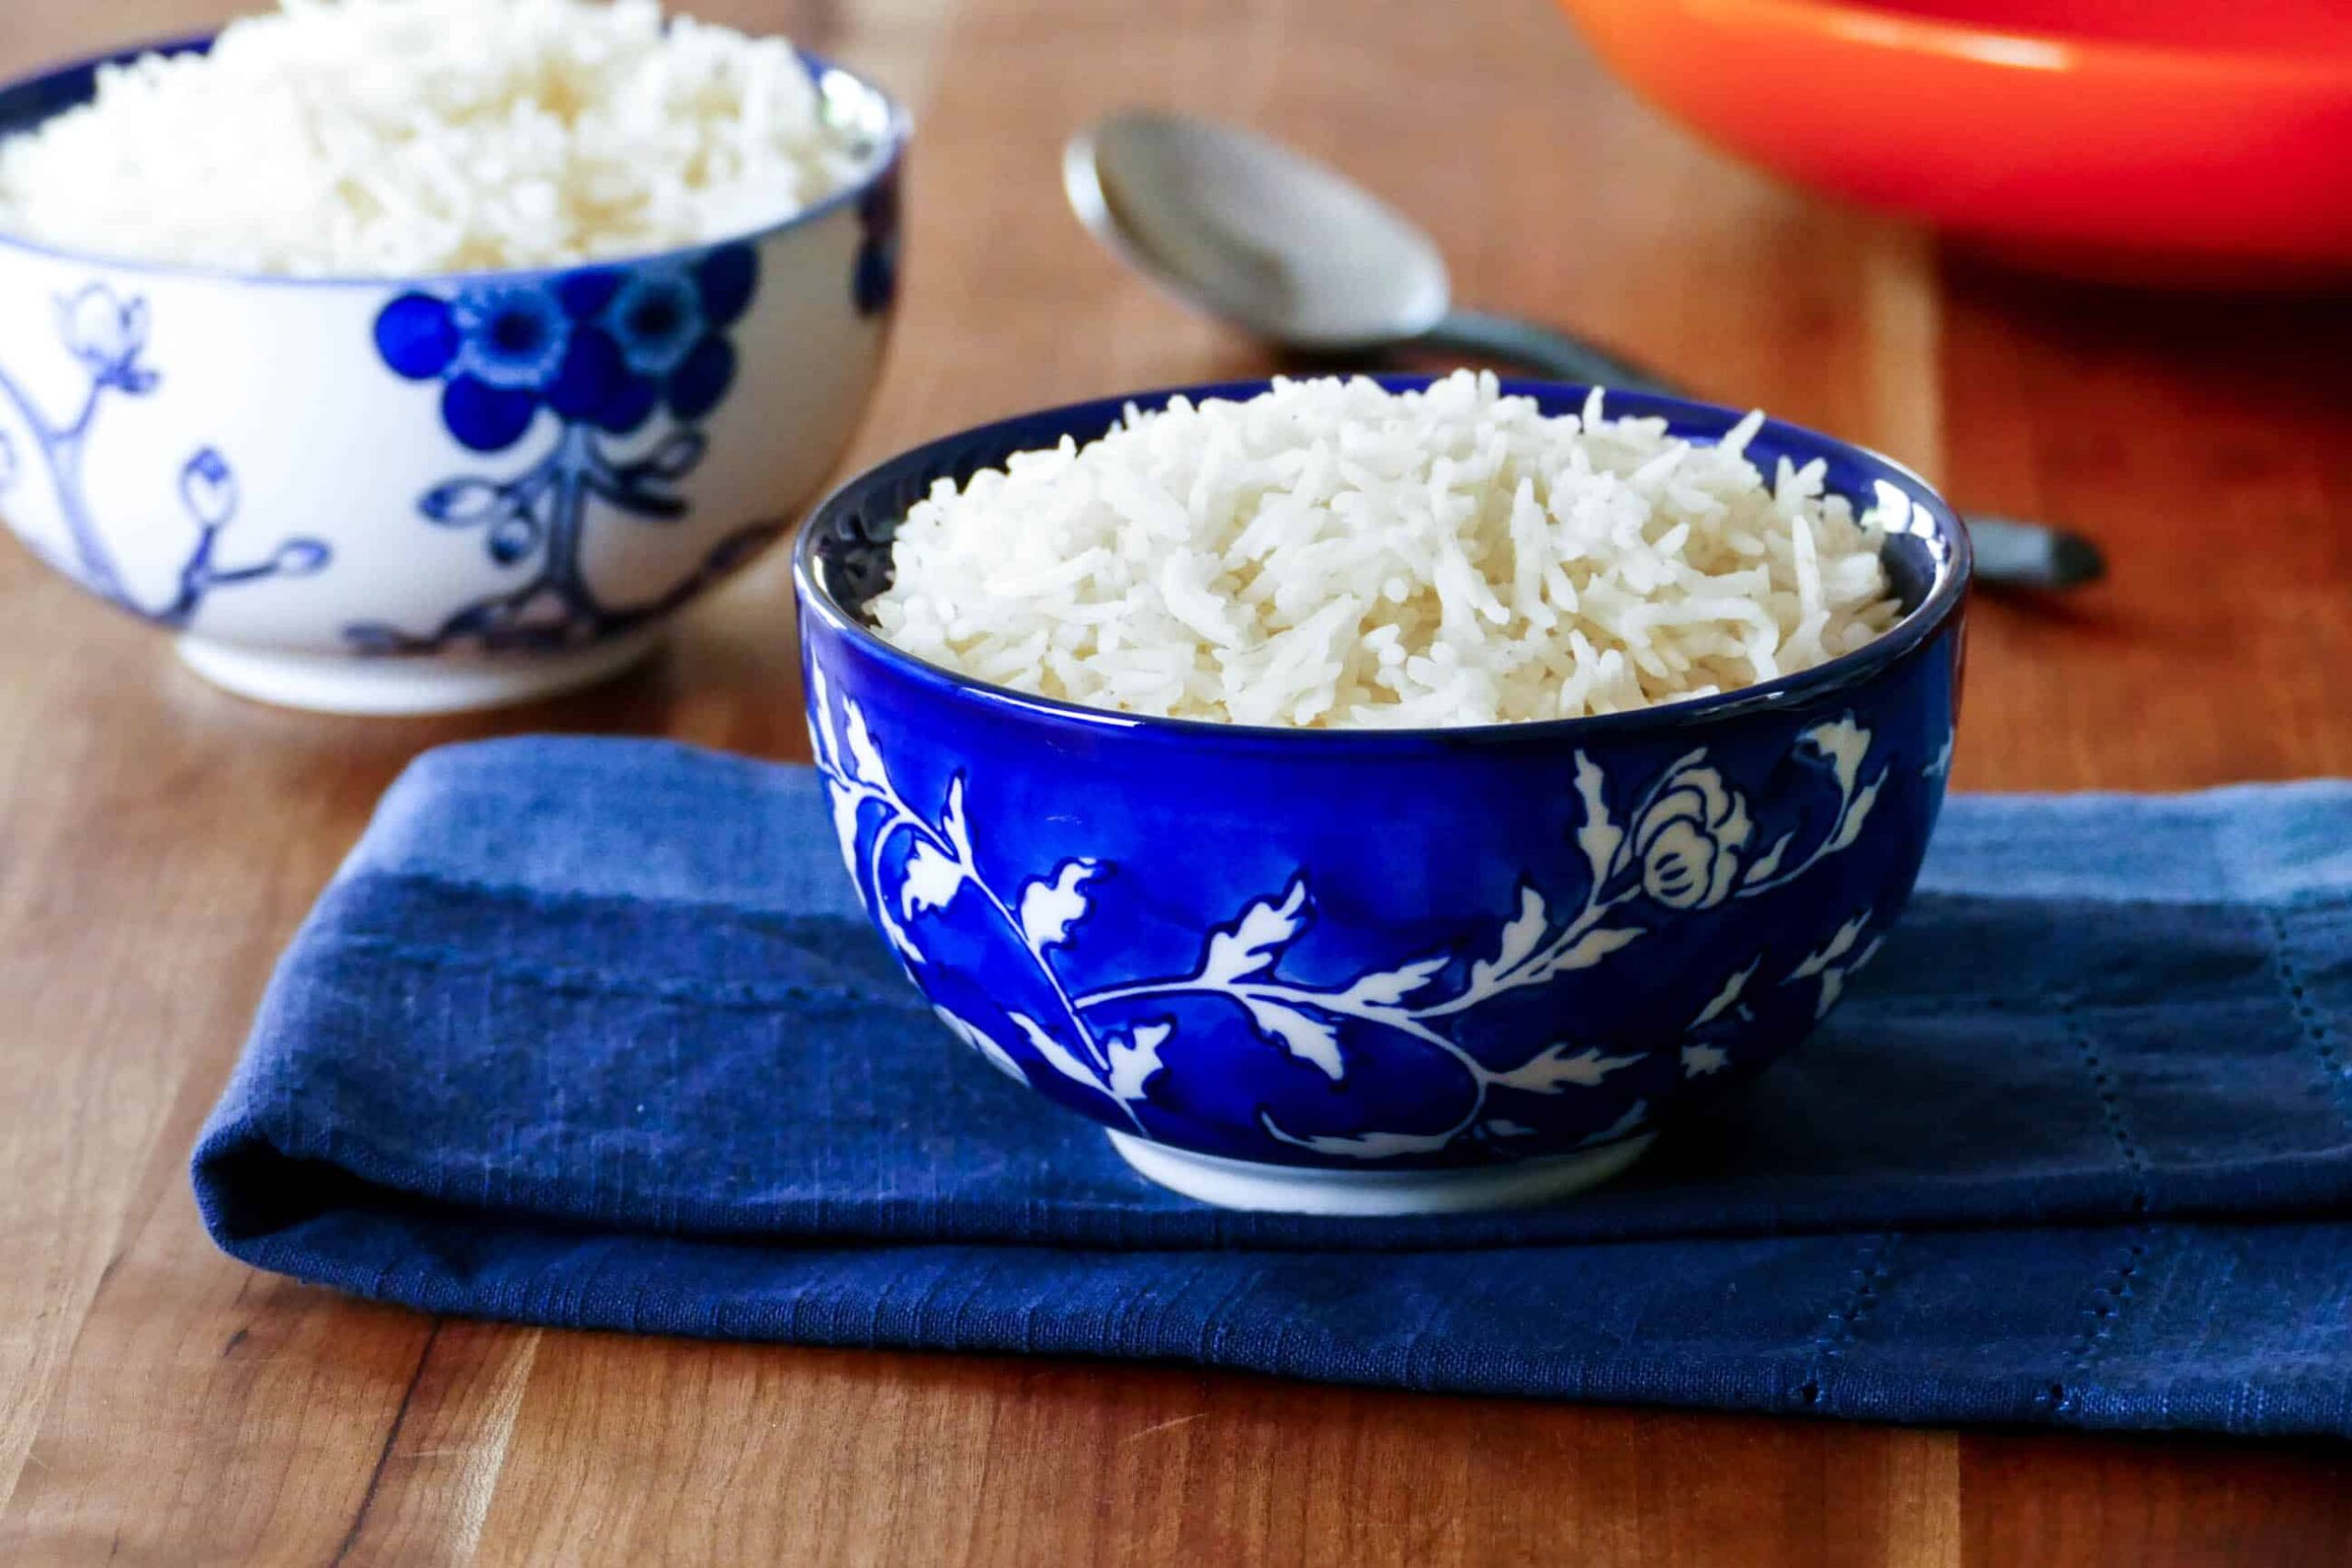
I do this all the time with Instant Pot Rice. I use a Pyrex dish to pressure cook the rice using the PIP method, and I don’t need to clean out the inner pot. Plus I can store leftovers in the same dish – very convenient!
7. Cook multiple dishes together
For me, cooking a complete meal altogether is the most exciting use of Pot in Pot. This method of cooking is very common in Indian kitchens and it’s something I’ve grown up with.
As mentioned in the Instant Pot Accessories section above, you can either use metal stackable containers or put the food in individual bowls separated by flat wire racks.
Another option is to cook the main dish (as long as it has enough liquid to bring the Instant Pot to pressure) directly in the inner pot, and place the second item or side dish such as rice in a separate container on a steam rack.
Here are some important factors when cooking two different recipes together. Both recipes should have the same:
- Approximate cooking time.
- Pressure level (i.e. low or high pressure).
- Pressure release method i.e. quick release (QR) or natural pressure release (NPR).
You can use the Pot in Pot cooking method to combine many different types of recipes. The Instant Pot recipe book that came with your Instant Pot has cooking times for different foods. I use the timings as a general guideline for which foods I can pressure cook together, using Pot in Pot. You might need to add some extra time for some recipes.
Possible combinations for Pot in Pot Cooking
- Quinoa and rice
- Chicken thighs and collard greens
- Chicken breasts and white rice
- Fish fillet and green beans
- Kidney beans (soaked) and brown rice
- Ground beef and basmati rice
- Basmati rice and dal (Indian lentil curry)
- Thai Green Curry and Jasmine Rice
- Chili and Cornbread
What do you do when the pressure cooking times for the two Pot in Pot recipes are different?
As I mentioned above, the recipes you cook together using Pot in Pot should have similar cooking times. So how can you solve the problem of different cooking times?
- Partly cook the longer-cooking item, do a quick release of pressure, add in the second item and continue cooking both items. e.g. if the amount of time to cook item A is 15 minutes and item B has a cook time of 10 minutes, you’ll pressure cook item A for 5 minutes, quick release (QR), open the lid, and add in the container for item B (on a rack or stacked), close the lid and pressure cook both for 10 minutes.
- Tightly cover the container of the faster-cooking item with a double layer of aluminum foil. The foil slows down the cooking of the contents.
- Cut the slower-cooking item (e.g. meat) into smaller pieces so that it takes less time to cook.
- Cook the faster-cooking item in a glass, ceramic or silicone container versus a stainless steel pot because that will slow down the cooking time a little bit.
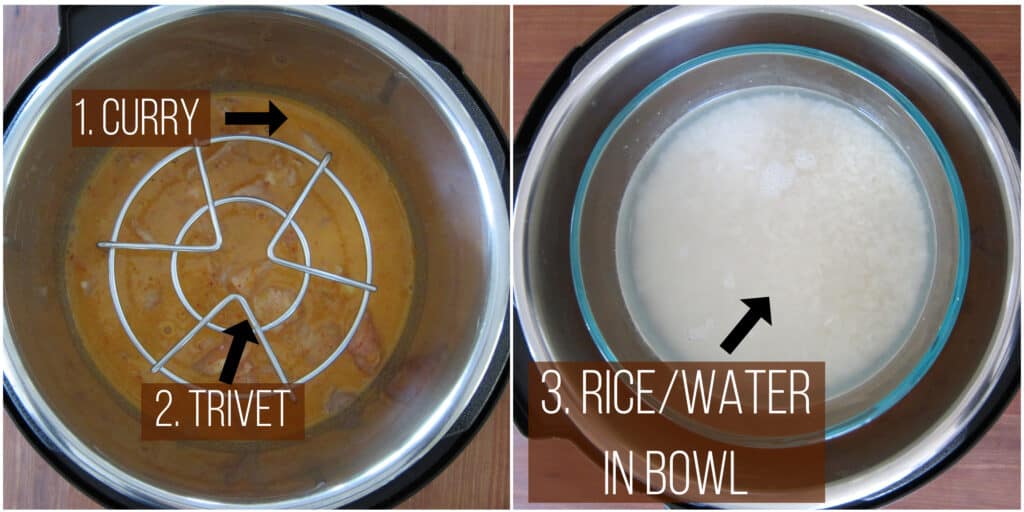
Example: How to Use Pot in Pot to Cook Two Recipes Together
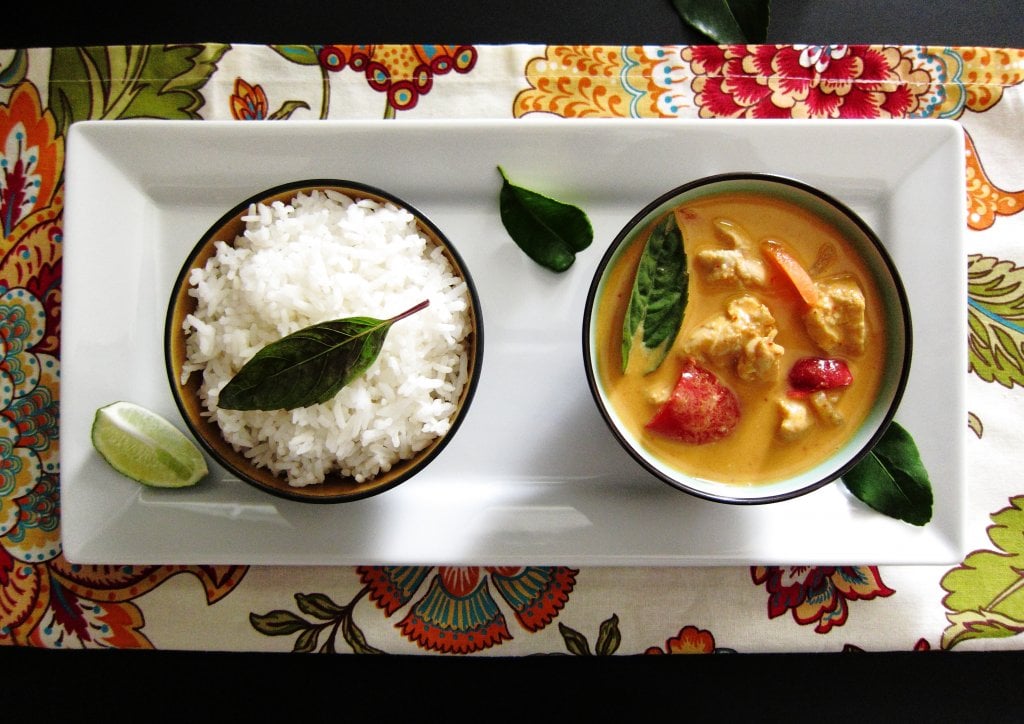
Let’s walk through the process of figuring out how to cook two different recipes at the same time. First, take a look at the two individual recipes I’m going to show you how to combine and cook together:
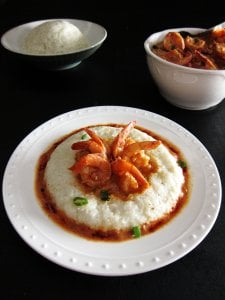
If you were cooking both dishes separately, you’d cook the Thai red curry, empty out the contents into a serving dish, clean the inner pot, and then cook the rice.
I’m going to show you how you can save time and cleanup by using the Pot in Pot method of cooking multiple items together. The chicken curry cooks in the main pot and the rice cooks in a smaller pot, on a trivet.
The recipe states that you need to cook Jasmine rice for 4 minutes. That’s perfect because that’s how long the chicken in the Thai red curry needs to cook for.
But there’s a problem. Remember how I mentioned that they both need to have the same method of pressure release? You’ll notice is that the Instant Pot Thai chicken curry recipe calls for quick release of pressure (QR), while the rice calls for 10 minute natural pressure release (NPR).
If you cook the two dishes together and do a quick release, the rice won’t be cooked properly. So the only other choice is to do a natural release. Chicken thighs do just fine with natural release, so problem solved!
Pot in Pot Recipes For you to Try!


If you found this article to be helpful, please share it on social media using the social media share buttons at the top and bottom of this post. Thank you so much!

Dorothy McCloud says
I just bought the2 in one steamer for my IP so as i could do califlower in one and broccoli in the other at the same time, the only thing I am confussed on is do i put the water in pot in pot and is there a cook book out for using pot in pot
Paint the Kitchen Red says
Dorothy, you do need water in the main pot (inner pot). The steamers will sit above the water. You should be able to get away with about 1.5 to 2 cups depending on the size of your Instant Pot. I am not aware of a pot in pot recipe book, sorry!
Deb Bailey says
Do you think thT I ça purchase a 3qt. Inner pot to use for rice for PIP in my 6 qt?
Rob Edwards says
Have you ever used a smaller Instant Pot’s liner for the inner of the pots using the pip method with a larger Instant Pot? In other words, could I use a 6qt liner for an inner pot with a 8 qt Instant Pot? Is it too tall to fit with a rack below?
Paint the Kitchen Red says
Rob, I think you can fit a 3 quart inner pot but not the 6 quart – too tight a fit.
Ollie says
Thank you so much for this! So educational! I’m now ready to make frittatas 😅
Paint the Kitchen Red says
Ollie – good luck! It’s all a learning process at the beginning 🙂
Jenny says
Hi! I am not having much luck with the stackable pots in the instant pot. Previously, I prepared a recipe with chicken thighs and cooking sauce in the bottom of instant pot. Then I placed a tall trivet over the chicken and an open pot of rice. Cooked for 10 minutes with 10 minute release. It was perfect. Then I did the same thing using the stackable pots. I put water in the IP liner then the stackable pots with chicken and sauce in bottom and rice on top. Neither the chicken or the rice was cooked. I’ve tried it several times with the same results. Any ideas?
Paint the Kitchen Red says
Jenny, I wonder if your stackable containers are thick and so need to have increased cooking time. You might need to do some experimenting. Why don’t you try to cook just rice in one of the stackable containers and see how much longer it takes to cook? Then you might have a ballpark percentage increase in cooking you might need to add to all your recipes cooked in the stackable container?
Debra says
Thanks for the information-packed article. You say to choose the inner container or stacked containers so they “allow the Instant Pot lid to be closed easily.” Does that mean they can be taller than the Instant Pot’s Max Fill line?
If the inner pot(s) are above the Max Fill line, does the top of the *food* in them have to be below the Max Fill line?
Thanks!
Paint the Kitchen Red says
Yes, when I do PIP cooking, the top of the bowls go above the max fill line. The quantity of food in the bowls should account for any expansion (e.g. rice). Hope that helps.
Heather says
Hi! I read your article and thought pot in pot would be great to solve the problem with scorching I’ve been having with my 8 qt duo. I hate getting the dreaded burn notice. However, the recipes I get this with are usually ones that start with sautéing. How would this work with the pot in pot? Thanks!
Paint the Kitchen Red says
Heather, you would have to empty out the contents of your inner pot, clean and then proceed. Have you tried to cool down the pot completely (after deglazing)? You might want to try that out – I find that some burn errors can be avoided by doing that. Also, try layering your ingredients. Good luck.
Sam says
Hi, can I use aluminum pot in IP?
Paint the Kitchen Red says
Sam, I use an anodized aluminum push pan for cheesecakes and it works great.
Diana Verhulst says
I have a question about a stainless steel bowl I have that I’d like to use – it’s perfect, UNTIL placed on the trivet – then it becomes just slightly too tall. The bowl is the kind that came back in the 50s and 60s with the Sunbeam or Oster brand kitchen centers: it has a ring on the bottom Here is a picture of one in case you don’t know what I mean. https://bit.ly/2Qcxnhm My question is this: would the rim and hollow on the bottom of this bowl suffice to raise it up off the IP’s bowl so that I do not need a trivet? I’m afraid to try it because I’ve only had my IP for a few days and am still QUITE the rookie. Please help me! Thank you!
Paint the Kitchen Red says
Diana, normally I would say you need to have the pot raised in order for heat to be transferred properly. However, since your pot has a ring base, I think that actually would work. I would try it out with something simple first. I don’t think you need to worry about safety. I’d love to hear back from you if you try it out.
Jeri says
Thanks for a quick, concise summary of PIP. Just what I needed when my (preferred thick) marinara kept getting a burn message. I figured this would be the trick, but it sure helped to have your experience and wisdom available online!
Paint the Kitchen Red says
Glad to be of help, Jeri!
Maratha Sharma says
Hi Neena,
I am used to Indian cooking in steel pressure cookes using stackable steel containers. Now that I have switched to IP I want to continue the same method here also. My question is , is it necessary to use the same container that IP comes with or I can use any similar container that fits inside IP properly? That way I can use original pot for direct cooking and other container for PIP cooking. Let me know.
Thanks
Maratha Sharma
Paint the Kitchen Red says
Hi Maratha – thanks for getting in touch. No, you don’t need Instant Pot-specific containers as long as they are safe for a pressure cooker and you should have a clearance of about 1/4 inch so the edges aren’t touching the inner pot. Hope that helps.
Me says
Thank you for all the information you provided in this post. It has answered a lot of question.
I only have one more question. Are you familiar with WECK jars? They are European style mason jars. They come with a glass jar, a rubber ring, a glass lid and clamps. They are normally used for canning. I have seen recipes for making homemade extracts using a Ball mason jar that uses the technique you described in this post. The recipe says that you barely close the lid of the mason jar and follow the same steps you described. Do you think I could use the same technique with my WECK jars? Can I safely use them with the rubber ring and clamps?
Paint the Kitchen Red says
Great question and short answer is “I don’t know”. I think I know the kind of jars you’re talking about. The recipes you’re looking at have lids that are screwed on, and you close them so that they aren’t airtight, just finger tight. This allows air to escape when pressure builds. I am not sure if the jars with clamps close the lids airtight. Sorry I couldn’t give you a definitive answer.
Vas says
Hi!
Thanks for this article. Can you recommend a larger container than the Pyrex one? I’ve been getting the burn message, and decided to try the PIP method with the Pyrex bowl. However, my dish won’t fit into the bowl, and lowering the quantity means there won’t be enough servings.
Paint the Kitchen Red says
Hi Vas, if you have a 6 quart you can use a container that’s about 5 inches tall and 7.5 inches in diameter. It’s not easy to find that size! Your other option is to use the stackable container and fill both compartments.
Jim says
Actually, you can push the size a bit. The Ikea Blanda s/s bowl (20cm/7.8″) works great in the 6qrt/litre model.
Paint the Kitchen Red says
Thanks Jim! That will be useful to other readers.
Ina says
I just found your blog by using our good ole friend google. What an incredible blog! Thank you for all these tips. I’m a frequent user of regular PCs for decades, thought I give it a try with a 6qt DUO since it was 40% off. Could not be happier.
Paint the Kitchen Red says
Excellent, Ina! I too had used a pressure cooker for my whole adult life and grew up with my mom cooking with one. Love the Instant Pot so much!
Seattle2k says
Chicken curry and rice would be faster without the instant pot. Start the rice, prepare ingredients for curry. Sweat onions and garlic in wok, turn up heat to high, cook chicken 2 minutes, add curry paste and coconut milk, bring just to boiling. done. This will save you the 10 minute NPR stage, and your food will have better flavor
Paint the Kitchen Red says
I’m afraid we’ll have to agree to disagree – I find my Instant Pot curry recipes to be as good as the stovetop version 🙂 I also have readers who like to cook recipes like Thai curry but don’t have access to a stove. Since my blog is an Instant Pot site, I try to make sure I give people delicious recipes that can be made in the Instant Pot.
Arthur says
Love using the PIp method with the IP do you have a general rule of thumb for the time difference in using just the PIp And using just the regular pot since I know the pot in a pot takes longer or is it all trial and error bunch
Paint the Kitchen Red says
Arthur, I really don’t change the cooking time and have no issues with my food being undercooked. I would try the same timings and see how the recipe works for you. You can always pressure cook it for another minute or two if needed, and also adjust next time you make it. Thanks for your question.
Ed says
What a fantastic tutorial!
This is so much appreciated…
Paint the Kitchen Red says
Ed, you’re so welcome – happy PIP cooking!
donnaQ says
Thanks, I am really happy to see these tips. I am making Louisiana style red beans and rice in my Instapot. This technique saves me from taking out my red beans and putting them in a “serving dish” as you stated—to get cold and then to rewarm them as best I can (which is silly because I have hot rice getting cold while I microwave or reheat the beans). The major tip here is you need to be aware of quick release versus natural release, and I never see many recipes for QR. But I will look for that and make sure to harmonize accordingly.
Paint the Kitchen Red says
Hey donna, I’m glad you’ve discovered PIP cooking; it’s very useful for many situations!
Donna says
Hi, Neena,
I don’t use my Instapot as often as I could because I have to,store it in the garage (tiny kitchen). However we both love Thai, so I will definitely be trying this dish (although I first need to get a high rack…)
Donna
Paint the Kitchen Red says
I’m glad to hear that you’ll try the Thai dishes together via PIP!
Kari says
Thanks for all the great info. I understand that the inside receptacle should not rest against the inside of the IP. my question is, what if it just fits? That is, I’d say there is approximately 1/2 to 3/4 of a cm of space surrounding my 9″ springform pan , while it sits inside the 8quart IP ultra. I want to make sure that’s sufficient space for steam to pass and not ruin the IP or cause any issues. Thanks!
Paint the Kitchen Red says
Kari, I’ve not ever had that tight a fit but I would think that as long as there’s some space around the bowl, there’s room for steam to escape.