
If you’ve just purchased an Instant Pot Duo Evo Plus model, this beginner’s quick start guide will help you get started. This user manual tells you about all the parts, the most important buttons and functions, and gives you instructions on how to use the Instant Pot Evo model for the first time by doing the water test or initial test run. [Video included]
Table of Contents
- Introduction with instructional video
- What is an Instant Pot?
- First Thing You Need to Do: Open the Box!
- Is the Instant Pot Safe to Use?
- Safety Precautions
- Parts
- Accessories
- Lid
- Sealing Ring
- Float Valve
- Anti-Block Shield
- Assembly
- Condensation Collector
- Open and Close the Lid
- Release Pressure
- Commonly Used Functions
- Initial Test Run/Water Test
- Pros and Cons
Introduction
If you have trouble viewing the instructional video below, try disabling your ad blocker temporarily and then refresh your browser.
This Instant Pot Duo Evo Plus is my fifth Instant Pot! I have an Instant Pot Duo, Instant Pot Ultra 6 quart and 8 quart, and Instant Pot Smart Wifi. I purchased my first Instant Pot 3 years ago and I was hooked from the get-go!
Although I like all my Instant Pots, until now the Ultra was my favorite. I may have to rethink that with the purchase of the Evo. I really like it and would highly recommend it! This guide will tell you how to use the Instant Pot Duo Evo Plus right out of the box.
If you’ve purchased the Instant Pot Pro Crisp, it’s basically a cross between the Duo Evo Plus and the Duo Crisp. So, this manual will tell you how to use just about all the functions except for the Air Fry smart program.
Make sure you also check out the companion Advanced User Guide for Instant Pot Duo Evo Plus. It gives you details on how to use the smart programs and all the buttons!
[Read more: Instant Pot Duo Quick Start Guide or Instant Pot Ultra Quick Start Guide]
What is an Instant Pot?
The Instant Pot has become so popular in recent years that Instant Pot is being used by some as a generic name for pressure cookers of any brand.
In reality, Instant Pot is the brand name of a multicooker that serves as a pressure cooker, slow cooker, rice cooker, yogurt maker, sauté/searing pan, steamer and warming pot all in one convenient appliance.
Some people use the name Instapot, but the correct name is Instant Pot.
The Instant Pot Company (Instant Brands) started out with one product – the Instant Pot – and now makes a wide range of kitchen appliances including air fryers, blenders, and toaster ovens.
Although the Instant Pot pressure multicooker has many different functions, the most commonly used is the Pressure Cook function. Pressure cooking allows you to cook foods at a fraction of the time it would take on the stovetop.
PURCHASE THE INSTANT POT DUO EVO PLUS ON AMAZON!
First Thing You Need to Do: Open the Box!
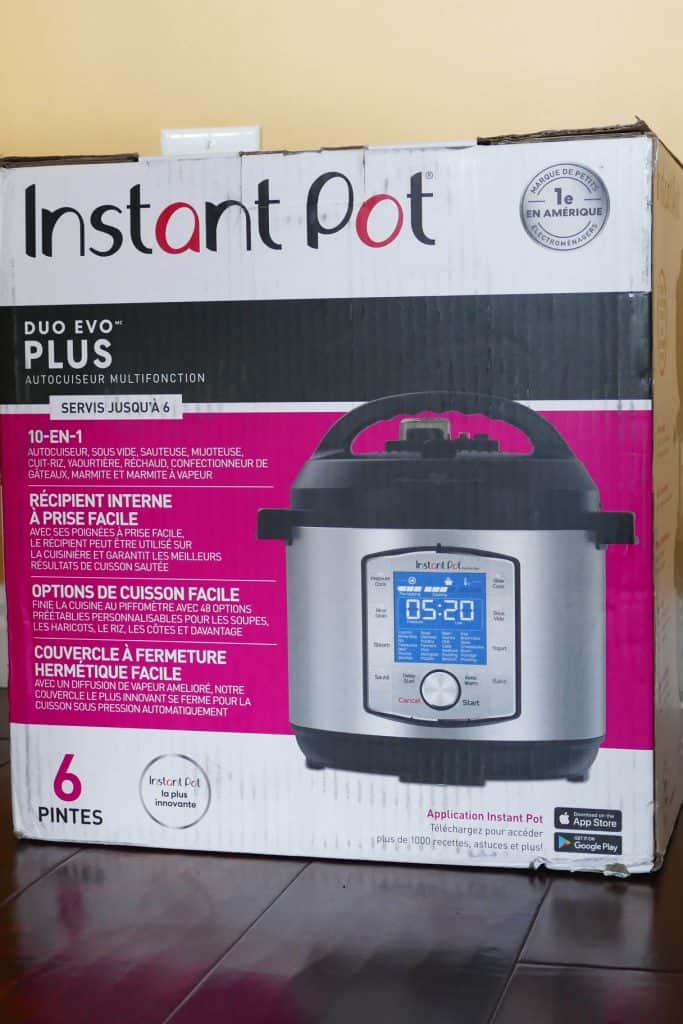
I can’t even tell you how many times I hear from people who either got the Instant Pot as a gift, or they bought it and are too scared to use it. So let me just say there’s nothing to worry about. The Instant Pot has many layers of built-in safety features!
Besides, if you don’t get it out of the box and try it out, in the event you have a defective unit you might miss the warranty period and be stuck with a bulky paperweight!
In this guide, I’m going to (virtually) hold your hand and help you get going to the point where you’ll pressure cook your first recipe: water!
Is the Instant Pot Duo Evo Plus Safe to Use?
This ain’t your grandma’s pressure cooker! If you’ve had experiences, like I, with stovetop pressure cooker mishaps in the past, fear no more. The Instant Pot eliminates most of those pressure cooker issues.
According to Instant Pot, in the past, most pressure cooker disasters could usually be attributed to user error. Instant Pot pressure multicookers are carefully designed to eliminate and avoid most of the potential problems.
Numerous safety features help reduce common errors. Safety features include pressure sensor technology, lid close detection, lid lock technology, overheat protection and automatic temperature and pressure controls.
Safety Precautions
Although there are many built-in safety features as explained above, as a user you need to follow common-sense precautions:
- Don’t touch the hot surfaces, particularly the stainless steel parts. Use the handles to move the Instant Pot or the inner pot.
- Don’t place the Instant Pot on or close to an electric or gas burner.
- Don’t move the Instant Pot when it’s under pressure.
- Don’t fill over ⅔ full.
- When cooking foods that expand e.g. rice, beans, pasta don’t fill over ½ full.
- Ensure anti-block shield, float valve, and steam release pipe are clean and not clogged.
- Don’t open the lid until the float valve is down i.e. the Instant Pot is depressurized.
- Keep hands and face away from the steam release mechanism.
- Don’t obstruct the steam release assembly when pressure is being released.
- When quick-releasing frothy foods such as applesauce, oatmeal, pasta, etc. take extra care. It’s best to release pressure is short bursts for these types of foods.
- Don’t use another Instant Pot model’s lid on the Duo Evo Plus model.
For more information about safety precautions, please read the Instant Pot Duo Evo Plus user manual.
Parts
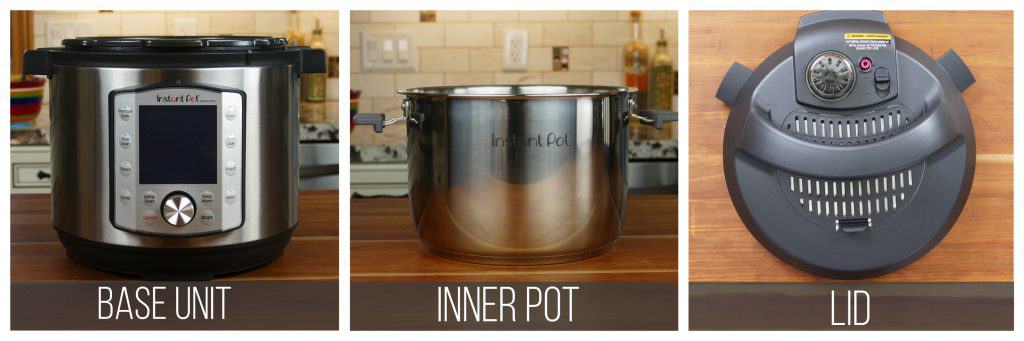
The Instant Pot Duo Evo Plus comes with the following main parts:
- Base unit/Outer Pot – stainless steel exterior that houses the heating element, control panel, and attached power cord
- Inner pot – removable stainless steel pot with easy-grip silicone handles. The inner pot is stove-friendly, so you can use it on your stovetop as you would a regular pot.
- Lid – closes the Instant Pot and seals it under pressure.
Accessories
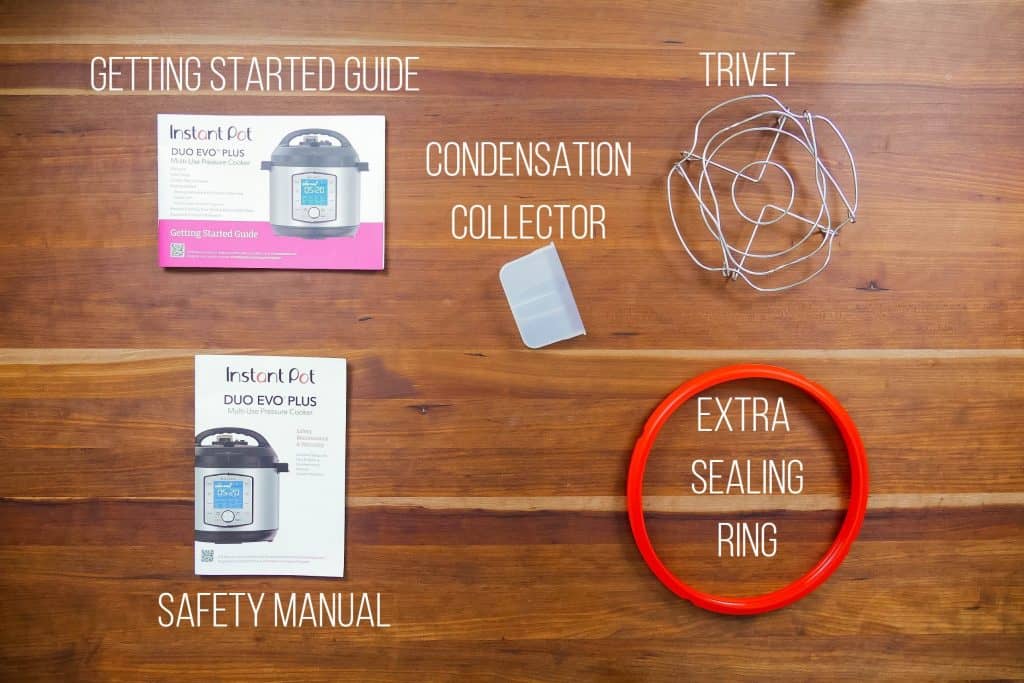
The Instant Pot Duo Evo Plus comes with the following manuals and accessories:
- Getting Started guide – setup, overview, and instructions
- Safety Manual – safety, maintenance, and warranty Information
- Condensation Collector – catches drips from condensation on the lid; attaches onto the back of the base unit
- Trivet – the trivet is useful for elevating food above the liquid and for Pot in Pot cooking
- Extra Sealing Ring – great for sweet recipes or desserts
Instant Pot Duo Evo Plus Lid
Duo Evo Plus Lid Exterior Parts
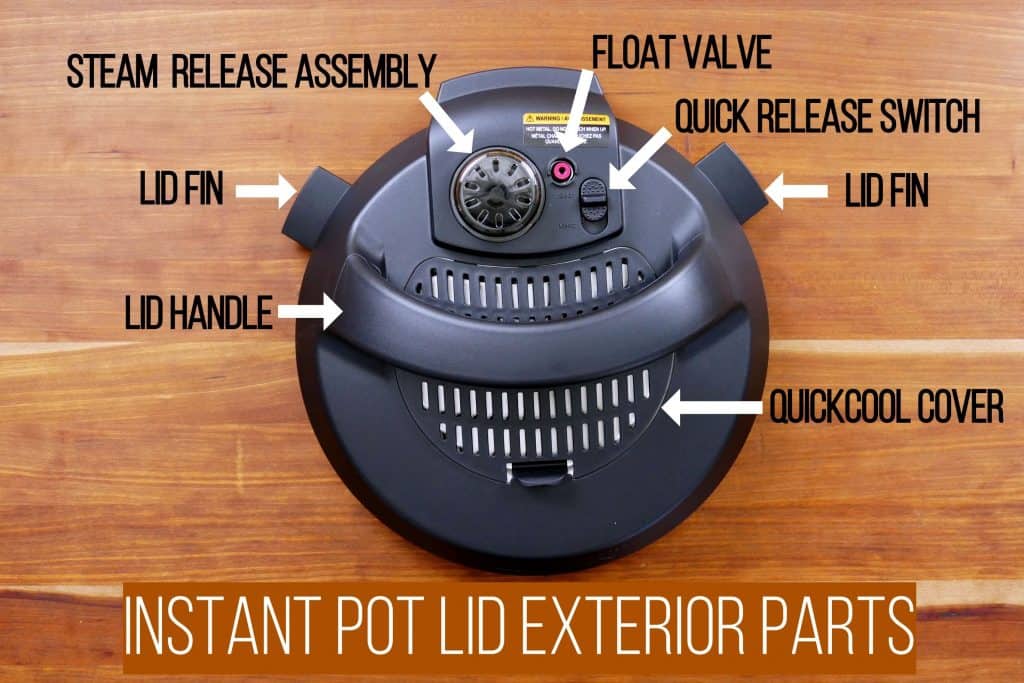
- Lid Handle – used to put on and take off the lid
- Lid Fin – placed in the lid fin slot of the base unit to prop the lid open
- Steam Release Assembly – consists of steam release cover, steam release valve, and steam release pipe
- Float Valve – seals in the steam, allowing the Instant Pot to be pressurized
- Quick Release Switch – used to do a Quick Release (QR) of pressure
- QuickCool Cover – removable cover that allows the Instant Pot to cool down faster when doing a natural pressure release (NPR or NR)
Steam Release Assembly – Parts
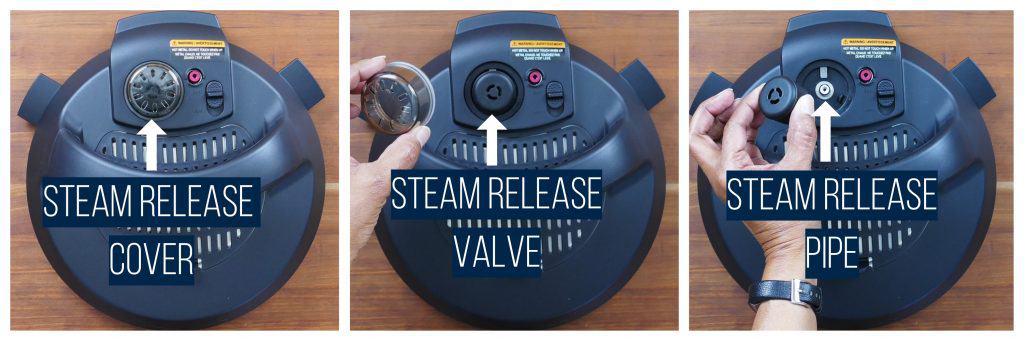
The steam release assembly consists of:
- Steam release cover – diffuses the steam when pressure is released
- Steam release valve – regulates the internal temperature. It is supposed to be wobbly, but should be pushed in all the way
- Steam release pipe – steam travels from the inner pot through the pipe during steam release
Instant Pot Duo Evo Plus Lid Interior Parts
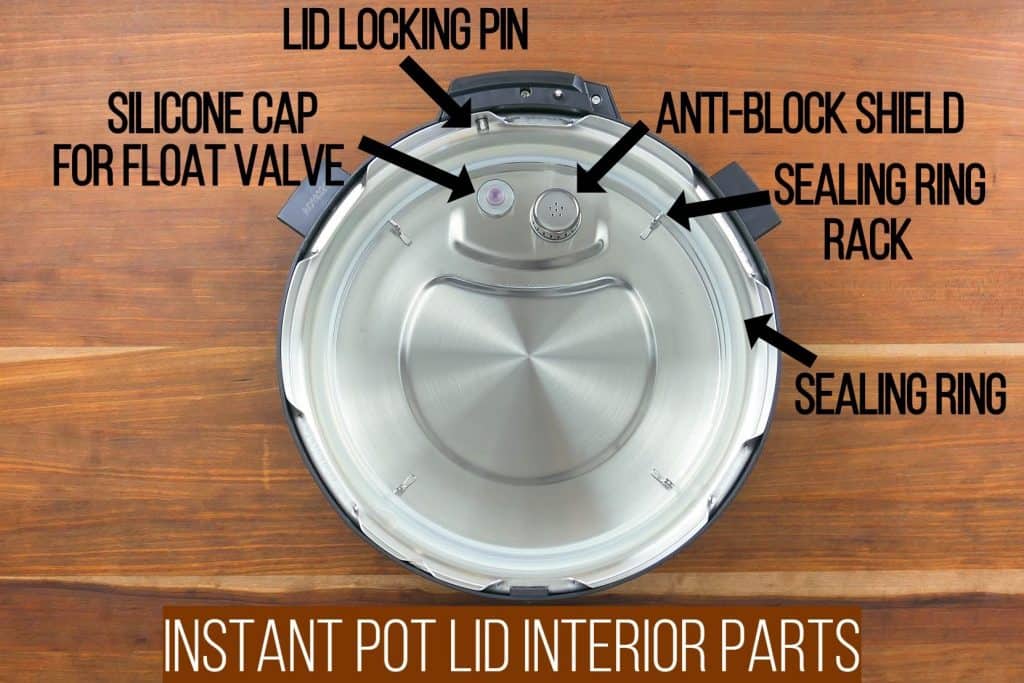
The inside of the Instant Pot Evo lid consists of the following parts:
- Silicone Cap for Float Valve – covers the float valve and keeps it in place
- Lid Locking Pin – safety mechanism that prevents the lid from opening under pressure
- Anti-Block Shield – prevents food from coming out of the inner pot through the steam release pipe
- Sealing Ring Rack – holds the sealing ring in place
- Sealing Ring – silicone sealing ring that allows the Instant Pot to seal
Sealing Ring
How to Remove the Sealing Ring
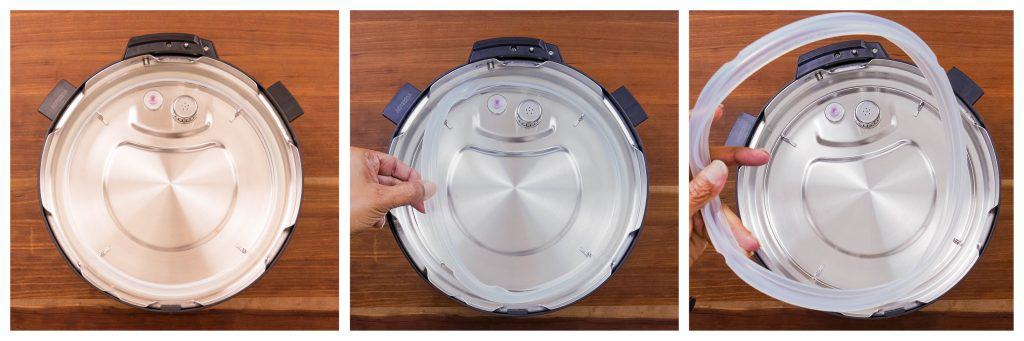
- Pull gently on the silicone ring until it detaches from the sealing ring rack.
- Continue to pull the silicone sealing ring out until it is completely separated.
How to Replace the Sealing Ring
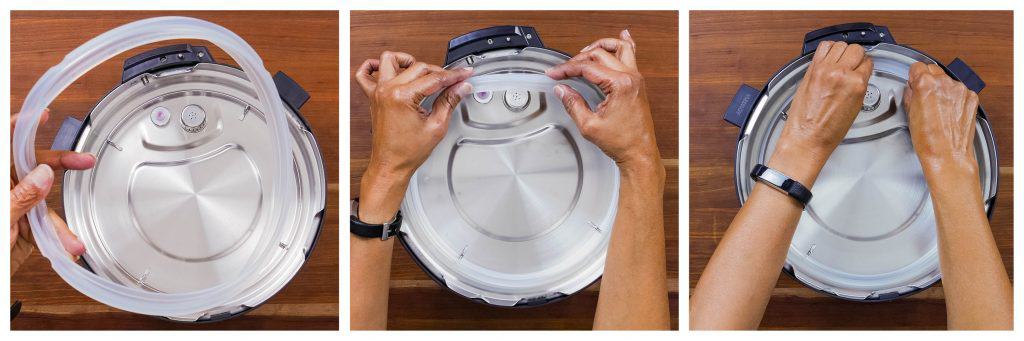
- Place the silicone sealing ring on the sealing ring rack.
- Working your way all around, push the sealing ring until it’s firmly seated in the sealing ring rack.
- Make sure no part of the sealing ring is sticking out, or you may have sealing issues and get the Burn Message.
- The first few times, you may find it difficult to remove the sealing ring but after a few uses, it should stretch out a bit.
Float Valve
The float valve needs be cleaned periodically, especially after cooking frothy or starchy foods.
How to Remove the Float Valve
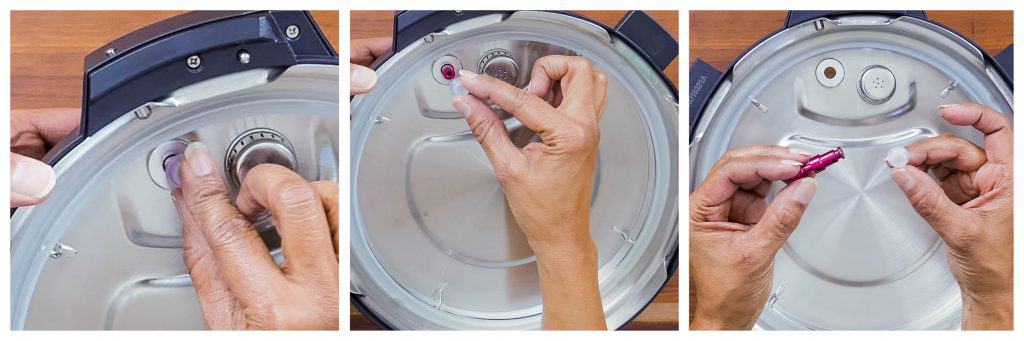
- While holding the float valve in place on the outside of the lid, remove the float valve’s silicone cap.
- Allow the float valve to fall out from the bottom.
- Be careful not to misplace the silicone cap.
How to Replace the Float Valve
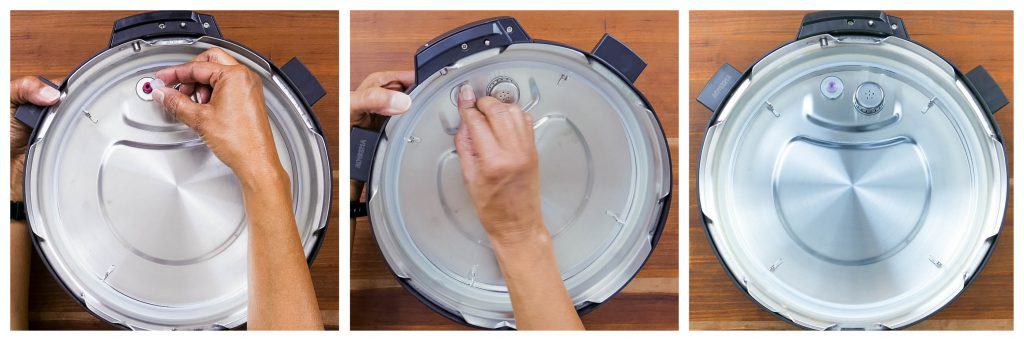
- Thread the float valve through the float valve hole.
- While holding it in place on the exterior of the lid, replace the silicone cover by pushing it onto the float valve on the interior of the lid.
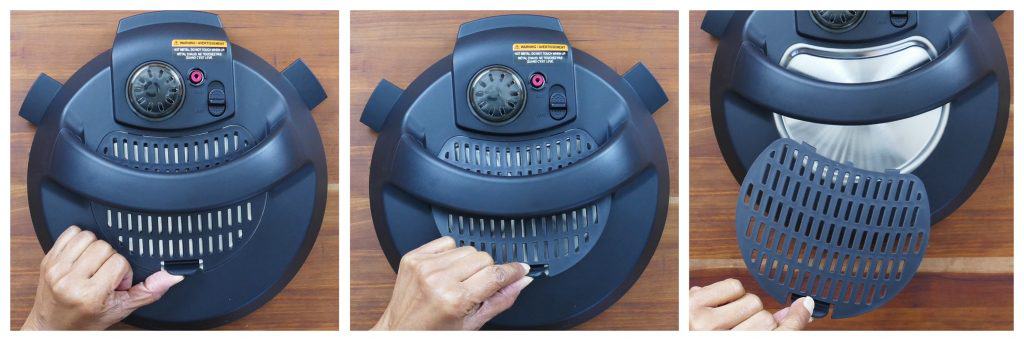
Anti-Block Shield
The anti-block shield should be cleaned periodically, especially after cooking frothy or starchy foods.
How to Remove and Replace the Anti-block Shield
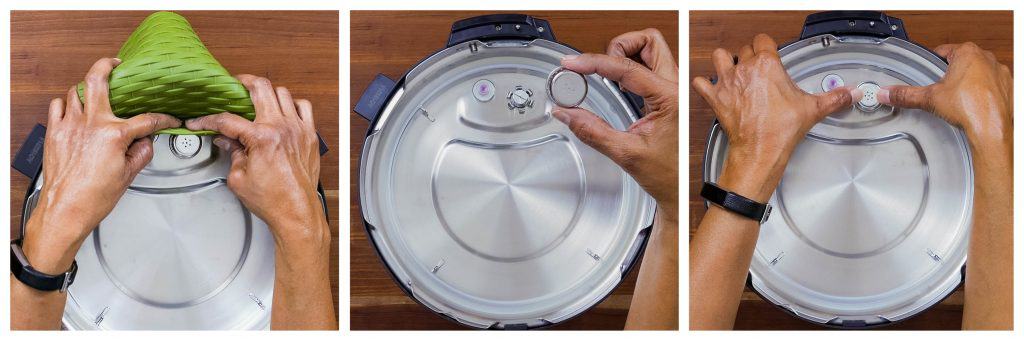
- The anti-block shield can be hard to remove with your bare hands.
- Use a silicone trivet or a dish towel to push the anti-block shield in an upwards motion.
- Try it from the front or from behind (as shown above in the first image)
- To replace the anti-block shield, push it in until it clicks into place.
Instant Pot Duo Evo Plus Assembly
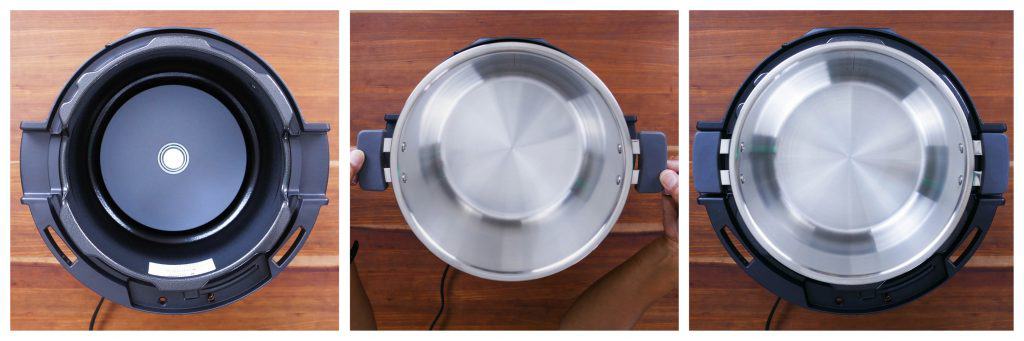
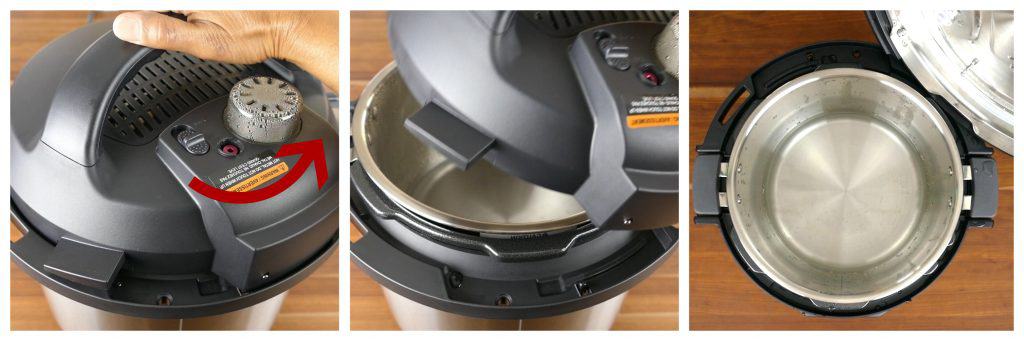
- Place the inner pot in the Instant Pot base unit with the handles resting in the handle notches.
Condensation Collector

The condensation collector catches any moisture that builds up on the rim. This usually comes from moisture dripping from inside the lid into the rim of the Instant Pot base, when the lid is propped open. Here’s how to attach the condensation collector:
- Line up the condensation collector with the edges aligned with the notches on the back of the Instant Pot base unit.
- Slide in the condensation collector until it’s pushed in all the way.
Open and Close the Lid
How to Close the Lid

- Place the lid onto the Instant Pot base unit with the arrow mark on the lid lined up with the small bar that is above the right corner of the control panel.
- You will hear a chime (if the volume is turned on).
- Turn the lid clockwise until you hear another chime.
- The lid will be closed.
How to Open the Lid

- Turn the lid counterclockwise until you hear a chime.
- The arrow on the lid will be lined up with the bar on the base unit.
- Lift the lid to remove it.
- If you feel a slight resistance, wiggle the lid back and forth and the suction should release.
How to Prop Open the Lid
Propping open the lid keeps it out of the way and allows you to use the Instant Pot hands-free.
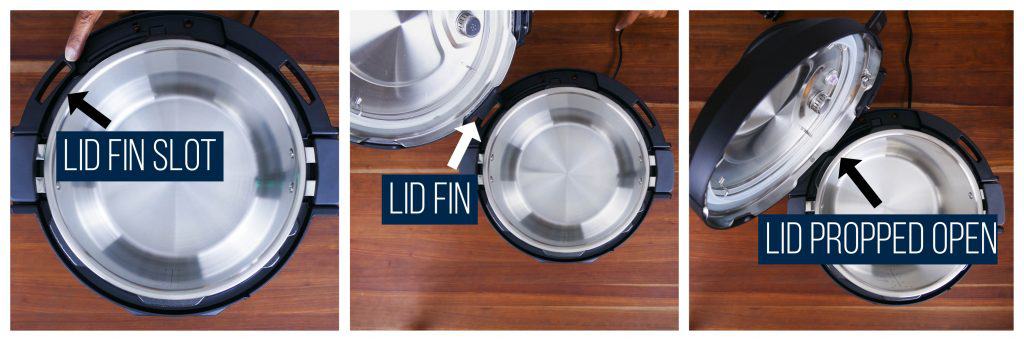
- Locate the lid fin slots in the rim of the base unit.
- Insert the left lid fin into the left slot or the right lid fin into the right slot.
Release Pressure
There are a few different ways to release pressure from the Instant Pot Duo Evo Plus:
- Natural Pressure Release/Natural Release
- Quick Release
- 10-minute or 15-minute Natural Pressure Release
- Quick Release in Short Bursts
[Find out more about the pressure release methods.]
How to do a Faster Natural Pressure Release with QuickCool
There is one additional pressure release method available with the Instant Pot Duo Evo Plus.
Back in the days of stovetop pressure cookers, you were able to cool the pressure cooker down faster by running cold water over the closed lid. This allowed the pressure to drop faster. This isn’t possible with an electric pressure cooker.
To speed up the cooling process, remove the QuickCool cover on the Instant Pot Duo Evo Plus and place the quick cool tray accessory filled with ice on the metal surface. This allows the pressure to be naturally released faster (up to 50% faster).
Here’s how you remove the cover and add the ice.
- Push the tab inwards and pull up.
- Lift the cover upward and towards you to remove it.
- Add ice to the QuickCool tray and place the tray on the metal part of the lid.
- The float valve will drop and you will be able to open the lid.
USES: tender-crisp vegetables, delicate fish
Commonly Used Functions of the Instant Pot Duo Evo Plus

The Instant Pot Duo Evo Plus has many buttons that may appear confusing and complicated. But they really aren’t. Just think of them as presets or shortcuts.
For the purposes of just getting you going, in this guide I’ll show you the most commonly used Instant Pot Duo Evo Plus buttons and functions:
- Pressure Cook | Custom option
- Saute
- Keep Warm
- Start
- Cancel
[For a more detailed description of the functions and buttons, please visit my Advanced User Guide for the Instant Pot Duo Evo Plus Buttons and Smart Programs.]
Pressure Cook | Custom
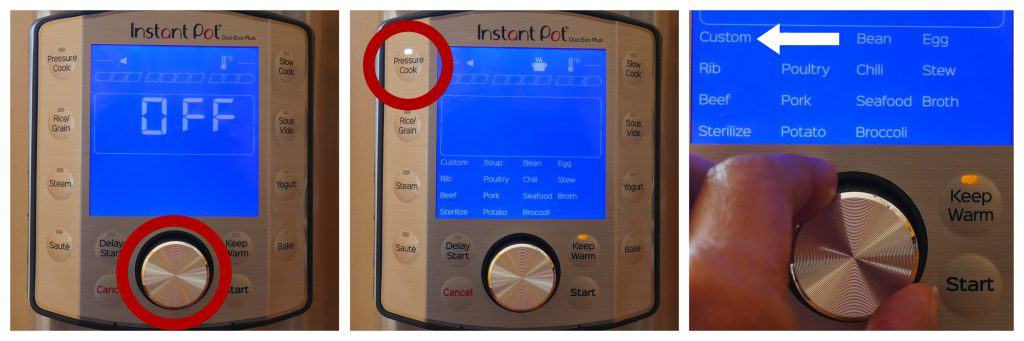
- If the display is off, press the knob once to turn it on.
- Press the Pressure Cook button.
- Turn the knob until Custom is blinking.
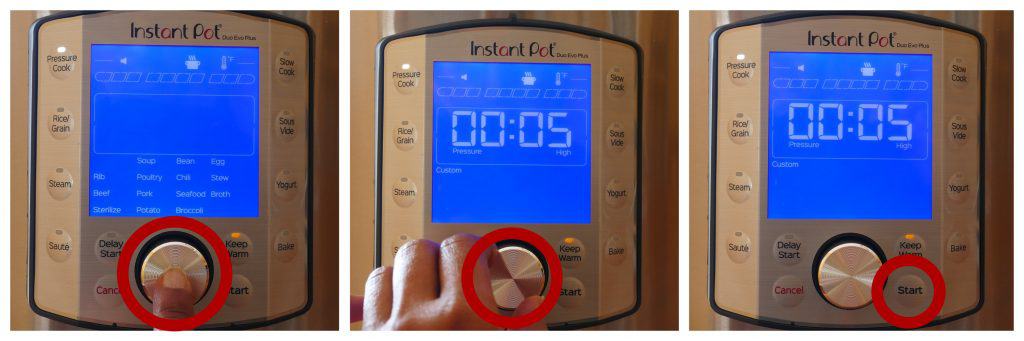
- Press the knob to confirm Custom.
- The time (e.g. 00:10) will be blinking.
- Turn the knob until you see 00:05 (5 minutes) or your desired pressure cooking time.
- Press Start.
Saute
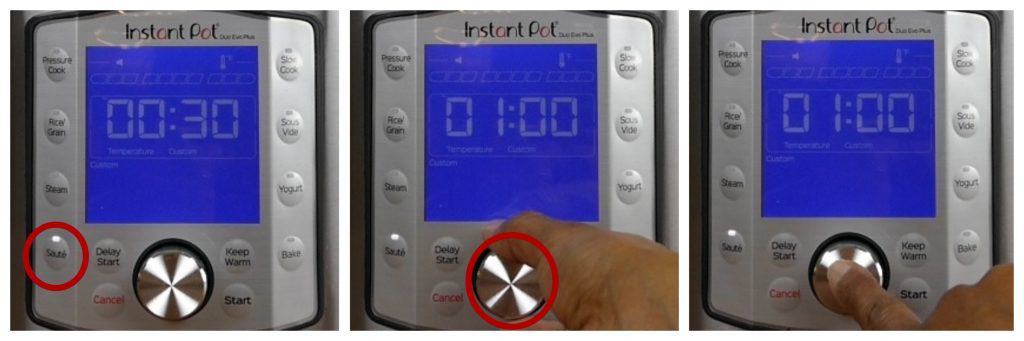
- Press Saute.
- The saute time will be blinking e.g. 00:30 (30 minutes)
- Turn the knob to set the saute time. In this example, it is set to 1 hour.
- Press the knob to confirm your selection.
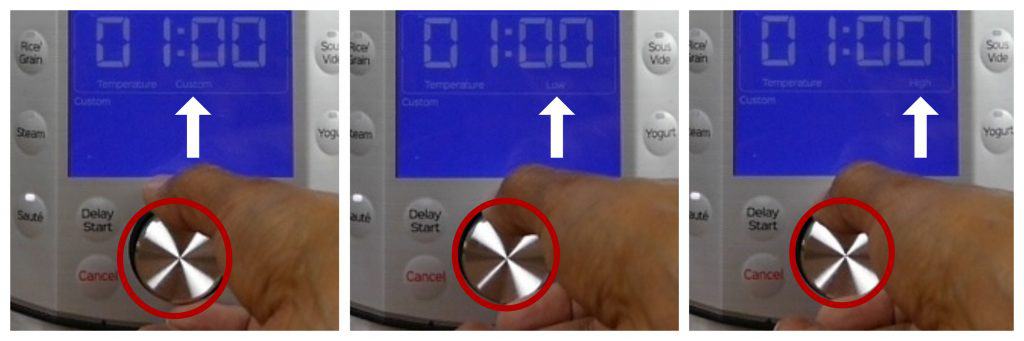
- The temperature setting will be blinking e.g. Custom.
- Turn the knob to toggle between Custom, Low and High saute temperatures.
- Press the knob to confirm your selection. In this example, it’s set to Custom.
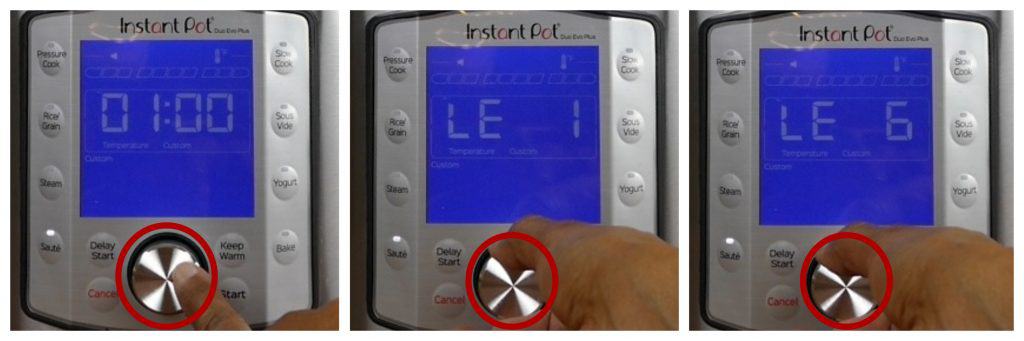
- The temperature level will be blinking (LE 1, LE 2, LE 3, etc.) This is the custom temperature level. Level 1 is the lowest setting and Level 6 is the highest.
- Turn the knob to your desired temperature level.
- Press the Start button to begin the saute function.
Keep Warm, Start and Cancel
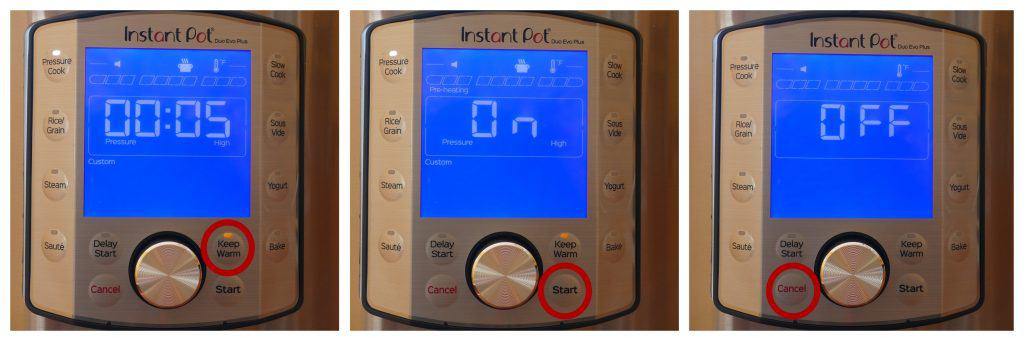
- Press the Keep Warm button to turn the Keep Warm function on and off. Turn it on when you want your food to stay warm after being pressure cooked. The steaming pot icon will be displayed at the top.
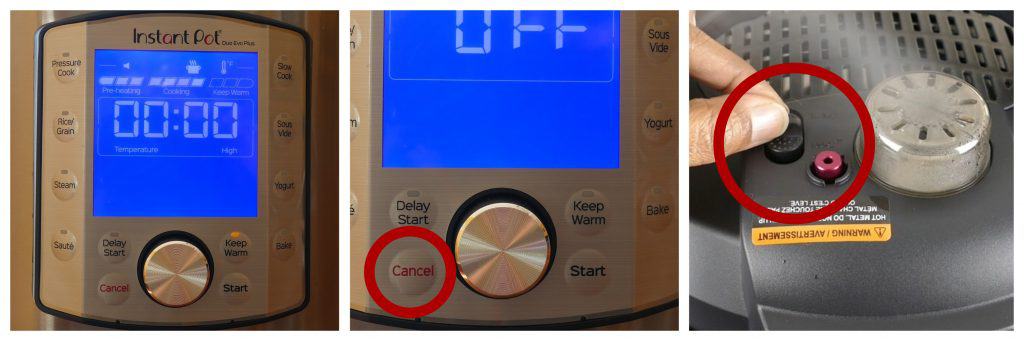
- Press the Start button to initiate the selected function or preset. e.g. press Saute and press Start. The Instant Pot Display will say On.
- Press Cancel to end the selected function. Instant Pot display will say Off.
Instant Pot Duo Evo Plus Initial Test Run / Water Test
What is the Water Test?
A water test is done by pressure cooking water for a few minutes. According to the Instant Pot manual you need to use 3 cups of water but I’ve found that using 2 cups of water is adequate. The advantage of using 2 cups is that it takes less time for the Instant Pot to come to pressure.
Why You Should do the Water Test
The initial test run or water test serves two purposes: it familiarizes you with using your new Instant Pot Duo Evo Plus and it allows you to establish that your Instant Pot is working properly. If you have a defective unit, the water test will identify that and you can get a replacement unit.
You should do a water test before the first use but you can also do it when you’re having problems with the Instant Pot pressurizing. Doing the water test will pinpoint whether there’s something about the recipe that’s causing your sealing issues.
How to do the Initial Test Run / Water Test
This section tells you how to use the Instant Pot Duo Evo Plus for the first time, right out of the box. You will do a water test i.e. pressure cook water.
- Make sure the sealing ring is properly seated.
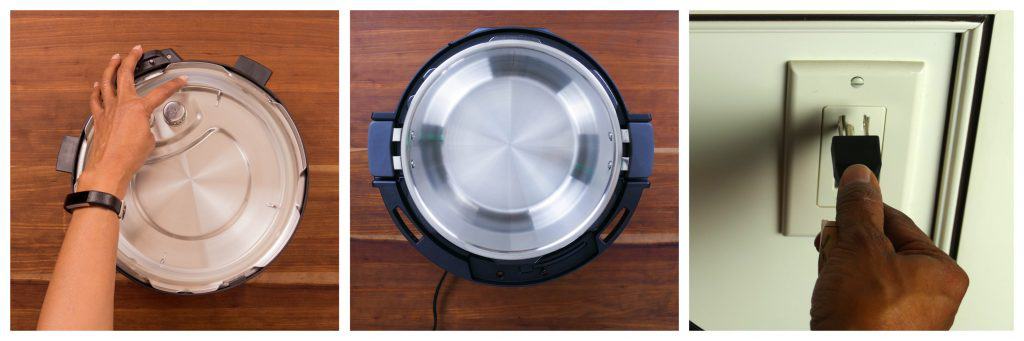
- Place the inner pot into the base unit.
- Plug power cord into an outlet.
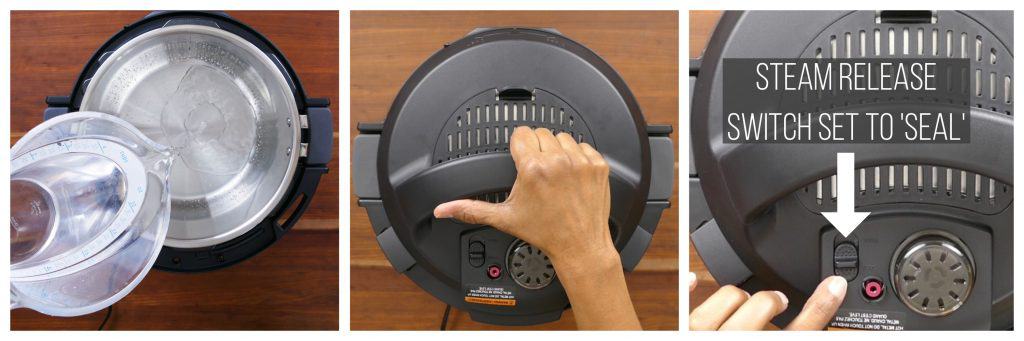
- Pour 2 cups of water into the inner pot.
- Close the lid.
- Make sure the steam release switch is in the Seal position.
- If the display is off, press the knob once to turn it on.
- Press the Pressure Cook button.
- Turn the knob until Custom is blinking.
- Press the knob to select Custom.
- The time (e.g. 00:10) will be blinking.
- Turn the knob until you see 00:05 (5 minutes).
- Press Start.
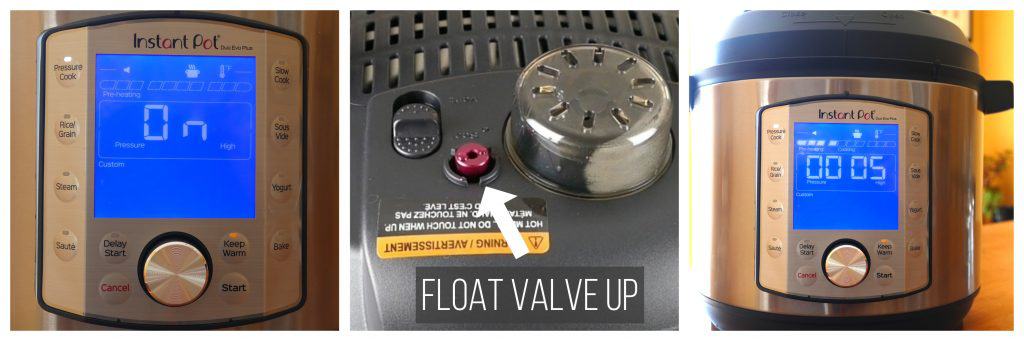
- The display will change to On.
- You’ll hear and see small amounts of steam coming from the top of the lid. This is normal and safe! Just keep your hands and face away from the steam.
- Once pressure has built up, the float valve will come up.
- After the float valve comes up, the display will change from On to 00 05. This can take a few minutes.
- The display will count down from 00 05 to 00 00.
- When pressure cooking is complete, you’ll hear a series of beeps.
- Press Cancel.
- Do a quick release: move the steam release switch from Seal to Vent.
- Steam will gush out of the steam release cover. Keep your hands and face away from the steam.
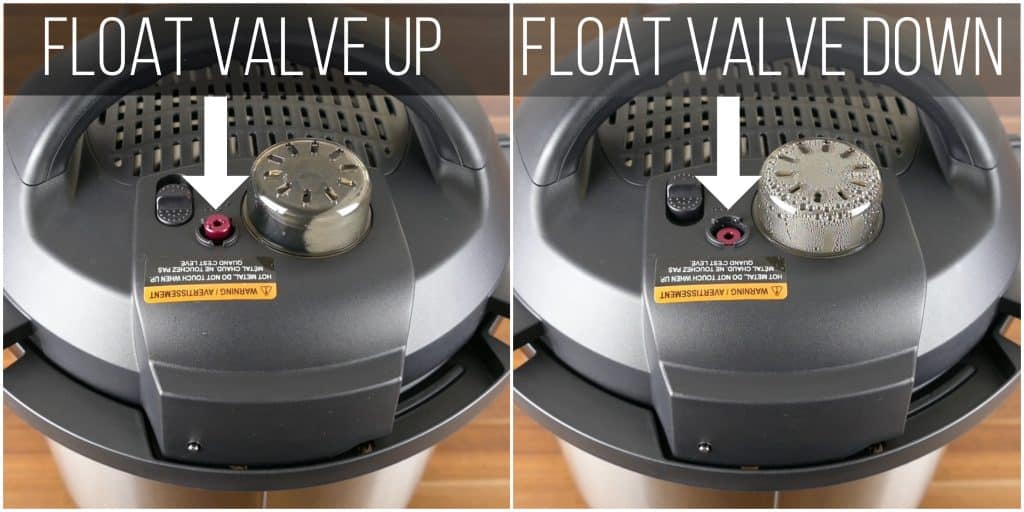
- Once all the steam has been released, the float valve will go down.
- This can take a few minutes.
- Open the lid and prop the lid open.
- That’s it! You’ve completed the water test.
Pros and Cons of the Duo Evo Plus
As I’ve mentioned before, I really love this model of the Instant Pot and it’s now my favorite model. But there are a couple of things that I don’t like.
Pros
- Pressure release is diffused
- Pressure release switch is easy to use and self sealing
- Bake function allows for dry baking
- Sous vide function
- Convenient access to functions through buttons and less reliance on the knob.
- Inner pot has handles
Cons
- Handles don’t allow the inner pot to be rotated while sauteing.
(Some find the rotating inner pot annoying, but I love being able to rotate the inner pot in place while sauteing.) - The minimum cook time is 00:01 instead of 00:00 as in some models.
(Sometimes I like to pressure cook for 00:00 minutes e.g. for quick-cooking vegetables.)
[UPDATE: I’ve had questions from readers about a workaround for this. Here’s what I do: I program the Instant Pot to pressure cook for 1 minute, and the moment it switches from On to 00:01, I press cancel and release pressure.]
First Recipes to Try
You should be all set to try out your first recipe! Here are some of my favorite easy recipes:
- Instant Pot Chipotle Shrimp Soup
- Instant Pot Thai Red Curry
- Instant Pot Chicken Tikka Masala
- Instant Pot Cream of Chicken Soup
- Instant Pot Vegetarian Moroccan Stew
- Instant Pot Chicken Curry Soup
If you found this article to be helpful, please share it on social media using the social media share buttons at the top and bottom of this post. Thank you so much!


Marion Winnett says
Thanks so much for your very informative guide. I am disappointed that there is no option to set cooking time for 0 min for steaming. Do you know a work around?
Thanks!
Paint the Kitchen Red says
Marion, as a workaround I program the Instant Pot to pressure cook for 1 minute, and the moment it switches from On to 00:01, I press cancel and release pressure.
Christina says
Hello my float valve is very loose does not stay up at all in the seal position. My rice burns on preheat it diesnt even get to the cooking part yet . What am I doing wrong . Is the float valve suppose to be tight and in an upright position to work with the seal and vent sliding button?? Help
Paint the Kitchen Red says
Christina, the float valve is loose when you start the pressure cooking and then goes up and is rigid once the Instant Pot is under pressure. If it doesn’t stay up, that means that your Instant Pot is having trouble sealing. Have you done a water test? If it never reaches pressure there could be any number of issues. Please read my post on the reasons your Instant Pot is not sealing. You might need to clean out the lid or replace the sealing ring.
CW says
You mentioned the “con” of the minimum cook time being 1 minute rather than 0 minute. Is there a way to work around this to keep tender foods from getting mushy?
Paint the Kitchen Red says
Yeah, I am seeing that in a lot of the newer versions of IP, even other models have this “feature”. The workaround I’ve found is to press Cancel the moment the ‘On’ changes to 00:01 and then release pressure.
CW says
Great! I was hoping that was the case. I have looked everywhere online for an answer, but couldn’t find the topic anywhere. Now I can buy the Instant Pot Duo Evo Plus and know that it will work well for vegetables. It will be my first Instant Pot, so I’m pretty excited! By the way, I love your website. I will definitely be using your information and recipes a lot for a long time! Thank you so much!
Paint the Kitchen Red says
You’ll love the Duo Evo Plus. Feel free to contact me with any questions, and hope you enjoy my recipes 🙂
James F Farrington says
Your Duo Evo Plus guide is an excellent tutorial. I’d love to keep a printed copy near the InstantPot as I learn to use it. Is there any way to download it as a PDF file.
Thanks
Paint the Kitchen Red says
James, you can try to right-click on the web page and select PRINT. When you get the dialog box for printing, change the destination to be “print to file” or “save as PDF”.
cheryl brownell says
how do i get the timer to read longer than 55 minutes?
Paint the Kitchen Red says
Cheryl, what smart program are you trying to use? Do you mean delay start? I would need more details to help you.
Dieter Schlein says
I just bought the Instant Pot Duo Evo plus and it failed the initial water test
I follow all instructions, 3 cups of water, release set to seal. It heats up but never starts the timer cycle and a lot of steam escapes from the steam release assembly. Stays on pre-heat the entire time and steam escapes. So much that it is louder than the TV. The float valve is up.
Paint the Kitchen Red says
Dieter, You can try and troubleshoot but since it’s brand new I would return it and get another one.
sylvie ferland says
The steam goes out by the steam release valve during the pressure cook, I try to found a new valve but it’s impossible. Someone can help me please. I tried with instantpot.com, but they not respond.
Paint the Kitchen Red says
I’m sorry you’re having trouble reaching the company. So is the Instant Pot sealed when the steam is releasing? Is it just a small amount? Is it when you cook all foods or only some? It is possible for small amounts of steam to escape. And it can happen more with some types of foods. Make sure you’ve cleaned all the parts of the lid really well. Remove the float valve and anti-block shield and wash them well.
Cei says
Hi – thank you for all the great information. Do you have to empty the condensation collector after every use?
Paint the Kitchen Red says
Cei, I find that the condensation collector doesn’t get filled too often. Almost always it’s due to pasta. So just check it every so often, but especially after cooking pasta.
Denisa says
Hy there, how many ml has a cup?
Paint the Kitchen Red says
1 cup is approximately 250 ml, a bit less.
Gail Pawlik says
Thank you so much for this article…..it seems that the manual that comes with it does not go into any detail.
Paint the Kitchen Red says
Gail, do read the Duo Evo Plus advanced manual too, for more detailed information on how to use the built-in functions.
Vera MAY Wright says
I find the manual describing the water test was useless. It finished the valverd were in thr corrdct position it woildnt allow ne to ooen thr lid. Finally I pulled the plug frkm thr wall and it opened oerfectly. I gavent cooked anything in it yet as it seemd you must follow a recipe. Will continue to try mashed potatoes first.
Andrea says
Thank you Neena, your youtube video was also super helpful. One question, so after the cooking is complete, I hit cancel? And I can take the food out? that is not specified, so I kept waiting for it to make a different sound. Meanwhile, the keep warm option was blinking on the screen and the time counting up. Other question, how do I properly place the lid on the counter, I am afraid to damage it. Thank you!
Paint the Kitchen Red says
Andrea, after cooking is complete you have two options. Let it stay in keep warm mode and the timer to count up until the float valve goes down (this is called natural pressure release). Or press cancel and do a quick release by moving the switch from sealing to venting. I hope that makes sense – read all about the different pressure release methods. I usually either stick the lid in the lid fin slot to prop it open or put it on the counter upside down to prevent condensation from dripping onto my counter.
Michelle says
I’m a first time user of the Insta Pot Duo Evo plus. When I turn it on, I set the timer for 15 minutes, then after about 5 the display screen shows PR SR
I’m guessing this means pressure.. But why? What am I doing wrong?
Paint the Kitchen Red says
Michelle, I’m not sure what that error means. I’ve heard of PrSE but not ‘sr’. You might need to open a support ticket with Instant Pot at support.instantpot.com.
LynnAnn Thomas says
I am soooo glad to have found you and this wonderful site! This new model is reviewed several places and so I bought it as my first IP.
I’m having trouble converting recipes for older models to this one, this one seems to be much hotter. Also, I have attempted to dry bake recipes in a PIP method with approved metal pots with trivets. I always get a burn error. I follow the dry bake instructions and still get it. Have you used that function yet? Any help is very appreciated! love and peace
Paint the Kitchen Red says
LynnAnn, getting a burn error when you’re dry baking sounds like there’s an issue. Yes, I did dry bake and it does take a lot longer than baking in the oven but no burn error for me. I would either return it or open a ticket at their support (support.instantpot.com).
LynnAnn Thomas says
thank you for your reply. I’ll give it another try, I think, after reading the manual again, I may have missed a step.
Jamie Gunn says
I’m confused. I just purchased a duo evo plus 6 quart IP. I notice on other versions, the cancel and keep warm are on one button but they are on two different buttons now. When my meal is finished cooking and the recipe says turn off and let do natural release do I push cancel or do I push keep warm?
Paint the Kitchen Red says
Jamie, in my experience, Keep Warm doesn’t really affect the natural release. You can have it on or not – depending on if you want the food to stay warm after pressure release. I generally just let it be and press Cancel when I’m ready to take the food out.
Joseph Bentley says
Where is a quickcool tray? It says coming soon??
Paint the Kitchen Red says
Joseph, hmmm I’ve been waiting too. I still don’t see it in the Instant Pot webstore 🙂 I’m not sure when it’ll be available.
eddie says
On the Instant Pot Duo Evo Plus if I press the keep warm button before I hit start cooking . Is their a timer that will tell me how long its been in the warm mode after cooking . Confused about it. Thanks for any answer.
Paint the Kitchen Red says
Eddie – it should show you how long it’s been in keep warm mode. What are you seeing?
Kaye Devon says
Hi. Couple non-cooking questions …I was told that there is a protective plastic covering over the controls of the base that should be removed. Can’t tell on mine and don’t want to damage it. Can you verify?
Also, do you know where I can obtain a second liner for this model??
Thanks.
Paint the Kitchen Red says
Kaye, yes there is. You may not even notice it, but you can peel it back. If I were you, I’d just leave it on and then when it gets cloudy or dirty, you can peel it off. Oh, good question re: liner. I have not seen them for sale on amazon or the Instant Pot site. Might be worth shooting them an email?
MT Hannigan says
By liner, are you referring to the Inner pot with the handles that comes with the Duo Evo? If so, the answer from Instant Pot is that it is NOT sold separately yet. If enough people ask about it, they might put a rush on offering one. I’d also like to see an inner pot with handles that is nonstick.
CM says
Why can’t I see the video on my Samsung tablet, but I can on my iPhone? Thanks!
Paint the Kitchen Red says
I’m not sure why that’s happening! I will look into it – thanks for letting me know. You can also watch it on my Youtube channel if you’d like. It’s the latest video.
CM says
Actually, my manual says 3 cups for water test.
Paint the Kitchen Red says
You can definitely do 3 cups, just takes a wee bit longer.
razzy 7 says
You have a beautiful site.
I’d add a bit of info to your water test. Once the test is completed, you should measure the quantity of water remaining in the pot. If it’s functioning properly, you should still have most of the 2 cups. If you don’t and you’ve lost much of the water, something isn’t functioning properly.
Paint the Kitchen Red says
Thank you so much! Great point – I will add that to my list of things to update.