
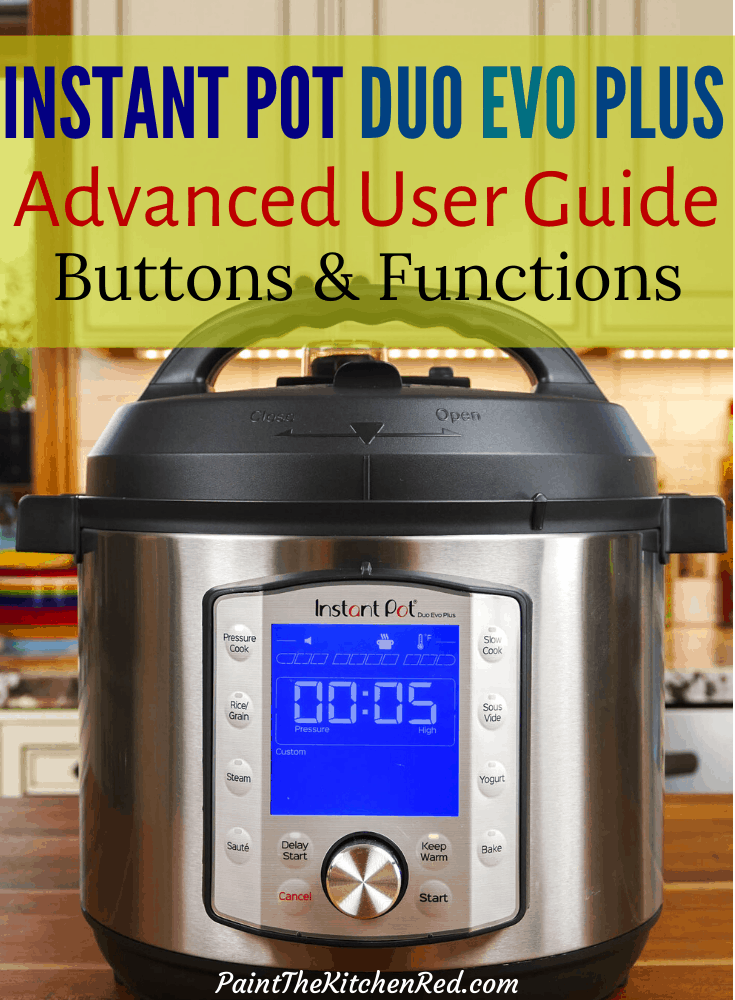
Learn more about all the smart programs, presets, buttons and capabilities of the Instant Pot Duo Evo Plus. This advanced user guide will give you detailed instructions on how to use the various buttons, functions and presets.
This post contains affiliate links. As an Amazon Associate, I earn from qualifying purchases. Please read the disclosure.
If you’re brand new to the Instant Pot Duo Evo Plus and just want to get started using it, I recommend that you read my Instant Pot Duo Evo Plus Quick Start Guide for Beginners first. It gives you the basics on how to use the Evo model of Instant Pot.
This user manual will give you detailed instructions on how to use the advanced features of the Instant Pot Duo Evo Plus buttons and smart programs.
[Learn more about other Instant Pot models: Instant Pot Duo Quick Start Guide or Instant Pot Ultra Quick Start Guide]
Table of Contents
Instant Pot Duo Evo Plus Display Panel

The display panel shows you default settings and cooking progress. It also shows you information about cooking time, pressure level, temperature and presets for each smart program.
- Sound
The sound icon is displayed when sound is turned on. If the sound is off, the icon will have a line through it. - Delay timer
This icon is displayed when the Delay Start button has been pressed. - Keep warm
The icon shows up when the Keep Warm button has been pressed. - Unit of Temperature
Shows whether the temperature is displayed in Fahrenheit or Celsius. - Progress Bar
Shows Pre-heating, Cooking and Keep Warm progress. - Numerical Display
Shows the time, pressure, or temperature depending on what option is currently selected. - Temperature
Shows whether temperature setting is custom, low or high. - Pressure
Shows whether the pressure level is set to none, low or high pressure. - Presets
Different presets are displayed depending on the function that was chosen.
How to Turn Sound On and Off
If the sound is on, you’ll hear a chime when you open and close the lid. You’ll also hear a beep when you press the Instant Pot Duo Evo Plus buttons or knob, when the Instant Pot reaches pressure and when cooking is complete.
When sound is turned off, you won’t hear any chimes or beeps.
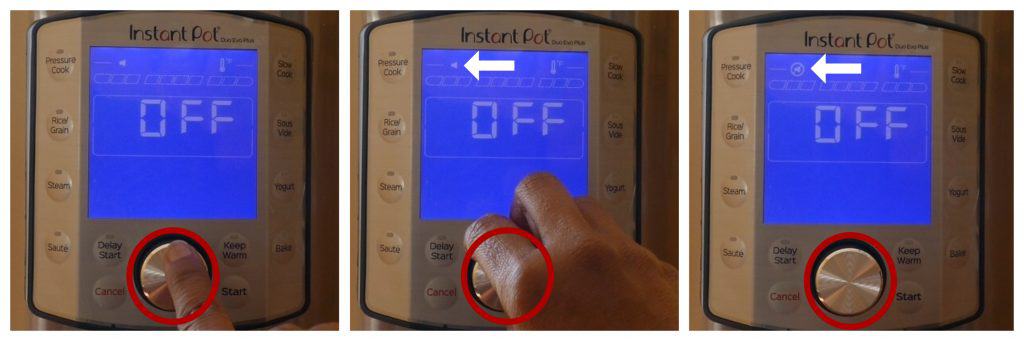
- Press Cancel. The display should say Off, press and hold the knob for 5 seconds.
- When the sound icon (microphone) starts blinking, turn the knob to toggle between sound On and Off.
- Press and hold the knob for 5 seconds to confirm your selection.
How to Change the Temperature Unit
The temperature unit will either default to F (Fahrenheit) or C (Celsius). The default setting for my Instant Pot Duo Evo Plus is F. I would assume that the default setting for temperature is based on country of purchase.

- When the display says Off, press and hold the knob for 5 seconds.
- The sound icon will blink.
- Press the knob once and F or C next to the temperature icon will blink.
- Turn the knob to toggle between Fahrenheit and Celsius.
- Press and hold the knob for 5 seconds to confirm your selection.
Display Panel Controls
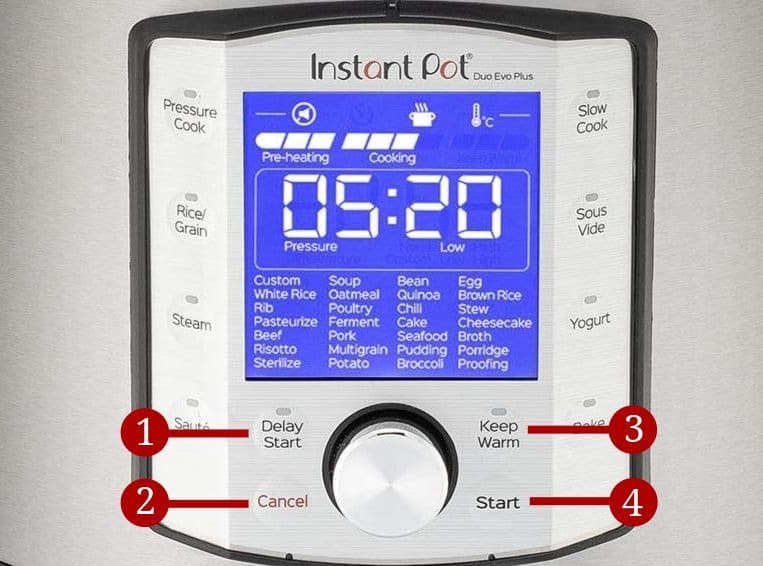
1. How to Set a Timer to Delay the Start of Cooking
- After selecting your desired cooking program (e.g. Pressure Cook, Rice/Grain) and time, press the Delay Start button.
- The time will blink.
- Turn the knob to set the number of hours before cooking should start.
- Press Start.
- Cooking will automatically begin after the timer has counted down to 00:00.
- The Delay Start light is on when the functionality is enabled.
- Be careful when setting the delay start timer when cooking meats. Follow proper food safety guidelines.
2. How to Keep Food Warm After Cooking
- Press the Keep Warm button to enable the Keep Warm functionality.
- The Keep Warm light is on when the functionality is enabled.
- This feature is most often used in conjunction with pressure cooking. If the Keep Warm light is on, the Instant Pot will keep food warm for up to 24 hours after pressure cooking is complete.
- You can press the Keep Warm button before or during the cooking process.
3. How to Cancel
- Press Cancel to end the selected function.
- The display will say Off.
- After some time, the display will go dark.
4. How to Start Cooking
- Press the Start button to initiate the selected function or preset. e.g. press Saute and press Start.
- The Instant Pot Display will say On.
Instant Pot Duo Evo Plus Smart Program Buttons and Presets
Each Instant Pot Duo Evo Plus smart program has presets (time and pressure levels) that have been pre-programmed for a particular food. Included in each of the presets is a Custom option and it’s used when you want to program the Instant Pot on your own and not use a preset.
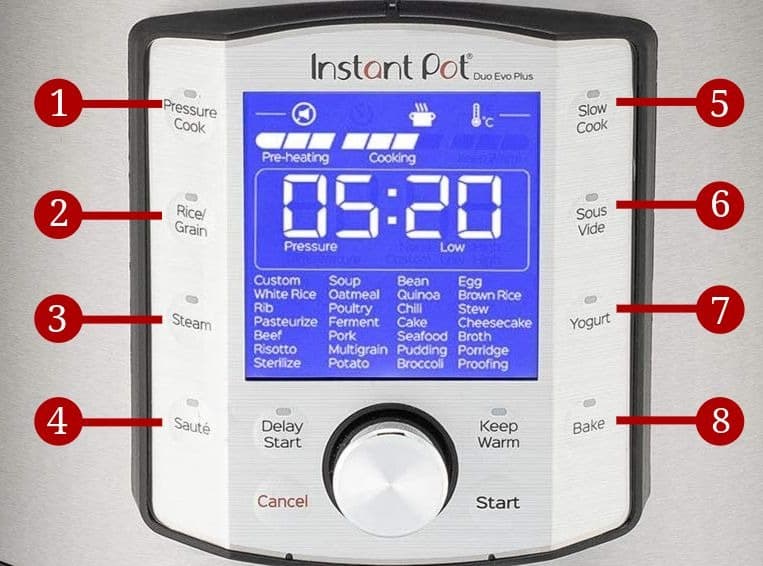
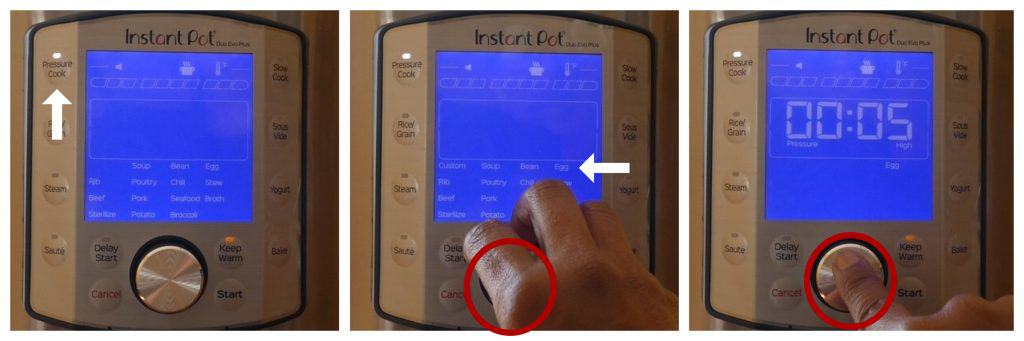
1. How to Use the Pressure Cook Button
Presets
Custom, Soup, Bean, Egg, Rib, Poultry, Chili, Stew, Beef, Pork, Seafood, Broth, Sterilize, Potato, Broccoli
Use
Pressure cook food on low or high pressure.
- Press the Pressure Cook button.
- Custom will blink.
- Turn the knob to desired preset e.g. Custom, Soup, Bean.
- Press the knob to confirm preset.
- The time will blink.
- Turn the knob to change the time to the desired time.
- Press the knob to confirm time.
- High or Low will blink.
- Turn the knob to change the pressure level.
- Press the knob to confirm pressure level.
- Press Start.
2. How to Use the Rice/Grain Button
Presets
Custom, White Rice, Oatmeal, Quinoa, Brown Rice, Risotto, Multigrain, Porridge
Use
Pressure cook rice and grains on low or high pressure.
- Press the Rice/Grain button.
- Custom will blink.
- Turn the knob to desired preset e.g. Custom, White Rice, Oatmeal, Quinoa.
- Press the knob to confirm preset.
- The time will blink.
- Turn the knob to change the time to the desired time.
- Press the knob to confirm time.
- High or Low will blink.
- Turn the knob to change the pressure level.
- Press the knob to confirm pressure level.
- Press Start
3. How to Use the Steam Button
Presets
Custom, Sterilize, Potato, Broccoli
Use
No-pressure steaming for fish or vegetables. Great for reheating foods.
- Press the Steam button.
- Custom will blink.
- Turn the knob to desired preset e.g. Custom, Sterilize, Potato
- Press the knob to confirm preset.
- The time will blink.
- Turn the knob to change the time to the desired time.
- Press the knob to confirm time.
- Press Start
4. How to Use the Saute Button
Presets
Custom
Use
Sear, brown, stir-fry, simmer or reduce food. Use the Low temperature setting for simmering and the High temperature setting for searing. For anything in between, use the Custom temperature setting. Make sure the display says ‘hot’ before you begin searing or browning. Use this function with the lid off. There is no pressure.
How to Saute with Low or High Temperature Setting
- Press the Saute button.
- The time (e.g. 00:30) will blink.
- Turn the knob to change the time, if desired.
- Press the knob to confirm the time.
- Custom, Low or High will blink.
- Turn the knob to change the saute level to Low or High.
- Press the knob to confirm selection.
- Press Start.
How to Saute with a Custom Temperature Setting
- Press the Saute button.
- The time (e.g. 00:30) will blink.
- Turn the knob to change the time, if desired.
- Press the knob to confirm the time.
- Custom, Low or High will blink.
- If Custom is not the default, turn the knob to change the saute level to Custom.
- Press the knob to select Custom.
- Saute level (LE 1 through LE 6) will blink. Level 1 is the coolest setting and level 6 is the hottest.
- Turn the knob to change the saute level.
- Press the knob to confirm the saute level.
- Press Start.
5. How to Use the Slow Cook Button
Presets
Custom, Rib, Poultry, Chili, Stew, Beef, Pork
Use
Slow cook food on low or high temperature. Instant Pot is not pressurized, so set the steam release switch to Vent.
- Press the Slow Cook button.
- Custom will blink.
- Turn the knob to desired preset e.g. Custom, Rib, Poultry.
- Press the knob to confirm preset.
- Time will blink.
- Turn the knob to change the time to the desired time.
- Press the knob to confirm time.
- High or Low will blink.
- Turn the knob to change the slow cook level.
- Press the knob to confirm slow cook level.
- Press Start
6. How to Use the Sous Vide Button
[Read More: Detailed instructions on how to use the Instant Pot Sous Vide smart program.]
Presets
Custom, Egg, Poultry, Beef, Pork, Seafood
Use
Cook food (usually meats and seafood) in a plastic bag in a water bath for a prolonged duration.
- Press the Sous Vide button.
- Custom will blink.
- Turn the knob to desired preset e.g. Custom, Egg, Poultry, Beef.
- Press the knob to confirm preset.
- Temperature will blink.
- Turn the knob to change the temperature.
- Press the knob to confirm temperature.
- Time will blink.
- Turn the knob to change the time.
- Press the knob to confirm the time.
- Press Start.
7. How to Use the Yogurt Button
Presets
Custom, Pasteurize, Ferment
Use
In two stages, pasteurize and then ferment milk to make homemade yogurt. After pasteurizing, allow yogurt to cool to 110 degrees and add yogurt culture.
Pasteurize Yogurt
- Press the Yogurt button.
- Custom will blink.
- Turn the knob until Pasteurize is blinking.
- Press Start.
Ferment Yogurt
- Press the Yogurt button.
- Custom will blink.
- Turn the knob until Ferment is blinking.
- Press Start.
Note: if you want to customize the yogurt settings, select the Custom option and change the temperature and time.
8. How to Use the Bake Button
Presets
Custom, Cake, Cheesecake, Pudding, Proofing
Use
Bake under low, high or no pressure for up to 4 hours.
Bake with Pressure
- Press the Bake button.
- Custom will blink.
- Turn the knob to the desired preset e.g. Cake, Cheesecake, Pudding.
- Press the knob to confirm preset.
- Time will blink.
- Turn the knob to change the time to the desired time.
- Press the knob to confirm the time.
- High or Low will blink.
- Turn the knob to change the pressure level.
- Press the knob to confirm the pressure level.
- Press Start.
Bake with No Pressure
- Press the Bake button.
- Custom will blink.
- Press the knob to select Custom.
- Time will blink.
- Turn the knob to change the time to the desired time.
- Press the knob to confirm the time.
- None, High, or Low will blink.
- Turn the knob to change the pressure level to None.
- Press the knob to confirm the pressure level.
- Temperature will blink.
- Turn the knob to change the temperature. (349 degrees Fahrenheit is the highest.)
- Press the knob to confirm the temperature.
- Press Start.
How to Best Use the Smart Program Presets
If you’re like most Instant Pot owners, you probably use the Pressure Cook –Custom setting and nothing else. You’ve probably noticed that most recipes in cookbooks and on the internet say something like “pressure cook on high for 10 minutes”. You may be wondering why they don’t say “use the poultry preset” or “use the oatmeal preset”.
The most likely reason is that the recipe writer is writing for a varied audience. People own all kinds of pressure cooker brands and models and they may not have a particular feature.
That doesn’t mean you can’t use the presets. If the default time and pressure level for a preset don’t meet your needs, you can change them.
For example, the preset for Egg (in the Pressure Cook smart program) is 5 minutes on high pressure. I generally like to make Instant Pot Eggs by pressure cooking for 2 minutes on high.
Another example is rice. The Rice preset defaults to 12 minutes on low pressure. I like to cook Instant Pot Jasmine rice very often, so I have changed the Rice preset time to 4 minutes on high pressure. Every time I select the Rice preset, it will remember my settings.
Here’s how I change the default Egg preset:
How to Change the Egg Preset Default Setting
- Press Pressure Cook button
- Turn knob till Egg is blinking
- Press knob to select Egg
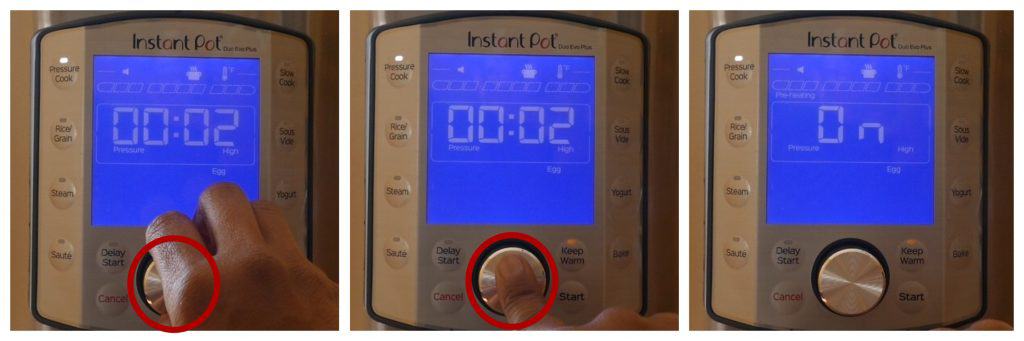
- Turn knob to change time to 00:02
- Press knob to select 2 minutes
- The display will change to On.
Next Steps:
Between the Instant Pot Duo Evo Plus Quick Start Beginner’s Manual and this Advanced User Guide, you should be in a position to take advantage of all of the Instant Pot Duo Evo Plus buttons and smart programs.
The next time you make a recipe, try to use one of the presets. And don’t be afraid to change the time and pressure level if it doesn’t meet your needs!
[Read More: Instant Tips and FAQs, Instant Pot Common Problems or visit the Instant Pot website.]
Here are some Instant Pot Recipes You Might Like!

If you found this article to be helpful, please share it on social media using the social media share buttons at the top and bottom of this post. Thank you so much!


Ruth Tunmore says
I was today looking for a manual for my Mother’s Instant Pot.
She has a Duo Nova. So I found a manual on it for her’s and I
already had a manual for my Instant pot which I have purchased but it has not arrived yet, Its a Duo Evo Plus. Your begginer’s Manual is completely different
and I was most impressed with it and also the Advanced Manual.
Your website is most impressive and will be very helpful indeed. I read the yogurt making will try it later. Thanks for the very detailed instructions.
Paint the Kitchen Red says
Ruth, I’m so happy that you found it useful! Thank you for taking the time to comment.
Sharon Cole says
When I press knob to make a selection ie custom nothing happens
Paint the Kitchen Red says
Sharon, once you select it, you have to press Start.
Simone says
hi Neena, I am late to the party, I have had my instant pot for three years now and only now getting the courage to try it out. After many videos and blogs yours is by far the best I have read to truly understand step by step what I should do.
And Sharee, thank you as well for the yoghurt step by step, I bought this machine only because of the yoghurt feature and could not find a blog anywhere that detailed the steps.
You both have been most helpful so thank you.
Paint the Kitchen Red says
Hey Simone – thank you for the comment and I’m so glad to help out. Feel free to reach out with any questions.
George Davos says
when I press pasteurize to make yogurt, should I stir the milk to avoid the milk to stick
Paint the Kitchen Red says
Hi George, I usually gently stir the yogurt into the milk to incorporate it.
Alex Edwards says
I would like to use this to temper chocolate among other uses, however all the info I can find says the temperature is customizable from 25 degrees C and upwards, but what sort of precision is offered in this customizable option? Can it be increased/decreased to the degree, or is it in 5 degree increments or LE1 to LE6 (temperature settings for these?)?
Paint the Kitchen Red says
Alex, it is customizable by the degree. However, in the case of my unit, it’s not precise. i.e. if I measure with a thermometer, the temperature can be off by a (few) degrees from what the display says. So if you’re looking for very precise temperatures, you might need to experiment.
Ruchika says
Hello
Are the 48 presets in evo plus are customisable as per our needs or they have to be used the same way they are? I mean Can be change time , pressure & temperature in preset apart from using pressure mode.
And if yes then how does it differs from the complete customisation of ultra?
I mean both are same then.. Please explain.
Thanks
Jane says
I can’t figure out what I’m doing wrong. I’m following a friend’s recipe for making soup in IPDE Plus. I cooked ingredients on Low Pressure for 7 minutes. I waited for a natural release. I waited for the screen to say END. I then used Custom again to set it for Slow Cooker at Low for 2 hours (moving QR to vent). It has been stuck on Preheating (blinking third bar) and the timer registers 1:30 and colon is blinking. How long does it take to reheat? I’ve waited a half hour and it isn’t going into the middle section. This happened to me last time I made this and I ended dumping it into my Crock Pot and slow cooking it. Is it malfunctioning or am I not setting it up correctly? Thank you for your time. As you may have gathered….I’m new to this!
Paint the Kitchen Red says
Jane, it’s hard to diagnose without being right there with you, but it shouldn’t take that long since the contents are hot already. Have you tried slow cooking from scratch i.e. just put some warm water in and begin the slow cook process. If that works as expected, you might need to Cancel, unplug, wait a minute and start the Slow Cook process for this recipe you’re having trouble with. If the Slow Cook function just doesn’t work, you probably have a defective unit. Also, make sure you’re pressing Start!
Michelle Zeitler says
I received my duo evo plus for Christmas and was wondering if there is an air fryer lid that will work with this one ?
Paint the Kitchen Red says
Michelle, the official Instant Pot air fryer lid is not compatible with the Duo Evo Plus, I’m thinking it’s because of the handles,maybe? That may change in the future.
Pat says
Hi – just bought the EVO Plus because of the BAKE feature, and haven’t been able to see any videos or recipes for that…any help?
Thanks.
Paint the Kitchen Red says
Pat, I have used the bake feature and the cake came out well except it took FOREVER! I used the same oven recipe and did it at the highest temperature available. If I recall, it took 2 to 2.5 hours. No water required, I think I did place the pan on a rack.
Kitty Bluhm says
What setting and procedures do you recommend for searing meat before pressure cooking? I try using Sauté on highest setting and get an error message. Lower saute settings don’t achieve a browning effect. Would it help to put oil in at the start of the process?
Thank you for any recommendations.
Paint the Kitchen Red says
Kitty, always make sure the pan is really hot before adding oil. When you sear meat, it may initially stick but if you gently jiggle the meat once it’s had a chance to brown, it should come loose. Also, make sure you deglaze before pressure cooking. I don’t use the highest temperature for saute on my duo evo plus. I use a 4 setting.
Ruth Tunmore says
Hi can you please explain how I can do a 4 setting on Saute, Thanks Ruth
Paint the Kitchen Red says
Ruth, the level 4 setting in Saute mode is a bit above medium hot, but I find 3 and 4 to be a good setting. When you’re programming the Saute button, select Custom and turn the knob to LE 4.
Valerie says
Hello,
I have a question about making soy yogurt in the Duo Evo Plus. I have pushed the button Yogurt, then selected Ferment, then set the time to 14 hours. I selected for the temperature the low mode.
I wasn’t sure what temp to select…
Should it be on low or high to ferment soy milk yogurts?
Thanks.
Paint the Kitchen Red says
Valerie, the default temperature for Ferment is high. I have never made soy milk yogurt but if your recipe doesn’t specify a temperature, it might be high.
Valerie says
Thank you so much for your reply.
I had changed it to low temperature and it ruined the process.
I’ll try tomorrow to make soy yogurt with your advice in mind. Thanks again.
Richard G says
Hello, Thank you for your help, I am very new to the instant pot and what you laid out is very helpful. I have ( I hope to be easy questions ) 2 questions, 1 – your “Quick Start for Beginner’s and Advanced User Guide” for the Duo Evo Plus, is it printable with the pics ? 2 – If I’m going double a recipe does the time and the temp change ? Again Thank You for what your doing and your help.
Paint the Kitchen Red says
Richard, thanks so much for reaching out!
1. I’m so sorry I don’t have a printable version but you could try to do the following: On the website, press ctrl-P, and when the print dialog comes up,change the printer to ‘print to PDF’. That will save it to a file and you should be able to print that file.
2. When you double the recipe, generally you will keep the cooking time the same. The exceptions include when your food is bigger e.g. if the original recipe is for 1 lb piece of beef and you’re making it a 2 lb piece of beef, you would need to change the cooking time since the beef size is larger. But that situation is rare, since usually you’re cutting the food up.
Hope all that helps! Good luck.
David Ecker says
What are your thoughts on Instant Pot Max vs Duo Evo Plus ?
Paint the Kitchen Red says
I absolutely love the Evo plus. I’ve not tried the Max but a friend of mine who has one doesn’t love it, not sure about the details. So considering its price, I would pick the Evo.
Claudia says
Hi, thank you for your article, it is really helpful!
I have a question about the pressure cook and rice/grain buttons. I frequently make risotto following a recipe that specifies to cook the risotto for 6 minutes on high pressure, using the custom/manual setting. So, this is what I have been doing: pressure cook + custom setting.
Given that I make this often, I decided to customize the risotto preset so that I can use it as a shortcut.
However, when I tried, the pot preheated, sealed, and then kept preheating (I actually had to turn it off before it ever started the cooking phase); while the pressure cook programs preheat, seal and then start cooking right away.
So my question is this: is there a difference between the way these two buttons work? Or do you think maybe my IP has a problem?
Paint the Kitchen Red says
Claudia, the multigrain function on some models does have a ‘soak’ functionality but I believe that’s before it comes to pressure. And I can’t imagine why risotto would do that. You might want to find another less-frequently used setting use that as your risotto preset or you could contact the company to ask them about it: support.instantpot.com. Let me know if you find anything out 🙂
Claudia says
Thank you for your reply! I have sent an email to IP support and will definitely let you know once they answer.
Claudia says
Hi again!
So I tried writing to Instant Pot UK support (I am located in Italy), but they haven’t replied.
I tried testing the various functions, doing a water test and timing the interval between the pot sealing and the actual start of the cooking cycle.
The results: with pressure cook > custom at high pressure, it only takes 2 minutes but with rice/grain > custom on high it takes 7 minutes. I don’t know what to make of it!
Paint the Kitchen Red says
Claudia, the rice function defaults to low pressure so I could see if you didn’t change the pressure level you’d have the discrepancy. I’m surprised because I cook rice on the rice setting but on high and it cooks fine. But to be honest, I haven’t timed it to see how long it took to come to pressure. I just leave it and go 🙂 Please do let me know if you hear back about this!
william stevens says
how do you use the proofing feature and what is it used for?
Paint the Kitchen Red says
William, the ‘Bake’ smart program has the ‘proofing’ feature. Use it to proof dough for bread. I don’t have a recipe on the blog for bread yet.
Lillian setton says
Do you have The instant pot duo plus advanced user guide for buttons and their functions in book form can this be purchased
Paint the Kitchen Red says
Lillian, I’m so sorry that I don’t have a printed version of the instructions 🙁
Susanne says
Other Insta pots you push the yogurt button and you are done. I’m confused on how to use the three settings and what they are used for. I tried making coldstart yogurt and use the custom setting and push start and it came out runny. Any help would be appreciated.
Paint the Kitchen Red says
Susanne, custom is always an option on all the smart programs. It’s for when you want to program it yourself. Pasteurize is for boiling the milk and Ferment is for fermenting. For cold start, you don’t need to pasteurize. You just ferment for however long your recipe indicates. I have a feeling that when you chose Custom, the temperature was too low and that’s why it was runny.
Linda says
I just purchased the Instant Pot Duo Evo Plus. In researching cookbooks, many say to select “”Manual” and there doesn’t seem to be a manual button. What setting do I chose for “Manual”?
Paint the Kitchen Red says
Use the Pressure Cook button. “Pressure Cook” used to be “Manual” in older models of the Instant Pot.
LynnAnn says
You posts are a huge help for this new IP user! Have you discovered how to rest defaults on th DEP?
LynnAnn says
I meant reset defaults times.
Paint the Kitchen Red says
Oh, sorry 🙂 I don’t know of any way other than to do a factory reset.
Jackie says
Hello.
I am new to this whole instant lot thing. I see most recipes and videos use different units and the instructions are different from what is indicated for my duo evo plus. For example, yogurt. Most say 8 hours for yogurt. I see in your instructions there is a two step method shown above. Does this mean that you do both steps together or choose between the two as different cooking methods.
Paint the Kitchen Red says
Jackie, yes it is confusing! So, you can follow those instructions and you would be fine. Or you can use the preset buttons. If you use the presets, you’ll need to pasteurize, let the yogurt cool to 110 degrees, add the culture, and then do the ferment.
Sharee Thornberry says
1. Pour in milk. Cover with lid. Seal/vent…doesn’t matter; it doesn’t get hot enough.
2. select yogurt and dial to pasteurize. This step takes about 45 minutes.
3. Remove lid and check temperature of milk. Should be about 180 degrees f. If it is low, turn on saute and check temperature every minute until it is 180 degrees f.
4. Remove pot and place in sink containing cold water and ice. Stir to bring temperature down to 100-110 degrees f. Remove pot from ice water.
5. Add 1/2 cup of liquid to 2 ounces of plain yogurt with active cultures. Stir. Pour back into pot.
6. Place inner pot back into cooker and cover with lid.
7. Press yogurt, dial to ferment (temp will show as high), and turn dial to adjust time to 8-10 hours depending on how thick you want the yogurt.
8. At end of cycle remove pot and lid and place in refrigerator for 6-8 hours.
9. Strain yogurt in strainer with a cloth to remove excess whey. This can take 1-4 hours.
10. Spoon into containers, seal, store in refrigerator for up to 3 weeks.
Paint the Kitchen Red says
Sharee, thank you for the detailed answer! You did a better job than me <3
Jan says
Thanks for a fantastic advanced user guide for the Evo+! I just got a 6-qt E+ & like you, the ulta WAS my favorite. (I have 2 3-qt ultras & a cosori 2-qt, for a total of 4 now. I’m catching up with your 5😂) I NEVER use the presets, so you’ve inspired me to try those out. Cooking for 1-2, so the 6 qt E+, I thought, was way too big for me. The handled pot, ability to use on stove, sold me. Now if Instant Pot will release that cooling tray & inner pot, we’ll be good to go. I also added a Mealthy Crisp Lid 💟💟💟 Yes, yes, I know, I voided my E+ warranty. But so many great reviews, I decided to go out on a limb. The handles don’t get any warmer with the crispLid than they do pressure cooking. And I’m getting rid of a 3.7 qt air fryer taking up counter space. I will do a lot of pot-in-pot with the E+ for my smaller qty. needs & BTW, your recipes halve perfectly for the 3-qt. Ultra. I would love if you would do a sous vide recipe, I’ve never done before. I will have to search to see if you’ve done one before, but if not, wish! Thanks again for the inspiration to try out presets!
Paint the Kitchen Red says
Hi Jan, thanks for the details! I love this model especially the steam release!!! Good to know that my recipes can be halved for the 3 quart. I should get one of those but hard to justify it haha! You’ve read my mind. I’m in the process of testing out sous vide on different foods and it’s coming in the new year – stick around!