
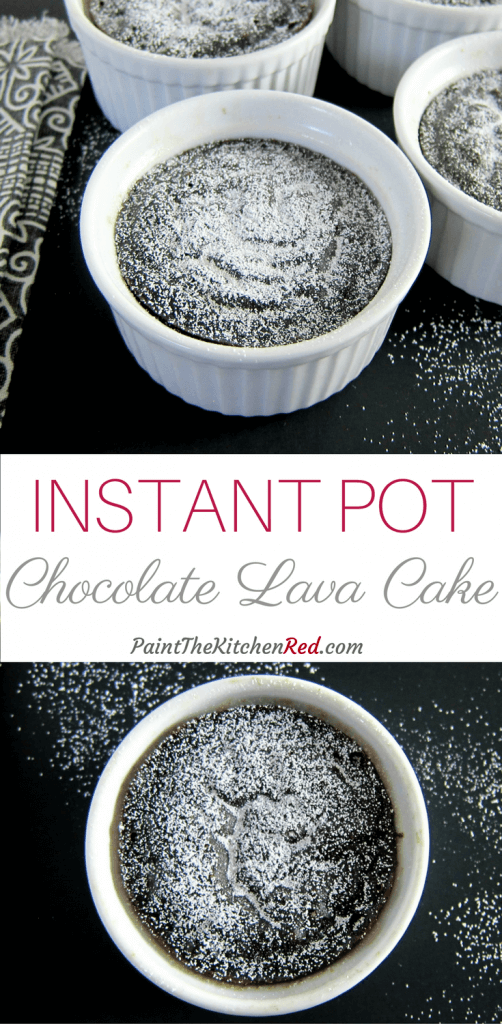
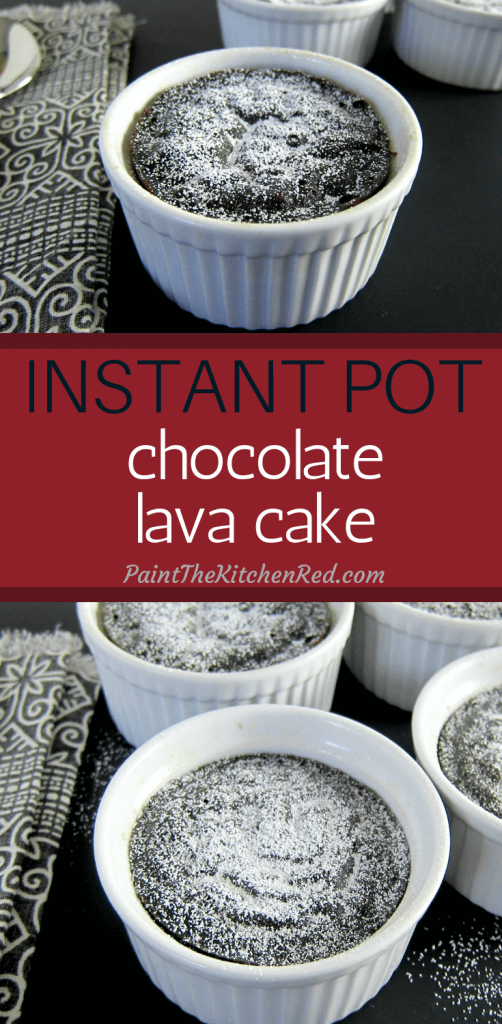
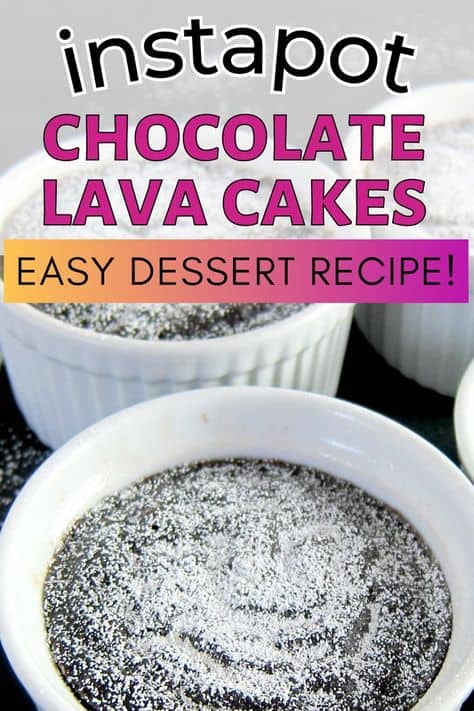
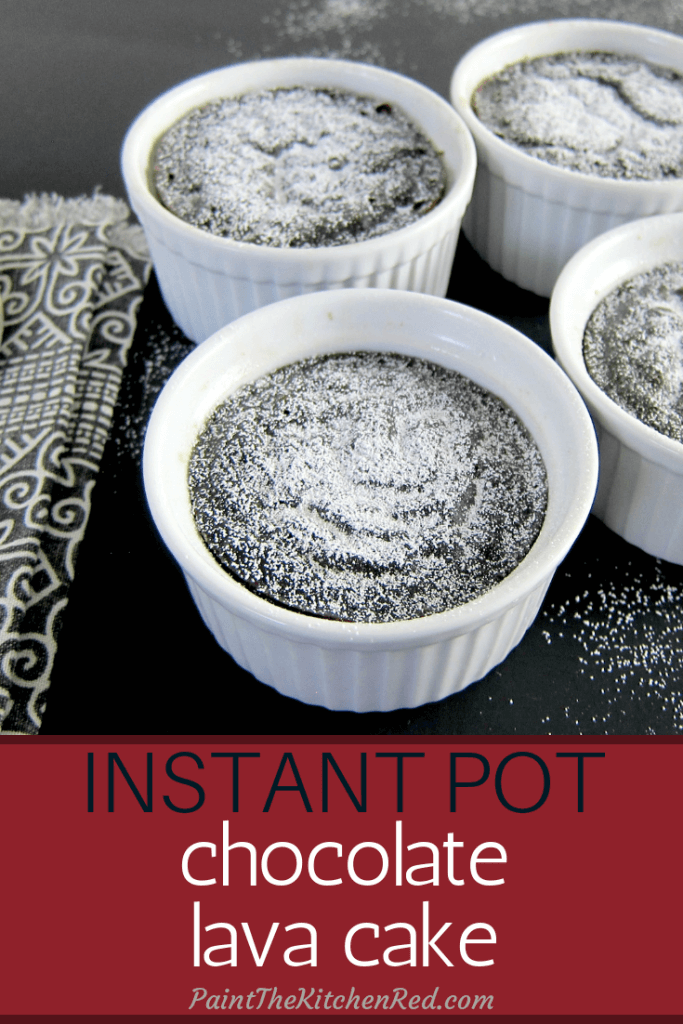
These Instant Pot lava cakes are the ultimate in decadence. They have a gooey chocolate center that oozes molten chocolate with every bite. With minimal ingredients and short preparation time, this easy Instant Pot dessert is perfect for satisfying your sweet tooth or impressing dinner guests! [Oven instructions also provided.]

This post contains affiliate links. As an Amazon Associate, I earn from qualifying purchases. Please read the disclosure.
When searching for a dessert recipe to adapt to the Instant Pot, this lava cake recipe stood out as the perfect choice. The original oven recipe uses a bain-marie (water bath), making it an ideal candidate for a quick and easy pressure cooker version.
Another reason I made this switch is to avoid heating up the kitchen during the summer months when the air conditioning is running.
These lava cakes are a wonderfully decadent treat that my whole family loves. With rich chocolate flavors and soft, gooey centers—true to their name—these molten lava cakes are always a hit.
I also love that I always have all the ingredients on hand and I can make them whenever I’m craving a chocolate treat.
They taste best when served warm, making them the perfect dessert for any occasion!
➡ I have many other desserts for you to try, like Instant Pot Oreo cheesecake, cupcakes, Instant Pot apple crisp, or peach crisp!
Ingredients and Tips
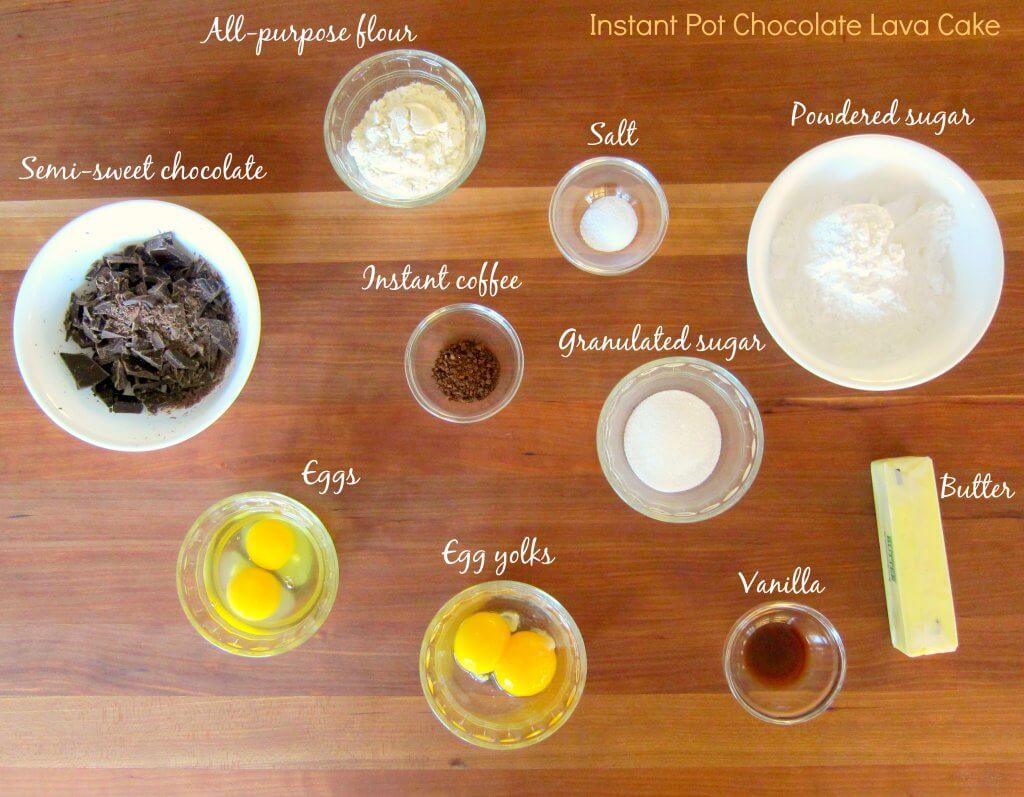
🧂 Instant Pot Lava Cake Ingredients
💡Ingredient and Recipe Tips
Here are some tips to help you make perfect Instant Pot lava cakes.
🥣 Equipment: Use 3 ½ inch ramekins or glass Pyrex custard cups. The recipe is for 6 oz. ramekins. Adjust cooking time for different containers or pressure cookers. Use the trivet that came with your Instant Pot.
☕ Coffee Flavor: Instant coffee granules add a nice balance to chocolate. Omit if you don’t like coffee.
🍫 Chocolate: Microwave at 50% power for a minute. Stir and repeat in 15-second bursts, stirring well between bursts. Stop when a few pieces remain unmelted. Let residual heat melt remaining chocolate. Overheating can ruin the recipe. Use the best quality chocolate you can afford to get.
⏱️ Cooking Time: May vary due to altitude, ingredient measurements, or Instant Pot model. If you’re a first-timer: Try 7 minutes, then add 1-2 minutes if undercooked. Experiment to find the perfect time for your setup.
❓ FAQS
You can cover them to prevent condensation from dripping in but I generally don’t.
These lava cakes taste best when eaten fresh. However, you can refrigerate them and warm them in the microwave. You may not have any molten lava, though.
I’ve found that different Instant Pot models cook these lava cakes at different rates. I would suggest cooking for two fewer minutes next time.
Again, it probably comes down to your specific Instant Pot model. If you see that the cake looks too jiggly, pressure cook for another 1 to 2 minutes.
How to Make Chocolate Lava Cakes
⏲️ Instant Pot Method
- Melt Chocolate
- Add eggs and flour
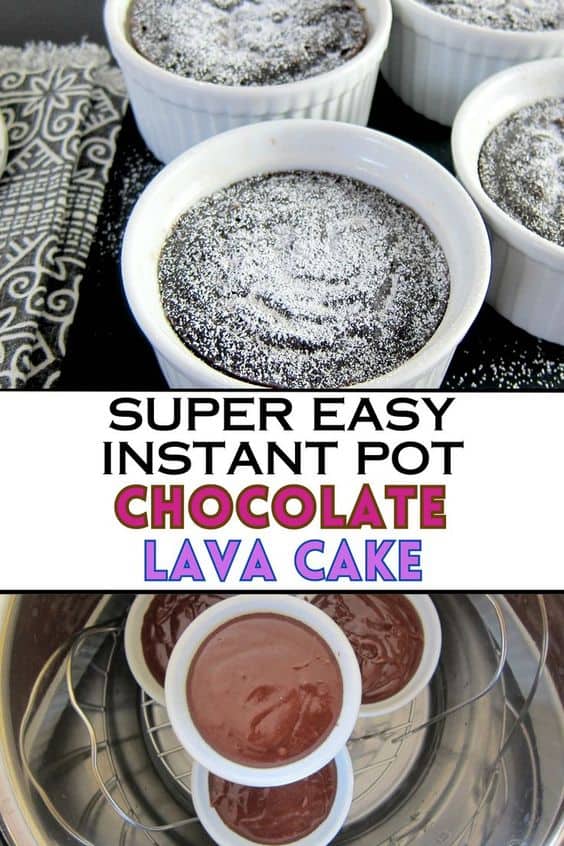
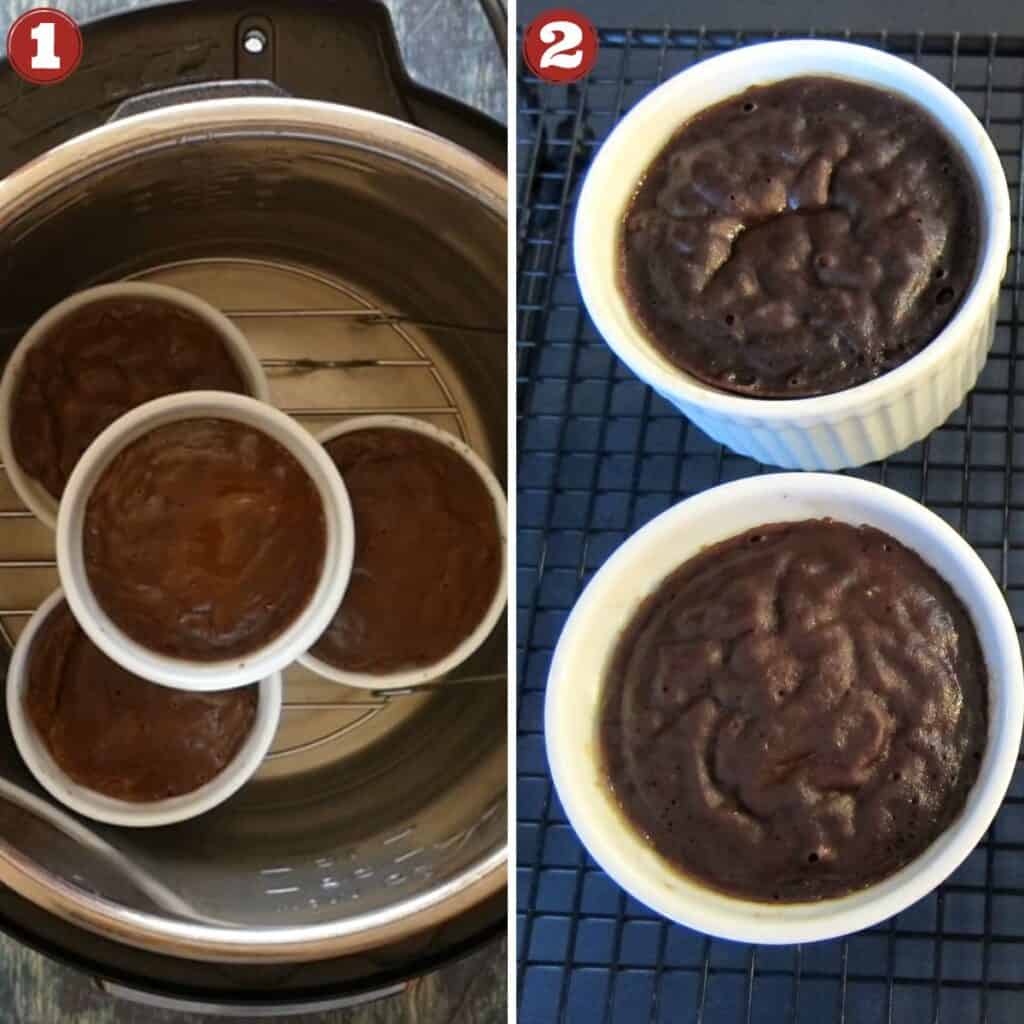
- Fill containers and set on a trivet
- Pressure cook and quick-release pressure
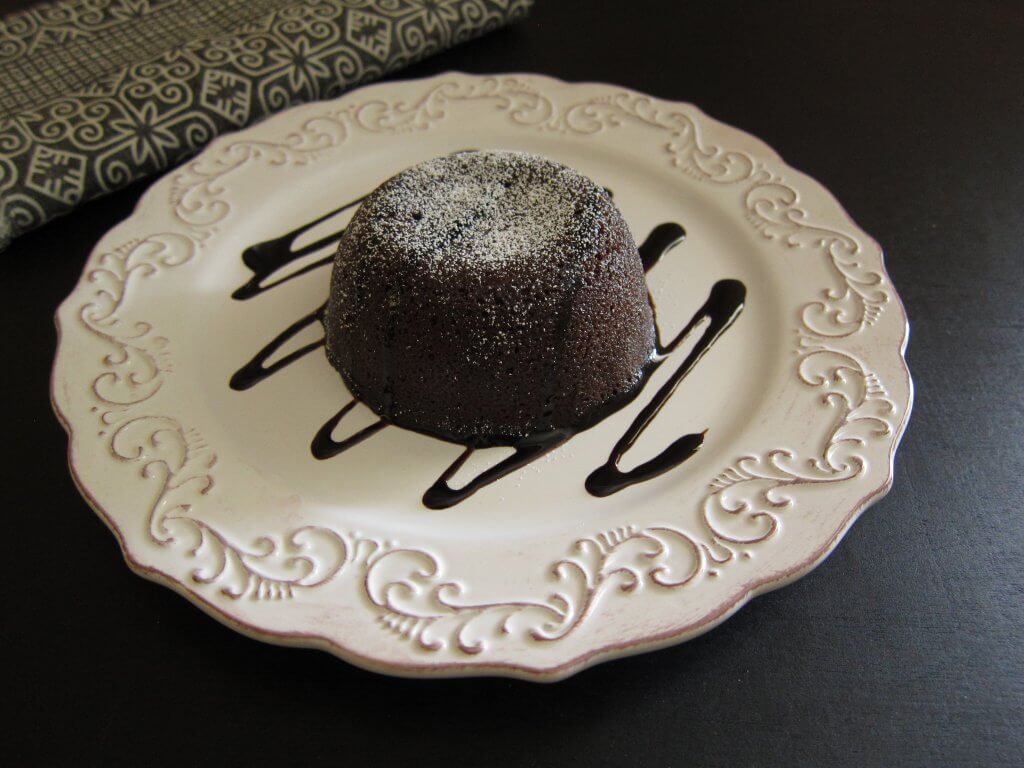
- Cool on a rack
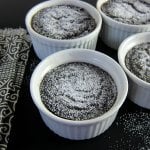
- Sprinkle powdered sugar
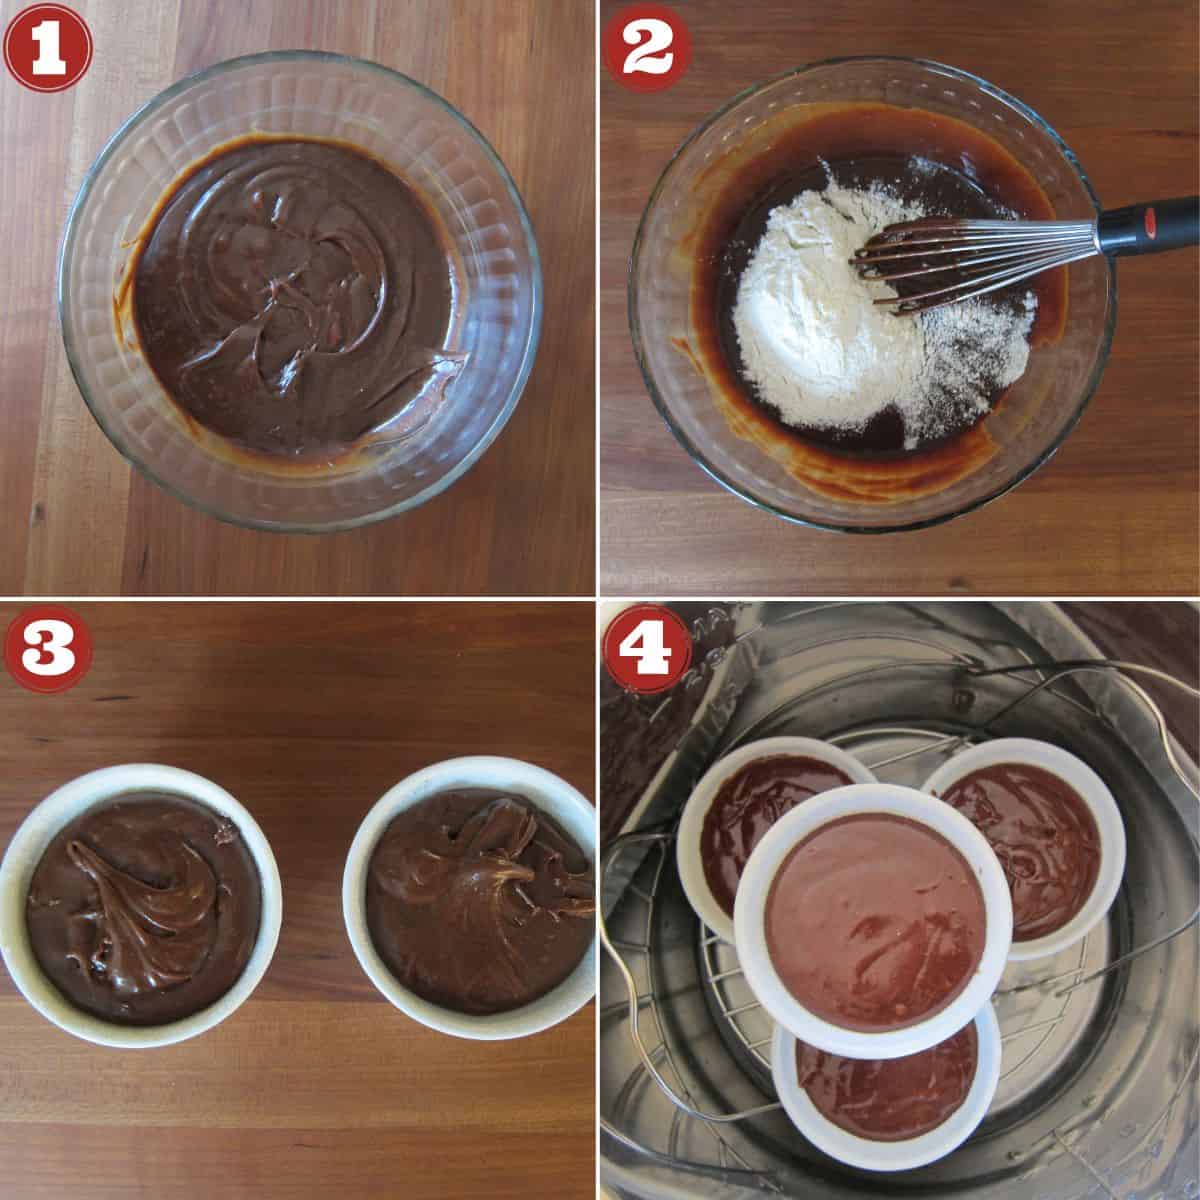
- Microwave butter and chocolate in medium bowl at 50% power for 1 minute. Stir. Heat in 15-second bursts, stirring each time, until mostly melted with a few small pieces remaining. Stir until completely smooth. Stir in confectioner’s sugar. *
- Whisk in eggs, yolks, coffee and vanilla. Stir in flour and salt.
- Grease the bottom and sides of four 6 oz. ramekins. Coat each with sugar. Divide batter among the lava cake containers.
- Pour 2 cups water into the Instant Pot’s main compartment (inner pot) and place the trivet in water. Place 3 ramekins on the trivet and stack the fourth container on top.
* Make sure you don’t over-melt the chocolate. See this article about melting chocolate in the microwave.
✏️ Pro Tip
- Pressure cook time varies by Instant Pot model. First time? Try 7 minutes. If undercooked, add 1-2 minutes more.
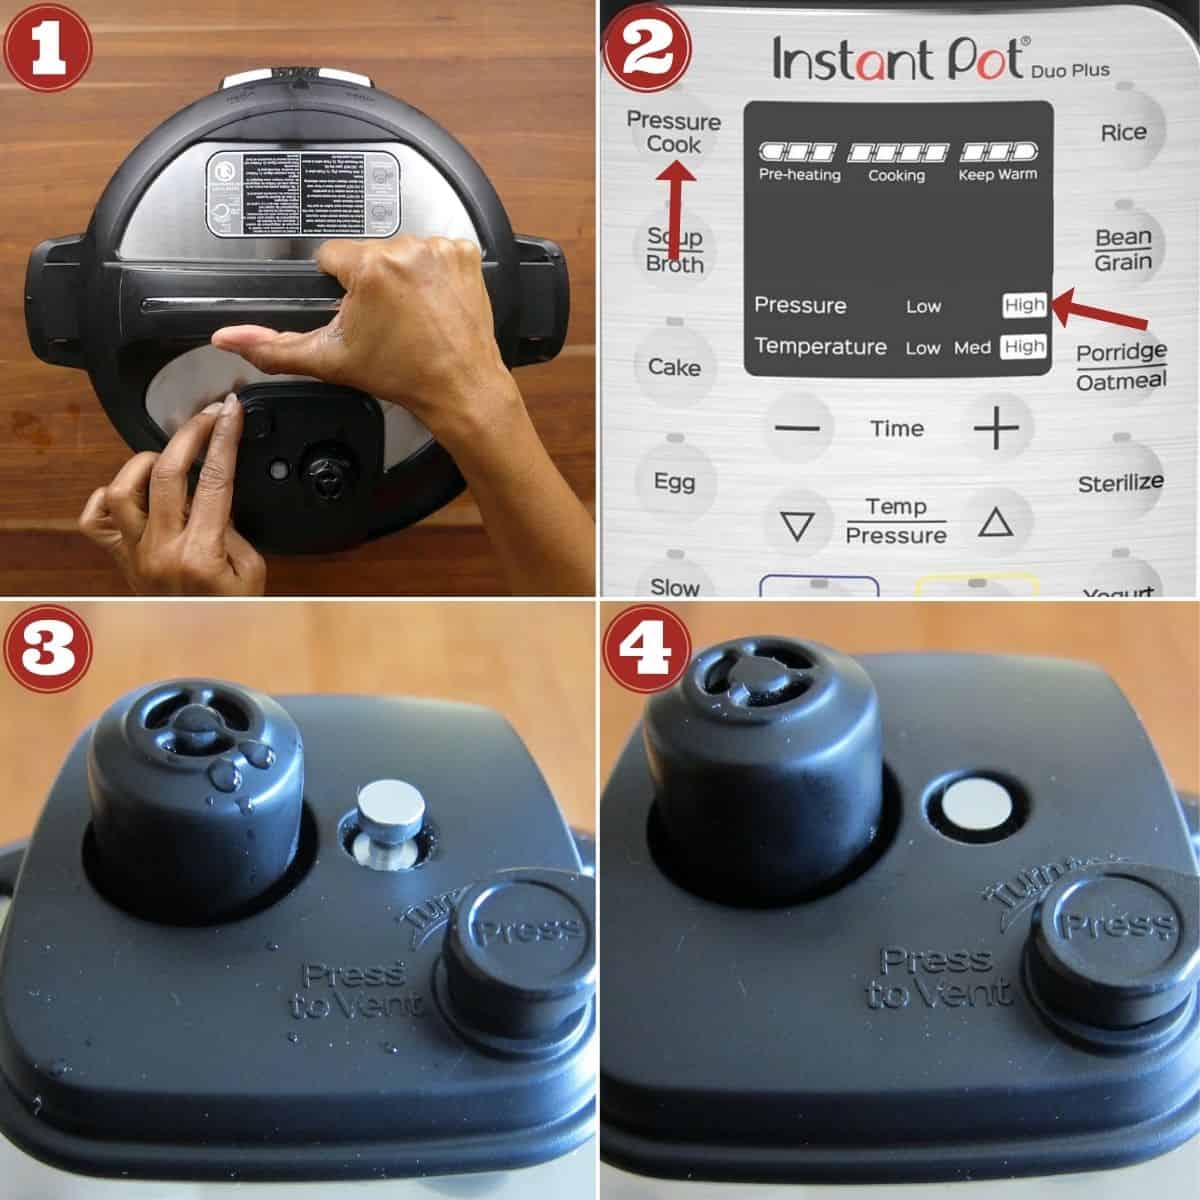
- Close the lid.
- Program the Instant Pot to pressure cook on high pressure for 9 minutes.
- The display will go from On to 9:00. The float valve will go up after a few minutes. The display will count down to 00:00.
- Do a quick release of pressure. Once the float valve goes down, the lid can be opened.
- Lift the trivet by the handles and carefully remove the ramekins from the Instant Pot. Use heat-resistant gloves.
- Place the lava cakes on a cooling rack to cool for a few minutes.
- Serve warm. To plate: Loosen cake edges with a knife. Place a plate on the ramekin. Flip both. The cake should release onto the plate. Sprinkle with powdered sugar.
♨️ Oven Method
- Follow the same directions to prepare the batter as the Instant Pot version
- Bake the lava cakes at 400 degrees F (204 degrees C) for about 12 minutes or until a thermometer reads 160 degrees F (71 degrees C)
- Remove ramekins to a wire rack and cool for 5 minutes
- Invert warm cakes onto serving plates and dust with powdered sugar
Instant Pot Chocolate Lava Cake
Ingredients
- 1 tablespoon granulated sugar
- ½ cup butter – 1 stick, cut into pieces (4 oz. or 113 grams)
- 4 oz. semisweet chocolate chopped (113 grams)
- 1 cup confectioners sugar
- 2 eggs
- 2 egg yolks
- 1 teaspoon instant coffee granules
- 1 teaspoon vanilla extract
- 6 tablespoon all purpose flour
- ¼ teaspoon salt
Instructions
- Grease the bottom and sides of four 6 oz ramekins. Coat each with sugar.
- Melt the chocolate and butter: In a medium-sized microwave-safe bowl, microwave butter and chocolate on medium heat for about 1 minute. Stir and scrape sides of the bowl with a silicone spatula and repeat heating at 15-second intervals, until the chocolate is melted and smooth but a few small pieces of chocolate still remain. Keep stirring to allow the chocolate to completely melt in the residual heat.
- Stir in confectioner’s sugar.
- Whisk in eggs, yolks, coffee and vanilla.
- Stir in flour and salt.
- Divide batter among the ramekins.
Instant Pot Instructions
- Pour 2 cups water into the Instant Pot’s main compartment (inner pot) and place trivet in water.
- Place 3 ramekins on the trivet and place 1 more on top of them, in the middle (staggered).
- Close the lid and pressure cook on High Pressure for 9 minutes. *
- Do a quick release of pressure (QR) and open the lid. [Read More: The Different Pressure Release Methods].
- Use the trivet handles to lift the trivet out of the inner pot and carefully remove the ramekins. Gently dab off any condensation from the surface of the cake.
- Dust the Insant Pot chocolate lava cakes with powdered sugar.
- Serve warm and enjoy!
Oven Instructions
- Preheat oven to 400 degrees Fahrenheit (204 degrees Celsius)
- Bake the ramekins for 12 minutes or until a thermometer reads 160 degrees F (71 degrees C), and the cake sides are set and the centers are soft.
- Transfer the ramekins to a wire rack and cool for about 5 minutes. Run a small knife around the edge of the cakes to loosen them. Invert the warm cakes onto serving plates and dust them with powdered sugar.
Notes
- If you have a larger Instant Pot, you might be able to fit all 4 ramekins in one layer.
- I use 6 oz ceramic ramekins and a 6 quart Instant Pot Duo and Ultra for this recipe as written; if you’re using different size or type of containers or pressure cooker, your cooking time may need to change.
- * The pressure cook time for this recipe can vary based on model of Instant Pot. If you’re doing this for the first time, you might want to try 7 minutes and if the lava cakes are undercooked, pressure cook them for another 1 to 2 minutes.
Nutrition
Thank you for visiting Paint the Kitchen Red. All photos and content are copyright protected. Please don’t use any content without prior written permission. If you’ve made this recipe and would like to share it with your friends, please link back to this recipe. Thank you!
I am not a certified nutritionist. I provide my best estimate of nutritional information merely as a courtesy to my readers. If you depend on nutritional information for dietary or health reasons, I suggest using your favorite online nutrition calculator to confirm the nutritional value of this recipe based on the actual ingredients that you use.
Did you know that the best way to support your favorite bloggers is to comment and rate recipes, and share on social media? If you loved this recipe, please comment and give it a five ⭐ rating in the comment section below. If you’re a pinner, pin this post using the Pin buttons at the top and bottom of this post and in the recipe card above. Thank you for your support!


Lovella says
So, I made this tonight exactly as written, except I used four 7 1/2 oz. ramekins, instead of the 6 oz. (It’s what I have). I have a 6 qt. Instant Pot Ultra. Three on tbe bottom and one on top. Well….they turned out perfect!!! Wish I could post a picture! Thanks for the delicious recipe. Will definitely make again!
Paint the Kitchen Red says
That’s so great – thank you for sharing, Lovella.
Megan says
Thanks for the recipe. These were a big hit with my kids!
Paint the Kitchen Red says
Hi Megan – glad they liked it and thanks for your comment!
Rachel Fichter says
Would it be ok to make the batter up ahead of time (the night before)?
Paint the Kitchen Red says
Rachel, I’ve never tried that. Since the recipe doesn’t have baking soda or powder in it,you might be able to do that. Let me know how it goes, will you? Thanks for your question.
Cathy Eads says
Can you cook this in one dish instead of the four?
Thank you
Paint the Kitchen Red says
Cathy – thanks for your question. I suppose you could, but you’d have to change the cooking time since the cake will be so much bigger – rough guesstimate would be 30 minutes, but I really don’t know. And you probably wouldn’t want a lava cake consistency, since that would be a mess – you’d get more of a brownie cake.
Angelica says
How did you get the ramekins out with out burning yourself?
Paint the Kitchen Red says
Hi Angelica, I have a trivet with handles which was shipped with my Instant Pot and I usually have no trouble removing it from the Instant Pot if I wait a minute or two after opening. If you have silicone gloves, those could help remove the individual ramekin. There are also canning jar lifters (just search for those words on amazon). Thanks for your question.
Sonia says
I find that measuring flour by the gram can be more precise, maybe eliminating that as a factor for a denser middle of the cake. Would you mind providing us with a gram measurement next time you make yours? Thank you!
Paint the Kitchen Red says
Sonia, great point. Next time I make it, I’ll make a note of weights. It appears this recipe needs some precision 🙂 Thanks for taking a moment to comment!
Michelle says
Any way you can convert this to low carb with almond flour?
Paint the Kitchen Red says
Hi Michelle, thanks for your question. I’m sorry, but I’ve never tried ‘baking’ in the pressure cooker with almond flour. I’m not sure whether you can do a 1 to 1 substitution. Would love it if you can let me know if you try it out.
SR says
I was very excited to try this recipe – unfortunately, like a few others posted, I did not get the molten center! It did taste good, however.
Paint the Kitchen Red says
When it comes to this recipe, I think there are individual differences: whether it’s ingredient brand, measurement of flour, altitude, or type of Instant Pot. I would suggest that if you wanted to try it again, reduce the cooking time by a minute. Thanks for taking the time to comment.
sher says
Made this tonight. Came out perfectly, but didn’t really have much chocolate flavor. I think I’ll try it with dark chocolate next time and see how it goes. Otherwise, comments ranged from “eggy” to “floury”. Go figure. 🙂
Paint the Kitchen Red says
Hi Sher – I do use dark chocolate at times and it’s quite rich – I use Ghirardelli brand. Some people have had issues with them over or under cooking so you at least had that problem covered 🙂 Thanks for sharing.
Kelly Smith says
Where would I find the trivet you used? The one that came with my instant pot doesn’t have long handles like that. Thanks!!
Paint the Kitchen Red says
Hi Kelly – the trivet with the handles don’t come with the LUX, if that is the model you have. You may want to check the IP company website: https://store.instantpot.com/ Also check out amazon.
Lifesastitch says
Followed the recipe and added 50% more to get six servings, without the coffee, using an 8qt IP., four on the bottom and two on top. It came out a little soupier than I like. Next timewould add an additional minute to the pressure cooking time. Thanks for an amazing treat.
Paint the Kitchen Red says
Thanks for commenting and giving your feedback. I feel that every Instant Pot has its own personality 🙂
Victor says
I tried this today in a 3 qt instant pot. I live in Manhattan. First try, my lava cakes turned out very spongy and solid. It’s like an overcooked brownie with a lot of bounce. This was using 8 minutes high pressure in three 3 oz ramekins.
I tried a second batch with leftover batter and instead cooked it for 5 minutes. The outside skirts was again very spongy and solid. The inside however was decently molten but still a tad overcooked.
So the issues I am getting with this recipe are:
– texture is very spongy.
– inside is getting overcooked in a 3oz ramekin.
I think I might have to reduce the cooking time down to 4 minutes, and perhaps add 1 less tablespoon of flour and maybe 1 less egg yolk?
Do you have any suggestions? I’m in the process of buying larger ramekins (4 oz), but I want to see if I can make this work with these 3 oz that I have.
Paint the Kitchen Red says
Victor – I’m sorry you had trouble with the recipe. I think the 3 quart is just fine for most recipes, but this recipe which does require some precision, the 3 quart may be overcooking the lava cakes because of the smaller size of the pot, plus the smaller size of the ramekin. FYI, the cake is actually more dense than if you baked in an oven. I think it wouldn’t hurt to try out the ideas you mentioned. Also, I wonder if refrigerating the batter for a bit might make a difference? Good luck.
Karen says
This looks absolutely delicious! I need to make 8 of them, so I’m wondering if I put the first patch in a hot water bath, would they keep the original consistency until the others are done? Thanks in advance.
Paint the Kitchen Red says
Hi Karen, they should be fine because your second batch will take a bit less overall time since your IP and water will be hot already. Hope you like them!
Anuradha says
Looks yum! Can these be made in advance or they’ll dry out?
Paint the Kitchen Red says
Anuradha, They become more like a truffle or brownie upon cooling. I have made them and reheated them the next day in the microwave, and it’s still good. But I think they taste best right away. Thanks for you question!
Jason says
Any idea if this would work with a non-dairy non-margarine substitute (like coconut oil)? If so, would you adjust anything else?
Paint the Kitchen Red says
Hi there Jason – I am so sorry, but I really have no idea how it would turn out. I’ve never had experience with desserts using coconut oil. I only use coconut oil for cooking. Good luck.
Barbara says
followed directions to a T but no lava……hubs still liked the taste as they were fudge like brownies…..
Paint the Kitchen Red says
Hi Barbara. Hmmm. This is a recipe that confounds me. It works for me every time and there are many people who make it and get that molten lava center. Then there are some people for whom this recipe produces more of a fudgy cake like you say. I suspect it’s altitude or slight variations with different Instant Pots or pressure cookers. I’m glad the taste was good still! If you ever choose to make it again, can you try with 7 minutes and report back? Thanks for commenting!
Brian says
Followed recipe fairly closely, but not crazy OCD. 9 minutes. Perfectly molten in the middle. Outside was a little more spongy than I am used to for lava cake, but bang for the buck – it’s a no-brainer. Thanks!
Paint the Kitchen Red says
Hi Brian, You’re welcome! Thanks for commenting, and I’m so glad it worked out for you.
Mark says
I cooked these today, following the recipe, they didnt turn out very good to tell the truth. Kind of gelatiny, rubbery, no molten center, no cake texture. I wonder what happened?
Paint the Kitchen Red says
Hi Mark, I’m so sorry it didn’t work out for you. So because of your comment, I made the lava cakes this morning – just to make sure I hadn’t made a mistake with the recipe. I made it in white ceramic ramekins and glass pyrex custard cups for 9 minutes. Both worked out about the same, with the ramekins being slightly more ‘done’. They all had the molten center. I was able to turn them onto a plate intact. The cake surrounding the molten part is not a ‘fluffy’ type of cake – it’s a bit dense because of pressure cooking. The filling is gooey and molten when the cake is hot. Once it cools down it does have a thick pudding consistency. It’s possibly matter of taste, but it could also be slight variations in quantity or specific brand of ingredients. I’m sorry I have no answer for you. Thanks for trying it out.
Paul Hickman says
I am giving my feedback after trying out this recipe. It’s just wonderful and I loved it. The chocolate cake is as yummy as it looks. I am glad I found this recipe. Thank you!
Paint the Kitchen Red says
Paul, I’m really glad you liked the recipe. Give the Instant Pot brownies a try too – minty and chocolatey!
Vic says
I made this recipe and mine turned out more gelatinous than cakelike. It still tasted good, bit there was no molten component. Any ideas what happened? Overstirred, too much liquid stirred in, didn’t cook long enough?
Paint the Kitchen Red says
Hi Vic, it’s possible you needed to cook it for longer and it was undercooked. That would be my first guess. If you are up for trying it again, increase the cooking time to 9 minutes and see how that works for you. Good luck!